LG FA415RMA Manuel utilisateur
- Catégorie
- Micro-ondes
- Taper
- Manuel utilisateur

ENGLISH FRANÇAIS PORTUGUÊS
www.lg.com
FA415RMA
OWNER’S MANUAL
GAS COOKER
Read this owner’s manual thoroughly before operating the appliance
and keep it handy for reference at all times.
•
DO NOT STORE GASOLINE OR ANY OTHER FLAMMABLE VAPORS
OR LIQUIDS IN THE VICINITY OF THIS OR ANY OTHER APPLIANCE.
•
WHAT TO DO IF YOU SMELL GAS
- DO NOT ATTEMPT TO TURN ON ANY APPLIANCE.
- DO NOT TURN ON ANY ELECTRICAL SWITCHES.
- DO NOT USE THE TELEPHONE INSTALLED IN YOUR BUILDING.
- IMMEDIATELY CALL YOUR GAS LEAKAGE SERVICE PROVIDER
OR YOUR GAS PROVIDER FROM A NEIGHBOR’S PHONE. FOLLOW
THE INSTRUCTIONS FROM THE GAS COMPANY.
- IF YOU ARE UNABLE TO COMMUNICATE WITH YOUR GAS
COMPANY, CALL THE FIRE DEPARTMENT
•
INSTALLATION AND MAINTENANCE MUST BE PERFORMED BY AN
LG QUALIFIED SERVICE TECHNICIAN.
IF YOU DO NOT FOLLOW THE INFORMATION GIVEN BY THIS
MANUAL EXACTLY, A FIRE OR ELECTRIC SHOCK, PROPERTY
DAMAGE, BODILY INJURY OR DEATH MAY OCCUR.
WARNING
www.lg.com
MFL62060343 (REV.03 210223)
Copyright © 2019 - 2021 LG Electronics Inc. All Rights Reserved.

2 TABLE OF CONTENTS
TABLE OF CONTENTS
3
THE CATEGORY AND
CLASSIFICATION OF APPLIANCE
4
IMPORTANT SAFETY
INSTRUCTIONS
12
PRODUCT GENERAL
DESCRIPTION
12 Parts
12 Accessories
13
INSTALLATION
13 Before installing
14 Fitting the adjustable feet
15 Positioning and levelling
15 Electrical connection
16 Gas connection
17 Check ignition of surface burners
18
OPERATING INSTRUCTIONS
18 Before using for the first time
19 The control panel
19 The cooktop
20 The oven
22 How to operate your cooktop
24 How to operate your oven
27 Tips and tricks
31
MAINTENANCE
31 Cleaning and care
35
CONVERTING THE GAS TYPE
40
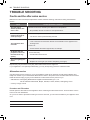
TROUBLE SHOOTING
40 Faults and the after-sales service

3THE CATEGORY AND CLASSIFICATION OF APPLIANCE
ENGLISH
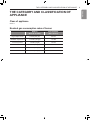
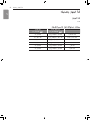
THE CATEGORY AND CLASSIFICATION OF
APPLIANCE
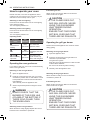
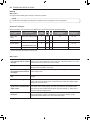
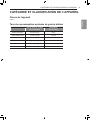
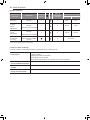
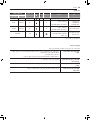
Class of appliance
Class 1
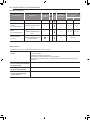
Nominal gas consumption rates of burner
GAS LP
(G30, 28~30 mbar)
GAS NATURAL
(G20, 20 mbar)
High output burner 3.0 kW (219 g/h) 3.0 kW
Standard output burner 1.75 kW (128 g/h) 1.75 kW
Economy burner 1.0 kW (73 g/h) 1.0 kW
Wok burner 3.6 kW (262 g/h) 3.6 kW
Oven burner 4.3 kW (313 g/h) 4.3 kW
Grill burner 2.0 kW (146 g/h) 2.0 kW

4 IMPORTANT SAFETY INSTRUCTIONS
IMPORTANT SAFETY INSTRUCTIONS
Read and follow instructions when you use the cooker to avoid fire risks, electric shock,
bodily injuries or damage. This guide does not include all possible situations that could
happen. Contact always your technical service agent or the manufacturer when any
incomprehensible problem appears. These instructions are only valid if the country symbol
appears on the appliance. If the symbol does not appear on the appliance, it is necessary
to refer to the technical instructions which will provide the necessary instructions concerning
modification of the appliance to the conditions of use of the country.
Download this user’s manual at: http://www.lg.com
This is the safety alert symbol. This symbol alerts you to potential hazards that
can kill or hurt you and others. All safety messages will follow the safety alert
symbol and either the word “WARNING” or “CAUTION”. This terms have the
following meanings:
WARNING
-
It indicates that a dangerous situations that, in case they are not
avoided, may cause serious bodily harm or death.
CAUTION
-
It indicates that a dangerous situations that, in case they are not
avoided, may cause minor or moderate injuries.
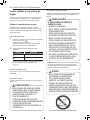
IMPORTANT SAFETY NOTICE
Gas appliances can cause minor exposure to four of these substances namely; benzene,
carbon monoxide, formaldehyde and soot, caused primarily by the imperfect combustion of
natural or LP gas (Propane). Correctly adjusted burners, indicated by a blueish rather than
a yellow flame will minimize imperfect combustion. Exposure to these substances can be
minimized by opening windows or using a ventilation fan or hood.
WARNING
•
NEVER USE YOUR COOKER AS A SPACE HEATER. DOING SO MAY
CAUSE CARBON MONOXIDE POISONING AND OVEN OVERHEATING.
•
NEVER WEAR LOOSE FITTING OR HANGING GARMENTS WHILE
USING THE APPLIANCE. BE CAREFUL WHEN REACHING FOR ITEMS
PLACED IN CABINETS OVER THE COOKER. FLAMMABLE MATERIALS
COULD BE IGNITED IF BROUGHT IN CONTACT WITH OPEN FLAMES
OR HOT OVEN SURFACES AND MAY CAUSE SEVERE BURNS.
•
MAINTAIN THE APPLIANCE SURROUNDINGS FREE FROM
COMBUSTION MATERIALS SUCH AS GASOLINE AND OTHER
VAPORS OR FLAMMABLE LIQUIDS.
•
DO NOT PLACE FLAMMABLE MATERIALS IN THE OVEN OR IN THE
VICINITY OF THE COOKTOP.
•
DO NOT LEAVE GREASE OR FLAMMABLE MATERIALS INSIDE OR
NEAR THE COOKER.
•
ACCESSIBLE PARTS MAY BECOME HOT DURING USE.
YOUNG CHILDREN SHOULD BE KEPT AWAY.

5IMPORTANT SAFETY INSTRUCTIONS
ENGLISH
WARNING
•
DO NOT USE WATER TO PUT OUT GREASE FIRES. NEVER TOUCH A
FLAMING POT. TURN OFF THE KNOBS. USE A MULTI-PURPOSE DRY
CHEMICAL OR FOAM-TYPE FIRE EXTINGUISHER.
GREASE FIRES COMING OUT OF A POT OR PAN MAY BE
EXTINGUISHED BY COVERING THE POT WITH BAKING SODA, OR IF
AVAILABLE, MULTI-PURPOSE DRY CHEMICAL OR FOAM-TYPE FIRE
EXTINGUISHER.
FLAMES COMING FROM THE OVEN OR STORAGE DRAWER CAN
BE SMOTHERED COMPLETELY BY CLOSING THE OVEN DOOR OR
STORAGE DRAWER AND TURNING OVEN OFF OR USING A MULTI-
PURPOSE DRY CHEMICAL OR FOAM-TYPE FIRE EXTINGUISHER.
•
DO NOT USE THE OVEN FOR STORAGE.
•
DO NOT STORE PLASTIC MATERIALS IN THE DRAWER.
•
ALLOW BURNER GRATES AND OTHER SURFACES TO COOL
BEFORE TOUCHING THEM.
•
DO NOT OBSTRUCT OVEN OR BROILER COMBUSTION GAS
OUTLETS NECESSARY FOR THE PROPER OPERATION OF THE
STOVE WITH AN ADEQUATE COMBUSTION. AIR OPENINGS ARE
LOCATED IN THE REAR OF THE COOKTOP, AT THE BOTTOM OF THE
OVEN DOOR AND AT THE BOTTOM OF THE COOKER.
•
NEVER OBSTRUCT THE COMBUSTION AIR FLOW AND VENTS (AIR
HOLES) OF THE COOKER, BY BLOCKING THE OVEN VENTILATION
OR OVEN AIR INLETS. DOING SO, WILL RESTRICT AIR INLET TO
BURNER WHICH MAY CAUSE CARBON MONOXIDE POISONING.
•
NEVER BLOCK ANY SLOTS, OPENINGS OR PASSAGES WITH
MATERIALS SUCH AS ALUMINUM FOIL. BY DOING SO, YOU MAY
BLOCK AIR FLOW IN THE OVEN, WHICH MAY CAUSE CARBON
MONOXIDE POISONING. ALUMINUM FOIL LININGS MAY ALSO TRAP
HEAT CREATING A FIRE HAZARD.
•
THIS APPLIANCE IS NOT INTENDED FOR USE BY PERSONS
(INCLUDING CHILDREN) WITH REDUCED PHYSICAL, SENSORY
OR MENTAL CAPABILITIES, OR LACK OF EXPERIENCE AND
KNOWLEDGE, UNLESS THEY HAVE BEEN GIVEN SUPERVISION
OR INSTRUCTION CONCERNING USE OF THE APPLIANCE BY A
PERSON RESPONSIBLE FOR THEIR SAFETY.
•
CHILDREN SHOULD BE SUPERVISED TO ENSURE THAT THEY DO
NOT PLAY WITH THE APPLIANCE.
•
EXCESS SPILLAGE AND UTENSILS INSIDE THE OVEN MUST BE
REMOVED BEFORE CLEANING.

6 IMPORTANT SAFETY INSTRUCTIONS
CAUTION
•
ITEMS OF INTEREST TO CHILDREN SHOULD NOT BE PLACED IN THE
CABINETS ABOVE THE COOKER; IF CHILDREN CLIMB THE COOKER
TO REACH FOR AN ITEM THEY MAY SUFFER SEVERE INJURIES.
•
DO NOT LEAVE CHILDREN ALONE OR UNATTENDED WHEN THE
COOKER IS HOT OR IN USE. THEY MAY SUFFER SEVERE BURNS.
•
DO NOT ALLOW ANYONE TO CLIMB OR HANG FROM THE OVEN
DOOR, THE WARMING DRAWER OR THE COOKTOP. THIS MAY
CAUSE DAMAGES TO THE COOKER OR EVEN MAKE IT TIP OVER,
WHICH MAY CAUSE SEVERE BODILY HARM.
•
USE GLOVES OR OVEN MITTS TO CLEAN THE COOKER TO AVOID
ANY INJURIES OR BURNS.
•
DO NOT USE THE COOKER TO KEEP FOOD OR COOKING
SUPPLIES.
•
DO NOT LEAN OR PUT EXTRA WEIGHT OVER AN OPEN DOOR. THIS
MAY MAKE THE COOKER TILT, BREAK THE DOOR OR HURT THE
USER.
•
DURING USE THE APPLIANCE BECOMES HOT. CARE SHOULD BE
TAKEN TO AVOID TOUCHING HEATING ELEMENTS INSIDE THE OVEN.
•
ACCESSIBLE PARTS MAY BE HOT WHEN THE GRILL IS IN USE.
YOUNG CHILDREN SHOULD BE KEPT AWAY.
•
THIS APPLIANCE IS FOR COOKING PURPOSES ONLY. IT MUST NOT
BE USED FOR OTHER PURPOSES, FOR EXAMPLE ROOM HEATING.
SAFETY MEASURES FOR INSTALLATION
WARNING
•
PRIOR TO INSTALLATION, ENSURE THAT THE LOCAL DISTRIBUTION
CONDITIONS (NATURE OF THE GAS AND GAS PRESSURE) AND THE
ADJUSTMENT OF THE APPLIANCE ARE COMPATIBLE.
•
THE ADJUSTMENT CONDITIONS FOR THIS APPLIANCE ARE STATED
ON THE LABEL.
•
THIS APPLIANCE IS NOT CONNECTED TO A COMBUSTION
PRODUCTS EVACUATION DEVICE. IT SHALL BE INSTALLED AND
CONNECTED IN ACCORDANCE WITH CURRENT INSTALLATION
REGULATIONS. PARTICULAR ATTENTION SHALL BE GIVEN TO THE
RELEVANT REQUIREMENTS REGARDING VENTILATION.
•
MAKE SURE YOUR COOKER IS PROPERLY INSTALLED AND
GROUNDED BY A QUALIFIED INSTALLER ACCORDING TO THE
INSTALLATION INSTRUCTIONS. ANY ADJUSTMENT AND SERVICE
SHOULD BE PERFORMED BY TECHNICIANS QUALIFIED BY LG.

7IMPORTANT SAFETY INSTRUCTIONS
ENGLISH
WARNING
•
MAKE SURE YOU COOKER IS ADJUSTED CORRECTLY BY A
SERVICE TECHNICIAN OR AN INSTALLER QUALIFIED BY LG BASED
ON THE TYPE OF GAS BEING USED (NATURAL OR LP). YOUR
COOKER CAN BE CONVERTED TO BE USED WITH EITHER TYPE OF
GAS. CHECK INSTALLATION INSTRUCTIONS.
•
THESE ADJUSTMENTS MUST BE MADE BY SERVICE TECHNICIANS
QUALIFIED BY LG ACCORDING TO THE MANUFACTURER
INSTRUCTIONS AND ALL THE CODES AND REQUIREMENTS OF
THE AUTHORITY HAVING JURISDICTION. NON COMPLIANCE OF
THESE INSTRUCTIONS COULD RESULT IN SEVERE INJURIES OR
PROPERTY DAMAGE. THE QUALIFIED AGENCY PERFORMING THIS
WORK TAKES RESPONSIBILITY FOR THE CONVERSION.
•
DISCONNECT POWER SUPPLY BEFORE GIVING MAINTENANCE TO
THE APPLIANCE.
•
NEVER USE THE COOKER DOOR AS A STEP OR SEAT. THIS MAY
MAKE THE COOKER TILT AND CAUSE SEVERE INJURIES.
•
IF THE SUPPLY CORD IS DAMAGED, IT MUST BE REPLACED BY THE
MANUFACTURER, ITS SERVICE AGENT OR SIMILARLY QUALIFIED
PERSONS IN ORDER TO AVOID A HAZARD.
•
PLUG YOUR COOKER IN TO A 220-240 VOLT GROUNDED OUTLET
ONLY. DO NOT REMOVE THE ROUND GROUNDING PRONG FROM
THE PLUG. IF THERE ARE ANY DOUBTS ABOUT THE GROUNDING
OF THE HOME ELECTRICAL SYSTEM, IT IS YOUR PERSONAL
RESPONSIBILITY AND OBLIGATION TO HAVE AN UNGROUNDED
OUTLET REPLACED WITH A PROPERLY GROUNDED THREE-PRONG
OUTLET ACCORDING TO THE NATIONAL ELECTRICAL CODE. DO
NOT USE AN EXTENSION CORD NOR AN ADAPTER WITH THIS
COOKER.
•
DO NOT USE AN ADAPTER PLUG, AN EXTENSION CORD OR
REMOVE GROUNDING PRONG FROM ELECTRICAL POWER CORD
TO PREVENT FIRE HAZARD OR ELECTRICAL SHOCK. FAILURE TO
FOLLOW THIS WARNING CAN CAUSE SERIOUS INJURIES, FIRE OR
DEATH.
•
TO PREVENT POOR AIR CIRCULATION, PLACE THE COOKER OUT
OF KITCHEN TRAFFIC PATH AND OUT OF DRAFTY LOCATIONS.
•
DO NOT ATTEMPT TO REPAIR OR REPLACE ANY PART OF YOUR
COOKER UNLESS IT IS SPECIFICALLY MENTIONED IN THIS
MANUAL. ALL OTHER SERVICES SHOULD BE PERFORMED BY A
QUALIFIED TECHNICIAN.

8 IMPORTANT SAFETY INSTRUCTIONS
WARNING
•
MAKE SURE ALL PACKAGING MATERIALS ARE REMOVED FROM
THE COOKER BEFORE OPERATING IT TO PREVENT FIRE OR
SMOKE DAMAGE, SHOULD THE PACKAGING MATERIAL IGNITE.
•
AFTER USING YOUR COOKER FOR A LONG TIME, HIGH FLOOR
TEMPERATURES MAY RESULT. MANY FLOOR COVERINGS WILL
NOT WITHSTAND THIS KIND OF USE.
•
NEVER INSTALL THE COOKER OVER VINYL TILES OR LINOLEUM
THAT CANNOT WITHSTAND SUCH TYPE OF USE. NEVER INSTALL IT
DIRECTLY OVER INTERIOR KITCHEN CARPETING.
CAUTION
•
THE USE OF A GAS COOKING APPLIANCE RESULTS IN THE
PRODUCTION OF HEAT, MOISTURE AND PRODUCTS OF
COMBUSTION IN THE ROOM IN WHICH IT IS INSTALLED. ENSURE
THAT THE KITCHEN IS WELL VENTILATED ESPECIALLY WHEN
THE APPLIANCE IS IN USE: KEEP NATURAL VENTILATION
HOLES OPEN OR INSTALL A MECHANICAL VENTILATION DEVICE
(MECHANICAL EXTRACTOR HOOD). PROLONGED INTENSIVE USE
OF THE APPLIANCE MAY CALL FOR ADDITIONAL VENTILATION,
FOR EXAMPLE OPENING OF A WINDOW, OR MORE EFFECTIVE
VENTILATION, FOR EXAMPLE INCREASING THE LEVEL OF
MECHANICAL VENTILATION WHERE PRESENT.
SURFACE BURNERS
WARNING
•
USE PROPER PAN SIZE. DO NOT USE PANS THAT ARE UNSTABLE
OR EASILY TIPPED. SELECT COOKWARE HAVING FLAT BOTTOMS
LARGE ENOUGH TO COVER BURNER GRATES. TO AVOID
SPILLOVERS, MAKE SURE COOKWARE IS LARGE ENOUGH TO
CONTAIN THE FOOD PROPERLY. THIS WILL BOTH SAVE CLEANING
TIME AND PREVENT HAZARDOUS ACCUMULATIONS OF FOOD,
SINCE HEAVY SPATTERING OR SPILLOVERS LEFT ON COOKER
CAN IGNITE. USE PANS WITH HANDLES THAT CAN BE EASILY
GRASPED AND REMAIN COOL.

9IMPORTANT SAFETY INSTRUCTIONS
ENGLISH
CAUTION
•
MAKE SURE ALL SURFACE BURNERS ARE IN THE "
●
" POSITIONS
BEFORE OPENING GAS SUPPLY.
•
NEVER LEAVE SURFACE BURNERS UNATTENDED AT HIGH FLAME
SETTINGS. SPLATTERS OR BOIL OVERS LEFT OVER THE COOKER
MAY CATCH ON FIRE.
•
ALWAYS TURN KNOBS TO THE “ON” POSITION WHEN IGNITING THE
TOP BURNERS, AND MAKE SURE THE BURNERS HAVE IGNITED.
•
CONTROL THE TOP BURNER FLAME SIZE SO IT DOES NOT EXTEND
BEYOND THE EDGE OF THE COOKWARE. EXCESSIVE FLAME IS
HAZARDOUS.
•
USE ONLY DRY POT HOLDERS, MOIST OR DAMP POT HOLDERS
OVER HOT SURFACES MAY RESULT IN BURNS FROM STEAM. DO
NOT LET POT HOLDERS COME NEAR OPEN FLAMES WHEN LIFTING
COOKWARE. DO NOT USE A TOWEL OR OTHER BULKY CLOTH,
ALWAYS USE A POT HOLDER.
•
WHEN USING GLASS COOKWARE, MAKE SURE IT IS DESIGNED
FOR TOP-ON-COOKER COOKING.
•
TO PREVENT BURNS, IGNITION OF FLAMMABLE MATERIALS AND
SPILLAGE, TURN COOKWARE HANDLES TOWARD THE SIDE OR
BACK OF THE COOKER WITHOUT EXTENDING OVER ADJACENT
BURNERS.
•
NEVER PLACE ANY ITEMS ON THE COOKTOP. THE HOT AIR FROM
THE VENT MAY IGNITE FLAMMABLE ITEMS AND WILL INCREASE
PRESSURE IN CLOSED CONTAINERS, WHICH MAY CAUSE THEM TO
BURST.
•
CAREFULLY WATCH FOODS BEING FRIED AT A HIGH FLAME
SETTING.
•
ALWAYS HEAT FAT SLOWLY AND WATCH AS TEMPERATURE RISES.
•
IF FRYING A COMBINATIONS OF OILS AND FATS, STIR TOGETHER
BEFORE HEATING.
•
USE A DEEP FAT THERMOMETER, IF POSSIBLE, TO PREVENT
OVERHEATING FAT BEYOND THE SMOKING POINT.
•
USE THE LEAST POSSIBLE AMOUNT OF FAT FOR DEEP FAT FRYING.
FILLING THE PAN TOO FULL OF FAT CAN CAUSE SPILLOVERS
WHEN FOOD IS ADDED.
•
DO NOT FLAME FOODS OVER THE COOKTOP.
•
DO NOT USE COOKWARE ON THE HOTPLATE THAT OVERLAP ITS
EDGES.

10 IMPORTANT SAFETY INSTRUCTIONS
CAUTION
•
DO NOT USE A WOK ON THE SURFACE BURNERS IF THE WOK HAS
A ROUND METAL RING THAT IS PLACED OVER THE BURNER GRATE
TO SUPPORT THE WOK. THIS RING ACTS AS A HEAT TRAP WHICH
MAY DAMAGE THE BURNER GRATE AND BURNER HEAD. ALSO,
IT MAY CAUSE THE BURNER TO WORK IMPROPERLY. THIS MAY
CAUSE A CARBON MONOXIDE LEVEL ABOVE THAT ALLOWED BY
CURRENT STANDARDS, RESULTING IN A HEALTH HAZARD.
•
FOODS FOR FRYING SHOULD BE AS DRY AS POSSIBLE. FROST OR
MOISTURE ON FOODS CAN CAUSE HOT FAT TO BUBBLE UP AND
SPILL OVER THE SIDES OF THE PAN.
•
NEVER TRY TO MOVE A PAN OF HOT FAT, ESPECIALLY A DEEP FAT
FRYER. WAIT UNTIL THE FAT IS COOL.
•
DO NOT PLACE PLASTIC ITEMS ON THE COOKTOP, THEY MELT IF
LEFT TOO CLOSE TO THE VENT.
•
KEEP ALL PLASTICS AWAY FROM THE SURFACE BURNERS.
•
TO PREVENT BURNS, ALWAYS BE SURE THAT THE CONTROLS FOR
ALL BURNERS ARE AT THE "
●
" POSITION AND ALL GRATES ARE
COOL BEFORE ATTEMPTING TO REMOVE THEM.
•
IF YOU SMELL GAS, TURN OFF THE COOKER SHOT-OFF VALVE AND
CALL A QUALIFIED SERVICE TECHNICIAN. NEVER USE AN OPEN
FLAME TO LOCATE A LEAK.
•
ALWAYS TURN KNOBS TO THE "
●
" POSITION BEFORE REMOVING
COOKWARE.
•
DO NOT LIFT THE COOKTOP. LIFTING THE COOKTOP CAN CAUSE
DAMAGE AND IMPROPER OPERATION OF THE COOKER.
•
IF COOKER IS LOCATED NEAR A WINDOW, DO NOT HANG LONG
CURTAINS THAT COULD BLOW OVER THE SURFACE BURNERS AND
CATCH FIRE.
•
CLEAN COOKTOP CAREFULLY. POINTY METAL ENDS ON SPARK
ELECTRODES MAY CAUSE INJURIES.

11IMPORTANT SAFETY INSTRUCTIONS
ENGLISH
OVEN
When opening the door of a hot oven, stay away from the cooker. The hot air and steam
coming therefrom can cause burns to hands, face and eyes.
WARNING
•
NEVER BLOCK ANY SLOTS, OPENINGS OR PASSAGES IN THE OVEN
BOTTOM OR COVER AN ENTIRE RACK WITH MATERIALS SUCH
AS ALUMINUM FOIL. BY DOING SO, YOU MAY BLOCK AIR FLOW IN
THE OVEN, WHICH MAY CAUSE CARBON MONOXIDE POISONING.
ALUMINUM FOIL LININGS MAY ALSO TRAP HEAT CREATING A FIRE
HAZARD.
•
DO NOT HEAT CLOSED FOOD CONTAINERS. PRESSURE COULD
INCREASE AND THE CONTAINER COULD BURST, CAUSING AN
INJURY.
•
DO NOT COVER INTERNAL WALLS OR BOTTOM OF OVEN WITH
ALUMINUM FOIL OR ALLOW IT TO COME IN CONTACT WITH
EXPOSED HEATING ELEMENTS IN OVEN. THIS MAY CAUSE A FIRE
RISK OR DAMAGE THE COOKER.
•
DO NOT USE OVEN AS A STORAGE AREA. OVEN STORED ITEMS
MAY CATCH FIRE.
•
KEEP THE OVEN FREE FROM GREASE BUILDUP.
•
INSERT THE OVEN RACKS IN THE DESIRED POSITION WHILE THE
OVEN IS COOL.
•
TO PREVENT BURNS WHEN REMOVING FOOD, SLIDE RACKS OUT
UNTIL THE STOP ENGAGES, THEN REMOVE FOOD ITEMS. THIS
MAY PROTECT FROM BURNS CAUSED BY TOUCHING DOOR OR
OVEN WALLS HOT SURFACES.
•
WHEN PLACING OR REMOVING AN OVEN RACK, ALWAYS WEAR
OVEN MITTS.
•
WHEN USING COOKING OR ROASTING BAGS IN THE OVEN,
FOLLOW THE MANUFACTURER’S DIRECTIONS.
•
USE ONLY GLASS COOKWARE RECOMMENDED FOR USE IN GAS
OVENS.
•
FOR SAFETY AND TO ENSURE A BETTER COOKING, ALWAYS
BAKE AND ROAST WITH THE OVEN DOOR CLOSED. BAKING AND
ROASTING WITH THE DOOR OPEN MAY CAUSE DAMAGE TO
THE KNOBS OR VALVES. DO NOT LEAVE THE OVEN DOOR OPEN
DURING COOKING OR COOL DOWN.
•
WHEN THERE IS A POWER OUTAGE, OVEN WILL SHUT OFF.
Read all instructions before using the appliance.
SAVE THESE INSTRUCTIONS.

12 PRODUCT GENERAL DESCRIPTION
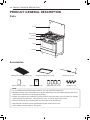
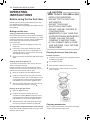
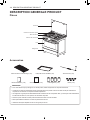
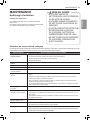
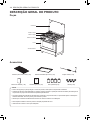
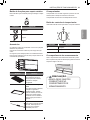
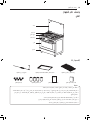
PRODUCT GENERAL DESCRIPTION
Parts
Cover
Cooktop
Control panel
Steam outlet
Oven
Storage
Accessories
Baking and roasting shelf (1 ea) Enamelled baking tray (1 ea) Rotary spit (1 ea)
Warranty
card
User’s Manual (1 ea) Warranty card (1 ea) Adjustable Feet (4 ea) Nozzles (7 ea)
NOTE
•
For your safety and to extend product useful life, use only authorized components.
•
Manufacturer shall not be responsible for any product malfunction or any accidents caused by the use of
unauthorized components or parts bought separately.
•
Images on this guide may be different to real accessories and components, which are subject to changes
at the manufacturer’s discretion, without previous notice, in order to improve the product.
•
Ensure that the deep pan is properly fitted onto both sides of the desired level.
•
Take particular care when removing finished dishes and meals from the oven.
•
Use a suitable cloth pot holder or oven gloves.

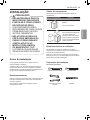
13INSTALLATION
ENGLISH
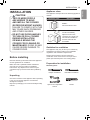
INSTALLATION
CAUTION
•
TWO OR MORE PEOPLE
ARE NEEDED TO MOVE
AND INSTALL THE COOKER
(EXCESSIVE WEIGHT HAZARD).
FAILURE TO COMPLY WITH THIS
MAY CAUSE BACK PROBLEMS
AND OTHER INJURIES.
•
DO NOT USE DOOR HANDLES
TO PUSH OR PULL COOKER
DURING INSTALLATION
OR WHILE MOVING THE
COOKER FOR CLEANING OR
MAINTENANCE. DOING SO MAY
CAUSE SEVERE DAMAGE TO
COOKER DOOR.
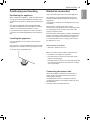
Before installing
Read the following information about the appliance
and the guidelines for ventilation.
Make sure that a qualified installer installs and
grounds your stove according to installation
instructions. Any adjustment or service may be
completed only by service technicians qualified by
LG.
Unpacking
Check the condition of the appliance after unpacking
it. Do not connect the appliance if it has been
damaged in transport.
Dispose of packaging in an environmentally-friendly
manner.
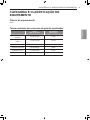
Appliance class
This appliance corresponds to the following appliance
classes:
Appliance class Description
Class 1
Non flush-fitted cooker
Class 2 - subclass 1
Cooker immediately
adjacent to two units,
consisting of a single unit.
Can also be installed so
that the side walls are
accessible.
Guideline for ventilation
This appliance may only be set up in a sufficiently
ventilated room and according to the applicable
regulations and ventilation requirements.
Please note that the air volume required for
combustion must not be below 2 m
3
/h per kW of
power (see kW total power on the rating plate)
Preparation for installation
Necessary tools
Phillips screwdriver Flat-blade screwdriver
Open-end or adjustable
wrench
Leveler

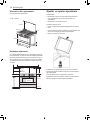
14 INSTALLATION
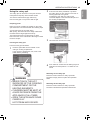
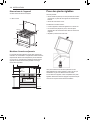
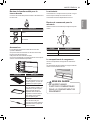
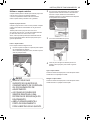
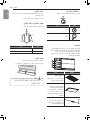
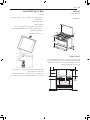
Appliance dimensions
Note the specified dimensions.
A = 89 - 149 mm
570 mm
895 mm
A
595 mm
750 mm
22 mm
Adjacent units
Adjacent units must be made of non-combustible
material. The fronts of adjacent units must be
resistant to temperatures up to at least 90 °C. If the
appliance is fitted close to other units, the minimum
distances specified in the picture must be maintained.
min.
50 mm
min.
50 mm
min.
650 mm
min.
400 mm
min.
100 mm
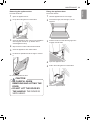
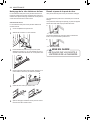
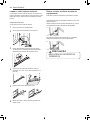
Fitting the adjustable feet
Beforehand:
•
Remove all parts that are not permanently fixed,
especially the pan supports and burners.
•
Remove the accessories from the oven.
Proceed as follows:
•
Tilt the appliance by raising one side slightly from
the floor.
•
With the plates in position, screw the adjustable
feet into the mounting holes on the underneath of
the appliance.
•
Repeat the process on the other side.
You can make the final adjustments to the feet
in order to level the appliance once the gas and
electricity supply have been connected.
If it is necessary to pull the appliance, screw the
adjustable feet in fully. Make the final settings
only when the other installation tasks have been
completed.

15INSTALLATION
ENGLISH
Positioning and levelling
Positioning the appliance
When installing the appliance, make sure that there is
enough space in the final installation location to pull
the appliance forwards for cleaning and maintenance
work.
The ground underneath must be hard and stable.
The wall immediately behind the appliance must be
made from non-flammable material, e.g. tiles.
If you need to pull the appliance in order to position
it, make sure that the adjustable feet are screwed in
fully.
Levelling the appliance
Level the appliance once all other work has been
completed.
Use a leveler to verify the adjustments. Place leveler
diagonally over shelf and check all positions to level.
To do this, turn the adjustable feet.
Electrical connection
Only a licensed expert may connect the appliance.
The appliance must be installed according to the
most recent IEE regulations (Institute of Electrical
Engineers).
The appliance could become damaged if incorrectly
connected.
Make sure the voltage of the power supply
corresponds to the specified value on the rating plate.
The rating plate can be found on the inside of the
storage compartment flap.
Ensure that the power supply is properly earthed and
that the fuse and the wiring and piping system in the
building can withstand the load from the appliance.
It is recommended that you configure the circuit for
the appliance to 16 A.
Nominal Electrical Features
•
220-240 V, 50/60 Hz, 54.1 W
When you route the mains cable, make sure that:
•
the cable is not trapped or squashed.
•
the cable does not come into contact with sharp
edges or cutting edges.
•
the cable does not come into contact with parts that
can reach temperatures of more than 50 °C above
room temperature.
Connecting the mains cable
Where the appliance is directly connected to the
power supply, an all-pole isolating switch with a
contact gap is required.
Complete disconnection in compliance with the
conditions specified in overvoltage category III must
be guaranteed.
The earth cable is excluded from this.

16 INSTALLATION
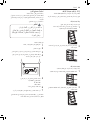
Replacing the mains cable
The mains cable is replaced via the rear backboard.
The mains cable must be of the following type:
•
H05RR-F, H05RN-F, H07RR-F, H07RN-F, H05VV-F
•
3 x 0.75 mm²; 3 x 1.00 mm²; 3 x 1.5 mm²
Leave the mains cable slightly overlong so that you
can pull out the appliance for cleaning purposes.
Proceed as follows:
•
Remove the rear backboard.
•
Undo the screw on the terminal block that fixes the
cable in place.
•
Loosen the screw contacts and replace the cable
with a new one of the same length.
The cable must comply with the stipulated
specifications.
•
Connect the yellow-green wire to the < terminal.
This wire must be at least 10 mm longer than the
other wires.
•
Connect the blue neutral wire to terminal N.
•
Connect the brown power wire to terminal L.
CAUTION
•
INCORRECT REPAIRS ARE
DANGEROUS.
REPAIRS MAY ONLY BE
CARRIED OUT BY ONE OF
OUR EXPERIENCED AFTER-
SALES ENGINEERS.
•
NEVER REPLACE A DAMAGED
POWER CABLE YOURSELF.
POWER CABLES MAY ONLY
BE REPLACED BY ONE OF
OUR EXPERIENCED AFTER-
SALES ENGINEERS.
•
SWITCH OFF THE CIRCUIT
BREAKER IN THE FUSE BOX
IF THE APPLIANCE IS FAULTY.
SHOUT OFF THE GAS SUPPLY.
CALL THE AFTERSALES
SERVICE.
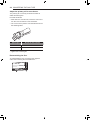
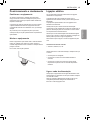
Gas connection
The appliance must be connected in accordance with
the currently applicable regulations.
Before installing the appliance, check that the local
conditions (type of gas and pressure) are compatible
with the appliance settings. The permissible appliance
settings can be found on the rating plate.
Connection to the gas lines and seal fitting must be
carried out professionally according to the currently
applicable standards.
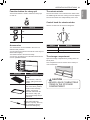
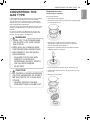
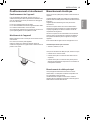
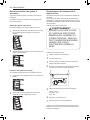
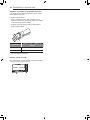
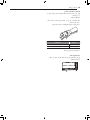
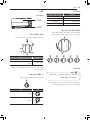
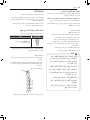
Gas connection on the appliance
The gas connection is located at the rear left of the
appliance.
Connecting
pieces
Description
NG/LPG corrugated tube union
(and seal)
Only use connecting lines or flexible hoses which
comply with the applicable regulations and which are
approved for this purpose.
Proceed as follows:
•
Screw the corrugated tube union (C) and the seal
(B) to the gas connection (A).
•
Hold the corrugated tube union (C) in place with
a spanner and screw the connecting piece to a
flexible gas connecting hose (E).
•
Tighten the clamp (D).
Only use approved sealing compound to seal the
thread.

17INSTALLATION
ENGLISH
Gas installation
This range was designed for use with NG and LPG
gas. Always use a pressure regulator exclusive for
your gas range. The lack of pressure regulator might
cause excess of pressure and leak of gas.
Always check for the validity of the pressure regulator.
Hose and regulator should be replaced every 5 years.
Technical specification of the pressure regulator.
•
Pressure : NG 2.0 kPa, LPG 2.9 kPa
Flexible hose
If you use flexible hoses, make sure that:
•
the hoses do not become trapped or squashed.
•
the hoses are not subject to twisting or pulling forces.
•
the hoses do not come into contact with sharp
edges or cutting edges.
•
Does not go on the back of the gas range neither
close to the hot air exits.
•
the hoses do not come into contact with parts that
could reach a temperature higher than 70 °C above
room temperature.
•
After the installation, check if there is any gas leak,
using soap or liquid detergent foam.
Ensure that the full length of the hoses are accessible
for inspection.
WARNING
•
DO NOT USE PLASTIC PIPE
TO CONNECT GAS COOKER
BECAUSE THEY CAN CAUSE
A LEAKAGE. THE USE OF
METAL FLEXIBLE PIPES TO
CONNECT HOME APPLIANCES
IS RECOMMENDED.
Safety valve
The installation of a safety valve for opening and
closing the gas supply is a compulsory requirement.
Fit the safety valve between the gas connecting
line to the appropriate room and the cooker. Ensure
unhindered access to this valve.
Checking for leaks
After connecting the gas line, check the connections
for leaks using soapy water.
Initial use
Switch the appliance on as described in the
instruction manual.
Light all the burners and check that the flames remain
stable at both the high and low settings.
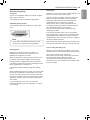
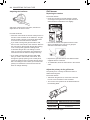
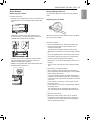
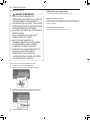
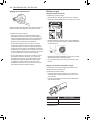
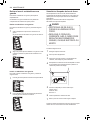
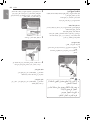
Check ignition of surface
burners
Electric ignition
Push knob when igniting surface burners and make
sure they have ignited. You will hear a clicking sound
indicating proper operation of the spark module.
Once the air has been purged from the supply lines,
burner should ignite within 4 seconds. After burner
ignites, turn knob to its original position. Try each
burner consecutively until all burners have been
checked.
In the event of the burner flames being accidentally
extinguished, turn off burner control and do not
attempt to re-ignite the burner for at least 1 min.
The device shall not be operated for more than 15 s.
If after 15 s the burner has not lit, stop operating the
device and open the compartment door and/or wait at
least 1 min before attempting a further ignition of the
burner.
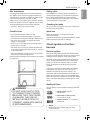
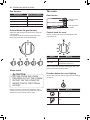
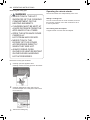
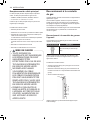
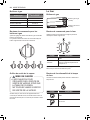
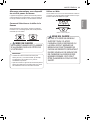
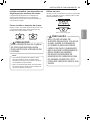
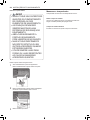
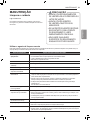
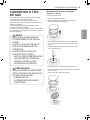
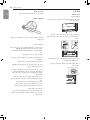
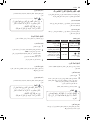
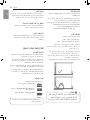
Quality of ame
The combustion of burner flames must be confirmed
visually.
A Yellow flames - Needs
maintenance.
B Yellow tips on outer cones -
It is normal for LP gas
C Soft blue flames - It is normal for
natural gas.
NOTE
•
With LP gas, some yellow tipping on outer
cones is normal.

18 OPERATING INSTRUCTIONS
OPERATING
INSTRUCTIONS
Before using for the first time
Please read the following instructions before using
your appliance for the first time.
Remove the appliance packaging and dispose of this
appropriately.
Baking out the oven
Cooking compartment initial cleaning
Remove the accessories from the cooking compartment.
Completely remove any leftover packaging, e.g. small
pieces of polystyrene, from the cooking compartment.
Some parts are covered with a protective film.
Remove this film.
1
Clean the outside of the appliance with a soft,
damp cloth.
2
If the hook-in racks have already been fitted,
unhook and remove them. For information on
removing the racks, see the section “Removing
and refitting hook-in racks.”
3
Clean the cooking compartment with warm soapy
water.
Heating up the oven gas burner
To remove the new cooker smell, heat up the oven
when it is empty and closed.
Please note that, in the case of appliances with a
cooktop cover, the burners in the oven may only be
switched on if the cooktop cover is open.
1
Open the cooktop cover and appliance door.
2
Press the control knob for the oven, turn it anti-
clockwise to position 250 °C and hold the control
knob pressed for a few seconds until the flame
has stabilised. Then close the appliance door.
3
After 45 minutes, switch the oven off by turning
the control knob clockwise to position
●
.
Heating up the grill gas burner
1
Open the appliance door.
2
Press the control knob for the grill, turn it
clockwise to position Grill and hold the control
knob pressed for a few seconds until the flame
has stabilised. Then close the appliance door.
3
After 30 minutes, switch the grill off by turning
the control knob anti-clockwise to position
●
.
Rinsing cooking compartment after initial cleaning
Clean the cooking compartment with hot soapy water.
Refit the hook-in racks.
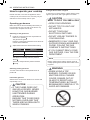
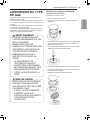
CAUTION
WHAT TO DO IF YOU SMELL GAS
•
OPEN YOUR WINDOWS.
•
DO NOT TRY TO LIGHT ANY
APPLIANCES.
•
DO NOT TOUCH ANY
ELECTRICAL SWITCHES.
•
DO NOT USE ANY PHONES IN
YOUR BUILDING.
•
IMMEDIATELY CALL YOUR GAS
SUPPLIER FROM A NEIGHBOR’S
PHONE. FOLLOW THE GAS
COMPANY’S INSTRUCTIONS.
•
IF YOU CANNOT REACH YOUR
GAS SUPPLIER, CALL THE FIRE
DEPARTMENT.
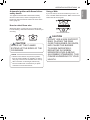
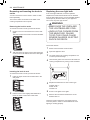
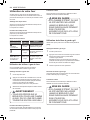
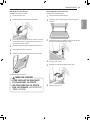
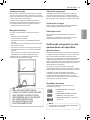
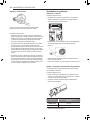
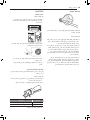
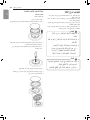
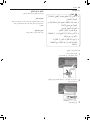
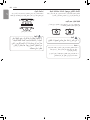
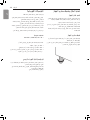
Cleaning the burner lids and cups
Proceed as follows:
1
Clean the burner lids (A) and cups (B) with water
and washing-up liquid.
2
Dry the parts off well.
3
Place the burner (B) on the burner (C).
4
Place the burner lid (A) exactly on top of the
burner cup (B).
A
B
C
Cleaning accessories
Before using the accessories, clean them thoroughly
using a cloth and warm soapy water.

19OPERATING INSTRUCTIONS
ENGLISH
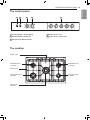
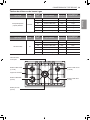
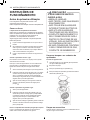
The control panel
1 2 3 4 5
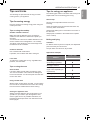
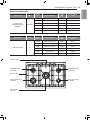
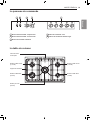
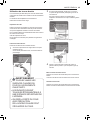
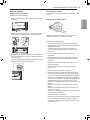
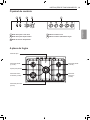
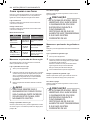
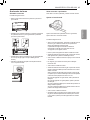
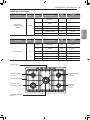
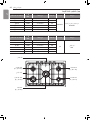
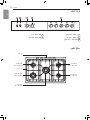
The cooktop
Steam outlet
Standard burner
(1.75 kW)
Standard burner
(1.75 kW)
Economy burner
(1.0 kW)
Pan support
High output burner
(3.0 kW)
Wok burner
(3.6 kW)
1
Function button : Oven lighting
2
Function button: Rotary spit
3
Control knob : Minute minder
4
Control knob : Oven
5
Control knob : Gas burners

20 OPERATING INSTRUCTIONS
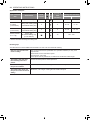
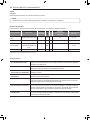
Gas burners
Gas burners Pot or pan diameter
Economy burner 8 - 16 cm
Standard output burner 12 - 20 cm
High output burner 20 - 23 cm
Wok burner 23 - 26 cm
Control knobs for gas burners
Adjust the heat setting of the gas burners using the
control knobs.
The symbol above the control knob shows you to
which gas burner the control knob belongs.
Steam outlet
CAUTION
•
HOT AIR FROM THE OVEN
ESCAPES OUT OF THE STEAM
OUTLET ON THE COOKTOP.
NEVER TOUCH THE STEAM
OUTLET.
Please note that, in the case of appliances with a
cooktop cover, the burners in the oven may only be
switched on if the cooktop cover is open.
The oven
Gas burners
Grill gas burner
(2.0 kW)
Oven gas burner
(4.3 kW)
Control knob for oven
Use this control knob to set the heat output of the
oven gas burner.
Setting Meaning
●
Off
130 - 250
Oven gas burner on,
temperature range in °C
There is a limit stop between settings 250 and 0. Do
not turn the knob beyond this point.
Function button for oven lighting
This function button is used to switch the oven lighting
on and off.
Setting Meaning
Off
On
La page est en cours de chargement...
La page est en cours de chargement...
La page est en cours de chargement...
La page est en cours de chargement...
La page est en cours de chargement...
La page est en cours de chargement...
La page est en cours de chargement...
La page est en cours de chargement...
La page est en cours de chargement...
La page est en cours de chargement...
La page est en cours de chargement...
La page est en cours de chargement...
La page est en cours de chargement...
La page est en cours de chargement...
La page est en cours de chargement...
La page est en cours de chargement...
La page est en cours de chargement...
La page est en cours de chargement...
La page est en cours de chargement...
La page est en cours de chargement...
La page est en cours de chargement...
La page est en cours de chargement...
La page est en cours de chargement...
La page est en cours de chargement...
La page est en cours de chargement...
La page est en cours de chargement...
La page est en cours de chargement...
La page est en cours de chargement...
La page est en cours de chargement...
La page est en cours de chargement...
La page est en cours de chargement...
La page est en cours de chargement...
La page est en cours de chargement...
La page est en cours de chargement...
La page est en cours de chargement...
La page est en cours de chargement...
La page est en cours de chargement...
La page est en cours de chargement...
La page est en cours de chargement...
La page est en cours de chargement...
La page est en cours de chargement...
La page est en cours de chargement...
La page est en cours de chargement...
La page est en cours de chargement...
La page est en cours de chargement...
La page est en cours de chargement...
La page est en cours de chargement...
La page est en cours de chargement...
La page est en cours de chargement...
La page est en cours de chargement...
La page est en cours de chargement...
La page est en cours de chargement...
La page est en cours de chargement...
La page est en cours de chargement...
La page est en cours de chargement...
La page est en cours de chargement...
La page est en cours de chargement...
La page est en cours de chargement...
La page est en cours de chargement...
La page est en cours de chargement...
La page est en cours de chargement...
La page est en cours de chargement...
La page est en cours de chargement...
La page est en cours de chargement...
La page est en cours de chargement...
La page est en cours de chargement...
La page est en cours de chargement...
La page est en cours de chargement...
La page est en cours de chargement...
La page est en cours de chargement...
La page est en cours de chargement...
La page est en cours de chargement...
La page est en cours de chargement...
La page est en cours de chargement...
La page est en cours de chargement...
La page est en cours de chargement...
La page est en cours de chargement...
La page est en cours de chargement...
La page est en cours de chargement...
La page est en cours de chargement...
La page est en cours de chargement...
La page est en cours de chargement...
La page est en cours de chargement...
La page est en cours de chargement...
La page est en cours de chargement...
La page est en cours de chargement...
La page est en cours de chargement...
La page est en cours de chargement...
La page est en cours de chargement...
La page est en cours de chargement...
La page est en cours de chargement...
La page est en cours de chargement...
La page est en cours de chargement...
La page est en cours de chargement...
La page est en cours de chargement...
La page est en cours de chargement...
La page est en cours de chargement...
La page est en cours de chargement...
La page est en cours de chargement...
La page est en cours de chargement...
La page est en cours de chargement...
La page est en cours de chargement...
La page est en cours de chargement...
La page est en cours de chargement...
La page est en cours de chargement...
La page est en cours de chargement...
La page est en cours de chargement...
La page est en cours de chargement...
La page est en cours de chargement...
La page est en cours de chargement...
La page est en cours de chargement...
La page est en cours de chargement...
La page est en cours de chargement...
La page est en cours de chargement...
La page est en cours de chargement...
La page est en cours de chargement...
La page est en cours de chargement...
La page est en cours de chargement...
La page est en cours de chargement...
La page est en cours de chargement...
La page est en cours de chargement...
La page est en cours de chargement...
La page est en cours de chargement...
La page est en cours de chargement...
La page est en cours de chargement...
La page est en cours de chargement...
La page est en cours de chargement...
La page est en cours de chargement...
La page est en cours de chargement...
La page est en cours de chargement...
La page est en cours de chargement...
La page est en cours de chargement...
La page est en cours de chargement...
La page est en cours de chargement...
La page est en cours de chargement...
La page est en cours de chargement...
La page est en cours de chargement...
La page est en cours de chargement...
La page est en cours de chargement...
La page est en cours de chargement...
-
 1
1
-
 2
2
-
 3
3
-
 4
4
-
 5
5
-
 6
6
-
 7
7
-
 8
8
-
 9
9
-
 10
10
-
 11
11
-
 12
12
-
 13
13
-
 14
14
-
 15
15
-
 16
16
-
 17
17
-
 18
18
-
 19
19
-
 20
20
-
 21
21
-
 22
22
-
 23
23
-
 24
24
-
 25
25
-
 26
26
-
 27
27
-
 28
28
-
 29
29
-
 30
30
-
 31
31
-
 32
32
-
 33
33
-
 34
34
-
 35
35
-
 36
36
-
 37
37
-
 38
38
-
 39
39
-
 40
40
-
 41
41
-
 42
42
-
 43
43
-
 44
44
-
 45
45
-
 46
46
-
 47
47
-
 48
48
-
 49
49
-
 50
50
-
 51
51
-
 52
52
-
 53
53
-
 54
54
-
 55
55
-
 56
56
-
 57
57
-
 58
58
-
 59
59
-
 60
60
-
 61
61
-
 62
62
-
 63
63
-
 64
64
-
 65
65
-
 66
66
-
 67
67
-
 68
68
-
 69
69
-
 70
70
-
 71
71
-
 72
72
-
 73
73
-
 74
74
-
 75
75
-
 76
76
-
 77
77
-
 78
78
-
 79
79
-
 80
80
-
 81
81
-
 82
82
-
 83
83
-
 84
84
-
 85
85
-
 86
86
-
 87
87
-
 88
88
-
 89
89
-
 90
90
-
 91
91
-
 92
92
-
 93
93
-
 94
94
-
 95
95
-
 96
96
-
 97
97
-
 98
98
-
 99
99
-
 100
100
-
 101
101
-
 102
102
-
 103
103
-
 104
104
-
 105
105
-
 106
106
-
 107
107
-
 108
108
-
 109
109
-
 110
110
-
 111
111
-
 112
112
-
 113
113
-
 114
114
-
 115
115
-
 116
116
-
 117
117
-
 118
118
-
 119
119
-
 120
120
-
 121
121
-
 122
122
-
 123
123
-
 124
124
-
 125
125
-
 126
126
-
 127
127
-
 128
128
-
 129
129
-
 130
130
-
 131
131
-
 132
132
-
 133
133
-
 134
134
-
 135
135
-
 136
136
-
 137
137
-
 138
138
-
 139
139
-
 140
140
-
 141
141
-
 142
142
-
 143
143
-
 144
144
-
 145
145
-
 146
146
-
 147
147
-
 148
148
-
 149
149
-
 150
150
-
 151
151
-
 152
152
-
 153
153
-
 154
154
-
 155
155
-
 156
156
-
 157
157
-
 158
158
-
 159
159
-
 160
160


LG FA415RMA Manuel utilisateur
- Catégorie
- Micro-ondes
- Taper
- Manuel utilisateur
dans d''autres langues
- English: LG FA415RMA User manual
- português: LG FA415RMA Manual do usuário
Documents connexes
Autres documents
-
Proline PMC57W-F User and Installation Manual
-
Siemens HSL6EI23/01 Manuel utilisateur
-
Bosch HBL6EI23/01 Mode d'emploi
-
Whirlpool ACMK 6123/WH Mode d'emploi
-
-
Ariston PC 640 N T X AUS.1 Le manuel du propriétaire
-
Bosch NGMP077UC Le manuel du propriétaire
-
Bosch Benchmark NGMP077UC Mode d'emploi
-
Bosch NGM8657UC Mode d'emploi
-