
OUTDOOR COOKING
Outdoor Power Burner
AGPB24
Use & Care Manual
Installation & Operation

HESTAN OUTDOOR, MOST
POWERFUL, VERSATILE
AND RELIABLE OUTDOOR
COOKING AVAILABLE.

EN
©2017 Hestan Commercial Corporation
1
IF THE INFORMATION IN THIS MANUAL IS NOT FOLLOWED
EXACTLY, A FIRE OR EXPLOSION MAY RESULT CAUSING
PROPERTY DAMAGE, PERSONAL INJURY, OR DEATH.
Do not try lighting this appliance without reading the LIGHTING
INSTRUCTIONS section of this manual.
For outdoor use ONLY. This cooking appliance is not intended to be
installed in or on recreational vehicles, and/or boats.
Flammable Gas - disconnect all propane or natural gas supplies to this
unit before servicing.
Electrical Parts & Components – disconnect all power supplies and
batteries before servicing.
DANGER
If you smell gas:
1. Shut off gas to the appliance.
2. Extinguish any open flame.
3. Open lid.
4. If odor continues, keep away from the
appliance and immediately call your gas
supplier or your fire department.
DANGER
1. Do not store or use gasoline or
other flammable liquids or vapors
in the vicinity of this or any other
appliance.
2. An LP cylinder not connected
for use shall not be stored in
the vicinity of this or any other
appliance.
READ THIS MANUAL CAREFULLY AND COMPLETELY BEFORE USING YOUR
APPLIANCE TO REDUCE THE RISK OF FIRE, BURN HAZARD, OR OTHER
INJURY. KEEP THIS MANUAL FOR FUTURE REFERENCE.

EN
©2017 Hestan Commercial Corporation
2
Message from Hestan:
Outdoor cooking is a perfectionist’s pursuit, and with your new investment,
you’ve now taken the ultimate step forward. We sincerely welcome you to
the Hestan Family. We’ve engineered and built our products so that your
guests will rave about your meal, but deep down, our customers know it
could’ve been just a little more tender, juicier – a pinch more salt in the rub
or a few seconds less on the flame. Yes, we’ve taken the time to know our
Hestan customer and we’re excited to be on this journey with you. Hestan
Outdoor was born from this same perfectionist passion. Our engineers
experimented, innovated, tweaked and tinkered until they created the most
powerful, versatile and reliable outdoor products available.
We pride ourselves on restless innovation, superior engineering and
purpose-built designs, but also our in-depth understanding of our target
consumer and the interests and needs of the ultimate end-users we serve
and covet. For many consumers, cooking outdoors is much more than an
act of food preparation. It’s a lifestyle activity that encompasses culinary,
leisure and social pursuits among others.
We are thankful and proud that you have chosen Hestan, and we yearn to
have you as a customer for life. We take your decision to choose Hestan
most seriously, and we promise to deliver the very best to you.
Welcome to Hestan Outdoor

EN
©2017 Hestan Commercial Corporation
3
4 MODEL NUMBERS
5 RATING LABELS
5 PRECAUTIONS
8 REGULATORY / CODE REQUIREMENTS
9 LOCATION AND ASSEMBLY
9 INSTALLATION
12 GAS AND ELECTRICAL CONNECTIONS
18 LIGHTING INSTRUCTIONS
19 USING YOUR POWER BURNER
19 CLEANING AND MAINTENANCE
23 TROUBLESHOOTING
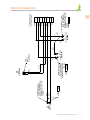
24 WIRING SCHEMATICS
26 PARTS LIST
26 SERVICE
26 WARRANTY
TABLE OF CONTENTS

EN
©2017 Hestan Commercial Corporation
4
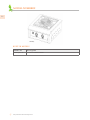
BUILT-IN MODELS
Model No. Description
AGPB24-NG / -LP 24” BUILT-IN POWER BURNER
AGPB24
MODEL NUMBERS

EN
©2017 Hestan Commercial Corporation
5
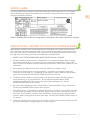
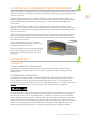
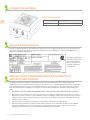
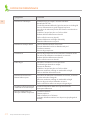
RATING LABEL
The rating label contains important information about your Hestan appliance such as the model
and serial number, gas type and manifold pressure, the BTU rating for each burner type, and the
minimum installation clearances.
PRECAUTIONS - BEFORE YOU USE YOUR POWER BURNER
When properly cared for, your Hestan Power Burner will provide safe, reliable service for many
years. However, extreme care must be used since the Power Burner produces intense heat, which
can cause serious injury or even death if the instructions are not followed carefully. When using
this appliance, basic safety practices must be followed as outlined below.
1. NEVER LEAVE THE POWER BURNER UNATTENDED WHILE COOKING.
2. Children should not be left alone or unattended in an area where the Power Burner is being
used. Never allow them to sit, stand, or play on or around the Power Burner. Do not store
items of interest to children around or below the Power Burner. Never allow children to crawl
underneath.
3. Never operate the Power Burner while under the influence of alcohol or drugs.
4. Never use the Power Burner in windy conditions. If located in a consistently windy area,
oceanfront, mountaintop, etc., a windbreak will be required. Always adhere to the specified
clearances as described in the INSTALLATION section of this manual.
5. The Power Burner shall be used only outdoors and shall not be used in buildings, garages,
sheds, breezeways, or any enclosed areas. Do not operate the Power Burner under
unprotected, combustible construction. Use only in well-ventilated areas. See the
INSTALLATION section of this manual.
6. Do not use the Power Burner unless a leak check has been performed on all gas connections.
See the GAS CONNECTIONS section of this manual.
7. If the Power Burner is installed by a professional installer or technician, be sure that they show
you where your gas supply shut-off is located. All gas lines must have a shut-off that is easily
accessible. If you smell gas, check for leaks immediately. Check only with a soap and water
solution. Never check gas leaks with an open flame. See the GAS CONNECTIONS section of
this manual.
8. Check the regulator, hoses, burner ports, and venturi / valve section carefully. Always turn off
gas at the source (tank or supply line) prior to inspecting parts.
Hestan Outdoor Power Burner rating label is located on the underside of the drip pan.

EN
©2017 Hestan Commercial Corporation
6
9. When lighting a burner, always pay close attention to what you are doing. Be certain you
are turning the correct knob labeled for the burner you intend to use. If any burner does not
light, or goes out during operation, turn off all gas control knobs, and wait five (5) minutes
before attempting to re-light. See the LIGHTING INSTRUCTIONS section of this manual.
10. Keep any electrical supply cord away from the heated areas of the Power Burner. The cord
is provided with a 3-prong grounding plug which should not be removed or altered. Do not
use this appliance with an ungrounded, 2-prong adapter. The cord must be plugged into a
properly grounded GFCI-protected outlet. See INSTALLATION section of this manual.
11. Spiders and insects like to nest in the burners, venturis, valves, and orifices of a Power Burner,
disrupting the gas flow in the burner. This very dangerous condition can cause a fire behind
the control panel, damaging the Power Burner and risking personal injury. If your Power
Burner has been unused for a long time, inspect and clean the burners, venturis, valves,
and orifices. It is recommended you inspect your Power Burner at least twice a year. See
BURNER ADJUSTMENT section of this manual for details.
12. Keep the areas surrounding the Power Burner free from combustible materials, trash, or
combustible fluids and vapors such as gasoline or charcoal lighter fluid. Do not obstruct the
flow of combustion gases and ventilation airways (front).
13. Never attempt to move the Power Burner grate or center plate when hot. When in use,
portions of the Power Burner are hot enough to cause severe burns.
14. Always have an “ABC” type fire extinguisher accessible – never attempt to extinguish a grease
fire with water or other liquids.
15. Avoid wearing loose-fitting garments or long sleeves while cooking with the Power Burner.
They could ignite. For personal safety, wear proper apparel while cooking. Some synthetic
fabrics are highly flammable and should not be worn while cooking.
16. Never let pot holders, covers, or other flammable materials come in contact with or too close
to any cooking grate, burner, or hot surface until it has cooled down sufficiently. Fabrics
may ignite and result in personal injury. Use only dry potholders. Moist or damp potholders
on hot surfaces may cause burns from steam. Do not use a towel or bulky cloth in place of
potholders. Do not let potholders touch hot portions of the cooking grate.
17. Never touch the cooking grate or immediate surrounding metal surfaces with your bare
hands while cooking with the Power Burner, as these areas become extremely hot and could
cause burns. Use only the handles and knobs provided for operation of the Power Burner.
18. Protect your hands with an insulated glove or mitt when operating the Power Burner. Always
keep your face away and open lids slowly on pots and pans to allow heat and steam to escape
before fully opening. Never lean over an open hot Power Burner.
19. The Power Burner metal cover must be removed while lighting. Leaving the cover in place
while lighting can result in an explosion and personal injury, or death. Never lean over a
Power Burner or look directly into the burner when attempting to light. See the LIGHTING
INSTRUCTIONS section of this manual.
20. Do not heat unopened food containers (cans) as pressure build-up will cause the container to
explode.
21. Do not use aluminum foil to line the burner bowl or the drip tray. This will alter the airflow
to the burner or trap excessive heat in the control area. This can melt control knobs, wiring,
or igniters, and increase the risk of personal injury. Such damage is specifically excluded from
our warranty.
22. Never use the Power Burner without the drip tray in place and pushed all the way to the
back. Without the drip tray, hot grease or oil from a spill-over can leak downward creating a
fire or explosion hazard.
PRECAUTIONS - BEFORE YOU USE YOUR POWER
BURNER
(continued)

EN
©2017 Hestan Commercial Corporation
7
PRECAUTIONS - BEFORE YOU USE YOUR POWER
BURNER
(continued)
23. Grease is extremely flammable. Let hot grease cool before attempting to handle or dispose
of it. Avoid letting excessive grease deposits collect by cleaning the drip tray often. Never
clean while the Power Burner is on, or hot from recent use.
24. Cooking excessively fatty meats and oils will cause flare-ups or grease fires. Damage caused
by them or by the Power Burner being left unattended, are not covered under the terms and
conditions of our warranty.
25. Only certain types of glass, heatproof glass-ceramic, earthenware, or other glazed utensils
are suitable for Power Burner use. However, these types of materials may break with sudden
temperature changes. Use only on low or medium heat settings, and according to their
manufacturers’ directions.
26. Do not repair or replace any part of the Power Burner unless specifically recommended in this
manual. All other warranty and non-warranty service should be referred to and performed by
a qualified technician.
27. For proper lighting and performance of the burners, keep the ports clean. It is necessary
to clean them periodically for optimum performance. The burners will operate only in one
position and must be mounted correctly for safe operation. See BURNER ADJUSTMENT
section of this manual.
28. Clean the Power Burner with caution. Avoid steam burns - do not use a wet sponge or cloth
to clean the Power Burner while it is hot. Some cleaners produce noxious fumes or can
ignite when applied to a hot surface. Be sure all Power Burner controls are turned off and
the appliance is cool before using any type of aerosol cleaner on or around the appliance.
The chemical that produces the spraying action could, in the presence of heat, ignite or
cause metal parts to corrode. Clean and perform general maintenance on the Power Burner
twice a year. Watch for corrosion, cracks, or insect activity. See the CLEANING AND
MAINTENANCE section of this manual.

EN
©2017 Hestan Commercial Corporation
8
REGULATORY / CODE REQUIREMENTS
Installation of this cooking appliance must be made in accordance with local codes. In the
absence of local codes, this unit should be installed in accordance with the National Fuel Gas
Code
ANSI Z223.1/NFPA 54
, Natural Gas and Propane Installation code
CSA B149.1
, or Propane
Storage and Handling Code
B149.2
.
All Electrical Components must be electrically grounded in accordance with local codes or in the
absence of local codes with the National Electrical Code
ANSI/NFPA 70
, or Canadian Electrical
code
CSA C22.1
.
COMMONWEALTH OF MASSACHUSETTS
The Commonwealth of Massachusetts requires all gas be installed by a licensed plumber or gas-
fitter carrying the appropriate Massachusetts license. All permanently installed natural gas or
propane installations require a “T”handle type manual gas valve be installed in the gas supply line
to this appliance. This does not apply to portable propane installations using a 20 pound cylinder.
CALIFORNIA PROPOSITION 65 - WARNING
The burning of gas cooking fuel generates toxic by-products, which are on the list of substances
which are known by the State of California to cause cancer or reproductive harm. California law
requires businesses to warn customers of potential exposure to such substances. To minimize
exposure to these substances, always operate this unit according to the use and care manual,
ensuring you provide good ventilation when cooking with gas. This warning is issued pursuant to
California Health & Safety Code Sec. 25249.6.

EN
©2017 Hestan Commercial Corporation
9
LOCATING AND ASSEMBLING THE POWER BURNER
When determining a suitable location for your Power Burner, take into account concerns such as
exposure to wind, rain, sprinklers, proximity to traffic paths, and keeping any gas supply line runs
as short as possible.
Locate the Power Burner only in a well-ventilated area. Never locate the Power Burner in a
building, garage, breezeway, shed or other such enclosed areas without an approved ventilation
system. Never locate the Power Burner over, under, or next to unprotected combustible
construction.
Using the Power Burner in windy areas can disrupt the flame, especially on low or simmer
settings. This may cause nuisance sparking of the igniters. Relocate to a less windy area. If the
Power Burner is mounted in an enclosure (island), you may need to build a wind-break to avoid
this issue in the future.
When installing a Power Burner or other gas appliance into an enclosure (island), the enclosure
must be constructed with ventilation openings to avoid accumulation of gas should there be a
leak. See the INSTALLATION section of this manual for details. Keep the area underneath the
Power Burner free of debris.
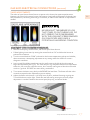
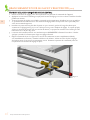
Ensure all packaging, straps, etc. have been
removed from the Power Burner. Remove any
tie-down wires from the burners.
Ensure that the burner cap is mounted correctly
on the center burner ring. Do not operate the
Power Burner without the burner cap in place
(see Fig. 1).
Figure 1
INSTALLATION
CLEARANCES:
TO NON-COMBUSTIBLE CONSTRUCTION
A minimum of 4” (10 cm) clearance from the sides and back of the Power Burner to non-
combustible construction is required. This is especially important when cooking with large
diameter pots.
TO COMBUSTIBLE CONSTRUCTION
This appliance must be installed in a NON-COMBUSTIBLE ENCLOSURE (ISLAND) ONLY. It
should NOT be installed on, over, or next to unprotected combustible construction. Do not
use this appliance under unprotected overhead combustible surfaces. The countertop, and
everything under the countertop must be of non-combustible materials. A minimum clearance to
vertical combustible material is 9” (23 cm) on the sides and the rear of the appliance.
As an example, if you have an island with a stucco or tiled surface and wood-frame construction
beneath, the wood is considered combustible, even though the Power Burner is touching the
stucco or tile surface, which is non-combustible. In extreme circumstances, the wood could
potentially get hot enough to burn. Therefore, ALL the construction must be non-combustible.
Adjacent walls above the cooking surface should also be non-combustible. If those adjacent
surfaces are made of combustible material, they must be outside this 9” (23 cm) zone. The Power
Burner has a very high output, and if installed in a confined area with a large pot on top, the
potential to heat up adjacent surfaces is dangerous and could result in property damage.

EN
©2017 Hestan Commercial Corporation
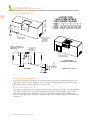
10
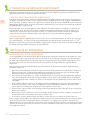
2.50
6.4
MIN.
36.0
91.4
REF.
18.8
47.8
H
W
10 in² [64.5 cm²] MIN.
VENTILATION
OPENING ON
BOTH SIDES
AND REAR
OPENING FOR
ACCESS DOOR
DIMENSIONS IN [ ] ARE IN CM.
9.00
6.25
1.00
D
9.00
TOP VIEW
3 X 5 [7.6 X 12.7]
OPENING FOR
GAS SUPPLY
& ELECTRICAL
*
*
* MIN. VERT. CLEARANCE TO
COMBUSTIBLE CONSTRUCTION
(SEE MANUAL PG. 9)
ACCESS DOOR
(SOLD SEPARATELY)
TYPICAL ISLAND
COUNTERTOP INSTALLATION
.44
1.1
NOTCH
1.00
2.5
MAX.
COUNTERTOP
OVERHANG
LAYOUT FOR
NON-COMBUSTIBLE
ENCLOSURE (ISLAND)
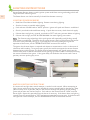
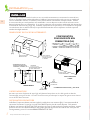
BUILT-IN DIMENSIONS:
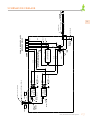
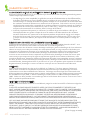
INSTALLATION
(continued)
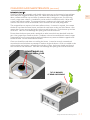
VENTILATION OPENINGS
A minimum of three 10 in² (65 cm²) of ventilation openings must be provided for both left and
right sides of your enclosure (island), as well as the back. These openings are required to safely
dissipate gas vapors if there is a leak in your enclosure.
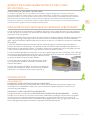
BUILT-IN INSTALLATION
Your Hestan Power Burner comes ready to install into your enclosure (island). It is recommended
to build your enclosure 6-9” (15-23 cm) LOWER than the adjacent countertop. This provides a
safer working height when cooking with a wok or very large stockpots, such as when frying a
turkey or cooking a large seafood-boil. Proceed to the GAS CONNECTIONS section for further
instruction.

Hestan delivers
the consistent
control

EN
©2017 Hestan Commercial Corporation
12
GAS AND ELECTRICAL CONNECTIONS
GAS SUPPLY
The local gas authority or supplier should be consulted at the installation planning stage in order
to establish the availability of an adequate supply of gas (NG or LP). If it is a new installation,
have the gas authorities or supplier check the meter size and piping to assure that the unit is
supplied with the necessary amount of gas supply and pressure to operate the unit(s).
Gas connections should be made by a qualified plumber, or your professional outdoor appliance
installer.
All fixed (non-mobile) appliances must be fitted with an accessible upstream gas shutoff valve as
a means of isolating the appliance for emergency shut off and for servicing.
Make certain new piping and connections have been made in a clean manner and have been
purged so that piping compound, chips, etc. will not clog regulators, valves, orifices, or burners.
Use pipe joint compound / thread sealant approved for natural and LP gases.
NEVER CONNECT THE POWER BURNER TO AN UNREGULATED GAS SUPPLY. Before
proceeding, ensure the appliance is fitted for Natural or Liquid Propane gas. Connecting to an
improper gas type will result in poor performance and increased risk of damage or injury. Gas
type and gas consumption (BTU per hour) for each burner type is shown on the rating label
affixed to the underside of the drip tray.
Installation of this cooking appliance must be made in accordance with local codes. In the
absence of local codes, this unit should be installed in accordance with the National Fuel Gas
Code No.
Z223.1/ NFPA 54
, Natural Gas and Propane Installation code
CSA B149-1,
or Propane
Storage and Handling Code
B149.2.
NOTE: See rating label for manifold pressure for the type of gas of your appliance.
CONVERSION KITS
Gas conversion kits are available from your Hestan dealer should you need to convert an LP unit
to NG, or vice-versa.
HIGH ALTITUDE KITS
If you live in a high altitude area, 2,000 ft. (610 m) or more above sea level, your Power Burner will
require different orifices for proper combustion and performance. High altitude kits are available
through Hestan Customer Service. Please have your model and serial number information ready
when you call.

EN
©2017 Hestan Commercial Corporation
13
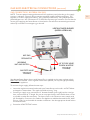
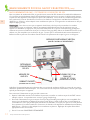
GAS CONNECTION - NATURAL GAS (NG)
NOTE: To ensure proper heating performance of this appliance, verify that the gas line supply
pressure is adequate. Use only the gas pressure regulator supplied with this appliance. This
regulator is set for a supply pressure of 7” WC (1.74 kPa) to maintain 4” WC (1.00 kPa) outlet
(manifold) pressure. Use a minimum 1/2” ID flex hose to prevent gas starvation. Ensure that the
service pipe supplying the Power Burner is fitted with a shut-off valve conveniently positioned
and easily accessible as an emergency gas shut-off.
Your Hestan Power Burner for use with Natural Gas is supplied with its own regulator which
MUST NOT be removed. If this regulator needs to be replaced, use only the type specified by
Hestan for this appliance.
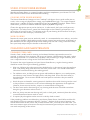
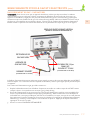
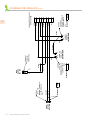
To connect the gas supply, follow the next steps:
1. Locate the regulator mounted underneath your Power Burner and install a 1/2”NPT elbow
and nipple as shown above. The nipple should be at least 3” long.
2. Connect gas supply using a minimum 1/2” diameter flexible (semi–rigid) stainless steel gas
hose, no more than 48” in length. Be sure to use proper fittings and a flexible hose as short
as possible to make the connection. The hose as well as the connectors must comply with
the
Standard for Connectors for Outdoor Gas Appliances and Manufactured Homes, ANSI
Z21.75 • CSA 6.27
, and suitable for outdoor installation. Use the appropriate thread sealant
on all connections.
3. Proceed to LEAK TESTING section.
HESTAN POWER BURNER
(MODEL AGPB24-NG)
NAT GAS
REGULATOR
INCOMING
NAT GAS SUPPLY
SHUTOFF VALVE
(SUPPLIED BY
CUSTOMER)
1/2” ID FLEX HOSE,
ELBOW & NIPPLE
(SUPPLIED BY
CUSTOMER)
GAS AND ELECTRICAL CONNECTIONS
(continued)

EN
©2017 Hestan Commercial Corporation
14
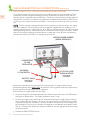
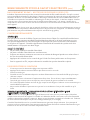
GAS CONNECTION - LIQUID PROPANE (LP) PIPED SYSTEMS
An LP piped system is one with a large central LP tank that feeds an entire household. These
systems are normally equipped with a high pressure regulator by the large LP tank, and may
have low pressure regulators close to the home. The gas line connectors must comply with the
Standard for Connectors for Outdoor Gas Appliances and Manufactured Homes, ANSI Z21.75
• CSA 6.27
, and suitable for outdoor installation. The connection shall be 48 inches (1.22 m) or
less.
NOTE: To ensure proper heating performance of this appliance, verify that the gas line supply
pressure is adequate. Use only the gas pressure regulator supplied with this appliance. The
regulator must be set for a supply pressure of 11” WC (2.74 kPa) to maintain 10” WC (2.49 kPa)
outlet (manifold) pressure. Use a minimum 1/2” ID flex hose to prevent gas starvation. Ensure
that the service pipe supplying the Power Burner is fitted with a shut-off valve conveniently
positioned and easily accessible as an emergency gas shut-off.
Your Hestan Power Burner for use with LP Gas Piped Systems is supplied with a special
convertible regulator which MUST NOT be removed. If this regulator needs to be replaced, use
only the type specified by Hestan for this appliance.
To connect the gas supply, follow the next steps:
1. Locate the regulator mounted underneath your Power Burner and install a 1/2”NPT elbow
and nipple as shown above. The nipple should be at least 3” long.
2. Connect gas supply using a minimum 1/2” diameter flexible (semi–rigid) stainless steel gas
hose, no more than 48” in length. Be sure to use proper fittings and a flexible hose as short
as possible to make the connection. The hose as well as the connectors must comply with
the
Standard for Connectors for Outdoor Gas Appliances and Manufactured Homes, ANSI
Z21.75 • CSA 6.27
, and suitable for outdoor installation. Use the appropriate thread sealant
on all connections.
3. Proceed to LEAK TESTING section.
GAS AND ELECTRICAL CONNECTIONS
(continued)
HESTAN POWER BURNER
(MODEL AGPB24-LP)
CONVERTIBLE
LP GAS
REGULATOR
INCOMING
LP GAS SUPPLY
SHUTOFF VALVE
(SUPPLIED BY
CUSTOMER)
1/2” ID FLEX HOSE,
ELBOW & NIPPLE
(SUPPLIED BY
CUSTOMER)

EN
©2017 Hestan Commercial Corporation
15
GAS CONNECTION - LIQUID PROPANE (LP) CYLINDER
The Hestan Power Burner can be connected to a standard 20 lb. LP gas cylinder when used with
a two-stage regulator/hose assembly and tank retention device available for purchase as kit
AGCKLPT from Hestan. This regulator/hose assembly must be used WITHOUT alteration. If the
hose or any part of the assembly is damaged, it should not be repaired - it needs to be replaced.
Please contact your Hestan dealer for genuine replacement P/N 014309. Please read and
understand the instructions supplied with the kit, and perform the leak testing described below
before using your appliance.
NOTE: To ensure proper heating performance of this appliance, verify that the supply pressure is
adequate to maintain 10.0” WC (2.49 kPa) outlet (manifold) pressure.
LEAK TESTING
GENERAL
Although all gas connections on your Hestan Power Burner are leak tested at the factory prior
to shipment, a complete gas tightness check must be performed at the installation site due to
possible movement in shipment, or excessive pressure unknowingly being applied to parts of the
unit. Periodically check the whole system for leaks, or immediately check if the smell of gas is
detected.
BEFORE TESTING
• Do not smoke while leak testing.
• Never leak test with an open flame.
• Make a soap solution of one part liquid detergent and one part water for leak testing
purposes.
• Apply the solution to the gas fittings by using a spray bottle or a brush.
• For LP units, always check with a full LP cylinder.
To Test
• Make sure all control valves are in the “OFF” position.
• Apply the soap solution described above to all fittings.
• Turn the gas supply on.
• Check all connections from the supply line, or LP cylinder up to and including the manifold
pipe assembly and all connections to each burner.
• Soap bubbles will appear where a leak is present. If a leak is present, immediately turn off gas
supply, tighten any leaking fittings, turn the gas supply back on, and recheck.
• If you cannot stop a gas leak, turn off the gas supply and call the dealer where you purchased
your Power Burner.
• Do not use the Power Burner until all connections have been checked and do not leak.
IMPORTANT NOTE - ALWAYS CHECK FOR LEAKS AFTER EVERY LP CYLINDER CHANGE.
If a leak is present, or if there is evidence of excessive abrasion or wear, or the hose is cut, it must
be replaced before using the Power Burner. The hose and LP regulator are supplied as a complete
assembly and must be replaced together. Do not attempt to repair or replace the hose itself.
Contact your Hestan dealer for genuine replacement P/N 014309.
Check all gas supply fittings for leaks before each use. It is handy to keep a spray bottle of soapy
water near the shut-off valve of the gas supply line. Spray all the fittings. Bubbles indicate leaks.
GAS AND ELECTRICAL CONNECTIONS
(continued)

EN
©2017 Hestan Commercial Corporation
16
ELECTRICAL SUPPLY
Important: This appliance must be electrically grounded in accordance with local codes, or in the
absence of local codes with the National Electrical Code,
ANSI/NFPA 70-1990
.
Appliances equipped with a flexible electrical supply cord are provided with a three-prong
grounding plug. It is imperative that this plug be connected to a properly grounded three-prong
receptacle. If the receptacle is not the proper grounding type, contact an electrician. Do not
remove the grounding prong from this plug.
The Power Burner is designed for 120 volt AC power and must be plugged into a Ground Fault
Circuit Interrupter (GFCI) protected circuit. Do not connect the Power Burner to the electrical
supply until after gas connections have been made and leak checks have been performed.
KEEP ANY ELECTRICAL CORD AND FUEL SUPPLY HOSE AWAY FROM ANY HEATED
SURFACES.
1. To protect against electric shock, do not immerse cord or plugs in water or other liquid.
2. Unplug from the outlet when not in use and before cleaning. Allow to cool before putting on
or taking off parts.
3. Do not operate any outdoor cooking gas appliance with a damaged cord or plug, or after the
appliance malfunctions or has been damaged in any manner. Contact the manufacturer for
repair.
4. Do not let the cord hang over the edge of a table or touch hot surfaces.
5. Do not use an outdoor cooking gas appliance for purposes other than intended.
6. Use only a Ground Fault Circuit Interrupter (GFCI) protected circuit with this outdoor cooking
gas appliance.
7. Never remove the grounding prong or use with a 2-prong ground adapter.
8. Use only extension cords with a 3-prong grounding plug, rated for the power of the
equipment, and approved for outdoor use with a W-A marking.
BURNER ADJUSTMENTS
The center burner of the Hestan Power Burner is similar to many residential gas cooktops. They
do not have any adjustments, except for the correct orifices, and adjustment of the low setting on
the valve. The octagonal burner also has no adjustment, except the correct orifice and adjustment
of the air-shutter.
BURNER FLAME ADJUSTMENT
Each Power Burner is tested and adjusted at the factory prior to shipment. The proper orifice
for the gas type, and the air-fuel adjustment was made at this time. However, variations in the
local gas supply, the elevation where you live, converting from one gas type to another, and other
factors might make it necessary to adjust the burner flames.
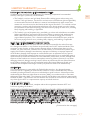
The flames of the burners should be visually checked and compared with the figures on the next
page. Flames should be blue and stable with no yellow tips (LP units will have some yellow
tipping). There should be no excessive noise or flame lifting. If any of these conditions exist,
remove the burner cap and check if dirt, debris, spider webs, etc., are blocking the center venturi
hole, or the individual burner ports. The occasional orange flame that quickly goes away is usually
a small amount of dust or water condensation which is burning off - this is normal.
The octagonal burner should also be periodically checked for blocked ports, debris, spider webs,
etc. Cleaning instructions are described in the CLEANING AND MAINTENANCE section.
GAS AND ELECTRICAL CONNECTIONS
(continued)

EN
©2017 Hestan Commercial Corporation
17
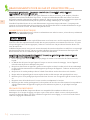
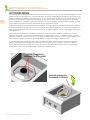
VALVE ADJUSTMENTS
The valves on your Hestan Power Burner are preset at the factory for optimum performance.
However, the valve for the center burner also features a low (simmer) adjustment if altitude, low-
heat performance, converting from one gas to another, or other factors indicate an adjustment is
needed.
GAS AND ELECTRICAL CONNECTIONS
(continued)
NEVER ADJUST THE BURNER SO LOW
THAT IT MAY GO OUT DURING USE. DO
NOT OPERATE THE POWER BURNER
WITH THE LOW HEAT SCREW REMOVED.
GAS CAN ESCAPE AND CAUSE A
POTENTIALLY HAZARDOUS CONDITION.
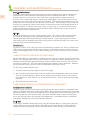
ADJUSTMENT STEPS FOR CENTER BURNER VALVE:
1. Remove the drip tray, control knobs, and control panel from the unit.
2. Follow lighting instructions by setting the control knob on “HI” and allow the burner to
preheat for 10 minutes.
3. Turn the control knob to “LOW” and wait for the burner temperature to drop and stabilize,
about 10 minutes. Attempting adjustment at any setting other than LOW can create a
dangerous condition.
4. Insert a small, flat-blade screwdriver into the small screw to the left of the valve stem to
begin the adjustment (see Fig. 2). The screw only has 2-3 complete revolutions of adjustment.
After this, the screw may continue to turn, but is actually coming out of the valve and could
result in a gas leak. DO NOT turn more than 3 revolutions!
5. Turn counter-clockwise very slowly to INCREASE the low flame. The flame will take a few
seconds to respond to the adjustments you are making.
6. Adjust the flame so the burner is still fully lit on all ports, without fluttering or going out.
Turn off the burner and re-light. Check the new low setting once again to assure proper
adjustment is reached. Reattach the control panel, drip tray, and control knobs.
Figure 2

EN
©2017 Hestan Commercial Corporation
18
LIGHTING INSTRUCTIONS
Hestan Power Burners feature a spark-ignition system with flame-sensing technology which will
relight the flame should it go out.
The Power Burner can also be manually lit should that become necessary.
LIGHTING POWER BURNERS
1. Read Use & Care Manual before lighting. Remove cover during lighting.
2. Stand as far away as possible when lighting.
3. Push and turn selected knob to “HIGH” position. Igniter will spark until flame is established.
4. Once lit, turn knob to desired flame setting. If spark does not occur, check electrical supply.
5. If burner does not light in 5 seconds, turn knob to “OFF” and wait 5 minutes before re-lighting.
6. If burner fails to light, see USE & CARE MANUAL for match lighting instructions.
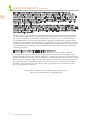
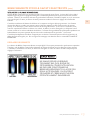
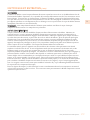
Note: The flame-sensing technology of the spark igniter will repeatedly spark (clicking sound)
until a flame is established. The igniter for the center burner is built in to the base of the burner
itself and is well protected (see Fig. 3). If you experience nuisance sparking during normal
operation of the burner, see the TROUBLESHOOTING section of this manual.
The igniter for the outer burner is exposed and subject to contamination such as in the event of
a boil-over while cooking. To ensure proper ignition, be careful to maintain the correct distance
between burner and the igniter. The igniter must be approximately 1/8” (3mm) away from the
nearest flame ports on the left side of the burner (see Fig. 4) so that a flame is constantly touching
the center electrode of the igniter. If the igniter body is disturbed or the burner itself is out of
position, nuisance sparking may occur.
MATCH LIGHTING INSTRUCTIONS
If a burner will not light after several attempts, it can be lit with a match. When attempting to
light a burner with a match, be sure you selected the correct control knob for that burner. Keep
your face away as far as possible, and pass the lit match through the openings of the cooking
grates and position near the burner ports. Push and turn the control knob to “HIGH” until the
burner lights. Repeat this procedure for each burner if necessary. If the burner does not light in 5
seconds, turn the control knob to “OFF” and wait 5 minutes before trying again. If the burner will
not light after several attempts, see the TROUBLESHOOTING section of this manual.
Figure 3 Figure 4
La page est en cours de chargement...
La page est en cours de chargement...
La page est en cours de chargement...
La page est en cours de chargement...
La page est en cours de chargement...
La page est en cours de chargement...
La page est en cours de chargement...
La page est en cours de chargement...
La page est en cours de chargement...
La page est en cours de chargement...
La page est en cours de chargement...
La page est en cours de chargement...
La page est en cours de chargement...
La page est en cours de chargement...
La page est en cours de chargement...
La page est en cours de chargement...
La page est en cours de chargement...
La page est en cours de chargement...
La page est en cours de chargement...
La page est en cours de chargement...
La page est en cours de chargement...
La page est en cours de chargement...
La page est en cours de chargement...
La page est en cours de chargement...
La page est en cours de chargement...
La page est en cours de chargement...
La page est en cours de chargement...
La page est en cours de chargement...
La page est en cours de chargement...
La page est en cours de chargement...
La page est en cours de chargement...
La page est en cours de chargement...
La page est en cours de chargement...
La page est en cours de chargement...
La page est en cours de chargement...
La page est en cours de chargement...
La page est en cours de chargement...
La page est en cours de chargement...
La page est en cours de chargement...
La page est en cours de chargement...
-
 1
1
-
 2
2
-
 3
3
-
 4
4
-
 5
5
-
 6
6
-
 7
7
-
 8
8
-
 9
9
-
 10
10
-
 11
11
-
 12
12
-
 13
13
-
 14
14
-
 15
15
-
 16
16
-
 17
17
-
 18
18
-
 19
19
-
 20
20
-
 21
21
-
 22
22
-
 23
23
-
 24
24
-
 25
25
-
 26
26
-
 27
27
-
 28
28
-
 29
29
-
 30
30
-
 31
31
-
 32
32
-
 33
33
-
 34
34
-
 35
35
-
 36
36
-
 37
37
-
 38
38
-
 39
39
-
 40
40
-
 41
41
-
 42
42
-
 43
43
-
 44
44
-
 45
45
-
 46
46
-
 47
47
-
 48
48
-
 49
49
-
 50
50
-
 51
51
-
 52
52
-
 53
53
-
 54
54
-
 55
55
-
 56
56
-
 57
57
-
 58
58
-
 59
59
-
 60
60


dans d''autres langues
- English: Hestan AGPB24NG User guide
Documents connexes
-
Hestan EABR36LP Le manuel du propriétaire
-
Hestan EMBR30-LP Le manuel du propriétaire
-
Hestan AGB122-LP Le manuel du propriétaire
-
Bosch HCP50652UC Le manuel du propriétaire
-
Hestan GSBR42-NG-OR Guide d'installation
-
Hestan GMBR42CXNG Mode d'emploi
-
-
Hestan AGB122-LP Mode d'emploi
-
-
Hestan GMBR42-NG-GR Le manuel du propriétaire