JVC LT-28HA82U Le manuel du propriétaire
- Catégorie
- Téléviseurs LCD
- Taper
- Le manuel du propriétaire

1
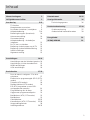
Content
Warnings 2
Safety Information 3
Getting Started 5-12
TV - Features 5
Accessories included 5
Installing / Removing the Base Stand 6
Viewing remote control 7-10
Control buttons(side) 10
Aerial connection 10
Power connection 10
Remote control - Inserting batteries 11
Switching the TV On and Off 11
Operation using TV control buttons 12
Operation using remote control 12
Initial setup 13
General operation 13
Connections 14-16
Left side connections explained 14
Left bottom connections explained 15
HDMI Connections 16
VGA Connections 16
Basic Feature 17-32
How to navigate menus - Selecting source
17
Electronic programme guide (EPG) (DTV
mode) 17
Teletext (ATV mode) 18
Digital Teletext (DTV mode) 19
Recording DTV Programme onto a USB
Storage Device 19
Timer Programming 20
Play Recorded Programme 21
Picture management (ATV / DTV Mode)
21
Picture management 22
Sound management 22-23
Channel management (ATV / DTV Mode)
23-28
Lock System management 28
Setup management 28-32
Entertainment 33-35
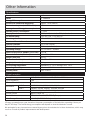
Other Information 36
6SHFL¿FDWLRQV 36
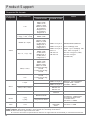
Product Support 37-38
Trouble shooting 37
6XSSRUWHG¿OHIRUPDWV 38
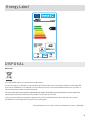
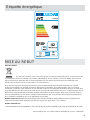
Energy Label 39
DISPOSAL 39

2
WARNINGS
This appliance is intended for domestic household use only and should not be used for any other purpose or in any
other application, such as for non domestic use or in a commercial environment.
Ventilation
Allow at least a 10 cm gap all around the product.
The ventilation should not be impeded by covering the ventilation openings with items, such as newspapers,
table-cloths, curtains, etc.
1RQDNHGÀDPHVRXUFHVVXFKDVOLJKWHGFDQGOHVVKRXOGEHSODFHGRQWKHDSSDUDWXV
This apparatus is not suitable for use in a tropical climate.
7KHDSSDUDWXVVKDOOQRWEHH[SRVHGWRGULSSLQJRUVSODVKLQJDQGWKDWQRREMHFWV¿OOHGZLWKOLTXLGVVXFKDVYDVHV
shall be placed on the apparatus.
Where the MAINS plug or an appliance coupler is used as the disconnect device, the disconnect device shall remain
readily operable.
%DWWHULHVEDWWHU\SDFNRUEDWWHULHVLQVWDOOHGVKDOOQRWEHH[SRVHGWRH[FHVVLYHKHDWVXFKDVVXQVKLQH¿UHRUWKHOLNH
To protect the environment, use local recycling facilities for battery disposal.
CAUTION:
To prevent possible hearing damage, do not listen at high volume levels for long periods.
WARNINGS

3
Safety Information
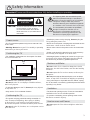
RISK OF ELECTRIC SHOCK
DO NOT OPEN
CAUTION
CAUTION:
TO REDUCE THE RISK OF ELECTRIC SHOCK,
DO NOT REMOVE COVER (OR BACK).
NO USER-SERVICEABLE PARTS INSIDE.
REFER SERVICING TO QUALIFIED SERVICE
PERSONNEL.
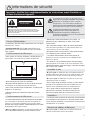
7KHOLJKWQLQJÀDVKZLWKDUURZKHDGV\PERO
ZLWKLQDQHTXLODWHUDOWULDQJOHLVLQWHQGHGWR
alert the user to the presence of un insulated
“dangerous voltage” within the product’s
HQFORVXUHWKDWPD\EHRIVXI¿FLHQWPDJQLWXGH
to constitute a risk of electric shock of persons.
7KHH[FODPDWLRQSRLQWZLWKLQDQHTXLODWHUDO
triangle is intended to alert the user to
the presence of important operating and
maintenance (servicing) instructions in the
literature accompanying the appliance.
Important-
Please read these instructions fully before installing or operating
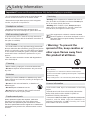
Power source
Positioning the TV
Positioning the TV
Moisture and Water
Ventilation
Heat sources and Flames
7KH79VKRXOGEHRSHUDWHGRQO\IURPD9$&
50 Hz outlet.
Warning:
Do not
leave your TV in standby or operating
mode when you leave your house.
7KHSRZHUFRUGSOXJVKRXOGEHHDVLO\DFFHVVLEOH,Q
case of storms and lightning, when going on holiday,
or when the TV is not used for a long period of time
disconnect the power cord from the mains power socket.
Do not
place the TV, furniture, etc. on the power cord or
pinch the cord.
)RUYHQWLODWLRQSOHDVHOHDYHDFOHDUVSDFHRIDWOHDVW
10cm all around the TV.
Do not
block the ventilation openings.
Do not
place the TV on sloping or unstable surfaces,
the TV may tip over.
7RSUHYHQWGDPDJHWRWKH79
do not
place any objects
on top of the TV.
2QO\XVHWKH79LQPRGHUDWHFOLPDWHV
+DQGOHWKHSRZHUFRUGE\WKHSOXJ
do not
unplug the
TV by pulling the power cord.
1HYHUWRXFKWKHSRZHUFRUGSOXJZLWKZHWKDQGVDVWKLV
could cause a short circuit or electric shock.
1HYHUPDNHDNQRWLQWKHSRZHUFRUGRUWLHLWZLWKRWKHU
cords.
3RZHUFRUGVVKRXOGEHSODFHGLQVXFKDZD\WKDWWKH\
are not likely to be stepped on or driven over.
$GDPDJHGSRZHUFRUGSOXJFDQFDXVH¿UHRUJLYH\RX
an electric shock. When damaged it must be replaced,
WKLVVKRXOGRQO\EHGRQHE\TXDOL¿HGSHUVRQQHO
Do not
use this TV in a humid or damp place (avoid
bathrooms, the sink in the kitchen, and near the washing
machine).
Do not
expose this TV to rain or water, as this may be
dangerous.
Do not
SODFHREMHFWV¿OOHGZLWKOLTXLGVVXFKDVÀRZHU
vases, on top of the TV. Avoid from dripping or splashing.
,IDQ\VROLGREMHFWRUOLTXLGIDOOVLQWRWKHFDELQHWXQSOXJ
WKH79DQGKDYHLWFKHFNHGE\TXDOL¿HGSHUVRQQHOEHIRUH
operating it any further.
7KHVORWVDQGRSHQLQJVRQWKH79VHWDUHLQWHQGHGIRU
ventilation and to ensure reliable operation.
7RSUHYHQWRYHUKHDWLQJWKHVHRSHQLQJVPXVWQRWEH
blocked or covered in anyway.
Do not
expose the TV to direct sunlight or other heat
sources.
10cm
10cm
10cm

4
:DUQLQJ,QFRUUHFWLQVWDOODWLRQRIEDWWHULHVPD\FDXVH
battery leakage and corrosion, resulting in damage to the
remote control.
Do not
mix old and new batteries, or batteries of
different types.
Do not
GLVSRVHRIEDWWHULHVLQD¿UH
Do not
dispose of batteries with normal household
waste, take to a local recycling centre.
:KHQUHSODFHPHQWSDUWVDUHUHTXLUHGPDNHVXUH
that the service technician has used replacement
SDUWVZKLFKDUHVSHFL¿HGE\WKHPDQXIDFWXUHRUKDYH
WKHVDPHVSHFL¿FDWLRQVDVWKHRULJLQDORQH8QDWKRULVHG
VXEVWLWXWLRQVPD\UHVXOWLQ¿UHHOHFWULFDOVKRFNRURWKHU
hazards.
Warning:
Risk of exposure to radiation from class 1/
class 3b visible and invisible laser beams.
Do not
open
the TV and stare directly into beam.
Warning:
Risk of electric shock,
do not
attempt to
repair, service or modify this TV yourself. Contact the
manufacturer, their approved service agent.
:DUQLQJ7RSUHYHQWWKH
VSUHDGRI¿UHNHHSFDQGOHVRU
RWKHURSHQÀDPHVDZD\IURP
this product at all times.
7KLVHTXLSPHQWLVD&ODVV,,RUGRXEOHLQVXODWHG
electrical appliance. It has been designed in such a
ZD\WKDWLWGRHVQRWUHTXLUHDVDIHW\FRQQHFWLRQWR
electrical earth.
Safety Information
Important-
Please read these instructions fully before installing or operating
7KH79VKRXOGQRWEHSODFHGQHDUWRRSHQÀDPHVDQG
sources of intense heat such as an electric heater.
(QVXUHWKDWQRRSHQÀDPHVRXUFHVVXFKDVOLJKWHG
candles, are placed on top of the TV.
([FHVVLYHVRXQGSUHVVXUHIURPHDUSKRQHVDQG
headphones can cause hearing loss, please take care.
To prevent injury, this TV must be securely attached to
the wall in accordance with the installation instructions (if
the option is available).
7KH/&'VFUHHQLVDYHU\KLJKWHFKQRORJ\SURGXFWZLWK
DERXWDPLOOLRQWKLQ¿OPWUDQVLVWRUVJLYLQJ\RX¿QHSLFWXUH
details. Occasionally, a few non-active pixels may appear
RQWKHVFUHHQDVD¿[HGEOXHJUHHQRUUHGSRLQW3OHDVH
note that this does not affect the performance of your
product.
7DNHFDUHQRWWRVFUDWFKWKHVFUHHQZLWK¿QJHUQDLOVRU
other hard objects.
%HIRUHFOHDQLQJXQSOXJWKH79IURPWKHZDOOVRFNHW
Do not
XVHOLTXLGRUDHURVROFOHDQHUV2QO\XVHDVRIW
dry cloth.
Headphone volume
Wall mounting (optional)
LCD Screen
Cleaning
Batteries
Replacement parts
Servicing
Dear Customer,
This apparatus is in conformance with the valid European
directives and standards regarding electromagnetic compatibility
and electrical safety.
Darty Holdings SAS © 14 route d’Aulnay 93140 Bondy, France
* DVB and the DVB logos are trademarks of the DVB
project.
* Manufactured under license from Dolby Laboratories.
Dolby, Dolby Audio and the double-D symbol are
trademarks of Dolby Laboratories.
7KHWHUPV+'0,DQG+'0,+LJK'H¿QLWLRQ0XOWLPHGLD
Interface, and the HDMI Logo are trademarks or
registered trademarks of HDMI Licensing LLC in the
United States and other countries.
License information

5
Getting Started
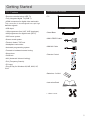
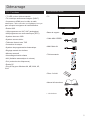
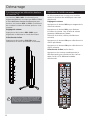
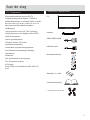
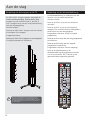
TV - Features
Accessories included
5HPRWHFRQWUROOHGFRORXU/('79
)XOO\LQWHJUDWHGGLJLWDO79'9%7
+'0,FRQQHFWRUVIRUGLJLWDOYLGHRDQGDXGLR
This connection is also designed to accept high
GH¿QLWLRQVLJQDOV
86%LQSXW
SURJUDPPHVIURP9+)8+)DQDORJXH
SURJUDPPHVIRUGLJLWDOPRGH,'79
26'PHQXV\VWHP
6WHUHRVRXQGV\VWHP
7HOHWH[WIDVWH[W723WH[W
+HDGSKRQHFRQQHFWLRQ
$XWRPDWLFSURJUDPPLQJV\VWHP
)RUZDUGRUEDFNZDUGPDQXDOWXQLQJ
6OHHSWLPHU
&KLOGORFN
$9/$XWRPDWLF9ROXPH/LPLWLQJ
3//)UHTXHQF\6HDUFK
3&LQSXW
3OXJ3OD\IRU:LQGRZV0(;3
Vista.
79
6WDQG%DVH
0,1,<3%35&DEOH
0,1,$9&DEOH
5HPRWH&RQWURO
%DWWHULHV[$$$
,QVWUXFWLRQ%RRN
4 base screws
MUTE
PMODE SMODE FAV SLEEP
CH.LIST
ASPECT
EPG AUDIO
MENU
EXIT
DISPLAY
SOURCE
TEXT
INDEX
HOLD
SIZE
SUBPAGE
REVEAL
SUBTITLE
ENTER

6
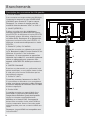
Getting Started
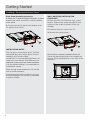
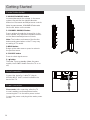
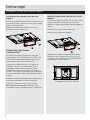
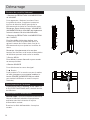
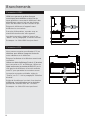
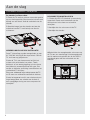
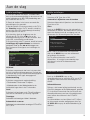
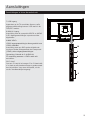
Installing / Removing the Base Stand
Base Stand Assembly Instruction
1.
3ODFHWKH79ZLWKWKHGLVSOD\VLGHGRZQRQDÀDW
surface.Use a cloth to protect. Locate the bottom
at the stand.
2.
Fix the bracket with stand to the bottom of the
TV with the four screws.
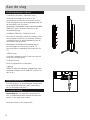
INSTALLATION NOTES
This TV can be connected to an AC 100-240
Volts,50/60 Hz power supply. Never connect
straight to a DC power supply.
Locate the TV in a room where light does not
strike the screen directly. Total darkness or a
UHÀHFWLRQRQWKHVFUHHQFDQFDXVHH\HVWUDLQ
Soft and indirect lighting is recommended for
comfortable viewing.
Allow enough space between the TV and the
wall to permit ventilation.
Avoid excessively warm locations to prevent
possible damage to the cabinet or premature
component failure.
WALL MOUNTING INSTALLATION
GUIDELINES
1.
Place the LED LCD Television onto a solid
surface. Please place some soft material over
the front of the screen to protect it from any
damage.
2.
Remove the four screws to the TV .
3.
Remove the stand column.
4.
8VHWKHIRXUVFUHZVSURYLGHGWR¿[WKH79
onto a wall mounting bracket (not included) via
the four VESA standard holes on the back of the
television.
100 x 100mm VESA mount

7
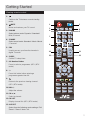
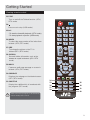
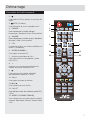
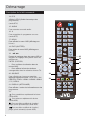
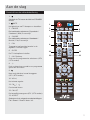
1.
Switches the TV between on and standby
mode.
2. MUTE
Mutes and restores your TV sound.
3. P.MODE
6HOHFWSLFWXUHPRGH'\QDPLF6WDQGDUG
Mild / Personal.
4. S.MODE
6HOHFWVRXQGPRGH6WDQGDUG0XVLF0RYLH
/ Personal.
5. FAV
Used to access your favorite channels in
digital TV mode.
6. SLEEP
Set the TV sleep timer.
7. 0-9 Number Button
Press to select a programme. (ATV / DTV
mode)
8. -/--
Press this button before entering a
programme greater than 09.
9.
Return to the previous viewing channel.
(ATV / DTV mode)
10. VOL+/-
Adjust the volume.
11. CH /
Select a channel.
12. CH.LIST
Display channel list. (ATV / DTV mode)
13. ASPECT
6HOHFWIURPWKHIROORZLQJPRGHVHWWLQJV)XOO
=RRP=RRP$XWR
Viewing remote control
MUTE
PMODE SMODE FAV SLEEP
CH.LIST
ASPECT
EPG AUDIO
MENU
EXIT
DISPLAY
SOURCE
TEXT
INDEX
HOLD
SIZE
SUBPAGE
REVEAL
SUBTITLE
ENTER
21
7
3
8
4
10
6
5
9
11
12 13
Getting Started

8
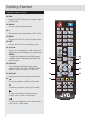
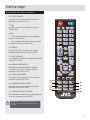
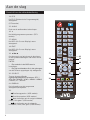
14. EPG
Display the EPG (Electronic Program Guide).
(DTV mode)
15. AUDIO
Press to switch the audio mode.
16. Ɣ
Record the current programme. (DTV mode)
17. MENU
Display the OSD (On Screen Display) menu.
18. EXIT
Exit the OSD (On Screen Display) menu.
19. ŻźŸŹ
Allows you to navigate the OSD menus and
adjust the system settings to your preference.
ENTER
&RQ¿UPWKHVHOHFWLRQLQWKH26'PHQXV
'LVSOD\DOLVWRIFKDQQHOVVDYHGLQWKH79
tuner memory.
20. SOURCE
Select among the different input signal
VRXUFHV'79$79$96&$57<3E3U
HDMI1 / HDMI2 / HDMI3 / PC / MEDIA.
21. DISPLAY
Displays/removes the program Information.
22.
To reverse playback rapidly. (USB mode)
To advance playback rapidly. (USB mode)
To skip to the beginning of the previous
chapter / track / photo. (USB mode)
To skip to the beginning of the next chapter /
track / photo. (USB mode)
Viewing remote control
MUTE
PMODE SMODE FAV SLEEP
CH.LIST
ASPECT
EPG AUDIO
MENU
EXIT
DISPLAY
SOURCE
TEXT
INDEX
HOLD
SIZE
SUBPAGE
REVEAL
SUBTITLE
ENTER
15
14
18
17
20
19
21
16
22
Getting Started

9
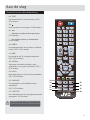
23.TEXT
Turn on and off the Teletext function. (ATV /
DTV mode.
24.
Press once to stop. (USB mode)
Ź,,
7RVWDUWWKHWLPHVKLIWSOD\EDFN'79PRGH
7RVWDUWSOD\EDFNRUSDXVH86%PRGH
26. INDEX
To select the page number of the index from
teletext. (ATV / DTV mode)
27. SIZE
To enlarge the picture on the TV in
teletext.(ATV / DTV mode)
28. REVEAL
Reveals hidden information such as the
DQVZHUWRDTXL]LQWHOHWH[W$79'79
mode).
29. HOLD
Freezes a multi-page passage on screen in
teletext. (ATV / DTV mode)
30. SUBPAGE
Displays the subpage on the teletext screen.
(ATV / DTV mode)
31. SUBTITLE
Display the subtitle which is broadcast with
the program. (DTV mode)
Viewing remote control
Getting Started
MUTE
PMODE SMODE FAV SLEEP
CH.LIST
ASPECT
EPG AUDIO
MENU
EXIT
DISPLAY
SOURCE
TEXT
INDEX
HOLD
SIZE
SUBPAGE
REVEAL
SUBTITLE
ENTER
25
28
31
23
26
27
30
29
24
127(,IWKHUHLVQRLQSXWVLJQDO79ZLOODXWRPDWLFDOO\
enter the standby state or shut off.

10
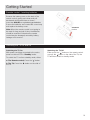
Control buttons(side)
Power connection
Aerial connection
1.VOLUME DOWN/UP button
Increases/decreases the volume. In the menu
system, they act like the right/left direction
buttons on the remote and adjust menu controls.
1RWH,QVRPHPHQXV92/80(83DOVRDFWV
like the OK button on the remote.
2. CHANNEL DOWN/UP button
Scans up/down through the channel list. In the
menu system, they act like the up/down buttons
on the remote and adjust menu controls.
Note:
The location and names of the function
buttons and power button on the TV may vary
according to TV model.
3.MENU button
Brings up the main menu or press to return to
the previous menu.
4. SOURCE button
Press to select signal source.
5. button
7XUQVWKH79RQRUVWDQGE\1RWHIRUVRPH
models, the POWER button turns the TV on or
off.)
Please note:
After unpacking, allow the TV
to reach ambient room temperature before
connecting the TV to the mains power socket.
Connect the power cord plug to the mains power
socket.
Connect the “aerial” or “cable TV” plug to
AERIAL INPUT (ANT.) socket located on the
back of the TV.
X
Y
Z
[
\
Getting Started

11
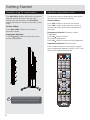
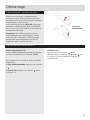
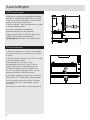
Remote control - Inserting batteries
Switching the TV On and Off
Remove the battery cover on the back of the
remote control, gently push down and pull
backwards at the same time as shown .
Insert two
AAA/R3
RUHTXLYDOHQWW\SHEDWWHULHV
Ensure the batteries are inserted the correct way
and replace the battery cover.
Note:
When the remote control is not going to
be used for long periods of time, the batteries
should be removed. Otherwise the remote
control may be damaged, caused by battery
leakage and corrosion.
6ZLWFKLQJWKH792Q
With power cord plug connected to the mains
power socket and TV in ‘
Standby
’ mode.
To switch the TV on from standby mode, either:
a: The Remote control;
Press the “
” button.
b: The TV;
Press the
button on the side of
the TV.
6ZLWFKLQJWKH792II
Either press the “
” button on the remote control
or press the
button on the side of the TV, the
TV will then switch to standby mode.
AAA/R3 X2
Batteries
Getting Started

12
Operation using TV control buttons Operation using remote control
The
VOL+/VOL-
buttons will function as volume
up/down as default. Even if you set other
functions for these buttons, the
VOL+/VOL-
buttons will return to volume control after a short
while.
Volume Setting
Press
VOL+/VOL-
buttons to increase or
decrease volume.
Programme Selection
Press
CH /CH
buttons to select the next or
previous programme.
The remote control is designed to control all the
functions of the model you selected.
Volume Setting
Press
VOL+
button to increase the volume.
Press
VOL-
button to decrease the volume. A
volume level scale (slider) will be displayed on
the screen.
Programme Selection
(Previous or Next
Programme)
Press
CH
button to select
the previous programme.
Press
CH
button to select the next programme.
Programme Selection
(Direct Access)
Press number buttons on the remote control to
select programmes between 0 and 9. The TV will
switch to the selected programme
X
Y
Z
[
\
MUTE
PMODE SMODE FAV SLEEP
CH.LIST
ASPECT
EPG AUDIO
MENU
EXIT
DISPLAY
SOURCE
TEXT
INDEX
HOLD
SIZE
SUBPAGE
REVEAL
SUBTITLE
ENTER
Getting Started
Key button is used for normal OSD select and input
source change. If remote does not work well, please
change a new remote or commulicate with service.

13
Initial setup Initial setup
General operation
1.
Connect one end of the RF coaxial cable to
the aerial socket on the wall and the other end of
WKHFDEOHWRWKH5)ȍVRFNHWDWWKHERWWRPRI
your TV.
2.
Connect the mains cable to the mains socket
after you have completed all the connections.
3.
With power cord plug connected to the mains
power socket and TV in
'Standby'
mode.At this
stage, the TV switches to standby mode. The red
LED indicator will illuminate on the front panel of
the TV.
4.
In standby mode, press the
" "
button on
the side of the TV or the button on the remote
control to turn the TV on. The red LED indicator
will turn blue.
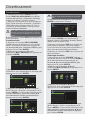
5.
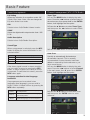
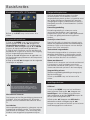
7KH¿UVWWLPH\RXWXUQWKH79RQLWZLOOJR
straight into
First Time Setup
menu. Press
the
ŻŹŸź
buttons to navigate the menu and
change the settings.
OSD Language
Selects your desired language to be displayed
on the menu. The default on-screen menu
language is set as English.
Mode Setting
Selects your desired mode setting.
+RPH0RGH9LHZLQJDWKRPH
6WRUH0RGH)RUVWRUHGHPRWKHEULJKWQHVVLV
higher than home mode.
Country
Selects the country where you will operate the
TV. The default country is set as France.
Tuner Type
6HOHFW7XQHU7\SH&DEOH$QWHQQD
Auto Scan
6HOHFWVWKHDXWRVFDQW\SH'79$79'79
ATV.
LCN
Select LCN Type On or Off.
Auto Channel Update
Select Auto Channel Update Type On or Off.
Start
Press the
ENTER
button to start auto tuning.
Auto Scan will commence. The display will show
the progress of the tuning and the number of
channels found.
6.
If you want to skip the DTV tuning, press the
MENU
button to interrupt the tuning half way.
<RXZLOOWKHQJRVWUDLJKWWR$79WXQLQJ<RXPD\
repeat the above step if you also want to skip the
ATV tuning.
Press the
SOURCE
button on the remote control
and select DTV to switch the TV to Digital
Terrestrial Television Broadcasting.
Information Banner
Whenever you change channel using the CH
/ CH
buttons or the number buttons, the TV
displays the broadcast picture along with an
information banner on the top left of the screen
(available only in DTV/ATV mode)
The information banner can be displayed a any
time while watching TV by pressing the
DISPLAY
button on the remote control.
First Time Setup
OSD Language
Mode Setting
Country
Tuner Type
English
Home Mode
France
Cable
Auto Scan DTV+ATV
LCN On
Auto Channel Update Off
Start
Move Adjust MENU: Return EXIT: Exit
Auto Scan
Scanning CH34
Digital Channels Found:
DTV :10 Radio :0 Data:0
Analog Channels Found: 0
MENU: Skip EXIT: Exit
Getting Started

14
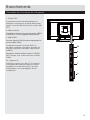
Connections
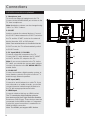
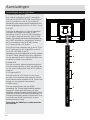
Left side connections explained
+HDGSKRQHMDFN
To connect an external headphone to the TV.
Connect to the HEADPHONE jack to listen to the
TV from headphones.
Note:
Headphone volume can be changed using
“VOL+” or “VOL-” buttons.
2. SCART
Inputs or outputs for external devices. Connect
the SCART cable between the SCART socket on
the TV and the SCART socket on the external
device (decoder, VCR or DVD player).
1RWH,IDQH[WHUQDOGHYLFHLVFRQQHFWHGYLDWKH
SCART socket, the TV will automatically switch
to SCART mode.
3. PC Input (VGA) / PC AUDIO
Connects a personal computer to the TV.
Connect the PC cable between the PC INPUT
on the TV and the PC output on the PC.
Note:
If you connect a device to the TV via the
PC cable, you should also use an audio cable to
connect your device to the
PC AUDIO INPUT
to
enable audio.
4. COAX OUT
Connect a sound bar, digital speaker system, or
home theater system to this jack to listen to TV
audio through external speakers.
5. RF Input (ANT.)
Connects to aerial (antenna) or cable TV. If you
use a decoder or a media recorder, you should
connect the aerial cable through the device to
the TV with an appropriate aerial cable.
6. HDMI Input
Connects a device that has an HDMI socket.
7KH79FDQGLVSOD\+LJK'H¿QLWLRQSLFWXUHV
IURPGHYLFHVVXFKDVD+LJK'H¿QLWLRQ6DWHOOLWH
Receiver or DVD Player. These devices must be
connected via the HDMI sockets or Component
Socket. No sound connection is needed for an
HDMI to HDMI connection.
1RWH7KH+'0,SRUWVXSSRUW$5&IXQWLRQ
2
1
6
3
4
5
SCART
HDMI1(ARC)RF INVGA IN COAX OUTPC AUDIO IN
HEADPHONE

15
Connections
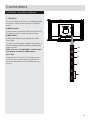
Left bottom connections explained
7. USB Input
To connect devices to the TV, providing fast data
exchange. USB will have function in USB/DTV
mode.
8.MINI AV Input
Connect to the composite VIDEO and AUDIO (L/
R) output sockets on external video devices.
9.MINI YPbPr
<3E3U,QSXWVRFNHWLVMXVWVXLWDEOHIRU<3E3U
Mini Cable.
Connect to a DVD player, Digital Set-Top-Box, or
RWKHU$9GHYLFHVZLWKFRPSRQHQW<3E3UYLGHR
output sockets.
Note: Pls. use "L-AUDIO IN-R" socket, when
you want to connect to YPbPr audio.
10 CI Slot
Used to insert a CI card. A CI card allows you
to view all the channels that you subscribe to.
For more information, see “Conditional Access”
section.
8
7
9
10
6
HDMI2 HDMI3 USB
MINI
AV
MINI
YPbPr
CI SOLT

16
Connections
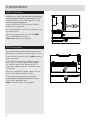
HDMI Connections
VGA Connections
+'0,OHWV\RXHQMR\KLJKGH¿QLWLRQGLJLWDOLPDJHV
DQGKLJKTXDOLW\VRXQGE\FRQQHFWLQJWKH79WR
external devices such as DVD players, set top
ER[HVRUJDPLQJHTXLSPHQW
Power off both the TV and the device before
making any connections.
For more information, refer to your device’s own
instruction book.
When connecting, switch “Source” to “
HDMI
”.
See, “Input Selection” section.
Note:
HDMI cable is not supplied.
<RXFDQFRQQHFWDFRPSXWHU3&WRWKH79WR
display your computer’s screen image on the TV.
Power off both computer and TV
before
making
any connections.
Use a 15-pin D-sub display cable to connect
a PC to the TV. Use an audio cable between
PC AUDIO inputs on the left side of the TV
and audio output on your PC to enable sound
connection.
When the connection is made, switch “Source”
to “PC”. See “Input selection” section.
Set the resolution that suits your viewing
UHTXLUHPHQWV5HVROXWLRQLQIRUPDWLRQFDQEH
found in the “Appendix parts”.
Note:
The VGA cable is not supplied.
HDMI1(ARC)RF INVGA IN COAX OUT
HDMI2 HDMI3 USB
MINI
AV
MINI
YPbPr
CI SOLT
SCART
HDMI1(ARC)RF INVGA IN COAX OUTPC AUDIO IN
HEADPHONE
HDMI2 HDMI3

17
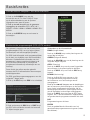
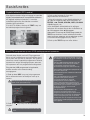
Basic Feature
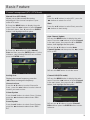
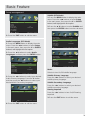
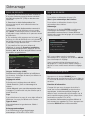
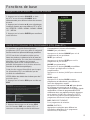
How to navigate menus - Selecting source
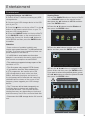
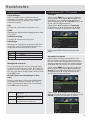
Electronic programme guide (EPG) (DTV mode)
1.
Press the
SOURCE
button on the top o f the
TV or the
SOURCE
button on the remote control
to display the Input source list.
2.
Press the
Ÿź
buttons to select the input
VRXUFHWKDW\RXZDQW'79$79$96&$57
<3E3U+'0,+'0,+'0,3&0(',$
3.
Press
ENTER
EXWWRQWRFRQ¿UP\RXUVHOHFWLRQ
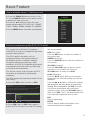
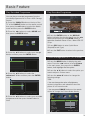
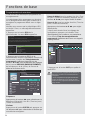
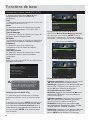
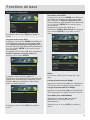
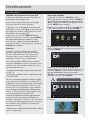
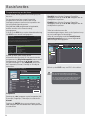
This system has an Electronic Programme
Guide (EPG) to help you navigate through all the
possible viewing options.
The EPG supplies information such as
programme listings, start and end times for
all available services. In addition, detailed
information about the programme is often
available in the EPG (the availability and amount
of programme information will vary, depending
on the particular broadcaster).
This function can be used only when the EPG
information is broadcast by broadcasting
companies.
The EPG displays the programme details for the
next 7 days.
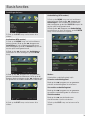
1.
Press the
EPG
button to switch on
EPG
.
2.
Press
EPG
button or
EXIT
button again to
switch off EPG and return to normal TV viewing.
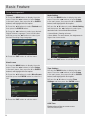
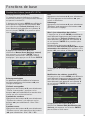
Info bar commands:
RED
(Prev. Date)
Press the
RED
button to view the schedule of
the previous day.
GREEN
(Next Date)
Press the
GREEN
button to view the schedule of
the next day.
YELLOW
(Schedule)
Press the
YELLOW
button to view the preset
reminders in the schedule list. Press the
YELLOW
button to return to the
EPG
.
BLUE
(Reminder)
Press the
BLUE
button while on the selected
programme, the Reminder setting menu will be
displayed.
Press the
ŻŹŸź
buttons to adjust the settings
DQGWKHQSUHVVWKH6DYHEXWWRQWRFRQ¿UPWKH
VHWWLQJV$IWHUFRQ¿UPDWLRQWKH
EPG
Schedule
List will then be displayed with your preset
reminders shown. Press the
YELLOW
button to
return to the
EPG
. The TV will automatically tune
to the selected programme when it starts.
REC
Timer Programming.
ENTER
Press to display detailed information of the
selected programme (if available).
SOURCE
DTV
ATV
AV
YPbPr
SCART
HDMI3
HDMI1
HDMI2
PC
MEDIA
Soure:Exit
Move
PROGRAM GUIDE
26 Dec 2008 10:00 - 26 Dec 2008 10:25 Big Cook Little Cook
Penguin: Cookey series with Big Cook Ben and foot-high Little Cook Small. Ben comes in to the cate
wearing flippers and a mask he’s found in the fancy dress box. [AD,S]
PrevDate NextDate Schedule Reminder
Rec: Record ENTER: Display EXIT: Exit
009 BBC FOUR
071 CBeebies
081 BBC Parliament
087 Community
301 301
302 302
10:00 Big Cook Little Cook
10:25 Bob the Builder
10:40 Me Too!
11:00 Something Special
11:15 Doodle Do
11:35 Our Planet
26 Dec 2008 10:21:43
[Children’s]

18
Basic Feature
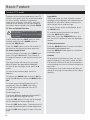
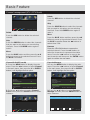
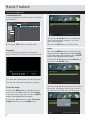
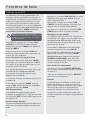
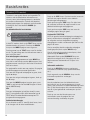
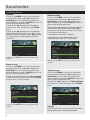
Teletext (ATV mode)
Teletext is a free service broadcast by some TV
stations which gives up-to-the-minute information
on news, weather, television programmes,
share prices and many other topics. Using the
Teletext control buttons you can view pages of
information that are listed in the teletext
INDEX
.
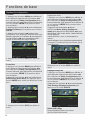
To Turn on Teletext Function
In ATV mode, press the
TEXT
button to enter
Teletext mode. Press the
INDEX
button to
display the
INDEX
page.
Press the
TEXT
button once to exit and the TV
will return to the channel you were watching.
To select a page of text
Find the number of the page in the
INDEX
and
enter it using the
0-9
buttons. The number of
the page will appear on the top left corner of the
screen.
The page counter will search for your page.
:KHQLW¿QGVLWWKHSDJHZLOOEHGLVSOD\HG
To move to the next page of text, press the
Ÿ
button.
To move to the previous page, press the
ź
button.
To return to the
INDEX
page, enter the “
100
” by
using the
0-9
buttons or press the
INDEX
button.
Mix
To view a page of text while watching a TV
programme, press the
TEXT
button twice.
The text will be superimposed over the TV
programme.
Double height text
,I\RXKDYHGLI¿FXOW\UHDGLQJWKHWH[WRQWKH79
you can double the height of the text.
Press the
SIZE
button. The top half of the page
will be displayed in double height text.
Press the
SIZE
button again. The bottom half of
the page will be displayed in double height text.
Press the
SIZE
button again to return to the full
page.
Page HOLD
If the page of text you have selected contains
subpages, these subpages will automatically be
displayed in order with a delay to allow you to
have enough time to read the page.
To stop the movie to the next sub page, press
the
HOLD
button.
To continue moving through the sub pages,
press the
HOLD
button again.
Alternative: Press the SUBPAGE button, and
then use the 0-9 buttons to enter a 4-digit page
number.
7R5HYHDO,QIRUPDWLRQ
Press the
REVEAL
button to reveal concealed
LQIRUPDWLRQTXL]DQVZHUVHWF
Press the
REVEAL
button again to conceal the
information again.
Fasttext
At the bottom of the teletext screen is a row of
subject headings in red, green, yellow and blue.
The remote control has a row of colour buttons
corresponding to the row of coloured subjects on
the screen.
Pressing one of the colour buttons will take you
directly to the page corresponding to the subject
heading.
Make sure the TV channel you are watching
transmits teletext.
“No Teletext” sign will show on the screen if teletext
is not available.

19
Basic Feature
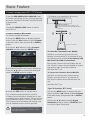
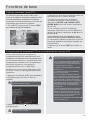
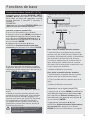
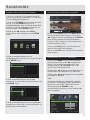
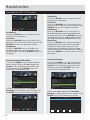
Digital Teletext (DTV mode)
Recording DTV Programme onto a USB Storage Device
Digital teletext can access special digital teletext
VHUYLFHVDQGVSHFL¿FVHUYLFHVZKLFKEURDGFDVW
GLJLWDOWHOHWH[W<RXZLOOQHHGWRWXUQRII6XEWLWOH
Function before using teletext.
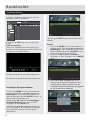
1.
In DTV mode, press the
TEXT
button to
display the teletext page.
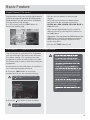
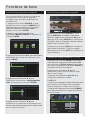
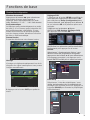
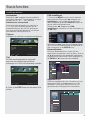
Use this function to record the DTV programme
you are watching on the main screen and save
it for future viewing. The recording from timer
programme or direct recording may have a little
bit of delay when it starts to record the broadcast
programme.
Please make sure the USB device is inserted. If
not, a warning message will pop up.
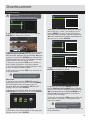
1.
Press the
Ɣ5(&
button to record the
programme that you are currently watching.
1.
Press the
Stop button to stop recording.
2.
Press the 0-9 buttons to select a page
number.
3.
Follow the instructions on digital teletext
and move onto the next step by pressing
(17(5ŻŹ5('*5((1<(//2:%/8(
or
0-9
buttons etc.
4.
To change digital teletext service, select a
different service by pressing the 0-9 buttons or
the
Ÿź
buttons.
$OWHUQDWLYH<RXPD\SUHVVWKH5('EXWWRQWRWKH
TEXT
button to display the teletext information
when you see a
Ɣ
red logo displayed on the
screen (e.g. BBC).
5.
Press the
TEXT
button to exit
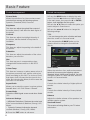
To display the recording information, press
the
REC button.
Recording will stop automatically when the
disk is full.
Recording
Recorded Time : 00 : 00 : 47
Available Time: 3837 Minute
16 QVC
A Traditional Christ
adapter is connected to the mains supply.
adapter is connected to the mains supply as the
total current consumption may exceed 500mA.
hard disk is 1 TB.
programme, the transfer rate of the USB storage
device must not be less than 5MB/s, otherwise
the picture and sound of the programme will be
affected and a warning statement will be shown
on the screen. If this happens, please upgrade
your USB storage device.
take time to start up and stabilise the connected
hard disk. This is normal and the starting time
may vary depending on the brand and the
memory size of the connected hard disk.
use.

20
Basic Feature
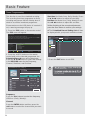
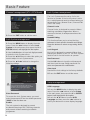
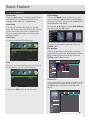
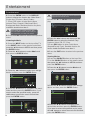
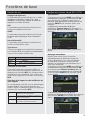
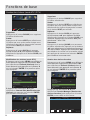
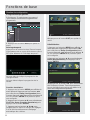
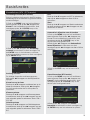
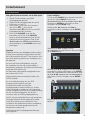
Timer Programming
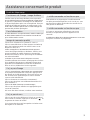
This function is used for scheduled recording.
The recording from timer programme or direct
recording may have a little bit of delay when it
starts to record the broadcast programme.
Please make sure the USB device is inserted. If
not, a warning message will pop up.
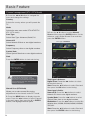
1. Press the
EPG
button on the remote control.
The
EPG
menu will appear.
2. Press the
Ɣ
(REC) button on the remote
control while on the selected programme, the
Scheduled Record
menu will be displayed.
Press the
ŸźŻŹ
buttons to select the settings
in the
RECORD
PHQXIRUWKH)UHTXHQF\
Channel, Start time, and End time.
Frequency
Press the
ŻŹ
EXWWRQVWRVHOHFWWKHIUHTXHQF\
(Off/Once / Daily / Weekly).
Channel
Press the
ENTER
button and then press the
Ÿź
buttons to select the channel that you want
to record.
Start time
(for Mode Once, Daily, Weekly) Press
the
ŸźŻŹ
buttons to adjust the start time.
End time
(for Mode Once, Daily, Weekly) Press
the
ŸźŻŹ
buttons to adjust the end time.
3.
$IWHU¿QLVKLQJDOOWKHUHFRUGHUDGMXVWPHQWV
SUHVVWKH6DYHEXWWRQWRFRQ¿UP\RXUVHWWLQJV
4.
The
Scheduled Record Setting List
will then
be displayed with your preset reminders shown.
5. Press the
EXIT
button to exit EPG.
Move
PROGRAM GUIDE
26 Dec 2008 10:00 - 26 Dec 2008 10:25 Big Cook Little Cook
Penguin: Cookey series with Big Cook Ben and foot-high Little Cook Small. Ben comes in to the cate
wearing flippers and a mask he’s found in the fancy dress box. [AD,S]
PrevDate NextDate Schedule Reminder
Rec: Record ENTER: Display EXIT: Exit
009 BBC FOUR
071 CBeebies
081 BBC Parliament
087 Community
301 301
302 302
10:00 Big Cook Little Cook
10:25 Bob the Builder
10:40 Me Too!
11:00 Something Special
11:15 Doodle Do
11:35 Our Planet
26 Dec 2008 10:21:43
[Children’s]
Delete One
Move Up
Move Down
Select
Return
Exit
Function
OK
MENU
EXIT
Frequency
Off
Off
Off
Off
Off
Off
Off
Off
Off
Off
Off
Off
Off
Off
Off
Off
Hot Key
Date
Scheduled Record
Scheduled Record Setting List
Standby
Delete All
Group
1
2
3
4
5
6
7
8
9
10
11
12
13
14
15
16
Channel
Start Time
Duration
10:03
25 Dec 2008 Thu.
Scheduled Record - Group 1
Move Up
Move Down
Adjust
Adjust
Select
Return
Exit
Hot Key
OK
MENU
EXIT
Setting Status
Setting Is Not In Use
Frequency Off
1 BBC ONE
2008-12-25
1 0 : 0 5
2008-12-25
1 0 : 1 5
Channel
Start Time
End Time
Save
recording automatically.
standby mode, the LED indicator will alternatively
flash red and blue.
La page est en cours de chargement...
La page est en cours de chargement...
La page est en cours de chargement...
La page est en cours de chargement...
La page est en cours de chargement...
La page est en cours de chargement...
La page est en cours de chargement...
La page est en cours de chargement...
La page est en cours de chargement...
La page est en cours de chargement...
La page est en cours de chargement...
La page est en cours de chargement...
La page est en cours de chargement...
La page est en cours de chargement...
La page est en cours de chargement...
La page est en cours de chargement...
La page est en cours de chargement...
La page est en cours de chargement...
La page est en cours de chargement...
La page est en cours de chargement...
La page est en cours de chargement...
La page est en cours de chargement...
La page est en cours de chargement...
La page est en cours de chargement...
La page est en cours de chargement...
La page est en cours de chargement...
La page est en cours de chargement...
La page est en cours de chargement...
La page est en cours de chargement...
La page est en cours de chargement...
La page est en cours de chargement...
La page est en cours de chargement...
La page est en cours de chargement...
La page est en cours de chargement...
La page est en cours de chargement...
La page est en cours de chargement...
La page est en cours de chargement...
La page est en cours de chargement...
La page est en cours de chargement...
La page est en cours de chargement...
La page est en cours de chargement...
La page est en cours de chargement...
La page est en cours de chargement...
La page est en cours de chargement...
La page est en cours de chargement...
La page est en cours de chargement...
La page est en cours de chargement...
La page est en cours de chargement...
La page est en cours de chargement...
La page est en cours de chargement...
La page est en cours de chargement...
La page est en cours de chargement...
La page est en cours de chargement...
La page est en cours de chargement...
La page est en cours de chargement...
La page est en cours de chargement...
La page est en cours de chargement...
La page est en cours de chargement...
La page est en cours de chargement...
La page est en cours de chargement...
La page est en cours de chargement...
La page est en cours de chargement...
La page est en cours de chargement...
La page est en cours de chargement...
La page est en cours de chargement...
La page est en cours de chargement...
La page est en cours de chargement...
La page est en cours de chargement...
La page est en cours de chargement...
La page est en cours de chargement...
La page est en cours de chargement...
La page est en cours de chargement...
La page est en cours de chargement...
La page est en cours de chargement...
La page est en cours de chargement...
La page est en cours de chargement...
La page est en cours de chargement...
La page est en cours de chargement...
La page est en cours de chargement...
La page est en cours de chargement...
La page est en cours de chargement...
La page est en cours de chargement...
La page est en cours de chargement...
La page est en cours de chargement...
La page est en cours de chargement...
La page est en cours de chargement...
La page est en cours de chargement...
La page est en cours de chargement...
La page est en cours de chargement...
La page est en cours de chargement...
La page est en cours de chargement...
La page est en cours de chargement...
La page est en cours de chargement...
La page est en cours de chargement...
La page est en cours de chargement...
La page est en cours de chargement...
La page est en cours de chargement...
-
 1
1
-
 2
2
-
 3
3
-
 4
4
-
 5
5
-
 6
6
-
 7
7
-
 8
8
-
 9
9
-
 10
10
-
 11
11
-
 12
12
-
 13
13
-
 14
14
-
 15
15
-
 16
16
-
 17
17
-
 18
18
-
 19
19
-
 20
20
-
 21
21
-
 22
22
-
 23
23
-
 24
24
-
 25
25
-
 26
26
-
 27
27
-
 28
28
-
 29
29
-
 30
30
-
 31
31
-
 32
32
-
 33
33
-
 34
34
-
 35
35
-
 36
36
-
 37
37
-
 38
38
-
 39
39
-
 40
40
-
 41
41
-
 42
42
-
 43
43
-
 44
44
-
 45
45
-
 46
46
-
 47
47
-
 48
48
-
 49
49
-
 50
50
-
 51
51
-
 52
52
-
 53
53
-
 54
54
-
 55
55
-
 56
56
-
 57
57
-
 58
58
-
 59
59
-
 60
60
-
 61
61
-
 62
62
-
 63
63
-
 64
64
-
 65
65
-
 66
66
-
 67
67
-
 68
68
-
 69
69
-
 70
70
-
 71
71
-
 72
72
-
 73
73
-
 74
74
-
 75
75
-
 76
76
-
 77
77
-
 78
78
-
 79
79
-
 80
80
-
 81
81
-
 82
82
-
 83
83
-
 84
84
-
 85
85
-
 86
86
-
 87
87
-
 88
88
-
 89
89
-
 90
90
-
 91
91
-
 92
92
-
 93
93
-
 94
94
-
 95
95
-
 96
96
-
 97
97
-
 98
98
-
 99
99
-
 100
100
-
 101
101
-
 102
102
-
 103
103
-
 104
104
-
 105
105
-
 106
106
-
 107
107
-
 108
108
-
 109
109
-
 110
110
-
 111
111
-
 112
112
-
 113
113
-
 114
114
-
 115
115
-
 116
116
-
 117
117


JVC LT-28HA82U Le manuel du propriétaire
- Catégorie
- Téléviseurs LCD
- Taper
- Le manuel du propriétaire
dans d''autres langues
- Nederlands: JVC LT-28HA82U de handleiding
Autres documents
-
Proline L1950HD LED Operating Instructions Manual
-
DGM ETV-2272WH Manuel utilisateur
-
Lenco LED-3213 Mode d'emploi
-
DGM LTV-1914WHTC Manuel utilisateur
-
Salora 24LCF-5000TDW Manuel utilisateur
-
-
Salora 55UHL2500 Manuel utilisateur
-
Panasonic TX-39DW334 Le manuel du propriétaire
-
Lenco DVT-229 Le manuel du propriétaire
-
Thomson 46FU5553W Le manuel du propriétaire