Sony Cordless Telephone SPP-ID971 Manuel utilisateur
- Catégorie
- Téléphones
- Taper
- Manuel utilisateur
Ce manuel convient également à

3-867-313-21 (1)
©1999 by Sony Corporation
FR
Operating Instructions
Mode d‘emploi
SPP-ID971
US
Cordless
Telephone

2
US
Caution: Users should not attempt to
make such connections themselves, but
should contact the appropriate electric
inspection authority, or electrician, as
appropriate.
NOTICE: The Ringer Equivalence
Number (REN) assigned to each
terminal device provides an indication
of the maximum number of terminal
allowed to be connected to a telephone
interface. The termination on an
interface may consist of any
combination of devices subject only to
the requirement that the sum of the
Ringer Equivalence Number of all the
devices does not exceed 5.
IMPORTANT INSTRUCTION TO
USERS
Your model (SPP-ID971) has been
approved by the Industry Canada.
Note
Operation is subject to the following two
conditions: (1) this device may not cause
interference, and (2) this device must
accept any interference, including
interference that may cause undesired
operation of the device.
Privacy of communications may not be
ensured when using this telephone.
DIGITAL SECURITY CODE
Your SPP-ID971 has been assigned a
permanent and unique digital security
code out of possible 16.8 million codes.
WARNING
To prevent fire or shock hazard, do
not expose the unit to rain or
moisture.
To avoid electrical shock, do not open
the cabinet. Refer servicing to
qualified personnel only.
INDUSTRY CANADA NOTICE
NOTICE: The Industry Canada label
identifies certified equipment. This
certification means that the equipment
meets certain telecommunications
network protective, operational and
safety requirements as prescribed in the
appropriate Terminal Equipment
Technical Requirements document(s).
The Department does not guarantee the
equipment will operate to the user’s
satisfaction.
Before installing this equipment, users
should ensure that it is permissible to be
connected to the facilities of the local
telecommunications company. The
equipment must also be installed using
an acceptable method of connection.
The customer should be aware that
compliance with the above conditions
may not prevent degradation of service
in some situations.
Repairs to certified equipment should be
coordinated by a representative
designated by the supplier. Any repairs
or alterations made by the user to this
equipment, or equipment malfunctions
may give the telecommunications
company cause to request the user to
disconnect the equipment.
Users should ensure for their own
protection that the electrical ground
connections of the power utility,
telephone lines and internal metallic
water pipe system, if present, are
connected together. This precaution may
be particularly important in rural areas.

3
US
Table of contents
Table of contents
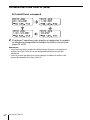
Getting Started
4 Read this first
5 Step 1: Checking the package
contents
6 Step 2: Setting up the base unit
9 Step 3: Preparing the battery
pack
11 Step 4: Entering the area code
14 Identifying the parts
Basics
16 Making calls
17 Redialing
18 Receiving calls
Telephone Features
19 Phone Directory
19 Storing phone numbers and
names
21 Changing a stored name
and/or phone number
22 Erasing a memory location
22 Making calls from the Phone
Directory
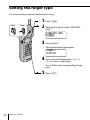
24 Setting the ringer type
25 Turning off the ringer of the
handset
26 Paging
Caller ID Features
27 Understanding the Caller ID
service
27 When you receive a call
28 Looking at the Caller ID list
28 Viewing the Caller ID list
29 Erasing data from the
Caller ID list
31 Using the Caller ID list
31 Calling back a number from
the Caller ID list
32 Storing a number of the
Caller ID list into the Phone
Directory
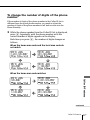
33 To change the number of
digits of the phone number
35 Using “Caller ID with Visual Call
Waiting” service
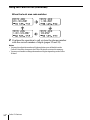
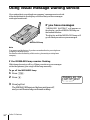
36 Using visual message waiting
service
Additional Information
38 Mounting the base unit on a wall
39 Notes on power sources
39 Maintenance
40 Troubleshooting
43 Specifications
44 Index
US

Getting Started
4
US
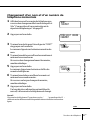
Getting Started
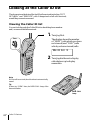
Base unit
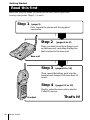
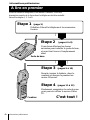
Read this first
Before you use your phone, you must first set it up. Here’s a quick way
to set up your phone: Steps 1, 2, 3 and 4.
Step 2 (pages 6 to 8)
Next, you need to do three things to set
up the base unit, including finding the
best location for the base unit.
Step 3 (pages 9 to 10)
Then, insert the battery pack into the
handset and charge it for more than 12
hours.
Step 4 (pages 11 to 13)
Finally, enter the area code to use the
Caller ID service.
First, unpack the phone and the supplied
accessories.
Step 1 (page 5)
That’s it!
Handset

Getting Started
5
US
Getting Started
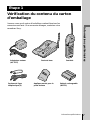
Telephone line cords (2)
HandsetAC power adaptor (AC-T127)
Wall bracket for base unit
Base unit
Rechargeable battery
pack (BP-T23)
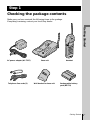
Step 1
Checking the package contents
Make sure you have received the following items in the package.
If anything is missing, contact your local Sony dealer.

Getting Started
6
US
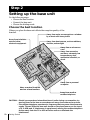
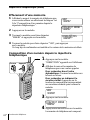
Step 2
Away from television
sets and other
electronic equipment
Away from a microwave
oven
Away from excessive
moisture, extremely low
temperatures, dust,
mechanical vibration, or
shock
Away from a personal
computer
Away from another
cordless telephone
Near a central location
and on a level surface
Away from heat sources, such as radiators,
airducts, and sunlight
Away from noise sources such as a window
by a street with heavy traffic
CAUTION: • Should you experience intermittent loss of audio during a conversation, try
moving closer to the base or move base unit away from other noise sources.
• The cordless telephone operates at a frequency that may cause interference to
nearby TVs and VCRs; the base unit should not be placed near or on the top of
a TV or VCR; and, if interference is experienced, moving the cordless telephone
farther away from the TV or VCR will often reduce or eliminate the
interference.
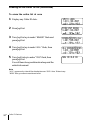
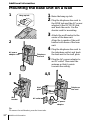
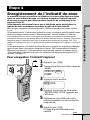
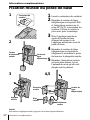
Setting up the base unit
Do the following steps:
• Choose the best location
• Connect the base unit
• Choose the dialing mode
Choose the best location
Where you place the base unit affects the reception quality of the
handset.

Getting Started
7
US
Getting Started
continued
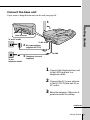
1 Connect the telephone line cord
to the LINE jack and to a
telephone outlet.
2 Connect the AC power adaptor
to the DC IN 9V jack and to an
AC outlet.
3 Raise the antenna. Make sure it
points towards the ceiling.
Connect the base unit
If you want to hang the base unit on the wall, see page 38.
Hook the cord.
To DC IN 9V
To LINE
To an AC outlet
To the
telephone outlet
3
Telephone line cord
(supplied)
1
AC power adaptor
(supplied AC-T127)
2

Getting Started
8
US
Notes
• Use only the supplied AC-T127 AC power adaptor.
Do not use any other AC power adaptor.
• Connect the AC power adaptor to a continuous power
supply.
• Place the base unit close to the AC outlet so that you
can unplug the AC power adaptor easily.
Tip
If your telephone outlet is not modular, contact your
telephone service company for assistance.
Choose the dialing mode
For the telephone to work properly, select an appropriate dialing mode
(tone or pulse).
Depending on your dialing system, set the DIAL MODE switch as
follows:
If your dialing system is Set the switch to
Tone TONE
Pulse PULSE
If you aren't sure of your dialing system
Make a trial call with the DIAL MODE switch set to TONE.
If the call connects, leave the switch as is; otherwise, set to PULSE.
Polarity of the plug
Step 2: Setting up the base unit (continued)
DIAL MODE switch
Modular
–
+

Getting Started
9
US
Getting Started
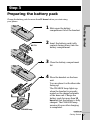
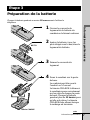
Preparing the battery pack
Charge the battery pack for more than 12 hours before you start using
your phone.
1 Slide open the battery
compartment lid of the handset.
2 Insert the battery pack (with
contacts facing down) into the
battery compartment.
3 Close the battery compartment
lid.
4 Place the handset on the base
unit.
You can place it with either side
facing up.
The CHARGE lamp lights up
when the handset is properly
seated on the charge terminals
of the base unit. Charge the
battery pack for more than 12
hours so that the battery is fully
charged. The CHARGE lamp
remains lit even after charging
is completed.
continued
Step 3
BP-T23
CHARGE lamp

Getting Started
10
US
Battery duration
A fully charged battery pack lasts for about:
• Approx. 6 hours when you use the handset continuously
• Approx. 7 days when the handset is in standby mode.
Notes
• The battery pack will gradually discharge over a long period of time, even
when not in use.
• If you leave the battery pack in the handset without charging it, the battery
pack will be completely discharged.
It may require several times of charging to recover to its full capacity.
To obtain the best performance from the battery
Do not place the handset on the base unit after each call. The battery
works best if the handset is returned to the base unit after two or three
calls. However, do not leave the handset off the base unit for a long
period of time as this will completely discharge the battery pack.
When to purchase a new battery pack
If the battery lasts only a few minutes even after 12 hours of charging,
the usable life of the battery has expired and needs replacement.
Contact your local Sony authorized dealer or service center, and ask
for a Sony BP-T23 rechargeable battery pack.
Note
Battery life may vary depending on usage condition and ambient temperature.
Step 3: Preparing the battery pack (continued)

Getting Started
11
US
Getting Started
Entering the area code
When you use this phone for the first time, or move to an area that has a
different area code, you must enter your home area code. Otherwise, you
cannot use some functions of this phone and the Caller ID functions.
This is also necessary because the phone must be able to select an area code to
properly dial call from the Caller ID list.
Depending on your region, enter 3-digit area code as follows:
Case 1.
If 7-digit dialing (no area code) is accepted for local calls in your area, see “To enter
your home area code” below.
If you live in an area where calls from or to other local areas can also be made by 10-digit dialing
(area code + number), you can register up to 5 local area codes with this telephone to take
advantage of this system. See “To enter the local area code (For 10 digits phone number users)”
on page 12.
Case 2.
If 10-digit dialing (area code + number) is required for all local calls in your area, at
first, enter “000” in your home area code. See “To enter your home area code” below.
Then see “To enter the local area code (For 10 digits phone number users)” on page
12.
To enter your home area code
1 Press (PGM).
2 Turn Jog Dial up to make “AREA”
flash.
3 Press Jog Dial.
4 Press Jog Dial again.
“ENTER AREA CODE” appears on
the display.
5 Enter three digits of your home area
code using the dialing keys.
6 Press (PGM).
You will hear a long confirmation
beep.
Step 4
DIRECTORY AREA
RINGER
HOME LOCAL
continued
Turn Press

Getting Started
12
US
Step 4: Entering the area code (continued)
Notes
• If the home area code is already entered, it appears on the display in step 4.
To enter a different home area code, see “To change the home area code”
below.
• Do not allow more than 20 seconds to elapse between each step of the
procedure.
Tips
• You may press Jog Dial instead of (PGM) in step 6.
• To check the current home area code, perform steps 1 to 4. The home area
code appears on the display for about 20 seconds.
To change the home area code
1 Perform steps 1 to 4 on page 11.
The current home area code appears on the display.
2 Turn Jog Dial down to erase the current home area code.
3 Enter a new home area code using the dialing keys.
4 Press (PGM).
You will hear a long confirmation beep.
To enter the local area code (For 10 digits
phone numbers users)
If a call matches one of the local area codes you entered, the phone
number will be registered with 10 digits in the Caller ID list (area code
+ number). If a call does not match one of the local area codes you
entered, the phone number will be registered with 11 digits in the
Caller ID list (1 + area code + number). Some regions of the country
allow you to have more than one local area code. (Up to five local area
codes can be entered in this phone.)
1 Perform steps 1 to 3 on page 11.
2 Turn Jog Dial up to make ”LOCAL“ flash.
3 Press Jog Dial.
4 Select the number (”#1“ to ”#5“) to enter the
local area code by turning Jog Dial.
HOME LOCAL
#1 #2 #3 #4 #5

Getting Started
13
US
Getting Started
Notes
• If the local area code is already entered, it appears on the display in step 5. To
enter a different local area code, see “To change the local area code” below.
• Do not allow more than 20 seconds to elapse between each step of the
procedure.
Tips
• You may press Jog Dial instead of (PGM) in step 7.
• To check the current local area code, perform steps 1 to 5. The local area code
appears on the display for about 20 seconds.
To change the local area code
1 Perform steps 1 to 5 on page 12.
The current local area code appears on the display.
2 Turn Jog Dial down to erase the current local area code.
3 Enter a new local area code using the dialing keys.
4 Press (PGM).
You will hear a long confirmation beep.
To erase the local area code
You can erase the local area code. Perform steps 1 and 2 above, then
press (PGM).
The local area code will be erased, and you hear a long confirmation
beep.
5 Press Jog Dial.
”ENTER AREA CODE“ appears on the
display.
6 Enter three digits of the local area code using the
dialing keys.
7 Press (PGM).
You will hear a long confirmation beep.

Getting Started
14
US
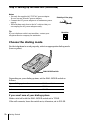
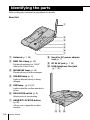
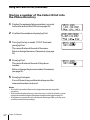
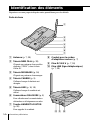
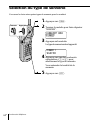
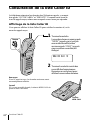
Identifying the parts
Refer to the pages indicated in parentheses for details.
Base Unit
1 Antenna (p. 7, 38)
2 NEW CALL lamp (p. 28)
Flashes when there is a “NEW”
data in the Caller ID list.
3 MESSAGES lamp (p. 36)
Flashes when you have messages.
4 CHARGE lamp (p. 9)
Lights while the battery is being
charged.
5 LINE lamp (p. 16, 18)
Lights when the cordless handset is
in use.
6 DIAL MODE switch (p. 8)
Selects pulse or tone dialing.
7 HANDSET LOCATOR button
(p. 26)
Allows you to page the cordless
handset.
8 Hook for AC power adaptor
cord (p. 7)
9 DC IN 9V jack (p. 7, 38)
0 LINE (telephone line) jack
(p. 7, 38)
5
1
2
3
4
6
7
098

Getting Started
15
US
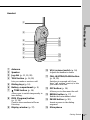
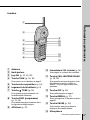
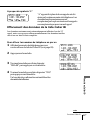
Getting Started
Handset
1
7
9
qa
qs
qd
qg
6
5
4
3
2
qf
0
8
1 Antenna
2 Speaker
3 Jog dial (p. 11, 19, 28)
4 TALK button (p. 16, 18)
Lets you make or receive a call.
5 Dialing keys (p. 16)
6 Battery compartment (p. 9)
7 TONE button (p. 16)
Allows you to switch temporarily to
tone dialing.
8 PGM (Program) button
(p. 11, 19)
Used to store numbers in Phone
Directory.
9 Display window (p. 27)
q; VOL (volume) switch (p. 16)
Adjusts the handset volume.
qa CALL WAITING/FLASH button
(p. 18, 35)
Switches to a second call if you
have “call waiting” service, or lets
you make a new call.
qs OFF button (p. 16)
Allows you to disconnect the call.
qd REDIAL button (p. 17)
Redials the last number called.
qf PAUSE button (p. 20)
Inserts a pause in the dialing
sequence.
qg Microphone

Basics
16
US
Do this
Set the VOL switch to H (high), M (middle) or L
(low).
Press (*TONE) after you’re connected.
The line will remain in tone dialing until
disconnected.
To
Adjust the handset volume
Switch to tone dialing
temporarily
1 Pick up the handset from the
base unit.
2 Press (TALK) and wait until
“TALK” appears on the display.
The display also shows the
operation duration in hours,
minutes and seconds.
The dialing keys light up for
five seconds.
You will then hear a dial tone.
The LINE lamp on the base unit
lights up.
If “CHANNEL SEARCHING”
appears on the display, move
closer to the base unit.
3 Dial the phone number.
4 When you’re done talking, press
(OFF) or replace the handset on
the base unit.
The display and the LINE lamp
on the base unit go off.
Basics
Making calls
Additional tasks
(REDIAL)
(*TONE)
VOL switch
Notes
• When you increase the sound volume, in some cases the back ground noise
may be increased as well. You should adjust the volume accordingly.
• If your conversation is muted and “CHANNEL SEARCHING” appears on
the display, move closer to the base unit; otherwise, the call will be
disconnected after one minute.

Basics
Basics 17
US
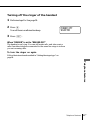
If the battery becomes weak during a call
The handset will beep every three seconds five times and i and
“BATTERY LOW” appears on the display. Finish your call and charge
the battery pack.
For optimum performance, charge the battery for a full 12 hours.
Note that during the first 10 - 15 minutes of charging, the phone will be
inactive, i.e., unable to make or receive a call.
After this initial 10 - 15 minutes, you may be able to use the phone, but
the battery duration will be very short; thus it is recommended that
you fully charge the battery before the next usage.
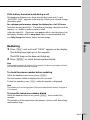
Redialing
1 Press (TALK) and wait until “TALK” appears on the display.
The dialing keys light up for five seconds.
The LINE lamp on the base unit lights up.
2 Press (REDIAL) to redial the last number dialed.
Note
If the number exceeds 32 digits or if it is erased, five short error beeps will alert
you that the number cannot be redialed.
To check the phone number before redialing
While the handset is not in use, press (REDIAL).
The last number dialed is displayed for five seconds.
To dial the number, press (TALK) while the number is displayed.
Note
The number will not be displayed if the last number dialed exceeds 32 digits or
if it is erased.
To erase the last phone number dialed
While the handset is not in use, press (REDIAL) twice within five
seconds.
The number will be erased from the memory, and you will hear a long
confirmation beep.

Basics
18
US
Note
If another call comes in by “call waiting” service while conversing with an
outside caller, you will hear two short beeps.
Tip
To inform you of an incoming call, the display shows “** RINGING **” when
ringing.
If you have subscribed to the Caller ID service;
• the caller’s number and/or name appears on the display when you receive a
call (see page 27) or when another call comes in by “call waiting” service.
• the ringer sound changes to a higher tone if the call matches the number
stored in the Phone Directory (memory match function; see page 27).
To
Adjust the handset volume
Switch to another call
(“call waiting” service*)
Turn on/off the ringer of
the handset
* You need to subscribe to the service from your telephone company.
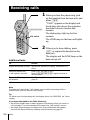
1 When you hear the phone ring, pick
up the handset from the base unit, and
press (TALK).
“TALK” appears on the display and
the display also shows the operation
duration in hours, minutes and
seconds.
The dialing keys light up for five
seconds.
The LINE lamp on the base unit lights
up.
2 When you’re done talking, press
(OFF) or replace the handset on the
base unit.
The display and the LINE lamp on the
base unit go off.
Receiving calls
Additional tasks
VOL switch
(CALL WAITING/FLASH)
Do this
Set the VOL switch to H (high), M (middle) or L
(low).
Press (CALL WAITING/ FLASH).
Press (CALL WAITING/ FLASH) again to return to
the first caller.
See “Turning off the ringer of the handset” on
page 25.

Telephone Features
19
US
Telephone Features
You can dial a number by scrolling through the Phone Directory, in
which up to 50 phone numbers can be stored.
Storing phone numbers and names
Example: to store “SONY” “123-4567”.
1 Press (PGM).
(Be sure not to press (TALK).)
The dialing keys light up for five
seconds.
If “DIRECTORY” is not flashing, turn
Jog Dial down to make it flash.
2 Press Jog Dial.
“ENTER NAME” appears.
3 Enter the name using the dialing keys.
You can enter up to 16 characters.
Press a dialing key until the desired
character appears. (See the character
table for details.)
Enter successive characters in the same
way.
To enter two characters assigned to the
same key, or to enter a “space”, turn
Jog Dial up to move the cursor to the
right.
Example: to enter “SONY”, press (7)
four times (S), press (6) three times
(O), turn Jog Dial up to move the
cursor, press (6) twice (N), and press
(9) three times (Y).
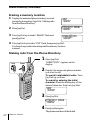
Phone Directory
DIRECTORY AREA
RINGER
SON
Y
Character table
Key Character
(1) 1
(2) A t B t C t 2
(3) D t E t F t 3
(4) G t H t I t 4
(5) J t K t L t 5
(6) M t N t O t 6
(7) P t Q t R t S t 7
(8) T t U t V t 8
(9) W t X t Y t Z t 9
(0) 0
(*) *
(#) & t ’ t , t – t . t #
Telephone Features
continued
Turn Press
(PAUSE)

20
US
Telephone Features
Phone Directory (continued)
4 Press (PGM).
“ENTER NUMBER” appears.
5 Enter the phone number.
You can enter up to 32 digits, including a tone
and a pause, each of which is counted as one
digit.
When the phone number of 17 digits or more
has been entered , the phone number appears in
two lines.
6 Press (PGM).
You will hear a long confirmation beep, and the
name and the number are stored. The display
goes off.
Notes
• If you intend to save a 51st phone number, you will hear five short error
beeps and “MEMORY FULL” will be displayed. You cannot store the phone
number. To store another phone number, erase one of the stored phone
numbers (see page 22).
• Do not allow more than 20 seconds to elapse between each step of the
procedure.
• The total number of phone numbers which can be stored into the Phone
Directory varies according to the number of digits of each phone number. If
all the phone numbers consist of up to 16 digits, you can store up to 50 phone
numbers. However, as the Phone Directory uses two-phone number memory
to store one phone number of 17 digits or more, the total number of phone
numbers which can be stored in the Phone Directory decreases two by two
every time you store a phone number of 17 digits or more.
Tips
• If you have entered a wrong name or number in step 3 or 5, turn Jog Dial
down to erase it. Then enter the correct name or number.
• You may press Jog Dial instead of (PGM) in steps 4 and 6.
To store a number to be dialed via Private Branch Exchange
(PBX)
Before entering a phone number in step 5 above, do as follows:
1 Enter the outside line access digit (e.g., 9).
2 Press (PAUSE).
SONY
123456
7
1234567890123456
1
2
La page charge ...
La page charge ...
La page charge ...
La page charge ...
La page charge ...
La page charge ...
La page charge ...
La page charge ...
La page charge ...
La page charge ...
La page charge ...
La page charge ...
La page charge ...
La page charge ...
La page charge ...
La page charge ...
La page charge ...
La page charge ...
La page charge ...
La page charge ...
La page charge ...
La page charge ...
La page charge ...
La page charge ...
La page charge ...
La page charge ...
La page charge ...
La page charge ...
La page charge ...
La page charge ...
La page charge ...
La page charge ...
La page charge ...
La page charge ...
La page charge ...
La page charge ...
La page charge ...
La page charge ...
La page charge ...
La page charge ...
La page charge ...
La page charge ...
La page charge ...
La page charge ...
La page charge ...
La page charge ...
La page charge ...
La page charge ...
La page charge ...
La page charge ...
La page charge ...
La page charge ...
La page charge ...
La page charge ...
La page charge ...
La page charge ...
La page charge ...
La page charge ...
La page charge ...
La page charge ...
La page charge ...
La page charge ...
La page charge ...
La page charge ...
La page charge ...
La page charge ...
La page charge ...
La page charge ...
-
 1
1
-
 2
2
-
 3
3
-
 4
4
-
 5
5
-
 6
6
-
 7
7
-
 8
8
-
 9
9
-
 10
10
-
 11
11
-
 12
12
-
 13
13
-
 14
14
-
 15
15
-
 16
16
-
 17
17
-
 18
18
-
 19
19
-
 20
20
-
 21
21
-
 22
22
-
 23
23
-
 24
24
-
 25
25
-
 26
26
-
 27
27
-
 28
28
-
 29
29
-
 30
30
-
 31
31
-
 32
32
-
 33
33
-
 34
34
-
 35
35
-
 36
36
-
 37
37
-
 38
38
-
 39
39
-
 40
40
-
 41
41
-
 42
42
-
 43
43
-
 44
44
-
 45
45
-
 46
46
-
 47
47
-
 48
48
-
 49
49
-
 50
50
-
 51
51
-
 52
52
-
 53
53
-
 54
54
-
 55
55
-
 56
56
-
 57
57
-
 58
58
-
 59
59
-
 60
60
-
 61
61
-
 62
62
-
 63
63
-
 64
64
-
 65
65
-
 66
66
-
 67
67
-
 68
68
-
 69
69
-
 70
70
-
 71
71
-
 72
72
-
 73
73
-
 74
74
-
 75
75
-
 76
76
-
 77
77
-
 78
78
-
 79
79
-
 80
80
-
 81
81
-
 82
82
-
 83
83
-
 84
84
-
 85
85
-
 86
86
-
 87
87
-
 88
88


Sony Cordless Telephone SPP-ID971 Manuel utilisateur
- Catégorie
- Téléphones
- Taper
- Manuel utilisateur
- Ce manuel convient également à
dans d''autres langues
Documents connexes
Autres documents
-
VTech LS6185-13 Manuel utilisateur
-
VTech LS6195-17 Manuel utilisateur
-
Motorola B801 Manuel utilisateur
-
AT&T CL81211 Manuel utilisateur
-
AT&T CRL81112 Manuel utilisateur
-
VTech DS6511-2 Manuel utilisateur
-
-
Geemarc AMPLIPOWER40 Mode d'emploi
-
Geemarc PhotoPhone Manuel utilisateur
-
ClearSounds Geemarc PhotoPHONE 100 Manuel utilisateur