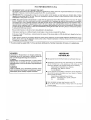
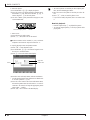
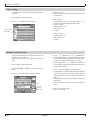
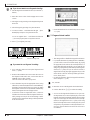
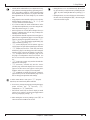
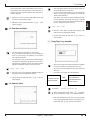
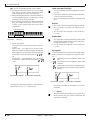
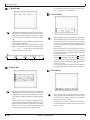
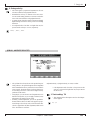
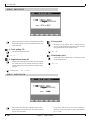
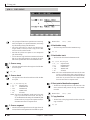
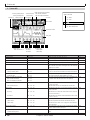
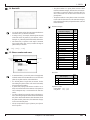
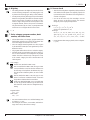
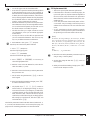
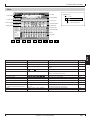
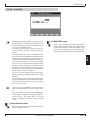
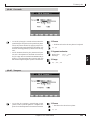
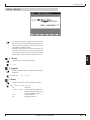
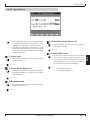
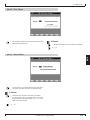
Yamaha QY700 Manuel utilisateur
- Catégorie
- Pianos numériques
- Taper
- Manuel utilisateur


3
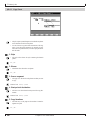
Reference
Introduction
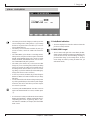
Thank you for purchasing the Yamaha QY700 music sequencer.
The QY700 is a 20 song / 32 track sequencer with 1/480th quarter note resolution featuring a built-in XG- and GM-compatible high-
quality AWM2 tone generator, all contained in a newly-designed package. The Style Sequencer functions that were so popular on the
QY300 etc. have been enhanced and made easier to use. A large LCD display also makes operation easier and more intuitive.
In order to take full advantage of the QY700’s functionality, please make good use of this owner’s manual. Once you have read it, keep it
in a safe and convenient place for reference should any questions arise later.
Owner’s Manual

4
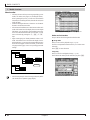
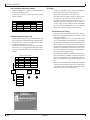
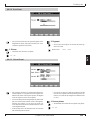
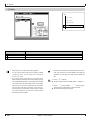
Features of the QY700
Features of the QY700
Powerful sequencer functionality
The sequencer of the QY700 provides 32 sequence tracks and 16 pattern tracks, and up to 110,000 notes of storage
capacity for professional-level sequencing power. Note timing resolution is 1/480th of a quarter note. Memory is
backed up, so your data will not disappear when the power is turned off. Play Effect functions and a full complement
of editing jobs allow you to edit and modify your data as desired. Play Effects provide a Groove Quantize function that
lets you instantly produce a variety of different groove feelings. Also provided are jobs such as Chord Sort and Chord
Separate, convenient for entering guitar strokes.
Functional music production environment with Songs, Patterns, and Phrases
The QY700’s Auto-Accompaniment functionality provides a highly practical music production environment that lets
you use patterns and phrases to create your song.
Easy operation with large display, dials, function buttons, and direct buttons
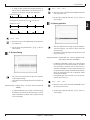
The large 320 × 240 dot full-graphic display provides you with plenty of information for efficient music-making. For
example, playback data can be viewed not only as an event list, but also graphically in a track-view or piano-roll
display.
The jog dial provides an easy way to modify data, and the shuttle dial lets you rewind/fast-forward intuitively through
data just as on a VTR.
Full assortment of preset phrases
The QY700 provides a vast 3,876 types of preset phrases from all musical genres. All preset phrases have been care-
fully selected for immediate musical usefulness. Simply by combining preset phrases into patterns, you can create
backing data with infinite variety.
Undo/redo function
The QY700 provides an Undo/Redo job. Even if recording, editing, or job execution has caused your important data to
disappear, you will always be able to recover it.

5
Features of the QY700
XG tone generator for rich expressiveness
The QY700 features an XG-compatible tone generator with 491 high-quality voices and 3 high-quality effect systems,
providing the rich expressiveness that you expect from XG.
Wide range of compatibility
The QY700’s tone generator section is compatible with XG and with the GM system level 1 tone generator format. The
sequencer section is compatible with ESEQ and SMF (Standard MIDI File) formats 0/1. Playback data that was
created on the QS300 music synthesizer can also be played back on the QY700. You can also playback commercially
available “XG-compatible song data” for additional enjoyment.
GM System Level 1
“GM System Level 1” is a standard specification that defines the arrangement of voices in a tone generator and its
MIDI functionality, ensuring that data can be played back with substantially the same sounds on any GM-compatible
tone generator, regardless of its manufacturer or model.
Tone generators and song data that meet the “GM System Level 1” bear this GM logo.
XG
“XG” is a tone generator format that expands the voice arrangement of the “GM System Level 1” specification to meet
the ever-increasing demands of today’s computer peripheral environment, providing richer expressive power while
maintaining upward compatibility of data. “XG” greatly expands “GM System Level 1” by defining the ways in which
voices are expanded or edited and the structure and type of effects.
When commercially available song data bearing the XG logo is played back on a tone generator which bears the XG
logo, you will enjoy a full musical experience that includes unlimited expansion voices and effect functions.

6
How to use the manuals
How to use the manuals
The documentation for the QY700 consists of the following two manuals. Understand the role of each manual, and refer to them as necessary.
Owner’s Manual: Reference (this manual)
This explains precautions for use, how to make connections, and all parameters and commands. Use this manual like a dictionary whenever
you need to.
Chapter 1. BASIC CONCEPTS
Chapter 2. SONG MODE
Chapter 3. VOICE MODE
Chapter 4. EFFECT MODE
Chapter 5. PATTERN MODE
Chapter 6. UTILITY MODE
Chapter 7. DISK MODE
“Song mode” and “Pattern mode” have several functions in common.
In this manual, explanations for these common functions is given in greatest detail in chapter 2 “SONG MODE”. Some of the overlapping
explanation in chapter 5 “PATTERN MODE” is omitted. In such cases, the appropriate page of chapter 2 “SONG MODE” is indicated so that
you can refer to it.
Owner’s Manual: QY700 Reference Listings
This is a booklet that contains various lists such as the Voice list, Preset Phrase list, Effect list, Chord Type list, MIDI data format, and MIDI
implementation chart.
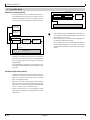
Printing conventions in this manual
This manual uses the following icons to indicate buttons and to distinguish different types of information.
s This indicates a panel button. The characters in the box indicate the characters printed on the panel. Buttons for which there are no
characters printed on the panel are indicated by the symbol printed on the panel, such as l. In the case of the function buttons 1
– 6, the function corresponding to each button is also given; for example, 3 (Effect).
[Explanation]
This icon indicates an explanation of the function.
0101
1101
[Setting values]
This icon indicates the range of values that can be set for that function.

7
[Procedure]
This icon indicates the actual procedure for using the function.
[Supplementary comments]
This icon indicates supplementary explanations related to the function, examples of use, and hints.
[Caution]
This icon indicates a caution. To avoid erasing or damaging important data, be sure to read such sections.
+ This icon means that an operation needs to be performed while doing something else. For example, s + y means “hold down
s and press y”.
/ This icon means “or”. For example,n/ymeans that you should press either thenor theykey.
→ This icon indicates the sequence in which buttons must be pressed. For example, numeric keys → e means that you must use the
numeric keys to select a value and then press the e button.
▼ This icon indicates the result of an operation.
→ p.● ● This indicates the page on which a related function or item is explained. Refer to these pages as necessary.
Printing conventions in this manual

8
Finding the information that you need
Finding the information that you need
In order to find the information that you need, you can make use of the following pages.
Table of contents (→ p.9)
Locate the desired information within the flow of the entire manual.
Front and rear panels (→ p.12)
Here you can read about the name and location of each button and control, and read about their function.
Function tree (→ p.34)
This lets you locate the desired information within the structure of the command hierarchy.
Glossary (→ p.324)
This section contains unfamiliar terms or phrases in alphabetical order with their explanations.
Index (→ p.328)
This lets you search alphabetically for unfamiliar terms to find pages on which they are discussed and pages on which related topics appear.

9
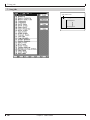
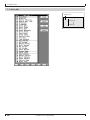
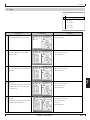
Table of contents
Table of contents
Introduction
Features of the QY700........................................................................................................................................................................................4
How to use the manuals......................................................................................................................................................................................6
Printing conventions in this manual ...................................................................................................................................................................6
Finding the information that you need ...............................................................................................................................................................8
SETUP
1. Front and rear panels ...................................................................................................................................................................................12
Top panel................................................................................................................................................................................12
Rear panel ..............................................................................................................................................................................16
Floppy disk drive ...................................................................................................................................................................17
2. Connections.................................................................................................................................................................................................18
Power supply connections......................................................................................................................................................18
Audio equipment connections ...............................................................................................................................................19
Connecting a foot switch .......................................................................................................................................................20
Connecting external MIDI devices ........................................................................................................................................20
Connecting an MTR (multi-track recorder)...........................................................................................................................21
Connecting two or more devices............................................................................................................................................21
3. Using the Style and Demonstration disk .....................................................................................................................................................22
Contents of the disk ...............................................................................................................................................................22
Listening to the demo playback .............................................................................................................................................22
Restoring the factory settings ................................................................................................................................................23
Chapter 1. BASIC CONCEPTS
1. Mode structure ............................................................................................................................................................................................26
2. Function tree................................................................................................................................................................................................34
3. How the QY700 is organized ......................................................................................................................................................................36
4. Sequencer block ..........................................................................................................................................................................................37
5. The tone generator block.............................................................................................................................................................................43
6. Controller block ..........................................................................................................................................................................................46
7. Effect block .................................................................................................................................................................................................47
8. Basic operation............................................................................................................................................................................................51
9. Song creation procedure..............................................................................................................................................................................56
Create pattrens .......................................................................................................................................................................57
Editing a pattern.....................................................................................................................................................................59
Pattern track recording...........................................................................................................................................................60
Chord track recording ............................................................................................................................................................61
Voice settings .........................................................................................................................................................................62
Realtime record of track 2 .....................................................................................................................................................62
Step recording of track 1........................................................................................................................................................63
Editing tracks 1 and 2 ............................................................................................................................................................65
Modifying the voice of track 1 ..............................................................................................................................................66
Save to floppy disk.................................................................................................................................................................67
Chapter 2. SONG MODE
SONG MODE Overview ..................................................................................................................................................................................70
1. SONG PLAY ...............................................................................................................................................................................................72
2. Play Effects ..................................................................................................................................................................................................80
Groove Quantizing .................................................................................................................................................................82
Clock Shift, Gate Time, and Velocity ....................................................................................................................................90
Transposition..........................................................................................................................................................................94
Drum Table Edit.....................................................................................................................................................................97
3. Track View ................................................................................................................................................................................................100
4. Output Channels........................................................................................................................................................................................103

10
Table of contents
5. Song Recording .........................................................................................................................................................................................106
Recording Standby...............................................................................................................................................................108
Realtime Recording: Sequence Tracks (TR1,...,TR32) .......................................................................................................112
Realtime Recording: PATTERN Track................................................................................................................................113
Realtime Recording: CHORD Track ...................................................................................................................................115
Realtime Recording: TEMPO Track....................................................................................................................................117
Punch Recording..................................................................................................................................................................118
Step Recording: Sequence Tracks (TR1,...,TR32)...............................................................................................................120
Step Recording: PATTERN track ........................................................................................................................................125
Step Recording: CHORD track............................................................................................................................................127
6. Song Editing..............................................................................................................................................................................................129
1 (Graphic) Graphic screen .......................................................................................................................................135
7. Song Jobs ..................................................................................................................................................................................................138
Chapter 3. VOICE MODE
About voice mode...........................................................................................................................................................................................168
1. Mixer .........................................................................................................................................................................................................170
2. Tune...........................................................................................................................................................................................................174
3. Voice edit...................................................................................................................................................................................................176
4. Drum Setup Edit........................................................................................................................................................................................182
Chapter 4. EFFECT MODE
About effect mode ..........................................................................................................................................................................................188
1. Connection ................................................................................................................................................................................................190
2. Reverb edit, Chorus edit, Variation edit ....................................................................................................................................................193
Chapter 5. PATTERN MODE
PATTERN MODE Overview..........................................................................................................................................................................198
1. PATCH ......................................................................................................................................................................................................200
Phrase Table .........................................................................................................................................................................209
2. Play Effects ...............................................................................................................................................................................................212
Groove Quantizing ...............................................................................................................................................................214
Clock Shift, Gate Time, and Velocity ..................................................................................................................................217
Transposition........................................................................................................................................................................219
Drum Table Edit ...................................................................................................................................................................222
3. Pattern Voice submode ..............................................................................................................................................................................225
Mixer....................................................................................................................................................................................227
Voice Edit.............................................................................................................................................................................232
Drum-Setup Edit ..................................................................................................................................................................235
4. Pattern Effects ...........................................................................................................................................................................................239
Connection ...........................................................................................................................................................................241
Reverb Edit, Chorus Edit, and Variation Edit ......................................................................................................................244
5. Phrase Recording ......................................................................................................................................................................................247
Recording Standby...............................................................................................................................................................248
Realtime Recording .............................................................................................................................................................252
Step Recording.....................................................................................................................................................................253
6. Phrase Editing ...........................................................................................................................................................................................254
7. Pattern Jobs ...............................................................................................................................................................................................256
Chapter 6. UTILITY MODE
About Utility mode.........................................................................................................................................................................................288
1. System .......................................................................................................................................................................................................289
2. MIDI..........................................................................................................................................................................................................291
3. MIDI filter .................................................................................................................................................................................................293
4. Sequencer ..................................................................................................................................................................................................295
5. Click ..........................................................................................................................................................................................................297
6. Fingered chord zone ..................................................................................................................................................................................299

11
Table of contents
Chapter 7. DISK MODE
About floppy disks..........................................................................................................................................................................................302
About Disk mode............................................................................................................................................................................................304
1. Save ...........................................................................................................................................................................................................307
2. Load...........................................................................................................................................................................................................310
3. Rename......................................................................................................................................................................................................312
4. Delete ........................................................................................................................................................................................................314
5. Format .......................................................................................................................................................................................................316
APPENDIX
1. Specifications ............................................................................................................................................................................................318
2. Troubleshooting ........................................................................................................................................................................................320
3. Error messages ..........................................................................................................................................................................................322
4. Glossary.....................................................................................................................................................................................................324
5. Index..........................................................................................................................................................................................................328

12
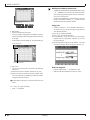
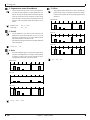
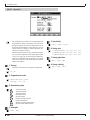
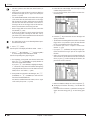
SETUP
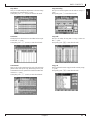
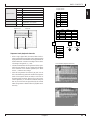
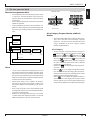
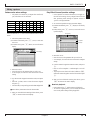
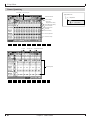
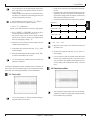
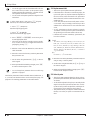
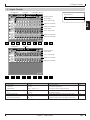
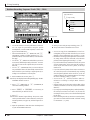
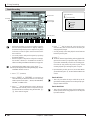
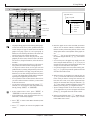
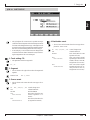
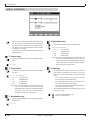
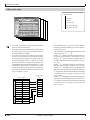
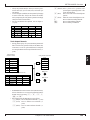
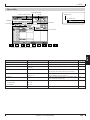
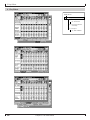
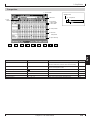
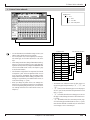
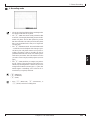
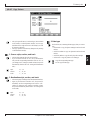
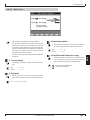
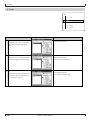
1. Front and rear panels
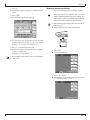
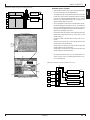
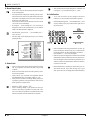
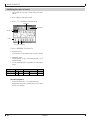
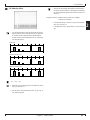
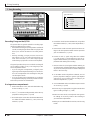
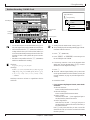
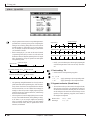
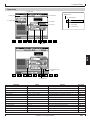
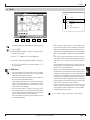
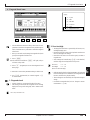
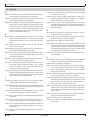
Top panel
1. PITCH wheel
This controller is used to continuously modify the pitch or tone etc. while you play. The controller will return to the center position when you
release it. (→ p.290)
2. ASSIGNABLE wheel
This controller is used to continuously modify the tone etc. while you play. You can specify how this controller will affect the sound. (→ p.290)
3. Mode keys
Use these buttons to switch between modes.
s key
Switch to Song mode. (→ p.70)
p key
Switch to Pattern mode. (→ p.198)
u key
Switch to Utility mode. (→ p.288)
v key
Switch to Voice mode. (→ p.168)
e key
Switch to Effect mode. (→ p.188)
d key
Switch to Disk mode. (→ p.302)
7. PLAY indicator
CONTRAST
OUT BOUT AIN B
IN B
MIDI
MIDI
OUT BOUT A
IN A
IN A
PLAYREC
VOICE
SHIFT F1 F2 F3 F4 F5 F6 SHIFT EXIT
MAX
VOLUME
EFFECT
DISK
SONG
PITCH ASSIGNABLE
PATTERN
UTILITY
FOOT SWRL/MONO
OUTPUT
MUSIC SEQUENCER
1. PITCH wheel 13. MIDI Data monitors
2. ASSIGNABLE wheel 8. LCD display
3. Mode keys
4. VOLUME control
5. CONTRAST control
14. Shuttle dial
15. Data dial
6. REC (recording) indicator
11. EXIT key
10. Function keys
9. SHIFT key
12. Direct Cursor
keys

13
SETUP
4. VOLUME control
Use this to adjust the volume of the output jacks and the headphone jack.
5. CONTRAST control
Use this to adjust the contrast of the display.
6. REC (recording) indicator
This indicator will light when the e key is pressed, indicating that you are in recording mode.
7. PLAY indicator
During playback, this indicator will blink in time with the tempo.
8. LCD display
Various types of information are displayed in this 320 x 240 pixel backlit liquid crystal display. The time after which the backlight will
automatically turn off can be set in Utility mode. (→ p.289)
9. s key
This button works in conjunction with other keys to perform various functions.
10.1–6 function keys
Use these keys to select from the menu that appears in the bottom line of the screen.
11.e key
This key moves from a sub mode or page display to the next higher level in the command hierarchy.
12.d [D1] –d [D5] direct keys
Use these keys to move the cursor to the setting items that are shown in the right side of the display.
13.MIDI Data monitors
The corresponding indicator will blink when MIDI data is transmitted or received at the four MIDI connectors (IN-A, IN-B, OUT-A, OUT-B).
This provides a way to confirm MIDI communications.
(Note) Since MIDI Clock messages are normally being transmitted, the MIDI OUT-A/B indicators will be blinking lightly.
14.Shuttle dial
Use this to fast-forward or rewind songs or patterns. Depending on the angle to which you rotate the dial, the speed of fast-forward or rewind
will change in four steps.
15.Data dial
Use this to select voices or to continuously increase/decrease a numerical value.

14
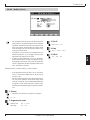
SETUP
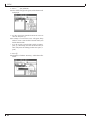
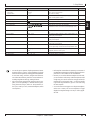
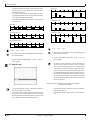
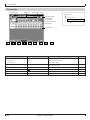
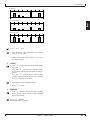
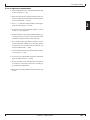
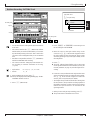
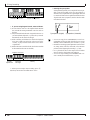
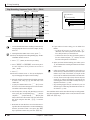
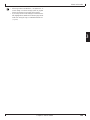
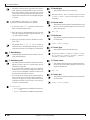
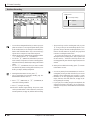
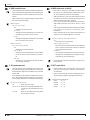
16.Sequencer keys
Use these keys to playback or record songs, patterns, and phrases. The layout of the buttons is similar to that of a conventional tape recorder.
t (Top) Return to the first measure of a song or pattern.
r (Rewind) Rewind the playback measure.
f (Forward) Advance the playback measure.
e (Recording) Enter recording standby mode.
s (Stop) Stop playback/recording.
p (Play) Begin playback/recording.
17.e key
Switch to Song Edit (→ p.129) or Phrase Edit (→ p.254).
18.j key
Access the Song jobs (→ p.138) or Pattern jobs (→ p.256).
19.1 (Locate 1) key
2 (Locate 2) key
In Song mode, these keys are used to move to a previously specified measure. Use s + 1/2 to store the current measure in the
corresponding locate key.
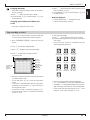
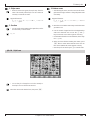
OCT
DOWN
OCT
UP
OCT
DOWN
OCT
UP
ON
BASS
F
#
E
FGAB C
D
M
add9
M7
add9
a
m
mM7
m6
c
C
#
D
#
REST
TRACK
DOWN
TRACK
UP
SOLOMUTE
EDIT JOB
LOC 2LOC 1
TIE
7
(
#
5)
7
(
b
5)
7
(
#
9)
7
sus4
sus4
SECTION
A
G
b
D
b
E
b
7
(
b
9)
m7
(
b
5
)
M7
(9)
6
6
(9)
7
7
(9)
m7
(9)
m7
dim
ZWV
/
HGF
UTSRQPO
#
N
CBA
?
MLK
_
!
S
%
&
E
)
D
(
_
YX
aug
7
(
b
13
)
7
(13)
7
(
#
11)
JI
m7
(11)
ORG
BASS
CAPS
SHIFT
SPACE
3
DEL
YESNO
c
G
#
A
b
A
#
B
b
789
456
123
0
-
-1 +1
3
B C D E F G H
16. Sequencer keys 18. JOB key
19. Locate keys 20. Track keys
22. Decrement key, Increment key
17. EDIT key
21. Cursor keys 23. Numeric keypad
24. Enter key26. Microkeyboard25. Octave keys 25. Octave keys

15
SETUP
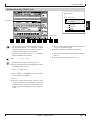
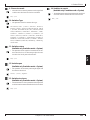
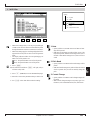
20.Track keys
Use these keys to change the currently selected track, or to mute or solo specific tracks.
d key These keys switch the currently selected track.
u key
m key This mutes the playback of the currently selected track. Press the key once again to un-
mute the track.
s key This mutes the playback of all tracks other than the selected track. Press the key once
again to restore playback of the other tracks. Use this button when you want to hear only
the selected track.
21.Cursor keys
Use these keys to move the cursor location within the display.
22.n (Decrement) key
y (Increment) key
In various setting displays you can use these buttons to increase (increment) / decrease (decrement) values, or switch settings on/off. These
keys are also used to reply YES or NO to an “Are you sure?” prompt.
23.Numeric keypad
Use these to enter numerical values or note values.
24.e (Enter) key
Use this key to finalize a number entered by the numeric keypad, to enter the job selected by the cursor, or to execute a job etc.
25.Octave keys
These keys modify the pitch of the microkeyboard in steps of an octave.
In addition, the left octave button sets On Bass or Original Bass for a chord, and the right octave button sets chord Syncopation.
d[OCT DOWN] (Octave Down) key Lowers the pitch of the keyboard buttons in one-octave steps.
u[OCT UP] (Octave Up) key Raises the pitch of the keyboard buttons in one-octave steps.
26.Microkeyboard
These function as a keyboard for entering your performance. They are not sensitive to velocity or aftertouch. The microkeyboard are also used
to specify chords and pattern sections, and to input characters.

16
SETUP
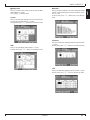
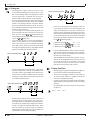
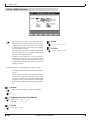
Rear panel
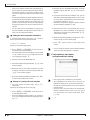
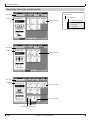
1. MIDI connectors
These connectors are used to connect external MIDI devices via a MIDI cable. There are four MIDI connectors: IN-A, IN-B, OUT-A, and
OUT-B. IN-A and IN-B are inputs, and OUT-A and OUT-B are outputs. (→ p.20)
2. FOOT SW (Foot switch) jack
A foot switch (FC4, FC5: option) can be connected to this jack. A connected foot switch can be used during performance as a sustain pedal or
as a start/stop switch. (→ p.290)
3. OUTPUT jacks
These jacks are for line connections to powered speakers or a mixer. When playing in stereo, connect both jacks. When playing in mono,
connect the L/MONO jack. (→ p.19)
4. PHONES (Headphones) jack
A set of headphones with a stereo phone plug can be connected to this jack. (HPE-170 or other Yamaha recommended headphones: impedance
8 – 150 ohms.) The headphone volume is adjusted by the Volume control. (→ p.19)
5. DC IN (Power supply) jack
Connect the included PA-5B AC adaptor to this jack. (→ p.18)
• Before connecting the AC adaptor, make sure that the power switch of the QY700 is turned off. First connect the AC adaptor
to the power supply jack, and then plug it into an AC outlet.
• Use only the included PA-5B AC adaptor. Using other AC adaptors will cause malfunctions. Also, be sure to unplug the AC
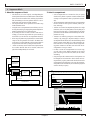
adaptor from the AC outlet if you will not be using the unit for an extended period of time.
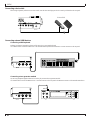
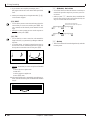
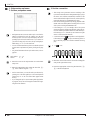
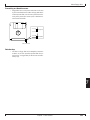
6. Cable clip
Wrap the AC adaptor power cable around this clip as shown in the diagram. This will decrease the possibility of the power cable being pulled
out accidentally.
7. POWER switch
This switch turns the power on/off. The power is on when the switch is pressed in. (→ p.18)
POWER
ON
INDCPHONESL/MONORSWFOOT
IN-AIN-BOUT-AOUT-B
MIDI
OUTPUT
OFF
1. MIDI connectors
3. OUTPUT jacks
2. FOOT SW (Foot switch) jack
5. DC IN (Power supply) jack
7. POWER switch
4. PHONES (Headphones) jack
6. Cable clip
Cable clip

17
SETUP
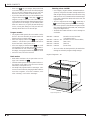
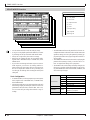
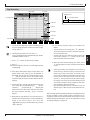
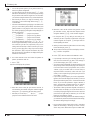
Floppy disk drive
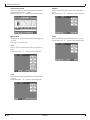
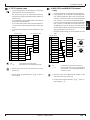
1. Floppy disk slot
This is where floppy disks are inserted for loading or saving data. 3.5 inch 2HD (MF2HD) or 2DD (MF2DD) floppy disks can be used. (→
p.302)
2. Disk-in-use indicator
This indicator will light while data is being read from or written to the floppy disk. Never attempt to remove the disk while this indicator is lit.
3. Eject button
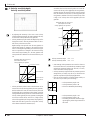
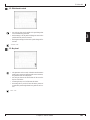
Press this button to remove the floppy disk. Disks must be inserted or removed gently and firmly, and only while the access indicator is dark.
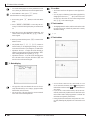
• The back of a floppy disk contains a write protect tab as shown in the following illustration. When this tab is in the downward position (with
the window open), it will not be possible to modify, add, or delete data. When you wish to protect important data, you should leave the tab
in this position.
• Be aware that Yamaha can make no guarantee regarding data damage that results from improper use.
1. Floppy disk slot
2. Disk-in-use indicator 3. Eject button
Write protect tab
Write permit
Write prohibit

18
SETUP
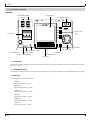
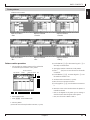
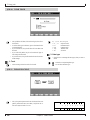
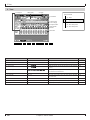
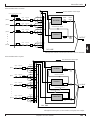
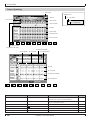
2. Connections
In order to use the QY700, the included AC adaptor and an amp system etc. must be connected. If you use external MIDI devices or controllers, these
must also be connected.
This sections explains how to make these connections.
• Be sure to turn off the power before making any connections. If you make connections while the power is on, you risk damag-
ing external equipment such as the amp or speakers.
Power supply connections
1. Make sure that the power switch of the QY700 is turned off, and connect the included AC adaptor (PA-5B) to the power supply jack.
2. Plug the AC adaptor into an AC outlet, and turn on the QY700 power switch.
• Use only the included PA-5B AC adaptor. Using other AC adaptors will cause malfunctions. Also, be sure to unplug the AC
adaptor from the AC outlet if you will not be using the unit for an extended period of time.

19
SETUP
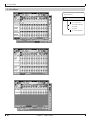
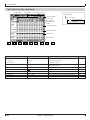
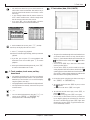
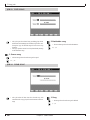
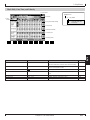
Audio equipment connections
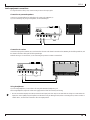
To output the sound of the QY700, connect an amp or mixer to the output jacks.
Connection to powered speakers
Connect two powered speakers (left and right) to the output jacks (L/MONO, R).
If you are connecting only one powered speaker, use the L/MONO jack.
Connection to a mixer
Connect the output jacks (L/MONO, R) to two channels of the mixer. The channel connected to the L/MONO jack should be panned left, and
the channel connected to the R jack should be panned right.
Make the same type of connections if you are connecting the QY700 to an MTR or cassette deck.
Using headphones
If you are using headphones, connect them to the rear panel PHONES (headphones) jack.
When using headphones, adjust the volume to an appropriate level that will not harm your hearing.
• Do not connect the output jacks of the QY700 to the mic input jacks of an amp or cassette deck etc. If they are connected to mic
inputs, the sound quality may be impaired, and the device may be damaged. Also, when connecting the QY700 to a mixer or
similar device, set the mixer channels to the Line Input position.
POWER
ON
INDCPHONESL/MONORSWFOOT
OUTPUT
OFF
6
0
5
10
0
5
10
20
6
0
5
10
0
5
10
20
6
0
5
10
0
5
10
20
6
0
5
10
0
5
10
20
6
0
5
10
0
5
10
20
6
0
5
10
0
5
10
20
6
0
5
10
0
5
10
20
6
0
5
10
0
5
10
20
6
0
5
10
0
5
10
20
6
0
5
10
0
5
10
20
6
0
5
10
0
5
10
20
6
0
5
10
0
5
10
20
6
0
5
10
0
5
10
20
6
0
5
10
0
5
10
20
6
0
5
10
0
5
10
20
6
0
5
10
0
5
10
20
6
0
5
10
0
5
10
20
6
0
5
10
0
5
10
20
6
0
5
10
0
5
10
20
6
0
5
10
0
5
10
20
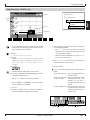
1 2 4 5 6 7 8 9 10 12 13 14 15 16
ST
R
ST ST
2
6016
6016
6016
6016
6016
6016
6016
6016
6016
2
6016
6016
6016
6016
6016
6016
6016
6016
6016
2
6016
6016
6016
6016
6016
6016
6016
6016
6016
2
6016
6016
6016
6016
6016
6016
6016
6016
6016
2
6016
6016
6016
6016
6016
6016
6016
6016
6016
2
6016
6016
6016
6016
6016
6016
6016
6016
6016
2
6016
6016
6016
6016
6016
6016
6016
6016
6016
2
6016
6016
6016
6016
6016
6016
6016
6016
6016
2
6016
6016
6016
6016
6016
6016
6016
6016
2
6016
6016
6016
6016
6016
6016
6016
6016
2
6016
6016
6016
6016
6016
6016
6016
6016
2
6016
6016
6016
6016
6016
6016
6016
6016
2
6016
6016
6016
6016
6016
6016
6016
6016
2
6016
6016
6016
6016
6016
6016
6016
6016
2
6016
6016
6016
6016
6016
6016
6016
6016
2
6016
6016
6016
6016
6016
6016
6016
6016
6016
6016
6016
6016
6016
6016
6016
6016
6016
6016
6
0
5
6
0
5
6
0
5
6
0
5
6
0
5
6
0
5
6
0
5
6
0
5
6
0
5
6
0
5
POWER
ON
INDCPHONESL/MONORSWFOOT
OUTPUT
OFF
La page est en cours de chargement...
La page est en cours de chargement...
La page est en cours de chargement...
La page est en cours de chargement...
La page est en cours de chargement...
La page est en cours de chargement...
La page est en cours de chargement...
La page est en cours de chargement...
La page est en cours de chargement...
La page est en cours de chargement...
La page est en cours de chargement...
La page est en cours de chargement...
La page est en cours de chargement...
La page est en cours de chargement...
La page est en cours de chargement...
La page est en cours de chargement...
La page est en cours de chargement...
La page est en cours de chargement...
La page est en cours de chargement...
La page est en cours de chargement...
La page est en cours de chargement...
La page est en cours de chargement...
La page est en cours de chargement...
La page est en cours de chargement...
La page est en cours de chargement...
La page est en cours de chargement...
La page est en cours de chargement...
La page est en cours de chargement...
La page est en cours de chargement...
La page est en cours de chargement...
La page est en cours de chargement...
La page est en cours de chargement...
La page est en cours de chargement...
La page est en cours de chargement...
La page est en cours de chargement...
La page est en cours de chargement...
La page est en cours de chargement...
La page est en cours de chargement...
La page est en cours de chargement...
La page est en cours de chargement...
La page est en cours de chargement...
La page est en cours de chargement...
La page est en cours de chargement...
La page est en cours de chargement...
La page est en cours de chargement...
La page est en cours de chargement...
La page est en cours de chargement...
La page est en cours de chargement...
La page est en cours de chargement...
La page est en cours de chargement...
La page est en cours de chargement...
La page est en cours de chargement...
La page est en cours de chargement...
La page est en cours de chargement...
La page est en cours de chargement...
La page est en cours de chargement...
La page est en cours de chargement...
La page est en cours de chargement...
La page est en cours de chargement...
La page est en cours de chargement...
La page est en cours de chargement...
La page est en cours de chargement...
La page est en cours de chargement...
La page est en cours de chargement...
La page est en cours de chargement...
La page est en cours de chargement...
La page est en cours de chargement...
La page est en cours de chargement...
La page est en cours de chargement...
La page est en cours de chargement...
La page est en cours de chargement...
La page est en cours de chargement...
La page est en cours de chargement...
La page est en cours de chargement...
La page est en cours de chargement...
La page est en cours de chargement...
La page est en cours de chargement...
La page est en cours de chargement...
La page est en cours de chargement...
La page est en cours de chargement...
La page est en cours de chargement...
La page est en cours de chargement...
La page est en cours de chargement...
La page est en cours de chargement...
La page est en cours de chargement...
La page est en cours de chargement...
La page est en cours de chargement...
La page est en cours de chargement...
La page est en cours de chargement...
La page est en cours de chargement...
La page est en cours de chargement...
La page est en cours de chargement...
La page est en cours de chargement...
La page est en cours de chargement...
La page est en cours de chargement...
La page est en cours de chargement...
La page est en cours de chargement...
La page est en cours de chargement...
La page est en cours de chargement...
La page est en cours de chargement...
La page est en cours de chargement...
La page est en cours de chargement...
La page est en cours de chargement...
La page est en cours de chargement...
La page est en cours de chargement...
La page est en cours de chargement...
La page est en cours de chargement...
La page est en cours de chargement...
La page est en cours de chargement...
La page est en cours de chargement...
La page est en cours de chargement...
La page est en cours de chargement...
La page est en cours de chargement...
La page est en cours de chargement...
La page est en cours de chargement...
La page est en cours de chargement...
La page est en cours de chargement...
La page est en cours de chargement...
La page est en cours de chargement...
La page est en cours de chargement...
La page est en cours de chargement...
La page est en cours de chargement...
La page est en cours de chargement...
La page est en cours de chargement...
La page est en cours de chargement...
La page est en cours de chargement...
La page est en cours de chargement...
La page est en cours de chargement...
La page est en cours de chargement...
La page est en cours de chargement...
La page est en cours de chargement...
La page est en cours de chargement...
La page est en cours de chargement...
La page est en cours de chargement...
La page est en cours de chargement...
La page est en cours de chargement...
La page est en cours de chargement...
La page est en cours de chargement...
La page est en cours de chargement...
La page est en cours de chargement...
La page est en cours de chargement...
La page est en cours de chargement...
La page est en cours de chargement...
La page est en cours de chargement...
La page est en cours de chargement...
La page est en cours de chargement...
La page est en cours de chargement...
La page est en cours de chargement...
La page est en cours de chargement...
La page est en cours de chargement...
La page est en cours de chargement...
La page est en cours de chargement...
La page est en cours de chargement...
La page est en cours de chargement...
La page est en cours de chargement...
La page est en cours de chargement...
La page est en cours de chargement...
La page est en cours de chargement...
La page est en cours de chargement...
La page est en cours de chargement...
La page est en cours de chargement...
La page est en cours de chargement...
La page est en cours de chargement...
La page est en cours de chargement...
La page est en cours de chargement...
La page est en cours de chargement...
La page est en cours de chargement...
La page est en cours de chargement...
La page est en cours de chargement...
La page est en cours de chargement...
La page est en cours de chargement...
La page est en cours de chargement...
La page est en cours de chargement...
La page est en cours de chargement...
La page est en cours de chargement...
La page est en cours de chargement...
La page est en cours de chargement...
La page est en cours de chargement...
La page est en cours de chargement...
La page est en cours de chargement...
La page est en cours de chargement...
La page est en cours de chargement...
La page est en cours de chargement...
La page est en cours de chargement...
La page est en cours de chargement...
La page est en cours de chargement...
La page est en cours de chargement...
La page est en cours de chargement...
La page est en cours de chargement...
La page est en cours de chargement...
La page est en cours de chargement...
La page est en cours de chargement...
La page est en cours de chargement...
La page est en cours de chargement...
La page est en cours de chargement...
La page est en cours de chargement...
La page est en cours de chargement...
La page est en cours de chargement...
La page est en cours de chargement...
La page est en cours de chargement...
La page est en cours de chargement...
La page est en cours de chargement...
La page est en cours de chargement...
La page est en cours de chargement...
La page est en cours de chargement...
La page est en cours de chargement...
La page est en cours de chargement...
La page est en cours de chargement...
La page est en cours de chargement...
La page est en cours de chargement...
La page est en cours de chargement...
La page est en cours de chargement...
La page est en cours de chargement...
La page est en cours de chargement...
La page est en cours de chargement...
La page est en cours de chargement...
La page est en cours de chargement...
La page est en cours de chargement...
La page est en cours de chargement...
La page est en cours de chargement...
La page est en cours de chargement...
La page est en cours de chargement...
La page est en cours de chargement...
La page est en cours de chargement...
La page est en cours de chargement...
La page est en cours de chargement...
La page est en cours de chargement...
La page est en cours de chargement...
La page est en cours de chargement...
La page est en cours de chargement...
La page est en cours de chargement...
La page est en cours de chargement...
La page est en cours de chargement...
La page est en cours de chargement...
La page est en cours de chargement...
La page est en cours de chargement...
La page est en cours de chargement...
La page est en cours de chargement...
La page est en cours de chargement...
La page est en cours de chargement...
La page est en cours de chargement...
La page est en cours de chargement...
La page est en cours de chargement...
La page est en cours de chargement...
La page est en cours de chargement...
La page est en cours de chargement...
La page est en cours de chargement...
La page est en cours de chargement...
La page est en cours de chargement...
La page est en cours de chargement...
La page est en cours de chargement...
La page est en cours de chargement...
La page est en cours de chargement...
La page est en cours de chargement...
La page est en cours de chargement...
La page est en cours de chargement...
La page est en cours de chargement...
La page est en cours de chargement...
La page est en cours de chargement...
La page est en cours de chargement...
La page est en cours de chargement...
La page est en cours de chargement...
La page est en cours de chargement...
La page est en cours de chargement...
La page est en cours de chargement...
La page est en cours de chargement...
La page est en cours de chargement...
La page est en cours de chargement...
La page est en cours de chargement...
La page est en cours de chargement...
La page est en cours de chargement...
La page est en cours de chargement...
La page est en cours de chargement...
La page est en cours de chargement...
La page est en cours de chargement...
La page est en cours de chargement...
La page est en cours de chargement...
La page est en cours de chargement...
La page est en cours de chargement...
La page est en cours de chargement...
La page est en cours de chargement...
La page est en cours de chargement...
La page est en cours de chargement...
La page est en cours de chargement...
La page est en cours de chargement...
La page est en cours de chargement...
La page est en cours de chargement...
La page est en cours de chargement...
La page est en cours de chargement...
La page est en cours de chargement...
La page est en cours de chargement...
La page est en cours de chargement...
La page est en cours de chargement...
La page est en cours de chargement...
La page est en cours de chargement...
La page est en cours de chargement...
La page est en cours de chargement...
La page est en cours de chargement...
La page est en cours de chargement...
La page est en cours de chargement...
La page est en cours de chargement...
La page est en cours de chargement...
La page est en cours de chargement...
La page est en cours de chargement...
La page est en cours de chargement...
La page est en cours de chargement...
La page est en cours de chargement...
La page est en cours de chargement...
La page est en cours de chargement...
La page est en cours de chargement...
La page est en cours de chargement...
La page est en cours de chargement...
La page est en cours de chargement...
La page est en cours de chargement...
-
 1
1
-
 2
2
-
 3
3
-
 4
4
-
 5
5
-
 6
6
-
 7
7
-
 8
8
-
 9
9
-
 10
10
-
 11
11
-
 12
12
-
 13
13
-
 14
14
-
 15
15
-
 16
16
-
 17
17
-
 18
18
-
 19
19
-
 20
20
-
 21
21
-
 22
22
-
 23
23
-
 24
24
-
 25
25
-
 26
26
-
 27
27
-
 28
28
-
 29
29
-
 30
30
-
 31
31
-
 32
32
-
 33
33
-
 34
34
-
 35
35
-
 36
36
-
 37
37
-
 38
38
-
 39
39
-
 40
40
-
 41
41
-
 42
42
-
 43
43
-
 44
44
-
 45
45
-
 46
46
-
 47
47
-
 48
48
-
 49
49
-
 50
50
-
 51
51
-
 52
52
-
 53
53
-
 54
54
-
 55
55
-
 56
56
-
 57
57
-
 58
58
-
 59
59
-
 60
60
-
 61
61
-
 62
62
-
 63
63
-
 64
64
-
 65
65
-
 66
66
-
 67
67
-
 68
68
-
 69
69
-
 70
70
-
 71
71
-
 72
72
-
 73
73
-
 74
74
-
 75
75
-
 76
76
-
 77
77
-
 78
78
-
 79
79
-
 80
80
-
 81
81
-
 82
82
-
 83
83
-
 84
84
-
 85
85
-
 86
86
-
 87
87
-
 88
88
-
 89
89
-
 90
90
-
 91
91
-
 92
92
-
 93
93
-
 94
94
-
 95
95
-
 96
96
-
 97
97
-
 98
98
-
 99
99
-
 100
100
-
 101
101
-
 102
102
-
 103
103
-
 104
104
-
 105
105
-
 106
106
-
 107
107
-
 108
108
-
 109
109
-
 110
110
-
 111
111
-
 112
112
-
 113
113
-
 114
114
-
 115
115
-
 116
116
-
 117
117
-
 118
118
-
 119
119
-
 120
120
-
 121
121
-
 122
122
-
 123
123
-
 124
124
-
 125
125
-
 126
126
-
 127
127
-
 128
128
-
 129
129
-
 130
130
-
 131
131
-
 132
132
-
 133
133
-
 134
134
-
 135
135
-
 136
136
-
 137
137
-
 138
138
-
 139
139
-
 140
140
-
 141
141
-
 142
142
-
 143
143
-
 144
144
-
 145
145
-
 146
146
-
 147
147
-
 148
148
-
 149
149
-
 150
150
-
 151
151
-
 152
152
-
 153
153
-
 154
154
-
 155
155
-
 156
156
-
 157
157
-
 158
158
-
 159
159
-
 160
160
-
 161
161
-
 162
162
-
 163
163
-
 164
164
-
 165
165
-
 166
166
-
 167
167
-
 168
168
-
 169
169
-
 170
170
-
 171
171
-
 172
172
-
 173
173
-
 174
174
-
 175
175
-
 176
176
-
 177
177
-
 178
178
-
 179
179
-
 180
180
-
 181
181
-
 182
182
-
 183
183
-
 184
184
-
 185
185
-
 186
186
-
 187
187
-
 188
188
-
 189
189
-
 190
190
-
 191
191
-
 192
192
-
 193
193
-
 194
194
-
 195
195
-
 196
196
-
 197
197
-
 198
198
-
 199
199
-
 200
200
-
 201
201
-
 202
202
-
 203
203
-
 204
204
-
 205
205
-
 206
206
-
 207
207
-
 208
208
-
 209
209
-
 210
210
-
 211
211
-
 212
212
-
 213
213
-
 214
214
-
 215
215
-
 216
216
-
 217
217
-
 218
218
-
 219
219
-
 220
220
-
 221
221
-
 222
222
-
 223
223
-
 224
224
-
 225
225
-
 226
226
-
 227
227
-
 228
228
-
 229
229
-
 230
230
-
 231
231
-
 232
232
-
 233
233
-
 234
234
-
 235
235
-
 236
236
-
 237
237
-
 238
238
-
 239
239
-
 240
240
-
 241
241
-
 242
242
-
 243
243
-
 244
244
-
 245
245
-
 246
246
-
 247
247
-
 248
248
-
 249
249
-
 250
250
-
 251
251
-
 252
252
-
 253
253
-
 254
254
-
 255
255
-
 256
256
-
 257
257
-
 258
258
-
 259
259
-
 260
260
-
 261
261
-
 262
262
-
 263
263
-
 264
264
-
 265
265
-
 266
266
-
 267
267
-
 268
268
-
 269
269
-
 270
270
-
 271
271
-
 272
272
-
 273
273
-
 274
274
-
 275
275
-
 276
276
-
 277
277
-
 278
278
-
 279
279
-
 280
280
-
 281
281
-
 282
282
-
 283
283
-
 284
284
-
 285
285
-
 286
286
-
 287
287
-
 288
288
-
 289
289
-
 290
290
-
 291
291
-
 292
292
-
 293
293
-
 294
294
-
 295
295
-
 296
296
-
 297
297
-
 298
298
-
 299
299
-
 300
300
-
 301
301
-
 302
302
-
 303
303
-
 304
304
-
 305
305
-
 306
306
-
 307
307
-
 308
308
-
 309
309
-
 310
310
-
 311
311
-
 312
312
-
 313
313
-
 314
314
-
 315
315
-
 316
316
-
 317
317
-
 318
318
-
 319
319
-
 320
320
-
 321
321
-
 322
322
-
 323
323
-
 324
324
-
 325
325
-
 326
326
-
 327
327
-
 328
328
-
 329
329
-
 330
330
-
 331
331
-
 332
332
-
 333
333
-
 334
334


Yamaha QY700 Manuel utilisateur
- Catégorie
- Pianos numériques
- Taper
- Manuel utilisateur
dans d''autres langues
- italiano: Yamaha QY700 Manuale utente
- English: Yamaha QY700 User manual
- español: Yamaha QY700 Manual de usuario
- Deutsch: Yamaha QY700 Benutzerhandbuch
- русский: Yamaha QY700 Руководство пользователя
- Nederlands: Yamaha QY700 Handleiding
- português: Yamaha QY700 Manual do usuário
- dansk: Yamaha QY700 Brugermanual
- polski: Yamaha QY700 Instrukcja obsługi
- čeština: Yamaha QY700 Uživatelský manuál
- svenska: Yamaha QY700 Användarmanual
- Türkçe: Yamaha QY700 Kullanım kılavuzu
- română: Yamaha QY700 Manual de utilizare