Français (Canada)
GARANTIE LIMITÉE À L’ACHETEUR INITIAL
Samsung Electronics Canada Inc. (SECA) garantit ce produit contre tout défaut de fabrication.
SECA garantit aussi que si cet appareil ne fonctionne pas convenablement durant la période de garantie SECA
se réservera le droit de réparer ou de remplacer l’appareil défectueux.
Toutes les réparations sous garantie doivent être effectuées par un Centre de service autorisé SECA. Le nom
et l’adresse du Centre de service le plus près de chez vous peut être obtenu en composant sans frais le 1- 800-
SAMSUNG ou en visitant notre site web au www.samsung.ca
MAIN-D’OEUVRE PIÈCES
UN (1) AN (AU COMPTOIR) UN (1) AN
Pour tous les modèles portatifs, le transport de l’appareil sera la responsabilité du client.
Le reçu de vente original doit être conservé par le client car cela constitue la seule preuve d’achat acceptée.
Le client doit le présenter au Centre de service agréé au moment où il fait la demande d’une réparation sous
garantie.
EXCLUSIONS (CE QUI N’EST PAS COUVERT)
Cette garantie ne couvre pas les dommages causés par un accident, un incendie, une inondation, un cas de force
majeure, un mauvais usage ou une tension incorrecte.
La garantie ne couvre pas une mauvaise installation, une mauvaise réparation, une réparation non autorisée
et tout usage commercial ou dommages survenus durant le transport. Le ni extérieur et intérieur de même
que les lampes ne sont pas couverts par cette garantie. Les ajustements par le client qui sont expliqués dans
le guide de l’utilisateur ne sont pas couverts en vertu de cette garantie. Cette garantie sera automatiquement
annulée pour tout appareil qui aurait un numéro de série manquant ou modié. Cette garantie est valable
seulement sur les appareils achetés et utilisés au Canada.
Samsung Electronics Canada Inc
2050 Derry Rd West
Mississauga, On. L5N 0B9
Tel: 1-800-SAMSUNG (726-7864)
Fax: (905) 542- 1199
Website: http://www.samsung.com/ca_fr
Manuel utilisateur
Les chiffres et les illustrations contenus dans ce manuel utilisateur sont fournis à titre de
référence uniquement et pourraient ne pas représenter exactement le produit
AH81-16940B-00
NSPBI01538A-00
HW-Q900C
Vous pouvez accéder au MANUEL COMPLET sur le centre de soutien à la clientèle de Samsung en balayant le code
QR situé à gauche.
Pour consulter le manuel sur votre PC ou appareil mobile, téléchargez le manuel en format document sur le site Web
de Samsung. (http://www.samsung.com/support)
© 2023 Samsung Electronics Co., Ltd. Tous droits réservés.
Comment contacter Samsung dans le monde
Si vous avez des suggestions ou des questions concernant les produits Samsung, veuillez contacter le Service Consommateurs
Samsung.
SIÈGE SOCIAL
Samsung Electronics Canada Inc. 2050 Derry Road West, Mississauga, Ontario L5N 0B9 Canada
TEL: 1-800-SAMSUNG (1-800-726-7864)
www.samsung.com/ca/support
Pays Centre de service de Samsung
Site Web
CANADA 1-800-SAMSUNG(726-7864)
1-844-SAM-PAYS (726-7297)
www.samsung.com/ca/support (English)
www.samsung.com/ca_fr/support (French)
U.S.A 1-800-SAMSUNG (726-7864)
1-844-SAM-PAYS (726-7297) www.samsung.com/us/support
INFORMATIONS RELATIVES À
LA SÉCURITÉ
AVERTISSEMENTS
POUR ÉVITER LES RISQUES DE CHOC ÉLECTRIQUE, NE
DÉMONTEZ PAS LE CAPOT.
L’APPAREIL NE CONTIENT PAS DE PIÈCES RÉPARABLES PAR
L’UTILISATEUR. S’ADRESSER À UN SERVICE APRÈS-VENTE
QUALIFIÉ.
Reportez-vous au tableau ci-dessous pour comprendre les
symboles pouvant gurer sur votre produit Samsung.
MISE EN GARDE
RISQUE DE CHOC ÉLECTRIQUE NE
PAS OUVRIR
Ce symbole indique la présence d’une haute
tension à l’intérieur. Tout contact avec une pièce
interne de l’appareil présente un danger.
Ce symbole vous informe qu’une documentation
importante relative au fonctionnement et à
l’entretien est fournie avec le produit.
Produit de catégorie II : Ce symbole indique
qu’une connexion de sécurité de mise à la terre (à
la masse) n’est pas requise.
Si ce symbole ne se trouve pas sur un appareil
doté d’un câble électrique, le produit DOIT avoir
un conducteur de protection able (mise à la
terre).
Tension CA : La tension nominale indiquée par ce
symbole est la tension CA.
Tension CC : La tension nominale indiquée par ce
symbole est la tension CC.
Attention. Consultez les instructions aux ns
d’utilisation: Ce symbole indique à l’utilisateur
qu’il doit consulter le guide d’utilisation pour
avoir de l’information au sujet de la sécurité.
AVERTISSEMENT
• An de diminuer les risques d’incendie ou de choc
électrique, n’exposez pas cet appareil à la pluie ou à
l’humidité.
• Pour éviter des blessures, cet appareil doit être solidement
xé au plancher/au mur conformément aux directives
d’installation.
MISE EN GARDE
• Veillez à éviter toute projection sur l’appareil. Ne placez
jamais de récipients contenant un liquide (ex. : vase) dessus.
• La prise d’alimentation fait ofce de système de
déconnexion. Elle doit donc rester disponible en
permanence.
ATTENTION (Pour le Canada)
L’émetteur/récepteur exempt de licence contenu dans le
présent appareil est conforme aux CNR d’Innovation, Sciences
et Développement économique Canada applicables aux
appareils radio exempts de licence. L’exploitation est autorisée
aux deux conditions suivantes :
1) L’appareil ne doit pas produire de brouillage;
2) L’appareil doit accepter tout brouillage radioélectrique subi,
même si le brouillage est susceptible d’en compromettre le
fonctionnement.
Cet appareil et son ou ses antennes ne doivent pas être installés
a proximité ou être utilisés conjointement avec une autre
antenne ou un autre émetteur.
Le dispositif pourrait automatiquement cesser d’émettre en
cas d’absence d’informations à transmettre, ou une défaillance
opérationnelle. Notez que ce n’est pas l’intention d’interdire la
transmission des informations de contrôle ou de signalisation
ou l’utilisation de codes répétitifs lorsque requis par la
technologie.
Cet appareil numérique de la classe B est conforme a la norme
NMB-003 du Canada.
Déclaration d’exposition aux radiations:
Cet equipement est conforme aux limites d’exposition aux
rayonnements IC RSS-102 établies pour un environnement non
contrôlé. Cet équipement doit etre installé et utilisé avec un
minimum de 20 cm de distance entre la source de rayonnement
et votre corps.
Consignes de sécurité importantes
Lisez attentivement ces consignes avant d’utiliser l’appareil.
Veillez à respecter toutes les consignes répertoriées ci-après.
Conservez ces instructions à portée de main pour vous y référer
ultérieurement.
1. Lisez attentivement ces consignes.
2. Conservez-les précieusement.
3. Tenez compte de tous les avertissements mentionnés.
4. Respectez toutes les instructions sans exception.
5. N’utilisez pas cet appareil à proximité de l’eau.
6. Nettoyez-le à l’aide d’un tissu sec.
7. Ne bloquez pas les ouvertures de ventilation.
Installez l’appareil conformément aux instructions du
fabricant.
8. N’installez pas le lecteur à proximité d’une source de chaleur
de type radiateur, registre de chaleur, cuisinière ou tout
autre appareil (y compris les récepteurs AV) générateur de
chaleur.
9. N’entravez d’aucune manière l’action du dispositif de
sécurité de la che de mise à la terre ou de la che polarisée.
Une che polarisée comporte deux lames dont l’une est plus
large que l’autre. Une che de mise à la terre comporte deux
lames et une troisième broche de mise à la terre. La lame
la plus large et la troisième broche sont destinées à assurer
votre sécurité. Si la che fournie ne s’insère pas dans la prise
utilisée, faites appel à un électricien pour faire remplacer
celle-ci.
10. Placez le cordon d’alimentation de sorte qu’il ne puisse être
ni piétiné ni pincé, particulièrement au niveau de la che, de
la prise de courant et du point de sortie de l’appareil.
11. Utilisez exclusivement les xations/ accessoires spéciés
par le fabricant.
12. Utiliser uniquement avec le chariot, la base,
le trépied, le support ou la table spécié par
le fabricant ou vendu avec l’appareil. Si
l’appareil est posé sur un meuble à roulettes,
déplacez l’ensemble avec précaution pour
éviter de faire tomber le lecteur et de vous
blesser.
13. Débranchez l’appareil en cas d’orage ou lorsqu’il est inutilisé
pendant une période prolongée.
14. Conez toutes les réparations à un technicien qualié. Votre
appareil doit impérativement être réparé lorsqu’il a été
endommagé de quelque manière que ce soit : détérioration du
cordon ou de la che d’alimentation, projection de liquide sur
l’appareil, chute d’objets à l’intérieur de l’appareil, exposition à
la pluie ou à l’humidité, dysfonctionnement, chute.
PRÉCAUTIONS
1. Assurez-vous que le bloc d’alimentation CA chez vous est
conforme aux exigences de puissance gurant sur la plaque
d’identication située sur le dessous de votre produit. Installez
votre produit horizontalement, sur un socle approprié
(meuble), en laissant un espace sufsant pour la ventilation
sur le pourtour 3~4 po. Faites attention à ne pas obstruer
les orices de ventilation. Ne posez pas l’ensemble sur un
amplicateur ou un autre appareil susceptible de chauffer. Cet
ensemble est conçu pour une utilisation en continu.
Pour éteindre totalement l’appareil, débranchez la che c.a.
de la prise murale. Débranchez l’appareil si vous prévoyez une
longue période d’inactivité.
2. En cas d’orage, débranchez la che de l’appareil de la prise
murale. Les surtensions occasionnées par l’orage pourraient
endommager votre appareil.
3. N’exposez pas l’ensemble aux rayons directs du soleil ou
à toute autre source de chaleur. Cela pourrait causer une
surchauffe du l et causer un dysfonctionnement de l’unité.
4. Protégez le produit de l’humidité (comme les vases) et
d’une chaleur excessive (comme une cheminée) ou de tout
équipement capable de créer des champs magnétiques ou
électriques. Débranchez le câble d’alimentation en cas de
dysfonctionnement. Votre produit n’est pas prévu pour un
usage industriel. Ce produit ne peut être utilisé qu’à des ns
personnelles. Une condensation peut se former si le produit
ou un disque a été stocké à basse température. Si vous devez
transporter l’ensemble pendant l’hiver, attendez environ 2
heures que l’appareil ait atteint la température de la pièce
avant de l’utiliser.
5. Les piles utilisées dans ce produit peuvent contenir des
produits chimiques dangereux pour l’environnement. Ne
jetez pas les piles dans votre poubelle habituelle. Ne vous
débarrassez pas des piles en les faisant brûler. Les piles ne
doivent pas être court-circuitées, démontées ou subir de
surchauffe.
MISE EN GARDE : Le remplacement incorrect des piles peut
entraîner un danger d’explosion. Remplacez-les uniquement
par des produits similaires ou équivalents.
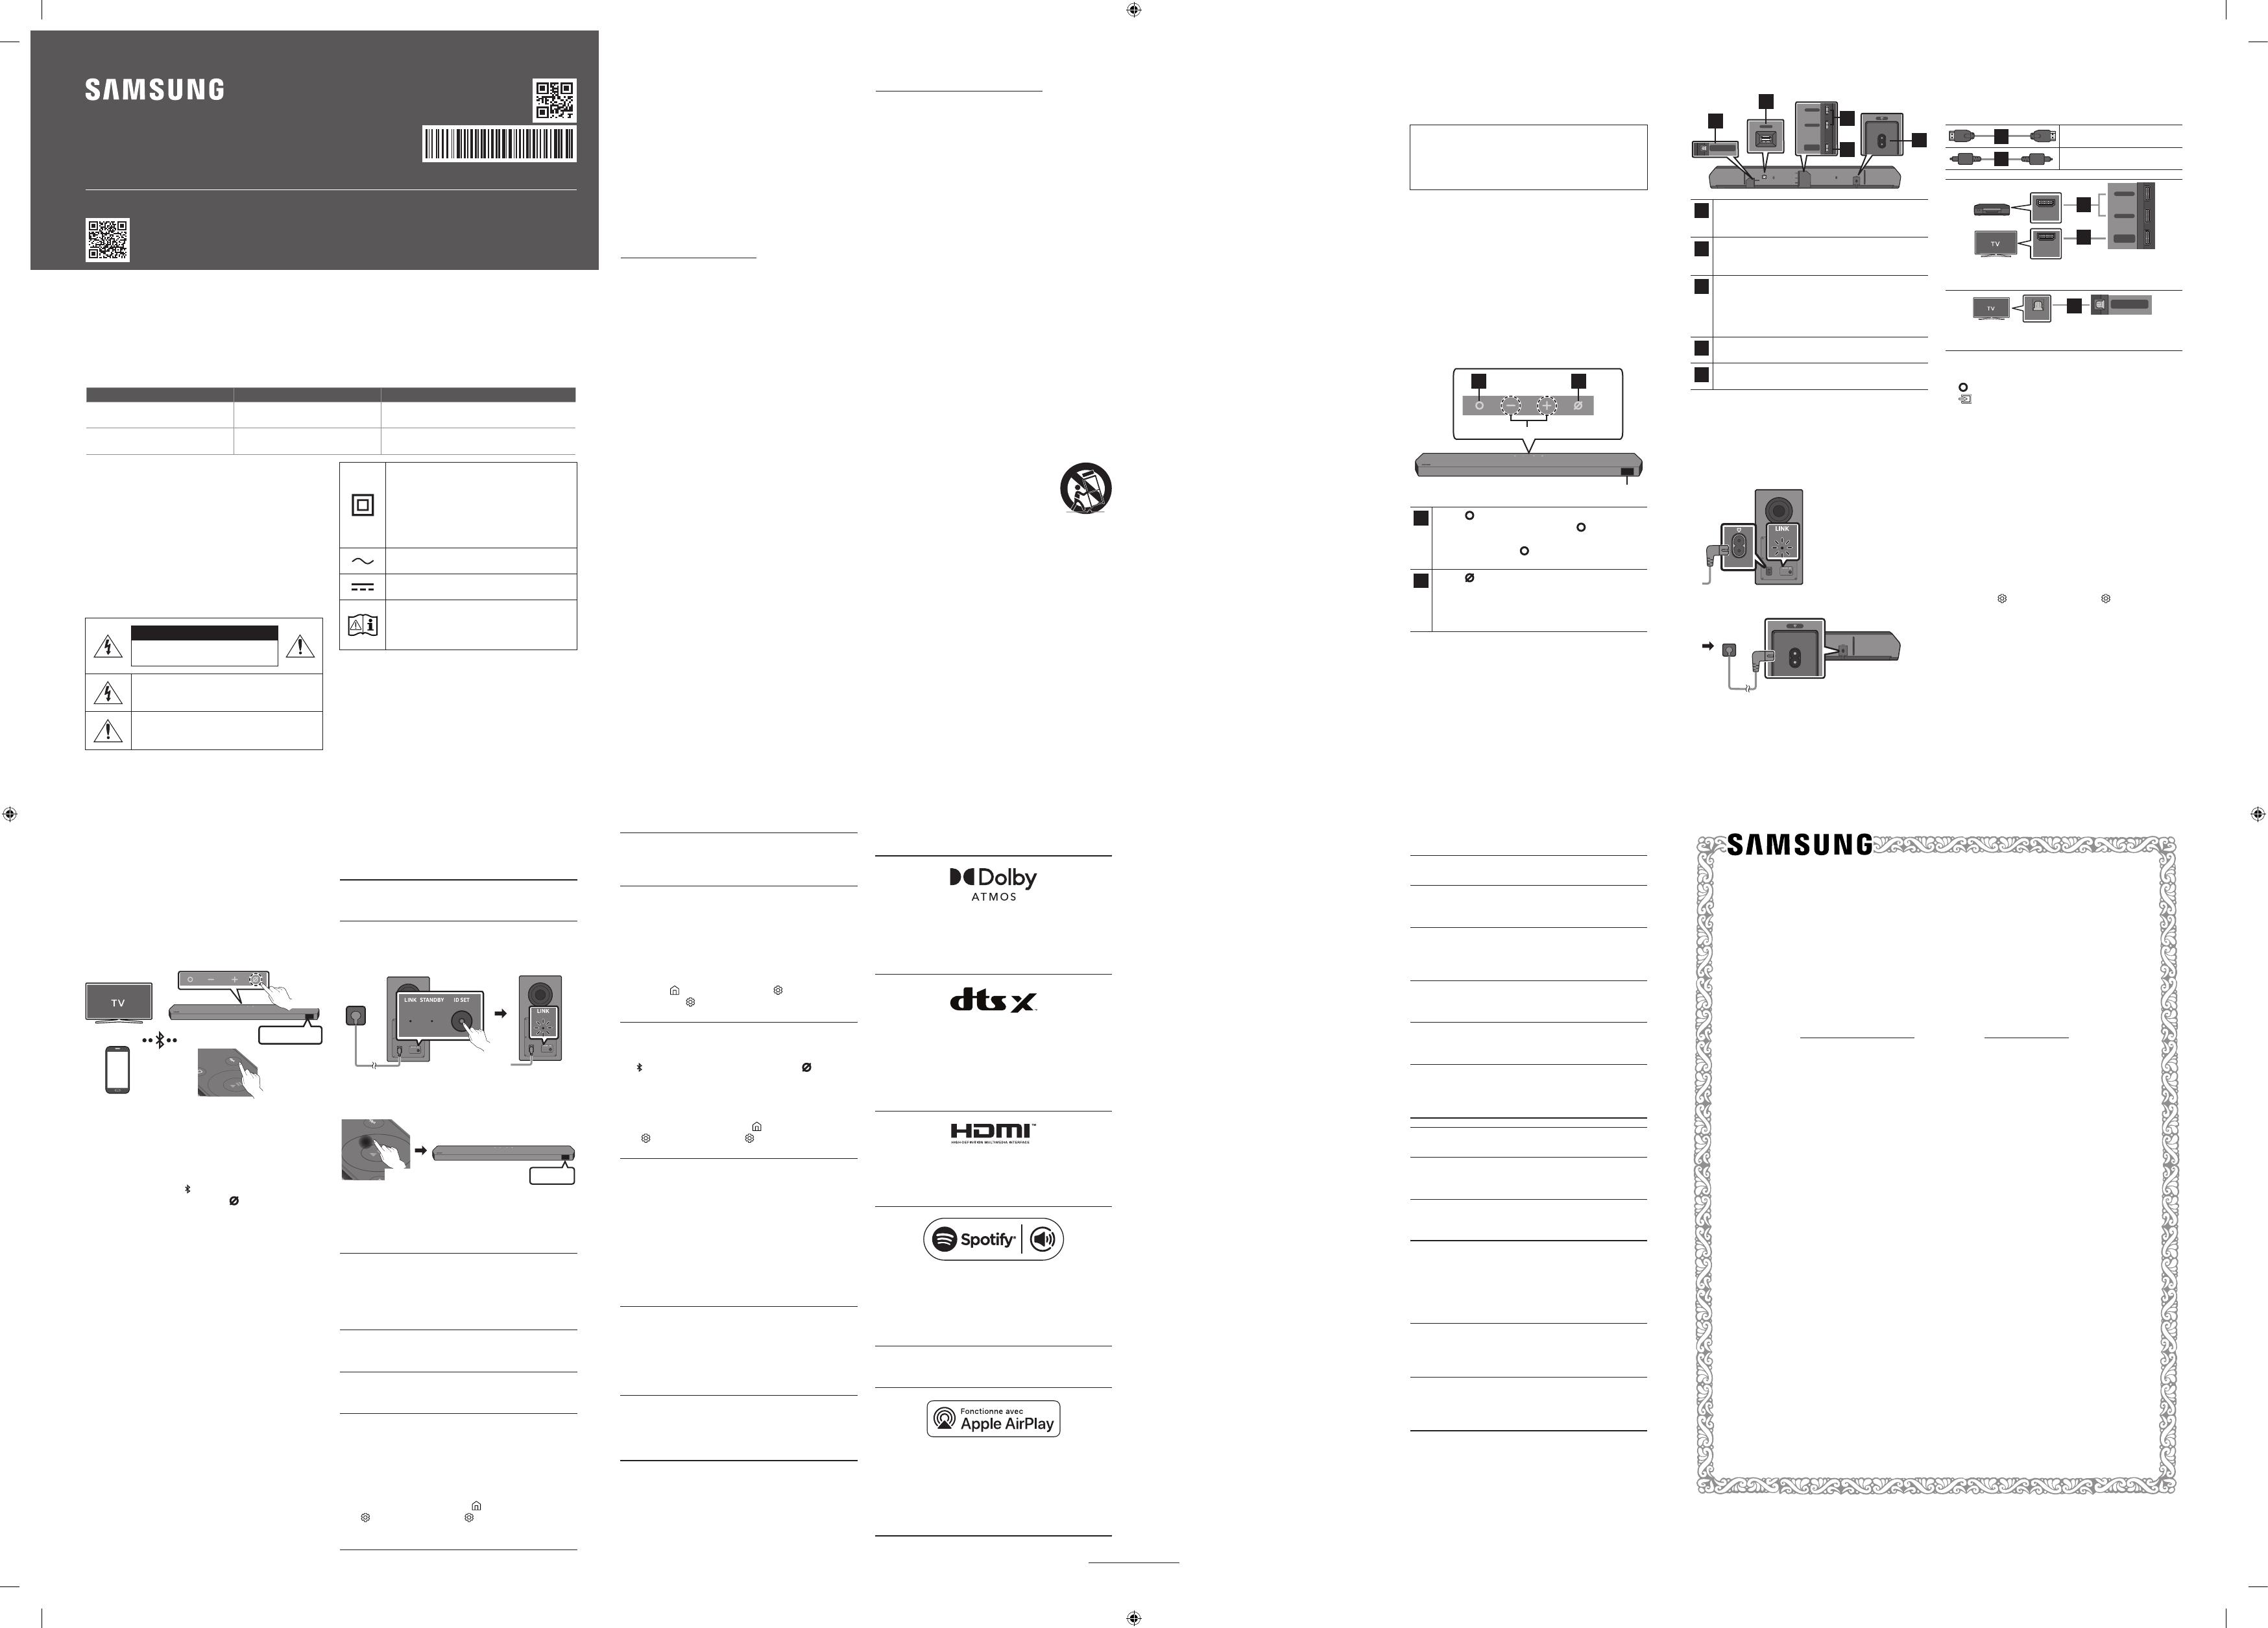
01 VÉRIFICATION DES
COMPOSANTS
Unité principale du Soundbar / Télécommande du Soundbar /
Piles / Caisson de basses / Cordon d’alimentation X 2 (caisson
de basses, Soundbar) / Câble HDMI / Guide de montage
mural / Vis de xation X 2 / Vis (M4 x L10) X 2 / Support de
montage mural X 2 / Pied en caoutchouc X 4
REMARQUE
• Pour plus d’informations sur l’alimentation et la
consommation électriques, reportez-vous à l’étiquette
apposée sur le produit (Étiquette : Arrière de l’unité
principale du Soundbar
• Pour acheter des composants supplémentaires ou des
câbles en option, contactez un centre de service Samsung
ou le service clientèle Samsung.
02 PRÉSENTATION DU
PRODUIT
Panneau supérieur du Soundbar
Volume
12
Écran
1Bouton (multifonction)
En mode veille, appuyez sur le bouton
(multifonction) pour allumer le Soundbar.
Appuyez sur le bouton (multifonction) pour changer
la source d’entrée.
2Bouton (Marche/Arrêt microphone)
Appuyez sur le bouton pour activer ou désactiver le
microphone.
Lorsque le microphone est éteint, le voyant DEL s’allume
en rouge.
Panneau inférieur du Soundbar
DIGITAL AUDIO IN
(OPTICAL)
HDMI TO TV
(eARC/ARC)
HDMI 1
HDMI 2
SERVICE
HDMI TO TV
(eARC/ARC)
HDMI 1
HDMI 2
DIGITAL AUDIO IN
(OPTICAL)
SERVICE
DIGITAL AUDIO IN
(OPTICAL)
HDMI TO TV
(eARC/ARC)
HDMI 1
HDMI 2
SERVICE
HDMI TO TV
(eARC/ARC)
HDMI 1
HDMI 2
DIGITAL AUDIO IN
(OPTICAL)
DIGITAL AUDIO IN
(OPTICAL)
HDMI TO TV
(eARC/ARC)
HDMI 1
HDMI 2
SERVICE
HDMI TO TV
(eARC/ARC)
HDMI 1
HDMI 2
DIGITAL AUDIO IN
(OPTICAL)
SERVICE
DIGITAL AUDIO IN
(OPTICAL)
HDMI TO TV
(eARC/ARC)
HDMI 1
HDMI 2
SERVICE
HDMI TO TV
(eARC/ARC)
HDMI 1
HDMI 2
DIGITAL AUDIO IN
(OPTICAL)
SERVICE
DIGITAL AUDIO IN
(OPTICAL)
HDMI TO TV
(eARC/ARC)
HDMI 1
HDMI 2
SERVICE
HDMI TO TV
(eARC/ARC)
HDMI 1
HDMI 2
DIGITAL AUDIO IN
(OPTICAL)
SERVICE
5
4
3
2
1
1DIGITAL AUDIO IN (OPTICAL)
Permet de connecter la sortie numérique (optique) d’un
appareil externe.
2SERVICE
Connectez un dispositif de stockage USB pour mettre à
niveau le logiciel du produit.
3HDMI 1 / HDMI 2
Entrées simultanées de signaux vidéo et audio
numériques à l’aide d’un câble HDMI.
Permet de connecter la sortie HDMI d’un appareil
externe.
4HDMI TO TV (eARC/ARC)
Permet de connecter la prise HDMI d’un téléviseur.
5POWER
Branchez le cordon d’alimentation CA du Soundbar.
03 CONNEXION DU
SOUNDBAR
Connexion de l’alimentation et des
unités
DIGITAL AUDIO IN
(OPTICAL)
HDMI TO TV
(eARC/ARC)
HDMI 1
HDMI 2
SERVICE
Dessous de l’unité
principale du Soundbar
HDMI IN 1
HDMI IN 2
ID SET
(WOOFER,
REAR)
NETWORK
SERVICE
DIGITAL AUDIO IN
(OPTICAL)
HDMI TO TV
(eARC/ARC)
HDMI 1
HDMI 2
ID SET
HDMI IN 1
HDMI IN 2
SERVICE
DIGITAL AUDIO IN
(OPTICAL)
HDMI TO TV
(eARC/ARC)
HDMI 1
Le voyant clignote
en bleu
Arrière du
caisson de
basses
• Le voyant DEL LINK arrête de clignoter et reste allumé en
bleu lorsque la connexion est établie entre le Soundbar et le
caisson de basses.
04 UTILISATION D’UNE
CONNEXION FILAIRE
1Câble HDMI
2Câble optique (non fourni)
HDMI IN
(ARC)
HDMI OUT
DIGITAL AUDIO IN
(OPTICAL)
HDMI TO TV
(eARC/ARC)
HDMI 2
HDMI 1
1
1
Connexion à l’aide d’un câble HDMI
(Appareil externe (HDMI 1 ou HDMI 2) / TV ARC/eARC)
OPTICAL OUT
DIGITAL AUDIO IN
(OPTICAL)
2
Connexion à l’aide d’un câble optique (D.IN)
REMARQUE
• Si le son du téléviseur n’est pas audible, appuyez sur le bouton
(multifonction) en haut du Soundbar ou sur le bouton
(Source) de la télécommande pour sélectionner le mode
« D.IN ». L’écran indique successivement « D.IN » et « TV ARC/
eARC », puis le téléviseur commence à émettre du son.
• Le câble recommandé est un câble Premium High Speed
HDMI Cable with Ethernet certié par HDMI.org.
• Lorsque vous utilisez un câble optique et que les bornes
sont munies de caches, assurez-vous de retirer les caches.
Utilisation de la fonction Q-Symphony
Lorsque le Soundbar se connecte à un téléviseur Samsung
prenant en charge la fonction Q-Symphony, vous pouvez lire
le son simultanément via le Soundbar et le téléviseur. Si vous
utilisez la fonction Q-Symphony, le son ambiophonique émis
par le téléviseur vous permet de proter d’un effet de son
tridimensionnel ambiophonique plus puissant et plus riche.
Lorsque le Soundbar est connecté, le menu « TV+Soundbar »
s’afche sur le téléviseur.
(Paramètres ( ) → Tous les paramètres ( ) → Son → Sortie
audio)
Utilisation du SpaceFit Sound
Cette fonction analyse l’espace d’écoute de l’utilisateur avec
le microphone du Soundbar et offre le son optimal pour cet
espace. L’optimisation du son se fait automatiquement.
05 UTILISATION D’UNE
CONNEXION SANS FIL
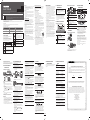
Connexion par Bluetooth
OU OU
PAIR
Dessus du Soundbar
5 sec
BT PAIRING
Quelle est la différence entre BT READY et BT PAIRING ?
• BT READY : dans ce mode, vous pouvez reconnecter
n’importe quel téléviseur ou appareil mobile Samsung
connecté auparavant.
• BT PAIRING : dans ce mode, vous pouvez connecter un
nouvel appareil au Soundbar.
(Appuyez sur le bouton PAIR de la télécommande du
Soundbar ou appuyez sur le bouton (Marche/Arrêt
microphone) situé sur le dessus du Soundbar et maintenez-
le enfoncé pendant plus de 5 secondes pendant que le
Soundbar est en mode « BT ».)
REMARQUE
• Si un code PIN vous est demandé lors de la connexion d’un
appareil Bluetooth, entrez <0000>.
Connexion par Wi-Fi (réseau sans l)
• Pour connecter un Soundbar à un appareil mobile via un
réseau sans l (Wi-Fi), l’application SmartThings est requise.
1. Connectez votre appareil mobile (téléphone intelligent,
tablette, etc.) au réseau Wi-Fi auquel le téléviseur est
connecté.
2. Installez et lancez l’application SmartThings sur votre
appareil mobile (téléphone intelligent, tablette, etc.).
3. Suivez les instructions de l’écran de l’application sur
l’appareil mobile pour connecter le Soundbar à votre réseau
Wi-Fi.
06 DÉPANNAGE
Avant de communiquer avec l’assistance, effectuez les
vérications suivantes.
Le Soundbar ne s’allume pas.
• Vériez si le cordon d’alimentation du Soundbar est
correctement inséré dans la prise.
Si le caisson de basses ne se connecte pas automatiquement
1. Éteignez l’unité principale du Soundbar.
2. Maintenez appuyé le bouton ID SET à l’arrière du caisson
de basses pendant au moins 5 secondes.
Arrière du caisson de basses Voyant bleu clignotant
rapidement
5 sec
3. Appuyez sur le bouton Haut de la télécommande et
maintenez-le enfoncé pendant 5 secondes.
PAIR
5 sec ID SET
4. Vériez que le voyant LINK est bleu xe (connexion
établie).
• Le voyant DEL LINK arrête de clignoter et reste allumé
en bleu lorsque la connexion est établie entre le
Soundbar et le caisson de basses.
Le Soundbar fonctionne par intermittence.
• Après avoir retiré le cordon d’alimentation, réinsérez-le.
• Réessayez après avoir initialisé le produit.
• S’il n’y a pas de signal, le Soundbar s’éteint
automatiquement après un certain temps. Allumez le
produit.
La télécommande ne fonctionne pas
• Pointez la télécommande directement sur le Soundbar.
• Remplacez les piles.
Le voyant du Soundbar s’allume en rouge xe.
• Le microphone est éteint.
Allumez le microphone.
Le Soundbar n’émet pas de son.
• Le volume du Soundbar est trop faible ou coupé. Réglez le
volume.
• Lorsqu’un appareil externe (STB, appareil Bluetooth,
appareil mobile, etc.) est connecté, réglez le volume de
l’appareil externe.
• Pour la sortie audio du téléviseur, sélectionnez Soundbar.
(Téléviseur Samsung : Accueil ( ) → Menu → Paramètres
( ) → Tous les paramètres ( ) → Son → Sortie audio →
Sélectionnez le Soundbar)
• Retirez le câble du Soundbar, puis rebranchez-le.
Le caisson de basses n’émet pas de son.
• Vériez si le voyant bleu à l’arrière du caisson de basses
est allumé. Rebranchez le caisson lorsque le voyant bleu
clignote ou que le voyant rouge s’allume.
Si le téléviseur n’est pas connecté via HDMI TO TV (eARC/ARC)
• Vériez que le câble HDMI est correctement connecté à la
borne ARC.
• La connexion peut ne pas être possible en raison de
l’appareil externe connecté (décodeur, console de jeu, etc.).
Connectez directement le Soundbar.
• HDMI-CEC peut ne pas être activé sur le téléviseur. Activez
le CEC dans le menu du téléviseur. (Téléviseur Samsung :
Accueil ( ) → Menu → Paramètres ( ) → Tous les
paramètres ( ) → Connexion → External Device Manager
→ Anynet+ (HDMI-CEC) ON)
Le Soundbar ne se connecte pas par Bluetooth.
• Lors de la connexion d’un nouvel appareil, passez à « BT
PAIRING » pour la connexion. (Appuyez sur le bouton
PAIR de la télécommande ou sur le bouton (Marche/
Arrêt microphone) de l’unité pendant au moins
5 secondes.)
• Reconnectez l’appareil après avoir supprimé la liste
des haut-parleurs Bluetooth sur l’appareil à connecter.
(Téléviseur Samsung : Accueil ( ) → Menu → Paramètres
( ) → Tous les paramètres ( ) → Son → Sortie audio →
Liste des haut-parleurs Bluetooth)
Le son se coupe lors d’une connexion par Bluetooth.
• Certains appareils peuvent créer des interférences radio
s’ils sont trop proches du Soundbar (p. ex. fours à micro-
ondes, routeurs sans l, etc.).
• Si votre appareil connecté par Bluetooth est trop éloigné
du Soundbar, il est possible que le son soit coupé.
Rapprochez l’appareil du Soundbar.
• Si une partie de l’unité est en contact avec l’émetteur-
récepteur Bluetooth ou si le produit est installé sur un
meuble en métal, une coupure du son peut se produire.
Vériez l’environnement d’installation et les conditions
d’utilisation.
Le Soundbar ne se connecte pas par Wi-Fi.
• Assurez-vous que le routeur sans l est sous tension, puis
reconnectez-le après l’avoir redémarré.
• Le Soundbar ne peut pas se connecter si le signal sans l
est trop faible. Placez le routeur plus près du Soundbar
ou éliminez tout obstacle entre le Soundbar et le routeur,
dans la mesure du possible.
Le Soundbar ne s’allume pas automatiquement avec le
téléviseur.
• Lorsque vous éteignez le Soundbar tout en regardant la
télévision, la synchronisation de l’alimentation avec le
téléviseur est désactivée. Éteignez d’abord le téléviseur.
07 LICENCE
Dolby, Dolby Atmos, and the double-D symbol are registered
trademarks of Dolby Laboratories Licensing Corporation.
Manufactured under license from Dolby Laboratories.
Condential unpublished works.
Copyright © 2012-2021 Dolby Laboratories. All rights reserved.
For DTS patents, see http://patents.dts.com. Manufactured
under license from DTS, Inc. (for companies headquartered in
the U.S./Japan/Taiwan) or under license from DTS Licensing
Limited (for all other companies). DTS, DTS:X, and the DTS:X
logo are registered trademarks or trademarks of DTS, Inc. in
the United States and other countries. © 2021 DTS, Inc. ALL
RIGHTS RESERVED.
Les termes HDMI, HDMI High-Denition Multimedia Interface,
la présentation commerciale HDMI et les logos HDMI sont
des marques ou des marques déposées de HDMI Licensing
Administrator, Inc.
• Utilisez votre téléphone, tablette ou ordinateur comme
une télécommande pour Spotify. Accédez à spotify.com/
connect pour savoir comment faire
• Le logiciel Spotify est soumis à des licences tierces
disponibles ici : https://www.spotify.com/connect/third-
party-licenses.
Pour envoyer des demandes de renseignements et questions
concernant les sources libres, communiquez avec Samsung
Open Source (http://opensource.samsung.com)
• Apple, AirPlay, iPhone, iPad et Mac sont des marques
commerciales d’Apple Inc. enregistrées aux États-Unis et
dans d’autres pays.
• L’emblème « Works with Apple » signie qu’un accessoire
a été conçu pour fonctionner spéciquement avec la
technologie indiquée et a été certié par le développeur
comme étant conforme aux normes de performance d’Apple.
08 REMARQUE IMPORTANTE
CONCERNANT LE SERVICE
Les chiffres et les illustrations contenus dans ce Guide
d’utilisation sont fournis à titre de référence uniquement et
pourraient ne pas représenter exactement le produit.
09 SPÉCIFICATIONS ET GUIDE
Nom du modèle
HW-Q900C
Poids
17,0 lb (7,7 kg)
Dimensions (L × H × P)
48,5 x 2,7 x 5,4 po
(1232,0 x 69,5 x 138,0 mm)
Plage de températures de
fonctionnement
+50 °F à +104 °F
(+10 °C à +40 °C)
Plage d’humidité de
fonctionnement
10 % à 80 %,
sans condensation
Température d’entreposage
-4 °F à +113 °F
(-20 °C à +45 °C)
Humidité d’entreposage
5 % à 95 %,
sans condensation
AMPLIFICATEUR
Puissance de sortie nominale
(18 W x 4) + (10 W x 2) + (18 W x 2) + (10 W x 1) + (18 W x 6)
Formats de lecture pris en charge
Dolby 5.1ch / Dolby Digital Plus / Dolby TRUE HD /
Dolby ATMOS / DTS 5.1ch / DTS HD /
DTS-HD Master Audio / DTS:X / LPCM 8Ch
Nom du caisson de basses
PS-WC90B
Poids
25,8 lb (11,7 kg)
Dimensions (L × H × P)
8,7 x 16,3 x 16,1 po
(220,0 x 413,0 x 410,0 mm)
AMPLIFICATEUR
Puissance de sortie nominale
200 W
REMARQUE
• Samsung Electronics Co., Ltd se réserve le droit de modier
les spécications sans préavis.
• Le poids et les dimensions sont approximatifs.
Précautions : Le Soundbar redémarrera automatiquement si
vous activez/désactivez le Wi-Fi.
Méthode de désactivation du port Wi-Fi
Appuyez sur le bouton CH LEVEL de la télécommande du
Soundbar pendant 30 secondes pour activer/désactiver le
Wi-Fi.
Méthode de désactivation du port Bluetooth
Appuyez sur le bouton TONE CONTROL de la télécommande
du Soundbar pendant 30 secondes pour activer/désactiver le
Wi-Bluetooth.


 1
1
 2
2


Samsung HW-Q910C Manuel utilisateur
Samsung HW-Q700A Manuel utilisateur
Samsung HW-Q900A Manuel utilisateur
Samsung HW-Q800A Manuel utilisateur
Samsung HW-Q950A Manuel utilisateur
Samsung HW-Q950T Manuel utilisateur