
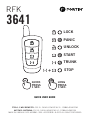
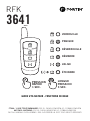
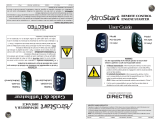
RFK
3641
STOP
LOCK
UNLOCK
START
TRUNK
PANIC
QUICK
PRESS
1 SEC.
LONG
PRESS
3 SEC.
FTX84 : 1-WAY REMOTES: FCC ID : 2ACKU-R1W02FM / IC : 12084A-R1W02FM
ANT-FM3 : ANTENNA : FCC ID : 2ACKU-A2W01FM / IC : 12084A-A2W01FM
MADE IN CANADA / DOC.#103961 / REV : A20220919 / © 2022 ALL RIGHTS RESERVED
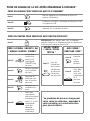
QUICK USER GUIDE

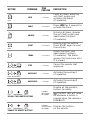
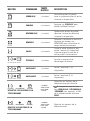
BUTTON COMMAND TIME
PRESSED DESCRIPTION
PRESS
LOCK 1 SECOND
Locks all doors, arms the
anti-theft system and
activates the Alarm
(if available).
PRESS
PANIC 3 SECONDS Press LOCK for 3seconds to
activate the Panic.
PRESS
UNLOCK 1 SECOND
Unlocks all doors, disarms
the anti-theft system and
deactivates the Alarm
(if available).
PRESS
START 3 SECONDS
Remote start the vehicle.
Press START again to reset
the runtime.
PRESS
TRUNK 3 SECONDS
Opens the trunk, and
deactivates the Alarm
(if available). The Alarm
ignores the trunk zone until
it is closed.
PRESS RELEASE PRESS
STOP 1 SECOND Cancel the remote start
sequence.
PRESS RELEASE PRESS
AUXILIARY1 1 SECOND Activates the auxiliary1
(if available).
PRESS RELEASE PRESS
AUXILIARY2 1 SECOND Activates the auxiliary2
(if available).
PRESS SIMULTANEOUSLY PRESS
DISABLE THE REMOTE BUTTONS
3 SECONDS
UNTIL THE RED
LED TURN ON
Disable all the remote’s
buttons for safety.
The RED LED will come
on whenever a button is
pressed when the remote is
DISABLED.
PRESS SIMULTANEOUSLY PRESS
ENABLE THE REMOTE BUTTONS
3 SECONDS
UNTIL THE GREEN
LED TURN ON
Enables the buttons
on the remote.

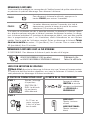
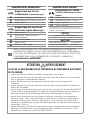
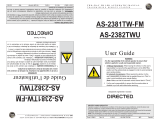
REMOTE STARTING
When leaving the vehicle it is recommended that the driver pre-set the climate controls in
preparation for a later remote start. To remote start the vehicle :
STEP 1 To remote-start the vehicle press the START button for
approximately 3 second
STEP 2 Approximately 5 seconds later the engine will crank and
run for the selected runtime (15 minutes by default).
If the vehicle fails to start on the rst attempt, the Remote-Starter will wait 3 seconds
before it will attempt to start the vehicle again. The Remote-Starter will attempt to start
the vehicle 2 times (default) before giving up. (See Failed Remote Start, on the complete
user guide). RUNTIME : On gas engines the Remote-Starter can run the vehicle for either
15 (default), 3 or 7 minutes. On diesel engines either 30 (default), 6, or 15 minutes.
REMOTE STARTING FROM FACTORY KEY FOB
IF OPTION AVAILABLE. To remote start the vehicle with the factory key fob :
PRESS LOCK 3TIMES (By default)
or PRESS LOCK UNLOCK LOCK. Remote-start the vehicle.
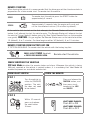
WHEN SERVICING THE VEHICULE
Valet Mode disables the remote starter and alarm. Whenever the vehicle is being
serviced, repaired or the vehicle is parked indoors; it is mandatory that Valet Mode be
enabled to prevent an accidental remote start.
FROM VALET SWITCH FROM THE REMOTE
STEP 1
Turn the vehicle ig-
nition to (ON/RUN)
position. The vehi-
cle does not need
to be started.
(
(
Press and release the
FUNCTION button, and
than press simul-
taneously the LOCK
andUNLOCK.
STEP 2
Within 10 seconds
press and release
the valet button
3times.
X3
FM-3
VALET MODE ENABLED:
The LED is ON
VALET MODE DISABLED:
The LED is OFF

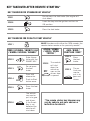
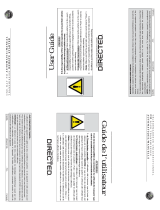
KEY TAKEOVER AFTER REMOTE STARTING*
KEY TAKEOVER FOR STANDARD KEY VEHICLE*
STEP 1 Do not press the foot brake (the engine will
shut down).
STEP 2 Insert the key into the ignition and turn to
ON position.
STEP 3 Press the foot brake.
KEY TAKEOVER FOR PUSH-TO-START VEHICLE*
STEP 1 UNLOCK the doors with either the OEM remote, the
remote-starter remote or the proximity remote*.
FORD / HYUNDAI / INFINITI / KIA
/ MAZDA / NISSAN / SUBARU*
ACURA / HONDA
/ LEXUS / SCION
TOYOTA *
AUDI / BMW /
CHRYSLER / GMC*
STEP 2
Enter the ve-
hicle with the
SMART-KEY. STEP 2
OFF
The module
will shut
down the
vehicle as
soon as the
drivers door
is opened.
STEP 2 Press
the foot
brake.
STEP 3
Do not press
the foot
brake. STEP 3 The ve-
hicle can
now be
put in to
gear and
driven.
STEP 4
X1
Press and
release the
Push-to-Start
button once.
STEP 5 Press the foot
brake.
STEP 6
The vehicle
can now be
put in to gear
and driven.
If the Smart-
Key is not
detected the
vehicle will
shut down.
*The remote starter key takeover may
vary by vehicle, ask your adviser or
technician for details.

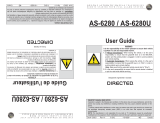
REMOTE START DIAGNOSTICS* ALARM DIAGNOSTICS*
Parking Light ashes
(beforestarting) :
Parking Light ashes
(afterdisarm) :
3x Ready mode disabled 3x Door open – zone 3
4x Valet mode activated
(The LED is on)
4x Shock sensor – zone 4
5x Hood open – zone 5
5x Hood open 6x Trunk open – zone 6
Parking Light ashes
(after Shutdown) :
*The parking light diagnostics can not be used on
some vehicles equipped with automatic lights.
1x Normal stop (Brake, Park Brake) RANGE
Up to 800m/2800ft
BATTERY
BATTERY REQUIRED : 1x CR2032
AVERAGE BATTERY LIFE : 24 months
3x Runtime expired or shut down
by transmitter
4x No tachometer signal
5x Hood open
6x Fail to start
THANK YOU FOR PURCHASING THIS REMOTE-STARTER/ALARM SYSTEM.
WE RECOMMEND THAT YOU DOWNLOAD AND THOROUGHLY REVIEW THE
COMPLETE USER MANUAL FOR MORE INFORMATION ABOUT THE REMOTE
STARTER / ALARM SYSTEM AT :
evoremotestart.com/RFK3641
CAUTION WARNING
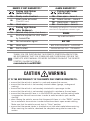
IT IS THE RESPONSIBILITY OF THE REMOTE CAR STARTER OPERATOR TO :
•ensure that the vehicle is parked in a safe and responsible manner.
•ensure that the vehicle is not remotely started indoors (garage, underground
parking).
•ensure that the vehicle is not remotely started with a passenger inside.
•ensure that the vehicle is not remotely started with a window or the roof open.
•ensure that the gearshift lever is in the NEUTRAL position and the parking brake
is engaged on manual transmission in order to avoid accidents upon remote
starting.
•when leaving the vehicle, ensure that the gearshift lever is in the “PARK” position
for an automatic transmission in order to avoid accidents upon remote starting.
Make sure that the vehicle cannot start in “Drive” position.
•ensure that the remote starter is disabled or put into valet mode before servicing.
When servicing the vehicle, download the complete user guide for more infor-
mation.

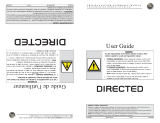
GUIDE UTILISATEUR - FONCTIONS DE BASE
RFK
3641
RFK
3641
ÉTEINDRE
VERROUILLE
DÉVERROUILLE
DÉMARRE
VALISE
PANIQUE
PRESSION
RAPIDE
1 SEC.
LONGUE
PRESSION
3 SEC.
RFK
3641
ÉTEINDRE
VERROUILLE
DÉVERROUILLE
DÉMARRE
VALISE
PANIQUE
PRESSION
RAPIDE
1 SEC.
LONGUE
PRESSION
3 SEC.
FTX84 : 1-VOIE TÉLÉCOMMANDES FCC ID : 2ACKU-R1W02FM /IC : 12084A-R1W02FM
ANT-FM3 : ANTENNE : FCC ID : 2ACKU-A2W01FM / IC : 12084A-A2W01FM
FAIT AU CANADA / DOC.#103961 / REV : A20220919 / © 2022 TOUS DROITS RÉSERVÉS

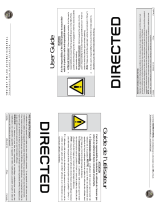
BOUTON COMMANDE TEMPS
D’APPUI DESCRIPTION
PRESSION
VERROUILLE 1 SECONDE
Verrouille toutes les portes,
arme le système antivol et active
l’alarme (si disponible).
PRESSION
PANIQUE 3 SECONDES Appuyez sur VERROUILLE pour
activer le Mode Panique.
PRESSION
DÉVERROUILLE 1 SECONDE
Déverrouille toutes les portes,
désarme l’antivol et désactive
l’alarme (si disponible)
PRESSION
DÉMARRE 3 SECONDES
Démarrer à distance le véhicule.
Appuyez de nouveau sur
DÉMARRE pour réinitialiser le
temps de fonctionnement.
PRESSION
VALISE 3 SECONDES
Ouvre la valise (coffre) et dés-
active l’alarme (si disponible).
L’alarme ignore la zone de la
valise jusqu’à sa fermeture.
PRESSION RELÂCHE PRESSION
ÉTEINDRE 1 SECONDE Annule la séquence de
démarrage à distance.
PRESSION RELÂCHE PRESSION
AUXILIAIRE1 1 SECONDE Active l’auxiliaire 1 (si
disponible).
PRESSION RELÂCHE PRESSION
AUXILIAIRE2 1 SECONDE Active l’auxiliaire 2 (si
disponible).
PRESSION SIMULTANÉMENT PRESSION-
DÉSACTIVE LES BOUTONS DE LA
TÉLÉCOMMANDE
3 SECONDES
JUSQU’À CE QUE
LA DEL ROUGE
S’ALLUME
Désactive les boutons de la
télécommande par sécurité.
À chaque fois que les bou-
tons VERROUILLE / DÉVERROUILLE
/ DÉMARRE sont appuyés, la DEL
de la télécommande allumera
ROUGE.
PRESSION SIMULTANÉMENT PRESSION
RÉACTIVE LES BOUTONS DE LA
TÉLÉCOMMANDE
3 SECONDES
JUSQU’À CE QUE
LA DEL VERTE
S’ALLUME
Réactive les boutons de la
télécommande.
DIAGNOSTIQUE
des DELs
LORSQUE LA DEL BLEU DE LA TÉLÉCOMMANDE CLIGNOTE
6FOIS ET QUE LA DEL ROUGE S’ALLUME UNE SECONDE: Le véhicule est hors de portée.
LORSQUE LA TÉLÉCOMMANDE ÉMET UN LONG BIP
ET QUE LA DEL ROUGE S’ALLUME UNE SECONDE: Les boutons de la télécommande sont désactivés.
LORSQUE LA TÉLÉCOMMANDE ÉMET UN BIP
ET QUE LA DEL VERTE S’ALLUME UNE SECONDE: La commande à été envoyée avec succés.

DÉMARRAGE À DISTANCE
Il est conseillé de prérégler les commandes de l’habitacle avant de quitter votre véhicule,
en prévision du prochain démarrage. Pour démarrer à distance :
ÉTAPE 1 Pour démarrer à distance le véhicule, appuyez sur le
bouton DÉMARRE pour environ 3 secondes.
ÉTAPE 2
Le moteur démarrera environ 5 secondes plus tard et
demeurera en marche le temps de marche du moteur
sélectionné (15minutes par défaut).
Si le véhicule ne démarre pas dès la première tentative, le démarreur à distance s’étein-
dra, attendra quelques secondes et tentera à nouveau de démarrer le moteur. Le démar-
reur à distance procédera à 2 tentatives de démarrage par défaut, mais peut être modié
dans la programmation pour 1 ou 3 tentatives, avant d’abandonner en cas d’échecs
répétés. (Voir le guide de l’utilisateur complet : Échec au démarrage àdistance) Temps
de mise en marche du moteur : 15 (par défaut), 3 ou 7 minutes. Pour un moteur diesel,
30 (par défaut), 6 ou 15 minutes.
DÉMARRAGE À DISTANCE AVEC LA CLÉ D’ORIGINE
SI DISPONIBLE. Pour démarrer à distance à partir de votre clé d’origine :
APPUYEZ SUR VERROUILLE 3 FOIS (par défaut)
ou APPUYEZ SUR VERROUILLE DÉVERROUILLE VERROUILLE
Démarre à dis-
tance le véhicule.
LORS D’UN ENTRETIEN DU VÉHICULE
Mode Valet désactive le démarrage à distance ainsi que l’alarme et le coupe moteur.
Si le véhicule doit être laissé en réparation, ou si vous le stationnez à l’intérieur, le mode
valet préviendra les démarrages à distance accidentels.
À PARTIR DU COMMUTATEUR VALET À PARTIR DE LA TÉLÉCOMMANDE
ÉTAPE 1Tournez l’allumage
à la position :
IGNITION ON /
RUN. Le véhicule
n’a pas besoin
d’être démarré.
(
(
Appuyer et relâcher
FONCTION et ensuite
appuyer simultanément
sur VERROUILLE et
DÉVERROUILLE
ÉTAPE 2
En 10 sec. ou
moins, appuyez
3 fois sur le bou-
ton du valet.
X3
FM-3
MODE VALET :
Témoin lumineux
allumé
MODE FONCTIONNEL :
Témoin lumineux
éteint

PRISE EN CHARGE DE LA CLÉ APRÈS DÉMARRAGE À DISTANCE*
PRISE EN CHARGE POUR VÉHICULES AVEC CLÉ STANDARD*
ÉTAPE 1 Ne pas appuyer sur la pédale de frein (le
moteur s’éteindra).
ÉTAPE 2 Insérez la clé dans l’allumage et tournez la clé
à la position ON.
ÉTAPE 3 Appuyer sur la pédale de frein.
PRISE EN CHARGE POUR VÉHICULES AVEC BOUTON POUSSOIR*
ÉTAPE 1
DÉVERROUILLEZ les portes avec soit: la télécom-
mande d’origine, la télécommande du démarreur
à distance ou celle de proximité*.
FORD / HYUNDAI / INFINITI / KIA
/ MAZDA / NISSAN / SUBARU*
ACURA / HONDA
/ LEXUS / SCION
TOYOTA *
AUDI / BMW /
CHRYSLER / GMC*
ÉTAPE 2
Entrez dans
le véhicule
avec la clé
intelligente
(SMART-Key)
sur vous.
ÉTAPE 2
OFF
Lors de
l’ouverture
de la porte
conducteur
le véhicule
s’éteindra
par sécurité.
ÉTAPE 2 Appuyer
sur la
pédale
defrein.
ÉTAPE 3
Ne pas appuyer
sur la pédale
de frein. ÉTAPE 3 Vous êtes
mainte-
nant prêt
àembrayer
et à
prendre
laroute.
ÉTAPE 4
X1
Appuyez et
relâchez une
fois le bouton
poussoir.
ÉTAPE 5
Appuyer sur
la pédale de
frein.
ÉTAPE 6
Vous êtes
maintenant
prêt à embrayer
et prendre la
route. Si la clé
intelligente
n’est pas
détectée
le véhicule
s’éteindra.
*La procédure de prise en charge peut
varier selon les véhicules, demandez à
votre conseiller ou à votre technicien
pour plus de détails.

DIAGNOSTIQUES DÉMARREUR* DIAGNOSTIQUES ALARME*
Diagnostique des feux de
stationnement (avant démarrage) :
Diagnostique de l’alarme
(feux de stationnement et sirène/
klaxon) :
3x Mode Prêt à démarrer désactivé 3x Porte – zone 3
4x Mode valet actif (Le témoin est allumé) 4x Détecteur de choc – zone 4
5x Capot ouvert 5x Capot – zone 5
6x Valise – zone 6
Diagnostique des feux de sta-
tionnement (après démarrage):
*Le diagnostique de feux de stationnement ne
peut être utilisé sur certains véhicules équipés de
lumières automatiques.
1x Arrêt normal PORTÉE
Jusqu’à 800m/2800pieds.
BATTERIE
BATTERIE REQUISE : 1x CR2032
DURÉE DE VIE MOYENNE: 24 mois
3x Arrêt après 15min ou par la
télécommande
4x Pas de tachymètre
5x Capot ouvert
6x Échec au démarrage
MERCI D’AVOIR ACHETÉ CE SYSTÈME DE DÉMARREUR À DISTANCE ET
SYSTÈME DE SÉCURITÉ. NOUS VOUS RECOMMENDONS DE TÉLÉCHARGER
ET DE LIRE ENTIÈREMENT LE GUIDE D’UTILISATION COMPLET POUR PLUS
D’INFORMATIONS SUR LE DÉMARREUR À DISTANCE / ALARME AU :
evoremotestart.com/RFK3641
ATTENTION AVERTISSEMENT
IL EST DE LA RESPONSABILITÉ DE L’OPÉRATEUR DU DÉMARREUR À DISTANCE
DE S’ASSURER :
•que le véhicule est stationné de façon convenable et sécuritaire.
•que le véhicule n’est jamais démarré à distance dans des endroits clos ou non aérés
tels un garage ou stationnement intérieur.
•que le véhicule n’est jamais démarré à distance alors qu’un passager est à
l’intérieur.
•que le véhicule n’est jamais démarré à distance alors qu’une fenêtre est ouverte ou
que le toit est ouvert.
•que le levier de vitesse du véhicule à transmission manuelle est en position NEUTRE
et que le frein de stationnement est appliqué de façon adéquate avant de quitter le
véhicule an d’éviter tout dommage au moment du démarrage à distance.
•que le levier de transmission de vitesse du véhicule à transmission automatique
est en position « Park » avant de quitter le véhicule an d’éviter tout dommage au
moment du démarrage à distance. (Remarque : Il faut s’assurer que le véhicule à
transmission automatique ne peut être démarré lorsque le levier de transmission est
en position « Drive »).
•que le démarreur à distance est désactivé ou bien en mode valet avant de coner le
véhicule à un mécanicien, un technicien affecté à l’entretien ou à un tiers. Il faut
désactiver le système en activant le MODE VALET.
-
 1
1
-
 2
2
-
 3
3
-
 4
4
-
 5
5
-
 6
6
-
 7
7
-
 8
8
-
 9
9
-
 10
10


dans d''autres langues
- English: Fortin RFK 3641 User guide
Documents connexes
Autres documents
-
Orbit OB-3485 Le manuel du propriétaire
-
 Autostart AS-2385TWS Le manuel du propriétaire
-
 Autostart GS-2371TW-FM Le manuel du propriétaire
-
 AstroStart TWO -WAY FM LED AUTOMATIC/MANUAL TRANSMISSION REMOTE STARTER Manuel utilisateur
-
 Autostart AS-2382TWU Le manuel du propriétaire
-
Orbit OB-2482 Le manuel du propriétaire
-
 PolarStart GS-1875FM Manuel utilisateur
-
 Autostart AS-6280 Manuel utilisateur
-
 Autostart GS2.8SH Le manuel du propriétaire


