SW-Motech HDG.00.220.21600/B Mounting instructions
- Taper
- Mounting instructions

ANBAUANLEITUNG
mounting instructions • instructions de montage • instrucciones de montaje • istruzioni di montaggio
beinhaltet • contains • contient • contiene • contiene
HDG.00.220.21600/B
HDG.00.220.81600/B
HDG.00.220.10300/B

Art.-Nr.: HDG.00.220.81600/B Revision: 00 · Datum: 11 - 2023
Handprotektoren Montage-Kit
~ 0.5 h. LEICHT SCHWER
DEUTSCH · Vielen Dank, dass Sie sich für dieses Premium-Produkt von SW-
MOTECH entschieden haben. Besuchen Sie unseren Webshop für weitere
Informationen (z. B. Modellzuweisungen). Erforderliche Dokumente (z. B.
ABE) stehen Ihnen dort als Download zur Verfügung.
Bitte lesen und verstehen Sie alle Anweisungen, Sicherheitshinweise und
Warnungen in dieser Anbauanleitung vor Montage und Nutzung des
Produkts, um Verletzungen und Schäden zu vermeiden. Bewahren Sie diese
Anbauanleitung als Referenz auf.
Dieses Produkt wurde für Fahrzeuge im Werkszustand entwickelt. Die
Kompatibilität mit Original-Zubehörteilen bzw. den Zubehörteilen anderer
Hersteller kann nicht gewährleistet werden.
Diese Anbauanleitung ist nach unserem derzeitigen Kenntnisstand verfasst
worden. Rechtliche Ansprüche auf Richtigkeit bestehen nicht. Fehler und
Irrtümer vorbehalten. Technische und gestalterische Änderungen sind
vorbehalten. Das Urheberrecht liegt bei SW-MOTECH.
SICHERHEITSWARNUNGSSYMBOL
Dieses Warnsymbol wird in dieser Anbauanleitung verwendet, um vor
tödlichen Gefahren, Verletzungen oder anderen Gefahren zu warnen. Die
Wörter GEFAHR, WARNUNG oder VORSICHT werden mit diesem
Warnsymbol verwendet, um wichtige Sicherheitshinweise und
Informationen in Bezug auf die Montage und Nutzung dieses Produkts zu
übermitteln. Diese Wörter zusammen mit dem Sicherheitswarnsymbol
bedeuten:
GEFAHR: Weist auf eine gefährliche Situation hin, die zum Tod oder zu
schweren Verletzungen führt, wenn sie nicht vermieden wird!
WARNUNG: Weist auf eine gefährliche Situation hin, die zum Tod oder zu
schweren Verletzungen führen kann, wenn sie nicht vermieden wird!
VORSICHT: Weist auf eine gefährliche Situation hin, die zu leichten oder
mittelschweren Verletzungen führen kann, wenn sie nicht vermieden wird!
HINWEIS: Wichtige Informationen, jedoch nicht in Bezug auf Todes- oder
Verletzungsgefahr (nur Sachschäden)!
ALLGEMEINE HINWEISE
WARNUNG: Die Montage und/oder Wartung dieses Produkts erfordert
fortgeschrittene technische Fähigkeiten, geeignetes Werkzeug und ein
gutes Verständnis der Werkzeugnutzung und Drehmomentangaben. Zu
Ihrer eigenen Sicherheit empfiehlt SW-MOTECH, die Montage und/oder
Wartung von einer qualifizierten und zertifizierten Zweiradwerkstatt
durchführen zu lassen.
WARNUNG: Wenn Sie sich für die Eigenmontage dieses Produkts
entscheiden, lesen Sie vor Montage und Nutzung die Anbauanleitung
sorgfältig und vollständig durch und befolgen Sie alle Anweisungen, um
schwere oder tödliche Verletzungen zu vermeiden. Beachten Sie bei der
Montage und Verwendung auch alle relevanten Informationen im
Fahrzeughandbuch. WENN SIE EINEN TEIL DIESER ANBAUANLEITUNG
NICHT VERSTEHEN ODER EINE ERKLÄRUNG EINER ANWEISUNG
BENÖTIGEN, VERSUCHEN SIE NICHT DIESES PRODUKT ZU MONTIERN,
OHNE SW-MOTECH UM HILFE ZU FRAGEN!
VORBEREITUNG: Lesen Sie die Anbauanleitung aufmerksam und stellen Sie
sicher, dass alle Teile der Stückliste vorhanden sind.
VORSICHT: Achten Sie auf den sicheren Stand Ihres Fahrzeugs.
Schalten Sie den Motor ab und ziehen Sie den Zündschlüssel. Lassen Sie
den Motor/Auspuff bei Bedarf abkühlen. Klemmen Sie die Batterie bei
Arbeiten an der Elektrik ab. Verwenden Sie nur geeignetes Werkzeug und
tragen Sie während der Montage und Wartung immer eine Schutzbrille
und Handschuhe. Lassen Sie sich bei der Montage und Wartung von einer
zweiten Person helfen.
MONTAGE: Alle vom Fahrzeug entfernten Teile und Verbindungen müssen
gemäß den Angaben des Fahrzeugherstellers wieder eingebaut oder durch
von SW-MOTECH gelieferte Teile und Hardware ersetzt werden.
WARNUNG: Sichern Sie alle Gewinde, sofern nicht anders angegeben,
mit mittelstarker, flüssiger Schraubensicherung.
GEFAHR: Von SW-MOTECH nicht definierte Anzugsdrehmomente
müssen Sie vom Fahrzeughersteller oder von einer zertifizierten
Motorradwerkstatt beziehen.
FUNKTIONSKONTROLLE: Stellen Sie nach der Montage sicher, dass keine
beweglichen Teile blockiert sind und die Funktion des Fahrzeugs nicht
gestört wird. Kabel und Schläuche dürfen nicht scheuern und/oder
geklemmt werden.
WARNUNG: Führen Sie vor Fahrtbeginn eine umfassende
Funktionskontrolle durch. Prüfen Sie nach den ersten 50 km und dann
regelmäßig das Anzugsmoment aller Verbindungen und den festen Sitz
des Produkts. Montiertes Zubehör kann das Fahrverhalten und die
Stabilität des Fahrzeugs verändern.
ANBAUANLEITUNG · ANBAUANLEITUNG LESEN UND AUFBEWAHREN!
SW-MOTECH GmbH & Co. KG
Ernteweg 7-10
35282 Rauschenberg
Deutschland
www.sw-motech.com
Die inhaltliche Übersetzung erfolgt automatisiert.
© SW-MOTECH GmbH & Co. KG
Irrtümer und Änderungen vorbehalten.
Technische und Design-Änderungen vorbehalten.
1

Beachten Sie in dem Abschnitt MONTAGE
vorkommenden Symbole und deren Bedeutung.
Wenn im Abschnitt MONTAGE die Bezeichnung OEM
vorkommt, müssten die Vorgaben des
Fahrzeugherstellers beachtet und angewandt
werden.
Bei Fragen steht Ihnen unser Kundendienst sowie unsere
Distributoren gerne zur Verfügung. Unsere
Telefonnummer sowie eine Liste unserer Distributoren
finden Sie in unserem Webshop:
www.sw-motech.com
Schraubensicherung verwenden: Weist darauf hin,
dass ein Gewinde mit flüssiger Schraubensicherung
bestrichen werden muss. H (HIGH): hohe Festigkeit;
M (MEDIUM): mittlere Festigkeit; L (LOW): niedrige
Festigkeit.
Anziehen / Anzugsmomentangabe beachten: Weist auf
das von SW-MOTECH bzw. vom Fahrzeughersteller (OEM)
vorgegeben Anzugsmoment eines Teils hin.
LEGENDENüBERSICHT · ANBAUANLEITUNG LESEN UND AUFBEWAHREN!
Die inhaltliche Übersetzung erfolgt automatisiert.
© SW-MOTECH GmbH & Co. KG
Irrtümer und Änderungen vorbehalten.
Technische und Design-Änderungen vorbehalten.
2

STüCKLISTE · ANBAUANLEITUNG LESEN UND AUFBEWAHREN!
Die inhaltliche Übersetzung erfolgt automatisiert.
© SW-MOTECH GmbH & Co. KG
Irrtümer und Änderungen vorbehalten.
Technische und Design-Änderungen vorbehalten.
3
11
HDG.00.220.032L.25
1/1
2
HDG.00.220.032R.25
1/1
3
M6 x 75, DIN 912
SC.ST.06.075.02.912.088
2/2
4
HDG.00.220.012.25
2/2
5
LVG.01.971.001.35
2/2

1
1×1
2×1
3×2
M 8 Nm
4×2
5×2
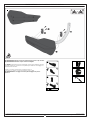
WARNUNG: Da das Handprotektoren Montage-Kit in einem
sicherheitsrelevanten Bereich des Fahrzeugs verbaut wird, empfiehlt SW-
MOTECH, die Montage/Wartung des Produkts von einer qualifizierten
Fachwerkstatt durchführen zu lassen!
WARNUNG: Tragen Sie immer Augen- und Handschutz!
WARNUNG: Verwenden Sie immer geeignetes Werkzeug!
HINWEIS: Die Montage ist linksseitig dargestellt. Wiederholen Sie die Montage
mit den entsprechenden Teilen auf der rechten Lenkerseite.
HINWEIS: Der gezeigte Lenker dient als Beispiel.
Demontieren Sie die original Endgewichte und Handprotektoren, falls
montiert.
Stellen Sie sicher, dass die Lenkerenden und das Innere des Lenkers frei
sind.
Verschrauben Sie die gezeigten Teile locker mit den Bügeln (1/2) an den
Lenkerenden.
WARNUNG: Verwenden Sie flüssige Schraubensicherung!
Positionieren Sie die Bügel (1/2) Ihrer Fahrergonomie entsprechend und
ziehen Sie die Schrauben (3) wie in der Anbauanleitung vorgegeben an.
GEFAHR: Falls das Platzangebot nach Montage aller Komponenten zu
knapp ist, muss die Brems- und Kupplungseinheit einige Millimeter in
Richtung Lenkerende bzw. Lenkermitte versetzt werden!
GEFAHR: Stellen Sie nach der Montage sicher, dass alle Schalter- und
Kontrolleinheiten, besonders der Gasgriff, Bremshebel, Notausschalter
und die Kupplung einwandfrei funktionieren und leicht zu bedienen sind!
Stellen Sie des Weiteren sicher, dass der Lenker in beide Richtungen voll
eingeschlagen werden kann. Sollten Teile des Produkts bei vollem
Lenkeinschlag Kontakt mit dem Tank oder anderen Fahrzeugkomponenten
haben, ist eine Neupositionierung des Produkts bzw. des Lenkers zwingend
notwendig!
Achten Sie dabei auf die Übereinstimmung mit den Fahrzeughersteller-
Vorgaben! Fahren Sie NICHT mit Ihrem Fahrzeug, wenn die Schalter- und
Kontrolleinheiten nicht korrekt funktionieren oder zu bedienen sind!
Führen Sie VOR jeder Fahrt eine vollständige Funktionskontrolle des
Lenkers und aller Armaturen durch!
ANBAUSCHRITT · ANBAUANLEITUNG LESEN UND AUFBEWAHREN!
Die inhaltliche Übersetzung erfolgt automatisiert.
© SW-MOTECH GmbH & Co. KG
Irrtümer und Änderungen vorbehalten.
Technische und Design-Änderungen vorbehalten.
4

PRODUKTSPEZIFISCHE HINWEISE
HINWEIS: Beachten Sie die landesspezifischen Vorschriften für
Zulassung/Betrieb Ihres Fahrzeugs bzw. anwendbare TÜV-Vorschriften. Lassen
Sie eintragungspflichtige Teile nach Montage durch Ihre Prüfstelle in die
Fahrzeugpapiere eintragen.
PRODUKTHINWEISE · ANBAUANLEITUNG LESEN UND AUFBEWAHREN!
Die inhaltliche Übersetzung erfolgt automatisiert.
© SW-MOTECH GmbH & Co. KG
Irrtümer und Änderungen vorbehalten.
Technische und Design-Änderungen vorbehalten.
5

Item number: HDG.00.220.81600/B Revision: 00 · Date: 11 - 2023
Handguard mounting kit
~ 0.5 h. EASY DIFFICULT
ENGLISH ·Thank you for choosing this premium product from SW-MOTECH.
Visit our online shop for more information (e.g. model assignments). Required
documents (e.g. national type approval) are available there for you to
download.
Please read and understand all the instructions, safety information and
warnings in these mounting instructions before mounting and using the
product in order to avoid injury and damage. Keep these mounting
instructions for reference.
This product was developed for vehicles in factory condition. Compatibility
with original accessories or accessories from other manufacturers cannot
be guaranteed.
These mounting instructions have been prepared to the best of our current
knowledge. No legal claims relating to accuracy can be made. Errors and
omissions excepted. We reserve the right to make technical and design
changes. The copyright is held by SW-MOTECH.
SAFETY WARNING SYMBOL
This warning symbol is used in these mounting instructions to warn of
deadly dangers, injuries or other hazards. The words DANGER, WARNING or
CAUTION are used as part of this warning symbol to convey important safety
messages and information relating to the installation and use of this
product. These words, together with the safety warning symbol, mean:
DANGER: Indicates a hazardous situation which, if not avoided, will result
in death or serious injury!
WARNING: Indicates a hazardous situation which, if not avoided, may
result in death or serious injury!
CAUTION: Indicates a hazardous situation which, if not avoided, may result
in minor or moderate injury!
NOTE: Important information, but not relating to a risk of death or injury
(property damage only)!
GENERAL INFORMATION
WARNING: Assembly and/or maintenance of this product requires
advanced technical skill, appropriate tools, and a good understanding of tool
usage and torque specifications. For your own safety, SW-MOTECH
recommends having the assembly and/or maintenance carried out by a
qualified and certified motorcycle workshop.
WARNING: If you do choose to assemble this product yourself, carefully
and fully read the mounting instructions before assembly and use, and
follow all instructions to avoid serious injury or death. Also observe all
relevant information in the vehicle manual when mounting or using the
product. IF YOU DO NOT UNDERSTAND ANY PART OF THESE MOUNTING
INSTRUCTIONS OR NEED AN EXPLANATION AS TO A SPECIFIC
INSTRUCTION, DO NOT ATTEMPT TO INSTALL THIS PRODUCT WITHOUT
CONSULTING SW-MOTECH FOR ASSISTANCE!
PREPARATION: Read the mounting instructions carefully and make sure
that all parts on the parts list are available.
CAUTION: Ensure that your vehicle is standing securely. Switch off the
engine and remove the ignition key. Allow the engine/exhaust to cool
down if necessary. Disconnect the battery when working on the electrical
system. Only use proper tools and always wear safety goggles and gloves
during assembly and maintenance. Have a second person help you with
assembly and maintenance.
ASSEMBLY: All parts and connections removed from the vehicle must be
reinstalled according to the vehicle manufacturer's specifications or
replaced with parts and hardware supplied by SW-MOTECH.
WARNING: Secure all threads with a medium-strength liquid
threadlocker, unless otherwise specified.
DANGER: Tightening torques not defined by SW-MOTECH must be
obtained from the vehicle manufacturer or a certified motorbike
workshop.
FUNCTIONAL CHECK:After mounting the product, ensure that no moving
parts are obstructed and that the function of the vehicle is not impeded.
Cables and hoses must not rub against each other and/or be hindered in any
way.
WARNING: Carry out a comprehensive functionality check before you
start to drive. Check the tightening torque of all connections and the tight
fit of the product after the first 50 km and then at regular intervals.
Mounted accessories can change the handling and stability of the vehicle.
MOUNTING INSTRUCTIONS · READ AND KEEP MOUNTING INSTRUCTIONS!
SW-MOTECH GmbH & Co. KG
Ernteweg 7-10
35282 Rauschenberg
Germany
www.sw-motech.com
The content translation is automated.
© SW-MOTECH GmbH & Co. KG
Errors and omissions excepted
Subject to technical and design changes.
1

Take note of the symbols and what they mean in the
ASSEMBLY section. If the term OEM appears in the
ASSEMBLY section, the vehicle manufacturer's
specifications must be observed and applied.
If you have any questions, please don't hesitate to contact
our Customer Service team or our distributors. You can
find our telephone number and a list of our distributors in
our online shop:
www.sw-motech.com
Use thread locker: Indicates that a thread must be
coated with liquid thread locker. H (HIGH): high
strength; M (MEDIUM): medium strength; L (LOW):
low strength.
Tighten/note the tightening torque information:
Indicates the tightening torque of a part specified by SW-
MOTECH or the vehicle manufacturer (OEM).
LEGEND OVERVIEW · READ AND KEEP MOUNTING INSTRUCTIONS!
The content translation is automated.
© SW-MOTECH GmbH & Co. KG
Errors and omissions excepted
Subject to technical and design changes.
2

PARTS LIST · READ AND KEEP MOUNTING INSTRUCTIONS!
The content translation is automated.
© SW-MOTECH GmbH & Co. KG
Errors and omissions excepted
Subject to technical and design changes.
3
11
HDG.00.220.032L.25
1/1
2
HDG.00.220.032R.25
1/1
3
M6 x 75, DIN 912
SC.ST.06.075.02.912.088
2/2
4
HDG.00.220.012.25
2/2
5
LVG.01.971.001.35
2/2

1
1×1
2×1
3×2
M 8 Nm
4×2
5×2
WARNING: The installation of this handguard mounting kit may
compromise the safety of your vehicle; SW-MOTECH recommends having
the assembly/maintenance of the product carried out by a specialized
professional!
WARNING: Always wear eye and hand protection!
WARNING: Always use the proper tools!
NOTE: Assembly is shown for the left side. Repeat the same process with the
corresponding parts on the right side of the handlebar.
NOTE: The handlebar shown is for illustrative purposes only.
Remove the original end weights and handguards, if mounted.
Ensure the handlebar ends and the inside of the handlebars are
unobstructed.
Loosely screw the parts indicated to the brackets (1/2) on the handlebar ends.
WARNING: Use a liquid threadlocker!
Position the brackets (1/2) according to your personal preferences and
tighten the screws (3) as specified in the mounting instructions.
DANGER: If there is not enough space after mounting all components, the
brake and clutch unit must be moved a few millimeters towards the end or
middle of the handlebar!
DANGER: After assembly, ensure that all switch and control units,
especially the throttle assembly, brake pedal, emergency stop and clutch,
function properly and are easy to use!
Also ensure that the handlebars can be fully turned in both directions. If
parts of the product come into contact with the tank or other vehicle
components when the steering wheel is at full lock, the product and/or the
handlebars must be repositioned!
Ensure that everything complies with the vehicle manufacturer's
specifications! DO NOT drive your vehicle if the switch and control units are
not functioning or operating correctly!
Carry out a complete functional check of the handlebars and all fittings
BEFORE each ride!
MOUNTING STEP · READ AND KEEP MOUNTING INSTRUCTIONS!
The content translation is automated.
© SW-MOTECH GmbH & Co. KG
Errors and omissions excepted
Subject to technical and design changes.
4

PRODUCT-SPECIFIC NOTES
NOTE: Observe the country-specific regulations for the registration/operation of
your vehicle or applicable TÜV regulations. After assembly, have parts that are
subject to registration entered in the vehicle documents by your test centre.
PRODUCT INFORMATION · READ AND KEEP MOUNTING INSTRUCTIONS!
The content translation is automated.
© SW-MOTECH GmbH & Co. KG
Errors and omissions excepted
Subject to technical and design changes.
5

Número de artículo: HDG.00.220.81600/B Revisión: 00 · Fecha: 11 - 2023
Kit de montaje para protectores de manos
~ 0.5 h. FÁCIL COMPLICADO
ESPAÑOL · Gracias por elegir este producto de primera calidad de SW-
MOTECH. Visite nuestra tienda online para obtener más información (p. ej.,
sobre el uso de los modelos). Desde esa página podrá descargar los
documentos que necesite (por ejemplo, la homologación nacional de tipo).
Para evitar lesiones y daños, asegúrese de leer y comprender todas las
instrucciones, advertencias de seguridad y precauciones de este manual
antes de montar y utilizar el producto. Guarde estas instrucciones de
montaje como referencia.
Este producto ha sido desarrollado para vehículos en condiciones de
fábrica. No se garantiza la compatibilidad con los accesorios originales o de
otros fabricantes.
Estas instrucciones de montaje se han redactado de acuerdo con nuestros
conocimientos actuales. No hay reclamaciones legales de corrección. Salvo
errores y omisiones. Nos reservamos el derecho a realizar cambios
técnicos y de diseño. Los derechos de autor pertenecen a SW-MOTECH.
SÍMBOLO DE ADVERTENCIA DE SEGURIDAD
Este símbolo de advertencia se utiliza en estas instrucciones de montaje
para advertir de peligros mortales, lesiones u otros riesgos. Las palabras
PELIGRO, ATENCIÓN o PRECAUCIÓN se utilizan con este símbolo de
advertencia para transmitir importantes avisos de seguridad e información
relacionada con el montaje y uso de este producto. Estas palabras, junto con
el símbolo de advertencia de seguridad, significan:
PELIGRO: Indica una situación de peligro que, si no se evita, provoca
lesiones graves o incluso la muerte.
ATENCIÓN: Indica una situación de peligro que, si no se evita, puede
provocar lesiones graves o incluso la muerte.
PRECAUCIÓN: Indica una situación de peligro que, si no se evita, puede
provocar lesiones leves o de gravedad media.
NOTA: Información importante, pero que no está relacionada con un
riesgo de lesiones o muerte (solo daños materiales).
INDICACIONES GENERALES
ATENCIÓN: El montaje y/o mantenimiento de este producto requiere
conocimientos técnicos avanzados, las herramientas apropiadas, un buen
manejo de dichas herramientas y conocer las especificaciones de los pares
de apriete. Por su propia seguridad, SW-MOTECH recomienda que el
montaje y/o el mantenimiento los realice un taller de motocicletas
cualificado y certificado.
ATENCIÓN: Si elige ensamblar este producto usted mismo, antes de
montarlo y usarlo, lea las instrucciones de montaje detenidamente y en su
totalidad, y siga todas las indicaciones para evitar lesiones graves o
mortales. Cuando monte y utilice el producto, tenga también en cuenta toda
la información relevante que figure en el manual del vehículo. SI NO
ENTIENDE ALGUNA PARTE DE ESTAS INSTRUCCIONES DE MONTAJE O
NECESITA ALGUNA ACLARACIÓN, NO INTENTE INSTALAR ESTE PRODUCTO
SIN CONSULTAR A SW-MOTECH PARA OBTENER AYUDA.
PREPARACIÓN: Lea atentamente las instrucciones de montaje y asegúrese
de que todas las piezas de la lista de piezas están presentes.
PRECAUCIÓN:Asegúrese de que su vehículo esté estacionado de
manera segura. Apague el motor y retire la llave de encendido. Deje que el
motor o el escape se enfríen si es necesario. Desconecte la batería cuando
trabaje en el sistema eléctrico. Utilice únicamente las herramientas
adecuadas y use siempre gafas de seguridad y guantes al realizar el
montaje y las tareas de mantenimiento. Pida a otra persona que le ayude
con el montaje y el mantenimiento.
MONTAJE: Todas las piezas y conexiones retiradas del vehículo deben ser
reinstaladas de acuerdo con las especificaciones del fabricante del vehículo
o sustituidas por piezas y herrajes suministrados por SW-MOTECH.
ATENCIÓN: Asegure todas las roscas con fijador de roscas líquido de
resistencia media, a menos que se especifique lo contrario.
PELIGRO: Los pares de apriete no definidos por SW-MOTECH deben
obtenerse del fabricante del vehículo o de un taller de motocicletas
certificado.
COMPROBACIÓN FUNCIONAL:Después del montaje, asegúrese de que no
haya piezas móviles bloqueadas y de que no se altere el funcionamiento del
vehículo. Los cables y tubos no deben rozarse ni quedar pinzados.
ATENCIÓN: Realice una comprobación exhaustiva del funcionamiento
antes de iniciar la marcha. Tras los primeros 50 km y, después, con
regularidad, compruebe el par de apriete de todas las conexiones y que el
producto está firmemente sujeto. Los accesorios instalados pueden
cambiar el comportamiento de conducción y la estabilidad del vehículo.
INSTRUCCIONES DE MONTAJE · LEE Y CONSERVA LAS INSTRUCCIONES DE MONTAJE!
SW-MOTECH GmbH & Co. KG
Ernteweg 7-10
35282 Rauschenberg
Alemania
www.sw-motech.com
La traducción del contenido es automática
© SW-MOTECH GmbH & Co. KG
Salvo errores y omisiones
Sujeto a cambios técnicos y de diseño.
1

Preste atención a los símbolos que figuran en la
sección de MONTAJE y su significado. Cuando, en la
sección de MONTAJE, aparecen las siglas OEM, se
deberán seguir y aplicar las especificaciones del
fabricante del vehículo.
Si tiene alguna pregunta, nuestro servicio de atención al
cliente y nuestros distribuidores estarán encantados de
prestarle ayuda. Encontrará nuestro número de teléfono
y una lista de nuestros distribuidores en nuestra tienda
online:
www.sw-motech.com
Usar fijador de roscas: Indica que una rosca debe
recubrirse con fijador de roscas líquido. H (HIGH):
resistencia alta; M (MEDIUM): resistencia media; L
(LOW): resistencia baja.
Respete la información del par de apriete: Indica el par
de apriete de una pieza especificada por SW-MOTECH o el
fabricante del vehículo (OEM).
RESUMEN DE LA LEYENDA · LEE Y CONSERVA LAS INSTRUCCIONES DE MONTAJE!
La traducción del contenido es automática
© SW-MOTECH GmbH & Co. KG
Salvo errores y omisiones
Sujeto a cambios técnicos y de diseño.
2

LISTA DE PIEZAS · LEE Y CONSERVA LAS INSTRUCCIONES DE MONTAJE!
La traducción del contenido es automática
© SW-MOTECH GmbH & Co. KG
Salvo errores y omisiones
Sujeto a cambios técnicos y de diseño.
3
11
HDG.00.220.032L.25
1/1
2
HDG.00.220.032R.25
1/1
3
M6 x 75, DIN 912
SC.ST.06.075.02.912.088
2/2
4
HDG.00.220.012.25
2/2
5
LVG.01.971.001.35
2/2

1
1×1
2×1
3×2
M 8 Nm
4×2
5×2
ATENCIÓN: El kit de fijación de los protectores de manos está instalado
en una zona del vehículo relevante para la seguridad. Por lo tanto, SW-
MOTECH recomienda que el montaje o el mantenimiento del producto lo
lleve a cabo un taller especializado cualificado.
ATENCIÓN: ¡Use siempre protección de ojos y manos!
ATENCIÓN: ¡Utilice siempre herramientas adecuadas!
NOTA: El montaje se muestra en el lado izquierdo. Repetir el montaje con las
piezas correspondientes en el lado derecho del manillar.
NOTA: El manillar que se muestra es un ejemplo.
Retire los contrapesos finales originales y los protectores de manos, si los
hubiera.
Asegúrese de que los extremos y el interior del manillar estén despejados.
Atornille sin apretar las piezas indicadas a los soportes (1/2) de los extremos
del manillar.
ATENCIÓN: ¡Utilice fijador de roscas líquido!
Coloque los soportes (1/2) según su ergonomía de conducción y apriete los
tornillos (3) como se especifica en las instrucciones de montaje.
PELIGRO: ¡Si no hay suficiente espacio después de montar todas las
piezas, el freno y el embrague deben moverse unos milímetros hacia el
extremo o el centro del manillar!
PELIGRO: Después del montaje, asegúrese de que todos los
interruptores y controles, especialmente el puño acelerador, el pedal del
freno, el interruptor de parada de emergencia y el embrague, funcionen
correctamente y se puedan utilizar con facilidad.
Asegúrese también de que el manillar se pueda girar completamente en
ambas direcciones. Si alguna pieza del producto entra en contacto con el
tanque u otros componentes del vehículo cuando el volante está
completamente girado, ¡es imprescindible reposicionar el producto o el
manillar!
¡Asegúrese de cumplir con las especificaciones del fabricante del vehículo!
¡NO conduzca su vehículo si el interruptor y los controles no funcionan o no
se pueden utilizar!
ANTES de cada salida, ¡compruebe que el manillar y todos los accesorios
funcionan correctamente!
PASO DE FIJACIóN · LEE Y CONSERVA LAS INSTRUCCIONES DE MONTAJE!
La traducción del contenido es automática
© SW-MOTECH GmbH & Co. KG
Salvo errores y omisiones
Sujeto a cambios técnicos y de diseño.
4

INDICACIONES ESPECÍFICAS DEL PRODUCTO
NOTA: Tenga en cuenta las normas específicas del país para la
matriculación/uso de su vehículo o las normas aplicables de la ITV. En caso de
piezas con registro obligatorio, su organismo de inspección debe registrarlas tras
el montaje en los documentos del vehículo.
INFORMACIóN SOBRE LOS PRODUCTOS · LEE Y CONSERVA LAS INSTRUCCIONES DE MONTAJE!
La traducción del contenido es automática
© SW-MOTECH GmbH & Co. KG
Salvo errores y omisiones
Sujeto a cambios técnicos y de diseño.
5

Numéro d‘article: HDG.00.220.81600/B Révision: 00 · Date: 11 - 2023
Kit de montage des protège-mains
~ 0.5 h. FACILE DIFFICILE
FRANÇAIS · Nous vous remercions d'avoir choisi ce produit haut de gamme
de SW-MOTECH. Visitez notre boutique en ligne pour plus d'informations (par
exemple affectation des modèles). Les documents nécessaires (par exemple
ABE) y sont disponibles en téléchargement.
Veuillez lire et prendre en compte toutes les instructions, les consignes de
sécurité et les avertissements contenus dans ce manuel de montage avant
de monter et d'utiliser le produit afin d'éviter toute blessure ou tout
dommage. Veuillez conserver la notice d'utilisation pour référence.
Ce produit a été développé pour des véhicules en configuration d'usine.
Nous ne sommes pas en mesure d'assurer la compatibilité avec les pièces
de rechange originales ou les pièces de rechange d'autres fabricants.
La présente notice d'installation a été élaborée conformément à nos
connaissances actuelles. Il n'existe aucun droit juridique à l'exactitude des
informations qu'elle contient. Sous réserve d'erreurs et de fautes. Sous
réserve de modifications techniques et conceptuelles. SW-MOTECH détient
les droits d'auteur.
SYMBOLE D'AVERTISSEMENT DE SÉCURITÉ
Ce symbole d'avertissement est utilisé dans ces instructions de montage
pour mettre en garde contre des dangers mortels, de blessures ou d'autres
risques. Les mots DANGER, ATTENTION ou RECOMMANDATION sont utilisés
avec ce symbole d'avertissement pour transmettre des consignes de
sécurité et des informations importantes concernant le montage et
l'utilisation de ce produit. Ces mots, associés au symbole d'avertissement
de sécurité, signifient :
DANGER : signale une situation dangereuse pouvant entraîner la mort ou
des blessures graves si elle n'est pas évitée !
ATTENTION : signale une situation dangereuse pouvant entraîner la mort
ou des blessures graves si elle n'est pas évitée !
PRUDENCE : Indique une situation dangereuse susceptible d'entraîner des
blessures de gravité réduite ou moyenne si elle se présente !
REMARQUE : Informations importantes, mais qui n'entraînent pas de
risque de décès ou de blessure (dommages matériels uniquement).
REMARQUES GÉNÉRALES
ATTENTION : le montage et/ou l'entretien de ce produit nécessite des
compétences techniques avancées, des outils appropriés et une bonne
compréhension de l'utilisation des outils et des indications de réglage. Pour
votre propre sécurité, SW-MOTECH recommande de confier le montage
et/ou l'entretien à un atelier de réparation de deux-roues qualifié et
certifié.
ATTENTION : si vous décidez de monter vous-même ce produit, lisez
attentivement et intégralement les instructions de montage avant le
montage et l'utilisation et suivez toutes les instructions afin d'éviter des
blessures graves ou mortelles. Lors du montage et de l'utilisation, tenez
également compte de toutes les informations pertinentes du manuel du
véhicule. SI VOUS NE COMPRENEZ PAS UNE PARTIE DE CE MANUEL
D'INSTALLATION OU SI VOUS AVEZ BESOIN D'EXPLICATIONS CONCERNANT
UNE INSTRUCTION, N'ESSAYEZ PAS D'INSTALLER CE PRODUIT SANS
DEMANDER DE L'AIDE À SW-MOTECH !
PRÉPARATION : Veuillez lire attentivement les instructions de montage et
assurez-vous que tous les éléments de la liste de pièces sont présents.
PRUDENCE : veillez à ce que votre véhicule soit bien stable. Éteignez le
moteur et retirez la clé de contact. Laissez refroidir le
moteur/l'échappement si nécessaire. Débranchez la batterie lorsque vous
travaillez sur le système électrique. Utilisez uniquement des outils
appropriés et portez toujours des lunettes de protection et des gants
pendant le montage et l'entretien. Faites-vous aider par une deuxième
personne lors du montage et de l'entretien.
MONTAGE : Toutes les pièces et connexions retirées du véhicule doivent
être réinstallées conformément aux instructions du fabricant du véhicule ou
remplacées par des pièces et du matériel fournis par SW-MOTECH.
ATTENTION Sauf indication contraire, sécurisez tous les filetages avec
du frein filet liquide de force moyenne.
DANGER : Les couples de serrage non définis par SW-MOTECH doivent
être obtenus auprès du constructeur du véhicule ou d'un atelier de
réparation de motos certifié.
CONTRÔLE DU FONCTIONNEMENT : Après le montage, assurez-vous
qu'aucune pièce mobile n'est bloquée et que le fonctionnement du véhicule
n'est pas perturbé. Les câbles et les tuyaux ne doivent pas frotter et/ou être
coincés.
ATTENTION : Effectuez un contrôle de fonctionnement complet avant
de commencer à rouler. Après les 50 premiers kilomètres, puis
régulièrement, vérifiez le couple de serrage de tous les raccords et la
bonne fixation du produit. Les accessoires montés peuvent modifier le
comportement sur la route et la stabilité du véhicule.
INSTRUCTIONS DE MONTAGE · LIRE ET CONSERVER LES INSTRUCTIONS DE MONTAGE!
SW-MOTECH GmbH & Co. KG
Ernteweg 7-10
35282 Rauschenberg
Allemagne
www.sw-motech.com
La traduction du contenu est automatisée.
© SW-MOTECH GmbH & Co. KG
Sous réserve d'erreurs et de modifications
Sous réserve de modifications techniques et de design.
1

Vous trouverez les symboles et leur signification
dans la section MONTAGE. Si le terme OEM apparaît
dans la section MONTAGE, il faut respecter et
appliquer les consignes du fabricant du véhicule.
Si vous avez des questions, notre service clientèle ainsi
que nos distributeurs se tiennent à votre disposition. Vous
trouverez notre numéro de téléphone ainsi que la liste de
nos distributeurs sur notre boutique en ligne :
www.sw-motech.com
Utilisez du frein filet : Indique qu'un filetage doit être
enduit de frein filet liquide. H (HIGH) : haute
résistance ; M (MEDIUM) : force moyenne ; L (LOW) :
faible résistance.
Serrer en respectant les instructions de couple de
serrage : indique le couple de serrage d'une pièce
prescrit par SW-MOTECH ou par le fabricant du véhicule
(OEM).
APERçU DES LéGENDES · LIRE ET CONSERVER LES INSTRUCTIONS DE MONTAGE!
La traduction du contenu est automatisée.
© SW-MOTECH GmbH & Co. KG
Sous réserve d'erreurs et de modifications
Sous réserve de modifications techniques et de design.
2

LISTE DES PIèCES · LIRE ET CONSERVER LES INSTRUCTIONS DE MONTAGE!
La traduction du contenu est automatisée.
© SW-MOTECH GmbH & Co. KG
Sous réserve d'erreurs et de modifications
Sous réserve de modifications techniques et de design.
3
11
HDG.00.220.032L.25
1/1
2
HDG.00.220.032R.25
1/1
3
M6 x 75, DIN 912
SC.ST.06.075.02.912.088
2/2
4
HDG.00.220.012.25
2/2
5
LVG.01.971.001.35
2/2

1
1×1
2×1
3×2
M 8 Nm
4×2
5×2
ATTENTION : étant donné que le kit de montage pour protège-mains
s'installe dans une zone du véhicule essentielle pour la sécurité, SW-
MOTECH recommande de confier le montage/l'entretien du produit à un
atelier professionnel qualifié !
ATTENTION : portez toujours des lunettes et des gants de protection !
ATTENTION : Utilisez toujours des outils appropriés !
REMARQUE : le montage est présenté du côté gauche. Répétez le montage
avec les pièces correspondantes sur le côté droit du guidon.
REMARQUE : le guidon représenté est un exemple.
Démontez les masses d'extrémité et les protège-mains d'origine, s'ils sont
en place.
Assurez-vous que les extrémités du guidon et l’intérieur du guidon sont
libres.
Vissez sans serrer les pièces indiquées aux supports (1/2) aux extrémités du
guidon.
ATTENTION : utilisez du frein filet liquide !
Positionnez les supports (1/2) selon votre ergonomie de conduite et serrez les
vis (3) comme indiqué dans les instructions de montage.
DANGER : si l'espace disponible après le montage de tous les
composants est trop restreint, l'unité de freinage et d'embrayage doit être
déplacée de quelques millimètres vers l'extrémité ou le centre du guidon !
DANGER : après le montage, assurez-vous que tous les interrupteurs et
commandes, en particulier la poignée d'accélérateur, le levier de frein,
l'interrupteur d'arrêt d'urgence et l'embrayage, fonctionnent correctement
et sans entrave !
Assurez-vous également que le guidon peut être braqué au maximum dans
les deux sens. Si des parties du produit entrent en contact avec le réservoir
ou d'autres composants du véhicule lorsque le guidon est complètement
braqué, il est impératif de repositionner le produit ou le guidon !
Assurez-vous de respecter les spécifications du constructeur du véhicule !
NE roulez PAS avec votre véhicule si les interrupteurs et les commandes ne
fonctionnent pas correctement ou ne peuvent pas être actionnés
correctement !
AVANT chaque utilisation, effectuez un contrôle complet du fonctionnement
du guidon et de toutes les commandes !
PHASE DE MONTAGE · LIRE ET CONSERVER LES INSTRUCTIONS DE MONTAGE!
La traduction du contenu est automatisée.
© SW-MOTECH GmbH & Co. KG
Sous réserve d'erreurs et de modifications
Sous réserve de modifications techniques et de design.
4
La page est en cours de chargement...
La page est en cours de chargement...
La page est en cours de chargement...
La page est en cours de chargement...
La page est en cours de chargement...
La page est en cours de chargement...
La page est en cours de chargement...
La page est en cours de chargement...
La page est en cours de chargement...
La page est en cours de chargement...
La page est en cours de chargement...
La page est en cours de chargement...
La page est en cours de chargement...
La page est en cours de chargement...
La page est en cours de chargement...
La page est en cours de chargement...
La page est en cours de chargement...
La page est en cours de chargement...
La page est en cours de chargement...
La page est en cours de chargement...
La page est en cours de chargement...
La page est en cours de chargement...
La page est en cours de chargement...
La page est en cours de chargement...
La page est en cours de chargement...
La page est en cours de chargement...
La page est en cours de chargement...
La page est en cours de chargement...
La page est en cours de chargement...
La page est en cours de chargement...
La page est en cours de chargement...
-
 1
1
-
 2
2
-
 3
3
-
 4
4
-
 5
5
-
 6
6
-
 7
7
-
 8
8
-
 9
9
-
 10
10
-
 11
11
-
 12
12
-
 13
13
-
 14
14
-
 15
15
-
 16
16
-
 17
17
-
 18
18
-
 19
19
-
 20
20
-
 21
21
-
 22
22
-
 23
23
-
 24
24
-
 25
25
-
 26
26
-
 27
27
-
 28
28
-
 29
29
-
 30
30
-
 31
31
-
 32
32
-
 33
33
-
 34
34
-
 35
35
-
 36
36
-
 37
37
-
 38
38
-
 39
39
-
 40
40
-
 41
41
-
 42
42
-
 43
43
-
 44
44
-
 45
45
-
 46
46
-
 47
47
-
 48
48
-
 49
49
-
 50
50
-
 51
51


SW-Motech HDG.00.220.21600/B Mounting instructions
- Taper
- Mounting instructions
dans d''autres langues
- italiano: SW-Motech HDG.00.220.21600/B
- English: SW-Motech HDG.00.220.21600/B
- español: SW-Motech HDG.00.220.21600/B
- Deutsch: SW-Motech HDG.00.220.21600/B
Documents connexes
-
 SW-Motech HDG.00.220.38100/B Mounting instructions
-
 SW-Motech LEH.22.039.10100/S Mounting instructions
-
 SW-Motech KFT.22.995.30100/B Mounting instructions
-
 SW-Motech GPT.05.440.65000/B Mounting instructions
-
 SW-Motech GPT.01.086.65000/B Mounting instructions
-
 SW-Motech GPT.02.059.65000/B Mounting instructions
-
 SW-Motech KFT.01.052.65000/B Mounting instructions
-
 SW-Motech KFT.01.070.65100/B Mounting instructions
-
 SW-Motech BC.SYS.22.995.21100/B Mounting instructions
-
 SW-Motech KFT.19.806.65000/B Mounting instructions


