Co2meter Remote CO2 Storage Safety 3 Alarm Manuel utilisateur
- Catégorie
- Détecteurs de monoxyde de carbone (CO)
- Taper
- Manuel utilisateur
Ce manuel convient également à

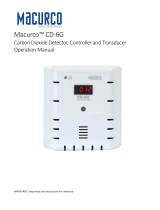
CO2 Monitor Operating Instructions
Model: RAD-0102-6 UL Listing
1. Product Overview
Thank you for selecting the RAD-0102-6 CO2 Storage Safety Alarm. This monitor is
designed to detect Carbon Dioxide levels in the ambient air to protect employees and
customers. CO2 monitors are required in most jurisdictions by code. High
concentrations of CO2 in confined spaces are dangerous and may lead to health
problems ranging from headaches and fatigue to asphyxiation and death. This
monitor has 3 audible and visual alarm levels with relays that are triggered at 5,000
ppm TWA, 15,000 ppm, and 30,000 ppm and can control a ventilation fan or signal
the fire panel to send an alarm to the fire department or monitoring company. These
standards meet IFC, NFPA, and NBIC requirements for monitoring.
RAD-0102-6 CO2 Monitor is cost-effective and includes these features:
1.) Multiple RDU’s can be connected for additional alarm points.
2.) Large digital LCD display clearly indicates the ambient CO2 concentration,
relative humidity, and temperature.
3.) 3 independent relay outputs can automatically control vent fan or be wired to
the fire alarm panel.
4.) Audible and visual alarm indications.
5.) Automatic altitude compensation (can be turned on/off).
6.) 4-20 mA output for offsite monitoring.
7.) 100% clean look by burying all cables in the wall.
8.) Allows for field upgrades with strobe package at a later date.
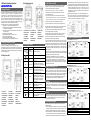
2. Package Content & Unit Layout
The RAD-0102-6 package comprises the following parts:
SEU (Main Unit), RDU (Remote Unit), Power Supply (1 Piece), CAT 5
Communication Cable (1 piece), Relay Cables (3 pieces), Wall Plug Safety Strap (1
piece), Mounting Brackets (2 pieces), Screws (13 pieces), Wall Anchors (12 pieces),
Cable Clips (10 pieces), International Power Adaptors (3 pieces), Warning Signs (6
pieces), User Manual (1 piece).
SEU (Main Sensor Unit)
A. CO2 Sensor
B. LCD display
C. Power (Green LED)
D. AL1 (Red 1 LED) E. AL2 (Red 2 LED) F. AL3 (Red 3 LED)
G. Fault (Yellow LED) H. Mode Button I. UP Button
J. Down Button
K. Enter Button
L. Buzzer
M. Reset Button N. 4-20mA Output O. Battery
P. DC Power Supply Q. RDU Cable (RJ45) R. Relay 3 (AL3)
S. Relay 2 (AL2) T. Relay 1 (AL1) U. Strobe Cable (RJ45)
V. Panel Holder
RDU (Remote Display Unit)
A. Power (Green LED)
B. AL1 (Red 1 LED)
C. AL2 (Red 2 LED)
D. AL3 (Red 3 LED) E. Fault (Yellow LED) F. LCD display
G. Mode Button H. UP Button I. Down Button
J. Enter Button K. Buzzer L. Strobe Cable (RJ45)
M. Output Cable to
RDU (RJ45)
N. Input Cable from
SEU/RDU (RJ45)
O. Panel Holder
3. LCD Display Symbol
Symbol
Meaning
Description
CO2
Concentration
ppm (Parts Per
Million)
Ambient CO2 Concentration
Alarm Alarm Icon
DIAG Diagnose Test communications between the SEU and
RDU (see 10.1)
AL1 CO2 5,000 TWA
Relay 1 will trigger when CO2 concentration
exceeds 5000ppm TWA (Time Weighted
Average). The AL1 (Red 1 LED) will flash but
buzzer will not sound. (see 10.2)
AL2 2nd CO2 Alarm
Level
Relay 2 will trigger when CO2 concentration
exceeds the 2nd alarm level. (Preset at
15,000ppm). The AL2 (Red 2 LED) will flash.
The buzzer will sound. (see 10.3)
AL3 3rd CO2 Alarm
Level
Relay 3 will be triggered when CO2
concentration exceeds the 3rd alarm level.
(Preset at 30,000ppm) The AL2 (Red 2 LED),
AL3 (Red3 LED), and Fault LED will flash.
The buzzer will sound. This status will be
latched. (see 10.4)
CALI Calibration To calibrate the CO2 sensor when the
accuracy deviates from the actual CO2
concentration. (see 10.5)
RCFS Recover Factory
Setting To recover factory default settings and remove
any customized settings. (See 10.6)
Hi
High
CO2 concentration is above 5% (50,000 ppm)
Fan Icon
CO2 levels exceeds Alarm2, the fan icon will
appear. If connected via Relay 2, this would
turn on a ventilation fan.
4. SEU (Main Sensor Unit)
The SEU (Main Sensor Unit) should be placed in a room where CO2 is likely to
accumulate, a room where CO2 is stored, like an area with CO2 beverages.
The large LCD displays the ambient CO2 concentration.
The SEU has “DIAG”, “AL1”, “AL2”,”AL3”, “CO2 CALI”, “RCFS” functions:
“DIAG” function executes communication tests between the SEU and RDU.
“AL1” is a fixed 5000ppm TWA.
“AL2” and “AL3” are two CO2 alarm levels. These alarm levels are adjustable.
- AL2 has CO2 level of: 5000, 1.0%, 1.5%, 2.0%, 2.5%, 3.0%. (AL2 default is 1.5%)
- AL3 has CO2 levels of: 2.0%, 2.5%, 3.0%, 3.5%, 4.0%. (AL3 default is 3.0%)
“CALI” function allows the user to perform calibration, when necessary.
“RCFS” function allows the user to re-set the unit to the original factory settings.
When the RAD-0102-6 detects a CO2 TWA (average in 8 hours) value that exceeds
5,000ppm, the AL1 (Red 1 LED) will blink and Relay 1 will be triggered.
When the CO2 TWA value drops below 5000ppm (with 5% hysteresis), AL1 (Red1
LED) will stop blinking and Relay 1 will be inactive.
When the RAD-0102-6 detects a CO2 value that exceeds the AL2 CO2 level, AL2
(Red 2 LED) will blink, the buzzer will sound and Relay 2 will be triggered.
When the CO2 value drops below the AL2 CO2 level, AL2 (Red 2 LED) will stop
blinking, the buzzer will stop and Relay 2 will be inactive.
If the CO2 concentration continues to rise and exceeds the AL3 CO2 level, AL2 (Red
2 LED) and AL3 (Red 3 LED) will flash together. The tempo of the flashing and
buzzer will increase. RAD-0102-6 will latch after this event. When the CO2 value
drops below the AL3 CO2 level and then below the AL2 CO2 level, the flashing and
buzzer will stop, but the Fault LED will remain flashing. The RAD-0102-6 must be
reset, by means of reset button of RAD-0102-6 (see item L in Section 2 SEU layout)
or power cycle the unit.
The Power (Green LED) will light continuously when the power is normally supplied.
If the device is powered by a battery, the Power (Green LED) will flash and battery
indicator will appear and change with the battery voltage.
If the communication cable between the SEU & RDU is not connect well, the
communication cable is loose or disconnected from the (RJ45) connectors, the fault
LED of SEU will blink as a reminder for the user to reconnect the cable. If the
communication cable is inserted into the wrong port on RDU, after about one minute,
the “Er7” will flash on the RDU LCD. Please plug the cables into the correct ports on
RDU and the unit will work normally.
5. RDU (Remote Display Unit)
The RDU displays the data from the SEU and provides visual and audible indication
that the SEU is in alarm status. The RDU is NOT an external/second sensor. The
RDU is connected to the SEU with a CAT5 cable. A 25-foot CAT5 cable is provided.
Users can source additional cable lengths as needed. The RDU should be placed
where it can be conveniently observed (eye level) before entering the room/space.
The “DIAG” function can test the communication between the SEU and RDU (see
9.1). Resetting the RAD-0102-6 CO2 Monitor is only available from SEU.
6. Strobes
The RAD-0102-6 can be equipped with strobes for additional visual alarms. Using
CAT5 cables, connect the strobes to the correct RJ45 ports on the SEU and RDU. If
CO2 levels exceed AL2, the strobe will flash. If the CO2 level exceeds AL3, the
strobe tempo increases.
Please visit www.CO2Meter.com for strobe package. Part Number: CM-1026.
7. Power
The RAD-1020-6 comes pre-wired with a 12V power supply that plugs in to a wall
outlet. The 12V power supply can be removed and 24V DC can be wired directly to
the device through the terminal block. Please use a 24V DC power converter to
properly convert your AC power source.
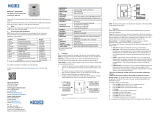
8. Installation Instructions
Please carefully remove all items from the package and follow the Step-by-Step
Installation Instructions:
1.
Choose a suitable location to install the SEU. Fix the panel holder on the wall with
the four screws. Install the SEU 18 inches from floor and close to the CO2 source.
2.
Put the SEU on the panel holder, making sure that they are connected tightly.
3.
Fix another panel holder in a suitable location outside the monitored space at eye
level. Place the RDU onto panel holder, and stick the warning signs next to RDU.
4.
Route the 25-foot CAT5 cable between the SEU and RDU. CAT5 cable can be run
through the wall/conduit or fixed to the wall using cable clips. Plug the CAT5 cable
into the designated ports. Communication between the SEU and RDU is complete.
5.
The RAD-0102-6 has 3 relay outputs connected to the programmed alarm settings.
All relays are normally open/closed dry contacts. Any of the relays can be used
to control an external device (fan, HVAC system, etc.) or can be wired to the fire
alarm panel directly. The relays will trigger when the CO2 concentration exceeds
the programmed alarm level.
6.
When the power has been connected, The SEU and the RDU will begin to work.
7.
Please use the “DIAG“ function to verify the communication between SEU and
RDU, the five LED’s will blink and buzzer will sound on SEU & RDU, after that the
communication is ready. The units will display the same information.
9.1)
Latch function: On/Off. Default is On.
Fault light will keep flashing if AL3 is activated, indicating unit went into alarm status.
1. Press Up & Enter button for 10 seconds
2. Change to Advance Mode by pressing Mode, and choose Lat Mode
3. Press Up/Down to set Latch Mode On or Off.
4. Press Enter to Save
9.2)
Alarm Level Lock: Lock/Unlock.
User cannot adjust the alarm levels when Locked. Default is Lock.
1. Press Up & Enter button for 10 seconds
2. Change to Advance Mode by press Mode, and choose Alm Mode
3. Press Up/Down to set Alm level Lock or Unlk.
4. Press Enter to Save.
9.3)
Barometric compensation: On/Off. Default is On.
Unit automatically compensates for barometric pressure / altitude.
1. Press Up & Enter button for 10 seconds
2 Change to Advance Mode by press Mode, and choose Baro Mode
3. Press Up/Down to set Baro Mode On or Off.
4. Press Enter to Save.
9. Advanced Management Settings

10. Customizing the Settings
When power has been connected, all LEDs will flash and buzzer will beep 4 times, at
this time, the LCD will show all icons for about 4 seconds.
After that, the SEU and RDU will begin to monitor the CO2 concentration.
In order to the get timely alarm safety information and meet the personal
requirements, it is advisable to set up the customizing parameter.
Select Temperature Unit ºC/ºF: Press “Up” to switch between ºC and ºF
Select Barometric hPa/inHg: Press “Down” to switch between hPa and inHg
10.1)
Using the DIAG function: Will test the communication link from SEU & RDU.
1. Press Mode until the “DIAG” icon flashes
2. Press Enter, the SEU’s five LEDs will blink and the buzzer will sound
3. The RDU’s five LEDs will blink and buzzer will sound simultaneously
10.2)
Checking the AL1 - CO2 TWA parameter: Not user configurable
1. Press Mode until the “AL1” & “CO2” icon flash
2.Press Enter, the “AL1” icon shows on LCD. The CO2 TWA is fixed at 5000ppm
3. Press Enter again or press Mode to quit the setting
10.3)
Setting the AL2 – 2nd CO2 Alarm Level parameter: User configurable
1. Press Mode until the “AL2” & “CO2” icons flash
2. Press Enter, the “AL2” icon shows on LCD, default AL2= 1.5%
3. Press Up/Down to go through “5000,1.0%,1.5%,2.0%,2.5%,3.0%” alarm
level.
4. Press Enter again to save the setting after selection or press Mode to quit the
setting
10.4)
Setting the AL3 – 3rd CO2 Alarm Level parameter: User configurable
Note: Please pump N2 (zero CO2) into the CO2 Sensor Entry (Item A in section 2)
and wait about 3 minutes before calibration, then execute the “Zero” calibration.
1. Hold the tubing from the Nitrogen (0ppm CO2) gas cylinder to the CO2
sensor opening (on the top left-hand corner).
2. Open the gas regulator. Flow rate should be between 0.15-0.50 liters per
minute.
3. Wait until the CO2 reading on the SEU settles consistently at or near 0ppm
CO2.
4. Press the Mode button 5 times, the “CO2” and “CALI” icon will start flashing
on the SEU.
5. Press Enter to view the calibration settings. The SEU screen will now display
a flashing “ZEro” and “CO2”.
6. Press Enter again to begin the calibration. “CALIBRATING” will begin flashing.
After approximately 3 minutes, the LCD will display either “PASS” or “FAIL”.
7. If the LCD reads “FAIL”, repeat the steps again. If it displays “PASS”, press
Enter. The display should now show 0ppm.
8. Remove the nitrogen cylinder.
9. Reset the unit by either pressing the reset bottom (bottom right-hand corner
with a round arrow) or power cycling the unit.
10. If your unit fails the “ZEro” calibration, please follow the procedure again
before calling support.
10.6) Using the Recover factory setting function:
Note: If the user has set the customer parameters or calibrates the RAD-0102-6
incorrectly, please use the ReFactSet (recover the factory Setting) to recover the
default factory setting
4. Do not touch the exposed electronic circuitry of the device under any circumstances,
as there is the dangerous of electric shocks.
5. Please take care of cable connection between SEU and RDU. Make sure the cable
from SEU is connected into the INPUT port of RDU.
6. Please ensure the external power supply is normally supplied to ventilation fan while
the relay is working. If there has no normally power supply to the fan, the relay will not
work, which may result in potential danger with high CO2 concentration in confined
space.
12. Product Care
To make sure to receive the maximum benefit from using this product, please
observe the follow guidelines.
1.Repair - Do not attempt to repair the product or modify the circuitry by yourself.
Please contact your local dealer or a qualified repairman if the product needs
servicing, including the replacement or calibration of sensor.
2.Cleaning - Disconnect the power before cleaning. Use a damp cloth. Do not use
liquid cleaning agents such as benzene, thinner or aerosols, as these will damage
the device.
3. Maintenance – We recommend users to test the communication between the SEU
and RDU under ‘DIAG” function to verify the working conditions or the SEU and
RDU. If these five LEDs blink and the buzzer of SEU and RDU sound
simultaneously, it indicates that SEU and RDU work normally.
13. Specifications
■CO2 & Temperature specification:
CO2 Specification
Measurement Range
0 - 50,000ppm (5%) display
Display Resolution
10ppm at 0~10,000ppm;
100ppm at 10,001~50,000ppM
Accuracy +/-200ppm or +/-10% reading
Pressure
Dependence
Auto pressure compensation, built in barometer. (50 to
110 kPa)
Response Time
CO2: <2min by 90%
CO2 AL1 (TWA )
5000ppm fixed
CO2 AL2
5000, 1.0%, 1.5%, 2.0%, 2.5%, 3.0%. Default AL2= 1.5%.
CO2 AL3
2.0%,2.5%,3.0%,3.5%,4.0%. Default AL3= 3.0%
Sound Alarm
80db@10cm
Warm-Up Time
<60 seconds at 22°C
Temperature Specification:
Temperature Range
0°C to 50°C (32°F to 122°F)
Display Resolution
0.1°C (0.1°F)
Display Options
°C/°F
Accuracy
±1.5°C(±2.7°F) when CO2 level is below first alarm level
Response Time
20-30 minutes (case must equalize with environment)
Operating Conditions:
Temperature
0°C to 50°C ( 32°F to 122°F)
Humidity Range
0 ~ 95% RH non-condensing
Storage Conditions:
Storage Temperature
-20°C to 60 °C (-4°F to 140°F)
■Power Supply
■Weight and Dimension
SEU
Weight
1 lb
Dimensions (LxWxD)
6.69 x 4.96 x 2.73 inches
RDU
Weight
0.4 lb
Dimensions (LxWxD)
5.51 x 3.54 x 1.89 inches
14. Fault Codes &Troubleshooting Guide
This section includes a list of Frequently Asked Questions for problems you may
encounter with the RAD-0102-6 CO2 Monitor.
15. Support & Warranty
No LCD
Fault
Icon
Description
(of the fault) SEU
Indication RDU
Indication Suggested Actions
1 Er3
Ambient temperature
exceeded the
temperature range 0°C
to 50°C (32°F to 122°F)
“Er3” flash,
Fault LED
blink
“Er3” flash,
Fault LED
blink
This error will disappear
when the temperature returns
to the range between 0°C
and 50°C (32°F to 122°F)
2 Er5 EEPROM System
Problem
“Er5” flash,
Fault LED
blink
“Er5” flash,
Fault LED
blink
Power on again or press
reset button, if the “Er5”
always appear, please
contact CO2Meter.
3 Er7 Internal Data
Transmission Error
“Er7” flash,
Fault LED
blink,
“Er7” flash,
Fault LED
Blink
Check the RJ45 plug is
connected into the INPUT
port of RDU, if the “Er7”
displays on the RDU only.
Press reset button on SEU or
power cycle the unit
Contact us: We’re here to help!
If the troubleshooting guide above doesn’t help you solving your problem or for more
information, please contact us using the information below.
Support@CO2Meter.com
(386) 256-4910 (M-F 9:00am–5:00pm EST)
www.CO2Meter.com
See CO2Meter, Inc. Terms & Conditions at:
www.CO2Meter.com/pages/terms-conditions
CO2Meter, Inc.
131 Business Center Drive
Ormond Beach, FL 32174
Phone: 386-872-7665 | Fax: 866-422-2356
Email: [email protected]
10.5) Calibration using the CO2 CALI function:
1.
You will need a gas cylinder of pure Nitrogen (0 ppm CO2).
11. Safety Notice
Warning: Your safety is very important to us. To ensure the proper and safe use of the
device, please read all warnings and the entire User Manual before using the device.
Otherwise, the protection provided by the equipment may be impaired. These
warnings provide important safety information and should be observed at all times.
1. Please handle the device carefully; do not subject the product to impact or shock.
Otherwise, this may cause the accuracy drift.
2.Do not place the unit near a heat source. Heat can cause distortion of the unit, which
may result in an explosion or fire.
3. Please keep working space clear at all times. Provide access and working space
distances around electrical equipment and enclosures to permit ready and safe
operation and maintenance.
■
Relay output
Relay 1
Operates at CO2 TWA
Relay 2
Operates at Alarm 2 level for CO2
Relay 3
Operates at Alarm 3 level for CO2
The Peak current for all relays is less than 2A@30 VDC or 250 VAC, SPDT.
■4-20mA Outputs
CL01:4-20mA
CO2: 0~50,000ppm
CL02:4-20mA
Temp: 32 to 122°F (0-50°C)
Ref. No.:062017
11-8-2020
1. Press Mode until the “ReFactSet” icon flashes.
2. Press Enter Up/Down to choose either “Yes” or “No”.
3. Press Enter again to save the setting or press Mode to quit the setting. Power
Supply
DC
9~32VDC (12~32VDC recommended), 2A.
AC adapter
Input: 100~240 VAC,50/60Hz, 0.6A
Output: 12VDC, 2000mA.
Battery Voltage
6VDC (5.4V~7.0V),
recommended capacity is 12AH
1. Press Mode until the “ AL3” “CO2”icon flashes
2. Press Enter, the “AL3” icon shows on LCD. Default AL3=3.0%
3. Press Up/Down to go through “2.0%,2.5%,3.0%,3.5%,4.0%” alarm level
4. Press Enter again to save the setting after selection or press Mode to quit the
setting
PLEASE NOTE: DEVICE MUST BE UNLOCKED FIRST, SEE SECTION 9.2)
PLEASE NOTE: DEVICE MUST BE UNLOCKED FIRST, SEE SECTION 9.2)

11.Avis de sécurité
Avertissement: Votre sécurité est très importante pour nous. Afin de garantir
l’utilisation appropriée et sécuritaire du produit, veuillez lire ces avertissements et tout
le manuel d’utilisation avant de vous en servir. Autrement, la protection offerte par
l’équipement pourrait être dégradée. Ces avertissements fournissent d’importantes
informations sur la sécurité et doivent être suivis en tout temps.
1. Veuillez manipuler l’appareil avec soin. Le produit ne doit pas subir des impacts ou des
chocs. Autrement, une déviation de la précision pourrait se produire.
2. Ne placez pas l’appareil près d’une source de chaleur. La chaleur peut causer la
distorsion de l’appareil et peut provoquer une explosion ou un incendie.
3. Veuillez garder l’espace de travail propre en tout temps. Prévoyez suffisamment
d’espace de travail et d’accès autour de l’équipement électrique et des enceintes afin de
garantir le fonctionnement et l’entretien sécuritaires.
4. Ne touchez pas les circuits électroniques accessibles puisqu’il existe un risque de
décharge électrique.
5. Veuillez assurer le branchement adéquat du câble entre le SEU et le RDU. Veuillez
vous assurer que le câble à partir du SEU est branché au port INPUT (entrée) du RDU.
6. Veuillez vous assurer que l’alimentation électrique est fournie adéquatement au
ventilateur afin que le relais puisse fonctionner normalement. Si le ventilateur n’est pas
alimenté adéquatement, le relais ne fonctionnera pas, ce qui pourrait causer la baisse de
la concentration de l’oxygène dans un espace clos.
12. Entretien du produit
Afin de profiter pleinement du produit, veuillez suivre les directives suivantes.
1. Réparation: N’essayez pas de réparer vous-même le produit ni de modifier les
circuits électroniques. Veuillez communiquer avec le détaillant de votre région ou avec
un technicien qualifié si le produit nécessite un entretien, y compris le remplacement ou
la calibration du capteur.
2. Nettoyage: Débranchez le câble d’alimentation avant de procéder au nettoyage.
Utilisez un chiffon humide. N’utilisez pas des liquides nettoyants tels que le benzène,
les diluants et les aérosols, puisqu’ils peuvent endommager l’appareil.
3. Entretien: Nous recommandons aux utilisateurs de vérifier la communication entre le
SEU et le RDU à l’aide de la fonctionnalité « DIAG » afin de s’assurer du
fonctionnement adéquat de ces deux modules. Si les cinq voyants clignotent et les
avertisseurs sonores du SEU et du RDU retentissent simultanément, cela signifie que
le SEU et le RDU fonctionnent normalement.
-
 1
1
-
 2
2
-
 3
3


Co2meter Remote CO2 Storage Safety 3 Alarm Manuel utilisateur
- Catégorie
- Détecteurs de monoxyde de carbone (CO)
- Taper
- Manuel utilisateur
- Ce manuel convient également à
dans d''autres langues
Autres documents
-
 Macurco CD-6G Manuel utilisateur
-
 Macurco 6 series Guide de démarrage rapide
-
Wacker Neuson Pureheat Manuel utilisateur
-
-
Wacker Neuson E2200 Manuel utilisateur
-
-
-
-
Wacker Neuson E3000 Manuel utilisateur
-
Eurotherm Piccolo Guide de démarrage rapide

