
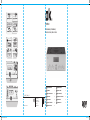
OKR 120
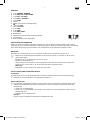
KÜCHENRADIO// KITCHENRADIO //
RADIO DE COCINA // RADIO CUISINE
DE
GEBRAUCHSANWEISUNG 3
NL
GEBRUIKSAANWIJZING 45
EN
USER MANUAL 9
PL
INSTRUKCJA OBSŁUGI 51
ES
MANUAL DE INSTRUCCIONES 15
PT
MANUAL DE UTILIZAÇÃO 57
FR
MODE D’EMPLOI 21
RU
63
GR
ΟΗΓIΕΣ ΧΡΗΣΗΣ 27
SE
BRUKSANVISNING 69
HU
FELHASZNÁLÓI KÉZIKÖNYV 33
TR
KULLANIM KILAVUZU 75
IT
MANUALE DELL’UTENTE 39
IM_OKR 120_170824_V03
www.ok-online.com
Imtron GmbH
Wankelstraße 5
85046 Ingolstadt
Germany
www.imtron.eu
5
TIME SET /
COOK TIMER
PRE.+ /
ALARM 2
SNOOZE /
DIMMER
SLEEPPRE.– /
ALARM 1
VOL-
VOL+
SKIP-
SKIP+
AMS / MEM.
TIME SET /
COOK TIMER
PRE.+ /
ALARM 2
SNOOZE /
DIMMER
SLEEPPRE.– /
ALARM 1
VOL-
VOL+
SKIP-
SKIP+
AMS / MEM.
TIME SET /
COOK TIMER
PRE.+ /
ALARM 2
SNOOZE /
DIMMER
SLEEPPRE.– /
ALARM 1
VOL-
VOL+
SKIP-
SKIP+
AMS / MEM.
TIME SET /
COOK TIMER
PRE.+ /
ALARM 2
SNOOZE /
DIMMER
SLEEPPRE.– /
ALARM 1
VOL-
VOL+
SKIP-
SKIP+
AMS / MEM.
TIME SET /
COOK TIMER
PRE.+ /
ALARM 2
SNOOZE /
DIMMER
SLEEPPRE.– /
ALARM 1
VOL-
VOL+
SKIP-
SKIP+
AMS / MEM.
TIME SET /
COOK TIMER
PRE.+ /
ALARM 2
SNOOZE /
DIMMER
SLEEPPRE.– /
ALARM 1
VOL-
VOL+
SKIP-
SKIP+
AMS / MEM.
1
2
1
08:30
RADIO
3 1
2
1
2
09:00
RADIO
3
TIME SET /
COOK TIMER
PRE.+ /
ALARM 2
SNOOZE /
DIMMER
SLEEPPRE.– /
ALARM 1
VOL-
VOL+
SKIP-
SKIP+
AMS / MEM.
TIME SET /
COOK TIMER
PRE.+ /
ALARM 2
SNOOZE /
DIMMER
SLEEPPRE.– /
ALARM 1
VOL-
VOL+
SKIP-
SKIP+
AMS / MEM.
6
TIME SET /
COOK TIMER
PRE.+ /
ALARM 2
SNOOZE /
DIMMER
SLEEPPRE.– /
ALARM 1
VOL-
VOL+
SKIP-
SKIP+
AMS / MEM.
TIME SET /
COOK TIMER
PRE.+ /
ALARM 2
SNOOZE /
DIMMER
SLEEPPRE.– /
ALARM 1
VOL-
VOL+
SKIP-
SKIP+
AMS / MEM.
TIME SET /
COOK TIMER
PRE.+ /
ALARM 2
SNOOZE /
DIMMER
SLEEPPRE.– /
ALARM 1
VOL-
VOL+
SKIP-
SKIP+
AMS / MEM.
TIME SET /
COOK TIMER
PRE.+ /
ALARM 2
SNOOZE /
DIMMER
SLEEP
PRE.– /
ALARM 1
VOL-
VOL+
SKIP-
SKIP+
AMS / MEM.
TIME SET /
COOK TIMER
PRE.+ /
ALARM 2
SNOOZE /
DIMMER
SLEEPPRE.– /
ALARM 1
VOL-
VOL+
SKIP-
SKIP+
AMS / MEM.
TIME SET /
COOK TIMER
PRE.+ /
ALARM 2
SNOOZE /
DIMMER
SLEEPPRE.– /
ALARM 1
VOL-
VOL+
SKIP-
SKIP+
AMS / MEM.
88:5MHz
RADIO
FM
L_01
SLEEP
120
TIME SET /
COOK TIMER
PRE.+ /
ALARM 2
SNOOZE /
DIMMER
SLEEPPRE.– /
ALARM 1
VOL-
VOL+
SKIP-
SKIP+
AMS / MEM.
7
2s
1
2
88:5MHz
RADIO
FM
TIME SET /
COOK TIMER
PRE.+ /
ALARM 2
SNOOZE /
DIMMER
SLEEPPRE.– /
ALARM 1
VOL-
VOL+
SKIP-
SKIP+
AMS / MEM.
8
1
2
P02
RADIO
FM
MEMORY
3
IM_OKR120_170824_V03_HR.indb 1 24/8/17 5:20 pm

1
TIME SET /
COOK TIMER
PRE.+ /
ALARM 2
SNOOZE /
DIMMER
SLEEPPRE.– /
ALARM 1
VOL-
VOL+
SKIP-
SKIP+
AMS / MEM.
1
2
3
16mm - 20mm
2
TIME SET /
COOK TIMER
PRE.+ /
ALARM 2
SNOOZE /
DIMMER
SLEEPPRE.– /
ALARM 1
VOL-
VOL+
SKIP-
SKIP+
AMS / MEM.
88:5MHz
RADIO
FM
3
TIME SET /
COOK TIMER
PRE.+ /
ALARM 2
SNOOZE /
DIMMER
SLEEPPRE.– /
ALARM 1
VOL-
VOL+
SKIP-
SKIP+
AMS / MEM.
CR2025
BATT
OPEN
TIME SET /
COOK TIMER
PRE.+ /
ALARM 2
SNOOZE /
DIMMER
SLEEPPRE.– /
ALARM 1
VOL-
VOL+
SKIP-
SKIP+
AMS / MEM.
CR2025
CR2025
BATT
OPEN
TIME SET /
COOK TIMER
PRE.+ /
ALARM 2
SNOOZE /
DIMMER
SLEEPPRE.– /
ALARM 1
VOL-
VOL+
SKIP-
SKIP+
AMS / MEM.
4
2s
00:00
1
2
3
TIME SET /
COOK TIMER
PRE.+ /
ALARM 2
SNOOZE /
DIMMER
SLEEPPRE.– /
ALARM 1
VOL-
VOL+
SKIP-
SKIP+
AMS / MEM.
AC : 230V~50Hz
FM ANTENNA
TIME SET /
COOK TIMER
PRE.+ /
ALARM 2
SNOOZE /
DIMMER
SLEEPPRE.– /
ALARM 1
VOL-
VOL+
SKIP-
SKIP+
AMS / MEM.
CR2025
BATT
OPEN
A B C D E F G H I J K L
M
NO
IM_OKR120_170824_V03_HR.indb 2 24/8/17 5:20 pm

3
DE
HERZLICHEN GLÜCKWUNSCH!
Vielen Dank, dass Sie sich für ein Produkt von ok. entschieden haben. Bitte lesen Sie diese Anleitung
sorgfältig durch und bewahren Sie sie für späteren Gebrauch auf.
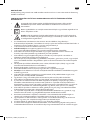
WICHTIGE SICHERHEITSANWEISUNGEN. BITTE AUFMERKSAM DURCHLESEN UND FÜR
SPÄTEREN GEBRAUCH AUFBEWAHREN.
1.
Das Ausrufezeichen innerhalb eines gleichseitigen Dreiecks soll den Benutzer auf
wichtige Betriebs- und Wartungsanweisungen im mitgelieferten Informationsmaterial
hinweisen.
2. Aus Sicherheitsgründen ist dieses Schutzklasse II-Produkt mit doppelter bzw. verstärkter
Isolierung ausgestattet, wie mit vorstehendem Symbol angezeigt.
3. Gefahr! Übermäßiger Schalldruck von Ohr- und Kopfhörern kann zu Gehörschädigungen
führen. Wenn Sie über längere Zeit laute Musik hören, kann Ihr Hörvermögen
beeinträchtigt werden. Eine angemessene Lautstärke einstellen.
4. Dieses Produkt ist nur für die Tonunterhaltung vorgesehen. Um gefährliche Situationen zu
vermeiden, das Produkt nicht für andere als die in dieser Anleitung beschriebenen Zwecke
verwenden. Unsachgemäße Verwendung ist gefährlich und führt zum Verlust der Garantie.
5. Nur für den Hausgebrauch. Nicht im Freien verwenden.
6. Erstickungsgefahr! Verpackungsmaterial von Kindern fernhalten.
7. Nur unter normalen Raumbedingungen (Temperatur und Feuchtigkeit) verwenden.
8. Das Produkt ist nur für die Verwendung in gemäßigten Breiten geeignet. Nicht in tropischen oder
besonders feuchten Klimazonen verwenden.
9. Das Produkt nicht von kalten in warme Umgebungen und umgekehrt bringen. Kondensation kann
zur Beschädigung des Produktes und elektrischer Bauteile führen.
10. Ausschließlich vom Hersteller empfohlenes oder im Lieferumfang bendliches Zubehör
verwenden. Entsprechend den Angaben in dieser Gebrauchsanweisung montieren.
11. Nicht in der Nähe von Wärmequellen wie z. B. Heizkörpern, Heizregistern, Öfen oder anderen
wärmeerzeugenden Geräten (einschließlich Verstärker) aufstellen.
12. Das Produkt nicht verschieben oder bewegen, während es eingeschaltet ist.
13. Die Oberäche des Produktes nicht mit scharfen oder harten Gegenständen berühren, andrücken
oder reiben.
14. Achtung! Um die Gefahr eines Brandes oder Stromschlages zu reduzieren, das Produkt nicht Regen
oder Feuchtigkeit aussetzen.
15. Das Produkt darf keinen Tropfen oder Spritzern ausgesetzt werden, und es dürfen keine mit
Flüssigkeiten gefüllte Gegenstände wie Vasen auf das Produkt gestellt werden.
16. Darauf achten, dass keine Gegenstände oder Flüssigkeiten durch Önungen in das Gehäuse
eindringen.
17. Keine oenen Flammen wie z. B. brennende Kerzen auf das Produkt stellen.
18. Sämtliche Wartungsarbeiten ausschließlich von qualiziertem Kundendienstpersonal durchführen
lassen. Auf keinen Fall versuchen, das Produkt selbst zu reparieren. Bei Beschädigungen jeglicher Art
den Kundendienst konsultieren, z. B. bei Beschädigung des Netzkabels oder Netzsteckers, nachdem
Flüssigkeiten in das Produkt eingedrungen oder Gegenstände hineingefallen sind, das Gehäuse
beschädigt ist, das Produkt Regen oder Feuchtigkeit ausgesetzt war, nicht ordnungsgemäß funktioniert
oder fallen gelassen wurde.
19. Vor Anschluss des Produktes an der Steckdose sicherstellen, dass die auf dem Produkt angegebene
Spannung mit der Netzspannung übereinstimmt.
20. Falls das Netzkabel beschädigt ist, muss es vom Hersteller, dessen technischen Kundendienst oder
von ähnlich qualizierten Personen ersetzt werden, um Gefahren zu vermeiden.
21. Das Netzkabel, das Produkt und Verlängerungskabel regelmäßig auf Beschädigungen prüfen. Ein
beschädigtes Produkt nicht betreiben. Sofort den Netzstecker ziehen.
22. Das Netzkabel und eventuell eingesetzte Verlängerungskabel so verlegen, dass nicht daran
gezogen oder darüber gestolpert werden kann. Das Netzkabel nicht in leicht zugänglichen
Bereichen herunterhängen lassen.
23. Das Netzkabel nicht einklemmen, knicken oder über scharfe Kanten ziehen.
IM_OKR120_170824_V03_HR.indb 3 24/8/17 5:20 pm

4
DE
24. Der Netzstecker dient zum Trennen des Produktes vom Netz und muss deshalb leicht zugänglich
bleiben. Um die Stromaufnahme vollständig auszuschalten, den Netzstecker ziehen.
25. Es ist möglich, dass das Produkt infolge elektrostatischer Entladungen nicht einwandfrei
funktioniert oder auf die Betätigung eines Bedienelementes nicht reagiert. Das Produkt ausschalten
und den Netzstecker ziehen; nach einigen Sekunden den Netzstecker wieder einstecken.
26. Darauf achten, dass das Kabel nicht betreten und nicht gequetscht wird, insbesondere am Stecker,
den Anschlussdosen und an der Stelle, an welcher das Kabel am Produkt angeschlossen ist.
27. Den Netzstecker niemals am Kabel oder mit nassen Händen herausziehen.
28. Bei Fehlfunktionen während der Verwendung, bei Gewitter, vor dem Reinigen und wenn das
Produkt längere Zeit nicht gebraucht wird, den Netzstecker ziehen.
29. Achtung! Vor dem Reinigen das Produkt ausschalten und den Netzstecker ziehen.
30. Am Ende der Lebensdauer das Produkt unbrauchbar machen: den Netzstecker ziehen und das
Netzkabel abschneiden.
31. Achtung! Es besteht Explosionsgefahr bei unsachgemäßem Auswechseln der Batterien. Ersetzen
Sie Batterien nur durch denselben oder einen gleichwertigen Batterietyp.
32. Wechseln Sie immer den gesamten Batteriesatz. Mischen Sie keine alten und neuen Batterien, bzw.
Batterien mit unterschiedlichem Ladungszustand.
33. Achten Sie darauf die Batterien korrekt einzusetzen. Beachten Sie die Polung (+) Plus / (-) Minus auf
der Batterie und auf dem Gehäuse. Unsachgemäß eingesetzte Batterien können zum Auslaufen
führen oder in extremen Fällen einen Brand oder eine Explosion auslösen.
34. Entfernen Sie verbrauchte Batterien. Entfernen Sie die Batterien, wenn Sie wissen, dass Sie das
Produkt für längere Zeit nicht benutzen. Anderenfalls könnten die Batterien auslaufen und Schäden
verursachen.
35. Nicht auadbare Batterien dürfen nicht wieder aufgeladen werden.
36. Die Anschlüsse dürfen nicht kurzgeschlossen werden.
37. Entfernen Sie die Batterien bevor Sie das Produkt entsorgen.
38. Setzen Sie Batterien niemals übermäßiger Hitze (z. B. pralle Sonne, Feuer) aus und werfen Sie sie
niemals in Feuer. Die Batterien könnten explodieren.
39. Bewahren Sie Batterien außerhalb der Reichweite von Kleinkindern auf. Wurden Batterien
verschluckt, suchen Sie sofort ärztliche Hilfe auf.
40. Sollten Batterien einmal ausgelaufen sein, entnehmen Sie diese mit Hilfe eines Tuches aus dem
Batteriefach und entsorgen Sie sie bestimmungsgemäß. Vermeiden Sie Haut- und Augenkontakt mit
der Batteriesäure. Sollten Sie doch einmal Augenkontakt mit Batteriesäure erfahren, spülen Sie die
Augen mit viel Wasser aus und kontaktieren umgehend einen Arzt. Bei Kontakt der Batteriesäure mit
der Haut, waschen Sie die Stelle mit viel Wasser und Seife ab.
41. Beim Aufstellen des Gerätes ausreichend Platz für Luftzirkulation freilassen. Nicht in Bücherregalen,
Einbauschränken o.ä. aufstellen.
42. Die Lüftungsönungen nicht mit Gegenständen wie Zeitungen, Tischtüchern, Vorhängen usw.
abdecken, da dies die Luftzirkulation behindert. Keine Gegenstände in das Gerät einstecken.
43. Warnung! Die Batterie nicht schlucken, Verätzungsgefahr.
44. Dieses Produkt enthält eine Knopfzellenbatterie. Wenn die Knopfzellen-Batterie verschluckt
worden ist, kann es innerhalb von 2 Stunden schweren inneren Verbrennungen verursachen und
zum Tod führen.
45. Halten Sie neue und gebrauchte Batterien von Kindern fern.
46. Wenn Sie denken, dass Batterien verschluckt wurden sind oder sich im Teil des Körpers benden,
suchen Sie sofort ärztliche Hilfe.
47. Verwenden Sie das Produkt nicht, wenn das Batteriefach nicht sicher zu verschließen ist und halten
Sie es von Kindern fern.
BESTIMMUNGSGEMÄSSE VERWENDUNG
Dieses Produkt ist für die Tonwiedergabe von Radioprogrammen vorgesehen. Das Produkt ausschließlich
gemäß diesen Anweisungen verwenden. Das Produkt ist konzipiert für die Verwendung im privaten
Haushalt und nicht für gewerblichen Gebrauch geeignet.
Die Imtron GmbH akzeptiert keinerlei Haftung für jegliche Verletzungen oder Schäden, die durch
unvorsichtige, nicht angemessene oder unsachgemäße Verwendung des Produkts oder Verwendung
des Produkts für nicht vom Hersteller empfohlene Zwecke verursacht werden.
IM_OKR120_170824_V03_HR.indb 4 24/8/17 5:20 pm

5
DE
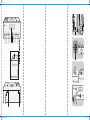
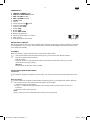
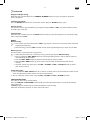
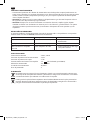
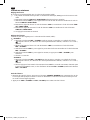
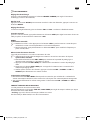
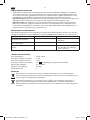
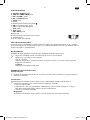
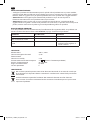
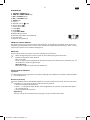
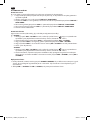
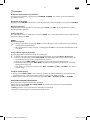
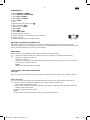
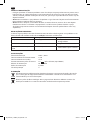
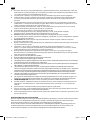
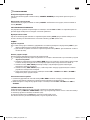
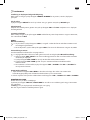
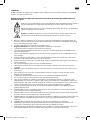
BAUTEILE
A. Taste SNOOZE / DIMMER
B. Taste TIME SET / COOK TIMER
C. Taste PRE.- / ALARM 1
D. Taste PRE.+ / ALARM 2
E. Taste SLEEP
F. Display
G.
Ein-/Ausschalter mit Beleuchtung
H. Lautstärke VOL-
I. Lautstärke VOL+
J. Taste SKIP-
K. Taste SKIP+
L. Taste AMS / MEM.
M. Batteriefach
N. Netzkabel mit Netzstecker (nicht abgebildet)
O. Wurfantenne
P. Bohrschablone (nicht abgebildet)
VOR DEM ERSTEN GEBRAUCH
Entfernen Sie das Produkt und Zubehör vorsichtig aus der Originalverpackung. Überprüfen Sie den
Verpackungsinhalt auf Vollständigkeit und Beschädigungen. Sollte der Verpackungsinhalt unvollständig
oder sollten Beschädigungen feststellbar sein, kontaktieren Sie umgehend Ihre Verkaufsstelle.
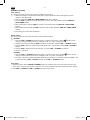
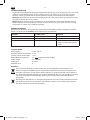
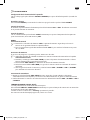
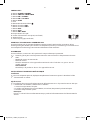
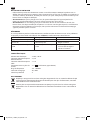
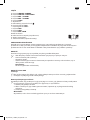
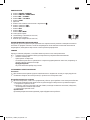
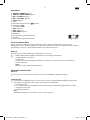
MONTAGE
Beachten Sie vor der Montage, dass das Radio in der Nähe einer Steckdose montiert wird.
1
• Nehmen Sie die beiliegende Schablone mit den Lochabständen und halten Sie diese an die
gewünschte Stelle.
• Markieren Sie die 4 Löcher oder messen Sie sie ab.
• Bohren Sie die 4 Löcher vor.
• Setzen Sie die Distanzstücke auf die vorgesehene Halterung und verschrauben Sie jetzt das
Radio mit den 4 Schrauben, z. B. an der Unterseite eines Hängeschrankes.
Warnung!
Montieren Sie das Produkt nicht direkt über dem Herd.
INSTALLATION UND STROMVERSORUNG
Installation
2
Befestigen Sie das Ende der Wurfantenne soweit wie möglich oben für besten Radioempfang.
Stecken Sie den Netzstecker in eine geeignete Steckdose.
Batterie-Notbetrieb
3
Das Einlegen von Batterien bewirkt, dass die interne Uhr auch bei einem möglichen Netzausfall
weiterläuft. Bei Wiedereinschalten des Netzstroms erscheint auf dem Display automatisch die
korrekte Zeit.
1. Önen Sie das Batteriefach.
2. Legen Sie 1 x 3 V Knopfzelle (Typ CR2025, nicht enthalten) in das Batteriefach. Achten Sie auf
korrekte Polarität.
3. Schließen Sie das Batteriefach.
Hinweis:
Display, Radio und Wecker funktionieren im Notbetrieb nicht.
IM_OKR120_170824_V03_HR.indb 5 24/8/17 5:20 pm

6
DE
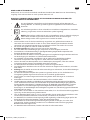
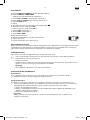
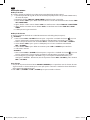
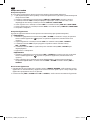
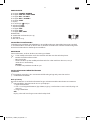
ALLGEMEINE EINSTELLUNG
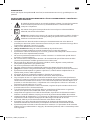
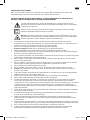
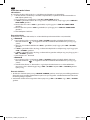
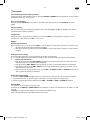
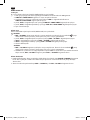
Uhrzeit einstellen
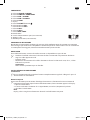
4
Die Uhrzeit lässt sich nur bei ausgeschaltetem Radio, d.h. im Standby-Modus einstellen:
1. Wenn das Produkt zum ersten mal mit dem Stromnetz verbunden ist, wird im Standby Modus
00:00 auf dem Display angezeigt.
2. Halten Sie die Taste TIME SET / COOK TIMER für ca. 2 Sekundenlang gedrückt.
3. Stellen Sie mit den Tasten SKIP+/- das Stundenformat 12H oder 24H ein und bestätigen Sie die
Auswahl mit der Taste TIME SET / COOK TIMER.
4. Stellen Sie nun die Stunden mit den Tasten SKIP+/- ein und bestätigen Sie die Einstellung mit
der Taste TIME SET / COOK TIMER.
5. Stellen Sie nun die Minuten mit den Tasten SKIP+/- ein und bestätigen Sie die Einstellung mit
der Taste TIME SET / COOK TIMER.
6. Die Einstellung wurde damit abgeschlossen.
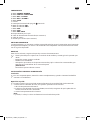
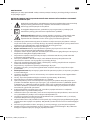
Alarm einstellen
Der Alarm lässt sich nur bei ausgeschaltetem Radio, d.h. im Standby-Modus einstellen:
5
ALARM 1
1. Halten Sie die Taste PRE.- / ALARM 1 ca. 2 Sekunden gedrückt. Im Display blinkt das
Alarmzeichen
1
und die zuvor eingestellte Alarmfunktion ("bell" oder "Radio") wird angezeigt.
2. Stellen Sie die Alarmfunktion mit den Tasten SKIP+/- ein und bestätigen Sie mit der Taste
PRE.- / ALARM 1.
3. Nehmen Sie die Einstellungen für Stunden mit den Tasten SKIP+/- vor und bestätigen Sie mit der
Taste PRE.- / ALARM 1.
4. Nehmen Sie die Einstellungen für Minuten mit den Tasten SKIP+/- vor und bestätigen Sie mit
der Taste PRE.- / ALARM 1.
5. Alarm1 ist aktiviert.
ALARM 2
1. Halten Sie die Taste PRE.+ / ALARM 2 ca. 2 Sekunden gedrückt. Im Display blinkt das
Alarmzeichen
2
und die zuvor eingestellte Alarmfunktion ("bell" oder "Radio") wird angezeigt.
2. Verfahren Sie zum Einstellen, Ein- und Ausschalten des ALARM 2 genauso wie bei ALARM 1,
jedoch durch Drücken der Taste PRE.+ / ALARM 2, anstatt der PRE.- / ALARM 1.
Alarm abstellen
1. Schlummerfunktion: Durch Drücken der Taste SNOOZE / DIMMER wird der Alarmton nur für wenige
Minuten unterbrochen und ertönt erneut nach ca. 9 Minuten. Das eingestellte Alarmsymbol blinkt auf.
2. Durch Drücken der Taste PRE.+ / ALARM 2 oder PRE.- / ALARM 1 wird der Alarmton abgestellt.
IM_OKR120_170824_V03_HR.indb 6 24/8/17 5:20 pm

7
DE
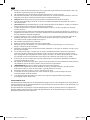
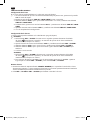
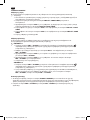
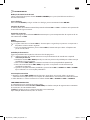
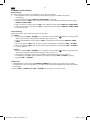
6
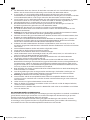
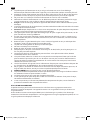
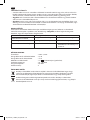
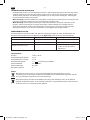
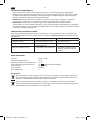
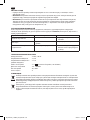
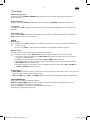
BEDIENUNG
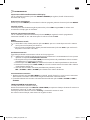
Displaybeleuchtung
Drücken Sie bei ausgeschaltetem Radio die Taste SNOOZE / DIMMER, um die Displayhelligkeit
(3 Helligkeitsstufen) einzustellen.
Ein- und Ausschalten
Drücken Sie ON/OFF um das Radio einzuschalten. Um das Radio in den Standby-Modus zu schalten,
drücken Sie ON/OFF erneut.
Lautstärkeregelung
Die Lautstärke kann einfach durch Drücken der Lautstärketasten VOL+ oder VOL- eingestellt werden.
Die eingestellte Lautstärke wird für einen Moment im Display angezeigt.
Abschaltfunktion (SLEEP)
Drücken Sie bei eingeschaltetem Radio die Taste SLEEP jeweils kurz, um den Timer zur Abschaltung des
Radios in 10 Minuten-Schritten von 120 Minuten bis OFF einzustellen.
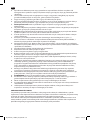
RADIO
Radiosender manuell einstellen
7
1. Schalten Sie das Radio ein. Drücken Sie die Taste SKIP+/- ca. 2 Sekunden, um den Sender mit der
nächsthöheren/-niedrigeren Frequenz zu suchen.
2. Zur Feinabstimmung tippen Sie die Einstellung SKIP+/- nur kurz an, um die Frequenz in Schritten
von ± 0,1 MHz zu ändern.
Programmspeicher
30 Radiostationen kann ein individueller Programmspeicherplatz zugewiesen werden.
8
1. Wählen Sie einen Radiosender wie im Absatz Radiosender manuell einstellen beschrieben.
2. Drücken Sie die Taste AMS / MEM, um das Abspeichern des Senders zu beginnen. Im Display
blinkt der zuletzt eingestellte Programmspeicherplatz „P“.
3. Drücken Sie die Tasten AMS / MEM um einen gewünschten Programmspeicherplatz auszuwählen.
4. Drücken Sie die Taste AMS / MEM erneut um den aktuellen Radiosender auf dem ausgewählten
Programmspeicherplatz abzuspeichern.
5. Haben Sie Ihre Radiosender wie gewünscht abgespeichert, können Sie diese mit der Taste
PRE.- / ALARM 1 oder PRE.+ / ALARM 2 auswählen.
Radiosender automatisch einstellen
1. Drücken und halten Sie die Taste AMS / MEM für ca. 2 Sekunden und lassen Sie sie dann los. Der
automatische Sendersuchlauf startet und die empfangenen Radiosender werden automatisch
abgespeichert.
2. Sie können die gespeicherte Radiosender mit den Tasten PRE.- / ALARM 1 oder PRE.+ / ALARM 2
auswählen.
KURZZEITWECKERTIMER
Das Radio kann dabei ein-oder ausgeschaltet sein.
Drücken Sie die Taste TIME SET / COOK TIMER jeweils kurz, um die Ablaufzeit des Kurzzeitweckers in 10
Minuten Schritten von 180 bis OFF einzustellen.
Im Display erscheint "Cooking" und der Kurzzeitwecker läuft nun ab.
Nach Ablauf der eingestellten Zeit, ertönt ein Alarmton.
IM_OKR120_170824_V03_HR.indb 7 24/8/17 5:20 pm

8
DE
REINIGUNG UND PFLEGE
• Vor dem Reinigen das Produkt vom Netz trennen. Das Produkt mit einem weichen, feuchten Tuch und
mildem Reinigungsmittel reinigen. Anschliesend trocken nachreiben. Zum Reinigen des Produktes
keinen Alkohol, Aceton, Benzol, scheuernde Reinigungsmittel usw. verwenden. Keine harten Bürsten
oder Metallgegenstände verwenden.
• Warnung! Tauchen Sie elektrische Teile des Produktes während des Reinigens nie in Wasser oder
andere Flüssigkeiten. Halten Sie es nie unter ießendes Wasser.
• Warnung! Verwenden Sie zur Reinigung keinesfalls Lösungs- und Scheuermittel, harte Bürsten,
metallische oder scharfe Gegenstände. Lösungsmittel sind gesundheitsschädlich und greifen die
Plastikteile an; scheuernde Reiniger und Hilfsmittel zerkratzen die Oberäche.
FEHLERBEHEBUNG
Sollte es während des Betriebs zu Störungen kommen, beachten Sie nachfolgende Tabelle. Sollten die
Probleme wie unter Behebung angegeben nicht abgestellt werden können, wenden Sie sich an Ihren Händler.
Problem Mögliche Ursache Behebung
Produkt funktioniert nicht • Keine Stromversorgung • Überprüfen der Stromversorgung
Kein Ton • Lautstärke ausgeschaltet • Lautstärke einstellen
Kein Radioempfang • Schlechter Radioempfang • Das Radio an einem anderen
Ort platzieren und Antenne neu
ausrichten.
TECHNISCHE DATEN
Stromversorgung : 230 V~, 50 Hz
Leistungsaufnahme im Betrieb : 3,5 W
Standby-Stromverbrauch : ≤1 W
Backup-Batteriebetrieb : 3 V
(Knopfzelle CR2025)
Tuning-Bereich (Tuner FM) : 88 - 108 MHz
Tuning Grid (Tuner FM) : 0,1 MHz
Schutzklasse : II
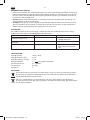
ENTSORGUNG
Das Symbol „durchgestrichene Mülltonne” erfordert die separate Entsorgung von Elektro- und
Elektronik-Altgeräten (WEEE). Elektrische und elektronische Geräte können gefährliche und
umweltgefährdende Stoe enthalten. Dieses Gerät nicht im unsortierten Hausmüll entsorgen.
An einer ausgewiesenen Sammelstelle für Elektro- und Elektronik-Altgeräte entsorgen. Dadurch
tragen Sie zum Schutz der Ressourcen und der Umwelt bei. Für weitere Information wenden Sie
sich bitte an Ihren Händler oder die örtlichen Behörden.
Bitte entsorgen Sie die Batterien umweltgerecht. Werfen Sie Batterien nicht in den Hausmüll.
Benutzen Sie bitte die Rückgabe- und Sammelsysteme in Ihrer Gemeinde oder wenden Sie sich an
den Händler, bei dem das Produkt gekauft wurde.
IM_OKR120_170824_V03_HR.indb 8 24/8/17 5:20 pm

9
EN
CONGRATULATIONS
Thanks for your purchase of an ok. product. Please read this manual carefully and keep it for future
reference.
IMPORTANT SAFETY INSTRUCTIONS. READ CAREFULLY AND KEEP FOR FUTURE REFERENCE.
1.
The exclamation point within an equilateral triangle is intended to alert the user to the
presence of important operating and maintenance instructions in the literature
accompanying the device.
2. For safety reasons, this class II product is provided with double or reinforced insulation as
indicated by this symbol.
3. Danger! Excessive sound pressure from earphones and headphones can cause hearing
loss. If you listen to loud music for a long time, your hearing may be impaired. Set to a
moderate volume.
4. This product is only intended for audio entertainment. Do not use the product for any other
purpose than described in this manual in order to avoid any hazardous situation. Improper use is
dangerous and will void any warranty claim.
5. For household use only. Do not use outdoors.
6. Danger of suocation! Keep all packaging material away from children.
7. Only use under normal room temperature and humidity conditions.
8. The product is only suitable for use at moderate degrees of latitude. Do not use in the tropics or in
particularly humid climates.
9. Do not move the product from cold into warm places and vice versa. Condensation can cause
damage to the product and electrical parts.
10. Do not use attachments or accessories other than recommended by the manufacturer or sold with
this product. Install in accordance with this user manual.
11. Do not install near any heat sources such as radiators, heat registers, stoves or other products
(including ampliers) that produce heat.
12. Do not shift or move the product when powered on.
13. Do not touch, push or rub the surface of the product with any sharp or hard objects.
14. Danger! To reduce the risk of re or electric shock, do not expose this product to rain or moisture.
15. The product shall not be exposed to dripping or splashing and no objects lled with liquids, such as
vases, shall be placed on the product.
16. Care should be taken so that no objects or liquids enter the enclosure through openings.
17. No naked ame sources, such as lighted candles, should be placed on the product.
18. Refer all servicing to authorised service agent. Do not attempt to repair the product yourself.
Servicing is required when the product has been damaged in any way, such as the supply cord or
plug are damaged, liquid has been spilled, objects have fallen into the product, the enclosure is
damaged, the product has been exposed to rain or moisture, does not operate normally, or has
been dropped.
19. Before connecting the product to a socket outlet, make sure the voltage indicated on the product
corresponds to your local mains.
20. If the supply cord is damaged, it must be replaced by the manufacturer or its service agent or
similarly qualied person in order to avoid hazard.
21. Regularly check if the supply cord, product or extension cable is defective. If found defective, do
not put the product into operation. Immediately pull the plug.
22. Place the supply cord and, if necessary, an appropriate extension cable in such away that pulling or
tripping over it is impossible. Do not allow the supply cord to hang down within easy reach.
23. Do not jam, bend or pull the supply cord over sharp edges.
24. The power plug is used as the disconnect device; the disconnect device shall remain readily
operable. To completely disconnect the power input, disconnect the mains plug.
25. The product may not function properly or not react to the operation of any control due to
electrostatic discharge. Switch o and disconnect the product; reconnect after a few seconds.
IM_OKR120_170824_V03_HR.indb 9 24/8/17 5:20 pm

10
EN
26. Protect the supply cord from being walked on or pinched particularly at the plug, convenience
receptacles and the point where it exits from the product.
27. Never pull the plug by the supply cord or with wet hands.
28. Disconnect the power plug in case of faults during use, during lightening storms, before cleaning
and when not using the product for a longer period of time.
29. Danger! Before cleaning, switch the product o and disconnect the power plug from the socket.
30. When the product has reached the end of its service life, make it defective by disconnecting the
plug from the socket and cutting the cord in two.
31. Caution! There is danger of explosion from improper replacement of the batteries. Replace
batteries only with the same or equivalent type of battery.
32. Always change the entire battery pack. Do not mix old and new batteries, or batteries with dierent
charge state.
33. Make sure the batteries are correctly inserted. Observe the polarity (+) plus / (-) negative on the
battery and the housing. Improperly inserted batteries can lead to leakage or, in extreme cases, a
re or an explosion.
34. Remove used batteries. Remove the batteries if you know that the product will not be used for a
longer period of time. Otherwise, the batteries could leak and cause damage.
35. Non-rechargeable batteries must not be recharged.
36. The connections must not be short-circuited.
37. Remove the batteries from the product before disposal.
38. Never expose batteries to excessive heat (e.g. bright sun, re), and never throw them into re. The
batteries could explode.
39. Keep batteries out of reach of small children. If batteries have been swallowed, seek immediate
medical attention.
40. If the batteries leak, remove them with a cloth and dispose of them accordingly. Prevent battery
acid from coming into contact with skin and eyes. If you do get battery acid in your eyes, ush
them thoroughly with lots of water and consult a physician immediately. If battery acid comes into
contact with your skin, wash the aected area with lots of water and soap.
41. When installing the device, leave sucient space for ventilation. Do not install in bookcases, built-in
cabinets or the like.
42. Do not impede ventilation by covering the ventilation openings with items, such as newspapers,
table-cloths, curtains, etc. Do not insert any objects.
43. WARNING! Do not ingest the battery, Chemical Burn Hazard.
44. This product contains a coin/button cell battery. If the coin/button cell battery is swallowed, it can
cause severe internal burns in just 2 hours and can lead to death.
45. Keep new and used batteries away from children.
46. If you think batteries might have been swallowed or placed inside any part of the body, seek
immediate medical attention.
47. If the battery compartment does not close securely, stop using the product and keep it away from
children.
INTENDED USE
This product is intended for audio playback of radio programs. Any other use may result in damage to
product or injuries. This product is designed for household use only and not intended for commercial use.
Do not use the product if damage is seen.
Imtron GmbH accepts no liability whatever for any injuries or damages caused to careless, improper or
incorrect use of the product or use of the product for purposes not recommended by the manufacturer.
IM_OKR120_170824_V03_HR.indb 10 24/8/17 5:20 pm

11
EN
COMPONENTS
A. SNOOZE / DIMMER button
B. TIME SET / COOK TIMER button
C. PRE.-/ ALARM 1 button
D. PRE.+/ ALARM 2 button
E. SLEEP button
F. Display
G. Illuminated On/O
button
H. Volume button VOL-
I. Volume button VOL+
J. Button SKIP-
K. Button SKIP+
L. Button AMS / MEM.
M. Battery compartment
N. Power cord with plug (not shown)
O. Wire antenna
P. Drilling template (not shown)
BEFORE FIRST TIME USE
Remove the product and accessories carefully from the original packaging. Inspect the delivery contents
for completeness and damages. Should the delivery contents be incomplete or damaged, contact your
sales outlet immediately.
ASSEMBLY
Before installation, make sure that there is an electrical outlet nearby.
1
• Take the enclosed template with the hole spacing and hold it to the desired location.
• Mark the 4 holes or measure them.
• Drill the 4 holes.
• Place the spacers on the provided bracket and x the radio with the 4 screws, e.g. on the
underside of a hanging cabinet.
Warning!
Do not install the product above a cooker.
INSTALLATION AND POWER SUPPLY
Installation
2
For optimal reception, extend the antenna fully and adjust it. Connect the power plug to the mains.
Back up battery
3
Insert batteries to enable the clock continues operating during a possible power failure. After the
mains power remains, the correct time will appear on the display.
1. Open the battery compartment.
2. Insert 1 x 3 V button cell (Type CR2025, not included). Make sure the polarity is correct as
indicated.
3. Close the battery compartment.
Note:
Display, radio and alarm will not function during back up operation.
IM_OKR120_170824_V03_HR.indb 11 24/8/17 5:20 pm

12
EN
GENERAL SETTINGS
Time setting
4
The time can be set only if the radio is in o mode (Standby):
1. When the product is connected to the power supply for the rst time, 0:00 appears on the
display in standby mode.
2. Press and hold the TIME SET / COOK TIMER button for 2 seconds.
3. Use the SKIP+/- buttons to set the hour format 12H or 24H and conrm with the TIME SET /
COOK TIMER button.
4. Now set the hours with the SKIP+/- buttons and conrm with the TIME SET / COOK TIMER
button.
5. Now set the minutes with the SKIP+/- buttons and conrm with the TIME SET / COOK TIMER
button.
6. The setting has now been completed.
Alarm setting
The alarm can be set only if the FM radio is in o mode (Standby):
5
ALARM 1
1. Press the PRE.- / ALARM 1 button for approx. 2 seconds. The alarm symbol
1
ashes in the
display and the previously set alarm function ("bell" or "radio") is displayed.
2. Set the alarm function with the SKIP+/- buttons and conrm with the PRE.- / ALARM 1 button.
3. Use the SKIP+/- buttons to adjust the settings for hours and conrm with the PRE.- / ALARM 1
button.
4. Use the SKIP+/- buttons to set the minutes, and press PRE.- / ALARM 1 to conrm.
5. Alarm1 is activated.
ALARM 2
1. Press the PRE.+ / ALARM 2 button for approx. 2 seconds. The alarm symbol
2
ashes in the
display and the previously set alarm function ("bell" or "radio") is displayed.
2. For setup, switching on/o of ALARM 2 follow the instructions as given for setup of ALARM 1. But
instead of pushing PRE.- / ALARM 1 button push PRE.+ / ALARM 2 button.
Stop alarm
1. Snooze function: Press SNOOZE / DIMMER button to suspend alarm sound for a few minutes. The
alarm will start again after approx. 9 minutes. The set alarm mode will remain ashing on the display.
2. Press PRE.+ / ALARM 2 or PRE.- / ALARM 1 to stop/cancel alarm.
IM_OKR120_170824_V03_HR.indb 12 24/8/17 5:20 pm

13
EN
6
OPERATION
Display backlight setting
With the radio switched o press the SNOOZE / DIMMER button to adjust (3 brightness level) the
display brightness.
Switching on and o
Press the ON/OFF button to turn on the radio. To turn o, press ON/OFF button again.
Volume control
The volume can be easily controlled by pressing the buttons VOL+ or VOL-. The volume will be shown
on display for a moment.
Sleep function
With the radio switched on press the SLEEP button shortly to adjust the sleep timer in 10 minutes steps
from 120 minutes to OFF.
RADIO
Manual tuning
7
1. Turn on the radio. Press the buttons SKIP+/- for approx. 3 seconds to search the station with next
higher/lower frequency.
2. For ne tuning, press the SKIP+/- button shortly to change the frequency in steps of ± 0.1 MHz.
Memory preset
30 radio stations can be preset to a program list.
8
1. Select FM radio mode. Set a station by tuning according to chapter Manual tuning.
2. Press and hold the AMS / MEM button to start the presetting process. The last preset station “P”
will be ashing on the display.
3. Press the AMS / MEM button to select the desired preset station number.
4. Press the AMS / MEM button again to save the actual station to the desired preset station
number.
5. Once the stations are preset, press the PRE.- / ALARM 1 or PRE.+ / ALARM 2 button to select
your desired stations.
Automatic tuning
1. Press and hold the AMS / MEM button for 2 seconds and then release it. The automatic station search
starts and the received radio stations are stored automatically.
2. You can select the stored radios using the PRE.- / ALARM 1 or PRE.+ / ALARM 2 buttons.
COUNTDOWN TIMER
The radio can be in on or standby mode.
Press the TIME SET / COOK TIMER button briey to set the countdown time in 10 minute increments
from 180 to OFF.
"Cooking" appears on the display and the countdown is now running.
When the set time has elapsed, an alarm sound will sound.
IM_OKR120_170824_V03_HR.indb 13 24/8/17 5:20 pm

14
EN
CLEANING AND CARE
• Disconnect the product from the power supply before cleaning it. Clean the product with a soft, damp
cloth and a mild cleaning agent. Finish by wiping it with a dry cloth. Do not use alcohol, acetone,
benzene, scouring cleansers etc. to clean the product. Do not use hard brushes or metal objects.
• Warning! Never immerse electrical parts of the product in water during cleaning or operation. Never
hold the product under running water.
• Warning! When cleaning, never use solvents or abrasive materials, hard brushes, metallic or sharp
objects. Solvents are harmful to human health and can attack plastic parts, while abrasive cleaning
mechanisms and tools may scratch the surface(s).
TROUBLESHOOTING
If there are any problems during operation, please refer to the following table. If problems cannot be
solved as indicated under Solution, please contact your manufacturer.
Problem Possible causes Solution
Product does not function • Interrupted power supply • Check the power supply
No Sound • Volume is very low • Adjust the volume
No radio reception • Poor radio reception • Place the product to another
place and adjust the antenna
again.
SPECIFICATION
Power supply : 230 V~, 50 Hz
Operation power consumption : 3.5 W
Standby-power consumption : ≤1 W
Backup-Batteries operation : 3 V
(button cell,type CR2025)
Tuning-range : 88 - 108 MHz
Tuning grid : 0.1 MHz
Protection class : II
DISPOSAL
The crossed-out wheeled bin logo requires the separate collection of waste electric and
electronic equipment (WEEE). Electric and electronic equipment may contain dangerous and
hazardous substances. Do not dispose of this appliance as unsorted municipal waste. Return it
to a designated collection point for the recycling of WEEE. By doing so, you will help to conserve
resources and protect the environment. Contact your retailer or local authorities for more
information.
Please dispose of batteries in an environmentally friendly manner. Do not put batteries into the
household waste. Please use the return and collection systems in your community or contact
the dealer where you purchased the product.
IM_OKR120_170824_V03_HR.indb 14 24/8/17 5:20 pm

15
ES
ENHORABUENA
Gracias por adquirir éste producto ok.. Por favor, lea atentamente este manual y guárdelo para un uso
posterior.
INSTRUCCIONES DE SEGURIDAD IMPORTANTES. LÉALAS CUIDADOSAMENTE Y CONSÉRVELAS
PARA FUTURAS CONSULTAS.
1.
El símbolo de exclamación en un triángulo equilátero advierte al usuario de la presencia
de instrucciones importantes de uso y mantenimiento en la documentación que
acompaña al dispositivo.
2. Por motivos de seguridad, este producto de clase II incluye un aislamiento doble o
reforzado, como indica este símbolo.
3. ¡Peligro! Una presión sonora excesiva de auriculares puede provocar pérdidas de oído. Si
escucha música alta durante un tiempo prolongado, puede sufrir carencias en su oído.
Establezca un volumen moderado.
4. Teste producto está diseñado exclusivamente para el entretenimiento con audio. No use el
producto para otros nes que los descritos en este manual para evitar situaciones de riesgo. El uso
inadecuado es peligroso y anularía la garantía.
5. Solo para uso doméstico. No usar en exteriores.
6. ¡Riesgo de asxia! Mantenga el material de embalaje alejado de los niños.
7. Use exclusivamente condiciones normales de temperatura y humedad ambiente.
8. El producto es adecuado solamente para usarse en grados de latitud templados. No lo use en los
trópicos ni en climas especialmente húmedos.
9. No mueva el producto de entornos fríos a cálidos ni viceversa. La condensación puede dañar el
producto y sus piezas eléctricas.
10. No use accesorios ni complementos distintos a los recomendados por el fabricante o vendidos
junto con este producto. Instálelo siguiendo el manual del usuario.
11. No lo instale cerca de fuentes de calor como radiadores, estufas, fogones ni otros productos
(incluyendo amplicadores) que generen calor.
12. No mueva el producto cuando esté encendido.
13. No toque, presione ni frote la supercie del producto con objetos alados o puntiagudos.
14. ¡Peligro! Para reducir el riesgo de electrocución, no exponga el producto a la lluvia ni la humedad.
15. El producto no debe exponerse a goteo ni salpicaduras, ni deben colocarse objetos llenos de
líquido, como jarrones, sobre el producto.
16. Asegúrese de que no se introduzcan objetos ni líquidos por las aperturas.
17. No deben colocarse fuentes de llama abierta, como velas, sobre el producto.
18. Dirija cualquier servicio a un agente autorizado. No intente reparar usted mismo el producto. Es
necesaria la asistencia cuando se haya dañado el producto de cualquier modo, como si el cable de
alimentación o el enchufe están dañados, si se ha derramado líquido o han entrado objetos en el
producto, si se ha dañado el chasis, si el producto se ha visto expuesto a la lluvia o la humedad, si
no funciona con normalidad, o si ha caído.
19. Antes de conectar el producto a la toma de corriente, asegúrese de que la tensión indicada en el
producto coincida con su alimentación local.
20. Si el cable de alimentación está dañado, debe ser sustituido por el fabricante o su agente de
servicio, o una persona con cualiciación similar, para evitar riesgos.
21. Compruebe con regularidad si el cable de alimentación, el producto o el cable extensor tienen
defectos. Si encuentra defectos, no ponga en marcha el producto. Desenchúfelo de inmediato.
22. Coloque el cable de alimentación y, si es necesario, un cable extensor adecuado de forma que sea
imposible tirar de él o tropezar. No deje que el cable cuelgue siendo fácil de alcanzar.
23. No encalle, doble ni pase el cable de alimentación sobre bordes alados.
24. El enchufe se usa como dispositivo de desconexión; el dispositivo de desconexión debe ser
fácilmente utilizable. Para desconectar por completo la alimentación, desconecte el enchufe.
25. El producto puede no funcionar correctamente o no reaccionar a las operaciones de los controles
debido a descargas electroestáticas. Apague y desconecte el producto; vuelva a conectarlo pasados
unos segundos.
IM_OKR120_170824_V03_HR.indb 15 24/8/17 5:20 pm

16
ES
26. Proteja el cable de alimentación de pisadas y enganches, especialmente en el enchufe, la toma de
corriente y el punto en el que sale del producto.
27. No desconecte nunca el enchufe tirando del cable ni con las manos mojadas.
28. Desconecte el enchufe si se producen fallos durante el uso, durante tormentas eléctricas, antes de
limpiarlo y cuando no use el producto durante un tiempo prolongado.
29. ¡Peligro! Antes de limpiarlo, apague el producto y desconecte el enchufe de la toma.
30. Cuando el producto llegue al n de su vida útil, anúlelo desconectando el enchufe de la toma y
cortando el cable.
31. ¡Precaución! Riesgo de explosión en caso de cambio inadecuado de baterías. Sustituya las baterías
exclusivamente con el mismo tipo de batería o equivalente.
32. Cambie siempre todas las baterías. No mezcle baterías nuevas y usadas, ni baterías en distintos
estados de carga.
33. Asegúrese de que las baterías estén correctamente introducidas. Observe la polaridad (+) positivo/ (-)
negativo en la batería y el chasis. Las baterías introducidas incorrectamente pueden provocar fugas o,
en casos extremos, incendio o explosión.
34. Saque las baterías usadas. Saque las baterías si no va a usar el dispositivo durante un periodo de
tiempo prolongado. En caso contrario, las baterías podrían tener fugas y provocar daños.
35. Las baterías no recargables no deben recargarse.
36. No se deben cortocircuitar los contactos.
37. Retire las baterías del producto antes de su eliminación.
38. No exponga nunca las baterías a un calor excesivo (como el sol o el fuego), ni las tire nunca al
fuego. Las baterías podrían explotar.
39. Mantenga las baterías fuera del alcance de niños pequeños. Si se tragan las baterías, consiga ayuda
médica de inmediato.
40. Si las baterías tiene fugas, sáquelas con un trapo y deséchelas de forma adecuada. Evite que el
ácido de las baterías entre en contacto con la piel y los ojos. Si entra ácido de las baterías en los
ojos, enjuáguelos por completo con mucho agua y consulte a un médico de inmediato. Si el ácido
de las baterías entra en contacto con la piel, lave la zona afectada con mucha agua y jabón.
41. Al instalar el aparato, se debe dejar espacio suciente para su ventilación. No colocar en librerías,
armarios empotrados o similar.
42. No impedir la ventilación tapando las aperturas de ventilación con otros elementos como pudieran
ser periódicos, trapos de cocina, cortinas, etc. No insertar ningún objeto.
43. ¡ADVERTENCIA! No ingiera la batería, peligro de quemadura química.
44. Este producto contiene una batería de botón. Si se traga la batería de botón, puede provocar
quemaduras internas graves en solo 2 horas y puede provocar la muerte.
45. Mantenga las baterías nuevas y usadas alejadas de los niños.
46. Si cree que se han tragado baterías o se han metido en alguna parte del cuerpo, busque
inmediatamente asistencia médica.
47. Si el compartimento de baterías no se cierra con seguridad, deje de utilizar el producto y
manténgalo alejado de los niños.
FINALIDAD DE USO
Este producto está destinado para la reproducción de programas de radio. Cualquier otro uso puede tener
como resultado danos en el producto o heridas. Este producto esta disenado solo para uso domestico y no
esta pensado para uso comercial.
El Imtron GmbH no asume ninguna responsabilidad por los daños al producto, daños a la propiedad o
lesiones debido al descuido o uso inadecuado del producto, o el uso del producto que no cumpla con el
propósito especicado por el fabricante.
IM_OKR120_170824_V03_HR.indb 16 24/8/17 5:20 pm

17
ES
COMPONENTES
A. Botón SNOOZE / DIMMER
B. Botón TIME SET / COOK TIMER
C. Botón PRE.- / ALARM 1
D. Botón PRE.+ / ALARM 2
E. Botón SLEEP
F. Pantalla
G. Interruptor de encendido/apagado
iluminado
H. Botón de volumen VOL-
I. Botón de volumen VOL+
J. Botón SKIP-
K. Botón SKIP+
L. Botón AMS / MEM.
M. Compartimento para la pila
N. Cable de alimentación con enchufe (no se muestra)
O. Cable de antena
P. Plantilla para taladrar (no se muestra)
ANTES DEL PRIMER USO
Saque el producto y sus accesorios cuidadosamente del embalaje original. Compruebe que el contenido
entregado esté completo y sin daños. Si el contenido está incompleto o dañado, contacte de inmediato
con su lugar de adquisición.
MONTAJE
Antes de la instalación, asegúrese de que hay una toma de corriente cerca.
1
• Tome la plantilla que se adjunta con las medidas de los oricios y manténgala en la posición que
desee.
• Marque los cuatro agujeros o mídalos.
• Perfore los cuatro oricios.
• Coloque los separadores en el soporte suministrado y je la radio con los cuatro tornillos, por
ejemplo, en la parte inferior de un armario de pared.
¡Advertencia!
No instale el aparato sobre una cocina.
INSTALACIÓN Y FUENTE DE ALIMENTACIÓN
Instalación
2
Para una recepción óptima, extienda la antena completamente y ajústela. Conecte el enchufe de
corriente a la red eléctrica.
Batería de respaldo
3
Inserte las baterías para que el reloj continúe funcionando en posibles fallos de alimentación.
Cuando vuelva la corriente de la red, en la pantalla aparecerá la hora correcta.
1. Abra el compartimento de baterías.
2. Inserte una pila de botón de 3 V (tipo CR2025, no incluida). Asegúrese de que la polaridad sea
correcta de acuerdo con la indicación.
3. Cierre el compartimento de las baterías.
Nota:
La pantalla, la radio y la alarma no funcionarán en el modo de respaldo.
IM_OKR120_170824_V03_HR.indb 17 24/8/17 5:20 pm

18
ES
CONFIGURACIÓN GENERAL
Conguración de la hora
4
La hora solo se puede establecer si la radio está apagada (Espera):
1. Cuando se conecta el aparato a la fuente de alimentación por primera vez, aparece en la pantalla
0:00 en modo de espera.
2. Mantenga pulsado el botón TIME SET / COOK TIMER durante 2 segundos.
3. Utilice los botones SKIP+/- para ajustar el formato de hora a 12 o 24 h y conrme con el botón
TIME SET / COOK TIMER.
4. A continuación, ajuste la hora con los botones SKIP+/- y conrme con el botón TIME SET / COOK
TIMER.
5. Ajuste los minutos con los botones SKIP+/- y conrme con el botón TIME SET / COOK TIMER.
6. Ya se ha completado la conguración.
Conguración de la alarma
La alarma solo se puede establecer si la radio FM está apagada (Espera):
5
ALARMA 1
1. Pulse el botón PRE.- / ALARM 1 durante unos 2 segundos aproximadamente. El símbolo
de alarma
1
parpadea en la pantalla y se muestran los ajustes de la alarma establecida
anteriormente («campana» o «radio»).
2. Ajuste la función de alarma con los botones SKIP+/- y conrme con el botón PRE.- / ALARM 1.
3. Utilice los botones SKIP+/- para ajustar la hora y conrme con el botón PRE.- / ALARM 1.
4. Utilice los botones SKIP+/- para ajustar los minutos y pulse el botón PRE.- / ALARM 1 para
conrmar.
5. La Alarma 1 está activada.
ALARMA 2
1. Pulse el botón PRE.+ / ALARM 2 durante unos 2 segundos aproximadamente. El símbolo
de alarma
2
parpadea en la pantalla y se muestran los ajustes de la alarma establecida
anteriormente («campana» o «radio»).
2. Para activar o desactivar la ALARMA 2 siga las instrucciones como para la ALARMA 1, pero en
lugar de pulsar el botón PRE.- / ALARM 1, pulse el botón PRE.+ / ALARM 2.
Detener alarma
1. Función de cabezada: Apriete el botón SNOOZE / DIMMER para suspender el sonido de la alarma
durante unos minutos. La alarma empezará de nuevo tras 9 minutos aproximadamente. El modo de
alarma establecido permanecerá destellando en la pantalla.
2. Pulse PRE.+ / ALARM2 o PRE.- / ALARM1 para detener o cancelar la alarma.
IM_OKR120_170824_V03_HR.indb 18 24/8/17 5:20 pm

19
ES
6
FUNCIONAMIENTO
Conguración de la iluminación de la pantalla
Con la radio apagada pulse el botón SNOOZE / DIMMER para ajustar el brillo de pantalla (3 niveles de
brillo).
Encender y apagar
Pulse el botón ON/OFF para encender la radio. Para apagarla vuelva a pulsar el botón ON/OFF.
Control de volumen
El volumen se puede controlar fácilmente pulsando los botones VOL+ o VOL-. El volumen se mostrará
en la pantalla durante un momento.
Función de reposo
Con la radio encendida pulse el botón SLEEP brevemente para ajustar el temporizador de reposo en
pasos de 10 minutos, entre 120 minutos y OFF.
RADIO
Sintonización manual
7
1. Encienda la radio. Pulse los botones SKIP+/- aproximadamente 3 segundos para buscar la
emisora en la siguiente frecuencia superior/inferior.
2. Para un ajuste preciso, pulse brevemente el botón SKIP+/- para cambiar la frecuencia en pasos
de ± 0,1 MHz.
Posiciones de memoria
En una lista de programas se pueden guardar 30 emisoras de radio.
8
1. Seleccione el modo de radio FM. Establezca una emisora sintonizando como indica el capítulo
Sintonización manual.
2. Presione y mantenga el botón AMS / MEM para iniciar el proceso de memorización. La última
emisora memorizada “P” parpadeará en pantalla.
3. Pulse el botón AMS / MEM para seleccionar el número de memoria deseado.
4. Pulse de nuevo el botón AMS / MEM para guardar la emisora actual en el número de memoria
que desee.
5. Una vez guardadas todas las emisoras, pulse los botones PRE.- / ALARM 1 o PRE.+ / ALARM 2
para seleccionar las emisoras deseadas.
Sintonización automática
1. Mantenga pulsado el botón AMS / MEM durante 2 segundos y luego suéltelo. La búsqueda
automática de emisoras empieza y las emisoras de radio encontradas se guardan automáticamente.
2. Puede seleccionar las emisoras de radio almacenadas utilizando los botones PRE.- / ALARM 1 o PRE.+
/ ALARM 2
TEMPORIZADOR DE CUENTA ATRÁS
La radio puede estar en modo encendido o de espera.
Pulse el botón TIME SET / COOK TIMER brevemente para ajustar el tiempo de cuenta atrás en intervalos
de 10 minutos desde 180 a APAGADO.
Cuando se activa la cuenta atrás, «Cooking» aparece en la pantalla.
Una vez transcurrido el tiempo programado, sonará una alarma.
.
IM_OKR120_170824_V03_HR.indb 19 24/8/17 5:20 pm

20
ES
LIMPIEZA Y MANTENIMIENTO
• Desconecte el producto de la fuente de alimentación antes de limpiarlo. Limpie el producto con un
paño suave y húmedo y un producto de limpieza suave. Termine frotando con un paño seco. No utilice
alcohol, acetona, benceno, limpiadores para fregar, etc. para limpiar el producto. No utilice cepillos
duros u objetos metálicos.
• Atención! No sumerja nunca las piezas eléctricas del producto en agua durante la limpieza o el uso.
No aguante nunca el producto bajo agua corriente.
• Atención! Al limpiar, no use nunca disolventes ni materiales abrasivos, cepillos rígidos, objetos
metálicos o alados. Los disolventes son dañinos para la salud humana y pueden afectar a las piezas
de plástico, mientras que los mecanismos y herramientas de limpieza abrasivos pueden rayar las
supercies.
RESOLUCIÓN DE PROBLEMAS
Si aparecen problemas de funcionamiento, consulte la siguiente tabla. Si los problemas no se pueden
resolver como se indica en Solución, contacte con el fabricante.
Problema Causas posibles Solución
El producto no funciona
• Alimentación Interrumpida • Compruebe la fuente de
alimentación
No hay sonido
• El volumen es muy bajo • Ajuste el volumen
Mala calidad en la recepción
de radio
• Mala recepción de radio • Sitúe el producto en otro lugar
y reajuste la antena..
ESPECIFICACIONES
Suministro de corriente : 230 V~, 50 Hz
Consumo de potencia en funcionamiento : 3,5 W
Consumo de potencia en espera : ≤1 W
Funcionamiento con baterías de respaldo : 3 V
(pila de botón, tipo CR2025)
Alcance de sintonización : 88 - 108 MHz
Cuadrícula de sintonización : 0,1 MHz
Clase de protección : II
ELIMINACIÓN
No deseche este aparato en la basura doméstica. Llévelo a un punto de recogida selectiva para
el reciclaje de los componentes eléctricos y electrónicos. Póngase en contacto con su vendedor
o autoridades locales para obtener más información al respecto.
Deshágase de las pilas de forma respetuosa con el medioambiente. No tire las pilas junto con los
residuos domésticos del hogar. Utilice los sistemas de devolución y recogida de su comunidad o
póngase en contacto con el vendedor al que compró el producto.
IM_OKR120_170824_V03_HR.indb 20 24/8/17 5:20 pm
La page est en cours de chargement...
La page est en cours de chargement...
La page est en cours de chargement...
La page est en cours de chargement...
La page est en cours de chargement...
La page est en cours de chargement...
La page est en cours de chargement...
La page est en cours de chargement...
La page est en cours de chargement...
La page est en cours de chargement...
La page est en cours de chargement...
La page est en cours de chargement...
La page est en cours de chargement...
La page est en cours de chargement...
La page est en cours de chargement...
La page est en cours de chargement...
La page est en cours de chargement...
La page est en cours de chargement...
La page est en cours de chargement...
La page est en cours de chargement...
La page est en cours de chargement...
La page est en cours de chargement...
La page est en cours de chargement...
La page est en cours de chargement...
La page est en cours de chargement...
La page est en cours de chargement...
La page est en cours de chargement...
La page est en cours de chargement...
La page est en cours de chargement...
La page est en cours de chargement...
La page est en cours de chargement...
La page est en cours de chargement...
La page est en cours de chargement...
La page est en cours de chargement...
La page est en cours de chargement...
La page est en cours de chargement...
La page est en cours de chargement...
La page est en cours de chargement...
La page est en cours de chargement...
La page est en cours de chargement...
La page est en cours de chargement...
La page est en cours de chargement...
La page est en cours de chargement...
La page est en cours de chargement...
La page est en cours de chargement...
La page est en cours de chargement...
La page est en cours de chargement...
La page est en cours de chargement...
La page est en cours de chargement...
La page est en cours de chargement...
La page est en cours de chargement...
La page est en cours de chargement...
La page est en cours de chargement...
La page est en cours de chargement...
La page est en cours de chargement...
La page est en cours de chargement...
La page est en cours de chargement...
La page est en cours de chargement...
La page est en cours de chargement...
La page est en cours de chargement...
-
 1
1
-
 2
2
-
 3
3
-
 4
4
-
 5
5
-
 6
6
-
 7
7
-
 8
8
-
 9
9
-
 10
10
-
 11
11
-
 12
12
-
 13
13
-
 14
14
-
 15
15
-
 16
16
-
 17
17
-
 18
18
-
 19
19
-
 20
20
-
 21
21
-
 22
22
-
 23
23
-
 24
24
-
 25
25
-
 26
26
-
 27
27
-
 28
28
-
 29
29
-
 30
30
-
 31
31
-
 32
32
-
 33
33
-
 34
34
-
 35
35
-
 36
36
-
 37
37
-
 38
38
-
 39
39
-
 40
40
-
 41
41
-
 42
42
-
 43
43
-
 44
44
-
 45
45
-
 46
46
-
 47
47
-
 48
48
-
 49
49
-
 50
50
-
 51
51
-
 52
52
-
 53
53
-
 54
54
-
 55
55
-
 56
56
-
 57
57
-
 58
58
-
 59
59
-
 60
60
-
 61
61
-
 62
62
-
 63
63
-
 64
64
-
 65
65
-
 66
66
-
 67
67
-
 68
68
-
 69
69
-
 70
70
-
 71
71
-
 72
72
-
 73
73
-
 74
74
-
 75
75
-
 76
76
-
 77
77
-
 78
78
-
 79
79
-
 80
80


dans d''autres langues
- italiano: OK. OKR 120 Manuale utente
- English: OK. OKR 120 User manual
- español: OK. OKR 120 Manual de usuario
- Deutsch: OK. OKR 120 Benutzerhandbuch
- русский: OK. OKR 120 Руководство пользователя
- Nederlands: OK. OKR 120 Handleiding
- português: OK. OKR 120 Manual do usuário
- polski: OK. OKR 120 Instrukcja obsługi
- svenska: OK. OKR 120 Användarmanual
- Türkçe: OK. OKR 120 Kullanım kılavuzu
Documents connexes
Autres documents
-
Muse Micro-chaîne M39 DBT Le manuel du propriétaire
-
Silvercrest SKR 800 D1 Operating Instructions And Safety Instructions
-
Lenco CR-520BU Le manuel du propriétaire
-
-
-
Lenco CR-520 Le manuel du propriétaire
-
Roadstar CLR-725BT/BK Manuel utilisateur