Vxl Itona IQ-B Series Guide d'installation
- Taper
- Guide d'installation

Itona IQB Series
Hardware Installation Guide
Guide d’Installation Hardware
Hardware-Installationsanweisungen
Instalación del hardware
This Class B digital apparatus complies with Canadian ICES-003.
Cet appareil numérique de classe B est conforme à la norme canadienne ICES-003.
Dieses digitale Class B-Gerät entspricht der Canandian ICES-003.
Este aparato digital de Clase B cumple la normativa canadiense ICES-003.
© 2015 VXL Instruments Limited.
600 0110 548 04 A01
1
2
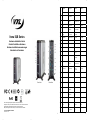
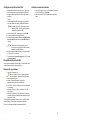
Front View Rear View
Ref English Français
Deutsch Español
Components Composants Bauteile Componentes
1 Power Button Bouton d’ali-
mentation
Ein/Aus-Taste Botón de encendido
2 Audio Out Port Port sortie
audio
Audioaus-
gang-Anschluss
Puerto de salida de
audio
3 Mic Microphone Mic Micrófono
4 Two USB 2.0 Ports Deux ports
USB 2.0
Zwei USB
2.0-Anschlüsse
Dos puertos USB
2.0
5 Mini PCIe WiFi
LED
LED de Mini
PCIe WiFi
Mini PCIe
WiFi-LED
LED Mini PCIe WiFi
6 HDD LED LED disque dur HDD-LED LED HDD
7 Pedestal Piédestal Sockel Pedestal
8 Line In faire la queue Linie in en linea
9 VGA Port Port VGA VGA-Anschluss Puerto VGA
10 Ethernet Port Port ethernet Ethernet-An-
schluss
Puerto Ethernet
11 Serial Port Port série seriellen
Anschluss
Puerto serie
12 PS/2 Mouse Port Port PS/2
souris
PS/2-
Mausanschluss
Puerto de ratón
PS/2
13 Antenna Port
(Optional)
Antenne Port
(Facultatif)
Antennenan-
schluss
(Optional)
Antena Puerto
(Opcional)
14 Mic Microphone Mic Micrófono
15 Line Out Line out Line out salida de línea
16 HDMI Port Port HDMI HDMI-Anschluss Puerto HDMI
17 Two USB 2.0 Port Deux ports
USB 2.0
Zwei ports USB
2.0
Dos ports USB 2.0
18 Two USB 2.0 Port Deux ports
USB 2.0
Zwei ports USB
2.0
Dos ports USB 2.0
19 USB 3.0 Ports Ports USB 3.0 Ports USB 3.0 Ports USB 3.0
20 PS/2 Keyboard
Port
Clavier PS/2
Port
PS/2-Tastaturan-
schluss
PS/2 Teclado
Puerto
21 DC Power In Alimentation
d’entrée DC
DC Stromein-
gang
Entrada CC

Product Safety
Improper connection/mounting of this product could result in product
failure or damage. Please read this guide carefully before setting up
your Itona thin client.
Battery Disposal
Batteries and battery packs should not be disposed together with the
general household waste. In order to forward them to recycling or
proper disposal, please use the public collection system for
electronic waste in your country.
VXL Technical Support
To access VXL hardware and software documentation, visit:
http://www.vxl.net//Independent/product-manuals.aspx
For online support or reporting a problem, visit:
http://vxlsupport.me
For more details about Product Warranty, visit:
http://www.vxl.net/Support/Product-Warranty-Terms.aspx
Package Contents
The Itona IQB Series package contains the following items:
• Itona IQB Series Thin Client
• Power Adapter 65 W, 19 V DC
• Power Cord country specic (Optional)
• Mouse (Optional)
• HDMI to DVI converter cable
• Pedestal
• This Manual
Safety Instructions
Follow these precautions when installing Itona IQB Series:
• Use approved 3 Pin grounded power cord only. Ensure
that you plug the power cord into a grounded 3 pin
electrical outlet.
• Allow approximately 4 Inches of space around the product
for effective ventilation.
• Always place the client vertically for convection cooling.
• Do not operate this equipment in corrosive or explosive
environment.
For more details about safety instructions, visit
http://vxl.net/Support/HardwareInstallationGuides.aspx
Setting up the Itona IQB Series
1. Unpack the unit from the carton. Take care not
to drop the product when removing from the carton
as it may damage the product.
2. Snap t the pedestal to place the thin client on a desk.
Or
English
Install the VESA Dock to mount the thin client on a wall,
behind the monitor or under the counter.
Note: For more information about installing the
VESA Dock and Pedestal, refer to the
Itona IQB Series Hardware User Guide.
3. Connect the USB mouse and keyboard to the USB Ports.
4. Connect the network cable to the Ethernet Port.
5. Connect the monitor to the VGA Port, HDMI Port,
Display Port or DVI Port (via HDMI to DVI converter
cable).
Note: For instructions to connect dual monitors,
refer to the Itona IQB/IQB Series Hardware
User Guide.
6. Connect the power cable to a grounded 3 pin electrical
outlet.
7. Connect serial devices to the Serial Port and Wi -Fi
Antenna to the Antenna Port*.
*If applicable
Switching on the Itona IQB Series
Press the Power Button. You will hear a beep and subsequently the
operating system start-up screen appears.
Reporting a Problem
1. Go to http://vxlsupport.me/.
Note: Skip to Step 4 if you are a registered user.
2. Click on Register. Provide the required details to complete
registration.
3. Activate your account by following the instructions
provided in the verication mail.
4. In the Login Tab, enter your Email Address and
Password.
5. Click on Submit a Ticket and select VXL Thin
Client Support.
6. Click Next, ll in the requested information along with
the problem description, and click Submit.
Your problem will be registered and you will receive an email with a
ticket number.
Please mention the ticket number in future correspondence
regarding the issue.
Checking the Status of Your Ticket
1. Go to http://vxlsupport.me/ and login using your Email
Address and Password.
2. Select the My Ticket option to view your ticket status.
3
4
5
Sécurité produit
La connexion / le montage impropre du produit peut entraîner sa dé-
faillance ou des dégâts. Veuillez lire attentivement ce mode d’emploi
avant d’installer votre client léger Itona.
Elimination des piles
Les piles et accumulateurs ne doivent pas être jetés avec les ordures
ménagères. Pour les recycler ou éliminer les piles sans risque pour
l’environnement, veuillez les déposer dans les centres de gestion
de déchets publics pour objets électroniques présents dans votre
région.
Soutien technique VXL
Pour consulter la documentation logicielle et matériel de VXL,
rendez-vous sur:
http://www.vxl.net//Independent/product-manuals.aspx
Pour le soutien en ligne ou pour signaler un problème, ren-
dez-vous sur:
http://vxlsupport.me/.
Pour de plus amples renseignements sur la garantie du produit,
rendez-vous sur :
http://www.vxl.net/Support/Product-Warranty-Terms.aspx
Guide d’Installation Hardware
Le paquet Itona Série IQB est composé des articles listés ci-des-
sous:
• Client léger Itona Série IQB
• Adaptateur d’alimentation 65 W, 19 V DC
• Cordon d’alimentation pays spécique (facultatif)
• Souris (facultative)
• HDMI à DVI câble convertisseur
• Piédestal
• Ce manuel
Instructions de sécurité
Veuillez suivre ces précautions lorsque vous installez l’Itona série
IQB:
• Utilisez un cordon d’alimentation homologué à 3 broches
mis à la terre. Assurez-vous de brancher le cordon d’ali
mentation sur une prise électrique à 3 broches mise à la
terre.
• Laissez une espace d’environ 10 cm autour du produit,
pour assurer une ventilation efcace.
• Positionnez toujours le client verticalement, pour assurer
un refroidissement par convection.
• N’utilisez pas cet équipement dans un environnement
corrosif ou explosif.
Pour de plus amples consignes de sécurité, http://vxl.net/Support/
HardwareInstallationGuides.aspx
Français

Vérication de l’état de votre ticket
1. Visite http://vxlsupport.me/ et connectez-vous en
utilisant votre adresse Email et le mot de passé.
2. Sélectionnez l’option « My Ticket » pour afcher votre
statut de ticke.
Installation de l’Itona Série IQB
1. Retirez l’unité du carton. Veillez à ne pas faire tomber le
produit lorsque vous le retirez du carton : ceci pourrait
endommager le produit.
2. Enclenchez le piédestal pour positionner le client léger sur
un bureau, ou
Installez la station VESA pour monter le client léger sur un
mur, derrière le moniteur ou sous un comptoir.
Note: Pour toutes informations complémentaires sur
l’in stallation de la station VESA et du piédestal,
veuillez vous reporter au Guide d’utilisation
hardware Itona Série IQB.
3. Connectez la souris USB et un clavier aux ports USB.
4. Connectez le câble réseau au port ethernet.
5. Connectez le moniteur au port VGA, port HDMI, Display
Port ou port DVI (via HDMI à câble convertisseur DVI).
Note: Pour obtenir des instructions pour connecter
deux moniteurs, reportez-vous à la Itona IQB/
IQB Series Guide de l’utilisateur du matériel.
6. Connectez le cordon d’alimentation sur une prise élec
trique à 3 broches mise à la terre.
7. Connecter des périphériques série au port série et une
connexion Wi -Fi antenne au Port antenne*.
Allumer l’Itona Série IQB
Appuyez sur le bouton d’alimentation. Vous entendrez un bip, et
l’écran de démarrage du système d’exploitation sera ensuite afché.
Signalez un problème
1. Visite: http://vxlsupport.me/
Note: Allez directement à l’étape 4, si vous êtes un
utilisateur enregistré.
2. Cliquez sur enregistrement ‘. Entrer les informations
détaillées d’enregistrement.
3. Activer votre compte en suivant les instructions envoyées
dans l’email de vérication.
4. Sur « Log-in », entrez votre adresse E-mail et le mot de
passe.
5. Cliquez sur « Soumettre un Ticket » et sélectionnez « VXL
Thin Client Support ».
6. Cliquez sur « Suivant », soumettre les informations
demandées ainsi que la description du problème et puis
cliquez sur « Soumettre ».
Votre problème sera enregistré sur la base de données et vous recev-
rez un courriel avec un numéro de référence du billet unique.
Veuillez utiliser le numéro de ticket unique dans toute future corre-
spondance.
Produktsicherheit
Falscher Anschluss/Montage dieses Produkt kann zum Versagen
oder zur Beschädigung des Produkts führen. Lesen Sie diese An-
weisungen bitte aufmerksam durch, bevor Sie Ihren Itona Thin Client
einrichten.
Akku-Entsorgung
Akkus und Akku-Pakete dürfen nicht zusammen mit dem normalen
Haushaltsmüll entsorgt werden. Um sie zum Recycling oder zur
ordnungsgemäßen Entsorgung zu senden, benutzen Sie bitte das
öffentliche Sammelsystem für Elektronikmüll in Ihrem Land.
VXL Technischer Support
Für den Zugriff auf VXL Hardware- und Software-
Dokumentation besuchen Sie bitte:
http://www.vxl.net//Independent/product-manuals.aspx
Für Online-Support oder um ein Problem zu melden, besuchen
Sie bitte:
http://vxlsupport.me/
Für weitere Einzelheiten über die Produktgarantie besuchen Sie
bitte:
http://www.vxl.net/Support/Product-Warranty-Terms.aspx
Hardware-Installationsanweisungen
Das Itona Paket der IQB Serie besteht aus den folgenden Posten:
• Itona IQB Serie Thin Client
• Netzgerät 65 W, 19 V DC
• Netzkabel (Option)
• HDMI zu DVI Konverterkabel
• Maus (Option)
• Sockel
• Diesem Handbuch
Sicherheitsanweisungen
Befolgen Sie diese Sicherheitsmaßnahmen bei der Installation von
Itona IQB Serie Geräten:
• Stets ein zugelassenes dreistiftiges, geerdetes Netzkabel
benutzen. Das Netzkabel muss an eine geerdete, dreistif
tige Steckdose angeschlossen werden.
• Um das Produkt herum ca. 10 cm Freiraum lassen, um
effektive Belüftung zu gewährleisten.
• Den Client zur Umluftkühlung stets vertikal aufstellen.
• Das Gerät darf nicht in einer korrosiven oder explosions
gefährdeten Umgebung betrieben werden.
Weitere Einzelheiten über Sicherheitsanweisungen nden Sie
unter http://vxl.net/Support/HardwareInstallationGuides.aspx
6 7 8
Deutsch
La page est en cours de chargement...
La page est en cours de chargement...
-
 1
1
-
 2
2
-
 3
3
-
 4
4
-
 5
5


Vxl Itona IQ-B Series Guide d'installation
- Taper
- Guide d'installation
dans d''autres langues
Documents connexes
-
Vxl Itona LQ & LQ+ Series Guide d'installation
-
-
-
-
-
-