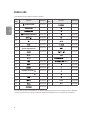
LG 60UL3E-B Le manuel du propriétaire
- Catégorie
- Équipement musical supplémentaire
- Taper
- Le manuel du propriétaire

AAA
www.lg.com/id-manual
LG Digital Signage
(MONITOR SIGNAGE)
60UL3E
70UL3E
ENGLISH
Easy Setup Guide
Please read this manual carefully before operating your set and retain it for future reference.
ESPAÑOL
Guía Rápida de Configuración
Lea atentamente este manual antes de poner en marcha el equipo y consérvelo para futuras consultas.
FRANÇAIS
Guide de configuration rapide
Avant d’utiliser l’appareil, veuillez lire attentivement ce manuel et le conserver pour pouvoir vous y reporter
ultérieurement.
Printed in Korea
Depending upon model / Selon le modèle / Según el modelo

ENGLISH Read Safety and Reference.
ESPAÑOL Leer Seguridad y Consultas.
FRANÇAIS Lisez Sécurité et références.


1
2
43

1
2
0
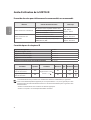
Stand Model Name
Nombre del modelo del soporte
Nom du modèle de socle
60UL3E-BJ
1,368
(53.8)
1 368
(53,8)
796
(31.3)
796
(31,3)
89.1
(3.5)
89,1
(3,5)
19.4
(42.7)
19,4
(42,7)
205 W ST-60UL3RB
70UL3E-TJ
1,573
(61.9)
1 573
(61,9)
910
(35.8)
910
(35,8)
69.0
(2.7)
69,0
(2,7)
32.5
(71.6)
32,5
(71,6)
270 W ST-70UL3DT
60UL3E-BJ AC 100 - 240 V ~ 50 / 60 Hz
70UL3E-TJ AC 120 V ~ 50 / 60 Hz


*MFL70780601*
(1809-REV01)
(Pour les États-Unis et le Canada)
Ce produit est conforme aux normes
ENERGY STAR® lorsque le « réglage
d’usine par défaut (Résidentiel) » est
sélectionné. Modier les réglages
d’usine par défaut ou activer d’autres
fonctionnalités augmente la consommation
d’énergie qui pourrait alors dépasser les limites de
la qualication ENERGY STAR®. Consultez le site
ENERGYSTAR.gov pour en savoir plus au sujet du
programme ENERGY STAR®.
(For USA and Canada only)
(Para Estados Unidos y Canadá)
This product qualies for ENERGY
STAR® in the factory default (Home
conguration) setting. Changing the
factory default settings or enabling
other features may increase power consumption
that could exceed the limits necessary to quality
for ENERGY STAR®. Refer to ENERGYSTAR.gov
for more information on the ENERGY STAR®
program.

60UL3E
70UL3E
Please read this manual carefully before operating your set and retain it
for future reference.
OWNER’S MANUAL
Safety and Reference
LG Digital Signage
(MONITOR SIGNAGE)
www.lg.com
Copyright © 2018 LG Electronics Inc. All Rights Reserved.
Printed in Korea
*MFL70780503*
(1809-REV00)

ENGLISH
2
Important Safety Instruction
• Read these instructions.
• Keep these instructions.
• Heed all warnings.
• Follow all instructions.
• Do not use this apparatus near water.
• Clean only with dry cloth.
• Do not block any ventilation openings. Install in accordance with the manufacturer’s instructions.
• Do not install near any heat sources such as radiators, heat registers, stoves, or other apparatus (including
amplifiers) that produce heat.
• Do not defeat the safety purpose of the polarized or grounding-type plug. A polarized plug has two blades with
one wider than the other. A grounding type plug has two blades and a third grounding prong. The wide blade
or the third prong are provided for your safety. If the provided plug does not fit into your outlet, consult an
electrician for replacement of the obsolete outlet.
• Protect the power cord from being walked on or pinched particularly at plugs, convenience receptacles, and the
point where they exit from the apparatus.
• Only use attachments/accessories specified by the manufacturer.
• Use only with the cart, stand, tripod, bracket, or table specified by the manufacturer, or sold with the apparatus.
When a cart is used, use caution when moving the cart/apparatus combination to avoid injury from tip-over.
• Unplug this apparatus during lightning storms or when unused for long periods of time.
• Refer all servicing to qualified service personnel. Servicing is required when the apparatus has been damaged in
any way, such as power-supply cord or plug is damaged, liquid has been spilled or objects have fallen into the
apparatus, the apparatus has been exposed to rain or moisture, does not operate normally, or has been dropped.

ENGLISH
3
Warning! Safety instructions
CAUTION
RISK OF ELECTRIC SHOCK
DO NOT OPEN
CAUTION : TO REDUCE THE RISK OF ELECTRIC
SHOCK DO NOT REMOVE COVER (OR BACK).
NO USER SERVICEABLE PARTS INSIDE. REFER TO
QUALIFIED SERVICE PERSONNEL.
The symbol is intended to alert the user to
the presence of uninsulated dangerous
voltage within the product’s enclosure that may
be of sufficient magnitude to constitute a risk of
electric shock to persons.
The symbol is intended to alert the user to
the presence of important operating and
maintenance (servicing) instructions in the
literature accompanying the device.
WARNING : TO REDUCE THE RISK OF FIRE
AND ELECTRIC SHOCK, DO NOT EXPOSE THIS
PRODUCT TO RAIN OR MOISTURE.
• TO PREVENT THE SPREAD OF FIRE, KEEP CANDLES OR
OTHER ITEMS WITH OPEN FLAMES AWAY FROM THIS
PRODUCT AT ALL TIMES.
• Do not place the monitor and/or remote control
in the following environments:
- Keep the product away from direct sunlight.
- An area with high humidity such as a bathroom
- Near any heat source such as stoves and other
devices that produce heat.
- Near kitchen counters or humidifiers where they
can easily be exposed to steam or oil.
- An area exposed to rain or wind.
- Do not expose to dripping or splashing and do
not place objects filled with liquids, such as vases,
cups, etc. on or over the apparatus (e.g., on shelves
above the unit).
- Near flammable objects such as gasoline or
candles, or expose the monitor to direct air
conditioning.
- Do not install in excessively dusty places.
Otherwise, this may result in fire, electric shock,
combustion/ explosion, malfunction or product
deformation.
• Ventilation
- Install your monitor where there is proper
ventilation. Do not install in a confined space such
as a bookcase.
- Do not install the product on a carpet or cushion.
- Do not block or cover the product with cloth or
other materials while unit is plugged in.
• Take care not to touch the ventilation openings.
When watching the monitor for a long period, the
ventilation openings may become hot.
• Protect the power cord from physical or mechanical
abuse, such as being twisted, kinked, pinched,
closed in a door, or walked upon. Pay particular
attention to plugs, wall outlets, and the point where
the cord exits the device.
• Do not move the monitor whilst the Power cord is
plugged in.
• Do not use a damaged or loosely fitting power cord.
• Be sure to grasp the plug when unplugging the
power cord. Do not pull on the power cord to unplug
the monitor.
• Do not connect too many devices to the same AC
power outlet as this could result in fire or electric
shock.
• Disconnecting the Device from the Main Power
- The power plug is the disconnecting device. In
case of an emergency, the power plug must remain
readily accessible.
• Do not let your children climb or cling onto the
monitor. Otherwise, the monitor may fall over, which
may cause serious injury.

ENGLISH
4
• Make sure the power cord is connected securely to
the monitor and wall socket if not secured damage
to the Plug and socket may occur and in extreme
cases a fire may break out.
• Do not insert metallic or inflammable objects into
the product. If a foreign object is dropped into the
product, unplug the power cord and contact the
customer service.
• Do not touch the end of the power cord while it is
plugged in. You may be electrocuted.
• If any of the following occur, unplug the product
immediately and contact your local customer
service.
- The product has been damaged.
- If water or another substance enters the product
(like an AC adapter, power cord, or monitor).
- If you smell smoke or other odors coming from the
monitor.
- When lightning storms or when unused for long
periods of time.
Even the monitor is turned off by remote control or
button, AC power source is connected to the unit if
not unplugged in.
• Do not use high voltage electrical equipment near
the monitor (e.g., a bug zapper). This may result in
product malfunction.
• Do not attempt to modify this product in any way
without written authorization from LG Electronics.
Accidental fire or electric shock can occur. Contact
your local customer service for service or repair.
Unauthorized modification could void the user’s
authority to operate this product.
• Use only an authorized attachments / accessories
approved by LG Electronics. Otherwise, this may
result in fire, electric shock, malfunction, or product
damage.
• Never disassemble the AC adapter or power cord.
This may result in fire or electric shock.
• Handle the adapter carefully to avoid dropping or
striking it. An impact could damage the adapter.
• To reduce the risk of fire or electrical shock, do not
touch the monitor with wet hands. If the power cord
prongs are wet or covered with dust, dry the power
plug completely or wipe dust off.
• Batteries
- Store the accessories (battery, etc.) in a safe
location out of the reach of children.
- Do not short circuit, disassemble, or allow the
batteries to overheat. Do not dispose of batteries
in a fire. Batteries should not be exposed to
excessive heat.
• Moving
- When moving, make sure the product is turned
off, unplugged, and all cables have been removed.
It may take 2 or more people to carry larger
monitors. Do not press or put stress on the front
panel of the monitor. Otherwise, this may result in
product damage, fire hazard or injury.
• Keep the packing anti-moisture material or vinyl
packing out of the reach of children.
• Do not allow an impact shock, any objects to fall
into the product, and do not drop anything onto the
screen.
• Do not press strongly upon the panel with a hand or
a sharp object such as a nail, pencil, or pen, or make
a scratch on it. It may cause damage to screen.
• Cleaning
- When cleaning, unplug the power cord and wipe
gently with a soft/dry cloth. Do not spray water
or other liquids directly on the monitor. Do not
clean your monitor with chemicals including glass
cleaner, any type of air freshener, insecticide,
lubricants, wax (car, industrial), abrasive, thinner,
benzene, alcohol etc., which can damage the
product and/or its panel. Otherwise, this may result
in electric shock or product damage.

ENGLISH
5
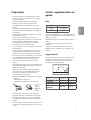
Preparing
• When the monitor is turned on for the first time after
being shipped from the factory, initialization of the
monitor may take approximately one minute.
• Image shown may differ from your monitor.
• Your monitor’s OSD (On Screen Display) may differ
slightly from that shown in this manual.
• The available menus and options may differ from the
input source or product model that you are using.
• New features may be added to this monitor in the
future.
• The device must be easily accessed to a location
outlet near the access. Some devices are not made
by turning on / off button, turning off the device and
unplugging the power cord.
• The items supplied with your product may vary
depending upon the model.
• Product specifications or contents of this manual
may be changed without prior notice due to
upgrade of product functions.
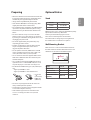
• For an optimal connection, HDMI cables and USB
devices should have bezels less than 10 mm (0.39
inches) thick and 18 mm (0.7 inches) width.
• Use an extension cable that supports USB 2.0 if the
USB cable or USB flash drive does not fit into your
monitor’s USB port.
• Use a certified cable with the HDMI logo attached.
If you do not use a certified HDMI cable, the screen
may not display or a connection error may occur.
• Recommended HDMI cable types (3 m (9.84 feet) or
less)
• High-Speed HDMI®/™ cable
• High-Speed HDMI®/™ cable with Ethernet
A
B
A
B
* A 10 mm
(0.39 inches)
* B 18 mm
(0.7 inches)
• Do not use any unapproved items to ensure the
safety and lifespan of the product.
• Any damages or injuries by using unapproved items
are not covered by the warranty.
• Some models appear to have a thin film on the
screen. It is actually part of the screen; do not
remove it.
Optional Extras
Stand
Model Stand
60UL3E ST-60UL3RB
70UL3E ST-70UL3DT
Optional extras can be changed or modified for quality
improvement without any notification.
Contact your dealer for buying these items.
These devices work only with certain models.
The model name or design may be changed due to
the manufacturer’s circumstances or policies.
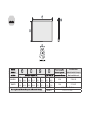
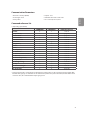
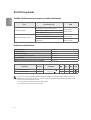
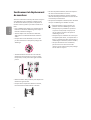
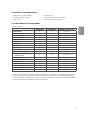
Wall Mounting Bracket
Make sure to use screws and wall mounts that meet
the VESA standard. Standard dimensions for the wall
mount kits are described in the following table.
A
B
Model
60UL3E 70UL3E
VESA (A x B)
300 x 300 600 x 400
Standard screw
M6 M8
Number of screws
4 4
Wall mount bracket
(optional)
OLW480B LSW640B

ENGLISH
6
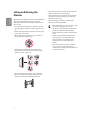
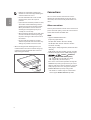
Lifting and Moving the
Monitor
When moving or lifting the monitor, read the following
to prevent the monitor from being scratched or
damaged and for safe transportation regardless of its
type and size.
• It is recommended to move the monitor in the box
or packing material that the monitor originally came
in.
• Before moving or lifting the monitor, disconnect the
power cord and all cables.
• When holding the monitor, the screen should face
away from you to avoid damage.
• Hold the top and bottom of the monitor frame
firmly. Make sure not to hold the transparent part,
speaker, or speaker grille area.
• Use at least two people to move a large monitor.
• When transporting the monitor by hand, hold the
monitor as shown in the following illustration.
• When transporting the monitor, do not expose the
monitor to jolts or excessive vibration.
• When transporting the monitor, keep the monitor
upright; never turn the monitor on its side or tilt
towards the left or right.
• When handling the monitor, be careful not to
damage the protruding buttons.
• Avoid touching the screen at all times, as this
may result in damage to the screen.
• Do not place the product on the floor with
its front facing down without padding.
Failure to do so may result in damage to the
screen.
• Do not move the monitor by holding the
cable holders, as the cable holders may
break, and injuries and damage to the
monitor may occur. (Depending upon
model)
• When attaching the stand to the monitor
set, place the screen facing down on a
cushioned table or flat surface to protect the
screen from scratches.

ENGLISH
7
Using the Kensington Security
System (optional)
The Kensington security system connector is located
at the rear of the monitor. For more information of
installation and using, refer to the manual provided
with the Kensington security system or visit
http://www.kensington.com. Connect the Kensington
security system cable between the monitor and a
table.
(Depending upon model)
• The Kensington security system is optional. You can
obtain additional accessories from your local dealer.
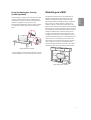
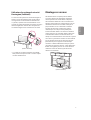
Mounting on a Wall
An optional wall mount can be used with your LG
monitor. Consult with your local dealer for a wall
mount that supports the VESA standard used by
your monitor model. Carefully attach the wall mount
bracket at the rear of the monitor. Install the wall
mount bracket on a solid wall perpendicular to the
floor. If you are attaching the monitor to other building
materials, please contact qualified personnel to install
the wall mount. Detailed instructions will be included
with the wall mount. We recommend that you use
an LG brand wall mount. The LG wall mount is easy
to adjust or to connect the cables. When you do not
use LG’s wall mount bracket, use a wall mount bracket
where the device is adequately secured to the wall
with enough space to allow connectivity to external
devices. If you are using a non-adjustable mount,
attach the mount to the wall. Attach the cables to the
monitor first, then attach the monitor to the mount.
10 cm
10 cm
10 cm
10 cm
10 cm
(4 inches)
(Depending upon model)

ENGLISH
8
• Remove the stand before installing the
monitor on a wall mount by performing the
stand attachment in reverse.
• For more information of screws and wall
mount bracket, refer to the Separate
purchase.
• If you intend to mount the product to a wall,
attach VESA standard mounting interface
(optional parts) to the back of the product.
When you install the set to use the wall
mounting bracket (optional parts), fix it
carefully so as not to drop.
• When mounting a monitor on the wall, make
sure not to install the monitor by hanging
the power and signal cables on the back of
the monitor.
• Do not install this product on a wall if it
could be exposed to oil or oil mist. This may
damage the product and cause it to fall.
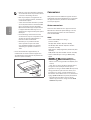
• When installing the wall mounting bracket, it is
recommended to cover the stand hole using tape,
in order to prevent the influx of dust and insects.
(Depending upon model)
Stand hole
Connections
You can connect various external devices to the
monitor. For more information on external device’s
connection, refer to the manual provided with each
device.
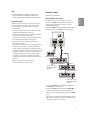
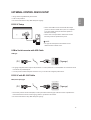
Other connections
Connect your monitor to external devices. For the best
picture and audio quality, connect the external device
and the monitor with the HDMI cable.
HDMI
• Supported HDMI Audio format :
(Depending upon model)
DTS (44.1 kHz / 48 kHz / 88.2 kHz / 96 kHz),
DTS HD (44.1 kHz / 48 kHz / 88.2 kHz / 96 kHz /
176.4 kHz / 192 kHz),
Dolby Digital / Dolby Digital Plus (32 kHz / 44.1 kHz
/ 48 kHz),
PCM (32 kHz / 44.1 kHz / 48 kHz / 96 kHz / 192 kHz)
• DTV Audio Supported Codec: MPEG, Dolby Digital
• ( ) [Picture] [Additional
Settings]
[HDMI ULTRA HD Deep Color]
- On : Support 4K @ 60 Hz (4:4:4, 4:2:2, 4:2:0)
- Off : Support 4K @ 60 Hz 8 bit (4:2:0)
If the device connected to Input Port also supports
ULTRA HD Deep Color, your picture may be clearer.
However, if the device doesn’t support it, it may not
work properly. In that case, change the monitor’s
[HDMI ULTRA HD Deep Color] setting to off.
- This feature is available only on certain models
which support HDMI ULTRA HD Deep Color.

ENGLISH
9
USB
• Some USB Hubs may not work. If a USB device
connected through a USB Hub is not detected,
connect it directly to the USB port on the monitor.
External Devices
Supported external devices are: Blu-ray player, HD
receivers, DVD players, VCRs, audio systems, USB
storage devices, PC, gaming devices, and other
external devices.
• The external device connections shown may differ
slightly from illustrations in a manual.
• Connect external devices to the monitor regardless
about the order of the monitor port.
• If you connect a gaming device to the monitor, use
the cable supplied with the gaming device.
• Refer to the external equipment’s manual for
operating instructions.
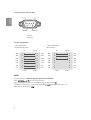
• In PC mode, there may be noise associated with the
resolution, vertical pattern, contrast or brightness.
If noise is present, change the PC output to another
resolution, change the refresh rate to another rate or
adjust the brightness and contrast on the [Picture]
menu until the picture is clear. Depending upon
the graphics card, some resolution settings may
not allow the image to be positioned on the screen
properly.
• When connecting via a wired LAN, it is
recommended to use a CAT 7 cable.
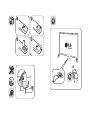
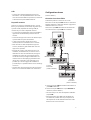
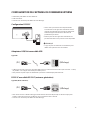
Network setup
(Depending upon model)
Wired network connection
This monitor can be connected to a Pro:Centric
server via the LAN port. After making the physical
connection, the monitor needs to be set up for
network communication.
Connect the LAN port of the Modem or Router from
Pro:Centric server to the LAN port on the monitor.
2 1
Broadband Modem
Pro:Centric Server
(Depending upon
model)
Broadband Modem
Pro:Centric Server
(Depending upon
model)
Router
Broadband Modem
1 Connect the LAN port of the Modem or Router to
the LAN port on the monitor.
2 Connect the LAN port of the PC to the AUX LAN
port on the monitor. (Depending upon model)
• Do not connect a modular phone cable to the LAN
port.
• Since there are various connection methods, please
follow the specifications of your telecommunication
carrier or internet service provider.

ENGLISH
10
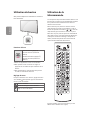
Using the Button
You can simply operate the monitor functions, using
the button.
Basic Functions
Power On (Press)
Power Off
1
(Press and Hold)
Menu control (Press
2
)
Menu selection (Press and Hold
3
)
1 All running apps will close.
2 You can access and adjust the menu by pressing the
button when monitor is on.
3 You can use the function when you access menu
control.
Adjusting the Menu
When the monitor is turned on, press the button
one time. You can adjust the Menu items using the
button.
Turns the power off.
Changes the input source.
Adjusts the volume level.
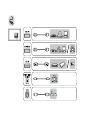
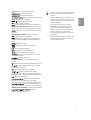
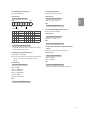
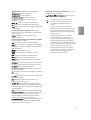
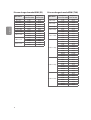
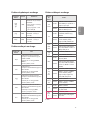
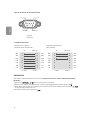
Using Remote Control
The descriptions in this manual are based on the
buttons on the remote control. Please read this
manual carefully and use the monitor correctly.
To install batteries, open the battery cover, replace
batteries (1.5 V AAA) matching the
and ends
to the label inside the compartment, and close the
battery cover.
To remove the batteries, perform the installation
actions in reverse. This remote uses infrared light.
When in use, it should be pointed in the direction of
the monitor’s remote sensor.
(Some buttons and services may not be provided
depending upon models or regions.)

ENGLISH
11
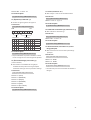
(Power) Turns the monitor on or off.
Turns the monitor on.
Turns the monitor off.
Reduces power consumption by
adjusting peak screen brightness.
Changes the input source.
Used for viewing 3D videos.
Toggles between numerical and alphabetical.
Number and Alphabet buttons Enters numerical or
alphabetical characters depending upon the setting.
Deletes the entered numerical or alphabetical
character.
Volume Up/Down Button Adjusts the volume.
Selects the Aspect Ratio mode.
Automatically adjusts picture position and
minimizes image instability (available for RGB input
only).
Mutes all sounds.
Adjusts the brightness of the display.
Selects the [Picture Mode].
Displays the input information.
Enters the [White Balance] menu.
Accesses the main menus or saves your
input and exit menus.
SuperSign menu key.
Navigation Buttons Scrolls through menus or
options.
Selects menus or options and confirms your input.
Allows you to move back one step in the
user interaction function.
Quit all OSD tasks and applications.
Allows you to control various
multimedia devices to enjoy multimedia simply by
using the remote control through the SimpLink menu.
Selects the TILE Mode.
When the Picture ID number
matches the Set ID number, you can control
whichever monitor you want in multi-display format.
( keys are multi-function key. In
special case, those keys can be operated as color key.)
USB Menu Control Buttons Controls media playback.
May not be
supported on some models.
• Do not mix new batteries with old batteries.
This may cause the batteries to overheat
and leak.
• Failure to match the correct polarities of
the battery may cause the battery to burst
or leak, resulting in fire, personal injury, or
ambient pollution.
• This apparatus uses batteries. In your
community there might be regulations
that require you to dispose of these
batteries properly due to environmental
considerations. Please contact your
local authorities for disposal or recycling
information.
• Batteries inside or inside the product shall
not be exposed to excessive heat such as
sunshine, fire or the like.

ENGLISH
12
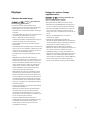
Troubleshooting
The software may be updated for improvement in
performance. The customer is responsible to ensure
the compatibility of their equipment with any LG
Electronics software. If needed, please consult with
LG Electronics and update new software versions
according to the guidance provided by LG Electronics.
• Cannot control the monitor with the remote control.
- Check if anything such as tape has been placed
over the receiver.
- Check if there is any obstacle between the
product and the remote control.
- Replace the batteries with new fresh ones.
• No image display and no sound is produced.
- Check if the product is turned on.
- Check if the power cord is connected to a wall
outlet.
- Check if there is a problem in the wall outlet by
connecting other products.
• The monitor turns off suddenly.
- Check the power control settings. The power
supply may be interrupted.
- Check if the auto-off function is activated on the
settings related time.
- If there is no signal while the monitor is on,
the monitor will turn off automatically after 15
minutes of inactivity.
• When connecting to the PC (HDMI), no signal is
detected.
- Turn the monitor off/on using the remote control.
- Reconnect the HDMI cable.
- Restart the PC with the monitor on.
• Abnormal Display
- If the monitor feels cold to the touch, there may
be a small flicker when it is turned on. This is
normal; there is nothing wrong with monitor.
Some minute dot defects may be visible on the
screen, appearing as tiny red, green, or blue
spots. However, they have no adverse effect on
the monitor’s performance. Avoid touching the
LCD screen or holding your finger(s) against it for
long periods of time. Doing so may produce some
temporary distortion effects on the screen.
- This panel is an advanced product that contains
millions of pixels. In a very few cases, you could
see fine dots on the screen while you’re viewing
the monitor. Those dots are deactivated pixels and
do not affect the performance and reliability of
the monitor.
- Displaying a still image for a prolonged period
of time may cause an image sticking. Avoid
displaying a fixed image on the monitor screen for
an extended length of time.
• Generated Sound
- Cracking noise A cracking noise that occurs
when watching or turning off the monitor is
generated by plastic thermal contraction due to
temperature and humidity. This noise is common
for products where thermal deformation is
required.
- Electrical circuit humming/panel buzzing
A low level noise is generated from a high-
speed switching circuit, which supplies a large
amount of current to operate a product. It varies
depending upon the product. This generated
sound does not affect the performance and
reliability of the product.
• When cleaning the product, be careful not
to allow any liquid or foreign objects to
enter the gap between the upper, left or
right side of the panel and the guide panel.
(Depending upon model)
• Make sure to wring any excess water or
cleaner from the cloth.
• Do not spray water or cleaner directly onto
the monitor screen.
• Make sure to spray just enough of water or
cleaner onto a dry cloth to wipe the screen.
La page est en cours de chargement...
La page est en cours de chargement...
La page est en cours de chargement...
La page est en cours de chargement...
La page est en cours de chargement...
La page est en cours de chargement...
La page est en cours de chargement...
La page est en cours de chargement...
La page est en cours de chargement...
La page est en cours de chargement...
La page est en cours de chargement...
La page est en cours de chargement...
La page est en cours de chargement...
La page est en cours de chargement...
La page est en cours de chargement...
La page est en cours de chargement...
La page est en cours de chargement...
La page est en cours de chargement...
La page est en cours de chargement...
La page est en cours de chargement...
La page est en cours de chargement...
La page est en cours de chargement...
La page est en cours de chargement...
La page est en cours de chargement...
La page est en cours de chargement...
La page est en cours de chargement...
La page est en cours de chargement...
La page est en cours de chargement...
La page est en cours de chargement...
La page est en cours de chargement...
La page est en cours de chargement...
La page est en cours de chargement...
La page est en cours de chargement...
La page est en cours de chargement...
La page est en cours de chargement...
La page est en cours de chargement...
La page est en cours de chargement...
La page est en cours de chargement...
La page est en cours de chargement...
La page est en cours de chargement...
La page est en cours de chargement...
La page est en cours de chargement...
La page est en cours de chargement...
La page est en cours de chargement...
La page est en cours de chargement...
La page est en cours de chargement...
La page est en cours de chargement...
La page est en cours de chargement...
La page est en cours de chargement...
La page est en cours de chargement...
La page est en cours de chargement...
La page est en cours de chargement...
-
 1
1
-
 2
2
-
 3
3
-
 4
4
-
 5
5
-
 6
6
-
 7
7
-
 8
8
-
 9
9
-
 10
10
-
 11
11
-
 12
12
-
 13
13
-
 14
14
-
 15
15
-
 16
16
-
 17
17
-
 18
18
-
 19
19
-
 20
20
-
 21
21
-
 22
22
-
 23
23
-
 24
24
-
 25
25
-
 26
26
-
 27
27
-
 28
28
-
 29
29
-
 30
30
-
 31
31
-
 32
32
-
 33
33
-
 34
34
-
 35
35
-
 36
36
-
 37
37
-
 38
38
-
 39
39
-
 40
40
-
 41
41
-
 42
42
-
 43
43
-
 44
44
-
 45
45
-
 46
46
-
 47
47
-
 48
48
-
 49
49
-
 50
50
-
 51
51
-
 52
52
-
 53
53
-
 54
54
-
 55
55
-
 56
56
-
 57
57
-
 58
58
-
 59
59
-
 60
60
-
 61
61
-
 62
62
-
 63
63
-
 64
64
-
 65
65
-
 66
66
-
 67
67
-
 68
68
-
 69
69
-
 70
70
-
 71
71
-
 72
72


LG 60UL3E-B Le manuel du propriétaire
- Catégorie
- Équipement musical supplémentaire
- Taper
- Le manuel du propriétaire
dans d''autres langues
- English: LG 60UL3E-B Owner's manual
Documents connexes
-
LG 98UH5E-B Le manuel du propriétaire
-
-
LG 49XEB3E-B Le manuel du propriétaire
-
-
LG 49UU670H Le manuel du propriétaire
-
LG 55UU770H Le manuel du propriétaire
-
LG 65UU670H Le manuel du propriétaire
-
LG 65UU770H Le manuel du propriétaire
-
-
LG 75UU770H Le manuel du propriétaire