Sony SPK-PC5 Manuel utilisateur
- Catégorie
- Caméscopes
- Taper
- Manuel utilisateur

Owner’s Record
The model and serial numbers are located inside of the unit. Record the serial number in the
space provided below. Refer to these numbers whenever you call upon your Sony dealer
regarding this product.
Model No. SPK-PC5 Serial No.
Usable at the depth as low as 2 meters (6.5 feet) under water.
For using your camcorder with this pack, refer to the operating instructions of the camcorder.
The splash-proof sports pack SPK-PC5 is water- and moisture- resistant, making it possible to
use the Sony Digital Handycam camcorder such as DCR-PC109/PC108/PC107/PC106/
PC105/PC104/PC103/PC101/PC9/PC8/PC6/PC5/PC4, in the rain or at the beach.
Notice
• Before you start recording, make sure that the camcorder is working correctly and there
is no water leakage.
• Sony does not accept liability for damage to the camcorder, battery, etc., when using the
sports pack or for the cost of recording if water leakage occurs as a result of incorrect
use.
• Before you use the camcorder, check the waterproof gasket for any sand or dirt and to
make sure that it is not loose or that nothing is wedged in the gasket. Water leakage will
occur if the camcorder is used in these states.
Precautions
• Do not subject the front glass to strong shock, as it may crack.
• Avoid opening the sports pack in the sea or at the beach. Preparation such as installing and
changing a cassette tape · “Memory Stick” should be done in a place with low humidity
and no salty air.
• Do not throw the sports pack into the water.
• Avoid using the sports pack in places with storong waves.
• Avoid using the sports pack under the following situations:
– in a very hot or humid place.
– in water hotter than 40 ˚C (104 ˚F).
– at temperatures lower than 0 ˚C.
In these situations moisture condensation or water leakage may occur and damage the
equipment.
• Use the sports pack for no longer than one hour at a time in temperatures above 35 ˚C
(95 ˚F).
• Do not leave the sports pack under direct sunlight for a long period of time. If you cannot
avoid leaving the sports pack under direct sunlight, be sure to cover the pack with a towel
or other protection.
If sun oil is on the sports pack, be sure to wash it off thoroughly using lukewarm water. If
the sports pack is left with sun oil on its body, the surface of the sports pack may become
discolored or damaged (such as cracks on the surface).
Before You Begin
To make sure that you do not miss good shooting opportunities, go over the following
checklist before installing your camcorder into the sports pack.
Note
When recording with this pack, we recommend you to use the battery pack of larger capacity.
However, you cannot use the battery pack NP-QM91D/QM91/FM91/FM90.
Maintenance and Precautions
Water Leakage
If water happens to leak in, stop exposing the sports pack to water immediately.
If the camcorder gets wet, take it to the nearest Sony service facility immediately.
Repair costs must be borne by the customer.
Notes on the Waterproof Gasket
• Check that there are no scratches or cracks on the waterproof gasket as they may allow
water to leak in. If there are scratches or cracks, replace the damaged waterproof gasket
with a new one.
Do not remove the waterproof gasket with a metal tool or a tool with a sharp point. (See
illustration M.)
• Remove foreign materials such as dust, sand or hair from the waterproof gasket, the groove
and from any surface the gasket touches.
If the body is closed with such materials present, these areas may be damaged and water
may leak in.
• After checking that there are no cracks or dust on the waterproof gasket, coat it slightly
with the supplied grease using your finger. This will prevent wearing.
While applying the grease, recheck for cracks or dust.
Never use cloth or paper for greasing as the fibers may cling.
Do not use any type of grease other than that supplied, as it may damage the waterproof
gasket.
• Put the waterproof gasket in the grooves evenly, with the tapering side up. Never twist it.
(See illustration N.)
• The useful life of the waterproof gasket depends upon the maintenance and the frequency
of use, but we recommend changing it once a year. You can obtain waterproof gasket and
grease.
Waterproof gasket (model No. 3-051-711-02)
Grease (model No. 2-115-921-01)
Be sure to check the water leakage after replacing the waterproof gasket.
Checking for the water leakage after replacing the waterproof
gasket
Check for the water leakage before installing the camcorder.
Close the sports pack without installing the camcorder, and keep the sports pack submerged
under water at a depth of about 15 cm (6 inches) for about 3 minutes and then check for
water leakage.
After Recording
After recording in a location subject to sea breezes, wash the sports pack with fresh water
with the buckles fastened thoroughly, then wipe with a soft dry cloth. It is recommended that
you submerge the sports pack in fresh water for about 30 minutes. If it is left with salt on it,
metal portions may be damaged or rust may form and cause water leakage.
• If you get suntan lotion or other greasy substances on your sports pack, wash it off with
tepid water.
• Clean the inside of the pack with a soft dry cloth. Do not wash the inside of the pack.
• Do not use any type of solvent such as alcohol, benzine or thinner for cleaning, as this
might damage the finish.
Anti-fogging lens solution
Coat the surface of the glass with the supplied anti-fogging lens solution. This is effective in
preventing from fogging.
How to use the anti-fogging lens solution
Apply 2 or 3 drops of the liquid to the front glass and the glass of the eye cup and wipe
evenly to spread the liquid out by using swabs, a soft cloth or tissue paper.
When storing the sports pack
• Attach the spacer supplied with your sports pack to prevent wear of the waterproof gasket.
(See illustration O.)
• Prevent dust from collecting on the waterproof gasket.
• Avoid storing the sports pack in a cold, very hot or humid place, or together with
naphthalene or camphor, as these conditions might damage the unit.
Specifications
Material
Plastic (PC, ABS), glass
Waterproof
Waterproof gasket, buckle
Available operations with the unit attached
• Turning on/off the POWER switch when recording or playing back
• Recording a still image
• Zooming
Built-in microphone
Stereo
Dimension
Approx. 150 × 170 × 110 mm (w/h/d) (6 × 6 3/4 × 4 3/8 inches)
Mass
Approx. 550 g (only sports pack) (1 lb 3.4 oz)
Supplied accessories
Shoulder strap (1)
Camera mounting shoe D (1)/C
2 (1)/A (1)
Tripod screw plate (1, pre-installed on the camera mounting shoe D)
Reflex prevention ring (2)
Grease (1)
Anti-fogging lens solution (1)
Operating Instructions (1)
Design and specifications subject to change without notice.
Preparing
For details, please refer to the operating instructions supplied with your camcorder.
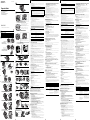
ASelecting the Camera Mounting Shoe
You have a choice of three types of camera mounting shoe, depending on the location of the
screw hole for attaching the camera mounting shoe of your camcorder.
BPreparing the Camera Mounting Shoe
Align the tripod screw plate to the notch of the mounting shoe D, C2 or A.
The tripod screw plate is pre-installed on the camera mounting shoe D.
CPreparing the Camcorder
For details, please refer to the operating instructions supplied with your camcorder.
1 Remove the shoulder strap, lens cap, protector, filter or conversion lens from
the camcorder.
2 Install the battery pack.
Be sure to use a fully charged battery pack.
3 Insert the cassette tape.
4 When shooting with the LCD screen, turn the LCD panel over and move back
to the camcorder with the LCD screen facing out.
5 Set all the adjustments of the camcorder to automatic mode.
6 Set the FOCUS switch to AUTO.
7 Set the finder power save function to OFF in the menu.
8 Set the START/STOP MODE switch to
.
9 When shooting with the viewfinder, pull out the viewfinder to its fullest.
When the viewfinder is not pulled out until it clicks, the picture does not appear in the
viewfinder even if the LCD panel is closed. (DCR-PC5/PC4 only)
10 When your camcorder has the Nightshot function, set it to OFF.
DInstalling the Camcorder
Turn the POWER switch of the camcorder to OFF (CHG), and leave the POWER switch of the
sports pack OFF.
1 Attach the camera mounting shoe.
Use the metal parts of shoulder strap as shown in the illustration.
2 Attach the reflex prevention ring.
There are two kinds of reflex prevention ring, 25 mm filter diameter and 30 mm filter
diameter. Use the one that fits your camcorder.
Attaching this ring to a certain extent prevents reflection of the lens ring section of the
camcorder in the front glass.
3 Check the POWER switch of the sports pack is set to OFF.
4 Release the buckle.
1 Slide the unlock button in the direction of the arrow, and release the buckle.
2 Open the side body.
The black rubber part is a spacer. Keep the spacer since you will need it to store the unit.
5 Preparing the sports pack
1 Grease the waterproof gasket.
Check there are no dust, sand or cracks on the waterproof gasket or the surface where
it touches, and grease them slightly.
Closing the lid with sand or dust attached to it may scratch the lid and allow water to
enter.
2 Coat the front glass with anti-fogging lens solution.
The inside surface of the glass on the front of the sports pack becomes foggy. So, be
sure to coat the surface of the glass with the supplied anti-fogging lens solution.
Operating Instructions
Mode d’emploi
Manual de instrucciones
Gebruiksaanwijzing
3-091-317-11(1)
SPK-PC5
© 2004 Sony Corporation Printed in Japan
Sports Pack
FrançaisEnglish
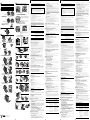
6 Bring the camcorder towards the sports pack and, taking care not to pull the
plugs, connect the remote control plug to the LANC
jack (1) and the
microphone plug to the MIC (PLUG IN POWER) jack (2).
7 Install the camcorder.
Check the lens and the LCD screen is clean before installing the camcorder.
Push the camera mounting shoe until it clicks.
8 Close the side body.
Secure the side body, and fasten the buckle until it clicks.
Notes
• Fold the grip strap into the camcorder, and attach the camera mounting shoe. (DCR-
PC101/PC9/PC8/PC6/PC5/PC4 only)
• Do not tighten the reflex prevention ring too rightly. This may maker it harder for you to
remove the reflex prevention ring.
• When closing the side body, be careful not to pinch the cable. Otherwise, these parts may
be damaged or water may leak in.
When using DCR-PC5/PC4, fit the jack cover rightly to S video jack before installing the
camcorder. Otherwise, the jack cover may rotate and be pinched.
• When the camcorder is put into the sports pack, the center of the lens may shift with
respect to the front glass of the sports pack.
This will cause no problems when recording.
EHow to place the connecting cord
If the connecting cord is not placed correctly when closing the side body, water leakage may
occur. Place the cord correctly. (See illustration
E
.)
Notes
• If the microphone plug is not fully inserted, you may not be able to record, or the recording
may be affected by noise.
• If the remote plug is not fully inserted, your camcorder might malfunction.
FPreparing the Sports Pack
1 Adjust the grip strap.
Holding the sports pack so that the tips of your finger can easily touch the POWER
switch, START/STOP button and ZOOM button, pull the strap to adjust its length.
2 Attach the shoulder strap.
The Sony mark should be on the outside.
Using the Sports Pack
Turn the POWER switch until it clicks into place.
GRecording
1 Turn the POWER switch to CAMERA.
The POWER switch is now as shown in illustration G-1.
2 Press START/STOP button to start recording.
Zooming
Press ZOOM.
• Keep the W side pressed for wide-angle.
• Keep the T side pressed for telephoto.
Press it gently for a relatively slow zoom.
To stop recording
Press START/STOP. Press it again to resume recording.
To turn off the power
Stop recording before turning the POWER switch to OFF.
Notes on recording
•If you leave the camcorder for 5 minutes or more with a cassette inserted in Standby mode,
the camcorder goes off automatically. This prevents battery and tape wear. To resume
Standby mode, turn the POWER switch to OFF and then turn it to CAMERA again. (Except
when using DCR-PC109/PC108/PC107/PC106 models with the [A.SHUT OFF] function
set to [NEVER]. For details, refer to the operating instructions of your camcorder.)
• The POWER switch of the sports pack has priority over the POWER switch of the
camcorder.
HWhen Shooting with the LCD Screen
1 Open the mirror hood.
2 Open the wings and insert the projections into each hole.
To close the mirror hood
Close the lower wing first.
Notes
• When opening the LCD panel, the picture does not appear in the viewfinder. (DCR-PC5/
PC4 only)
• Do not hold the mirror hood directly for shooting.
•A part of the LCD screen may be covered with the unit depending on the camcorder.
IRecording a Still Picture
A. When in MEMORY mode
1 Turn the POWER switch to MEMORY.
2 Lightly press the PHOTO button.
The green mark stops flashing, then lights up. This makes it possible to record a Still
Picture.
No image is recorded yet.
3 Firmly press the PHOTO button.
The image when you pressed PHOTO button deeper will be recorded on the “Memory
Stick”.
Note
If the camcorder is not compatible with the “Memory Stick”, it will be CAMERA mode.
B. When in CAMERA mode
1 Turn the POWER switch to CAMERA.
2 Lightly press the PHOTO button.
The word “Capture” appears in the top right of the screen.
No image is recorded yet.
3 Firmly press the PHOTO button.
The image shown on the screen is recorded onto the “Memory Stick”.
Notes
• You cannot use the sports pack for taking night shots.
• If your camcorder is not “Memory Stick” compatible, images are recorded on tape.
• You cannot use your camcorder’s flash function when using the sports pack.
JRecording moving pictures on the “Memory Stick”
1 Turn the POWER switch to MEMORY.
2 Press START/STOP button.
Note
If the camcorder is not compatible with the “Memory Stick”, it will be CAMERA mode.
KPlaying Back with the Remote Commander
You can play back pictures on the LCD screen, using the Remote Commander (supplied with
your camcorder).
1 Set the mirror hood.
See “H When Shooting with the LCD Screen”.
2 Turn the POWER switch to VCR.
3 Press N PLAY on the remote.
Use the remote commander for all other functions including STOP, REW and FF.
Note
The picture on the mirror looks turned sideways.
LRemoving the Camcorder
Before opening the sports pack, wipe moisture off the sports pack and yourself. Do not allow
water on the camcorder.
1 Set the POWER switch to OFF.
2 Release the buckle and open the side body, with mirror hood side up.
Close the mirror hood firmly before performing the step above.
3 Take out the camcorder and disconnect the plugs.
1 Unlock the camera mounting shoe by picking up the knob.
2 Take out the camcorder.
3 Disconnect the remote control plug and the MIC plug.
After removing the camcorder, put the plugs in the plug holder inside of the sports pack.
4 Detach the camera mounting shoe and the reflex prevention ring.
After using the camera mounting shoe, attach it to the sports pack.
Notes
• Be sure to disconnect the plugs before taking out the camcorder. Otherwise, the plugs may
be damaged.
• If sun oil is on the sports pack, be sure to wash it off thoroughly using lukewarm water. If
the sports pack is left with sun oil on its body, the surface of the sports pack may become
discolored or damaged.
• After using the sports pack, read Maintenance and Precautions for storing.
Troubleshooting
Symptom
The sound is not
recorded.
There are drops of
water inside of the
sports pack.
The recording and
playing back function
does not work.
Cause
The microphone plug is not
connected.
• The buckles are not fastened.
• The waterproof gasket is not
set correctly.
• There are scratches or cracks
on the waterproof gasket.
• The battery pack is run out.
• The remote control plug is
not connected.
• The tape has run out.
• The “Memory Stick” is full.
• The safety tab on the cassette
and the “Memory Stick” is set
to unrecordable position.
Corrective Actions
Connect it to MIC (PLUG IN
POWER) jack on the camcorder.
• Fasten the buckles until they click.
• Put the gasket in the groove
evenly.
• Replace the gasket with a new
one.
• Charge the battery pack fully.
• Connect it to
LANC jack on the
camcorder.
• Rewind the tape or use a new one.
• Insert another “Memory Stick” or
erase unneeded data from the
“Memory Stick”.
• Slide the safety tab or install a
new cassette tape and a new
“Memory Stick”.
Battery pack
Cassette tape
Waterproof gasket
Fully charged.
• The tape length will cover the planned recording time.
• The tape is wound to the point where you want to start
recording.
• The safety tab on the cassette is in the correct position. (The
red portion is not visible.)
• No scratches or cracks. No dust, sand or hair around the
gasket.
• Correctly set in the groove. (See “Notes on the Waterproof
Gasket” for details.)
Utilisable à 2 mètres de profondeur.
Pour le fonctionnement du caméscope proprement dit, consultez le mode d’emploi du
caméscope.
Le caisson sport SPK-PC5 est étanche à l’eau et à l’humidité et permet d’utiliser les
caméscopes Sony Digital Handycam DCR-PC109/PC108/PC107/PC106/PC105/PC104/
PC103/PC101/PC9/PC8/PC6/PC5/PC4 sous la pluie ou au bord de la mer.
Avis
• Avant de filmer, assurez-vous que le caméscope fonctionne correctement et que le
caisson est bien étanche.
• Sony décline toute responsabilité quant aux dommages que peut subir le caméscope, la
batterie, etc. lors de l’utilisation du caisson, et aux pertes subites en cas d’infiltration
d’eau résultant d’un mauvais emploi.
• Avant d’utiliser le caméscope, assurez-vous qu’il n’y a pas de sable ni de poussière sur
le joint, que le joint n’est pas détendu et que rien n’est coincé dans celui-ci, sinon une
infiltration d’eau peut se produire.
Précautions
• Ne pas exposer la vitre du caisson à un choc violent, car il peut se briser.
• Evitez d’ouvrir le caisson en mer ou au bord de la plage. Les préparatifs, comme
l’installation ou le changement de cassette, de « Memory Stick », etc. doivent être effectués
à l’abri de l’humidité et de l’air marin.
• Ne pas jeter le caisson dans l’eau.
• Evitez d’utiliser le caisson dans une mer agitée.
• Eviter d’utiliser le caisson dans les situations suivantes:
– Endroits très chauds ou humides.
– Dans de l’eau chaude de plus 40 °C (104 °F).
–A des températures inférieures à 0 °C.
Dans ces situations, de la condensation d’humidité ou une infiltration d’eau peut se
produire et endommager l’appareil.
• Ne pas utiliser le caisson plus d’une heure à une température de plus de 35 °C (95 °F).
• Ne pas exposer le caisson à la lumière directe du soleil pendant longtemps. Si vous ne
pouvez pas éviter de le laisser au soleil, recouvrez-le par exemple d’une serviette.
De l’huile solaire tombée sur le caméscope peut décolorer ou endommager le caisson
marin (craquelures) s’il reste exposé au soleil. Lavez soigneusement l’huile avec de l’eau
tiède pour éviter ces problèmes.
Informations préliminaires
Pour être sûr de ne pas manquer de bonnes prises de vues, passez en revue la liste suivante
avant d’installer le caméscope dans le caisson.
Remarque
Lorsque vous filmez avec le caisson, il est conseillé d’utiliser une batterie à grande capacité.
La batterie NP-QM91D/QM91/FM91/FM90 ne peut toutefois pas être utilisée.
Entretien et précautions
Infiltration d’eau
Si de l’eau s’infiltre à l’intérieur du caisson, sortez immédiatement le caisson de l’eau.
Si le caméscope est mouillé, présentez-le immédiatement au service après-vente Sony le plus
proche.
Les réparations sont à la charge du client.
Remarques sur le joint d’étanchéité
• Vérifiez s’il n’y a pas de rayures ni craquelures sur le joint, car de l’eau peut s’infiltrer. Le
cas échéant, remplacez le joint endommagé par un neuf.
Ne pas retirer le joint avec un outil métallique ou un objet pointu. (Voir l’illustration M.)
• Enlevez toute matière, sable, poussière ou cheveux, présente sur le joint, la rainure et la
surface en contact avec le joint.
Si vous fermez le caisson malgré la présence de saleté, les surface en contact risquent d’être
endommagées et le caisson ne sera pas étanche.
• Après vous être assuré que le joint était en bon état et propre, recouvrez-le de la graisse
fournie avec le doigt. Il s’usera moins.
Lorsque vous appliquez de la graisse, vérifiez une nouvelle fois si le joint n’est pas craquelé
ou sale.
Ne jamais utiliser de chiffon ou de papier pour graisser le joint, car les fibres peuvent rester
collées.
Ne pas utiliser d’autre graisse que celle qui est fournie, car le joint pourrait être
endommagé.
• Insérez le joint correctement dans la rainure, avec la partie effilée orientée vers le haut. Ne
jamais tordre le joint. (Voir l’illustration N.)
• La durée de service du joint dépend de l’entretien et de la fréquence d’utilisation, mais il est
conseillé de le changer chaque année. Vous pouvez vous procurer un joint étanche et de la
graisse.
Joint étanche (No. de modèle 3-051-711-02)
Graisse (No. de modèle 2-115-921-01)
Après le remplacement du joint, vérifiez si le caisson est bien étanche.
Vérification de l’étanchéité du caisson après le remplacement du
joint
Assurez-vous que le caisson est bien étanche avant d’installer le caméscope.
Fermez le caisson sans le caméscope et mettez-le dans l’eau à environ 15 cm de profondeur
pendant 3 minutes. Ressortez-le et vérifiez si de l’eau n’a pas pénétré à l’intérieur.
Après la prise de vues
Après le tournage à un endroit exposé aux embruns marins, lavez le caisson à l’eau douce en
laissant les boucles bien fermées, puis essuyez-le avec un chiffon sec. Il est conseillé de laisser
le caisson environ 30 minutes dans l’eau pour que tout le sel soit enlevé. S’il reste du sel sur le
caisson, les pièces métalliques peuvent être endommagées ou rouiller, réduisant par la suite
l’étanchéité du caisson.
• Si de la crème solaire ou d’autres substances graisseuses tombent sur le caisson, essuyez-les
à l’eau courante.
• Nettoyez l’intérieur du caisson avec un chiffon sec. Ne pas laver l’intérieur du caisson.
• Ne pas utiliser non plus de solvant, alcool, benzine ou produit brillant pour le nettoyer, car
la finition pourrait être endommagée.
Produit antibuée
Mettez du produit antibuée (fourni) sur le verre du caisson pour le protéger contre la
formation de buée.
Utilisation du produit antibuée
Appliquez 2 ou 3 gouttes du produit sur le verre du caisson et le verre de l’œilleton et étalez
le liquide sur toute le surface avec un morceau de coton, un chiffon ou du papier soie.
Rangement du caisson
• Fixez l’entretoise fournie avec le caisson pour éviter l’usure du joint d’étanchéité. (Voir
l’illustration O.)
• Protégez le joint de la poussière.
• Evitez de ranger le caisson à un endroit très chaud, froid et humide, et avec de la
naphtaline ou du camphre, car il peut être endommagé.
Spécifications
Matière
Plastique (PC, ABS), verre
Etanchéité
Joint, boucles
Fonctions opérationnelles sur le caméscope
• Marche/Arrêt du caméscope lors de l’enregistrement et de la lecture
• Enregistrement de photos
• Zooming
Microphone intégré
Stéréo
Dimensions
Approx. 150 × 170 × 110 mm (l/h/p) (6 × 6 3/4 × 4 3/8 pouces)
Poids
Approx. 550 g (caisson seulement) (1 lb 3,4 oz)
Accessoires fournis
Bandoulière (1)
Sabot de montage de caméscope D (1)/C
2 (1)/A (1)
Plaquette à vis (1, préinstallée sur le sabot de montage D)
Bague antireflet (2)
Graisse (1)
Produit antibuée (1)
Mode d’emploi (1)
La conception et les spécifications peuvent être modifiées sans avis préalable.
Préparatifs
Pour le détail, consultez le mode d’emploi du caméscope.
ASélection du sabot de montage
Vous avez le choix entre trois types de sabot de montage, selon l’emplacement du filetage
servant à fixer le sabot de montage au caméscope.
BPréparation du sabot de montage
Faites coïncider la plaquette à vis et l’entaille sur le sabot de montage D, C2 ou A.
La plaquette à vis est préinstallée sur le sabot de montage D.
CPréparation du caméscope
Pour le détail, consultez le mode d’emploi du caméscope.
1 Retirez la bandoulière, le capuchon d’objectif, le protecteur, le filtre ou le
convertisseur du caméscope.
2 Installez la batterie.
La batterie doit être pleine.
3 Insérez une cassette.
4 Pour la prise de vues avec l’écran LCD, retournez le panneau LCD et
rabattez-le contre le caméscope avec l’écran LCD dirigé vers vous.
5 Faites les réglages nécessaires sur le caméscope pour la prise de vues
automatique.
6 Réglez FOCUS sur AUTO.
7 Désactivez la fonction d’économie d’énergie en la réglant sur OFF dans le
menu.
8 Réglez le commutateur START/STOP MODE sur
.
9 Tirez complètement le viseur pour la prise de vues avec le viseur.
Si le viseur n’est pas tiré jusqu’au déclic, l’image n’apparaîtra pas dans le viseur même si
le panneau LCD est fermé. (DCR-PC5/PC4 seulement)
10 Si le caméscope présente la fonction Nightshot, réglez-la sur OFF.
DInstallation du caméscope
Mettez le commutateur POWER du caméscope en position OFF (CHG) et laissez le
commutateur POWER du caisson sur OFF.
1 Fixez le sabot de montage.
Utilisez les pièces métalliques de la bandoulière comme indiqué sur l’illustration.
2 Fixez la bague antireflet.
Il existe deux sortes de bagues antireflet, à diamètre de filetage de 25 mm et de 30 mm.
Utilisez la bague adaptée à votre caméscope.
Cette bague protège dans une certaine mesure contre les réflexions de la bague de
l’objectif du caméscope sur le verre du caisson.
3 Assurez-vous que le commutateur POWER du caisson est en position OFF.
4 Ouvrez la boucle.
1 Poussez le bouton de déverrouillage dans le sens de la flèche et libérez la boucle.
2 Ouvrez le côté du caisson.
La partie en caoutchouc noir est une entretoise. Gardez-la, car vous en aurez besoin lors
du rangement du caisson.
5 Préparez le caisson.
1 Graissez le joint.
Assurez-vous qu’il n’y a pas de poussière, sable ou craquelures sur le joint ou sur la
surface en contact avec le joint, et graissez-les doucement.
Si le couvercle est fermé malgré la présence de sable, poussière ou craquelures, de
l’eau risque de pénétrer à l’intérieur du caisson.
2 Appliquez du produit antibuée sur le verre du caisson.
Recouvrez bien la surface du verre avec le produit antibuée fourni car la face interne
du verre s’en bue.
6 Approchez le caméscope du caisson en prenant soin de ne pas tirer sur les
fiches, raccordez la fiche de télécommande à la prise LANC
(1) et la fiche
de microphone à la prise MIC (PLUG IN POWER) (2).
7 Installez le caméscope.
Vérifiez si l’objectif et l’écran LCD sont propres avant d’installer le caméscope.
Poussez le sabot de montage jusqu’à ce qu’il s’encliquette.
8 Fermez le côté du caisson.
Fermez bien le côté du caisson et la boucle jusqu’à ce qu’elle s’encliquette.
Remarques
• Pliez la sangle dans le caméscope et attachez le sabot de montage. (DCR-PC101/PC9/PC8/
PC6/PC5/PC4 seulement)
• Ne pas trop serrer la bague antireflet. Elle sera ensuite difficile à enlever.
• Lorsque vous fermez le côté, veillez à ne pas coincer le câble, sinon il risque d’être
endommagé, ainsi que le côté, ou de l’eau peut pénétrer dans le caisson.
Lorsque vous utilisez le DCR-PC5/PC4, insérez bien le cache-prise dans la prise S-vidéo
avant d’installer le caméscope, sinon, il peut tourner et se coincer.
• Lorsque le caméscope est dans le caisson, l’objectif peut être légèrement décalé par rapport
à la vitre du caisson.
L’enregistrement s’effectue toutefois sans problème.
EMise en place du cordon de liaison
Si le cordon de liaison n’est pas correctement mis en place lorsque vous fermez le côté du
caisson, de l’eau peut s’infiltrer. Le cordon doit être placé correctement. (Voir l’illustration
E.)
Remarques
• Si la fiche de microphone n’est pas insérée à fond dans la prise, vous ne pourrez peut-être
pas enregistrer, ou du bruit sera enregistré.
• Si la fiche de télécommande n’est pas insérée à fond dans la prise, le caméscope risque de
ne pas fonctionner.
FPréparation du caisson
1 Ajustez la sangle.
Tout en tenant le caisson de sorte que vous touchiez facilement le commutateur POWER,
la touche START/STOP et la touche ZOOM du bout des doigts, ajustez la sangle à la
bonne longueur.
2 Fixez la bandoulière.
La marque Sony doit être orientée vers l’extérieur.
Utilisation du caisson
Tournez le commutateur POWER jusqu’à ce qu’il s’encliquette.
GEnregistrement
1 Réglez le commutateur POWER sur CAMERA.
Le commutateur POWER est maintenant dans la position indiquée sur l’illustration
G-1.
2 Appuyez sur la touche START/STOP pour commencer l’enregistrement.
Zooming
Appuyez sur ZOOM.
• Appuyez en continu sur le côté W pour la prise de vues grand-angle.
• Appuyez en continu sur le côté T pour la prise de vues au téléobjectif.
Appuyez doucement pour un zooming lent.
Pour arrêter l’enregistrement
Appuyez sur la touche START/STOP. Appuyez une nouvelle fois pour continuer.
Pour éteindre le caméscope
Arrêtez l’enregistrement avant de mettre le commutateur POWER en position OFF.
Remarques sur l’enregistrement
• Si vous laissez le caméscope au moins 5 minutes en mode d’attente avec un cassette à
l’intérieur, il s’éteindra automatiquement pour que la batterie et la bande ne s’usent pas
inutilement. Pour revenir au mode d’attente, réglez le commutateur POWER sur OFF, puis
à nouveau sur CAMERA. (Sauf avec les modèles DCR-PC109/PC108/PC107/PC106
lorsque la fonction [A.SHUT OFF] est réglée sur [NEVER]. Pour le détail, voir le mode
d’emploi du caméscope.)
• Le commutateur POWER du caisson a priorité sur le commutateur POWER du caméscope.
HPrise de vues avec l’écran LCD
1 Ouvrez le viseur à miroir.
2 Ouvrez les volets et insérez les saillies dans chaque trou.
Pour fermer le viseur à miroir
Fermez le volet inférieur en premier.
Remarques
• Lorsque vous ouvrez le panneau LCD, l’image n’apparaît pas dans le viseur. (DCR-PC5/
PC4 seulement)
• Ne tenez pas le viseur à miroir pendant le tournage.
• Une partie de l’écran LCD peut être couverte par l’appareil avec certains caméscopes.
IEnregistrement d’une image fixe
A. En mode MEMORY
1 Régler le commutateur POWER sur MEMORY.
2 Appuyez légèrement sur la touche PHOTO.
La marque verte cesse de clignoter et reste allumée. Une image fixe alors être enregistrée.
Mais l’image n’est pas enregistreé à ce moment.
3 Appuyez à fond sur la touche PHOTO.
L’image qui apparaît lorsque vous appuyez à fond sur la touche PHOTO est enregistrée
sur le « Memory Stick ».
Remarque
Si le caméscope n’est pas compatible avec les « Memory Stick », ce sera le mode CAMERA.
B. En mode CAMERA
1 Mettez le commutateur POWER en position CAMERA.
2 Appuyez légèrement sur la touche PHOTO.
Le mot « Capture » apparaît dans le coin supérieur droit de l’écran.
Aucune image n’est encore enregistrée.
3 Appuyez à fond sur la touche PHOTO.
L’image affichée sur l’écran est enregistrée sur le « Memory Stick ».
Remarques
• Vous ne pouvez pas utiliser le caisson pour la prise de vue nocturne.
• Si votre caméscope n’est pas compatible avec les « Memory Stick », les photos seront
enregistrées sur la cassette.
• Vous ne pouvez pas utiliser le flash du caméscope lorsque le caméscope est dans le caisson.
JEnregistrement d’images animées sur le
« Memory Stick »
1 Régler le commutateur POWER sur MEMORY.
2 Appuyez sur la touche START/STOP.
Remarque
Si le caméscope n’est pas compatible avec les « Memory Stick », ce sera le mode CAMERA.
KLecture avec la télécommande
Vous pouvez revoir vos images sur l’écran LCD en utilisant la télécommande (fournie avec le
caméscope).
1 Réglez le viseur à miroir.
Voir « H Prise de vues avec l’écran LCD ».
2 Réglez le commutateur POWER sur VCR.
3 Appuyez sur N PLAY de la télécommande.
Vous pouvez utiliser la télécommande pour d’autres fonctions, en particulier STOP, REW
et FF.
Remarque
L’image dans le viseur à miroir semble tournée de côté.
LRetrait du caméscope
Avant d’ouvrir le caisson, essuyez-le et séchez-vous. Ne pas mouiller le caméscope.
1 Réglez le commutateur POWER sur OFF.
2 Ouvrez la boucle et le côté du caisisson, avec le viseur à miroir dirigé vers le
haut.
Fermez bien le viseur à miroir avant d’ouvrir la boucle.
3 Sortez le caméscope et débranchez les fiches.
1 Déverrouillez le sabot de montage en relevant le bouton.
2 Sortez le caméscope.
3 Débranchez la fiche de télécommande et la fiche de microphone.
Après avoir retiré le caméscope, insérez les fiches dans les supports de fiche à l’intérieur
du caisson.
4 Détachez le sabot de montage et la bague antireflet.
Après avoir utilisé le sabot de montage, fixez-le au caisson.
Remarques
• Veillez à débrancher les fiches avant de sortir le caméscope, sinon elles peuvent être
endommagées.
• De l’huile solaire tombée sur le caméscope peut décolorer ou endommager le caisson marin
(craquelures) s’il reste exposé au soleil. Lavez soigneusement l’huile avec de l’eau tiède
pour éviter ces problèmes.
• Après avoir utilisé le caisson et avant de le ranger, lisez le paragraphe sur l’Entretien et les
Précautions.
Batterie
Cassette
Joint d’étanchéité
Complètement rechargée.
• L’autonomie de la cassette est suffisante pour la prise de vues
prévue.
• La bande est rembobinée jusqu’au point où l’enregistrement
doit commencer.
• Le taquet de protection de la cassette est en bonne position (la
partie rouge n’est pas visible).
• Absence de craquelures ou de rayures. Pas de poussière, sable
ou cheveux sur le joint.
• Joint bien inséré dans la rainure. (Voir « Remarques sur le
joint d’étanchéité » pour le détail.)
Guide de dépannage
Symptômes
Le son n’est pas
enregistré.
Il y a des gouttes
d’eau à l’intérieur du
caisson.
L’enregistrement et la
lecture sont
impossibles.
Causes
La prise du microphone n’est
pas branchée.
• La boucle n’est pas fermée.
• Le joint d’étanchéité n’est pas
inséré correctement.
• Le joint d’étanchéité a des
craquelures ou fissures.
• La batterie est épuisée.
• La fiche de télécommande
n’est pas raccordée.
• La bande est finie.
• Le « Memory Stick » est plein.
• Le taquet de sécurité de la
cassette et du
« Memory Stick » sont en
position d’interdiction
d’enregistrement.
Solutions
Branchez-la sur la prise MIC (PLUG
IN POWER) du caméscope
• Fermez la boucle de sorte qu’elle
s’encliquetten.
• Mettez le joint correctement dans
la rainure, bien à plat.
• Remplacez-le par un neuf.
• Chargez complètement la batterie.
• Raccordez-la à la prise
LANC
du caméscope.
• Rembobinez la bande ou utilisez
une autre cassette.
• Insérez un autre « Memory Stick »
et effacez les données inutiles du
« Memory Stick ».
• Faites glisser le taquet de sécurité
ou installez une nouvelle cassette
et un nouveau « Memory Stick ».
B
A
Mounting shoe D
Sabot de montage D
Tripod screw plate
Plaquette à vis
4
To disassemble after using
Démontage après emploi
Mounting shoe D
Sabot de montage D
Mounting shoe C
2
, A
Sabot de montage C
2
, A
mounting shoe
sabot de montage
D
C2
A
model
modèle
DCR-PC109/PC108/PC107/PC106
DCR-PC105/PC104/PC103/PC101/PC9/PC8/PC6
DCR-PC5/PC4
Tripod screw plate
Plaquette à vis
Mounting shoe C
2
, A
Sabot de montage C
2
, A
C
D
2
1
Use metal parts of
shoulder belt.
Utilisez les pièces
métalliques de la
bandoulière.
2
1
1
2
1
23
4
6
When using DCR-PC105/PC104/PC103
Lorsque DCR-PC105/PC104/PC103 est utilisé
When using DCR-PC101/PC9/PC8/PC6
Lorsque DCR-PC101/PC9/PC8/PC6 est utilisé
When using DCR-PC5/PC4
Lorsque DCR-PC5/PC4 est utilisé
E
F
G
H
I
K
L
M
N
Make sure that the microphone plug and remote
plug are properly inserted as far as they can go.
La fiche de microphone et la fiche de
télécommande doivent être insérées à fond dans la
prise.
When DCR-PC5/PC4 is attached
Quand le DCR-PC5/PC4 est attaché
When DCR-PC109/PC108/PC107/PC106 is attached
Quand le DCR-PC109/PC108/PC107/PC106 est attaché
Place the cord in the hollow.
Placez le cordon dans le creux.
Keep the cord at an angle so that it does not
snag on the edges of the camcorder.
Pour ne pas coincer le cordon sur les bords du
caméscope courbez-le en angle.
Be careful when inserting the grip belt.
Attention lorsque vous insérez la sangle.
Connect the plugs as shown in illustration.
Raccordez les fiches comme indiqué sur
l’illustration.
When DCR-PC105/PC104/PC103 is attached
Quand le DCR-PC105/PC104/PC103 est attaché
When DCR-PC101/PC9/PC8/PC6 is attached
Quand le DCR-PC101/PC9/PC8/PC6 est attaché
2
Telephoto
Téléobjectif
Wide-angle
Grand-angle
START/
STOP
PHOTO
START/
STOP
PHOTO
Groove
Rainure
Tapering side up
Côté effilé vers le haut
Waterproof gasket
Joint
12
23
1
2
3
1
3
4
12
Zooming
Zoom
START/
STOP
PHOTO
Groove
Rainure
Groove
Rainure
START/
STOP
PHOTO
J
O
D
7
When using DCR-PC109/PC108/PC107/PC106
Lorsque DCR-PC109/PC108/PC107/PC106 est utilisé
1
2
A
La page charge ...
-
 1
1
-
 2
2


Sony SPK-PC5 Manuel utilisateur
- Catégorie
- Caméscopes
- Taper
- Manuel utilisateur
dans d''autres langues
- English: Sony SPK-PC5 User manual
- español: Sony SPK-PC5 Manual de usuario
- Nederlands: Sony SPK-PC5 Handleiding
Documents connexes
-
Sony SPK-PC4 Manuel utilisateur
-
Sony SPK-THB Manuel utilisateur
-
-
-
-
-
-
Sony SPK-TRC Le manuel du propriétaire
-
-