
Features
The XA-300 is an external selector for connecting
a Sony BUS system-compatible CD/MD device
or a non-compatible portable device (such as a
DVD player, MD Walkman, or laptop computer)
to a Sony BUS system-compatible master unit.
Enjoy the sound of portable media in your car.
"WALKMAN" and "WALKMAN" logo are
registered trademarks of Sony Corporation.
Precaution
Road safety
Do not use headphones/earphones while
driving, cycling, or operating any motorized
vehicle. It may create a traffic hazard and is
illegal in many areas. It can also be potentially
dangerous to play your recorder at high volume
while walking, especially at pedestrian
crossings. You should exercise extreme caution
or discontinue use in potentially hazardous
situations.
Caractéristiques
Le XA-300 est un sélecteur externe servant à
raccorder un périphérique CD/MD compatible
avec un système BUS Sony ou un périphérique
portable non compatible (comme un Lecteur
DVD, un walkman MD ou un ordinateur
portable) à un appareil principal compatible
avec un système BUS Sony.
Appréciez le son du support portable dans votre
voiture.
« WALKMAN » et le logo « WALKMAN » sont
des marques déposées de Sony Corporation.
Précaution
Sécurité routière
N’utilisez pas de casque d’écoute ou d’écouteurs
en voiture, à vélo ou au volant de tout véhicule
motorisé. L’utilisation d’un casque d’écoute ou
d’écouteurs peut être dangereuse dans la
circulation et est illégale dans de nombreuses
régions. Il peut également être dangereux de les
utiliser à un volume élevé, plus particulièrement
lorsque vous franchissez un passage protégé.
Redoublez de vigilance ou interrompez l’écoute
dans des situations pouvant se révéler
dangereuses.
3-232-755-21 (1)
AUX-IN Selector
Sony Corporation © 2006 Printed in Thailand
XA-300
Operating Instructions
Mode d’emploi
Owner’s Record
The model and serial numbers are located at the bottom of the unit.
Record the serial number in the space provided below.
Refer to these numbers whenever you call upon your Sony dealer regarding this
product.
Model No. XA-300 Serial No.
For the customers in the USA
WARNING
This equipment has been tested and found to comply with the limits for a Class B digital device,
pursuant to Part 15 of the FCC Rules. These limits are designed to provide reasonable protection
against harmful interference in a residential installation. This equipment generates, uses, and can
radiate radio frequency energy and, if not installed and used in accordance with the instructions,
may cause harmful interference to radio communications. However, there is no guarantee that
interference will not occur in a particular installation. If this equipment does cause harmful
interference to radio or television reception, which can be determined by turning the equipment
off and on, the user is encouraged to try to correct the interference by one or more of the
following measures:
— Reorient or relocate the receiving antenna.
— Increase the separation between the equipment and receiver.
— Connect the equipment into an outlet on a circuit different from that to which the receiver is
connected.
— Consult the dealer or an experienced radio/TV technician for help.
You are cautioned that any changes or modifications not expressly approved in this manual
could void your authority to operate this equipment.
If you have any questions about this product, you may call:
Sony Direct Response Center 1-(800)-222-7669
or write to:
Sony Direct Response Center 12451 Gateway Blvd. Fort Myers, FL 33913
Declaration of Conformity
Trade Name: SONY
Model No.: XA-300
Responsible Party: Sony Electronics Inc.
Address: 1 Sony Drive, Park Ridge, NJ.07656 USA
Telephone No.: 201-930-6972
This device complies with Part 15 of the FCC Rules. Operation is subject to the following two
conditions: (1) This device may not cause harmful interference, and (2) this device must accept
any interference received, including interference that may cause undesired operation.
Specifications
Power requirement 12 V DC car battery
(negative ground)
Current drain 340 mA
Operating temperature –10°C to +55°C
(14° F to 131° F)
Dimensions Approx. 148 × 34 × 101 mm
(5
7
/8 × 1
3
/8 × 4 in)
(w/h/d)
Mass Approx. 470 g (1 lb 1 oz)
Supplied accessories BUS cable
RCA pin cord
Velcro tape
Optional accessories BUS cable (supplied with
an RCA pin cord)
RC-62 (2 m)
Plug adaptor
PC-233S
(stereo mini plug y
stereo standard plug)
Design and specifications are subject to change
without notice.
Caractéristiques
Techniques
Puissance requise Batterie de voiture 12 V CC
(masse négative)
Consommation de courant
340 mA
Température de fonctionnement
–10°C à +55°C
(14° F à 131° F)
Dimensions Environ 148 x 34 x 101 mm
(5
7
/8 × 1
3
/8 × 4 po)
(l/h/p)
Poids Environ 470 g (1 lb 1 oz)
Accessoires fournis Câble BUS
Cordon RCA
Bande Velcro
Accessoires en option Câble BUS (fourni avec un
câble RCA)
RC-62 (2 m)
Adaptateur de prise
PC-233S
(mini-prise stéréo y
prise stéréo standard)
La conception et les caractéristiques techniques sont
sujettes à modification sans préavis.
•Corrugated cardboard is used for the packaging
cushions.
•Halogenated flame retardants are not used in the
certain printed wiring boards.
•La prévention contre les chocs est assurée par une
protection en carton ondulé.
•Aucun retardateur de flamme halogéné n’est
utilisé dans certaines cartes à circuits imprimés.

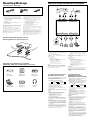
Equipment used in illustrations (not supplied)
Equipements utilisés dans les illustrations (non fournis)
3
Master unit
Appareil principal
CD/MD changer
Changeur CD/MD
Headphones
Casque
MD Walkman, etc.
Walkman MD, etc.
Laptop computer
Ordinateur portable
DVD player, etc.
Lecteur DVD, etc.
Before Installation
• Choose the installation location carefully so that the
unit does not interfere with normal driving operations.
• Avoid installing the unit where it would be subject to:
— high temperatures, such as from direct sunlight or
hot air from the heater.
— draft, rain or moisture.
— dust or dirt.
— magnetic fields.
• Use only the supplied mounting hardware for a safe
and secure installation.
If you have any questions or problems concerning your
unit that are not covered in this manual, please consult
your nearest Sony dealer.
Stick one piece of the Velcro tape provided to the
bottom of the unit and the other to the surface of the car
where you want to place it (such as the carpet
underneath the passenger seat) in order to hold the unit
in position.
After removing the dust and dirt from the surface of
Velcro tapes, stick them together.
Avant l’installation
• Choisissez l’emplacement de l’installation avec soin
afin que l’appareil n’interfère pas avec la conduite.
• Évitez d’installer l’appareil à des endroits où il serait
soumis :
—à des températures élevées comme aux rayons
directs du soleil ou à proximité de l’air
chaud du système de chauffage.
—à un courant d’air, à la pluie ou à l’humidité.
—à la poussière ou la saleté.
—à des champs magnétiques.
• Pour une installation fiable et sûre, utilisez
uniquement le matériel fourni.
Si vous avez des questions ou des problèmes qui ne sont
pas abordés dans ce manuel, consultez votre revendeur
Sony le plus proche.
Collez l’un des morceaux de bande Velcro fournis sur la
partie inférieure de l’appareil et l’autre morceau sur la
surface du véhicule où vous souhaitez l’installer (sur la
moquette située en dessous du siège passager, par
exemple) afin de maintenir l’appareil en position.
Après avoir enlevé la poussière et la saleté de la surface
des bandes Velcro, collez-les ensemble.
3
123
× 22 m 2 m
Parts list/Liste des composants
Place the unit under the passenger seat, etc.
Placez l’appareil sous le siège passager, etc.
Connection example/Exemple de raccordement
Mounting/Montage
∗1 Vous pouvez raccorder le sélecteur de source (XA-
C40, etc.) compatible avec le système BUS Sony.
Pour obtenir des détails, reportez-vous au manuel
utilisateur concernant le sélecteur de source que
vous utilisez.
∗2 Fourni avec le changeur CD/MD
∗3 Commande de volume pour le casque raccordé à
AUX IN 1.
∗4 Mini-prise stéréo
∗5 Connecteur USB
• Ordinateur avec port USB
• Systèmes d’exploitation compatibles
– Windows
®
98 Second Edition/Windows
®
Me/
Windows
®
2000/Windows
®
XP
(Windows
®
XP recommandé)
– Système d’exploitation Mac version 8.6 ou
ultérieure
(Système d’exploitation Mac version 10 ou
ultérieure recommandée)
Remarque
Selon le périphérique à raccorder, il est possible que vous
ayez besoin d’un cordon de connecteur différent. Pour
plus de détails, reportez-vous au mode d’emploi du
périphérique à raccorder ou demandez conseil à votre
revendeur.
Pour sélectionner un
périphérique raccordé à
l’appareil via l’appareil principal
1 Appuyez plusieurs sur (SOURCE) jusqu’à ce que
l’indication «CD» soit sélectionnée.
2 Appuyez plusieurs fois sur (MODE) jusqu’à ce que
le périphérique de votre choix soit sélectionné.
Exemple : fenêtre d’affichage de l’appareil
principal
Conseil
Lorsque vous sélectionnez un périphérique compatible
avec un système BUS Sony, la lecture commence
automatiquement.
3 Commencez la lecture avec le périphérique
sélectionné à l’étape 2.
En ce qui concerne la méthode de lecture du périphérique
sélectionné, reportez-vous à son mode d’emploi.
4 Réglez le volume de l’appareil principal et du
périphérique sélectionné.
Remarques
• Suivez les étapes ci-dessous pour lire le fichier audio sur
l'ordinateur connecté à la prise USB de cet appareil.
1 Appuyez sur la touche MODE de l'appareil
principal afin de sélectionner le mode «USB».
2 Lancez le lecteur multimédia (logiciel
Windows Media Player, etc.) sur votre
ordinateur.
3 Démarrez la lecture du fichier audio
(MP3,etc.).
Après avoir lu ce fichier audio sur votre ordinateur, si
vous sélectionnez le mode «USB» dans la fenêtre
d'affichage de l'appareil principal, il est possible que
celui-ci ne reconnaisse pas le signal audio et qu'aucun
son ne soit émis.
• Étant donné que selon le périphérique connecté les
réglages du volume peuvent différer, réglez
individuellement le volume sur chaque périphérique.
De plus, le signal de sortie audio n'étant pas le même
sur AUX IN 1 et AUX IN 2, connectez le changeur DVD
audio de voiture Sony à la prise AUX IN 1 et tout
périphérique portatif, tel qu'un MD WALKMAN, à la
prise AUX IN 2.
• Lors de la lecture de fichiers audio sur un périphérique
connecté à cet appareil via les prises AUX IN 1, AUX IN 2
ou USB, ne modifiez pas les paramètres de la fonction
CD CUSTOM FILE. En cas de problème, appuyez sur la
touche SOURCE de l'appareil principal afin de
sélectionner le périphérique souhaité.
∗1 You can connect the source selector (XA-C40, etc.)
compatible with the Sony BUS system.
For details, refer to the user's manual for the source
selector you are using.
∗2 Supplied with the CD/MD changer
∗3 Volume control for headphones connected to AUX
IN 1.
∗4 Stereo mini-plug
∗5 USB connector
• Computer with USB port
• Compatible operating systems
– Windows
®
98 Second Edition/Windows
®
Me/
Windows
®
2000/Windows
®
XP
(Windows
®
XP recommended)
– Mac OS 8.6 or later
(Mac OS 10 or later recommended)
Note
Depending on the device to be connected, you might
need to buy a different connector cord. For further
details, read the operating manual of the device to be
connected or ask your local dealer.
To select a device connected to
the unit by the master unit
1 Press (SOURCE) repeatedly until “CD” is selected.
2 Press (MODE) repeatedly until the device you
want to listen to is selected.
Example: Master unit display window
Tip
When you select a Sony BUS system-compatible device,
it will automatically start playing.
3 Start playing the device selected in 2.
For the playback method of the selected device, refer to its
operating manual.
4 Adjust the volume of the master unit and selected
device.
Notes
• Follow the steps below to play the audio file of the
computer connected to the USB jack of this unit.
1 Press the MODE button of the master
unit to select “USB.”
2 Open the playback software (Windows
Media Player, etc.) on your computer.
3 Play the audio file (MP3, etc.).
After playing the audio file on the computer, if you
select “USB“ mode on the display of the master unit,
this unit may not recognize the signal and sound may
not come out.
• As the volume settings of each connected device may
differ, adjust the volume on each device separately. As
the sound output differs on AUX IN 1 and AUX IN 2,
connect the Sony car audio DVD changer to AUX IN 1,
and connect a portable device (such as MD WALKMAN,
etc.) to AUX IN 2.
• While playing audio file in a device connected to AUX
IN 1, AUX IN 2, or the USB jack on this unit, do not
change any settings of the CD CUSTOM FILE function. If
trouble occurs, press the SOURCE button again on the
master unit to select the device you want.
CONTROL
AUDIO
LR
AUDIOHEADPHONE
MIN MAX
LVOL R
AUDIO
LR
OUTPUT
AUX IN 1
AUX IN 2
USB
CONTROL
AUDIO
LR
INPUT
MIN
VOL
MAX
∗1
∗2
∗3
∗4
∗5
1
2
B CD1 B CD2/AUX1
CD4/USB b CD3/AUX2 b
B CD1 B CD2/AUX1
CD4/USB b CD3/AUX2 b
-
 1
1
-
 2
2

