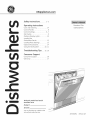
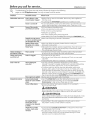
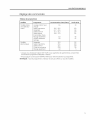
GE GSD3300D45BB Le manuel du propriétaire
- Catégorie
- Lave-vaisselle
- Taper
- Le manuel du propriétaire
Ce manuel convient également à

GEAppliances.com
Safety Instructions ........ 2-s
Operating Instructions
Care and Cleaning .............. 14
Control Panels ................... 8
Control Settings ............... 6-7
Dial Cycles ....................... 9
Flashing Display Lights .......... 10
Loading the
Dishwasher Racks ............... 12
Loading Place Settings .......... 13
Optional Accessories ............ 14
Using the Dishwasher ........ 10, 11
Troubleshooting Tips... 15, 16
Consumer Support
Consumer Support .............. 18
Warranty ....................... 17
/
.... ___f --/-I
f./\
Write the model and serial
numbers here:
Model #
Serial #
Youcan find them on a label on the
tub wall just insidethe door.
Standard Tub
Dishwashers
49-55091 09-14 GE

IMPORTANT SAFETY INFORMATION
READ ALL INSTRUCTIONS BEFORE USING-
SAVE THESE INSTRUCTIONS
For your safety, the information in this manual must be followed to minimize the risk
A WARNING! offire,explosion,electricshock, andtoprevent property damage, personal inJury, or
death.
WARNING! WATER HEATER SAFETY
Under certain conditions, hydrogen gas may be produced in a water heater that has not been used for two or more weeks.
HYDROGENGAS ISEXPLOSIVE.
If the hot water has not been used for two or more weeks, prevent the possibility of damage or injury by turning on all hot
water faucets and allowing them to run for several minutes. Do this before using any electrical appliance connected to
the hot water system. This simple procedure will allow any built-up hydrogen gas to escape. Since the gas is flammable,
do not smoke, use an open flame, or use the appliance during this process.
WARNING! PROPER INSTALLATION AND MAINTENANCE
This dishwasher must be properly installed and located in accordance with the Installation Instructions before it is used. If
you did not receive an Installation Instructions sheet with your dishwasher, you can receive one by visiting our Website at
GEAppliances.com. In Canada, visit www.GEAppliances.ca.
[] Connectthe dishwasher/appliance to a grounded metal, []
permanent wiring system; or run an equipment-grounding
conductor with the circuit conductors and connect to the
equipment-grounding terminal or leadof the appliance.
[] Improper connection of the equipment-grounding conductor []
can result in a risk of electric shock. Checkwith a qualified
electrician or service representative if you are in doubt
whether the appliance is properly grounded. []
[] Disposeof discardedappliances and shippingor packing
material properly.
Do not attempt to repair or replace any part of your
dishwasher unless it isspecifically recommended in this
manual. Allother servicing shouldbe referredto a qualified
technician.
Use only cord kit WX09x70gl0 or hard-wire to building
electrical.Failureto follow this instruction,could resultinriskof
fire and personal injury.
Tominimize the possibilityof electric shock,disconnect this
appliance from the power supply before attempting any
maintenance.
NOTE:Turning the dishwasher off does not disconnect the
appliance from the power supply. We recommend having
a qualified technician service your appliance.
WARNING! When using your dishwasher, follow basic precautions, including the following:
[] Use this appliance only for its intended purpose as
described in this Owner's Manual.
[] Useonlydetergents or wetting agents
recommended for useina dishwasher
and keepthem out of reachof children.
Using a detergent that is not specifically
designedfor dishwashers will cause the
dishwasher to fill with suds.
[] Locate sharp itemsso that they are not likelyto damage the
door seal.
[] Load sharp kniveswith the handles upto reducethe risk of
cut-type injuries.
[] Do not wash plastic items unless marked dishwasher safe
or the equivalent. Forplastic itemsnot so marked,checkthe
manufacturer's recommendations.
[] Do not touch the heating element during or immediately
after use.
[] Do not operate your dishwasher unless all enclosure
panels are properly in place.
[] Do not tamper with controls.
[] Do not abuse, sit on or stand on the door or dish rack of the
dishwasher.
[] Toreduce the risk of injury, do not allow children to playwith,
on or insidethis appliance at any time.
[] Do not store or usecombustible materials includinggasoline
or other flammable liquidsorvapors inthe vicinityof this or any
other appliance.
[] Smallparts,such as rack clips and filter retaining posts,can
be a choke hazardto small children ifremoved from the
dishwasher.Keepout of reach of small children.

IMPORTANT SAFETY INFORMATION
READ ALL INSTRUCTIONS BEFORE USING-
SAVE THESE INSTRUCTIONS GEAppliances.com
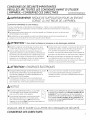
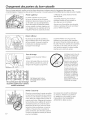
A WARNING! RISK OF CHILD ENTRAPMENT
PROPER DISPOSAL OF THE DISHWASHER
Junked or abandoned dishwashers are dangerous...even if they will sit for "just afew days."
If you are getting rid of your dishwasher, please follow the instructions below to help prevent
accidents.
[] Do not allow children to play with, on, or inside this or any discarded appliance.
[] Do not discard a dishwasher without first removing the door of the washing compartment
or remove the latch by removing the two screws from the door latch keeper (asshown).
Door
latch
keeper
A CAUTION: Topreventminor injury and property damage
[] During or after wash cycle, contents may be hot to the
touch. Use care before handling.
[] Close supervision is necessary if this appliance is used by
or near children. Do not allow children to play around the
dishwasher when closing the door, closing the upper rack,
or while vertically adjusting the upper rack due to the
possibility of small fingers being pinched.
[] Non-Dishware Items: Do not wash items such as
electronic air cleaner filters, furnace filters and paint
brushes in your dishwasher. Damage to the dishwasher
and discoloration or staining of the dishwasher may
result.
[] Load light-weight, plastic items so they do not become
dislodged and drop to the bottom of the dishwasher-
they might come into contact with the heating element
and be damaged.
CAUTION: ELECTRICALREQUIREMENTS
[] This appliance must be supplied with 120V,60 Hz,and
connected to an individual, properly grounded branch
circuit, protected by a lS or 20 amp circuit breaker or
time-delay fuse.
[] If the electric supply provided does not meet the above
specifications, it is recommended that a licensed
electrician install an approved outlet.
[] Your dishwasher circuit should not be used for any other
appliance while the dishwasher is in operation asthe
dishwasher requires the full capacity of the circuit.
ANOTICE
[] Ifyour dishwasher isconnected to a wall switch,
ensurethat the switch ison prior to use.
[] Ifyou choose to turn the wall switch off between
wash cycles,allow 5-ZOseconds after turning the
switch on beforetouching Stort to allow the control
to initialize.
[] Useonly powder, Cascade®All-in-1 ActionPacsT', liquid
detergents or rinse agents recommended for use in a
dishwasher and keepthem out of the reach of children.
Cascade®All-in-1 ActionPacsTMAutomatic Dishwashing
Detergent, and Cascade®RinseAidTMrinse agents have
been approved for use in all GE dishwashers.
READAND FOLLOW THISSAFETYINFORMATION CAREFULLY.
SAVE THESE INSTRUCTIONS

INFORNACION INPORTANTE DE SEGURIDAD
LEA TODAS LAS INSTRUCCiONES ANTES DE USAR-
GUARDE ESTAS INSTRUCCIONES
A iADVERTENCIA! Para su seguridad, siga las instrucciones de este manual a fin de minimizar
riesgos de incendio, explosi6n, descargas el_ctricas, y para evitar dafios en
su propiedad, lesiones personales o la muerte.
iADVERTENCIA! SEGURIDAD DEL CALENTADOR DE AGUA
Bajo ciertas condiciones, se podrd producir gas de hidr6geno en un calentador de agua que no rue usado pot dos semanas
o mds. EL GASDEHIDROGENOES UN EXPLOSIVO.
Siel agua caliente no seus6 durante dos semanas o m6s, evite la posibilidad de daho o lesi6nabriendo todos los grifos de agua
caliente y permitiendo que el agua corra durante varios minutos. Haga esto antes de usar cualquier artefacto el6ctrico que est6
conectado al sistema de agua caliente.Esteprocedimiento simple permitir6 el escape de cualquier gas de hidr6geno acumulado.
Debido a que el gas es inflamable, no fume, no use una llama abierta ni use el electrodom6stico durante este proceso.
iADVERTENCIA! INSTALACION Y MANTENIMIENTO ADECUADOS
Esta lavadora se deberd instalar y ubicar de acuerdo con las Instrucciones de Instalaci6n antes de ser usada. Sino
recibi6 una ficha de Instrucciones de Instalaci6n con su lavavajillas, podrd acceder a una visitando nuestro sitio web en
GEAppliances.com.
[] Conecteel lavavajillas/electrodom6stico a un sistema de []
cableado de metal permanente con conexi6n a tierra o
sedebe tender un conducto para la conexi6n a tierra del
equipo con losconductores del circuito y conectado al
terminal de tierra del equipo o al conductor de suministro del []
electrodom6stico.
[] Unaconexi6n inapropiada del conductor de conexi6n a
tierra del equipo puede provocar riesgosde descargas
el6ctricas.Consultea un electricistacalificado o personal del
serviciot@cnicositiene dudas de que el electrodom6stico se
encuentre conectado a tierra apropiadamente.
[] Desh6gasede forma correcta de electrodom6sticos y
materiales de envioo embalajes descargados.
Nointente reparar o reemplazar ninguna parte dela cocina,a
menos que se Iorecomiende especificamente en este manual.
Cualquierotra reparaci6n deber6 set realizadapor un t6cnico
calificado.
Use s61oel kit de cables W×09×70910 o cables duros para
la conexi6n el6ctrica. Si no se siguen estas instrucciones,
se pueden producir riesgos de incendio y lesiones
personales.
A fin de minimizar la posibilidadde descargas el6ctricas,
desconecte este electrodom6stico del suministro de corriente
antes de intentar cualquier mantenimiento.
NOTA:Apagarel lavavajillasno desconecta el
electrodom@sticodel suministro de corriente.Le
recomendamos que el serviciot6cnico de su electrodom6stico
sea realizadopor un t6cnico calificado.
A iADVERTENCIA! AI usar su lawwjillas, siga las precauciones b6sicas, incluyendo Io siguiente:
[] Use este electrodom6stico s61opara su prop6sito original, [] Notoqueel elementode calefacci6nduranteo inmediatamente
como se describe en el Manual del Propietario.
[] Use s61odetergentes o agentes
humectantes recomendados para _ _
usecon un lavavajillasy mantenga los
mismos fuera del alcance de losnihos.
Elusode un detergente que no est@
dise_adoespecificamente para lavavajillashar6 que este
@imo seIlenede agua conjab6n.
[] Ubique articulos puntiagudos de modo que no haya
posibilidadesde daBossobre el selladorde la puertal.
[] Cargueloscuchillos puntiagudos con losmangos hacia
arriba,a fin de reducir el riesgode lesionespot cortes.
[] No laveproductos de pl6stico, a menos que contengan una
marca de seguridad en lavavajillaso suequivalente. Cuando
setrate de productos de pl6stico que no est6n marcados de
esta manera, consulte lasrecomendaciones del fabricante.
despu6s del uso.
[] No use su lavavajillas a menos que todos los paneles de
cercamiento est6n correctamente en sus lugares.
[] No manipule indebidamente loscontroles.
[] No abuse, no se siente, no se sostenga ni se pare sobre la
puerta o la bandeja del plato del lavavajillas.
[] A fin de reducir el riesgo de incendios, no permita
que los nihos jueguen con, sobre o dentro de este
electrodom6stico en cualquier momento.
[] No guarde ni use materiales combustibles, incluyendo
gasolina u otros liquidos o vapores inflamables cerca de
6ste o de otros electrodom6sticos.
[] Las piezas pequeBas, tales como los sujetadores de
estantes y los pivotes de retenci6n de filtros, pueden
generar riesgos de asfixia en nihos pequehos si son
retirados del lavavajillas, iVlantenga los mismos fuera del
alcance de los nihos pequeBos.
4

INFORh/IACION IHPORTANTE DE SEGURIDAD
LEA TODAS LAS INSTRUCCiONES ANTES DE USAR-
GUARDE ESTAS INSTRUCCIONES
GEAppliances.com
_iADVERTENCIA! RIESGO DE OUE UN NINO OUEDE ATRAPADO
FORHA ADECUADA DE DESCARTAR EL LAVAVAJILLAS
Los lavavajillas tirados o abandonados son peligrosos...incluso aunque se conserven par "s61o
unos pocos dias". Si se deshar6 de su lavavajilla, siga las siguientes instrucciones a fin de evitar
accidentes.
[] No permita que losnihosjueguen con, en,o dentro de 6ste o cualquier electrodom6stico que haya
descartado.
[] No se deshaga de un lavavajinas sin primero retirar la puerta del compartimiento de lavado o
quitar el pestillo, retirando losdos tornillos de la traba del pestillo de la puerta (coma se muestra).
Cierrede
puerto
keeper
s
PRECAUCION: A fi_ d_ evitar lesiones menores y dafios sobre la propiedad
[] Durante o despu6s del ciclo de lavado, es posible que los
contenidos est6n calientes al tacto. Tenga cuidado antes
de tomar los mismos.
[] Sedeberc_estar especialmente atento si el
electrodom_stico es usado par niBos o se encuentra
cerca de los mismos. No permita que los nihos jueguen
alrededor del lavavajillas cerrar la puerta, cerrar la
bandeja superior, o mientras verticalmente ajustando la
rejilla superior debido a la posibilidad de que sus dedos
pequehos sean presionados.
[] Productos que no sean utensilios: no lave art[culos tales
coma filtros electr6nicos de limpieza con aire, filtros de
homo y brochas de pintura en su lavavajillas. Se podran
producir dahos, descoloraci6n o manchas sabre el
lavavajillas.
[] Cargue artfculos de plc_sticolivianos, de modo que no
sean desplazados ni caigan al rondo del lavavajillas - es
posible que entren en contacto con el calentador y sean
daBados.
PRECAUCION: REOUISITOS ELECTRICOS
[] Esteelectrodom_stico deber6 serprovisto con 120V,60 Hz,
y astor conectado a un circuito individual correctamente
conectado a tierra, protegido par un disyuntor o fusible de
retardo de 15 o 20 amp.
[] Siel suministro de corriente provisto no cumple con
las especificaciones anteriores, se recomienda que
un electricista matriculado instale un tomacorriente
aprobado.
[] Su circuito del lavavajillas no deberia ser usado para
ningOn otro electrodom_stico mientras el lavavajillas estd
funcionando, ya que 6ste requiere toda la capacidad del
circuito.
_AVISO
[] Siellavavajillasestc_conectado a un tomacorriente
de pared, asegOresede que el interruptor est6
encendido antes del usa.
[] Sidecide apagar el interruptor entre ciclos de
lavado, espere entre 5 y !0 segundos luego de
encender el interruptor antes de presionar Start (Iniciar)para
permitir que el control se inicie.
[] Uses61opolvo,Cascade@ All-in-1 ActianPecsT', detergentes
I[quidos o agentes de enjuague recomendados para usa
con un lavavajillasy mantenga los mismos fuera del alcance
de los nihos. El Detergente para Lavavajillas AutomcXicos
Cascade@ All-in-1 ActionPacs TM,y los agentes de enjuagues
Cascade @Rinse AidTMfueron aprobados para su usa en
todos los lavavajillas de GE.
LEA Y SIGA ESTAINFORMACION DE SEGURIDAD CUIDADOSAMENTE.
GUARDE ESTAS INSTRUCCIONES

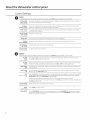
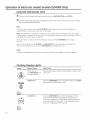
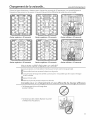
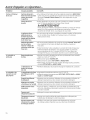
About the dishwasher control panel
Control Settings
Cycles
An indicator light above theselected pad will be ONto indicate which CYCLEhas been selected,on some models.
POTS& PANS/ Forheavily soiled dishes or cookware with dried-on or baked-on soils. Everyday dishes may be included.
HEAVYWASH This cycle will not remove burned-on foods.
(onsomemodels)
NORMAL/ This cycle is meant for daily, regular, or typical use to completely wash a full 1Dadof normally soiled
NORMAL WASH dishes and is designed to conserve both water and energy.
SHORT WASH For quickly washing loads of everyday dishes with medium so% that have not dried on, such as loads
(onsomemodels) consisting mostly of glasses.
WATER SAVER For dishes with light soils.
LIGHT WASH
(onsomemodels)
RINSEONLY For rinsing partial loads that will be washed later. Do not use detergent.
DRYING For warming clean dishes and serving plates. This cycle will take approximately 30 minutes.
PLATEWARMER
HOT PREWASH Preheats wash water to the correct temperature.
HOTSTART
CHINA CRYSTAL For lightly soiled china and crystal.
{onsome models)
Options
Anindicator light above the selectedpad will beONto indicate which OPTIONhas beenselected,on some models.
HI TEh,IP Turns on the heater in all final rinse cycles to help prevent spotting on dishware. This option may be
RINSE turned ON or OFFduring the wash cycle.
(onsomemodels)
HI TEh'IP Energizes the heater to boost water temperature in prewash and main wash fill cycles. Recommended
WASH for use with heavily soiled dishes. Option may be turned ONor OFF during the wash cycle.
HEATED DRY Shuts off the drying heat option. Dishes air dry naturally and energy issaved. Open the dishwasher door
OFF to speed drying.
HEATED DRY Turns the heater on for fast drying. This cycle will extend the time to your wash cycle by 30 minutes.
ON DO NOTuse with RINSE ONLY cycle.
LOCK
(electronic models
only)
When the LOCKpad istouched twice within 3seconds,all pads become inoperative. Youcan lockthe controls to
prevent any selectionsfrom being made. Oryou can lockthe controls afteryou havestarted a cycleor selected
DELAYSTARTsothe cycleor DELAYSTARTis notinterrupted.
Children cannot accidentally start dishwasher by touching pads with this option selected.
To unlock the dishwasher after it has been locked, touch the LOCKpadtwice within 3seconds. The light above
the LOCKpad win turn off.
DELAY HOURS Delays the start of a wash cycle for up to 8 hours.
{on some models)
RESET Touch RESET to cancel options.
(timer models)
START/RESET Touch START/RESETone time to start dishwasher cycle. Touch START/RESETa second time to pump
out (electronicmodels)and then turn off the dishwasher. Do not touch START/RESETmore than one time
unless you intend to end the cycle.

GEAppliances.com
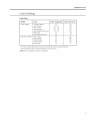
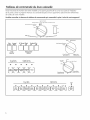
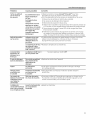
Control Settings
Cycle Chart
Models Cycle Water Usage {gal.) {min.)
Timer Models
Electronic Models
Hot Start Option 1
Heavy Wash
Pots & Pans
Normal Wash*
Light Wash/Water Saver
Rinse Only
Plate Warmer/Drying
Pots & Pans
Heavy Wash
Normal Wash
China/Crystal
Rinse Only
2.5
4.9 - 7.0
6.0 - 7.0
4.0 - 5.6
3.9 - 4.5
2.2
0.0
8.8
7.5
4.0
6.3
1.3
Cycle Time
10
120
118
110
114
58
45
112
108
120
80
5
tHot Start Option adds water (]mount and cycle time shown when selected.
*Normal Wash button should be pushed to run this cycle.
NOTE:Not all models have every cycle listed.

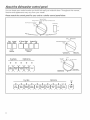
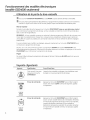
About the dishwasher control panel
You can locate your model number on the left tub wall just inside the door. Throughout this manual,
Features and appearance may vary Fromyour model.
Please match the control panel for your unit to a similar control panel below.
Normal Wash
Heavy Wash 11 F LightWash or Water Saver
Hot Prewash or Hot Start
Heated Dry
Option ®
Off O | On
II
Off
Pots Normal
& Pans Wash
i ii N
Cycle
Selector
HI Temp Wash Heated Dry
On Off On Off
I ILII III
EnergySaver
Option
START WATER SAVER
® •
HOT PREWASHOPTION ®
OFF ®
PLATE WARMER
(HEATED DRY ON) Q
• RINSEONLY
(HEATED DRY OFF)
Cycles Options
aid m QD m
L_Pa_P°ts_NrNo,m_ _,e .m_pCasU L_'as-_ _,,_ _eset_
Hot Start
Option
O
Off O
(Heated Dry On)
Start
®
Light Wash
Dry Off)
Cycles Options C_EA,
|
II II II II II II II II II 248 II
_PoTS_ _HEAW_ _NORMA_L_cH,NA_ _R,NSE] _HlTEM_P_HiTE_ _HEATED__Loc a _'DELAV_ ESTARq
L?u L_YST_ UNL_J L_TIM_L_PA"j LWAs_J L?,sj
LR'su
8

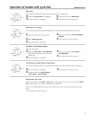
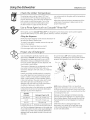
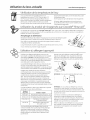
Operation of models with cycle dial GEAppliances.com
hot start
Opton start
Rinse Only
Forrinsing partial loads that will bewashed later. Donot usedetergent.
:i_ HakesureHEATEDDRYisnot selected. Slowlyturn the Dialto RINSEONLY.
Besurethe door isunlatched. Latch the door to start the cycle.
Hotstart
opton sta4
Start aelag ,_
Off 0 Light blfa_)
Plate Wermer _
eared Drg offl
Plate Warmer or Drying
Forwarming clean dishesand serving plates.This cyclewill take approximately 3g minutes,
_!_ Load clean dishware to be warmed, i_ Slowlyturn the Dialto PLATEWARNERor
DRYING.
Select HEATEDDRYON. _ Latch the door to start the cycle.
Besurethe door isunlatched.
Hat Sta[t
Hot Start or Hot Prestart Option
Preheatswash water.
_ii__ISelectthe HOTSTARTor HOTPRESTART
cycle and any other option on the push
button pad.
_il Besurethe door isunlatched.
Slowlyturn the Dialto HOTSTARTor
HOTPRESTART.
Latchthedoortostartthecycle
Short Wash or Light Wash or Water Saver
Hatstart
option oStart ....
Forqu,cklywash,ng loads of everyday d,shesw,th light to medium soilsthat have not dried on
(i_atiiW_rb_i_r_!.... Besurethe door isunlatched. _ Latch the door to start the cycle.
,,'"°;°°'_o_o_', Slowlyturn the Dialto SHORTWASH,
LIGHTWASHor WATERSAVER.
Start (Modelswith a Dial)
Slowlyturn the Dialto the STARTor ONposition,or the selected cycle. Don'tturn it pastthe START,
ONor cycle position;you could accidentally missa prewash.
There isa time delay between start-up and water fill soyou will not hear any wash action right
away.
Latch the door to begin the cycle.

Operation of electronic models (model GSD4000 Only)
Using the Dishwasher Door
_mhe door must be closed and locked into place to select a LOAD SELECTION or an OPTION.
Ifthe door isopened during a cycleand left open,thedishwasherwilt beeponceevery30 secondsuntil the
door isclosedand latched intoplace.
Start
Close and latch the door. Touch the START/RESETpad to begin the cycle. Water fill begins and
approximately 60 seconds later the wash action begins.
NOTE:The dishwasher remembers your last cycle soyou don't have to reprogram each time. When
the dishwasher is loaded and the door latch is in the locked position, the control panel lights will be ON
and display the last settings you selected.
If you don't want to change any of the settings, simply touch the START/RESETpad to begin
the cycle.
Also, if a power failure occurs, NORMAL and HEATEDDRYwill automatically be programmed.
Make any new selections and touch the START/RESETpad to begin the cycle.
Clean
This light is illuminated when a wash cycle is complete. The light willstay ON until the door is opened.
Flushing Display Lights
Lights What It Means
What To Do
This isnormal.
TheSTART/RESETpad
has been pressed.
Allowthe dishwasher to drain and reset beforeyou start a new
wash cycle.
CLEAN
PLUS A
BEEPING
ii¸¸¸¸¸I (
WA_
(i_ii_i_ ;__)
PLUS A
BEEPING
SOUND
Control Error
Pressthe START/RESETpod to turn off the beeper.If the CLEAN
light continues to flash,call for service.
Control Error
Pressthe START/RESETpad to turn off the beeper and the
dishwasher will attempt to reset.Restartthe wash cycle.
If this error continues, turn off the power to the dishwasher at
the circuit breaker for 30 seconds.Try the dishwasher again.
If the error isstill present,callfor service.
10

Using the dishwasher GEAppliances.cam
Check the Water Temperature
Theentering water must be at least 120°Fand
not more than 150°F,for effective cleaning and to
prevent dish damage. Checkthe water temperature
with u candy or meat thermometer. Turn onthe
hot water faucet nearest the dishwasher, place
the thermometer in a glass and letthe water
run continuously into the glass until the temperature
stops rising.
Adjust the maximum/minimum temperature of the
water heater if necessary to deliverwater at the
proper temperature.
Use o RinseAgent such as Cascade®Rinse AidTM
Rinseagents,such usCascade®RinseAidTM are designed for great drying action and to protect against
spots and film build-up on your dishes,glasses,flatware, cookware, and plastic.
Filling the Dispenser
Fillthe rinseagent dispenser until it reachesthe bottom of
lip insidethe opening. Replacecap.
Tocheck if rinseagent is needed,remove the cap and
look into the dispenser.
A full dispensershould last about one month.
If the rinseagent spills,wipe up the excess.
Proper Use of Detergent
Useonly detergent specifically made for usein
dishwashers.Cascade®Automatic Dishwashing
Detergents have been approved for use in all GE
dishwashers. Keepyour detergent fresh and dry.
Don't put powder detergent into the dispenser until
you're ready to wash dishes.
Theamount of detergent to usedepends on whether
your water ishard or soft. With hard water, you
need extra detergent. With soft water, you need less
detergent.
Protectyour dishes and dishwasher by contacting
your water department and asking how hard your
water is.Twelve or more grains isextremely hard
water. A water softener is recommended. Without
it, lime can build up in the water valve,which could
stick while open and cause flooding. Too much
detergent with soft water can cause a permanent
cloudiness of glassware, calledetching.
Usethe information in the table below as a guideline
to determine the amount of automatic dishwasher
detergent to place in the dispenser.
Number
of Grains Detergent Cups to Fill
Lessthan/4 Fillto 1/5 of main cup
/4to 8 Fillto 2/3 of main cup
8 to 12 Fillmain cup
Greater than 12 Fillmain cup and open cup
You'llfind two detergent dispenserson the insidedoor
of your dishwasher.Allwash cyclesrequire detergent
in the main cup.When usingautomatic dishwashing
detergent tabs,simplyplace one tab in the main cup
and close.
Besurethe DialisOFF before adding detergent.
Otherwise,the detergent cup will not close and latch
properly. Add detergent then closethe main cup.
Open cup
Main cup
NOTE:Using a detergent that isnot specificaf/y
designedfor dishwasherswill cause the dishwasher
to fill with suds.Duringoperation, thesesuds wilt spill
out of the dishwashervents,covering the kitchenfloor
and making the floor wet.
Becauseso many detergent containers lookalike,
store the dishwasher detergent in a separate space
from all other cleaners.Showanyone who may use
the dishwasher the correct detergent and where it
is stored.
Whilethere will be no lastingdamage to the
dishwasher,your disheswill not get clean using
a dishwashing detergent that isnot formulated
to work with dishwashers.
11

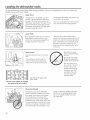
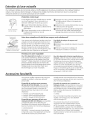
Loading the dishwasher racks
For best dishwashing results, follow these loading guidelines. Features and appearance of racks and silverware
baskets may vary from your model.
Upper Rack
The upper rack isfor glasses,cups and
saucers.Cupsand glassesfit best along
the sides.Thisisalso a secure placefor
dishwasher-safe plastics.Theupper rack is
good for all kinds of odd-shaped utensils.
Saucepans,mixing bowls and other items
should be placed face down.
Securelarger dishwasher-safeplastics over
two fingers when possible.
Make sure small plastic items are secure so
they can't fall onto the heating element.
Lower Rack
When loading the lower rack, do not load
large platters or trays in the front right
comer. They may prevent detergent from
circulating during the wash cycle.
Thelower rack isbest usedfor plates,
saucers and cookware. Large items such as
broiler pans and racksshould go along the
sides.Load platters, pots and bowls along
the sides,in corners or in the back.The
soiledside of items should face the center
of the rack.
Tower
Wash Tower
Keepthe centerarea clearin the lower
rack.
Thewash tower risesthrough the
center of the lower rack during the
wash and rinseportions of the cycle.
Do not cover upper rack tower
(not present on all models)
Don't block the upper rack
wash tower.
Don't blockthe wash
tower or load tall things
next to it.
Besure items don't fall
through rack and block
rotation of the spray arm.
Also,be careful not to
let a portion of an item
such asa pot or dish
handle extend through
the bottom rack.This
could block the wash
arm and cause poor
washing results.
Silverware Basket
Putflatware inthe removable basket
with fork and knife handles up to protect
your hands. Placespoons in the basket
with handles down. Mix knives,forks
and spoons sothey don't nest together.
Distribute evenly.Smallplastic items, such
as measuring spoons and lidsfrom small
containers, should go in the bottom ofthe
silverware basketwith silverware on top.
DON'T LETANY ITEM EXTENDTHROUGH
BOTTOM OF SILVERWARE BASKETAND
RACK,TO ENSUREPROPERFUNCTION
OF SPRAYARM.
12

Loading place settings... GEAppliances.com
Follow these guidelines for loading 10 place settings. Features and appearance of racks and silverware baskets
may vary from your model.
Upper Rack--lO place settings Upper Rack--lO place settings Lower Rack--lO place settings
Upper Rack--12 place settings Upper Rack--12 place settings Lower Rack--12 place settings
_et to Add a Dish?
A forgotten dishcan be added any time before the main wash.
Pushthe door latch to the left.
_" Oncethe water calms,open the door. Steam may riseout of the dishwasher.
Add forgotten dish.
Closethe door and pushthe latch to the far right.
Tipsfor Loading and Good Wash Performance
Don't block the lower rack wash tower.
Don't let items fall through rack and
block spray arms.
13

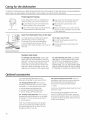
Caring for the dishwasher
Toclean the control panel, usea lightly dampened cloth, then dry thoroughly. Toclean the exterior, use a good appliance
polish. Never use sharp objects, scouring pads or harsh cleaners on any part of the dishwasher.
Sump cover screws
Protect Against Freezing
If your dishwasher isleft in an unheated place
during the winter, ask a servicetechnician to:
!_ii Cut off electrical power to the dishwasher.
........................Removefusesor trip circuit breaker.
_i: Turnoff the water supply and disconnect the
.....................water inet inefrom the water vave.
Drainwater from the inlet lineand water
valve.(Usea pan to catch the water.)
Reconnectthe water inlet line to the
.......................water valve.
_ii Removethe plastic sump cover in the tub
bottom and use a sponge to soak up water
in the rubber boot.
,t 0 rllTr
Does Your Dishwasher Have an Air Gap?
An air gap protects your dishwasher against
water backing up into it ifa drain clogs.
Theair gap isnot a part of the dishwasher.
It is not covered by your warranty. Not all
plumbing codes require air gaps, soyou may not
have one.
The air gap is easy to clean.
_Turn off the dishwasher and lift off the
....................chrome cover.
Unscrew the plasticcap and clean with
a toothpick.
Checktheair gapany timeyour
dishwasherisn'tdrainingwell,
Stainless Steel Panels
For cleaning rust and tarnish, cleaners with
oxalic acid such as Bar Keepers Friend Soft
CleanserTM will remove rust, tarnish and small
blemishes. Use only a liquid cleanser free
of grit and rub in the direction of the brush
lines with a damp soft sponge. Do not use
appliance wax or polish on the stainless steel.
Forother blemishes and marks, useStainless
SteelMagic or a similar product usinga clean
soft cloth. Donot useappliance wax, polish,
bleach or products containing chlorine on
StainlessSteel. You can order Stainless Steel
Magic# WXZ0X29through GE Parts by calling
877.959.8688.InCanada, call 1-800-661-1616.
Optional accessories
Youcan change the appearance of your
dishwasher byadding a custom panel trim kit.
.!/4" Wood panel trim kit--This accessory
contains trim and instructions for you to supply
and install a !/4" thick decorative wood door:
, GPF25B(Black)GPF325B/GPF425B
GPF25W (White)GPF325W/GPF425W
GPF25C(Bisque)GPF325C/GPF425C
3/4" Trimless wood panel kit--This accessory
contains parts and instructions for you to supply
and install a 3/4" thick decorative wood door:
GPF375/GPF475
NOTE:TheGPFIO0dishwasher door spring kit
must also be ordered and installed when the
door panel weighs four Ibs.or more. Thiskit is
included with the 3/4" trim kits.
Non-wood countertop bracket kit--This isfor
installations which have non-wood countertops
and includes side-mounting brackets and
instructions for securing the dishawasher:
, GPF65
Consultyour GEAppliance dealer to get the correct
kit foryour model.
Theseaccessoriesare availableat extra cost
from GE.Call800.525.2002to order,or seeyour
authorized GEAppliance dealer.Visa,MasterCard
or Discovercardsare accepted.Specifyaccessory
number when ordering.
14

Beforeyou call for service... GEAppliances.com
(_ Troubleshooting TipsSave time and money! Review the charts on the following
pages, or visit GEAppliances.com You may not need to call for service.
Problem Possible Causes What To Do
Dishwasher wont run
Noise
Fuseis blown, or the , Replacefuse or reset circuit breaker. Removeany other appliances
circuit breaker tripped from the circuit.
Try pressingthe START/RESETpad(Electronicmodels)two times.
Power isturned off , In some installations, power to the dishwasher is provided through awall
switch, often located next to the disposer switch. Make sure it ison.
Someof the sounds , Soft food disposal shredding action.
you'll hear are normal , Drain valve opening to pump water out.
Timer control as cycle progresses.
Detergent cup opening.
Themotor stopping during the drying period.
Waterdrainingoutoftub immediatelyaftertouchingtheSTART/RESETpad.
Utensils are not secure • Make sure everything issecured in dishwasher.
in rack or something small
has dropped into rack
Rattling dishes when • Make sure dishesare properly loaded. Seethe Loading the
the spray arm rotates dishwasher rackssection.
Motor hums , Dishwasher has not been used on a regular basis.Ifyou do not use
your dishwasher often,set itto fill and pump out once every week.
Thiswill help keepthe seal moist.
Water standing in This isnormal , A small amount of clean water around the outlet on the tub bottom
the bottom of the tub at the back of the tub keepsthe water seallubricated.
Water won't pump Drain isclogged , If you have an air gap,clean it.
out of the tub , Checkto seeifyour kitchensink isdraining well. If not,you may need
a plumber.
If the dishwasher drains into a disposer,run disposer clear.
Sudsin the tub Wrong detergent , Use onlyautomatic dishwasher detergents to avoid sudsing.
was used Cascade®,Cascade®Complete and Electrasol®Automatic Dishwashing
Rinse agent was spilled
Stained tub interior Sometomato-based
foods can cause reddish
stains
Teaor coffee stains
An overall yellow or
brown film can be
caused by iron deposits
Jnwater
Detergents have been approved for use in all GEdishwashers.
Toremove suds from the tub, open the dishwasher and let suds
dissipate.Add I gallon of coldwater to the tub. On Modelswith a Dial:
Closeand latch the dishwasher. Pump out water by slowlyturning the
Dial until a drain period isreached. Repeat if necessary.On Modelswith
ElectronicControl: Pumpout water by pressing the START/RESETpad,
then !0 seconds later, pressSTART/RESETpadagain. Repeatif necessary.
Alwayswipe up rinseagent spillsimmediately.
Use ofthe RINSEONLYcycleafter adding the dishto the load
can decrease the levelof staining. GErecommends Cascade®
Plastic Booster to help remove these types of stains.
Removethe stain by hand, usinga solution of 1/2 cup bleach
and 3 cups warm water.
WARNING
Beforecleaning interior, wait atleast 20 minutes after a cycle for the
heating elements to cool down. Failureto do socan result in burns.
A ADVERTENCIA
Antesde limpiarelinterior,espereporIomenos20minutosdespu_sdeunciclo
paraqueloselementoscalentadoresseenfrien.Nohacerlopuedeprovocar
quemaduras.
• A specialfilter inthe water supply line isthe only way to correct
this problem. Contact a water softener company.
White film on inside
surface--hard water
minerals
, GErecommends Cascade Crystal Clear®to help prevent hard water
mineral deposits from forming.
, Rundishwasher with citric acid to remove mineral deposits.Citric
acid (Partnumber: WD35X!5!) can be ordered through GEParts.
Seeback cover for ordering information.
15

Before you call for service...
Problem Possible Causes What To Do
Dishes don't dry Low inlet water
temperature
, Hake sure inletwater temperature isat least 120°F.
SelectHEATEDDRY.
Use HOTSTARTand ADDEDHEAToptions.
Selecta higher cycle, such as POTS& PANSor HEAVYWASH.
Rinseagent dispenser , Checkthe rinse agent dispenser and fill asrequired.
is empty
Dishes and flatware inletwater temperature , Raisethe water heater temperature to !20°F.
not clean is below 120°F. , Use HOTSTART,POTS& PANSor HEAVYWASHand HI TEHPWASH.
Too little detergent , SeeUsingthe dishwasher section, referto Proper UseofDetergentfor
detergent recommendations,
Old or damp powdered , SeeUsingthe dishwasher section, referto Proper Useof Detergentfor
detergent detergent recommendations.
Water pressure is , Turnon a faucet. Iswater coming out more slowly than usual? Ifso,
temporarily low wait until pressure isnormal before usingyour dishwasher.
Air gap isclogged • Cleanthe air gap.
Improper rack loading • Hake surelarge dishware doesnot block detergent dispenseror wash arm.
No air gap or high , Verifythat you have an air gap or a high drain loop. Referto
drain loop the Installation Instructions.
Spots and filming
an glasses and
flatware
Extremely hard water
Low inlet water
temperature
Overloading the
dishwasher
Improper loading
Old or damp powder
detergent
Rinseagent dispenser
empty
Too little detergent
Use Cascade®RinseAidTM rinse agents to remove spots and prevent
new film buildup.
Toremove stubborn spots and pre-existing film from glassware:
1 Removeall metal utensilsfrom the dishwasher.
2 Donot add detergent.
3 Selectthe longest cycle.
4 Start the dishwasher and allow to run for 18to 22 minutes.
Dishwasher will now be in the main wash.
5 Open the door and pour 2 cups (500ml)of white vinegar into the
bottom of the dishwasher.
6 Closethe door and allow to complete the cycle. If vinegar rinse
doesn't work: Repeatas above, except use1/4 cup (60ml)of citric
acid crystals instead ofvinegar.
Cloudiness on Combination of soft , Thisiscalled etching and ispermanent. To prevent this from
glassware water and too much happening, use lessdetergent if you have soft water. Wash glassware in
detergent the shortest cyclethat will get itclean.
Water temperature • Lower the water heater temperature.
entering the dishwasher
exceeds 150°F.
Detergent cup lid Dial is not in the OFF , Turnthe Timer Dialto OFF.
won't latch position
Detergent left in Dishes are blocking the , Repositionthe dishes.
dispenser cups detergent cups
Steam This is normal , Steam comes through the vent bythe door latch during drying and
when water is being pumped out.
Black orgray Aluminum utensils have , Removemarks with a mild,abrasive cleaner.
marks on dishes rubbed against dishes
Control panel lights Time too long between , Eachpad must be touched within 30 seconds ofthe others.To relight,
go offwhen you are touching or selecting touch any pad again or unlatch and relatch the door.
setting controls pads
Control panel Door latch may not , Callfor service.
responded to inputs be properly seated
but dishwasher never
filled with water
16

GEDishwasher Warranty.
All warranty serviceprovided byour FactoryServiceCenters,
or an authorized CustomerCare®technician.Toscheduleservice
on-line,visitus at GEAppliances.com,or call800.GE.CARES(800.432.2737)
in the UnitedStates.InCanada,call!.800.56!.3344. Pleasehave serial
number and model number availablewhen callingfor service.
Stapleyour receipt here.
Proof of the original purchase
date is needed to obtain service
under the warranty.
For The Period Of: GE Will Replace:
One Year Any part of the dishwasher which fails due to a defect in materials or workmanship. During
From the date of the this limited one-year warranty, GEwillalso provide, free of charge, all labor and in-home service
original purchase to replace the defective part.
What GE Will Not Cover (for customers in the United States):
[] Service trips to your home to teach you how to use
the product.
[] Improper installation, delivery or maintenance.
[] Failure of the product if it isabused, misused, or usedfor
other than the intended purpose or used commercially.
[] Replacementof housefusesor resetting ofcircuit breakers.
[] Product not accessible to provide required service.
[] Damage to the product caused by accident, fire, floods
or acts of God.
[] Incidental or consequential damage caused by possible
defects with this appliance.
[] Cleaningor servicing ofthe air gap device in the drain line.
[] Damage caused after delivery, including damage from
items dropped on the door.
l[ XCLUSION OF IMPLIED WARRANTIES--Your sole and exclusive remedy is product repair as provided in this Limited
Warranty. Any implied warranties, including the implied warranties of merchantability or fitness for a particular
purpose, are limited to one year or the shortest period allowed by low.
Thiswarranty isextendedto the original purchaserand anysucceedingowner forproductspurchased for home usewithin the
USA.If the product is locatedin an area whereservicebya GEAuthorizedServiceris not available,you may be responsiblefor a trip
charge oryou may be requiredto bring theproduct to anAuthorized GEServicelocation for service.Proofof original purchase date
isneededto obtain serviceunder the warranty. InAlaska,the warranty excludesthe costofshipping or servicecallstoyour home.
Somestates do not allow the exclusionor limitation of incidental or consequentialdamages.Thiswarranty givesyou specificlegal
rights,and you may alsohave other rights which vary from state to state. Toknow what your legal rights are,consultyour localor
state consumeraffairs officeor your state'sAttorney General.
Warranton Genera! Electric Company. Louisville, KY /40225
What Is Not Covered (for customers in Canada):
[] Service trips to your home to teach you how to use
the product.
[] Improper installation.
If you have an installation problem, contact your dealer
or installer. You are responsible for providing adequate
electrical, exhausting and other connecting facilities.
[] Failure of the product if it isabused, misused, or usedfor
other than the intended purpose or used commercially.
[] Replacementof housefusesor resetting of circuit breakers.
[] Damage to the product caused by accident, fire, floods
or acts of God.
[] Damage caused offer delivery.
EXCLUSION OF IHPLIED WARRANTIES--Your sole and exclusive remedy is product repair us provided in this Limited
Warranty. Any implied warranties, including the implied warranties of merchantability or fitness for a particular
purpose, are limited to one year or the shortest period allowed by law.
Thiswarranty isextendedto the original purchaserand anysucceedingowner forproductspurchased in Canadafor home use
within Canada.Inhome warranty servicewill be providedin areas whereit isavailableand deemedreasonablebyMabeto provide.
Warrantor: MC COMMERCIAL, Burlington, L7R 5B6
17

Consumer Support.
GEAppliances Website Inthe U.S.:GEAppliances.com
Have a question or need assistancewith your appliance?Try the GEAppliances Website 24 hours a day,
any day of the year! Forgreater convenience and faster service,you can now download Owner's Manuals,
order parts or evenschedule service on-line.In Canada, visit: www.GEAppliances.ca
Schedule Service IntheU.S.:GEApplionces.com
Expert GE repair service is only one step away from your door. Get on-line and schedule your service at your
convenience any day of the year! Or call 800.GE.CARES(800./432.2737) during normal business hours.
In Canada, call 800.561.3344
RealLifeDesignStudio Inthe U.S.:GEAppliances.com
GE supports the Universal Design concept-products, services and environments that can be used by people of
all ages, sizes and capabilities. We recognize the need to design for a wide range of physical and mental abilities
and impairments. For details of GE's Universal Design applications, including kitchen design ideas for people with
disabilities, check out our Website today. For the hearing impaired, please call 800.TDD.GEAC(800.833.4322).
In Canada, contact: Manager, Consumer Relations, MCCommercial
Suite 310, ! Factory Lane
kloncton, N.B.EIC 9M3
Extended Warranties IntheU.S.:GEApplionces.com
Purchase a GEextended warranty and learn about special discounts that are available while your warranty is still
in effect. You can purchase it on-line anytime, or call 800.626.222/4 during normal business hours. GEConsumer
Home Services will still be there after your warranty expires. In Canada, consult your local listings for an
extended warranty provider.
Parts and Accessories Inthe U.S.:GEApplionces.com
Individuals qualified to service their own appliances can have parts or accessories sent directly to their homes
(VISA,MasterCard and Discover cards are accepted). Order on-line today, 24 hours every day or by phone at
800.626.2002 during normal business hours.
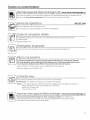
Instructions contained in this manual cover procedures to be performed by any user. Other servicing generally
should be referred to qualified service personnel. Caution must be exercised, since improper servicing may cause
unsafe operation.
In Canada, consult your local listings for your nearest GEparts distributor or call 800.661.1616.
Contact Us
Inthe U.S.:GEAppliances.com
Ifyou are not satisfiedwith the serviceyou receivefrom GE,contact uson our Website with all the details including
your phone number, or write to: General Manager, Customer Relations
GEAppliances,Appliance Park
Louisville,KY/40225
In Canada, write to: Director,Consumer Relations,ivlcCommercial
Suite310, ]_Factory Lane
Moncton, N.B.EIC 9M3
Forquestions on installation call 800-626-2000 (US)or 800-561-33/4/4(Canada).
I ] Register Your Appliance Inthe U.S.:GEAppliances.com
Register your new appliance on-line--at your convenience! Timely product registration will allow for enhanced
communication and prompt service under the terms of your warranty, should the need arise. You may also mail
in the pre-printed registration card included in the packing material. In Canada, visit: www.GEAppliances.ca
18

Notes.
19

Notes.
20
La page est en cours de chargement...
La page est en cours de chargement...
La page est en cours de chargement...
La page est en cours de chargement...
La page est en cours de chargement...
La page est en cours de chargement...
La page est en cours de chargement...
La page est en cours de chargement...
La page est en cours de chargement...
La page est en cours de chargement...
La page est en cours de chargement...
La page est en cours de chargement...
La page est en cours de chargement...
La page est en cours de chargement...
La page est en cours de chargement...
La page est en cours de chargement...
La page est en cours de chargement...
La page est en cours de chargement...
La page est en cours de chargement...
La page est en cours de chargement...
La page est en cours de chargement...
La page est en cours de chargement...
La page est en cours de chargement...
La page est en cours de chargement...
La page est en cours de chargement...
La page est en cours de chargement...
La page est en cours de chargement...
La page est en cours de chargement...
-
 1
1
-
 2
2
-
 3
3
-
 4
4
-
 5
5
-
 6
6
-
 7
7
-
 8
8
-
 9
9
-
 10
10
-
 11
11
-
 12
12
-
 13
13
-
 14
14
-
 15
15
-
 16
16
-
 17
17
-
 18
18
-
 19
19
-
 20
20
-
 21
21
-
 22
22
-
 23
23
-
 24
24
-
 25
25
-
 26
26
-
 27
27
-
 28
28
-
 29
29
-
 30
30
-
 31
31
-
 32
32
-
 33
33
-
 34
34
-
 35
35
-
 36
36
-
 37
37
-
 38
38
-
 39
39
-
 40
40
-
 41
41
-
 42
42
-
 43
43
-
 44
44
-
 45
45
-
 46
46
-
 47
47
-
 48
48


GE GSD3300D45BB Le manuel du propriétaire
- Catégorie
- Lave-vaisselle
- Taper
- Le manuel du propriétaire
- Ce manuel convient également à
dans d''autres langues
- English: GE GSD3300D45BB Owner's manual
Documents connexes
-
GE GDF510PSJ0SS Le manuel du propriétaire
-
GE GDF540HSF1SS Le manuel du propriétaire
-
-
GE GSD2100VBB Mode d'emploi
-
GE GSD3360KSS Le manuel du propriétaire
-
Hotpoint GSD4060DSS Le manuel du propriétaire
-
GE HDA3640R20SA Le manuel du propriétaire
-
GE PDW8700J10BB Le manuel du propriétaire