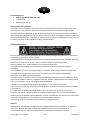
afx light PIXSTRIP40 Le manuel du propriétaire
- Catégorie
- Stroboscopes
- Taper
- Le manuel du propriétaire

PIXEL STRIP BAR
WITH 40 RGB
SMD LEDS
Ref.: PIXSTRIP40 (16-2710)
USER MANUAL
MANUEL D'UTILISATION
BEDIENUNGSANLEITUNG
HANDLEIDING
Imported from China by
LOTRONIC S.A.
Avenue Z. Gramme 9
B-1480 Saintes

©Copyright Lotronic 2018 2 PIXSTRIP40
Contents of the carton:
• PIXEL STRIP BAR WITH 40 RGB SMD LEDS
• 1x RJ45 lead
• 1x User manual
Unpacking Instructions
Immediately upon receiving a fixture, carefully unpack the carton, check the contents to ensure that
all parts are present and have been received in good condition. Notify the freight company
immediately and retain packing material for inspection if any parts appear to be damaged from
shipping or the carton itself shows signs of mishandling. Keep the carton and all packing materials. In
the event that a fixture must be returned to the factory, it is important that the fixture be returned in
the original factory box and packing.
Safety Instructions
Please read these instructions carefully, they include important information about the installation,
usage and maintenance of this product.
• Please keep this User Guide for future reference. If you sell the unit to another user, be sure that
he also receives this instruction booklet.
• This product is intended for indoor use only!
• Always connect the product to a grounded circuit to avoid electrocution.
• To prevent risk of fire or shock, do not expose fixture to rain or moisture. Make sure there are no
flammable materials close to the unit while operating.
• The unit must be installed in a location with adequate ventilation, at least 1m from adjacent
surfaces. Be sure that no ventilation slots are blocked.
• Let the device cool down for 10 minutes prior to servicing it.
• Don't touch the housing during operation as it may be very hot.
• Maximum ambient temperature (Ta) is 104° F (40°C). Do not operate the fixture at temperatures
higher than this.
• In the event of a serious operating problem, stop using the unit immediately. Never try to repair
the unit by yourself. Repairs carried out by unskilled people can lead to damage or malfunction.
Please contact the nearest authorized technical assistance center. Always use the same type of spare
parts.
• Avoid direct eye exposure to the light source while it is on.
Features
PIXSTRIP40 is a linear video fixture for the rental market or fixed installation in clubs, bars and small
stages. The effect is particularly impressive when several units work together to create multiple
configurations in any orientation.
• Almost effortless pixel mapping to configure images and effects
• Up to 16 pcs PIXSTRIP40 can be used with the PIXSTRIP-C
• Easy daisy chain linking by RJ45
• Impressive built-in effects or controlled via DMX / Artnet / Klingnet
• Requires the control unit PIXCOLOR-C
GB

©Copyright Lotronic 2018 3 PIXSTRIP40
• Power & signal transmission via RJ45 (lead included)
• Mechanical link system between two bars
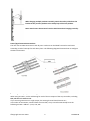
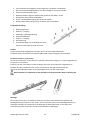
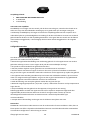
Product Description
1. Fastening knob
2. RJ45 in/out
3. Hanging/mounting bracket
4. Bracket angle adjustment knob
5. RJ45 in/out
6. Safety loop
7. Bracket position adjustment knobs (used to align
end-to-end on truss)
Installation
Unpack all parts carefully and put them on a stable surface.
Connect the unit via a standard RJ45 cable to the output of the strip controller.
Installation of Clear/Frost filter
The unit contains a pre-installed frost filter. Follow the steps below to install the included clear filter.
Remove the 4 screws from the end cap that is not fitted with connectors.
Slide out the installed filter and insert the desired filter.
Put the end cap back in place and secure it with the 4 screws.
Please note: Install the frost filter with the shiny side facing towards the LEDs.
Mounting
The unit comes with an adjustable mounting bracket and a safety loop. The mounting bracket has
three 13mm holes to attach a clamp directly to the mounting bracket and serves as support for either
mounting on the floor or on the wall. The safety loop is used to attach a safety cable.
Mounting Guidelines
1. Before deciding on a location, make sure that the product remains easily accessible for
maintenance and repair.
2. Make sure that the mounting structure or surface can support the weight of the product.
3. When mounting the product overhead, always use a safety cable. Mount the product securely to
a rigging point, such as an elevated platform or a truss.

©Copyright Lotronic 2018 4 PIXSTRIP40
4. When rigging the product onto a truss, you should use a mounting clamp of the appropriate
weight capacity.
5. The bracket adjustment knobs allow for directional adjustment when aiming the product to the
desired angle. Only loosen or tighten the bracket knobs manually. Using tools could damage the
knobs.
6. When mounting the product on the floor, make sure that the product and cables are away from
people and vehicles.
Mounting Instructions
1. Attach the clamp to the mounting bracket.
2. Attach the clamp to the desired structure or surface.
3. Attach the safety cable to the product's safety loop.
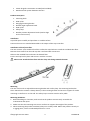
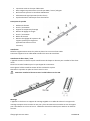
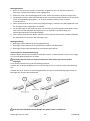
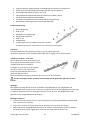
Series Attachment Instructions
The unit can be attached in an end-to-end formation to create a strip up to 4m long from just one
rigging point.
Do not connect more than a total of 4 strips in a row when hanging vertically.
Loosen the safety loop and fastening knob.
Slide the connecting bracket out till it stops and tighten the safety loop.
Slide the 2
nd
strip into the connecting bracket and tighten the fastening knob, then attach the safety
cable.
Be sure to install the safety cable last when attaching the products in series.

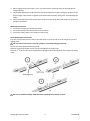
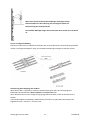
©Copyright Lotronic 2018 5 PIXSTRIP40
When hanging multiple products vertically, attach the safety cable from the
bracket of the previous product to the safety loop of the next product.
Never attach more than 3 items from the initial item when hanging vertically.
Power/Signal Connection Procedure
The unit uses an RJ45 connection to link all ports. Each unit can be linked from end-to-end never
exceeding a total of 16 strips for each daisy chain. The following diagram illustrates how to configure
the data connections.
Addressing of every output when using Art-Net™
When using Art-Net™, set the addressing for each of the 16 outputs of the strip controller, including
Net, Sub-net and Universe 1-4.
If you are using 16 items on a single output, the starting channel should remain at 1.
In the order of connection, outward from the controller, every unit will automatically have the
following Art-Net™ address: 1, 121, 241, 361.

©Copyright Lotronic 2018 6 PIXSTRIP40
To maintain optimum performance and minimize wear, you should clean this product frequently.
Usage and environment are contribution factors in determining the cleaning frequency.
As a rule, clean this product at least twice a month. Dust residues reduce light output performance
and can cause overheating. This can lead to reduced light source life and increase mechanical wear.
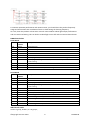
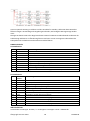
DMX Channel Chart
10-CH Mode
Channel
DMX
address
Description
1CH
0-255
General Dimmer
2CH
0-255
Strobe
3CH
0-255
Red
4CH
0-255
Green
5CH
0-255
Blue
6CH
0-255
Built-in program 1 (multi-color effect. The last one is auto running)
7CH
0-255
Built-in program 2 (single color effect, can be controlled by channel 9. The last one
is auto-running
8CH
0-255
Speed for built-in effects
9CH
0-255
Color for built-in effects
10CH
0-255
Sensitivity of sound control (weak -> strong)
55-CH Mode
Channel
DMX
address
Description
1CH
0-255
General Dimmer
2CH
0-255
Strobe
3CH
0-255
Built-in program 1 (multi-color effect. The last one is auto running)
4CH
0-255
Built-in program 2 (single color effect, can be controlled by channel 9. The last one
is auto-running
5CH
0-255
Speed for built-in effects
6CH
0-255
Color for built-in effects
7CH
0-255
Sensitivity of sound control (week -> strong)
8CH
0-255
Red for 1. Light of 1. Output
9CH
0-255
Green for 1. Light of 1. Output
10CH
0-255
Blue for 1. Light of 1. output
…
55CH
0-255
Blue for 4. Light of 4. output
480-Channel mode:
4 led as a group, 40 leds / 4 = 10 groups,

©Copyright Lotronic 2018 7 PIXSTRIP40
10 groups x 16pcs = 480CH
PixelCh: 40pcs x RGB= 120CH each port,
120 x 4 ports = 480 Ch (each pixel can be controlled)
Cleaning
1. Unplug the product.
2. Wait until it has cooled down to room temperature.
3. Use a vacuum (or dry compressed air) and a soft brush to remove dust collected on the external
vents.
4. Clean all external surfaces with a mild solution of non-ammonia glass cleaner or isopropyl alcohol.
5. Apply a solution directly to a soft, lint-free cotton cloth or a lens cleaning tissue.
Wipe any dirt or grime to the outside edge of the surface. Gently polish the surfaces with the lint-
free cotton cloth or lens cleaning tissue until they are free of haze and lint. Always dry the external
surfaces carefully after cleaning them.
Specifications
Input voltage ............................................................................................. 48V via RJ45 lead
Light source .................................................................................... 40x SMD5050 RGB LEDs
Illuminance ........................................................................................ 1174 NITS (clear filter)
......................................................................................................... 828 NITS (frosted filter)
Pitch ............................................................................................................................ 25mm
Protection rate ............................................................................................................... IP20
Control protocols ............................................................................................. DMX, Art-Net
Art-Net & DMX channels ............................................................................................. 120/8
Viewing angle ................................................................................................................ 120°
Dimensions .............................................................................................. 37 x 95 x 1000mm
Weight ............................................................................................................................. 2kg
IMPORTANT NOTE: Electric products must not be put into household waste. Please bring them to a
recycling centre. Ask your local authorities or your dealer about the way to proceed.

©Copyright Lotronic 2018 8 PIXSTRIP40
Contenu du carton:
• BARRE DE PIXELS AVEC 40 LED SMD RGB
• 1 cordon RJ45
• 1 manuel
Déballage
Dès réception de l’appareil, ouvrez le carton et vérifiez que le contenu est complet et en bon état.
Prévenez immédiatement le transporteur et conservez l’emballage s’il est endommagé. Conservez le
carton et tous les matériaux d’emballage. En cas de retour à l'usine, il est important de renvoyer
l'appareil dans son emballage d'origine.
Consignes de sécurité
Lisez attentivement ce manuel qui contient des informations importantes sur l’installation,
l’utilisation et l’entretien de cet appareil.
• Conservez le manuel pour référence ultérieure. Si l’appareil change un jour de propriétaire,
assurez-vous que le nouvel utilisateur est en possession du manuel.
• Utilisation uniquement à l’intérieur!
• Connectez toujours le produit à un circuit mis à la terre pour éviter l'électrocution.
Afin d’éviter tout risque d’incendie ou de choc électrique, ne pas exposer cet appareil à la pluie ou à
l’humidité. Assurez-vous qu’aucun objet inflammable ne se trouve à proximité de l’appareil pendant
son fonctionnement.
Installez l’appareil à un endroit bien ventilé à une distance minimum de 1m de toute surface.
Assurez-vous que les fentes de ventilation ne sont pas bloquées.
• Laissez l'appareil refroidir pendant 10 minutes avant d'effectuer l'entretien.
• Ne touchez pas le boîtier pendant le fonctionnement car il peut être très chaud.
La température ambiante ne doit pas dépasser 40°C. Ne pas faire fonctionner l’appareil à des
températures supérieures.
En cas de dysfonctionnement, arrêtez immédiatement l’appareil. N’essayez jamais de réparer
l’appareil par vous-même. Une réparation mal faite peut entraîner des dommages et des
dysfonctionnements. Contactez un service technique agréé. Utilisez uniquement des pièces
détachées identiques aux pièces d’origine.
• Ne pas exposer vos yeux à la source lumineuse.
Caractéristiques
Le PIXSTRIP40 est un effet linéaire pour le marché des prestataires et des installateurs qui convient
particulièrement aux clubs, bars et petites scènes. Son effet prend toute sa dimension lorsque
plusieurs PIXSTRIP40 sont combinés pour former des ensembles animés dans toutes les
configurations et orientations possibles.
• Créez des images et des effets par pixel mapping
• Le contrôleur PIXSTRIP-C permet de commander jusqu'à 16 PIXSTRIP40
F

©Copyright Lotronic 2018 9 PIXSTRIP40
• Connexion aisée en série par câbles RJ45
• Effet intégrés impressionnants ou créés par DMX / Artnet / Klingnet
• Ne fonctionne qu'avec le contrôleur PIXCOLOR-C
• Alimentation & signal par RJ45 (cordon fourni)
• Système de liaison mécanique entre deux barres
Description du produit
1. Molette de fixation
2. Entrée / sortie RJ45
3. Support de suspension/montage
4. Bouton de réglage de l'angle
5. Entrée / sortie RJ45
6. Œillet de sécurité
7. Boutons de réglage de la position du
support (utilisés pour aligner les
appareils bout à bout sur une
structure)
Installation
Déballez soigneusement toutes les pièces et placez-les sur une surface stable.
Connectez l'appareil via un câble RJ45 standard à la sortie du contrôleur.
Installation du filtre Clear / Frost
L'appareil contient un filtre frost pré-installé. Suivez les étapes ci-dessous pour installer le filtre clear
inclus.
Retirez les 4 vis de l'embout qui n'est pas équipé de connecteurs.
Faites glisser le filtre installé et mettez le filtre souhaité à sa place.
Remettez le capuchon en place et fixez-le avec les 4 vis.
Attention: Installez le filtre Frost avec le côté brillant vers les LED.
Montage
L'appareil est livré avec un support de montage réglable et un œillet de sécurité. Le support de
montage comporte trois trous de 13 mm pour y fixer directement une attache et sert de support
pour l'installation au sol ou sur le mur. L’œillet de sécurité est utilisée pour attacher un câble de
sécurité.

©Copyright Lotronic 2018 10 PIXSTRIP40
Directives de montage
1. Avant de décider d'un emplacement, assurez-vous que le produit reste facilement accessible
pour l'entretien et la réparation.
2. Assurez-vous que la structure ou la surface de montage peut supporter le poids du produit.
3. Lors du montage du produit au plafond, utilisez toujours un câble de sécurité. Montez le produit
en toute sécurité sur un point d'accrochage, tel qu'une plate-forme surélevée ou une structure.
4. Lorsque vous fixez le produit sur une structure, vous devez utiliser une attache appropriée
capable de supporter le poids.
5. Les boutons de réglage du support permettent un réglage directionnel lorsque le produit est
orienté vers l'angle souhaité. Dévissez ou serrez les molettes uniquement à la main. L'utilisation
d'outils pourrait endommager les molettes.
6. Lors du montage du produit sur le sol, assurez-vous que le produit et les câbles sont hors
d'atteinte des personnes et des véhicules.
Instructions de montage
1. Fixez l'attache sur le support de montage.
2. Fixez l'attache sur la structure ou la surface désirée.
3. Fixez le câble de sécurité à œillet de sécurité du produit.
Instructions de branchement en série
Plusieurs appareils peuvent être reliés en ligne pour créer une bande pouvant atteindre 4 m de
longueur à partir d'un seul point d'attache.
Ne connectez pas plus de 4 appareils d'affilée lorsqu'ils sont suspendus verticalement.
Desserrez l'œillet de sécurité et la molette de fixation.
Faites glisser le support de connexion jusqu'à la butée et resserrez l'œillet de sécurité.
Faites glisser le 2ème appareil dans la barrette de connexion et resserrez la molette de fixation, puis
fixez le câble de sécurité.
Veillez à installer le câble de sécurité en dernier lors de la fixation des produits en série.

©Copyright Lotronic 2018 11 PIXSTRIP40
Lorsque vous suspendez plusieurs appareils verticalement, fixez le câble de
sécurité du support du premier produit sur l’œillet de sécurité de l'appareil
suivant.
N'attachez jamais plus de 4 produits suspendus.
Connexion de l'alimentation / signal
Les appareils sont reliés ensemble par les ports RJ45. Chaque appareil peut être relié bout à bout sans
toutefois pouvoir dépasser un total de 16 appareils pour chaque chaîne. Le diagramme suivant illustre
la configuration des connexions de données.
Adressage de toutes les sorties avec Art-Net™
Lorsque vous utilisez Art-Net ™, réglez l'adressage pour chacune des 16 sorties du contrôleur, y
compris Net, Sub-net et Univers 1-4.
Si vous utilisez 16 éléments sur une seule sortie, le canal de départ doit rester à 1.
Dans l'ordre de connexion, à partir du contrôleur, chaque appareil aura automatiquement l'adresse
Art-Net ™ suivante: 1, 121, 241, 361.

©Copyright Lotronic 2018 12 PIXSTRIP40
Pour maintenir une performance optimale et minimiser l'usure, vous devez nettoyer ce produit
fréquemment. L'utilisation et l'environnement sont déterminant dans la fréquence de nettoyage.
En règle générale, nettoyez ce produit au moins deux fois par mois. Les résidus de poussière réduisent
les performances de la lumière et peuvent provoquer une surchauffe. Cela peut réduire la durée de vie
de la source lumineuse et augmenter l'usure mécanique.
Tableau des canaux DMX
Mode 10 canaux
Canal
Adresse DMX
Description
1CH
0-255
Dimmer général
2CH
0-255
Strobo
3CH
0-255
Rouge
4CH
0-255
Vert
5CH
0-255
Bleu
6CH
0-255
Programme intégré 1 (effet multicolore, le dernier est le fonctionnement
automatique)
7CH
0-255
Programme intégré 2 (effet monocolore, le dernier est le fonctionnement
automatique)
8CH
0-255
Vitesse des effets intégrés
9CH
0-255
Couleur des effets intégrés
10CH
0-255
Sensibilité du contrôle musical (faible -> élevé)
Mode 55 canaux
Canal
Adresse DMX
Description
1CH
0-255
Dimmer général
2CH
0-255
Strobo
3CH
0-255
Rouge
4CH
0-255
Vert
5CH
0-255
Bleu
6CH
0-255
Programme intégré 1 (effet multicolore, le dernier est le fonctionnement
automatique)
7CH
0-255
Programme intégré 2 (effet monocolore, le dernier est le fonctionnement
automatique)
8CH
0-255
Rouge pour la 1ère lumière de la 1ère sortie
9CH
0-255
Vert pour la 1ère lumière de la 1ère sortie
10CH
0-255
Bleu pour la 1ère lumière de la 1ère sortie
…
55CH
0-255
Bleu pour la 4ème lumière de la 4ème sortie

©Copyright Lotronic 2018 13 PIXSTRIP40
Mode 480 canaux
4 LEDs constituent un groupe. 40 LED / 4 = 10 groupes
10 groupes x 16 pcs. = 480 canaux
Pixel CH: 40 x RVB = 120 canaux, 120 x 4 ports = 480 canaux (chaque pixel est contrôlable
individuellement)
Nettoyage
1. Débranchez le produit.
2. Attendez qu'il ait atteint la température ambiante.
3. Utilisez un aspirateur (ou de l'air comprimé sec) et une brosse douce pour enlever la poussière
accumulée sur les évents externes.
4. Nettoyez toutes les surfaces externes avec une solution douce de nettoyant pour vitres sans
ammoniaque ou d'alcool isopropylique.
5. Appliquez une solution directement sur un chiffon de coton doux et non pelucheux ou sur un
chiffon de nettoyage pour lentilles.
Essuyez toute la saleté et la crasse vers le bord extérieur. Polissez délicatement les surfaces avec un
chiffon en coton non pelucheux ou un chiffon de nettoyage pour lentilles jusqu'à ce qu'elles soient
parfaitement propres. Séchez toujours soigneusement les surfaces externes après les avoir
nettoyées.
Caractéristiques techniques
Tension d'entrée ................................................................................. 48V via le câble RJ45
Source de lumière ............................................................................ 40x LED SMD5050 RVB
Luminance ......................................................................................... 1174 NITS (filtre clair)
............................................................................................................ 828 NITS (filtre Frost)
Espacement ................................................................................................................ 25mm
Taux de protection ........................................................................................................ IP20
Protocoles de contrôle ................................................................................... DMX, Art-Net
Canaux Art-Net et DMX .............................................................................................. 120/8
Angle de vision ............................................................................................................... 120°
Dimensions ............................................................................................. 37 x 95 x 1000mm
Poids .............................................................................................................................. 2 kg
NOTE IMPORTANTE: Les produits électriques ne doivent pas être mis au rebut avec les ordures
ménagères. Veuillez les apporter à un centre de recyclage. Renseignez-vous auprès des autorités locales
ou votre revendeur pour connaître la façon de procéder.

©Copyright Lotronic 2018 14 PIXSTRIP40
Verpackungsinhalt
• PIXEL LEISTE MIT 40 RGB SMD LEDS
• 1x RJ45 Kabel
• Bedienungsanleitung
Anweisungen zum Auspacken
Unmittelbar nach Erhalt eines Geräts den Karton vorsichtig auspacken und den Inhalt prüfen, um
sicherzustellen, dass alle Teile vorhanden und in gutem Zustand sind. Benachrichtigen Sie den
Versender sofort und bewahren Sie das Verpackungsmaterial zur Inspektion auf, wenn Teile durch
den Versand beschädigt wurden oder der Karton selbst Anzeichen von Mängeln aufweist. Karton und
alle Verpackungsmaterialien aufbewahren. Falls ein Gerät ins Werk zurückgeschickt werden muss, ist
es wichtig, das Gerät in der Originalverpackung zurückzusenden.
Sicherheitshinweise
Bitte lesen Sie diese Anweisung sorgfältig durch. Sie enthält wichtige Informationen zur Installation,
Verwendung und Wartung dieses Produkts.
• Bitte bewahren Sie dieses Benutzerhandbuch zur späteren Einsichtnahme auf. Wenn Sie das Gerät
verkauft wird, vergewissern Sie sich, dass es auch diese Bedienungsanleitung erhält.
• Dieses Produkt ist nur für den Gebrauch in Innenräumen bestimmt!
• Schließen Sie das Produkt immer an einen geerdeten Stromkreis an, um Stromschläge zu
vermeiden.
• Um das Risiko von Feuer oder Stromschlag zu vermeiden, setzen Sie das Gerät nicht Regen oder
Feuchtigkeit aus. Vergewissern Sie sich, dass sich während des Betriebs keine brennbaren
Materialien in der Nähe des Geräts befinden.
• Das Gerät muss an einem Ort mit ausreichender Belüftung installiert werden, mindestens 1 m von
angrenzenden Flächen entfernt. Vergewissern Sie sich, dass die Lüftungsschlitze nicht blockiert sind.
• Lassen Sie das Gerät vor der Wartung 10 Minuten abkühlen.
• Berühren Sie das Gehäuse während des Betriebs nicht, da es sehr heiß sein kann.
• Die maximale Umgebungstemperatur (Ta) beträgt 40°C. Betreiben Sie das Gerät nicht bei höheren
Temperaturen.
• Im Falle eines ernsthaften Betriebsproblems, hören Sie sofort auf, das Gerät zu benutzen.
Versuchen Sie niemals, das Gerät selbst zu reparieren. Reparaturen, die von Laien durchgeführt
werden, können zu Schäden oder Fehlfunktionen führen. Bitte wenden Sie sich an einen anerkannten
technischen Kundendienst. Verwenden Sie immer die Original-Ersatzteile.
• Niemals direkt in die Lichtquelle blicken, während sie eingeschaltet ist.
Features
PIXSTRIP40 ist eine gerade Lichteffektleiste für Verleihbetriebe oder Festinstallation in Clubs, Bars
und kleinen Bühnen. Der Effekt ist besonders beeindruckend, wenn mehrere Einheiten
zusammenarbeiten, um mehrere Konfigurationen in beliebiger Ausrichtung zu erstellen.
D

©Copyright Lotronic 2018 15 PIXSTRIP40
• Fast müheloses Pixel-Mapping zur Konfiguration von Bildern und Effekten
• Bis zu 16 Stück PIXSTRIP40 können mit dem PIXSTRIP-C verwendet werden
• Einfache Verkettung über RJ45
• Beeindruckende integrierte Effekte oder gesteuert über DMX / Artnet
• Benötigt die Steuereinheit PIXCOLOR-C
• Strom- und Signalübertragung über RJ45 (inkl. Kabel)
• Mechanisches Verbindungssystem zwischen zwei Leuchtstäben
Produktbeschreibung
1. Befestigungsknopf
2. RJ45 Ein- / Ausgang
3. Aufhänge- / Montagehalterung
4. Winkeleinstellknopf
5. RJ45 Ein- / Ausgang
6. Sicherheitsring
7. Feststellschrauben zur Verbindung mit einem
weiteren Leuchtstab am Ende der Leiste
Aufbau
Packen Sie alle Teile sorgfältig aus und legen Sie sie auf eine stabile Oberfläche.
Verbinden Sie das Gerät über ein Standard-RJ45-Kabel mit dem Ausgang des Steuerpults.
Einsetzen des Clear / Frost-Filters
Das Gerät enthält einen vorinstallierten Frostfilter. Gehen Sie wie folgt vor, um den mitgelieferten
Clear-Filter zu installieren.
Entfernen Sie die 4 Schrauben von der Endkappe, die nicht mit Anschlüssen ausgestattet ist.
Schieben Sie den installierten Filter heraus und setzen Sie den gewünschten Filter ein.
Setzen Sie die Endkappe wieder auf und befestigen Sie sie mit den 4 Schrauben.
Bitte beachten Sie: Installieren Sie den Frostfilter mit der glänzenden Seite in Richtung der
LEDs.
Montage
Das Gerät wird mit einer verstellbaren Halterung und einer Sicherheitsschleife geliefert. Die
Montagehalterung hat drei 13-mm-Löcher, um eine Klemme direkt an der Montagehalterung zu
befestigen und dient als Halterung für die Montage auf dem Boden oder an der Wand. Der
Sicherheitsring wird verwendet, um ein Sicherheitskabel zu befestigen.

©Copyright Lotronic 2018 16 PIXSTRIP40
Montagehinweise
1. Bevor Sie sich für einen Standort entscheiden, vergewissern Sie sich, dass das Produkt für
Wartungs- und Reparaturarbeiten leicht zugänglich ist.
2. Stellen Sie sicher, dass die Montagestruktur oder -fläche das Gewicht des Geräts tragen kann.
3. Verwenden Sie bei der Über-Kopf-Montage immer ein Sicherheitskabel. Montieren Sie das Gerät
sicher an einem Befestigungspunkt, z. B. an einer erhöhten Plattform oder an einem
Traversensystem
4. Wenn Sie das Gerät an einem Traversensystem befestigen, sollten Sie eine Montageklemme mit
der entsprechenden Tragfähigkeit verwenden.
5. Die Einstellknöpfe an der Halterung dienen zur Ausrichtung auf den gewünschten Winkel. Lösen
oder ziehen Sie die Schrauben der Halterung nur per Hand fest. Die Verwendung von
Werkzeugen könnte die Knöpfe beschädigen.
6. Wenn Sie das Gerät auf dem Boden aufstellen, achten Sie bitte darauf, dass die Kabel außerhalb
der Reichweite von Personen und Fahrzeugen sind.
Montageanleitung
1. Befestigen Sie die Klemme an der Montagehalterung.
2. Befestigen Sie die Klemme an der gewünschten Struktur oder Oberfläche.
3. Befestigen Sie das Sicherheitskabel am Sicherheitsring des Geräts.
Anweisungen für die Reihenbefestigung
Mehrere Geräte können hintereinander verbunden werden, um einen Streifen von bis zu 4 m Länge
ab nur einem Befestigungspunkt zu bilden.
Verbinden Sie nicht mehr als insgesamt 4 Geräte in einer Reihe, wenn Sie sie vertikal
aufhängen.
Lösen Sie den Sicherheitsring und den Befestigungsknopf.
Schieben Sie die Verbindungsklammer bis zum Anschlag heraus und ziehen Sie den Sicherheitsring
fest.
Schieben Sie das 2. Gerät in die Verbindungsklammer und ziehen Sie die Befestigungsschraube an.
Befestigen Sie dann das Sicherheitskabel.
Bitte das Sicherheitskabel beim Anbringen der Geräte zuletzt zu installieren.

©Copyright Lotronic 2018 17 PIXSTRIP40
Wenn Sie mehrere Geräte vertikal aufhängen, befestigen Sie das
Sicherheitskabel von der Halterung des vorherigen Produkts am
Sicherheitsring des nächsten Geräts.
Bei vertikaler Montage hängen Sie niemals mehr als 3 Geräte ans erste Gerät
an.
Strom- und Signalverbindung
Alle Ports werden über ein RJ45 Kabel verbunden. Bis zu 16 Geräte können hintereinander geschaltet
werden. Das folgende Diagramm zeigt, wie die Datenverbindungen konfiguriert werden müssen.
Adressierung jedes Ausgangs mit Art-Net™
Wenn Sie Art-Net ™ verwenden, stellen Sie die Adressierung für jeden der 16 Ausgänge des
Bandreglers einschließlich ein Netto, Subnetz und Universum 1-4 ein.
Wenn Sie 16 Geräte an einen einzigen Ausgang angeschlossen haben, sollte der Startkanal auf 1
bleiben.
In der Reihenfolge der Verbindung, außerhalb des Controllers, hat jedes Gerät automatisch die
folgende Art-Net ™ -Adresse: 1, 121, 241, 361.

©Copyright Lotronic 2018 18 PIXSTRIP40
Um eine optimale Leistung zu erhalten und den Verschleiß zu mindern, sollten Sie dieses Gerät des
Öfteren reinigen. Verwendung und Umgebung entscheiden, wie häufig das Gerät gereinigt werden
muss.
Reinigen Sie dieses Gerät in der Regel mindestens zweimal im Monat. Staubrückstände reduzieren die
Lichtleistung und können zu Überhitzung führen. Dies kann zu einer verringerten Lebensdauer der
Lichtquelle und zu erhöhtem mechanischem Verschleiß führen.
DMX Kanaltabelle
10-Kanalbetrieb
Kanal
DMX Adresse
Beschreibung
1CH
0-255
Dimmer
2CH
0-255
Stroboskop
3CH
0-255
Rot
4CH
0-255
Grün
5CH
0-255
Blau
6CH
0-255
Eingebautes Programm 1 (Mehrfarbiger Effekt. Der letzte ist Automatikbetrieb)
7CH
0-255
Eingebautes Programm 2 (Einfarbiger Effekt. Der letzte ist Automatikbetrieb)
8CH
0-255
Geschwindigkeit der eingebauten Effekte
9CH
0-255
Farbe für eingebaute Effekte
10CH
0-255
Empfindlichkeit der Musiksteuerung (schwach -> hoch)
55-Kanalbetrieb
Kanal
DMX
Adresse
Beschreibung
1CH
0-255
Dimmer
2CH
0-255
Stroboskop
3CH
0-255
Eingebautes Programm 1 (Mehrfarbiger Effekt. Der letzte ist Automatikbetrieb)
4CH
0-255
Eingebautes Programm 2 (Einfarbiger Effekt. Der letzte ist Automatikbetrieb)
5CH
0-255
Geschwindigkeit der eingebauten Effekte
6CH
0-255
Farbe für eingebaute Effekte
7CH
0-255
Empfindlichkeit der Musiksteuerung (schwach -> hoch)
8CH
0-255
Rot für die 1. Leuchte des ersten Ausgangs
9CH
0-255
Grün für die 1. Leuchte des ersten Ausgangs
10CH
0-255
Blau für die 1. Leuchte des ersten Ausgangs
…
55CH
0-255
Blau für die 4. Leuchte des vierten Ausgangs
480-Kanalbetrieb:
4 LEDs bilden eine Gruppe. 40 LEDs / 4 = 10 Gruppen. 10 Gruppen x 16 St. = 480 Kanäle

©Copyright Lotronic 2018 19 PIXSTRIP40
Pixel CH: 40 St. x RGB – 120 Kanäle pro Port. 120 x 4 Ports = 480 Kanäle (jeder Pixel kann einzeln
gesteuert werden)
Reinigung
1. Trennen Sie das Gerät vom Stromnetz.
2. Warten bis das Gerät auf Raumtemperatur abgekühlt ist.
3. Verwenden Sie einen Staubsauger (oder trockene Druckluft) und eine weiche Bürste, um Staub zu
entfernen, der sich an den externen Entlüftungsöffnungen angesammelt hat.
4. Reinigen Sie alle äußeren Oberflächen mit einer milden Lösung aus ammoniakfreiem Glasreiniger
oder Isopropylalkohol.
5. Tragen Sie die Lösung direkt auf ein weiches, fusselfreies Baumwolltuch oder Reinigungstuch für
Kontaktlinsen.
Wischen Sie Schmutz in Richtung Außenkante der Fläche ab. Reiben Sie die Oberflächen vorsichtig
mit dem fusselfreien Baumwolltuch oder Kontaktlinsenreiniger, bis sie frei von Schmutzbelag und
Fusseln sind. Trocknen Sie die Außenflächen nach dem Reinigen immer sorgfältig ab.
Technische Daten
Eingangsspannung ............................................................................... 48V über RJ45-Kabel
Leuchtmittel .................................................................................. 40x SMD5050 RGB LEDs
Beleuchtungsstärke ........................................................................ 1174 NITS (klarer Filter)
............................................................................................................. 828 NITS (Frostfilter)
Abstand zwischen den LEDs ....................................................................................... 25mm
Schutzfaktor .................................................................................................................. IP20
Steuerprotokolle ............................................................................................. DMX, Art-Net
Art-Net- und DMX-Kanäle .......................................................................................... 120/8
Betrachtungswinkel ....................................................................................................... 120°
Abmessungen ........................................................................................ 37 x 95 x 1000 mm
Gewicht .......................................................................................................................... 2 kg
WICHTIGER HINWEIS: Elektro-Geräte gehören nicht in den Hausmüll. Bringen Sie sie zu einer speziellen
Entsorgungsstelle für Elektrokleingeräte (Wertstoffhof) Weitere Auskünfte erfahren Sie von den
örtlichen Behörden oder Ihrem Fachhändler.

©Copyright Lotronic 2018 20 PIXSTRIP40
Verpakkingsinhoud:
• PIXEL STRIP BAR MET 40 RGB SMD LED'S
• 1x RJ45-kabel
• 1x handleiding
Instructies voor uitpakken
Onmiddellijk na ontvangst van een toestel, pak de doos voorzichtig uit, controleer de inhoud om er
zeker van te zijn dat alle onderdelen aanwezig zijn en in goede staat zijn ontvangen. Breng het
vrachtbedrijf onmiddellijk op de hoogte en bewaar het verpakkingsmateriaal voor inspectie als er
onderdelen lijken te zijn beschadigd door verzending of de doos zelf tekenen vertoont van verkeerd
gebruik. Bewaar de doos en alle verpakkingsmaterialen. In het geval dat een toestel naar de fabriek
moet worden teruggebracht, is het belangrijk dat het toestel wordt teruggebracht in de originele
verpakking.
Veiligheidsinstructies
Lees deze instructies aandachtig door, ze bevatten belangrijke informatie over de installatie, het
gebruik en het onderhoud van dit product.
• Bewaar deze gebruikershandleiding voor toekomstig gebruik. Als u het apparaat aan een andere
gebruiker verkoopt, moet u ervoor zorgen dat hij ook dit instructieboekje ontvangt.
• Dit product is alleen bedoeld voor gebruik binnenshuis!
• Sluit het product altijd aan op een geaard circuit om elektrocutie te voorkomen.
• Stel het toestel niet bloot aan regen of vocht om het risico op brand of schokken te voorkomen.
Zorg ervoor dat er geen ontvlambare materialen in de buurt van het apparaat zijn tijdens het gebruik.
• Het apparaat moet worden geïnstalleerd op een locatie met voldoende ventilatie, op ten minste 1
meter van aangrenzende oppervlakken. Zorg ervoor dat er geen ventilatiesleuven zijn geblokkeerd.
• Laat het apparaat 10 minuten afkoelen voordat u het onderhoudt.
• Raak de behuizing niet aan tijdens gebruik omdat deze erg heet kan zijn.
• Maximale omgevingstemperatuur (Ta) is 104° F (40°C). Gebruik het armatuur niet bij temperaturen
hoger dan dit.
• Stop onmiddellijk met het gebruik van het apparaat in het geval van een ernstig
bedieningsprobleem. Probeer het apparaat nooit zelf te repareren. Reparaties uitgevoerd door
ongeschoolde personen kunnen leiden tot schade of storingen. Neem contact op met het
dichtstbijzijnde erkende technische assistentiecentrum. Gebruik altijd hetzelfde type
reserveonderdelen.
• Vermijd directe blootstelling van de ogen aan de lichtbron terwijl deze aan staat.
Kenmerken
PIXSTRIP40 is een lineaire video-armatuur voor de verhuurmarkt of vaste installatie in clubs, bars en
kleine podia. Het effect is bijzonder indrukwekkend wanneer verschillende eenheden samenwerken
om meerdere configuraties in elke richting te creëren.
NL
La page est en cours de chargement...
La page est en cours de chargement...
La page est en cours de chargement...
La page est en cours de chargement...
-
 1
1
-
 2
2
-
 3
3
-
 4
4
-
 5
5
-
 6
6
-
 7
7
-
 8
8
-
 9
9
-
 10
10
-
 11
11
-
 12
12
-
 13
13
-
 14
14
-
 15
15
-
 16
16
-
 17
17
-
 18
18
-
 19
19
-
 20
20
-
 21
21
-
 22
22
-
 23
23
-
 24
24


afx light PIXSTRIP40 Le manuel du propriétaire
- Catégorie
- Stroboscopes
- Taper
- Le manuel du propriétaire
dans d''autres langues
- Deutsch: afx light PIXSTRIP40 Bedienungsanleitung
- Nederlands: afx light PIXSTRIP40 de handleiding
Documents connexes
-
 afx light PIXCOLOR Manuel utilisateur
-
 afx light PROWASH-RGB540 Le manuel du propriétaire
-
 afx light SPOTY60LED Manuel utilisateur
-
 afx light PRO-STROBE Le manuel du propriétaire
-
 afx light COMET-FX Le manuel du propriétaire
-
 afx light DJ-TRUSS4 Le manuel du propriétaire
-
 afx light LED-EGG Le manuel du propriétaire


Autres documents
-
Orion ORFX107 Le manuel du propriétaire
-
Chauvet OVATION Guide de référence
-
-
 Ibiza Light BOX-HEX4 Le manuel du propriétaire
-
 Ibiza Light PARLED1212IR Manuel utilisateur
-
 Ibiza Light PARLED712IR Manuel utilisateur
-
EuroLite 5250083P Manuel utilisateur
-
 Ibiza Light LED-LAMP-BIG Le manuel du propriétaire


