Hamilton Beach 49911 Mode d'emploi
- Catégorie
- Cafetières
- Taper
- Mode d'emploi

Smart FlexBrew
TRIO Coffee Maker
Cafetière
intelligente
FlexBrew TRIO
Cafetera inteligente
FlexBrew TRIO
READ BEFORE USE
English ����������������������������������� 2
Visit hamiltonbeach.com for our
complete line of products and
Use and Care Guides – as well
as delicious recipes, tips, and to
register your product online.
LIRE AVANT UTILISATION
Français �������������������������������� 16
Rendez-vous sur
hamiltonbeach.ca pour notre liste
complète de produits et de nos
manuels utilisateur – ainsi que
nos délicieuses recettes et nos
conseils.
LEA ANTES DE USAR
Español �������������������������������� 30
Visite hamiltonbeach.com (EE. UU.)
o hamiltonbeach.com.mx (México)
para ver otros productos de Hamilton
Beach o para contactarnos.
Le invitamos a leer cuidadosamente este
instructivo antes de usar su aparato.

2
IMPORTANT SAFEGUARDS
1. Read all instructions.
2. This appliance is not intended for use by persons (including
children) with reduced physical, sensory, or mental capabilities,
or lack of experience and knowledge, unless they are closely
supervised and instructed concerning use of the appliance by a
person responsible for their safety.
3. Close supervision is necessary when any appliance is used by or
near children. Cleaning and user maintenance shall not be made
by children without supervision. Children should be supervised to
ensure that they do not play with the appliance.
4. Do not touch hot surfaces. Use handles or knobs. Care must be
taken, as burns can occur from touching hot parts or from spilled,
hot liquid.
5. To protect against electric shock, do not place cord, plug, or coffee
maker in water or other liquid.
6. Unplug from outlet when the coffee maker is not connected to
WiFi, is not in use, and before cleaning. Allow to cool before
putting on or taking off parts and before cleaning the appliance.
7. Coffee maker must be operated on a flat surface away from the
edge of counter to prevent accidental tipping.
8. Do not operate any appliance with a damaged supply cord or
plug, or after the appliance malfunctions or has been dropped or
damaged in any manner. Supply cord replacement and repairs
must be conducted by the manufacturer, its service agent, or
similarly qualified persons in order to avoid a hazard. Contact
Customer Service for information on examination, repair, or
adjustment as set forth in the Limited Warranty.
9. The use of accessory attachments not recommended by the
appliance manufacturer may cause injuries.
10. Use only the carafe provided with the appliance.
11. Do not use outdoors.
12. Do not let cord hang over edge of table or counter or touch hot
surfaces, including stove.
13. Do not place coffee maker on or near a hot gas or electric burner
or in a heated oven.
14. The carafe is designed for use with this coffee maker. It must never
be used on a range top or in a microwave oven.
15. Do not set a hot carafe on a wet or cold surface.
16. Do not use a cracked carafe or one with loose or weakened
handle.
17. Do not clean carafe with cleansers, steel wool pads, or other
abrasive materials.
18. Be certain carafe lid is securely in place during brew cycle and
when pouring coffee. Do not use force when placing lid on carafe.
19. To disconnect coffee maker, turn controls to off ( ) and then
remove plug from wall outlet. To unplug, grasp the plug and pull
from the outlet. Never pull from the power cord.
20. Do not use appliance for other than intended use.
21. Scalding may occur if the lid is lifted during the heating cycle.
22. WARNING! Risk of Fire or Electric Shock. Do not remove the
bottom cover. No user-serviceable parts are inside. Repair should
be done by authorized service personnel only.
23. Do not place coffee maker in a cabinet when in use.
24. CAUTION! Cut Hazard: Removable single-serve pod holder
contains a sharp needle. Use caution when handling.
25. CAUTION! Cut Hazard: Piercing needle is sharp. Use caution
when cleaning.
26. WARNING! To avoid hot water spraying from the piercing needle,
do not lift the lid during the brew process.
27. Keep-warm plate may remain hot after the coffee maker is turned
off.
When using electrical appliances, basic safety precautions should always be followed to reduce the risk of fire, electric shock,
and/or injury to persons, including the following:
SAVE THESE INSTRUCTIONS

3
Other Consumer Safety Information
This appliance is intended for household use only.
w WARNING Electrical Shock Hazard: This appliance is provided
with a polarized plug (one wide blade) to reduce the risk of electric
shock. The plug fits only one way into a polarized outlet. Do not defeat
the safety purpose of the plug by modifying the plug in any way or by
using an adapter. If the plug does not fit fully into the outlet, reverse the
plug. If it still does not fit, have an electrician replace the outlet.
The length of the cord used on this appliance was selected to reduce
the hazards of becoming tangled in or tripping over a longer cord. If a
longer cord is necessary, an approved extension cord may be used.
The electrical rating of the extension cord must be equal to or greater
than the rating of the appliance. Care must be taken to arrange the
extension cord so that it will not drape over the countertop or tabletop
where it can be pulled on by children or accidentally tripped over.
To avoid an electrical circuit overload, do not use another
high-wattage appliance on the same circuit with this appliance.
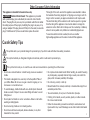
This symbol alerts you to potential danger for personal injury if you fail to read and follow these safety precautions.
This symbol reminds you that glass is fragile and can break, which could result in personal injury.
This symbol instructs you to read the use and care manual before operating the coffee maker.
• Do not use a cracked Carafe or a Carafe having a loose or weakened
handle.
• This Carafe is designed to be used only on the Keep-Warm Plate of
your Coffee Maker. Do not use on a gas or electric rangetop, or in a
microwave or conventional oven.
• To avoid breakage, handle Carafe with care. Avoid impact. Glass will
break as a result of impact. Use care when filling with water to avoid
hitting faucet.
• Do not place hot Carafe on cool or wet surface. Allow to cool before
washing or adding liquids.
• Do not set empty Carafe on a hot heating surface.
• Do not clean with steel wool pads, abrasive cleanser, or any other
materials that may scratch.
• Do not place hands inside Carafe. When handling, be careful if wearing
any hand jewelry, especially diamond rings. Jewelry can scratch the
glass, which increases possibility of breakage.
• Do not bump, scratch, or boil dry.
• Discard Carafe if it is cracked, scratched, or heated while empty for an
extended period of time.
• To avoid accidents, do not pour in the direction of people.
• If stirring in the Carafe, use only wooden, plastic, or rubber utensils.
Do not use metal utensils.
• Follow the above safety precautions carefully to avoid serious burn
injuries which may result if breakage occurs while Carafe holds heated
liquids.
Carafe Safety Tips

48
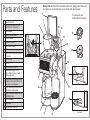
Parts and Features
To order parts, visit:
hamiltonbeach.com/parts
Before rst use: Wash all removable parts in hot, soapy water. Rinse and
dry. Brew one cycle with water on each side and discard water.
1Carafe Side Lid
2
Carafe Water Reservoir (with
markings for measuring)
3Brew Basket
4Swivel Shower Head
5Control Panel
6Carafe (12 cups)
7Keep-Warm Plate
8Base
9Removable Cup Rest/Storage
Container
10
Cord Storage
11 Funnel
12
Single-Serve
Lid Latch
13 Removable Single-Serve
56 oz. Water Reservoir with
Removable Lid
14 Removable Single-Serve Brew
Basket for Ground Coffee with
Hinged Lid and Handle
15
Gray Removable Single-Serve
Pod Holder with Handle
16 Gray Removable Needle Holder
with Black Seal
17
Piercing Needle
18 Black Seal
19 Single-Serve Side Lid
15
14
10
12
13
(on back)
1
6
19
2
3
5
9
11
16
17
18
7
4

5
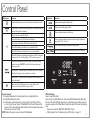
Control Panel
How to Connect
1. Download Alexa App from Apple App Store or Google Play Store.
2. Plug Coffee Maker into outlet.
3. In Alexa App, select devices icon in lower right corner. Next, click the +
icon in top right corner. Select “Coffee Maker” from the list of devices that
appears. Then, select Hamilton Beach and the model number. Follow screen
instructions to connect to WiFi.
NOTE: Setup QR code is located on back of Coffee Maker.
Display Icon Function
Press to start/stop brew cycle or manually turn Keep Warm mode off.
Power Status – White indicator will light when not brewing. Red LED
indicator will light when brewing.
Press to set up or erase WiFi profile.
During QR code setup, WiFi indicator will flash red.
During user-guided setup, WiFi indicator will flash pink.
When WiFi indicator is solid blue, it is connected to WiFi.
When WiFi indicator is dim white, it is not connected to WiFi.
When WiFi indicator is alternating red and blue, the WiFi connection
has been lost. See “Troubleshooting – WiFi” section on page 11.
Press after Coffee Maker is filled with water and coffee to enable
remote brew cycle. NOTE: This will lock the chosen brew type
(single or carafe).
When READY TO BREW is green it indicates a brew can be remote
started by Alexa App, voice command, or a routine.
When READY TO BREW is white is indicates a remote brew cycle
cannot be started.
When connected to WiFi, press to turn clock display on/off.
When not connected to WiFi, press to set time.
WiFi Information
How to erase WiFi profile:
Press and hold (WiFi) Button for 15 seconds. WiFi LED will quickly flash pink,
then turn off, reset and flash red slowly. Or, visit settings page of Alexa App. You
may also unregister the Coffee Maker through the app via the Alexa App settings
page.
• Supports routers with WEP, WPA, WPA2 802.11 b/g/n.
• WiFi problems? See “Troubleshooting – WiFi” section on page 11.
Display Icon Function
Press to select regular strength coffee.
Press to select bold strength coffee.
Press to set brew mode to carafe brew.
Press to set brew mode to single serve and to select single-serve
cup size (8, 10, 12, or 14 oz).
When illuminated indicates brewer is making coffee.
When illuminated indicates brewer is keeping carafe coffee warm.

6
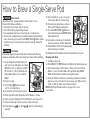
How to Brew a Single-Serve Pod
w WARNING Burn Hazard.
If overflow occurs, unplug and allow coffee maker to cool.
To avoid hot coffee overflowing:
• Fully insert cup or travel mug on cup rest.
• Do not lift lid during the brewing process.
• Use appropriate sized cup or travel mug for your brew size.
• If brew cycle is stopped early, the coffee must be drained. Return
cup or travel mug to cup rest. Press BREW NOW ( ) Button. Failure
to drain the cup or travel mug can cause the next cup brewed to
overflow.
w CAUTION Cut Hazard.
Removable single-serve pod holder has a sharp needle. Piercing
needle on underside of lid is also sharp. Use caution when handling.
1. Lift up Single-Serve Water Reservoir
and remove Lid. Add water to at least
MIN ll line (15 oz. [444 mL]) or MAX
ll line (56 oz. [1.65 L]). Add Lid and
place Water Reservoir on to Coffee
Maker.
2. Plug into outlet.
3. Press Single ( ) Button to select
8 or 10 oz for best avor.
4. Lift Lid Latch until Lid stays in place.
5. Place Gray Removable Single-Serve Pod Holder in Funnel.
6. Place a pod into Single-Serve Pod Holder. Do not remove foil.
7. Close Lid and snap in place to pierce single-serve pod.
8. Press Regular ( ) or Bold ( ) button for desired brew
strength.
9. Use Cup Rest for a cup or mug and
remove Cup Rest for a travel mug.
10. To brew later using Alexa, continue
below with “Brewing with Alexa”.
11. Or, press BREW NOW ( ) Button to
start coffee brewing and BREW NOW
will illuminate red.
12. As machine is brewing, Control Panel
will show volume of coffee dispensed.
13. Coffee Maker will shut off automatically
when brewing is complete.
14. Single-Serve Pod Holder should be rinsed after every use.
Brewing with Alexa:
1. Complete steps 1–9.
2. Press READY TO BREW Button and Button will illuminate green.
3. Say to Alexa App, or Echo device, “Alexa, turn on my Coffee
Maker” or turn on Coffee Maker through Alexa App. BREW
NOW will illuminate red when brewing has begun.
4. Economy Mode: Customize your brewing experience in Alexa
App or by voice command. To save energy, turn ON economy
mode, or OFF for faster, more frequent brews.
NOTE: Visit Alexa Phrases section, on page 9, for more
commands.

7
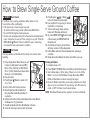
How to Brew Single-Serve Ground Coffee
w CAUTION Cut Hazard.
Piercing needle on underside of lid is sharp. Use caution when
handling.
w WARNING Burn Hazard.
If overflow occurs, unplug and allow coffee maker to cool.
To avoid hot coffee overflowing:
• Fully insert cup or travel mug on cup rest.
• To avoid overflow, keep ground coffee below MAX fill line.
• Do not lift lid during the brewing process.
• If brew cycle is stopped early, the coffee must be drained. Return
cup or travel mug to cup rest. Place a mug on cup rest. Press the
BREW NOW ( ) Button. Failure to drain the cup or travel mug
can cause the next cup brewed to overflow.
1. Lift up Single-Serve Water Reservoir and
remove Lid. Add water to at least MIN
ll line (15 oz. [444 mL]) or MAX ll line
(56 oz. [1.65 L]). Add Lid and place Water
Reservoir on to Coffee Maker.
2. Plug into outlet.
3. Press Single ( ) Button to select 8, 10,
12, or 14 oz.
4. Lift Lid Latch until Lid stays in place.
5. Open Single-Serve Brew Basket Lid;
then place Removable Brew Basket on
countertop.
6. Add ground coffee to Removable Single-Serve Brew Basket:
3 tablespoons (15 g) maximum.
7. Close Brew Basket Lid. Place Brew Basket in Funnel.
8. Close Lid and snap in place to latch Lid closed.
9. Press Regular ( ) or Bold ( )
button for desired brew strength.
10. Use Cup Rest for a cup/mug, or remove
Cup Rest for a travel mug.
11. To brew later using Alexa, continue
below with “Brewing with Alexa”.
12. Or, press BREW NOW ( ) Button to start
coffee brewing and BREW NOW will
illuminate red.
13. As machine is brewing, Control Panel
will show volume of coffee dispensed.
14. Coffee Maker will shut off automatically when brewing is
complete.
15. Single-Serve Brew Basket should be rinsed after every use.
Brewing with Alexa:
1. Complete steps 1–10.
2. Press READY TO BREW Button and Button will illuminate green.
3. Say to Alexa App, or Echo device, “Alexa, turn on my Coffee
Maker” or turn on Coffee Maker through Alexa App. BREW
NOW will illuminate red when brewing has begun.
4. Economy Mode: Customize your brewing experience in Alexa
App or by voice command. To save energy, turn ON economy
mode, or OFF for faster, more frequent brews.
NOTE: Visit Alexa Phrases section, on page 9, for more commands.

8
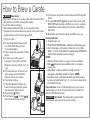
How to Brew a Carafe
1. Plug into outlet.
2. Lift Lid. Rotate Swivel Shower Head
over Carafe Water Reservoir and
remove Brew Basket.
3. Place a basket-style paper filter in Brew
Basket.
4. For each cup of coffee, place 1
tablespoon (5 g) of coffee into filter.
Maximum capacity is 60 g for up to 12
cups.
5. Fill Carafe with up to 12 cups of cold
water and pour into Carafe Water
Reservoir. Place Lid on Carafe.
6. Place Carafe on Base.
7. Place Brew Basket into holder and
lower Lid. Shower Head will go back
into place when Lid is lowered.
8. Press Carafe ( ) Button.
9. Press Regular ( ) or Bold ( )
button for desired brew strength.
w WARNING Burn Hazard.
If filter basket overflow occurs, unplug coffee maker and allow coffee
in filter basket to cool before removing filter basket.
To avoid hot coffee overflowing:
• When using decaffeinated coffee, do not exceed the coffee
manufacturer’s recommended serving amount. Use only the carafe
supplied with your unit or its exact replacement.
10. To brew later using Alexa, continue below with “Brewing with
Alexa”.
11. Or, press BREW NOW ( ) Button to start coffee brewing and
BREW NOW will illuminate red. When brew cycle is complete,
Coffee Maker will automatically shut off after selected Keep
Warm time.
12. Brew Basket and Carafe should be rinsed after every use.
Brewing with Alexa:
1. Complete steps 1–9.
2. Press READY TO BREW Button and Button will illuminate green.
3. Say to Alexa App, or Echo device, “Alexa, turn on my Coffee
Maker” or turn on Coffee Maker through Alexa App. BREW NOW
will illuminate red when brewing has begun.
NOTES:
• Visit Alexa Phrases section, on page 9, for more commands.
• Bold ( ) mode will require additional time to complete a
brewing cycle.
• Coffee Maker remembers last brew strength selected. If
unplugged, Coffee Maker defaults to Regular ( ).
• Keep Warm mode: Customize Keep Warm time in Alexa App or
by voice command. Select from 1, 2, 3, or 4 hours to keep coffee
warm (default 2 hours).
Pause and Serve: To serve coffee during brewing cycle, remove
Carafe and pour a cup. By removing Carafe, flow of coffee from
bottom of Filter Basket will stop.
w CAUTION Burn Hazard. The carafe must be replaced within
20 seconds of being removed to prevent overflow.

9
Notes and Tips
• If Single-Serve Lid is opened after BREW NOW ( ) Button was pressed,
discard contents of cup or travel mug. Discard used pod. Add new pod and
press BREW NOW ( ) Button to restart brewing cycle.
• Use only cold water in Reservoir. Do not use hot water.
• Do not reheat coffee in machine.
• Do not use creamer or nondairy creamer in Reservoir.
• After brewing hot cocoa single-serve pods, immediately brew a water-only
cycle without a single-serve pod to avoid possibility of clogging Piercing
Needle.
• Press BREW NOW ( ) Button again to stop brewing midcycle.
• If CLOSE LId scrolls on Control Panel, Lid is not closed. Lower Lid until it clicks
to lock. Press BREW NOW ( ) Button.
• Do not brew coffee without Removable Needle Holder locked into place.
• Do not use hot cocoa powder or mix in Brew Basket.
For Best-Tasting Coffee
• All coffees are made from either arabica beans or robusta beans, or some
combination of both. Arabica beans are slightly more expensive, but tend to
produce better-tasting coffee.
• Ground coffee will become stale much faster than whole beans. If buying
preground coffee, choose a package with latest expiration date or a smaller
quantity.
• If grinding whole beans, set your coffee grinder on a fine/medium grind. This
will yield best-tasting grounds. Try to use freshly ground coffee within about a
week of grinding.
• Using a water filter, filtered water, or bottled water will yield better-tasting
coffee than tap water.
• Use approximately 1 tablespoon (5 g) of grounds for each cup of coffee being
made. To avoid overflow, use slightly less grounds (3/4 tablespoon [4 g])
when brewing finely ground coffee, decaf, or flavored coffees.
• Make sure your Coffee Maker is clean. See “Care and Cleaning” section.
Alexa Phrases
READY TO BREW must be green to use any “on” phrase.
To start brewing
Alexa, turn on Coffee Maker.
Alexa, turn Coffee Maker on.
To turn off
Alexa, turn off Coffee Maker.
Alexa, turn Coffee Maker off.
To find out if coffee is ready or brewing
Alexa, what is Coffee Maker brew status?
Alexa, what is Coffee Maker brew format?
To find out how long has it been since coffee was brewed
Alexa, what is Coffee Maker time since brew?
Alexa, what is Coffee Maker coffee freshness?
To find out or change brew strength
Alexa, what is Coffee Maker brew strength?
Alexa, set Coffee Maker brew strength to regular (bold).
Alexa, set Coffee Maker to regular (bold).
To find out or change Economy Mode
Alexa, is Coffee Maker Economy mode set to on (off)?
Alexa, set Coffee Maker Economy mode to on (off).
To find out or change Keep Warm
Alexa, what is Coffee Maker Keep Warm?
Alexa, set Coffee Maker Keep Warm to 1 (2, 3, or 4) hour(s).
To check if cleaning is required
Alexa, is Coffee Maker cleaning required?
Troubleshooting Alexa Phrases
• Speak clearly when using Alexa phrases.
• Alexa may hear differently than intended due to a noisy environment or the
location of Echo or Dot within room.
• Changing name of the Coffee Maker can cause Alexa difficulties in
understanding phrases. Example: Alexa does not like names that are
combination words; instead of “Coffeemaker” use “Coffee Maker”, or instead
of “Java1” use “Java One”. Alexa may also have issues with common names,
as she may think you’re interested in an internet search.
• If “Coffee Maker” name is changed then replace “Coffee Maker” with new
name when using Alexa Phrases.
• Occasionally, there maybe a short pause in Alexa capability due to system
maintenance.

10
Care and Cleaning
w WARNING Electrical Shock Hazard.
Do not immerse cord, plug, or coffee maker in any liquid.
w WARNING Burn Hazard.
Failure to allow coffee maker to cool down may cause hot water or
coffee to spray from the piercing needle. Use caution when cleaning.
w CAUTION Cut Hazard.
Removable single-serve pod holder has a sharp needle. Piercing
needle on underside of lid also is sharp. Use caution when handling.
To Clean Carafe Side:
1. Plug into outlet.
2. Press Carafe ( ) Button.
3. Pour 2 cups (473 mL) of plain white vinegar into Carafe Water
Reservoir. Place Carafe underneath to catch vinegar.
4. Press BREW NOW ( ) Button once. After 30 seconds, press
BREW NOW ( ) Button again to stop brewing and allow vinegar
to clean. After 30 minutes, press BREW NOW ( ) Button and
allow it to finish brew cycle. When brew cycle is finished, empty
Carafe and rinse. Run 2-3 additional cycles, using cold tap water.
Carafe side is cleaned and ready to brew coffee.
To Clean Single-Serve Side:
1. Remove Single-Serve Water Reservoir and discard water.
Add 1 cup (273 mL) plain vinegar to Reservoir and return to
place.
2. Plug into outlet.
3. Press Single ( ) Button to select 8 oz.
4. Place a 10 oz (295 mL) or larger mug on Removable Cup Rest.
5. Press BREW NOW ( ) Button.
6. When solution starts dispensing, press BREW NOW ( ) Button
again to stop brewing and allow vinegar to clean.
7. After 30 minutes, press BREW NOW ( ) Button and allow it to
finish brew cycle.
8. Empty Reservoir and fill with cold water; run 2-3 additional
cycles. Unit is cleaned and ready to brew coffee.
General Cleaning
1. Unplug and allow to cool.
2. Hand wash all removable parts in hot, soapy water. Rinse
and dry or wash in top rack only of dishwasher. DO NOT use
“SANITIZE” setting when washing in dishwasher. “SANITIZE”
cycle temperatures could damage your product.
3. Wipe outside of Coffee Maker with a soft damp cloth.
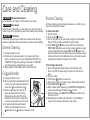
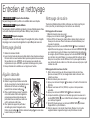
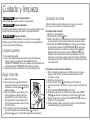
Clogged Needle
1. Unplug and allow to cool.
2. Remove Gray Removable Needle Holder
in Lid by turning counterclockwise from
locked icon ( ) to unlocked icon ( ).
3. Bend a small paper clip. Insert tip of
paper clip through hole of Piercing
Needle and up into shaft of Piercing
Needle, then hold under running water
to ensure grounds have been removed.
4. To replace Gray Removable Needle
Holder, insert tab between lock icon
() and unlock icon ( ) and turn clockwise to lock.
All coffee makers should be cleaned at least once a month (once a
week for areas with hard water).
Routine Cleaning

11
Troubleshooting – WiFi
WiFi indicator is flashing red and blue.
• Loss of power. Wait a few minutes and your Coffee Maker will
automatically reconnect to internet.
• Name or password to WiFi access changed. Reconnect with QR code
or user-guided internet setup.
• Loss of internet service. Contact your ISP to verify any reported
outages.
WiFi indicator is not solid blue.
• Coffee Maker is not connected to internet. Reconnect Coffee Maker
to internet with QR code or user-guided internet setup.
QR code internet setup (preferred setup)
1. Before starting, have name and password to your WiFi access in
case it’s needed.
2. Plug in Coffee Maker and perform a factory reset (see Factory
Reset at right).
3. Make sure Alexa App is on your device (download from Apple
App Store or Google Play Store).
4. In Alexa App, select devices icon along bottom.
5. Next, click the + icon in top right corner.
6. Choose “Add Device”, then select “Coffee Maker” from list of
devices that appear.
7. Select “Hamilton Beach,” then select your model.
8. Allow Alexa App to use Bluetooth and camera so you can scan
QR code on back of Coffee Maker, then review privacy policy and
terms of use and tap “Next”.
9. Make sure WiFi indicator is flashing red. Follow instructions on
App to connect Coffee Maker.
10. When finished, WiFi indicator should be solid blue.
NOTE: For your security, you have 5 minutes to complete setup
process before Coffee Maker turns off WiFi access. If WiFi indicator
stops flashing red, unplug and plug back in to restart 5-minute setup
timer again.
Alternative user-guided internet setup
If QR code is missing from back of Coffee Maker or is damaged,
follow these steps.
1. Complete steps 1-8 from QR code internet setup.
2. On Alexa App page called “Locate the QR code for your Hamilton
Beach Coffee Maker”, select “Don’t have a barcode.”
3. On Coffee Maker, press and hold WiFi Button for 3 seconds until
Button flashes pink.
4. Then press “Next” in App and follow remaining instructions.
5. When finished, WiFi indicator should be solid blue.
Factory Reset
1. While plugged in, press and hold (WiFi) Button for 15 seconds.
WiFi indicator will flash pink before turning off.
2. Release WiFi Button and after 5 seconds, Button will slowly flash
red. Then restart QR code or user-guided setup.
NOTE: Factory Reset will erase your internet connection information.
Close and reopen Alexa App to confirm deletion of Coffee Maker.

12
Troubleshooting – Single-Serve Side
Coffee Maker will not brew/coffee not dispensing.
• Piercing Needle may be clogged. Always remove Gray Removable
Needle Holder. Clean Piercing Needle in Lid of Coffee Maker as shown
on page 10, or visit hamiltonbeach.com.
• Mineral deposits have formed. Clean Coffee Maker following directions
in Care and Cleaning section.
• Too little water. Need 15 oz. (444 mL) or more.
Coffee tastes bad.
• Too much water was added or too much or too little ground coffee was
added. Change ratio of water to coffee grounds or use less water with
coffee pods.
• Poor coffee quality and freshness.
• Poor water quality. Use filtered or bottled water.
• Soft water causes poor coffee extraction, which leads to poor tasting
coffee. Use filtered, spring, or bottled water.
Coffee sediment in cup.
• Try a coarser grind of coffee, or add a #1 paper cone coffee filter to
Removable Brew Basket. Make sure hinged Lid is closed on Removable
Brew Basket.
Water on counter under unit.
• Overfilled Water Reservoir. Do not add more than 56 oz. (1.65 L) of water.
Some mugs/cups do not pour cleanly and can dribble water down side
of cup and onto counter.
Bubbles in Reservoir indicate high pressure. One of the following occurred.
• Lid opened during brew or after FIL H2O error. Don’t open Lid during
brewing and keep Lid closed for 1 minute after FIL H2O error.
• Needle clogged. Follow “Clogged Needle” instructions on page 10, or
visit hamiltonbeach.com.
• Brew Basket loaded with too much fine grind coffee. Use a lesser amount
of ground coffee. 3 tablespoons (15 g) is maximum amount of grounds
to brew.
Control Panel notifications.
• CLOSE LId: Coffee Maker Lid is not closed properly. Push Lid down to
lock into place.
• NEEDLE: Needle is clogged or Brew Basket is overloaded. Do not fill
Brew Basket above MAX fill line. Always remove Gray Removable
Needle Holder and follow “Clogged Needle” instructions on page 10, or
visit hamiltonbeach.com for video cleaning instructions.
• FIL H2O: Not enough water. Add water to Single-Serve Water Reservoir
and press BREW NOW ( ) Button to clear Control Panel. Press BREW
NOW ( ) Button to restart brew cycle.
Coffee overflows from Brew Basket.
• Use Removable Brew Basket with Lid for ground coffee.
• Use less ground coffee. 3 tablespoons (15 g) is maximum amount of
grounds to brew.
• When using whole bean coffee, a standard automatic drip coffee grind
will yield best results. Be careful not to overgrind, since very finely
ground coffee can cause overflow.
• Black Seal around Needle in Removable Needle Holder is missing.
Carefully place seal around needle and push until in place.
Coffee overflows from travel mug or regular mug.
• Empty mug after manually stopping brew cycle. Press BREW NOW
() Button to start a new brewing cycle.
Single-serve pod bursts.
• There is variability in single-serve pod manufacturing process which
causes some types of single-serve pods to be weaker at seams so foil
seal fails. Try a different brand.
• If you are using softened water or live in an area where your tap water
is naturally soft, this can cause single serve pod issues and filter basket
overflows. Use filtered, spring, or bottled water.

13
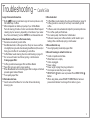
Longer than normal brew time.
• Bold ( ) brewing cycle takes longer to brew to produce a rich,
full bodied cup of coffee.
• Mineral deposits can build up in pump of your Coffee Maker.
Periodic cleaning of inside of unit is recommended. More frequent
cleaning may be necessary, depending on hardness of your water.
See “Care and Cleaning” section. NOTE: Do not disassemble unit.
Brew Basket overflows or coffee brews slowly.
• Excessive amounts of ground coffee.
• Decaffeinated and/or coffee ground too finely can cause overflow.
Use slightly less grounds when brewing decaffeinated, flavored, or
finely ground coffee. Or use medium ground coffee.
• Coffee Maker needs cleaning. See Care and Cleaning on page 10.
• Do not use soft water. Use filtered, spring, or bottled water.
If using a paper filter:
• Coffee grounds between paper filter and Brew Basket.
• Paper filter not open and in proper position.
• Rinse Brew Basket before inserting paper filter so edges will remain
pressed against sides of Basket.
• Poor-quality paper filter.
Coffee leaks onto base.
• Carafe removed from Base for more than 20 seconds during
brewing cycle.
Coffee tastes bad.
• Coffee Maker needs cleaning. See Care and Cleaning on page 10.
• Coffee ground too coarsely or too finely. Use medium ground
coffee.
• Coffee-to-water ratio unbalanced. Adjust for personal preference.
• Poor coffee quality and freshness.
• Poor water quality. Use filtered or bottled water.
• Soft water causes poor coffee extraction, which leads to poor
tasting coffee. Use filtered, spring or bottle water.
Coffee sediment in cup.
• Use a high-quality, basket-style paper filter.
Coffee not brewing or unit will not turn on.
• Carafe not positioned on Base.
• Water Reservoir is empty.
• Unit is unplugged.
• Power outage.
• Power surge. Unplug; then plug unit back in.
• Clock requires reset after power outage.
• BREW NOW ( ) Button was not pressed. Press BREW NOW ( )
Button.
• When using Alexa, ensure READY TO BREW Button has been
pressed and indicator has changed from white to green.
Troubleshooting – Carafe Side

14
This device complies with Part 15 of the FCC Rules. Operation is subject to the following two conditions: (1) this device may not cause harmful
interference, and (2) this device must accept any interference received, including interference that may cause undesired operation.
NOTE: This equipment has been tested and found to comply with the limits for a Class B digital device, pursuant to part 15 of the FCC Rules. These limits
are designed to provide reasonable protection against harmful interference in a residential installation. This equipment generates, uses and can radiate
radio frequency, energy and, if not installed and used in accordance with the instructions, may cause harmful interference to radio communications.
However, there is no guarantee that interference will not occur in a particular installation. If this equipment does cause harmful interference to radio or
television reception which can be determined by turning the equipment off and on, the user is encouraged to try to correct the interference by one or
more of the following measures:
• Reorient or relocate the receiving antenna.
• Increase the separation between the equipment and receiver.
• Connect the equipment into an outlet on a circuit different from that to which the receiver is connected.
• Consult the dealer or an experienced radio/TV technician for help.
Changes or modications not expressly approved by the manufacturer could void your authority to operate the equipment.
Hamilton Beach Brands, Inc.
4421 Waterfront Drive
Glen Allen, VA 23060
1.800.851.8900

15
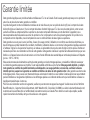
This warranty applies to products purchased and used in the U.S. and Canada. This is the only express warranty for this product and
is in lieu of any other warranty or condition.
This product is warranted to be free from defects in material and workmanship for a period of five (5) years from the date of original
purchase in Canada and one (1) year from the date of original purchase in the U.S. During this period, your exclusive remedy is
replacement of this product or any component found to be defective, at our option; however, you are responsible for all costs
associated with our returning a product or component under this warranty to you. If the product or component is unavailable, we will
replace with a similar one of equal or greater value.
This warranty does not cover glass, filters, wear from normal use, use not in conformity with the printed directions, or damage to
the product resulting from accident, alteration, abuse, or misuse. This warranty extends only to the original consumer purchaser or
gift recipient. Keep the original sales receipt, as proof of purchase is required to make a warranty claim. This warranty is void if the
product is used for other than single-family household use or subjected to any voltage and waveform other than as specified on the
rating label (e.g., 120V ~ 60 Hz).
We exclude all claims for special, incidental, and consequential damages caused by breach of express or implied warranty. All
liability is limited to the amount of the purchase price. Every implied warranty, including any statutory warranty or condition
of merchantability or fitness for a particular purpose, is disclaimed except to the extent prohibited by law, in which case such
warranty or condition is limited to the duration of this written warranty. This warranty gives you specific legal rights. You may have
other legal rights that vary depending on where you live. Some states or provinces do not allow limitations on implied warranties or
special, incidental, or consequential damages, so the foregoing limitations may not apply to you.
To make warranty claim, do not return this appliance to the store. Please write Hamilton Beach Brands, Inc., Customer Service
Department, 4421 Waterfront Dr., Glen Allen, VA 23060, or visit hamiltonbeach.com/customer-service in the U.S. or hamiltonbeach.ca/
customer-service in Canada. For faster service, locate the model, type, and series numbers on your appliance.
Limited Warranty

16
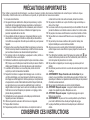
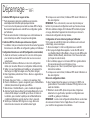
PRÉCAUTIONS IMPORTANTES
1. Lire toutes les instructions.
2. Cet appareil n’est pas destiné à être utilisé par des personnes (y compris
les enfants) dont les capacités physiques, sensorielles ou mentales sont
réduites, ou manquant d’expérience et de connaissance, sauf si elles sont
étroitement surveillées et instruites sur l’utilisation de l’appareil par une
personne responsable de leur sécurité.
3. Une surveillance étroite est requise pour tout appareil utilisé par ou près
des enfants. Le nettoyage et l’entretien ne doit pas fait par des enfants à
moins d’être sous supervision. Surveiller que les enfants ne jouent pas avec
l’appareil.
4. Ne pas toucher aux surfaces chaudes. Utiliser les poignées ou les boutons.
Prendre toutes les précautions nécessaires pour éviter les brûlures causées
par les surfaces chaudes ou les déversements de liquide chaud.
5. Pour protéger contre le choc électrique, ne pas placer le cordon, la fiche ou
la cafetière dans l’eau ou autre liquide.
6. Débrancher la cafetière de la prise lorsqu’elle n’est pas connectée au réseau
WiFi, lorsque vous ne l’utilisez pas et avant de la nettoyer. Laisser refroidir la
cafetière avant d’installer ou de retirer des pièces et avant de la nettoyer.
7. La cafetière doit fonctionner sur une surface plane, loin du rebord de
comptoir pour éviter le basculement accidentel.
8. Ne pas faire fonctionner un appareil électroménager avec un cordon ou
une fiche endommagée, ou lorsque l’appareil ne fonctionne pas bien ou a
été échappé ou endommagé d’une manière quelconque. Le remplacement
et la réparation du cordon d’alimentation doivent être faits par le fabricant,
son agent de service ou toute personne qualifiée de façon à éviter tout
danger. Veuillez communiquer avec le service à la clientèle pour obtenir de
l’information concernant l’inspection, la réparation ou le réglage, comme
précisé dans la garantie limitée.
9. L’utilisation de tout autre accessoire contre-indiqué par le fabricant de
l’appareil peut causer des blessures.
10. Utiliser uniquement la verseuse à café fournie avec cet appareil.
11. Ne pas utiliser à l’extérieur.
12. Ne pas laisser pendre le cordon de la table ou du comptoir et éviter tout
contact entre le cordon et les surfaces chaudes, incluant la cuisinière.
13. Ne pas placer la cafetière sur ou près d’un brûleur à gaz ou électrique ou
dans un four chaud.
14. La verseuse à café est conçue exclusivement pour cette cafetière. Elle ne doit
jamais être utilisée sur une table de cuisson ou dans un four à micro-ondes.
15. Ne pas placer la verseuse à café chaude sur une surface mouillée ou froide.
16. Ne pas utiliser une verseuse à café fissurée ou avec une poignée lâche ou
usée.
17. Ne pas nettoyer la verseuse à café avec de la poudre à nettoyer, des
tampons métalliques ou autres matériaux abrasifs.
18. Assurez-vous que le couvercle est bien fermé durant la préparation du
café et lorsque vous le versez. Ne forcer pas en plaçant le couvercle sur la
verseuse.
19. Pour débrancher la cafetière, placer l’interrupteur à la position arrêt ( ), puis
enlever la fiche de la prise de courant. Pour le débrancher, tenir la fiche et la
retirer de la prise. Ne jamais tirer sur le cordon.
20. Ne pas utiliser cet appareil pour un autre usage que celui auquel il est
destiné.
21. Des brûlures peuvent survenir si le couvercle est soulevé pendant le cycle de
chauffage.
22. AVERTISSEMENT ! Risque d’incendie ou de choc électrique. Ne pas
enlever le couvercle inférieur de la cafetière. Aucune pièce à l’intérieur n’est
réparable par l’utilisateur. Les réparations doivent être faites par du personnel
d’entretien autorisé seulement.
23. Ne pas ranger la cafetière dans une armoire lors de l’utilisation.
24. ATTENTION ! Risque de coupures : Le support à dosette amovible est
équipé d’une aiguille très pointue. Manipuler avec soin.
25. ATTENTION ! Risque de coupures : L’aiguille de perçage est coupant.
Nettoyer avec prudence.
26. AVERTISSEMENT ! Ne pas ouvrir le couvercle pendant le cycle d’infusion
pour éviter la distribution d’eau chaude par l’aiguille de perçage.
27. La plaque chauffante peut demeurer chaude après que la cafetière est
éteinte.
Pour utiliser un appareil électroménager, vous devez toujours prendre des mesures élémentaires de sécurité pour réduire le risque
d’incendie, d’électrocution et/ou de blessure corporelle, en particulier les mesures suivantes :
CONSERVER CES INSTRUCTIONS

17
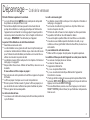
Autres consignes de sécurité pour le consommateur
Cet appareil est destiné à un usage domestique uniquement.
w AVERTISSEMENT Risque de choc électrique : Cet appareil est
fourni avec une fiche polarisée (une broche large) pour réduire le
risque d’électrocution. Cette fiche n’entre que dans un seul sens dans
une prise polarisée. Ne contrecarrez pas l’objectif sécuritaire de cette
fiche en la modifiant de quelque manière que ce soit ou en utilisant
un adaptateur. Si vous ne pouvez pas insérer complètement la fiche
dans la prise, inversez la fiche. Si elle refuse toujours de s’insérer, faire
remplacer la prise par un électricien.
La longueur du cordon installé sur cet appareil a été sélectionnée an
de réduire les risques d’enchevêtrement ou de faux pas causés par
un l trop long. L’utilisation d’une rallonge approuvée est permise si le
cordon est trop court. Les caractéristiques électriques de la rallonge
doivent être équivalentes ou supérieures aux caractéristiques de
l’appareil. Prendre toutes les précautions nécessaires pour installer
la rallonge de manière à ne pas la faire courir sur le comptoir ou sur
une table pour éviter qu’un enfant ne tire sur le cordon ou trébuche
accidentellement.
Pour éviter la surcharge du circuit électrique, ne pas utiliser un autre
appareil à haute puissance sur le même circuit de cet appareil.
Ce symbole vous indique les dangers possibles de blessures corporelles si vous omettez de lire et de suivre ces précautions de sécurité.
Ce symbole vous rappelle que le verre est fragile et qu’une brisure peut entraîner des blessures corporelles.
Ce symbole vous demande de lire le manuel d’utilisation et d’entretien avant d’utiliser la cafetière.
• N’utiliser pas une verseuse fêlée ou dont la poignée est desserrée.
• Cette verseuse est conçue pour être utilisée uniquement sur la
plaque chauffante de votre cafetière. Éviter de la faire fonctionner
sur le dessus d’une cuisinière électrique ou à gaz, ou dans un four à
micro-ondes ou conventionnel.
• Pour éviter de la briser, manipuler la verseuse avec soin. Éviter tout
impact car le verre cassera. Lorsque vous la remplir d’eau, agir avec
précaution pour éviter de heurter un robinet.
• Ne placer pas la verseuse chaude sur une surface froide ou humide.
Laisser-la refroidir avant de la nettoyer ou d’y verser un liquide.
• Ne laisser pas une verseuse vide sur une surface chauffante chaude.
• Éviter de nettoyer la verseuse avec des produits qui égratignent
comme les tampons en laine d’acier ou les produits nettoyants
abrasifs.
• N’insérer pas les mains dans la verseuse. Manipuler celle-ci avec
soin si vous porter des bijoux, particulièrement des bagues avec
diamants. Les bijoux peuvent égratigner le verre, ce qui augmente la
possibilité de casse.
• Ne pas heurter, égratigner ou faire chauffer la verseuse à vide.
• Jeter la verseuse si elle est craquée, égratignée ou chauffée à vide
durant une longue période.
• Afin d’éviter les accidents, ne verser pas le liquide en faisant face
aux gens.
• Pour remuer le liquide dans la verseuse, n’utiliser que des ustensiles
en plastique, en bois ou en caoutchouc. N’utiliser pas d’ustensiles en
métal.
• Veuiller suivre à la lettre ces précautions de sécurité pour éviter toute
brûlure grave qui pourrait être causée par le bris d’une verseuse
remplie de liquide chaude.
Conseils de sécurité pour la verseuse

18 8
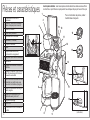
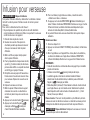
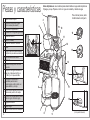
Pièces et caractéristiques
Pour commander des pièces, visiter :
hamiltonbeach.ca/parts
Avant la première utilisation : Laver toutes les pièces amovibles dans de l’eau chaude savonneuse. Rincer
et sécher. Faire un cycle d’infusion en ayant ajouter de l’eau de chaque côté puis jeter l’eau à la n du cycle.
1Couvercle du côté de la
verseuse
2
Réservoir d’eau pour verseuse
(avec marques pour mesurer)
3Panier d’infusion
4Douchette pivotante
5Panneau de commande
6Verseuse (12 tasses)
7Plaque chauffante
8Base
9Repose-tasse amovible/
contenant de rangement
10
Rangement pour cordon d’alimentation
11 Entonnoir
12
Loquet du couvercle une tasse
à la fois
13 Réservoir d’eau de 1,65 L (56 oz)
du côté une tasse à la fois avec
couvercle amovible
14
Panier d’infusion une tasse à la fois
amovible pour café moulu avec
couvercle à charnière et poignée
15
Support à dosette amovible gris
avec poignée
16 Support de perforateur gris
amovible avec joint noir
17
Aiguille de perçage
18 Joint noir
19 Couvercle du côté une tasse à
la fois
15
14
10
12
13
(à l’arrière)
1
6
19
4
2
3
5
9
11
16
17
18
7

19
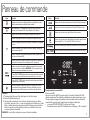
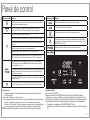
Panneau de commande
Connexion
1. Télécharger l’appli Alexa avec l’App Store Apple ou le Play Store Google.
2. Brancher la cafetière dans la prise.
3. Dans l’appli Alexa, sélectionner l’icône « Devices » (appareils) dans le coin inférieur
droit. Ensuite, cliquer sur l’icône « + » dans le coin supérieur droit. Sélectionner « Coffee
Maker » (cafetière) dans la liste d’appareils qui s’affiche. Sélectionner ensuite Hamilton
Beach et le numéro de modèle. Suivre les instructions qui s’affichent à l’écran pour
connecter l’appareil au réseau WiFi.
REMARQUE : Le code QR de configuration se trouve à l’arrière de la cafetière.
Icône Fonction
Appuyer sur ce bouton pour démarrer/arrêter le cycle d’infusion ou pour
éteindre manuellement le mode Keep Warm (réchaud).
État d’alimentation – l’indicateur blanc s’illumine lorsque la cafetière
n’infuse pas. L’indicateur à DEL rouge s’illumine lors de l’infusion.
Appuyer sur ce bouton pour configurer ou supprimer un profil WiFi.
Durant la configuration avec code QR, l’indicateur WiFi clignotera en rouge.
Durant la configuration guidée par l’utilisateur, l’indicateur WiFi clignotera
en rose.
Lorsque l’indicateur WiFi s’illumine en bleu sans clignoter, l’appareil est
connecté au réseau WiFi.
Lorsque l’indicateur WiFi s’illumine faiblement en blanc, l’appareil n’est
pas connecté au réseau WiFi.
Lorsque l’indicateur WiFi passe du rouge au bleu, la connexion au réseau WiFi
a été perdue. Consulter la section « Dépannage – WiFi » à la page 25.
Appuyer sur ce bouton lorsque la cafetière est remplie d’eau et de café
pour activer l’infusion à distance. REMARQUE : Cela verrouillera le type
d’infusion choisi (tasse individuelle ou verseuse).
L’icône READY TO BREW (prête à infuser) verte indique que l’infusion peut être
lancée à distance avec l’appli Alexa, une commande vocale ou une routine.
L’icône READY TO BREW (prête à infuser) blanche indique que l’infusion
à distance ne peut être lancée.
Une fois la cafetière connectée au réseau WiFi, appuyer sur ce bouton
pour activer/désactiver l’affichage de l’horloge. Lorsqu’elle n’est pas
connectée au réseau WiFi, appuyer sur ce bouton pour régler l’heure.
Renseignements sur la connexion WiFi
Effacer un profil WiFi :
Appuyer sur le bouton (WiFi) et le garder enfoncé 15 secondes. L’indicateur WiFi à DEL
clignotera rapidement en rose, s’éteindra, se réinitialisera, puis clignotera lentement en rouge.
Ou visiter la page des réglages de l’appli Alexa. Il est aussi possible de retirer la cafetière du
réseau WiFi au moyen de l’appli en visitant la page des réglages de l’appli Alexa.
• Les routeurs WEP, WPA, WPA2 802.11 b/g/n sont pris en charge.
• Des problèmes avec le réseau WiFi? Consulter la section « Dépannage – WiFi » à la page 25.
Icône Fonction
Appuyer sur ce bouton pour sélectionner l’intensité d’infusion classique.
Appuyer sur ce bouton pour sélectionner l’intensité d’infusion corsée.
Appuyer sur ce bouton pour régler l’infusion d’une verseuse.
Appuyer sur ce bouton pour régler l’infusion d’une seule tasse et pour en
choisir la taille (8, 10, 12 ou 14 oz [237, 295, 355 ou 414 mL]).
Cette icône s’illumine pour indiquer que la cafetière est en cours d’infusion.
Cette icône s’illumine pour indiquer que la cafetière garde la verseuse à café chaude.

20
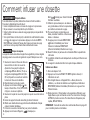
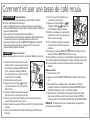
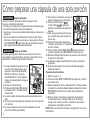
Comment infuser une dosette
w AVERTISSEMENT
Risque de brûlures.
Si un débordement se produit, débrancher et laisser refroidir la cafetière.
Pour éviter le débordement de café chaud :
• Insérer complètement la tasse ou la tasse de voyage sur le repose-tasse.
• Ne pas soulever le couvercle pendant le cycle d’infusion.
• Utiliser le format de tasse ou tasse de voyage approprié pour la quantité de
café à infuser.
• Si le cycle d’infusion s’arrête trop tôt, le café doit être vidé. Remettre la tasse
ou la tasse de voyage sur le repose-tasse. Appuyer sur le bouton BREW
NOW ( /infuser maintenant). Ne pas vider la tasse ou la tasse de voyage
peut faire en sorte que la prochaine infusion déborde de la tasse.
w ATTENTION
Risque de coupures.
Le support à dosette amovible est équipé d’une aiguille très pointue. L’aiguille
de perçage sous le couvercle est également coupant. Manipuler avec soin.
1. Soulever le réservoir d’eau du côté une
tasse à la fois et retirer le couvercle.
Ajouter de l’eau jusqu’à la ligne de
remplissage MIN de 444 mL (15 oz) ou
la ligne de remplissage MAX de 1,65 L
(56 oz). Ajouter le couvercle et remettre
le réservoir d’eau sur la cafetière.
2. Brancher dans la prise de courant.
3. Appuyer sur le bouton Single ( /une
tasse) et choisir 8 ou 10 oz (237 ou 295
mL) pour une saveur optimale.
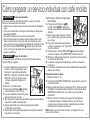
4. Soulever le loquet du couvercle jusqu’à ce que le couvercle reste en
place.
5. Insérer le support à dosette amovible gris dans l’entonnoir.
6. Mettre une dosette dans le support à dosette individuelle. Ne pas
enlever la feuille métallique.
7. Fermer le couvercle et enclencher pour percer la dosette.
8. Appuyer sur le bouton Regular ( /classique) ou
Bold ( /corsée) pour choisir l’intensité
d’infusion souhaitée.
9. Utiliser le repose-tasse pour une tasse ou
une grande tasse et retirer le repose-tasse
pour utiliser une tasse de voyage.
10. Pour une infusion programmée avec
Alexa, consulter la section « Infusion avec
Alexa » ci-dessous.
11. Ou appuyer sur le bouton BREW NOW
(/infusion immédiate) pour lancer
l’infusion. L’indicateur BREW NOW
(infusion immédiate) s’illuminera en rouge.
12. Durant l’infusion, le panneau de commande affiche la quantité de
café versé.
13. La cafetière s’éteindra automatiquement une fois que l’infusion sera
terminée.
14. Le support à dosette doit être rincé après chaque utilisation.
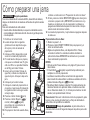
Infusion avec Alexa :
1. Suivre les étapes 1 à 9.
2. Appuyer sur le bouton READY TO BREW (prête à infuser). Il
s’illuminera en vert.
3. Dire à l’appli Alexa ou à l’appareil Echo « Alexa, allume ma
cafetière », ou allumer la cafetière avec l’appli Alexa. L’indicateur
BREW NOW (infusion immédiate) s’illuminera en rouge une fois
l’infusion lancée.
4. Mode économie : Personnalisez votre expérience d’infusion avec
l’appli Alexa ou par commande vocale. Pour économiser l’énergie,
ACTIVEZ le mode économie. Pour des infusions fréquentes plus
rapides, DÉSACTIVEZ-le.
REMARQUE : Consulter la section des commandes Alexa à la page 23
pour connaître plus de commandes.
La page est en cours de chargement...
La page est en cours de chargement...
La page est en cours de chargement...
La page est en cours de chargement...
La page est en cours de chargement...
La page est en cours de chargement...
La page est en cours de chargement...
La page est en cours de chargement...
La page est en cours de chargement...
La page est en cours de chargement...
La page est en cours de chargement...
La page est en cours de chargement...
La page est en cours de chargement...
La page est en cours de chargement...
La page est en cours de chargement...
La page est en cours de chargement...
La page est en cours de chargement...
La page est en cours de chargement...
La page est en cours de chargement...
La page est en cours de chargement...
La page est en cours de chargement...
La page est en cours de chargement...
La page est en cours de chargement...
La page est en cours de chargement...
-
 1
1
-
 2
2
-
 3
3
-
 4
4
-
 5
5
-
 6
6
-
 7
7
-
 8
8
-
 9
9
-
 10
10
-
 11
11
-
 12
12
-
 13
13
-
 14
14
-
 15
15
-
 16
16
-
 17
17
-
 18
18
-
 19
19
-
 20
20
-
 21
21
-
 22
22
-
 23
23
-
 24
24
-
 25
25
-
 26
26
-
 27
27
-
 28
28
-
 29
29
-
 30
30
-
 31
31
-
 32
32
-
 33
33
-
 34
34
-
 35
35
-
 36
36
-
 37
37
-
 38
38
-
 39
39
-
 40
40
-
 41
41
-
 42
42
-
 43
43
-
 44
44


Hamilton Beach 49911 Mode d'emploi
- Catégorie
- Cafetières
- Taper
- Mode d'emploi
dans d''autres langues
Documents connexes
-
Hamilton Beach 46220 Mode d'emploi
-
-
Hamilton Beach 49902 Mode d'emploi
-
-
-
-
-
-
-
Hamilton Beach FlexBrew Le manuel du propriétaire