TFA 31.1028 Le manuel du propriétaire
- Catégorie
- Mesure
- Taper
- Le manuel du propriétaire
Ce manuel convient également à

H560 DewPoint Pro
Bedienungsanleitung
Operating Instructions
Mode d’emploi
®
4. Garanties
Pour une utilisation conforme aux règles, la garantie des
instruments de mesures s’élève à 12 mois, celle des sondes
et capteurs à 6 mois. La garantie n’est pas applicable si l’ap-
pareil a été ouvert.
Le fabricant garantit que le produit ne présentera aucun
vice de matériel ni de défaut de fonctionnement pendant
la période nommée dans le cadre d’une utilisation confor-
me aux règles et entretien. Les exceptions sont précisées ci-
après:
La garantie ne s’étend pas sur les piles ni le coupe-circuit.
La garantie ne porte pas sur des produits qui ont été mal
utilisés ou utilisés de manière imprudente, qui fonc-
tionnent ou sont stockés de manière non conforme.
Les conditions de garantie remplacent tout autre éventuel-
le garantie. De plus, notre responsabilité ne sera pas
engagée pour des dommages occasionnés directement ou
indirectement sur des installations où notre appareil serait
amené à fonctionner.
16
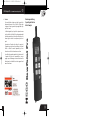
H560 Dewpoint Pro – Instrument de mesure de précision
DE Anl. H560.bel 02.02.2005 10:13 Uhr Seite 1

2
H560 Dewpoint Pro
2. Alimentation
L’appareil est alimenté par pile 1,5 V AAA. Pour la rempla-
cer, débranchez l’appareil et ouvrez le couvercle situé au dos
du boîtier. Enlevez la pile et retirez le câble de raccorde-
ment. Branchez une nouvelle pile et remettez le couvercle.
Le segment « BAT » indique que la pile devra être rem-
placée sous peu. Vous pouvez encore prendre des mesures
correctes pendant une heure environ.
Par respect pour l’environnement, veuillez jeter les piles
usagées dans des endroits prévus à cet effet.
3. Données techniques
Température
Gamme de mesure -40 à +70°C
Résolution 0,1°C
Précision ±0,5°C
Humidité
Gamme de mesure 0 à 99% HR
Résolution 0,1%
Précision ±3% (20 à 90% HR) sinon ±4% HR
Température
d’utilisation -40 à +70°C
Autonomie des piles 1000 heures
Piles 2 x 1,5 V AAA
Dimensions 170 x 50 x 17 mm
Poids 100 g (incluant l’emballage)
Fonctions MAX/ MIN/ HOLD, point de rosée,
Température de bulbe humide,
étalonnage / ajustage,
changement d’unités °C/ °F
15
H560 Dewpoint Pro – Instrument de mesure de précision
DE Anl. H560.bel 02.02.2005 10:13 Uhr Seite 2

3
H560 Dewpoint Pro – Präzisionsmessgerät
Inhaltsverzeichnis
1. Handhabung/Einleitung
1.1. Hinweise
1.2. Inbetriebnahme
1.3. Ein-/Ausschalten
1.4. Bedienung/Funktionen
1.4.1. Einheiten-Umschaltung °C/°F
1.4.2. Kalibriermodus (Offset-Justierung)
1.4.3. MAX/MIN
1.4.4. Hold-Taste
1.4.5. AUTO-OFF-Funktion
1.4.6. Anzeige Taupunkt/Feuchtkugel (Td/Tw)
2. Spannungsversorgung/Batteriewechsel
3. Technische Daten
4. Garantiebestimmungen
1.4.3 Affichage MAX / MIN
Appuyer sur la touche MAX/MIN, les valeurs MAX
d’humidité et de température s’affichent. Appuyer
une nouvelle fois sur la touche MAX/ MIN et les
valeurs MIN d’humidité et de température apparais-
sent.
Effacer les valeurs MAX / MIN
A chaque fois que vous souhaitez effacer les valeurs
MAX MIN mémorisées, appuyer sur la touche CLEAR
L’appareil affiche chaque fois 3 barres par valeur
mesurée pendant une seconde.
1.4.4 Fonction Hold
Appuyer sur la touche HOLD, la dernière mesure est
figée. En appuyant une nouvelle fois sur cette tou-
che, vous retournez à la fonction mesure.
1.4.5 Fonction AUTO-OFF
Pour activer la fonction auto-extinction (AUTO-OFF),
appuyer pendant 3 secondes sur la touche CLEAR/
AUTO. L’écran affiche sur la gauche AUTO-OFF: l’ap-
pareil s’éteindra automatiquement après 15 min de
non-utilisation.
Cette fonction peut être desactivée en appuyant pen-
dant 3 secondes sur la touche CLEAR / AUTO.
1.4.6 Affichage du point de rosée / température bulbe
humide (Td / Tw)
Pour afficher le point de rosée (Td) appuyer sur la
touche Td / Tw.
Appuyer une nouvelle fois pour afficher la tempéra-
ture de bulbe humide (Tw)
14
H560 Dewpoint Pro – Instrument de mesure de précision
DE Anl. H560.bel 02.02.2005 10:13 Uhr Seite 3

1. Handhabung/Einleitung
1.1 Hinweise / Bitte beachten
• Zum Reinigen des Instrumentes keine aggressiven
Reinigungsmittel verwenden sondern nur mit einem
trockenen oder feuchten Tuch abreiben.
• Messgerät an einem trockenen und sauberen Ort auf-
bewahren.
• Vermeiden Sie Gewalteinwirkung wie Stöße oder
Druck.
1.2. Inbetriebnahme
Vor dem Einschalten sicherstellen das zwei volle 1,5V-
Batterien (AAA-size) eingelegt sind.
1.3. Ein- / Ausschalten
Durch Betätigen der ON/OFF-Taste wird das Mess-
gerät eingeschaltet. Zum Ausschalten muss die ON/
OFF-Taste ca. 3 Sekunden gedrückt.
1.4 Funktionen / Bedienung
1.4.1 Einheiten-Umschaltung °C und °F (Celsius / Fahren-
heit)
Um die angezeigte Einheit (°C oder °F) zu ändern die
°C/°F-Taste jeweils einmalig drücken.
1.4.2 Justierfunktion
Ihr Messgerät bietet Ihnen die Möglichkeit den ange-
zeigten Messwert zu korrigieren (z.B. um Fühlertole-
ranzen auszugleichen).
Dazu halten Sie die MAX/MIN-Taste und CLEAR/
AUTO-Taste für 5 Sekunden gleichzeitig gedrückt. In
der Anzeige erscheint 0%. Mit der Td/Tw-Taste kön-
nen Sie den Wert von -3% bis +3% verändern. Mit
der MAX/MIN-Taste wird die Anzeige verlassen und
der Wert als Offset-Korrektur abgespeichert. Mit der
CLEAR/AUTO-Taste erschein in der Anzeige 0,0°C. Mit
der Td/Tw-Taste können Sie den Wert von -1,0 bis
+1,0 verändern. Mit der MAX/MIN-Taste wird die
Anzeige verlassen und der Wert als Offset-Korrektur
abgespeichert.
4
H560 Dewpoint Pro – Präzisionsmessgerät
1. Manipulation / Introduction
1.1 Remarques / Précautions d’emploi
• Pour nettoyer l’instrument, ne pas utiliser de déter-
gent agressif mais frotter avec un chiffon sec ou
humide.
• Ranger l’instrument de mesure dans un endroit sec et
propre.
• Eviter toute contrainte violente comme les chocs ou
écrasements.
1.2. Mise en service
Vérifier avant emploi qu’il y ait une pile 1,5 V AAA
dans l’appareil.
1.3. Marche / arrêt
La touche On / Off permet de mettre en marche l’ap-
pareil ou de l’éteindre.
1.4 Fonctions
1.4.1 1.4.1 Changement d’unité °C/ °F (Celsius / Fahrenheit)
Appuyer une fois sur le touche °C/°F pour changer l’u-
nité de mesure.
1.4.2 Fonction d’étalonnage
L’appareil de mesure a la possibilité de corriger la
valeur affichée (par exemple en comparant cette valeur
avec une sonde de référence).
Pour cela, appuyer en même temps sur les touches
CLEAR/ AUTO et MAX/ MIN pendant 5 sec. L’écran affi-
che 0%. Avec la touche Td/ Tw la valeur d’humidité
peut être modifiée de –3% à +3%. Retour au menu
avec la touche MAX/ MIN, la correction de l’offset est
alors sauvegardée.
Avec la touche CLEAR/AUTO, l’écran affiche 0,0°C. Avec
la touche Td/ Tw, la valeur de température peut être
modifiée de –1,0 à +1,0°C. Retour au menu avec la tou-
che MAX/ MIN, la correction de l’offset est sauvegardée
PS: Ma valeur de l’offset enregistrée sera rajoutée ou
retranchée (si la valeur est négative) lors de chaque
mesure.
13
H560 Dewpoint Pro – Instrument de mesure de précision
DE Anl. H560.bel 02.02.2005 10:13 Uhr Seite 4

Table des matières
1. Introduction
1.1. Remarques / Précautions d’emploi
1.2. Mise en service
1.3. Marche/ Arrêt
1.4. Fonctions
1.4.1. Changement d’unités (°C/°F)
1.4.2. Fonction d’étalonnage
1.4.3. MAX/MIN
1.4.4. Hold mode
1.4.5. Fonction AUTO-OFF
1.4.6. Point de rosée
2. Alimentation
3. Données techniques
4. Garanties
12
H560 Dewpoint Pro – Instrument de mesure de précision
PS: Der jeweils so eingestellte Wert wird zum Mess-
ergebnis dazugezählt oder bei negativem Vorzeichen
abgezogen.
1.4.3 Anzeigen MAX / MIN
Durch Betätigen der MAX/MIN-Taste wird zuerst der
maximale Feuchte- und Temperaturwert, nach erneu-
tem Betätigen der niedrigste Wert angezeigt.
Max-Min-Speicher löschen
Zum Löschen muss die CLEAR-Taste im jeweiligen An-
zeigemodus(MAX und MIN-Wert separat) betätigt
werden. Das Gerät zeigt für eine Sekunde jeweils
3 Striche pro Messwert an.
1.4.4 Hold-Taste
Durch Betätigen der HOLD-Taste wird der angezeigte
Messwert eingeforen. Durch erneutes Betätigen der
HOLD-Taste gelangt man zurück in den Messmodus.
1.4.5 AUTO-OFF-Funktion
Zum Aktivieren der AUTO-OFF-Funktion halten Sie
die CLEAR/AUTO-Taste für ca. 3 Sekunden gedrückt.
Im Display erscheint auf der linken Seite AUTO OFF –
das Gerät schaltet sich jetzt nach ca. 15 Minuten
automatisch ab.
Damit wird vermieden das, das Messgerät unbe-
absichtigt angeschaltet bleibt und die Batterien ent-
laden werden.
Diese Funktion wird deaktiviert indem man wieder-
um die CLEAR/AUTO-Taste für ca. 3 Sekunden ge-
drückt hält.
1.4.6 Anzeige Td / Tw (Taupunkt / Feuchtkugel)
Zum Anzeigen des Taupunkt betätigen Sie die Td/Tw-
Taste. Auf der Anzeige erscheint in der 2. Zeile der
Taupunkt (Td). Durch erneutes Betätigen erscheint
die Feuchtkugeltemperatur.
5
H560 Dewpoint Pro – Präzisionsmessgerät
DE Anl. H560.bel 02.02.2005 10:13 Uhr Seite 5

2. Spannungsversorgung
Als Spannungsversorgung des Gerätes dienen zwei 1,5 Volt
Batterien (AAA size). Zum Wechseln der Batterie das Instru-
ment ausschalten und das auf der Rückseite angebrachte
Batteriefach öffnen. Dazu muss eine Kreuzschlitzschraube
entfernt werden. Die Batterien entnehmen und die neuen
Batterien einlegen. Bitte achten Sie auf die richtige
Polung(siehe Hinweis am Gehäuse).
Das Segment "BAT" zeigt an, dass Sie die Batterie in Kürze
auswechseln müssen. Sie können jetzt noch ca. 1 Std. kor-
rekte Messungen durchführen.
Der Umwelt zuliebe verbrauchte Batterien in dafür vorge-
sehene Sammelbehälter geben.
3. Technische Daten
Temperatur
Messbereich -40..+70°C
Displayauflösung 0,1°C
Genauigkeit ± 0,5°C
Feuchte
Messbereich 0..99%rF
Displayauflösung 0,1%
Genauigkeit ± 3% (20..90%) sonst ± 4%
Arbeitstemperatur -40..70°C
Batterielebensdauer Typisch 1000 Std. bei Dauerbetrieb
Batterie 2 x 1,5 Volt AAA size
Abmessungen 170 x 50 x 17 mm
Gewicht 100 gr. (inkl. Verpackung)
Funktionen Max/Min/Hold-Funktion, Taupunkt,
Feuchtekugeltemperatur, kalibrier-
fähig, C/F-umschaltbar
6
H560 Dewpoint Pro – Präzisionsmessgerät
3. Technical data
Temperature
Measuring range -40..+70°C
Display resolution 0,1°C
Accuracy ± 0,5°C
Humidity
Measuring range 0..99%rF
Display resolution 0,1%
Accuracy ± 3% (20..90%)
remaining range ± 4%
Working temperature -40..70°C
Battery life time Typical 1000 hrs by continousely use
Battery 2 x 1,5 Volt AAA size
Dimensions 170 x 50 x 17 mm
Weight 100gr. (incl. packaging)
Functions Max/Min/Hold-Function, dewpoint,
wetbulb, calibration certificate as
an option, C/F-switchable
4. Guarantee
With normal use, the guarantee lasts for 12 months for the
instruments and 6 months for the probes and sensors. Open-
ing of the instruments leads to expiration of guarantee.
The producer guarantees that his product will not have any
material defect or defect in workmanship during the above-
mentioned period if the product is accordingly used and
maintained. Exceptions are defined in the following way:
The guarantee does not apply for batteries and fuses. The
guarantee does not cover products that are damaged, used
improperly or negligent, practised or stored incorrectly.
These guarantee conditions replace all possible expressly or
tacitly confirmations. No liability will be assumed for special,
casual or constructive damages when it occurs through
unauthorized act or through another way even if it is within
the contract.
11
H560 Dewpoint Pro – Precision measuring instruments
DE Anl. H560.bel 02.02.2005 10:13 Uhr Seite 6

after pushing again the key the display will show the
lowest measurements.
Clearing the memory (MAX MIN)
Press CLEAR/AUTO key in the MAX- and in the MIN-
Mode to delete MAX/MIN-memory.
1.4.4 HOLD
Press HOLD key to freeze the actual display measure-
ment. Press HOLD key again to release.
1.4.5 AUTO-OFF-function
To enable the AUTO-OFF-function press down CLEAR/
AUTO key for appr. 3 seconds. On the display appears
AUTO OFF.
The instrument will switch off automatically after
15 minutes without pressing any key. Pressing the
AUTO-OFF key again the instrument will not switch
off automatically.
1.4.6 Display Td/Tw (dewpoint/wetbulb temperature)
Press Td/Tw key once: On the second line the actual
dewpoint temperature will be displayed.
Press Td/Tw key once again: On the second line the
actual wetbulb temperature will be displayed.
2. Power supply
For the power supply of the instrument two 1,5 Volt bat-
tery (AAA size) are used. To exchange the batteries switch
off the instrument and open the battery cover on the back
of the instrument. Replace the used batteries with new
ones.
When the instrument displays the "BAT" segment, it indica-
tes that the batteries need replacing and the instrument
allows app. 1 hour of further measurement time.
Note: For protection of our environment please dispose of
the batteries according to current local regulations.
10
H560 Dewpoint Pro – Precision measuring instrument
4. Garantiebestimmungen
Bei ordnungsgemäßem Gebrauch leisten wir auf Meßgerä-
te 12 Monate und auf Fühler und Sensoren 6 Monate
Garantie. Durch Öffnen des Gerätes erlischt der Garantie-
anspruch.
Der Hersteller garantiert, dass das Produkt im genannten
Zeitraum bei ordnungsgemäßer Anwendung und Wartung
keine Material- und Bearbeitungsfehler aufweist. Ausnah-
men sind im folgenden festgelegt.
Die Garantie erstreckt sich nicht auf Sicherungen oder Bat-
terien. Die Garantie schließt keine Produkte ein, die miss-
bräuchlich oder fahrlässig verwendet, beschädigt oder
unzulässig betrieben oder gelagert wurden.
Die vorstehenden Garantiebedingungen ersetzen alle
anderen eventuell gemachten ausdrücklichen oder still-
schweigenden Zusicherungen. Auch wird keine Haftung für
einen besonderen, beiläufigen oder mittelbaren Schaden
übernommen, gleich ob dieser im Rahmen des Vertrages,
durch eine unerlaubte Handlung oder auf andere Weise
entstanden ist.
7
H560 Dewpoint Pro – Präzisionsmessgerät
DE Anl. H560.bel 02.02.2005 10:13 Uhr Seite 7

1. Handling
1.1 General advice
• For cleaning the instrument please do not use abra-
sive cleaner, but a dry or damp cloth.
• Please store the measuring instrument in a dry and
clean place when not in use.
• Avoid any force like shocks or pressure to the instru-
ment.
• A retractable stand on the back of the instrument
allows it to be used as a bench top instrument.
1.2. Operation
Before switching on the instrument insert the bat-
tery.
1.3. Switching on and off
By operating the ON/OFF-key the instrument swit-
ched on or off. For switching off please keep the
ON/OFF-key pressed for appr. 3 seconds.
1.4 Functions
1.4.1 Measuring unit switching °C and °F
(Celsius / Fahrenheit)
To change the measuring unit push °C/°F-key once.
1.4.2 CAL-option (how to adjust the instrument)
Press down Max/Min key and Clear key together
down for 5 seconds, the display will show 0% only.
You enter the calibration mode. Press Td/Tw key, will
will see the display change from 0% to 1%, 2% etc.
Select the compensation you want say 2 % then press
Max/Min to exit. All the humidity value will be add
2%.
When in calibration mode as above, press Clear key
once, you enter the calibration of temperature. Press
Td/Tw key to select the value of compensation.
1.4.3 Display MAX / MIN
Press down Max/Min-key, the display will show the
highest humidity and temperature measurement;
9
Summary
1. Handling
1.1. General advice
1.2. Operation
1.3. Switching on/off
1.4. Functions
1.4.1. Measuring unit switching °C/°F
1.4.2. Calibration (Offset-adjustment)
1.4.3. MAX/MIN
1.4.4. HOLD
1.4.5. AUTO-OFF-function
1.4.6. Dewpoint / Wetbulb (Td/Tw)
2. Power supply / Changing the battery
3. Technical data
4. Guarantee
8
H560 Dewpoint Pro – Precision measuring instrument
H560 Dewpoint Pro – Precision measuring instruments
DE Anl. H560.bel 02.02.2005 10:13 Uhr Seite 8
-
 1
1
-
 2
2
-
 3
3
-
 4
4
-
 5
5
-
 6
6
-
 7
7
-
 8
8


TFA 31.1028 Le manuel du propriétaire
- Catégorie
- Mesure
- Taper
- Le manuel du propriétaire
- Ce manuel convient également à
dans d''autres langues
- Deutsch: TFA 31.1028 Bedienungsanleitung
Documents connexes
Autres documents
-
Dostmann H560 DewPoint Pro Digital Thermo-Hygrometer Manuel utilisateur
-
-
geo-FENNEL FHT 100 Manuel utilisateur
-
Testo TE622 Le manuel du propriétaire
-
-
Omega RH202 and RH-202L Le manuel du propriétaire
-
Motorola H560 - Headset - Over-the-ear Manuel utilisateur