Kimex 041-3402 Guide d'installation
- Catégorie
- Écrans de projection
- Taper
- Guide d'installation

Manuel de montage
Ecran de projection manuel
Réfé
rence
:
041-3XXX

/
8
/
/
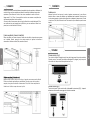
Fixation au plafond (à l'aide de vis)
Mesurez l'écart entre les trous sur le carter, et reportez ces mesures sur le plafond.
Prêtez une attention particulière au parallélisme. Ensuite, percez les trous ainsi
marqués, et rajoutez les chevilles si nécessaire. Enfin, fixez l'écran au plafond à
l'aide de vis. Veillez à ne pas les serrer trop fort.

Installation manual
Manual projection screen
Refe
rence
:
041-3XXX

/
Install the screen in a location easily accessible to all vie
w
ers. Ideally, the center of the
screen,
w
hen fully unrolled, should be at the level of the vie
w
ers' eyes (lo
w
er third of the
canvas).
W
e advise you to put the bottom of the image bet
w
een
8
0 and 120cm. The screen
can be scre
w
ed to a
w
all or a ceiling, or hung from the ceiling via hoo
k
s.
If necessary, be sure to obtain adequate scre
w
s,
w
all plugs and hoo
k
s. (For a
w
ooden
surface, for example 04x5Omm scre
w
s, for a concrete or stone surface, scre
w
s and
do
w
els 0 6x5Omm)
C
h
h
h
y
Place the eyelets on the screen and measure the gap bet
w
een the eyelets, and record
these measurements on the ceiling. Then, drill the holes thus mar
k
ed, and add the do
w
els
if necessary and finally the hoo
k
s. Finally, hang up the screen.
/
W
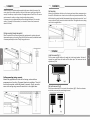
Measure the gap bet
w
een the holes on the housing, and record those measurements on
the
w
all.
D
o not hesitate to use a level in order to obtain a very horizontal installation. Then,
drill the holes thus mar
k
ed, and add the appropriate plugs and scre
w
s. Leave about 1 cm of
scre
w
s on the
w
all. Finally, secure the screen on the scre
w
s. Then tighten the scre
w
s, being
careful not to overtighten them.
z
/
U
h
c
Pull the canvas using the handle on the
w
eight bar to the desired position.
W
ait about 3
seconds then gently release the handle until the fabric stops. The canvas can thus be
adjusted every 10cm.
a Fig. 1
R
h
c
Pull the canvas do
w
n about 3
-
5cm to unloc
k
the mechanism (Fig 2).
W
hen the mechanism
is unloc
k
ed, accompany the canvas during its ascent.
TFig. 2
Ceiling mounting (using screws)
Measure the gap between the holes on the housing, and record these
measurements on the ceiling. Pay special attention to parallelism. Then, drill
the holes thus marked, and add the dowels if necessary. Finally, secure the
screen to the ceiling using screws. Be careful not to over tighten them.
-
 1
1
-
 2
2
-
 3
3
-
 4
4


Kimex 041-3402 Guide d'installation
- Catégorie
- Écrans de projection
- Taper
- Guide d'installation
dans d''autres langues
- English: Kimex 041-3402 Installation guide
