
www.lg.com
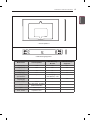
OWNER’S MANUAL
CANVAS SPEAKER
Please read this manual carefully before operating your set and retain it
for future reference.
P/NO : MFL67980402 (1310-REV00)
Printed in Korea
OCF100

2
ENG
ENGLISH
TABLE OF CONTENTS
TABLE OF CONTENTS
3 SAFETY INSTRUCTIONS
5 BEFORE INSTALLATION
6 UNPACKING
7 INSTALLATION
7 Attaching the Guide Spacer on the TV
8 Attaching Set Protection Cushion
8 Checking the Spots for Fixing Screws on the Wall Using VESA Guide Sheet
9 Fixing Anchors and Screws
9 Installing the Wall Mounting Supporter
10 Assembling the Wall Mounting Supporter and the Canvas Speaker
11 Adjusting the Level of the Product
12 Organizing the Power Cord
13 Fixing the Safety Clip (Bottom)
13 Connecting the Optical Cable
14 Combined Appearance of the Canvas Speaker and TV
14 PRODUCT SPECIFICATIONS
WARNING
y
If you ignore the warning message, you may be seriously injured or there is a possibility of accident
or death.
CAUTION
y
If you ignore the caution message, you may be slightly injured or the product may be damaged.

3
ENGENGLISH
SAFETY INSTRUCTIONS
SAFETY INSTRUCTIONS
- Make sure the professional installer read this manual before installation.
- After the installation, the professional installer should pass this user manual to the customer and ask the
customer to read the manual carefully and keep it in a safe place.
After reading the user manual, keep the manual in a readily accessible location so the users can refer to
it in the future as required.
WARNING
The product should be installed by a
professional installer designated by the
retailer.
Having the product installed by a non-specialized
installer is very dangerous and can cause a personal
injury.
Do not install the product where the weight
cannot be supported.
If the location where the product is installed is not stable
and sturdy enough, it may fall causing personal injuries.
Contact a professional installer designated by
the retailer to move or replace the product, if
needed.
Installation requires special techniques and moving or
installing the product on your own can cause serious
safety issues.
After installing the product, do not hang on it
or apply severe impact to the product.
The product may fall causing personal injuries.
When installing the wall mount-type product,
never hang the power cable or signal cable on
the rear side of the TV.
The cord can be damaged, resulting in a re, an electric
shock or damage to the product.

4
ENG
ENGLISH
SAFETY INSTRUCTIONS
CAUTION
Install the product according to the directions
in this user manual.
Failure to follow the directions in the user manual
may cause a serious personal injury or damage to the
product due to the improper installation.
At least two people must work together when
installing the product or adjusting the height
of the product after the installation.
Working alone may cause the product to fall, resulting in
personal injury or damage to the product.
Check the type of wall material before the
installation and use the provided anchors and
screws if the conditions comply.
If you do not use the designated anchors or screws, they
may not be able to withstand the weight of the product
and cause a safety issue.
When drilling holes in the wall, always use a
drill bit and drill in designated diameter.
If you make a hole to install the product without following
the instructions, the product may not be installed stably,
resulting in a safety issue.
Do not wipe the product with a wet towel
and make sure you do not use any heater
or humidier under the location where the
product is installed.
If water ows into the product or moisture and heat are
applied to the product, it may cause a re, an electric
shock or product malfunction.
Do not install the product in any place other
than the vertical wall, for example, near a
sprinkler or sensor, in a place where may be
affected by vibration or shock, or near any
high voltage power cable or power source.
Unplug the power cord from the power outlet
before installing the product.
If you install the product with the power cord plugged, it
may cause an electric shock or a re.
Do not install the product with bare hands.
Always wear proper work gloves.
Otherwise, this may result in personal injuries.
When you do use other cables than the
provided one to connect the product, the
wall or the connector of the product may be
damaged due to the friction with the wall.
Make sure to use the cable gender provided
with the product.

5
ENGENGLISH
BEFORE INSTALLATION
BEFORE INSTALLATION
y
Use this product only for installing the TV on the wall.
y
Be cautious when installing/using the wall mounting product in order to prevent the damage to the
product and avoid safety accidents.
y
If you have not fully read and understood the installation manual, do not install the product and contact
an authorised service centre.
If you have not fully understood after the inquiry, have a specialized installer install the product for you.
y
Even if you are not a specialized installer but have experience in mechanical or construction eld, it is
advantageous for you to fully understand this manual and install the product.
y
This product is designed to be mounted to walls with standard space between the studs. LG Electronics
is not responsible for any issues occurred by installing the product on the walls where the standard
space is not applicable.
y
Install the wall mounting screws to the wall so that they can be installed at the centre of the both ends of
the studs.
It is recommended to use the stud nder, a separate device.
y
When installing the bracket on a concrete wall or on any other walls capable of holding the strength
specied in the manual, you may remove the brackets for xing to the wall of studs with standard space
and follow the instructions for attaching the bracket to make the installation easier.
y
Install the product only on a vertical wall.
Do not install the bracket on a wall inclined at an angle, exceeding the standard range, or on the ceiling.
LG Electronics is not liable for any issues occurred due to the installation of the product on a slanted
wall or on the ceiling.
y
Check the accessories provided with the product before installing. LG Electronics is not liable for any
damage to or loss of the accessories after the package has been opened.
y
Keep the provided accessories out of reach of babies or children as it may cause safety issues,
including suffocation, from swallowing the parts.
y
Make sure that screws are installed securely on the wall.
Applying excessive force to screws may damage the wall, impair the performance or reduce the strength
of the product, or cause it to become damaged.
y
Be careful not to install a TV that exceeds the weight restrictions and not to apply external force.
y
Be careful when using the tools during installation to prevent accidents or damage.
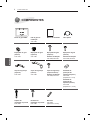
<Tools for Installation>
Philips screwdriver (manual or electric) / 8 mm spanner / drill / Ф 8 mm drill bit for concrete wall Ф 4 mm drill
bit for wood or steel / level / stud nder / slotted screwdriver

6
ENG
ENGLISH
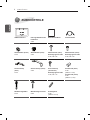
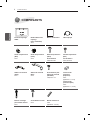
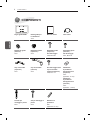
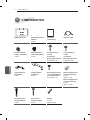
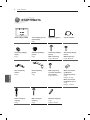
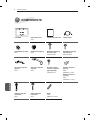
UNPACKING
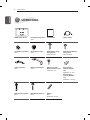
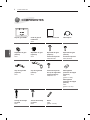
UNPACKING
VESA Guide Sheet
Installation Guide Tape
4 EA
User Manual Optical Cable
Guide Spacer (Bottom)
2 EA
Guide Spacer (Top)
2 EA
Guide Spacer (Top)
Fixing Screw
2 EA, M6 X 26
Guide Spacer (Bottom)
Fixing screw
2 EA, M4 X 20
Safety Clip (Top)
2 EA
Safety Clip (Bottom)
2 EA
Safety Clip (Top/
Bottom) Fixing screw
4 EA, M4 x 12
Set Protection
Cushion (Upper)
2 EA
(thickness: 11 mm)
Set Protection
Cushion (Bottom)
2 EA
(thickness: 1.5 mm)
Wall Mounting Anchor
8 EA
Wall Mounting Screw
8 EA
Rubber
2EA
(thickness: 12 mm)

7
ENGENGLISH
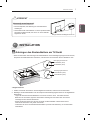
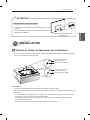
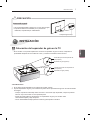
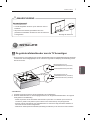
INSTALLATION
Attach the rubber here.
CAUTION
How to use the Rubber
y
It is recommanded to install the bracket on a concreate wall.
y
The product should be installed by a professional installer
designated by the retailer.
INSTALLATION
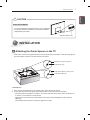
1
Attaching the Guide Spacer on the TV
y
If the screws cannot be fully tightened when xing the guide spacer with them, check the xing depth of
the screws again and refer to the technical service manual.
Guide Spacer (Top) Fixing Screw
Guide Spacer (Bottom) Fixing screw
Guide Spacer (Top)
Guide Spacer (Bottom)
< Procedures >
1 If any screws are installed into the mounting holes, please remove the screws.
2 Fix the guide spacers and the guide spacer xing screws in the order shown in the gure.
- Place the product facing down on a table. To prevent scratches on the screen, place the product on
a cushion or a soft clothes on a flat surface.
- Tighten the screw until the set, guide spacers and screws are joined together securely and stop
tightening.
- Use a Phillips driver (manual or electric) to tighten the screws.

8
ENG
ENGLISH
INSTALLATION
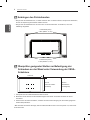
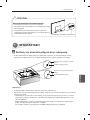
2
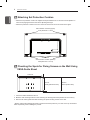
Attaching Set Protection Cushion
y
Attach the set protection cushion to mitigate the impact between the TV and the Canvas Speaker in
case of bumping against each other when adjusting the angle.
y
Attach the protection cushion to the four corners of the back of the set as shown in the gure.
Set Protection Cushion (Upper)
2 EA (thickness: 11 mm)
Set Protection Cushion (Bottom)
2 EA (thickness: 1.5 mm)
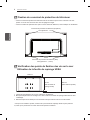
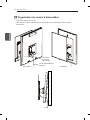
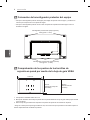
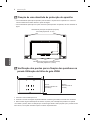
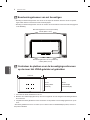
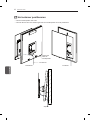
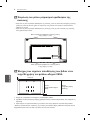
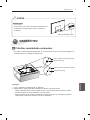
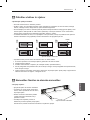
3
Checking the Spots for Fixing Screws on the Wall Using
VESA Guide Sheet
1430 mm
840 mm
(VESA guide sheet size)
865 mm
(Actual product size)
1 Check the VESA standard for the TV.
2 Mark the wall mounting location on the wall using the VESA guide sheet provided as an accessory.
3 Remove the VESA guide sheet after checking the spots for xing screws on the wall.
* Please note that the VESA guide sheet is shorter than actual product by 12.4 mm on the top and bottom
sides respectively, when installing the product.

9
ENGENGLISH
INSTALLATION
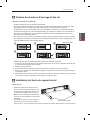
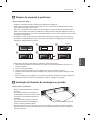
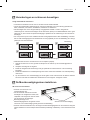
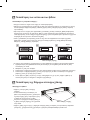
4
Fixing Anchors and Screws
< Please follow the directions below >
y
Check the material of the wall and thickness of nishing material.
y
You can use the anchors and screws provided with the TV set for the wall made with concrete,
lightweight concrete, soft eldstone, hard eldstone, brick or cellular block.
y
Do not mount on the wall made with plaster board or medium density breboard (MDF). Otherwise, you
must x the anchor screws to the retaining wall (concrete) inside the nishing material. If there is no
retaining wall, you must install a separate hanger rst to x the anchors and screws.
y
When installing the product on the wall that is not specied in this manual, make sure that each xing
point withstands an pullout load of 70 kgf (686 N) and a shearing load of 100 kgf (980 N) or more.
Wall mounting screw
Anchor
1 2
5
3
4
y
Use the Ø 8 mm drill bit for concrete wall and hammer (Impact) drill.
1 Use a Ø 8 mm drill bit to make a hole with a depth of 80-100 mm on the anchor position.
2 Clean the drilled holes.
3 Insert the provided anchor in the hole. (Use a hammer when inserting the anchor.)
4 Place the angle adjusting part to face upward. Place the angle adjusting part to face upward.
5 Align the wall mounting screws with the holes to tighten the screws. Tighten the screw using a
recommended torque of 45 kgf/cm - 60 kgf/cm or more.
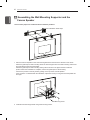
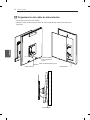
5
Installing the Wall Mounting Supporter
<How to tighten the screws>
y
Tighten the four wall mounting screws.
y
If the screws cannot be xed in the
designated location, move the bracket to
the left or right to x the screws.
y
Fix the wall mounting supporter using the
wall mounting screws as shown in the
gure.
y
Tighten the screws until the wall, the wall
mounting supporter and the screws are
joined together securely using a (manual
or electric) Phillips screwdriver or 8 mm
spanner.
Wall Mounting Screw

10
ENG
ENGLISH
INSTALLATION
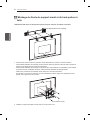
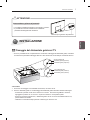
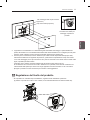
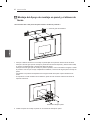
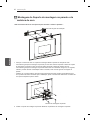
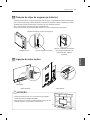
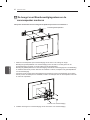
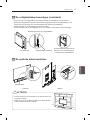
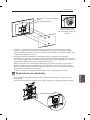
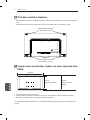
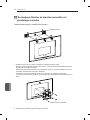
6
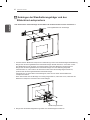
Assembling the Wall Mounting Supporter and the
Canvas Speaker
< Two or more people are needed to lift and install the product >
Installation Guide Tape
1 Place the Canvas Speaker on the wall mounting attached to the wall in the direction of the arrow.
- Attach the guide tape for wall mounting above the left and right holes of the wall mounting and the left
and right VESA of the Canvas Speaker .
- Attach the guide tape for wall mounting side by side as shown in the figure and then install the
product. When the installation is complete, remove the guide tape for wall mounting.
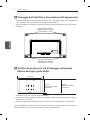
- Check if the product is securely fixed by pulling ou the top of the Canvas Speaker
- If the product is not levelled after the installation, adjust the level by moving the Canvas Speaker left
and right.
Wall Mounting Screw
2 Install the wall mounting bracket using wall mounting screws.

11
ENGENGLISH
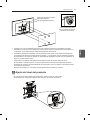
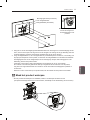
INSTALLATION
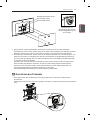
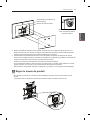
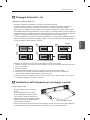
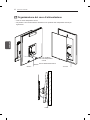
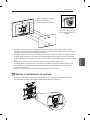
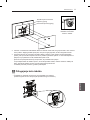
Safety Clip (Top) Fixing screw
Safety Clip (Top)
Assemble Safety Clip
between the Wall Mounting
Bracket and the Product
3 Hang the TV assembled with the guide spacers on the wall mounting bracket attached to the wall by
aligning it with the grooves of the bracket in the direction of the arrow. Attach the lower part rst, and
then attach the uppepart by slightly lifting up the set.
4 Insert the safety pin, which is provided in order to prevent the product desorption, in the direction of the
arrow while adjusting the position, and then completely x the safety clip with xing screw for safety clip.
If the safety pin is not xed as shown in the gure, the product may fall.
- Check if the product is securely fixed by pulling ou the bottom of the TV.
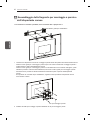
When using cables or accessories that are not provided as accessories for this product, make sure to
keep a certain distance from the wall so that excessive force is not applied on cables or accessories.
- Pushing the product with excessive force may cause damage to the product.
7
Adjusting the Level of the Product
y
If the product is not levelled after the installation, adjust the level using this screw.
(The product goes up or down, depending on the rotation direction of the screw.)

12
ENG
ENGLISH
INSTALLATION
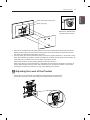
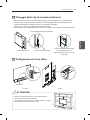
8
Organizing the Power Cord
y
Pull the Canvas speaker forward.
y
Draw out the power cord through the square hole below the Canvas speaker to organize it.
< Back > < Front >
TV Power cord
Square hole
below the
Canvas Speaker
< Side >

13
ENGENGLISH
INSTALLATION
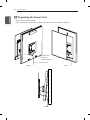
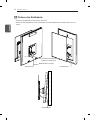
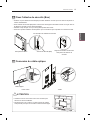
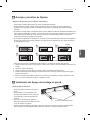
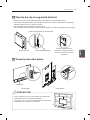
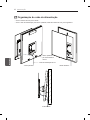
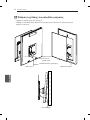
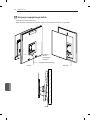
9
Fixing the Safety Clip (Bottom)
y
Be sure to x the safety clip (bottom) after organizing the power cord.
y
Fix the safety clip (bottom) using the safety clip xing screw in the wall mounting brackets square hole
as shown in the gure.
y
Fix the clip to make it symmetrical bilaterally.
y
Pull out the lower part of the canvas speaker to check if the product is securely xed.
Safety Clip Fixing screw
Combined Appearance of the wall
mounting brackets and canvas
speaker, Safety Clip
Safety Clip (Bottom)
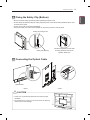
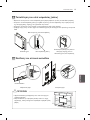
10
Connecting the Optical Cable
< Front > < Side >
Optical Cable
CAUTION
y
Leave a 10 cm (minimum) space from the wall for proper
ventilation.
y
Do not place the TV near or on sources of heat, as this may
result in fire or other damage.
10 cm
10 cm
10 cm
10 cm
Canvas Speaker

14
ENG
ENGLISH
INSTALLATION / PRODUCT SPECIFICATIONS
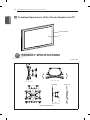
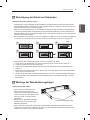
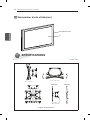
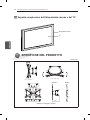
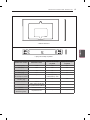
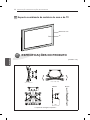
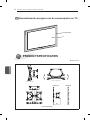
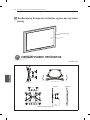
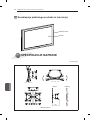
11
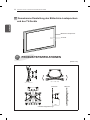
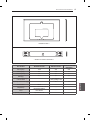
Combined Appearance of the Canvas Speaker and TV
Canvas Speaker
TV
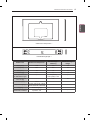
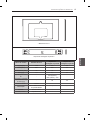
PRODUCT SPECIFICATIONS
[ Unit : mm ]
° ~ °± °
° ~ °± °
145
° ~ °± °
° ~ °± °
145
TX\° ~ RX\°G ± Y°
TX\° ~ RX\°G ± Y°
145
14
Maximum Minimum
TX\° ~ RX\°G± Y°
TX\° ~ RX\°G± Y°
145
14
TX\° ~ RX\°G± Y°
TX\° ~ RX\°G ± Y°
145
14
< Wall Mounting Bracket >

15
ENGENGLISH
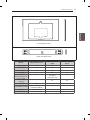
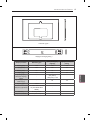
PRODUCT SPECIFICATIONS
< Canvas Speaker >
< Wall Mounting Supporter >
Model Name Canvas Speaker
Wall Mounting
Bracket
Wall Mounting
Supporter
Width (mm) 1430 450 500
Height (mm) 865 500 64
Depth (mm)
64 40 9
Weight (kg)
17.7 5.7 0.6
Wall Mounting VESA
Specifications
-
210 (Top)
/ 364 (Bottom) * 450
-
Max.UL Load
Capacity(kg)
- 50 50
Audio Output 100 W - -
Power
AC 100V~240V 50~60Hz
(SMPS ADPATER)
- -
Input SPDIF input - -
Front, woofer Impedance: 8 Ω - -


www.lg.com
BENUTZERHANDBUCH
BILDSCHIRM-LAUTSPRECHER
Lesen Sie dieses Handbuch aufmerksam durch, bevor Sie Ihr Gerät
zum ersten Mal verwenden und bewahren Sie es zur späteren
Verwendung auf.

2
ENG
DEUTSCH
INHALTSVERZEICHNIS
INHALTSVERZEICHNIS
3 SICHERHEITSVORKEHRUNGEN
5 VOR DER INSTALLATION ZU BEACHTEN
6 ZUBEHÖRTEILE
7 INSTALLATION
7 Anbringen des Abstandhalters am TV-Gerät
8 Anbringen des Polsterbandes
8 Überprüfen geeigneter Stellen zur Befestigung der Schrauben an der Wand unter Verwendung der
VESA - Schablone
9 Befestigung der Dübel und Schrauben
9 Montage der Wandhalterungsträger
10 Anbringen der Wandhalterungsträger und des Bildschirm-Lautsprechers
11 Ausrichten des Produkts
12 Ordnen des Netzkabels
13 Befestigen des Sicherheitsclips (unten)
13 Anschließen des Glasfaserkabels
14 Gemeinsame Darstellung des Bildschirm-Lautsprechers und des TV-Geräts
14 PRODUKTSPEZIFIKATIONEN
WARNUNG
y
Bei Nichtbeachtung drohen schwere Verletzungen, Unfälle und Tod.
VORSICHT
y
Bei Nichtbeachtung drohen leichte Verletzungen oder eine Beschädigung des Produkts.

3
ENGDEUTSCH
SICHERHEITSVORKEHRUNGEN
SICHERHEITSVORKEHRUNGEN
- Dieses Handbuch muss vor der Installation vom zuständigen Techniker gelesen werden.
- Nach der Installation sollte das Handbuch an den Kunden übergeben werden. Dieser sollte es sorgfältig
lesen und sicher aufbewahren.
Das Handbuch sollte nach dem Lesen für den weiteren Gebrauch an einem leicht zugänglichen Ort
aufbewahrt werden.
WARNUNG
Das Produkt sollte ausschließlich von einem
professionellen Techniker installiert werden,
der Ihnen von einem Händler zugewiesen
wurde.
Bei der Installation durch jede andere Person
besteht höchste Gefahr, und es kann zu
Körperverletzungen kommen.
Installieren Sie das Produkt nicht an einem mit
unzureichender Tragfähigkeit.
Wenn das Produkt an einem Ort installiert wird, der
nicht ausreichend stabil und fest ist, kann es u.U.
herunterfallen und Körperverletzungen verursachen.
Wenden Sie sich an einen vom Händler
empfohlenen Techniker, wenn Sie das Produkt
umpositionieren oder entfernen wollen.
Die Installation bedarf spezieller Vorgehensweisen.
Eigenständiges Umpositionieren oder Installieren kann
daher zu schwerwiegenden Sicherheitsproblemen
führen.
Setzen Sie das Produkt nach der Installation
keinerlei Zug- oder Druckbelastung aus.
Anderenfalls kann es passieren, dass es herunterfällt
und Verletzungen verursacht.
Hängen Sie bei Produkten, die an der
Wand montiert werden, nie das Netz- oder
Signalkabel auf die Rückseite des Fernsehers.
Anderenfalls kann es passieren, dass die Kabel
beschädigt werden, und Brand, Stromschläge oder
Produktbeschädigungen verursachen.

4
ENG
DEUTSCH
SICHERHEITSVORKEHRUNGEN
VORSICHT
Installieren Sie das Produkt gemäß den
Beschreibungen im Benutzerhandbuch.
Wenn Sie sich nicht an die Beschreibungen im
Benutzerhandbuch halten, kann es aufgrund
einer fehlerhaften Installation zu schweren
Körperverletzungen oder Beschädigungen des Produkts
kommen.
Zur Installation oder Höhenanpassung des
Produkts sind mindestens zwei Personen
erforderlich.
Anderenfalls kann es zu Körperverletzungen oder
Beschädigungen des Produkts kommen.
Überprüfen Sie vor der Installation die
Beschaffenheit der Wand, und verwenden Sie
zur Installation nur die beiliegenden Dübel und
Schrauben.
Andere als die vorgesehenen Dübel und Schrauben
halten u.U. dem Gewicht des Produkts nicht stand, was
zu Sicherheitsproblemen führen kann.
Verwenden Sie zum Bohren der Löcher stets
eine Bohrmaschine und einen Bohrer mit
passendem Durchmesser.
Wenn Sie sich beim Bohren der Löcher nicht an
die folgenden Beschreibungen halten, ist das
Produkt u.U. nicht stabil befestigt, und es kann zu
Sicherheitsproblemen kommen.
Wischen Sie das Produkt nie mit einem nassen
Tuch ab, und halten Sie es von Heizungen oder
Luftbefeuchtern fern.
Bei Kontakt mit Nässe, Feuchtigkeit oder Hitze
besteht die Gefahr von Brand, Stromschlägen oder
Fehlfunktionen.
Installieren Sie das Produkt nur an einer
senkrechten Wand und nie beispielsweise
in der Nähe eines Sprinklers oder Sensors,
an einem Ort, an dem es Erschütterungen
oder Schlägen ausgesetzt sein könnte bzw.
in der Nähe von Hochspannungskabeln oder
Stromquellen.
Ziehen Sie vor der Installation das Netzkabel
aus der Steckdose.
Wenn das Produkt bei eingestecktem Netzkabel
installiert wird, besteht Stromschlag- oder Brandgefahr.
Installieren Sie das Produkt nie mit bloßen
Händen. Tragen Sie stets geeignete
Arbeitshandschuhe.
Anderenfalls kann es zu Körperverletzungen kommen.
Wenn Sie zum Anschließen des Produkts
andere als die beiliegenden Kabel verwenden,
kann die Wand oder der Anschluss des
Produkts durch Reibung beschädigt werden.
Verwenden Sie ausschließlich die beiliegenden
Kabelkomponenten.
La page est en cours de chargement...
La page est en cours de chargement...
La page est en cours de chargement...
La page est en cours de chargement...
La page est en cours de chargement...
La page est en cours de chargement...
La page est en cours de chargement...
La page est en cours de chargement...
La page est en cours de chargement...
La page est en cours de chargement...
La page est en cours de chargement...
La page est en cours de chargement...
La page est en cours de chargement...
La page est en cours de chargement...
La page est en cours de chargement...
La page est en cours de chargement...
La page est en cours de chargement...
La page est en cours de chargement...
La page est en cours de chargement...
La page est en cours de chargement...
La page est en cours de chargement...
La page est en cours de chargement...
La page est en cours de chargement...
La page est en cours de chargement...
La page est en cours de chargement...
La page est en cours de chargement...
La page est en cours de chargement...
La page est en cours de chargement...
La page est en cours de chargement...
La page est en cours de chargement...
La page est en cours de chargement...
La page est en cours de chargement...
La page est en cours de chargement...
La page est en cours de chargement...
La page est en cours de chargement...
La page est en cours de chargement...
La page est en cours de chargement...
La page est en cours de chargement...
La page est en cours de chargement...
La page est en cours de chargement...
La page est en cours de chargement...
La page est en cours de chargement...
La page est en cours de chargement...
La page est en cours de chargement...
La page est en cours de chargement...
La page est en cours de chargement...
La page est en cours de chargement...
La page est en cours de chargement...
La page est en cours de chargement...
La page est en cours de chargement...
La page est en cours de chargement...
La page est en cours de chargement...
La page est en cours de chargement...
La page est en cours de chargement...
La page est en cours de chargement...
La page est en cours de chargement...
La page est en cours de chargement...
La page est en cours de chargement...
La page est en cours de chargement...
La page est en cours de chargement...
La page est en cours de chargement...
La page est en cours de chargement...
La page est en cours de chargement...
La page est en cours de chargement...
La page est en cours de chargement...
La page est en cours de chargement...
La page est en cours de chargement...
La page est en cours de chargement...
La page est en cours de chargement...
La page est en cours de chargement...
La page est en cours de chargement...
La page est en cours de chargement...
La page est en cours de chargement...
La page est en cours de chargement...
La page est en cours de chargement...
La page est en cours de chargement...
La page est en cours de chargement...
La page est en cours de chargement...
La page est en cours de chargement...
La page est en cours de chargement...
La page est en cours de chargement...
La page est en cours de chargement...
La page est en cours de chargement...
La page est en cours de chargement...
La page est en cours de chargement...
La page est en cours de chargement...
La page est en cours de chargement...
La page est en cours de chargement...
La page est en cours de chargement...
La page est en cours de chargement...
La page est en cours de chargement...
La page est en cours de chargement...
La page est en cours de chargement...
La page est en cours de chargement...
La page est en cours de chargement...
La page est en cours de chargement...
La page est en cours de chargement...
La page est en cours de chargement...
La page est en cours de chargement...
La page est en cours de chargement...
La page est en cours de chargement...
La page est en cours de chargement...
La page est en cours de chargement...
La page est en cours de chargement...
La page est en cours de chargement...
La page est en cours de chargement...
La page est en cours de chargement...
La page est en cours de chargement...
La page est en cours de chargement...
La page est en cours de chargement...
La page est en cours de chargement...
La page est en cours de chargement...
La page est en cours de chargement...
La page est en cours de chargement...
La page est en cours de chargement...
La page est en cours de chargement...
La page est en cours de chargement...
La page est en cours de chargement...
La page est en cours de chargement...
La page est en cours de chargement...
La page est en cours de chargement...
La page est en cours de chargement...
La page est en cours de chargement...
La page est en cours de chargement...
-
 1
1
-
 2
2
-
 3
3
-
 4
4
-
 5
5
-
 6
6
-
 7
7
-
 8
8
-
 9
9
-
 10
10
-
 11
11
-
 12
12
-
 13
13
-
 14
14
-
 15
15
-
 16
16
-
 17
17
-
 18
18
-
 19
19
-
 20
20
-
 21
21
-
 22
22
-
 23
23
-
 24
24
-
 25
25
-
 26
26
-
 27
27
-
 28
28
-
 29
29
-
 30
30
-
 31
31
-
 32
32
-
 33
33
-
 34
34
-
 35
35
-
 36
36
-
 37
37
-
 38
38
-
 39
39
-
 40
40
-
 41
41
-
 42
42
-
 43
43
-
 44
44
-
 45
45
-
 46
46
-
 47
47
-
 48
48
-
 49
49
-
 50
50
-
 51
51
-
 52
52
-
 53
53
-
 54
54
-
 55
55
-
 56
56
-
 57
57
-
 58
58
-
 59
59
-
 60
60
-
 61
61
-
 62
62
-
 63
63
-
 64
64
-
 65
65
-
 66
66
-
 67
67
-
 68
68
-
 69
69
-
 70
70
-
 71
71
-
 72
72
-
 73
73
-
 74
74
-
 75
75
-
 76
76
-
 77
77
-
 78
78
-
 79
79
-
 80
80
-
 81
81
-
 82
82
-
 83
83
-
 84
84
-
 85
85
-
 86
86
-
 87
87
-
 88
88
-
 89
89
-
 90
90
-
 91
91
-
 92
92
-
 93
93
-
 94
94
-
 95
95
-
 96
96
-
 97
97
-
 98
98
-
 99
99
-
 100
100
-
 101
101
-
 102
102
-
 103
103
-
 104
104
-
 105
105
-
 106
106
-
 107
107
-
 108
108
-
 109
109
-
 110
110
-
 111
111
-
 112
112
-
 113
113
-
 114
114
-
 115
115
-
 116
116
-
 117
117
-
 118
118
-
 119
119
-
 120
120
-
 121
121
-
 122
122
-
 123
123
-
 124
124
-
 125
125
-
 126
126
-
 127
127
-
 128
128
-
 129
129
-
 130
130
-
 131
131
-
 132
132
-
 133
133
-
 134
134
-
 135
135
-
 136
136
-
 137
137
-
 138
138
-
 139
139
-
 140
140
-
 141
141
-
 142
142
-
 143
143
-
 144
144


dans d''autres langues
- italiano: LG OCF100 Manuale utente
- español: LG OCF100 Manual de usuario
- Deutsch: LG OCF100 Benutzerhandbuch
- Nederlands: LG OCF100 Handleiding
- português: LG OCF100 Manual do usuário
Documents connexes
-
LG OCF100 Le manuel du propriétaire
-
-
-
-
LG LG OTW150 Le manuel du propriétaire
-
-
-
-
LG WB20GB Manuel utilisateur
-
LG 42LM345S Manuel utilisateur
Autres documents
-
 AmazonBasics B01MRT552R Mode d'emploi
-
Ricoo S6044 Manuel utilisateur
-
Ricoo F0344 Manuel utilisateur
-
Philips MCD988/12 Quick Installation Guide
-
Clarion SRS1626 Manuel utilisateur
-
-
Yamaha YTS-V1200 Le manuel du propriétaire
-
Hama 00049656 Le manuel du propriétaire
-
Kimex 041-3432 Guide d'installation
-
