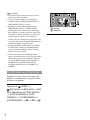
Sony HDR-XR200V Le manuel du propriétaire
- Catégorie
- Caméscopes
- Taper
- Le manuel du propriétaire
Ce manuel convient également à

4-135-833-11(1)
2009 Sony Corporation
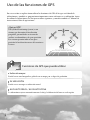
How To Use GPS
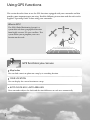
Using GPS functions
GB
Utilisation des fonctions GPS
FR
Uso de las funciones de GPS
ES

2
GB
Using GPS functions
This section describes how to use the GPS functions equipped with your camcorder and also
provides some important notes on using. Read the following instructions and also refer to the
supplied “Operating Guide” before using your camcorder.
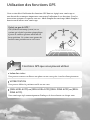
What is GPS?
The GPS (Global Positioning System) is a
system that calculates geographical location
from highly accurate US space satellites. This
system allows you to pinpoint your exact
location on the earth.
GPS functions you can use
Map Index
You can find a movie or photo on a map by its recording location.
YOUR LOCATION
You can display the current location on a map.
AUTO CLOCK ADJ / AUTO AREA ADJ
Your camcorder adjusts the clock and the time difference on each area automatically.

3
GB
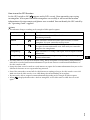
How to use the GPS function
Set the GPS switch to ON ( appears on the LCD screen). Your camcorder starts trying
to triangulate. When your camcorder triangulates successfully, it will record the location
information at the time movies and photos were recorded. You can identify the GPS switch by
the “Operating Guide” supplied.
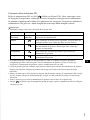
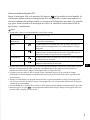
Notes
The indicator changes according to the strength of GPS signal reception.
Triangulating status GPS indicators GPS reception status
Function off No indicator
The GPS switch is set to OFF, or the GPS receiver is not
functioning normally.
Difficult
Your camcorder cannot find a GPS signal, therefore, it cannot
triangulate. Use your camcorder in an open area.
Processing
Your camcorder is confirming the GPS signal, and will be able
to acquire location information soon. Wait until your camcorder
completes the triangulation.
Triangulating
Your camcorder is receiving a GPS signal, and can acquire location
information.
Triangulating
Your camcorder is receiving a strong GPS signal, and can acquire
location information.
The GPS switch is set to ON in the default setting. Movies and photos recorded during triangulation by
GPS will be recorded with location information. If you do not want to record location information, set
the GPS switch to OFF.
It may take from several seconds to several minutes to acquire the location information when you use the
GPS for the first time or use it again after long intervals.
Even if the camcorder is turned off, the GPS function is working as long as the GPS switch is set to ON.
Make sure that the GPS switch is set to OFF during take off and landing of an airplane.
You may not be able to acquire location information depending on the strength of GPS reception.
When is displayed and it takes a while to triangulate, set the GPS switch to OFF, then set to ON
again.
GB

4
GB
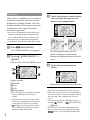
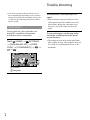
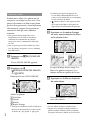
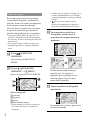
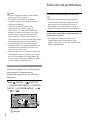
Map Index
Where movies and photos were recorded is
marked on a map. You can select a movie
or photo by recording location. Select the
recording media which contains the movie
or photo you want to play back before
starting this operation.
You can use the Map Index only with movies
and photos having location information that
was recorded with the GPS switch set to ON.
You cannot use the Map Index with photos
recorded on “Memory Stick PRO Duo” media.
Press (VIEW IMAGES).
The VISUAL INDEX screen appears.
Touch ( VIEW IMAGES)
[ MAP].
Returns to the VISUAL INDEX screen
Displays photos
Previous
Next
Scale
Image marker
You can change the scale using the zoom
lever or zoom buttons (W: larger, T:
smaller).
The point you touch on the map scrolls
to the center automatically. If you hold a
certain point, the map keeps scrolling.
will appear at the upper right corner
of the thumbnail of the movie or photo
without location information.
Touch the location marker where
you recorded the movies and
photos to be played back.
The image marker turns red. The
movies or photos recorded at that
location are displayed on the left of the
screen.
Touch the desired movie or
photo.
Playback starts from the selected scene.
The map always displays the north at the top.
When you record several movies and photos at
the same location, the movie or photo recorded
most recently will be displayed on the LCD
screen.
You can also display the Map Index screen by
touching (HOME) (VIEW IMAGES)
[ MAP].
You can also search for the thumbnail of the
movie or photo you want to play by touching
/ in step 3. The recording location of the

5
GB
When your camcorder cannot acquire the
current location information, the center marker
turns gray and the map shows the last location
acquired.
If you hold a certain point, the map keeps
scrolling.
You can also display the current location by
touching (HOME) (OTHERS)
[ YOUR LOCATION].
AUTO CLOCK ADJ/AUTO AREA ADJ
Your camcorder can maintain accurate
time and compensate for time difference
automatically, by acquiring time and
location information from GPS.
Touch (HOME)
(SETTINGS) [CLOCK/ LANG]
[AUTO CLOCK ADJ]/[AUTO
AREA ADJ].
Touch a desired setting
.
Notes
You must set the date and time on your
camcorder before using your camcorder.
There may be discrepancies of a few seconds
even if [AUTO CLOCK ADJ] is activated.
The clock is adjusted automatically by
[AUTO CLOCK ADJ] when you turn off your
camcorder if the camcorder is receiving a GPS
signal while it is being used. The clock is not
adjusted until the camcorder is turned off. Also,
the clock is not adjusted unless the camcorder
is receiving a GPS signal, even if the GPS switch
is set to ON.
The [AUTO AREA ADJ] function automatically
compensates for a time difference when it
detects a time differences with the current area.
movie or photo will be displayed at the center
of the map.
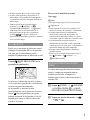
YOUR LOCATION
You can display the current location on a
map.
Set the GPS switch to ON so that your
camcorder can acquire the current location
information.
Touch ( YOUR LOCATION) on the
recording screen.
The current location is displayed and
marked at the center of the LCD screen.
If you touch a certain point on the screen,
the map shows the area with that point at
the center.
Touch (your location) at the bottom
left of the LCD screen to move the current
location back to the center.
To close the map screen
Touch .
Notes
The map always displays the north at the top.
Tips
You can change the scale using the zoom lever
or zoom buttons (W: larger, T: smaller).
Your camcorder acquires the current location
information every 10 seconds. The displays
of the center marker, etc., appear differently
according to the status of the current inquiry.

6
GB
The clock may not be adjusted to the correct
time automatically, depending on the country/
region selected for your camcorder. In this case,
set [AUTO CLOCK ADJ] and [AUTO AREA
ADJ] to [OFF].
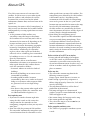
COORDINATES
During playback, your camcorder can
display the coordinates information
recorded on movies and photos.
Touch (HOME) (SETTINGS)
[VIEW IMAGES SET] [DATA
CODE] [COORDINATES]
.
60
min
W139˚ 44’ 43
N35˚ 37’ 19
W139˚ 44’ 43
60
N35˚ 37’ 19
min
VOL
Latitude
Longitude
Trouble shooting
The camcorder is not receiving a GPS
signal.
Your camcorder may not be able to receive
radio signals from GPS satellites because of
obstructions. Bring your camcorder to an
open area, and set the GPS switch to ON
again.
The current location on the map of the
camcorder is different from the actual
current location.
The margin of error of the radio signal from
GPS satellites is large. The margin of error can
be as wide as several-hundred meters at the
maximum.

7
GB
radio signals from 3 or more GPS satellites. The
triangulating error allowed by the GPS satellites
is about 30 m (98 feet). Depending on the
environment of the location, the triangulating
error can be greater. In this case, your actual
location may not match the location on the map
based on the GPS information. Meanwhile,
the GPS satellites are controlled by the Unites
States Department of Defense, and the degree of
accuracy may be changed intentionally.
Error during the triangulating process
The camcorder acquires location information
every 10 seconds during triangulating. There
is a slight time difference between when the
location information is acquired and when the
location information is recorded on an image,
therefore, the actual recording location may not
match exactly the location on the map based on
the GPS information.
On the restriction of use of GPS on an airplane
During take off and landing of an airplane,
set the GPS switch to OFF and turn off the
camcorder, as you will be instructed to do by
the on-board announcement. In other cases, use
GPS in accordance with the regulations of the
place or situation.
On the map data
The camcorder contains map data for the
following countries/regions.
Europe, Japan, North America, Oceania, etc.
Built-in map is powered by companies as
follows; Map of Japan by Zenrin Co., Ltd., other
areas by NAVTEQ.
The map data included is as of the date of
production of this manual.
GPS maps will appear in 2-dimensional
graphics except for certain landmarks in Japan,
which will appear in 3D.
You cannot change the language on the map.
You cannot update the map data.
The scale of the map is 25 m to 6,000 km (or
100 feet to 6,000 miles).
On the geographic coordinate system
The “WGS-84” geographic coordinate system
is used.
About GPS
The GPS system consists of 24 or more GPS
satellites. A GPS receiver receives radio signals
from the satellites, and calculates the current
location of the receiver based on the orbital
information (almanac data) and travel time of the
signals, etc.
Determining a location is called “triangulating.” A
GPS receiver can determine the location’s latitude
and longitude by receiving signals from 3 or more
satellites.
As the positions of GPS satellites vary
constantly, it may take longer to determine
the location or the receiver may not be able to
determine the location at all, depending on the
location and time you use the camcorder.
“GPS” is a system for determining geographic
location by triangulating radio signals from
GPS satellites. Avoid using the camcorder
in places where radio signals are blocked or
reflected, such as a shadowy place surrounded
by buildings or trees, etc. Use the camcorder in
open sky environments.
You may not be able to record location
information at locations or in situations where
radio signals from the GPS satellites do not
reach the camcorder as follows.
In tunnels, indoors or under the shade of
buildings.
Between tall buildings or at narrow streets
surrounded by buildings.
In underground locations, locations
surrounded by dense trees, under an elevated
bridge, or in locations where magnetic fields
are generated, such as near high voltage
cables.
Near devices that generate radio signals of the
same frequency band as the camcorder: near
1.5 GHz band mobile telephones, etc.
On triangulating errors
If you move to another location right after
setting the GPS switch to ON, it may take
a longer time for the camcorder to start
trianguating, compared to when you stay in the
same place.
Error caused by the position of GPS satellites
The camcorder automatically triangulates your
current location when the camcorder receives

8
GB
On copyright
The map data of the camcorder is copyrighted.
Unauthorized copying or other usage of the
map data may be contrary to the copyright laws.
On the navigation function
The camcorder does not have a navigation
function that uses GPS.
Australia
Copyright. Based on data provided under license
from PSMA Australia Limited (www.psma.com.
au).
Austria
© Bundesamt für Eich- und Vermessungswesen
Croatia, Estonia, Latvia, Lithuania, Poland and
Slovenia
© EuroGeographics
France
source: Géoroute® IGN France & BD Carto® IGN
France
Germany
Die Grundlagendaten wurden mit Genehmigung
der zustaendigen Behoerden entnommen.
Great Britain
Based upon Crown Copyright material.
Greece
© EuroGeographics; Copyright Geomatics Ltd.
Hungary
Copyright © 2003; Top-Map Ltd.
Italy
La Banca Dati Italiana è stata prodotta usando
quale riferimento anche cartografia numerica ed
al tratto prodotta e fornita dalla Regione Toscana.
Japan
Norway
Copyright © 2000; Norwegian Mapping Authority
Portugal
Source: IgeoE – Portugal
Spain
Información geográfica propiedad del CNIG
Sweden
Based upon electronic data © National Land
Survey Sweden.
Switzerland
Topografische Grundlage: © Bundesamt für
Landestopographie.

9
GB

2
FR
Utilisation des fonctions GPS
Cette section décrit l’utilisation des fonctions GPS dont est équipé votre caméscope et
vous fournit des remarques importantes concernant l’utilisation de ces fonctions. Lisez les
instructions suivantes et reportez-vous au « Mode d’emploi du caméscope/Mode d’emploi »
fourni avant d’utiliser votre caméscope.
Qu’est-ce que le GPS ?
GPS (Global Positioning System) est un
système qui calcule la position géographique
à partir de satellites spatiaux américains de
haute précision. Ce système vous permet de
localiser votre position exacte sur la terre.
Fonctions GPS que vous pouvez utiliser
Index des cartes
Vous pouvez retrouver un film ou une photo sur une carte grâce à son lieu d’enregistrement.
VOTRE POSITION
Vous pouvez afficher la position actuelle sur une carte.
[REGL.HORL.AUTO] ou [RÉGL.HORL.AUTO]/[REGL.ZONE AUTO] ou [RÉGL.
ZONE AUTO].
Votre caméscope règle automatiquement l’horloge et le fuseau horaire sur chaque zone.

3
FR
Comment utiliser la fonction GPS
Réglez le commutateur GPS sur ON ( s’affiche sur l’écran LCD). Votre caméscope essaye
de trianguler. Lorsque votre caméscope réussira à trianguler, il enregistrera les informations
de position au moment où les films et les photos ont été enregistrés. Vous pouvez identifier le
commutateur GPS grâce au « Mode d’emploi du caméscope/Mode d’emploi » fourni.
Remarques
L’indicateur change selon la force du signal de réception GPS.
État de la triangulation Indicateurs GPS Statut de réception GPS
Fonction
désactivée
Aucun
indicateur
Le commutateur GPS est réglé sur OFF, ou le récepteur GPS ne
fonctionne pas normalement.
Difficile
Votre caméscope ne trouve pas de signal GPS, il ne peut donc pas
trianguler. Utilisez votre caméscope dans une zone ouverte.
Traitement
Votre caméscope confirme le signal GPS et pourra bientôt acquérir
des informations de position. Attendez que votre caméscope
termine la triangulation.
Triangulation
Votre caméscope reçoit un signal GPS et peut obtenir des
informations de position.
Triangulation
Votre caméscope reçoit un signal GPS fort et peut obtenir des
informations de position.
Le commutateur GPS est réglé sur ON par défaut. Les films et les photos enregistrés pendant la
triangulation par GPS seront enregistrés avec les informations de position. Si vous ne voulez pas
enregistrer les informations de position, réglez le commutateur GPS sur OFF.
Cela peut prendre plusieurs secondes voire plusieurs minutes pour obtenir des informations de position
lorsque vous utilisez le GPS pour la première fois ou que vous l’utilisez de nouveau après de longs
intervalles.
Même si le caméscope est hors tension, la fonction GPS fonctionne tant que le commutateur GPS est réglé
sur ON. Assurez-vous que le commutateur GPS est réglé sur OFF pendant le décollage ou l’atterrissage
d’un avion.
Vous ne pourrez pas recevoir les informations de position selon la force de réception GPS.
Lorsque est affiché et que la triangulation prend du temps, réglez le commutateur GPS sur OFF, puis
à nouveau sur ON.
FR

4
FR
Index des cartes
L’endroit où les films et les photos ont été
enregistrés est indiqué sur une carte. Vous
pouvez sélectionner un film ou une photo
par lieu d’enregistrement. Avant l’opération,
sélectionnez le support d’enregistrement
contenant le film que vous souhaitez
visionner.
Vous pouvez utiliser l’Index des cartes
uniquement avec des films et des photos
contenant des informations de position
enregistrées avec le commutateur GPS réglé
sur ON.
Vous ne pouvez pas utiliser l’Index des cartes
avec des photos enregistrées sur un « Memory
Stick PRO Duo ».
Appuyez sur (AFFICHER LES
IMAGES).
L’écran VISUAL INDEX apparaît.
Appuyez sur
( VISUALISATION DES IMAGES)
[ CARTE].
Retourne à l’écran VISUAL INDEX
Affiche les photos
Précédent
Suivant
Echelle
Repère d’image
Vous pouvez modifier l’échelle à l’aide de la
manette de zoom motorisé ou des touches
de zoom (W : plus grand, T : plus petit).
L’endroit sur lequel vous appuyez sur
la carte défile automatiquement vers le
centre. Si vous maintenez un certain point,
la carte continue de défiler.
s’affichera dans le coin supérieur droit
de la vignette du film ou de la photo ne
disposant pas d’informations de position.
Appuyez sur le repère d’image
où vous avez enregistré les films
et les photos à lire.
Le repère d’image devient rouge. Les
films et les photos enregistrés à cet
endroit s’affichent à gauche de l’écran.
Appuyez sur le film ou la photo
de votre choix.
La lecture commence à partir de la
scène sélectionnée.
La carte affiche toujours le nord en haut.
Lorsque vous enregistrez plusieurs films et
photos au même endroit, le film ou la photo
enregistré en dernier s’affiche sur l’écran LCD.

5
FR
Conseils
Vous pouvez modifier l’échelle à l’aide de la
manette de zoom motorisé ou des touches de
zoom (W : plus grand, T : plus petit).
Votre caméscope obtient les informations de
position actuelle toutes les 10 secondes. Les
affichages du repère de centre etc. s’affichent
de façon différente selon l’état de la requête
actuelle.
Si votre caméscope ne peut pas obtenir les
informations de position actuelle, le repère
central devient gris et la carte affiche la dernière
position obtenue.
Si vous maintenez un certain point, la carte
continue de défiler.
Vous pouvez aussi afficher la position actuelle
en appuyant sur (HOME) (AUTRES)
[ VOTRE POSITION].
REGL.HORL.AUTO ou RÉGL.HORL.
AUTO/REGL.ZONEAUTO ou RÉGL.
ZONE AUTO
Votre caméscope peut maintenir une heure
précise et compenser automatiquement les
fuseaux horaires en obtenant l’heure et le
lieu à partir du GPS.
Appuyez sur (HOME)
(REGLAGES) ou (RÉGLAGES)
[REG.HOR./ LAN.] ou [RÉG.
HOR./ LAN.] [REGL.HORL.
AUTO] ou [RÉGL.HORL.AUTO]/
[REGL.ZONE AUTO] ou [RÉGL.
ZONE AUTO].
Appuyez sur le réglage de votre
choix .
Vous pouvez également afficher l’Index des
cartes en appuyant sur (HOME)
(AFFICHER LES IMAGES)
[ CARTE].
Vous pouvez aussi rechercher la vignette
du film ou de la photo que vous souhaitez
lire en appuyant sur / à l’étape 3. Le
lieu d’enregistrement du film ou de la photo
s’affichera au centre de la carte.
VOTRE POSITION
Vous pouvez afficher la position actuelle
sur une carte.
Réglez le commutateur GPS sur ON pour
que votre caméscope puisse obtenir les
informations de position actuelle.
Appuyez sur ( VOTRE POSITION)
sur l’écran d’enregistrement.
La position actuelle est affichée et indiquée
au centre de l’écran LCD.
Si vous appuyez sur un certain point à
l’écran, la carte affiche la zone avec ce point
au milieu.
Appuyez sur (Position actuelle) en bas
à gauche de l’écran LCD pour déplacer la
position actuelle vers le centre.
Pour fermer l’écran de la carte
Appuyez sur .
Remarques
La carte affiche toujours le nord en haut.

6
FR
Latitude
Longitude
Remarques
Vous devez régler la date et l’heure sur votre
caméscope avant de l’utiliser.
Il peut y avoir des différences de quelques
secondes même si [REGL.HORL.AUTO] ou
[RÉGL.HORL.AUTO] est activé.
L’horloge est réglée automatiquement par
[REGL.HORL.AUTO] ou [RÉGL.HORL.
AUTO] quand vous mettez votre caméscope
hors tension si ce dernier reçoit un signal GPS
alors qu’il est utilisé. L’horloge n’est pas ajustée
jusqu’à ce que le caméscope soit mis hors
tension. De plus, l’horloge n’est pas ajustée sauf
si le caméscope reçoit un signal GPS, même si le
commutateur GPS est réglé sur ON.
La fonction [REGL.ZONE AUTO] ou [RÉGL.
ZONE AUTO] compense automatiquement
le fuseau horaire lorsqu’elle détecte le fuseau
horaire de la zone actuelle.
L’heure peut ne pas être automatiquement
réglée sur la bonne heure selon le pays/la région
sélectionné(e) pour votre caméscope. Dans ce
cas, réglez [REGL.HORL.AUTO] ou [RÉGL.
HORL.AUTO] et [REGL.ZONE AUTO]
ou [RÉGL.ZONE AUTO] sur [ARRET] ou
[ARRÊT].
COORDONNEES ou COORDONNÉES
Pendant la lecture, votre caméscope peut
afficher les coordonnées enregistrées dans
les films et les photos.
Appuyez sur (HOME)
(REGLAGES) ou (RÉGLAGES) [AFF.
REGL.IMAGES] ou [AFF.RÉGL.IMAGES]
[CODE DONNEES] ou [CODE
DONNÉES] [COORDONNEES] ou
[COORDONNÉES] .

7
FR
Dépannage
Le caméscope ne reçoit pas de signal GPS.
Il se peut que votre caméscope ne reçoive
pas de signaux radio des satellites GPS à
cause d’obstacles. Placez votre caméscope
dans une zone ouverte et réglez à nouveau le
commutateur GPS sur ON.
La position actuelle sur la carte du
caméscope est différente de la position
actuelle réelle.
La marge d’erreur du signal radio des satellites
GPS est trop grande. La marge d’erreur peut
être de plusieurs centaines de mètres au
maximum.
A propos de GPS
Le système GPS se compose de 24 satellites GPS
ou plus. Un récepteur GPS reçoit des signaux
radio des satellites et calcule la position actuelle
du récepteur selon les informations orbitales
(données des éphémérides) et le temps de
propagation des signaux, etc.
La détermination de la position s’appelle la
« triangulation ». Un récepteur GPS peut
déterminer la latitude et la longitude du lieu en
recevant des signaux de 3 satellites ou plus.
Puisque les positions des satellites GPS varient
constamment, cela peut prendre plus de temps
pour déterminer la position ou le récepteur
peut ne pas pouvoir déterminer la position
du tout, selon le lieu et l’heure d’utilisation du
caméscope.
« GPS » est un système de détermination de
position géographique par triangulation de
signaux radio à partir de satellites GPS. Evitez
d’utiliser le caméscope dans des endroits où les
signaux radio sont bloqués ou réfléchis, comme
un endroit sombre entouré d’immeubles ou
d’arbres, etc. Utilisez le caméscope dans des
environnements à ciel ouvert.
Il est possible que vous ne puissiez pas
enregistrer les informations de position dans
des lieux ou des situations où les signaux radio
des satellites GPS n’atteignent pas le caméscope
comme suit.
Dans les tunnels, en intérieur ou à l’ombre des
immeubles.
Entre des immeubles hauts ou dans des rues
étroites entourées d’immeubles.
Dans les métros, des emplacements entourés
d’arbres, sous un pont élevé ou des endroits
où des champs magnétiques sont générés
(près de câbles haute tension par exemple).
Près d’appareils générant des signaux radio à
la même fréquence que le caméscope : près
des téléphones mobiles de 1,5 GHz, etc.
Erreurs lors de la triangulation
Si vous vous déplacez juste après avoir réglé le
commutateur GPS sur ON, le caméscope peut
mettre plus longtemps à lancer la triangulation
que si vous restez au même endroit.

8
FR
Vous ne pouvez pas modifier la langue de la
carte.
Vous ne pouvez pas mettre à jour les données
cartographiques.
L’échelle de la carte est de 25 m à 6 000 Km.
A propos du système de coordonnées géographiques
Le système de coordonnées géographiques
« WGS-84 » est utilisé.
A propos des droits d’auteur
Les données cartographiques du caméscope
sont protégées par des droits d’auteur. Toute
copie ou autre utilisation non autorisée
des données cartographiques peuvent être
contraires aux lois sur le droit d’auteur.
A propos de la fonction de navigation
Le caméscope ne possède pas de fonction de
navigation qui utilise GPS.
Erreur causée par la position des satellites GPS
Le caméscope triangule automatiquement votre
position actuelle lorsqu’il reçoit des signaux
radio de 3 satellites GPS ou plus. L’erreur de
triangulation autorisée par les satellites GPS
est d’environ 30 m. Selon l’environnement de
la position, l’erreur de triangulation peut être
supérieure. Dans ce cas, votre position actuelle
peut ne pas correspondre à la position de
la carte basée sur les informations GPS. Les
satellites GPS sont contrôlés par le Ministère de
la Défense américain et le degré de précision
peut être modifié intentionnellement.
Erreur lors de la procédure de triangulation
Le caméscope obtient des informations de
position toutes les 10 secondes lors de la
triangulation.
Il existe un léger décalage entre le moment où
les informations de position sont acquises et
celui où elles sont enregistrées sur une image,
par conséquent, la position d’enregistrement
réelle peut ne pas correspondre exactement à la
position sur la carte basée sur les informations
GPS.
A propos de la restriction d’utilisation du GPS dans un
avion
Au décollage et à l’atterrissage d’un avion,
désactivez le GPS et éteignez le caméscope,
comme indiqué par l’annonce de bord. Dans
d’autres cas, utilisez le GPS conformément aux
réglementations en vigueur dans le lieu ou la
situation.
A propos des données de la carte
Le caméscope contient des données de carte
pour les pays/régions suivant(e)s.
Europe, Japon, Amérique du Nord, Océanie,
etc.
Une carte intégrée est optimisée par des sociétés
comme suit ; carte du Japon par Zenrin Co.,
Ltd., autres zones par NAVTEQ.
Les données cartographiques sont effectives à
partir de la date de création de ce manuel.
Les cartes GPS s’affichent dans des graphiques
bidimensionnels excepté certains repères au
Japon qui s’affichent en 3D.

9
FR
Australie
Copyright. Based on data provided under license
from PSMA Australia Limited (www.psma.com.
au).
Autriche
© Bundesamt für Eich- und Vermessungswesen
Croatie, Estonie, Lettonie, Lituanie, Pologne et
Slovénie
© EuroGeographics
France
source: Géoroute® IGN France & BD Carto® IGN
France
Allemagne
Die Grundlagendaten wurden mit Genehmigung
der zustaendigen Behoerden entnommen.
Grande-Bretagne
Based upon Crown Copyright material.
Grèce
© EuroGeographics; Copyright Geomatics Ltd.
Hongrie
Copyright © 2003; Top-Map Ltd.
Italie
La Banca Dati Italiana è stata prodotta usando
quale riferimento anche cartografia numerica ed
al tratto prodotta e fornita dalla Regione Toscana.
Japon
Norvège
Copyright © 2000; Norwegian Mapping Authority
Portugal
Source: IgeoE – Portugal
Espagne
Información geográfica propiedad del CNIG
Suède
Based upon electronic data © National Land
Survey Sweden.
Suisse
Topografische Grundlage: © Bundesamt für
Landestopographie.

2
ES
Uso de las funciones de GPS
En esta sección se explica cómo utilizar las funciones de GPS de las que está dotada la
videocámara y también se proporcionan importantes notas referentes a su utilización. Antes
de utilizar la videocámara, lea las instrucciones siguientes y consulte también el “Manual de
instrucciones/Guía de operaciones”.
¿Qué es GPS?
GPS (Global Positioning System) es un
sistema que determina la localización
geográfica por medio de un sistema de
satélites estadounidenses de gran precisión.
Este sistema permite indicar con gran
precisión la localización exacta del usuario en
la tierra.
Funciones de GPS que puede utilizar
Índice de mapas
Puede buscar una fotografía o película en un mapa por su lugar de grabación.
SU UBICACIÓN
Puede ver en un mapa su ubicación actual.
AJUS.AUTO RELOJ / AJUS.AUTO ZONA
La videocámara ajusta automáticamente el reloj y la diferencia de hora en cada región.

3
ES
Cómo se utiliza la función GPS
Ponga el interruptor GPS en la posición ON (aparece en la pantalla de cristal líquido). La
videocámara intenta realizar la triangulación. Si la triangulación se realiza correctamente, se
incluirá la información del lugar donde se encuentra en las fotografías que tome y las películas
que grabe. Puede identificar el interruptor de GPS en el “Manual de instrucciones/Guía de
operaciones” suministrado.
Notas
El indicador cambia con la intensidad de la señal GPS recibida.
Estado de triangulación Indicadores
de GPS
Estado de recepción de GPS
Función
desactivada
Sin indicador
El interruptor GPS está en la posición OFF o el receptor de GPS
no funciona normalmente.
Difícil
La videocámara no encuentra una señal de GPS y, por tanto, no
puede realizar la triangulación. Use la videocámara en un lugar
despejado.
Procesando
La videocámara está confirmando la señal de GPS, y podrá
adquirir pronto la información de ubicación. Espere hasta que la
videocámara finalice la operación de triangulación.
Triangulando
La videocámara está recibiendo una señal de GPS y puede adquirir
la información de ubicación.
Triangulando
La videocámara está recibiendo una señal de GPS intensa y puede
adquirir la información de ubicación.
El interruptor GPS está en la posición ON de forma predeterminada. Las películas y fotografías tomadas
durante la triangulación de GPS se grabarán con información de ubicación. Si no desea grabar la
información de ubicación, coloque el interruptor GPS en la posición OFF.
La primera vez que utilice el GPS o cuando vuelva a utilizarlo después de un período de tiempo
prolongado sin usarlo, adquirir la información de ubicación puede tardar desde varios segundos hasta
varios minutos.
Aunque la videocámara esté apagada, la función GPS seguirá funcionando en tanto el interruptor GPS
esté en la posición ON. Asegúrese de que el interruptor GPS esté en la posición OFF durante el despegue
y aterrizaje de un aeroplano.
Si la intensidad de la señal de GPS recibida es débil, quizá no pueda adquirir la información de ubicación.
Mientras aparece el signo , si la triangulación tarda mucho tiempo, coloque el interruptor GPS en la
posición OFF y después otra vez en ON.
ES

4
ES
Índice de mapas
En un mapa aparecen los lugares donde
se tomaron las fotografías y grabaron las
películas. Puede seleccionar una fotografía
o película por su lugar de grabación.
Antes de iniciar esta operación, seleccione
el soporte de grabación que contiene la
película o fotografía que desea reproducir.
Sólo puede utilizar Índice de mapas si en las
películas y fotografías se grabó la información
de ubicación, al colocar el interruptor GPS en la
posición ON.
No se puede utilizar el Índice de mapas con
fotografías grabadas en “Memory Stick PRO
Duo”.
Pulse (VISUALIZAR
IMÁGENES).
Aparecerá la pantalla VISUAL
INDEX.
Toque ( VISUALIZAR
IMÁGENES) [ MAPA].
Regresa a la pantalla VISUAL INDEX
Muestra fotografías
Anterior
Siguiente
Escala
Marcador de imagen
Puede cambiar la escala con la palanca o
los botones del zoom (W: aumentar, T:
disminuir).
Cuando toque un punto en el mapa, éste se
centrará automáticamente en él. El mapa
seguirá desplazándose si mantiene pulsado
el punto.
aparecerá en la esquina superior
derecha de la miniatura de la película o
fotografía sin información de ubicación.
Para reproducir películas o
fotografías, puede tocar el
marcador de imagen donde se
grabaron.
El color del marcador de imagen
cambia a rojo. Las películas o
fotografías que se grabaron en esa
ubicación aparecerán en la parte
izquierda de la pantalla.
Toque la película o fotografía
que desee.
La reproducción se inicia a partir de la
escena seleccionada.
La page est en cours de chargement...
La page est en cours de chargement...
La page est en cours de chargement...
La page est en cours de chargement...
La page est en cours de chargement...
La page est en cours de chargement...
La page est en cours de chargement...
La page est en cours de chargement...
-
 1
1
-
 2
2
-
 3
3
-
 4
4
-
 5
5
-
 6
6
-
 7
7
-
 8
8
-
 9
9
-
 10
10
-
 11
11
-
 12
12
-
 13
13
-
 14
14
-
 15
15
-
 16
16
-
 17
17
-
 18
18
-
 19
19
-
 20
20
-
 21
21
-
 22
22
-
 23
23
-
 24
24
-
 25
25
-
 26
26
-
 27
27
-
 28
28


Sony HDR-XR200V Le manuel du propriétaire
- Catégorie
- Caméscopes
- Taper
- Le manuel du propriétaire
- Ce manuel convient également à
dans d''autres langues
- English: Sony HDR-XR200V Owner's manual
- español: Sony HDR-XR200V El manual del propietario
Documents connexes
-
Sony HDR-TG5V Mode d'emploi
-
Sony HDR-CX500V Le manuel du propriétaire
-
-
-
-
-
-
Sony HDR-PJ10 Mode d'emploi
-
Mode d'Emploi Sony Série HDR-XR520E Le manuel du propriétaire