La page est en cours de chargement...

INSTRUCTIONS D’UTILISATION
INSTRUCTIONS FOR USE
Ο∆ΗΓΙΕΣ ΧΡΗΣΗΣ
M16301392 4/2/04 08:26 Página 1

MODÈÑES:
Ref.- 919010278 (4 L)
Ref.- 919010287 (6 L)
Ref.- 919010777 (8 L)
Ref.- 919010303 (10 L)
Classic 4L R
Classic 6L R
Classic 8L R
Classic 10L R
3
7
9
2
8
6
10
4
5
1
11
1
Fig.
Fagor Electrodomésticos, S.Coop.Barrio S.Andrés, nº.18 - 20500 MONDRAGON (ESPAÑA)
M16301392 4/2/04 08:26 Página 2

1
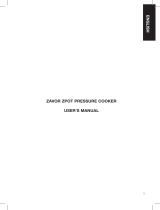
1) DESCRIPTION GENERALE
(*) Voici votre autocuiseur (Voir figure 1)
1.
Marmite.
2.
Couvercle.
3.
Poignée de fermeture.
4.
Poignée.
5.
Joint de fermeture.
6.
Soupape tournante.
7.
Soupape de sécurité.
8.
Ensemble de fermeture.
9.
Soupape de fonctionnement.
10.
Etrier.
11.
Fond diffuseur thermique.
Cet autocuiseur a été conçu pour
répondre aux critères les plus exigeants et
pour s’utiliser sur tous les modes de
chauffage (GAZ, ELECTRIQUE,
VITROCERAM et INDUCTION). La récipient
et la couvercle sont en acier inox. 18-10 et la
plaque de diffusion thermique de type
sandwich.
2) INSTRUCTIONS DE
FONCTIONNEMENT
A) Avant d'utiliser votre autocuiseur pour
la première fois:
•
Lisez toutes les instructions de la notice.
•
Mettez en place les poignées, introduisez la
vis avec la rondelle de blocage dans le trou
correspondant et serrez avec un tournevis.
•
Nettoyez soigneusement toutes les pièces
avec de l’eau chaude et un détergent normal,
rincez-les et essuyez-les avec un torchon doux.
•
S’il reste des traces blanches dues à une
eau trop calcaire, nettoyez l’autocuiseur avec
un peu de vinaigre.
•
Le lavage en lave-vaisselle peut modifier
la couleur de l’acier inoxydable.
•
N’utilisez pas de tampons métalliques ni de
produits abrasifs car ils peuvent rayer l’acier inox.
•Utiliser une source de chaleur
appropriée.
En cas d’utilisation sur
plaque électrique, se servir d’une
plaque de diamètre égal ou inférieur à
celui du fond de l’appareil.
Une
surchauffe peut noircir l’acier ou produire des
taches dorées ou bleutée, qui disparaîtront avec
un nettoyage normal.
B) Precautions essentielles de securite
LIRE TOUTES LES INSTRUCTIONS.
1.
SURVEILLER ETROITEMENT VOTRE
AUTOCUISEUR EN CAS D’UTILISATION A
PROXIMITE D’ENFANTS.
2.
NE PAS INTRODUIRE L’AUTOCUISEUR
DANS UN FOUR CHAUD.
3.
DEPLACER L’AUTOCUISEUR AVEC
BEAUCOUP DE PRECAUTIONS. NE PAS
TOUCHER LES SURFACES CHAUDES.
UTILISER LES POIGNEES ET LE CAS
ECHEANT, METTRE DES GANTS.
4.
NE PAS UTILISER L’AUTOCUISEUR A
D’AUTRES FINS QUE CELLES POUR
LESQUELLES IL A ETE CONÇU.
5.
CET APPAREIL CUIT SOUS PRESSION. UNE
MAUVAISE UTILISATION PEUT PRODUIRE
DES BRULURES. S’ASSURER QUE L’UNITE
EST BIEN FERMEE AVANT DE L’UTILISER.
VOIR LES INSTRUCTIONS DE
FONCTIONNE-MENT (Apdo. C).
6.
NE JAMAIS OUVRIR L’AUTOCUISEUR DE
FORCE. S’ASSURER QUE LA PRESSION A
L’INTERIEUR EST TOMBEE TOTALEMENT.
VOIR «NOTICE D’UTILISATION».
7.
NE JAMAIS UTILISER L’AUTOCUISEUR SANS
AVOIR AJOUTE DE L’EAU, CELA POURRAIT
GRAVEMENT L’ENDO-MMAGER.
8.
NE PAS REMPLIR LA MARMITE A PLUS DES
DEUX TIERS DE SA CAPACITE.
LORSQU’ON CUIT DES ALIMENTS QUI
GONFLENT A LA CUISSON, COMME LE
RIZ ET LES LEGUMES SECS, NE PAS
REMPLIR L’AUTOCUISEUR A PLUS DE LA
MOITIE DE SA CONTENANCE.
9.
UTILISER UNE SOURCE DE CHALEUR
CONFORME AUX INSTRUCTIONS
D’UTILISATION.
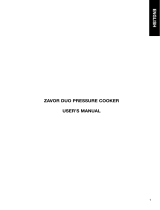
ø fond diffuseur thermique
4-6 L.
8-10 L.
21 cm.
21 cm.
21 cm.
21 cm.
Plat Bombé
M16301392 4/2/04 08:26 Página 1

2
10.
APRES LA CUISSON DE VIANDES AYANT
UNE PEAU (PAR EXEMPLE LA LANGUE DE
BOEUF), QUI PEUT GONFLER SOUS
L’EFFET DE LA PRESSION, NE PIQUEZ PAS
LA VIANDE TANT QU’ELLE PRESENTE UN
ASPECT GONFLE, VOUS POURRIERZ
VOUS EBOUILLANTER.
11.
EN CAS D’ALIMENTS A CONSISTANCE
PATEUSE, REMUER LEGEREMENT
L’AUTOCUISEUR AVANT D’OUVRIR LE
COUVERCLE POUR EVITER QUE LES
ALIMENTS N’ECLABOUSSENT À
L’EXTERIEUR.
12.
AVANT CHAQUE UTILISATION, VERIFIER
QUE LES SOUPAPES NE SONT PAS
OBSTRUEES. VOIR «notice
D’INSTRUCTIONS»
13.
NE PAS UTILISER L’AUTOCUISEUR POUR
FRIRE SOUS PRESSION AVEC DE L’HUILE.
14.
N’INTERVENIR SUR LES SYSTEMES DE
SECURITE QUE DANS LA LIMITE DES
INSTRUCTIONS D’ENTRETIEN INDIQUEES
DANS LA NOTICE D’UTILISATION.
15.
N’UTILISER QUE DES PIECES DE
RECHANGE D’ORIGINE CORRESPONDANT
AU MODELE D’AUTO-CUISEUR.
16.
CONSERVER CES INSTRUCTIONS.
C) INSTRUCTIONS DE FONCTIONNEMENT
Pou
r cuisiner, il est indispensable:
•
D’introduire au moins 1/4 de litre d’eau ou
d’un liquide permettant la vaporisation, et au
maximum les 2/3 de sa capacité (eau et
ingrédients compris).
•
Si on va préparer des sauces, il faut veiller
à ce qu’elles ne soient pas trop épaisses.
REMUER l’autocuiseur avant d’OUVRIR LE
COUVERCLE afin de briser les éventuelles
sources de chaleur ou dépressions pouvant se
créer à l’intérieur. NECESSAIRE LORS DE LA
CUISSON DE SOUPES OU DE LEGUMES
COMME LA SOUPE AUX LENTILLES, LES
POIS-CHICHES, etc...
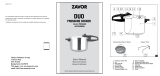
Pou
r fermer l’autocuiseur:
•
Faire tourner la poignée de fermeture
dans le sens contraire des aiguilles d’une
montre jusqu’à ce que l’étrier s’abaisse au
maximum sur le couvercle.
•
Faire glisser horizontalement le couvercle
sur le bord de la marmite jusqu’à ce que
l’étrier entre dans les fixations.
•
S’assurer que le couvercle s’emboîte sur
tout son périmètre et que l’étrier entre bien
dans les fixations.
•
Faire tourner la poignée dans le sens de
fermeture (dans le sens des aiguilles d’une
montre) jusqu’à ce qu’on sente une légère
pression de l’étrier sur les fixations.
•
Lorsque l’étrier est au contact des
fixations de la marmite (corps), prendre la
référence de la figure.
•
Procéder à la fermeture complète en
faisant tourner la poignée au moins trois tours.
•
Placer la soupape tournante sur la soupape
de fonctionnement et l’emboîter à fond.
x 3 MIN
M16301392 4/2/04 08:26 Página 2

3
Cuisson
•
Placer l’autocuiseur sur la source de
chaleur. Lorsque la soupape tournante se met en
MOUVEMENT, et laisse échapper de la vapeur,
réduire la puissance de la source de chaleur de
manière que la soupape tourne LENTEMENT.
Elle peut même NE PAS TOURNER mais
laisser échapper une petite quantité de vapeur.
La cuisson se fera ainsi parfaitement, on
économisera de l’énergie et l’apport en
vitamines des aliments sera plus grand.
•
Le temps de cuisson commence à ce
moment-là.
•
Pour faire un maximum d’économie
d’énergie:
Sur des cuisinières électriques, sélectionner
le diamètre de la plaque égal ou inférieur à
celui de l’autocuiseur.
Sur des cuisinières à gaz, régler la flamme
de manière qu’elle ne dépasse pas le fond
de l’autocuiseur.
Pour
ouvrir l’autocuiseur
IL EST INDISPENSABLE QU’IL N’Y AIT PAS DE
PRESSION A L’INTERIEUR, POUR CELA:
•
S’assurer que la source de chaleur est
éteinte et froide.
•
Si on a utilisé une source de chaleur
électrique, placer l’autocuiseur sur une surface
froide pour éviter qu’il ne continue à être
chauffé pendant son ouverture.
•
Soulever légèrement la soupape tournante
pour laisser échapper la vapeur et que la
pression tombe.
•
Il est également possible de refroidir
l’autocuiseur sous un filet d’eau courante. On
réduit ainsi la pression plus rapidement et on
évite la buée dans la cuisine.
•
NE JAMAIS PLONGER L’AUTO
CUISEUR DANS L’EAU.
•
REMUER L’AUTOCUISEUR AVANT DE
L’OUVRIR.
•
NE JAMAIS OUVRIR L’AUTOCUISEUR DE
FORCE.
•
Faire tourner la poignée dans le sens
contraire de celui des aiguilles d’une montre
jusqu’à ce que l’étrier s’abaisse. Soulever le
couvercle et le faire glisser horizontalement.
3)
ENTRETIEN
Après chaque utilisation:
•
Laver la marmite à l'eau chaude et un
détergent normal avec un linge doux, puis
rincez-la et essuyez-la.
Po
ur l’entretien de l’autocuiseur, il faut
respecter les instructions suivantes:
•
Ne pas utiliser de tampons métalliques ni
de détergents abrasifs.
•
Ne pas introduire les éléments dans le four.
•
Si on ne peut pas nettoyer les différents
éléments immédiatement après utilisation, les
remplir d’un peu d’eau et de savon. On évite
ainsi que les restes d’aliments ne collent.
•
S’il y a des traces blanches dues à une
eau trop calcaire, les nettoyer avec un peu de
vinaigre.
•
Une surchauffe peut noircir l’acier ou
produire des taches dorées ou bleutée, qui
disparaîtront avec un nettoyage normal.
•
Ne pas laisser d’eau de Javel à l’intérieur,
pour éviter la corrosion.
4) CONSEILS PRATIQUES
Si on constate que:
•
De la vapeur sort du bord du
couvercle.
•
Avant que la soupape ne tourne, il est
possible que:
•
Le couvercle ne soit pas bien emboîté ou
qu’on n’ait pas serré suffisamment.
•
Répéter l’opération de fermeture.
•
Le joint de fermeture est détérioré.
•
Le remplacer.
•
La soupape de sécurité laisse
échapper de la vapeur.
•
Il est normal que la soupape de sécurité
laisse échapper de petits jets de vapeur. Cela
n’a pas d’importance.
•
Si la vapeur s’en échappe avec force, il est
possible que:
M16301392 4/2/04 08:26 Página 3

4
•
L’ensemble soit bouché par des restes
d’aliments.
•
Vérifier l’ensemble et le nettoyer.
•
La soupape tournante ne tourne pas
Il est possible que:
•
Il y ait peu d’eau à l’intérieur de
l’autocuiseur et qu’il manque de la vapeur pour
la faire tourner.
•
Surveiller la quantité d’eau, en rajouter si
nécessaire.
•
Pour remplacer le joint de fermeture.
•
Normalement, le joint de fermeture dure
environ un an.
•
Il faut remplacer le joint lorsqu’il présente
un aspect humide et collant rendant difficile
une fermeture correcte du couvercle.
Procéder de la manière suivante:
•
Retirer le joint usé et nettoyer
soigneusement son logement.
•
Tremper le joint neuf pendant quelques
secondes dans de l’eau tiède savonneuse.
•
Mettre bout à bout les deux extrémités du joint
neuf sur un point du logement dans le couvercle et
appuyer fermement pour s’assurer que les deux
extrémités sont bien unies.
•
Terminer d’introduire le reste du joint en
utilisant un objet non pointu (par exemple une
cuiller en bois).
REMARQUE IMPORTANTE
•
Si vous constatez un défàut quelconque,
n´utilisez pas l´autocuiseur.
•
Remplaces inmédiatement la pièce
défectueuse.
N´UTILISEZ QUE DES PIECES DE
RECHANGE D´ORIGINE FAGOR
PIECES DE RECHANGE:
998011191 Joint de fermeture G
EAN13: 84127880190088
998010147 Poignée de fermeture EAN13:84127888007256
998010192 Poignée tiramisú EAN13:8412788007300
998010174 Soupape touenante yelmo EAN13:8412788007287
998010165 Soupape de fonctionnement
EAN13:8412788007270
Si l’anomalie persiste, n’intervenez pas
sur l’appareil, adressez-vous à notre S.A.V.
M16301392 4/2/04 08:26 Página 4

5
TEMPS DE CUISSON
ALIMENTS Quantité d'eau nécessaire Minutes de cuisson
Soupes:
Purée de légumes secs
Pot-au-feu
Artichauts
Asperges
Betteraves
Carottes entières
Carottes en rondelles
Chou
Chou-fleur
Endives
Epinards
Haricots verts
Macédoine de légumes
Pommes de terre
Petits pois
Tomates
LEGUMES SECS
Haricots
Lentilles
Pâtes
Riz
VIANDES
Bœuf
Mouton-Brebis
Porc
Veau
VIANDES EN SAUCE
Bœuf
Bœuf lardé
Langue
Tripes
Ragoût de veau
Ragoût de mouton
Ragoût viande et haricots
Ragoût de lapin
Lapin
Pieds de veau
Pieds de mouton
Veau
VOLAILLES
Poulet rôti
Poulet en sauce
Poule au riz
FRUITS
Confitures
Compotes (fruits divers)
Crème renversée
2/3 au maximum
“
“
1 à 2 centimètres
“
“
“
“
“
“
“
“
“
“
“
“
“
Recouvrir
2/3 au maximum
“
“
Pour améliorer la qualité, ne pas
utiliser d’eau mais du lard (une
noix)
Faire la sauce plus épaisse
Dorer la viande avant
Faire la sauce plus épaisse
Dorer la viande avant la cuisson
1 cm d’eau
10
25
30
10
10
30
10
8
12
10
12
8
10
15
12
15
10
30
30
8
12
25
15
25
25
30
40
35
60
20
30
25
20
12
20
30
25
15
25
40
5
5
10
M16301392 4/2/04 08:26 Página 5

6
1)
GENERAL DESCRIPTION
(*)
Your pressure cooker is like this
(See fig. 1)
1. Cooker.
2. Lid.
3. Closing handle.
4. Handle.
5. Closing seal.
6. Revolving valve.
7. Safety valve.
8. Operating unit.
9. Automatic valve.
10. Bridge.
11. Heat distributing base.
This pressure cooker is designed to satisfy
the most demanding requirements. The
cooker and lid are 18-10 stainless steel and
the heat distributing base is the ‘sandwich’
type.
2)
OPERATING INSTRUCTIONS
A)
Before using the cooker for the first
time
• Read all the instructions in the Manual.
• Set the handles in their position, put
the screw with its blocking washer in the
correct hole and tighten with a
screwdriver.
• Clean all the parts with hot water and
normal detergent and rinse and dry them
using a soft cloth.
• If there are white stains because of
excessive lime in the water, clean them
with a little vinegar.
• Using the dishwasher may alter the
colour of the stainless steel.
• Do not use metal scourers or abrasive
products as the stainless steel may be
scratched.
•Use an appropriate heat source, equal
to or smaller than the bottom of the
appliance. Overheating may blacken the
steel or cause yellowish or blue stains which
are removed with normal cleaning
.
B)
Basic Safety Precautions
READ ALL THE INSTRUCTIONS.
1.
MAINTAIN STRICT VIGILANCE IF THE
PRESSURE COOKER IS USED NEAR
CHILDREN.
2. DO NOT PUT THE PRESSURE COOKER
IN A HEATED OVEN.
3. MOVE THE PRESSURE COOKER WITH
MAXIMUM PRECAUTION.
4. DO NOT TOUCH HOT SURFACES, USE
THE HANDLES AND BUTTONS. IF
NECESSARY USE GLOVES.
5. DO NOT USE THE PRESSURE COOKER
FOR ANY OTHER PURPOSE THAN
THAT FOR WHICH IT IS DESIGNED.
6. THIS APPARATUS COOKS UNDER
PRESSURE. ITS INCORRECT USE CAN
RESULT IN BURNS, MAKE SURE THAT
THE UNIT IS CORRECTLY CLOSED
BEFORE OPERATING IT; SEE THE
OPERATING FUNCTIONS
(PARAGRAPH C.).
7. NEVER FORCE OPEN THE PRESSURE
COOKER. MAKE SURE THAT THE ITS
INTERNAL PRESSURE HAS DISSIPATED
COMPLETELY. SEE ‘USER MANUAL’.
8. NEVER USE THE APPARATUS
WITHOUT ADDING WATER, AS THIS
WOULD SERIOUSLY DAMAGE IT.
9. DO NOT FILL THE APPARATUS TO
MORE THAN 2/3 OF ITS CAPACITY;
WHEN PREPARING FOODS WHICH
EXPAND WHEN COOKED SUCH AS
RICE AND PULSES DO NOT FILL THE
COOKER TO MORE THAN HALF ITS
CAPACITY.
10. USE HEAT SOURCE(S) IN
ACCORDANCE WITH THE USER
INSTRUCTIONS.
ø Heat Distributing Plate
4-6 L.
8-10 L.
21 cm.
21 cm.
21 cm.
21 cm.
Straight Convex
M16301392 4/2/04 08:26 Página 6

7
11. AFTER COOKING MEAT WITH SKIN
(EG. OX TONGUE) WHICH MAY
SWELL UNDER PRESSURE, DO NOT
PUNCTURE THE MEAT WHEN IT IS
SWOLLEN AS YOU MAY GET
SCALDED.
12. IN THE CASE OF PASTA-BASED
FOODS, THE PRESSURE COOKER
SHOULD BE LIGHTLY SHAKEN
BEFORE OPENING THE LID SO THAT
THESE FOODS DO NOT SPLASH OUT.
13. CHECK THAT THE VALVES ARE NOT
BLOCKED BEFORE EACH OCCASION
OF USE. SEE ‘INSTRUCTIONS
MANUAL’.
14. DO NOT USE THE PRESSURE COOKER
TO FRY UNDER PRESSURE WITH OIL.
15. DO NOT MAKE ANY CHANGES TO
THE SAFETY SYSTEMS OTHER THAN
THOSE LISTED IN THE
MAINTE-NANCE INSTRUCTIONS IN
THE USER MANUAL.
16. ONLY USE ORIGINAL PARTS IN
ACCORDANCE WITH THE RELEVANT
MODEL.
17. KEEP THESE INSTRUCTIONS.
C)
OPERATING INSTRUCTIONS
For cooking it is essential
:
• To put in the cooker a minimum of 1/4
litre of water or any liquid generating
vaporisation, and as a maximum 2/3 parts
of the volume (water and ingredients
included).
• If you cook sauces make sure that
they are not too thick and also to SHAKE
the cooker before the OPENING THE LID
in order to eliminate possible heat focuses
or depressions which may have arisen in
the interior. REQUIRED WHEN COOKING
SOUPS OR PULSES SUCH AS CREAM OF
LENTILS, CHICK PEAS, etc.
To close the cooker
•
Turn the handle anticlockwise until the
bridge comes down fully on the lid.
• Slide the lid horizontally across the
edge of the cooker until the bridge fits into
the clamps.
• Make sure that the lid fits right around
it perimeter onto the cooker and the
bridge into its clamps.
• Turn the handle in the closing
direction (clockwise) until you note a slight
pressure of the bridge against the clamps
(handles).
• When contact is made between the
bridge and the clamps of the cooker
(body), set the reference as indicated.
• Close completely by turning the
handle at least three times.
• Place the revolving valve on the
operating valve and push it in fully.
x 3 MIN
M16301392 4/2/04 08:26 Página 7

8
Cooking
• Place the cooker on the heat source.
When the revolving valve begins to MOVE,
emitting steam, turn down the heat source
to a position in which the valve turns
SLOWLY. It can even rest WITHOUT
TURNING, emitting a small quantity of
steam. In this situation cooking will take
place perfectly, energy will be saved and
there will be a higher vitamin contribution.
• At this point the cooking time begins.
• To obtain maximum energy savings:
With electrical cookers select the plate
diameter which is equal to or smaller and
nearest in size to the bottom of the
cooker.
With gas cookers adjust the flame so that
it does not overlap the bottom of the
cooker.
To open the cooker
TO DO THIS IT IS ESSENTIAL THAT THERE
IS NO PRESSURE IN THE INTERIOR:
• Make sure that the heat source is
turned off completely and cold.
• If an electric heat source has been
used put the cooker on a cold surface to
prevent it continuing to heat when it is
being opened.
• Raise the revolving valve slightly let-
ting the steam escape until the pressure
drops.
• It is also possible to cool the cooker
under running water, which will reduce
the pressure more quickly, and also
prevent the kitchen from steaming up.
• DO NOT IMMERSE THE
COOKER IN WATER.
•
SHAKE THE COOKER BEFORE
OPENING THE LID.
• NEVER FORCE OPEN THE PRESSURE
COOKER.
• Turn the handle in the opposite
direction to that of closing until the bridge
comes down to the lid. Lift the lid until it
disengages and slide it off horizontally.
3) MAINTENANCE
After each use:
• Wash the cooker with hot water and
normal detergent using a soft cloth, rinse
and dry it.
To maintain your cooker, follow these
instructions:
•
Do not use metallic scourers or
abrasive detergents.
• Do not put its parts in the oven.
• If you cannot clean the parts used,
immediately after cooking, fill them with a
little soap and water, which will prevent
any leftover food from sticking.
• If there are white stains because of
excessive lime in the water, clean them
with a little vinegar.
• If intense overheating occurs it may
blacken the steel or cause yellowish or
blue stains which you can remove with
normal cleaning.
• To prevent corrosion do not leave
bleach in the interior.
4)
PRACTICAL ADVICE
If you observe that:
• Steam escapes from the edge of
the lid.
•
Before the revolving valve starts to
move, it is possible that:
• The lid is not correctly engaged or you
have not tightened it enough.
• Repeat the closing operation.
• The closing seal is worn.
• Replace it.
• The safety valve emits steam.
•
It is normal that the safety valve emits
small jets of steam. This is not significant.
• In the case that the steam escapes
violently it is possible that:
M16301392 4/2/04 08:26 Página 8

9
• The operating unit is blocked by food
remnants.
• Check the operating unit and clean it.
• The revolving valve does not
revolve.
It is possible that:
• You have insufficient water in the
interior of the cooker and it lacks steam to
turn the valve.
• Check the quantity of water, and put
in what is needed.
• To change the closing seal
.
• Normally the closing seal lasts for
approximately 1 year.
• The seal needs to be changed when it
has a damp, sticky appearance which it
makes it difficult to close the lid correctly.
Proceed as follows:
• Remove the used seal and carefully
clean its housing groove.
• Wet the new seal for a few seconds in
tepid, soapy water.
• Put the two ends of the new closing
seal together, in a point of its housing
groove in the lid and press in hard making
sure that the ends are well joined.
• Finish fitting the rest of the rubber
using a blunt object (eg. a wooden spoon).
IMPORTANT NOTE
•
Do not make changes in the parts, nor
try to assemble them other than in the way
indicated.
• ALWAYS USE ORIGINAL SPARE PARTS.
M16301392 4/2/04 08:26 Página 9

10
COOKING TIMES
FOOD
Amount water needed
Minutes to cook
Soup
Puree of dried legumes
Stew
Artichokes
Asparagus
Beets
Whole carrots
Carrots slices
Cabbage
Cauliflower
Chickory
Spinach
Green beans (pods)
Legume hash
Potatoes
Peas
Tomatoes
DRIED LEGUMES
Beans
Lentils
Assorted pastas
Rice
ROASTS
Ox
Sheep-mutton
Pork
Veal
MEATS IN SAUCE
Ox
Larded beef
Tongue
Tripe
Veal stew
Mutton stew
Meat-and beans stew
Rabbit stew
Rabbit
Legs of veal
Legs of mutton
Veal
POULTRY
Roast chicken
Chicken in sauce
Hen with rice
FRUIT
Marmelade
Compote (assorted fruits)
Custard
2/3 at most
“
“
1 to 2 centimeters
“
“
“
“
“
“
“
“
“
“
“
“
“
To cover
2/3 at most
“
“
To improve quality, do not use
water, but rather a piece of lard or
shortening (the size of a wainut)
Make the sauce thicker
Brown the meat first
Make the sauce thicker
Brown the meat before cooking
1 cm. of water
10
25
30
10
10
30
10
8
12
10
12
8
10
15
12
15
10
30
30
8
12
25
15
25
25
30
40
35
60
20
30
25
20
12
20
30
25
15
25
40
5
5
10
M16301392 4/2/04 08:26 Página 10
/