Toro 14in Electric Trimmer Manuel utilisateur
- Catégorie
- Coupe-herbe
- Taper
- Manuel utilisateur

FormNo.3368-911Rev B
14inTrimandEdgeElectricTrimmer
ModelNo.51480—SerialNo.311000100andUp
Operator'sManual
Registeratwww.Toro.com
Ifyouhavequestionsorproblems,contactusat
www.Toro.comorcalltollfree1-800-237-2654(US)or
1-800-248-3258(Canada)beforereturningthisproduct.
GeneralSafetyRules
WARNING:Whenusingelectricgardeningappliances,basicsafety
precautionsshouldalwaysbefollowedtoreducetheriskofre,electric
shock,andpersonalinjury,includingthefollowing:
Readallinstructions.
Theterm“powertool”inallofthewarningsreferstoyour
mains-operated(corded)powertoolorbattery-operated(cordless)
powertool.
1.Workareasafety
A.Keepworkareacleanandwelllit.Clutteredordarkareas
inviteaccidents.
B.Donotoperatepowertoolsinexplosiveatmospheres,
suchasinthepresenceofammableliquids,gasesor
dust.Powertoolscreatesparkswhichmayignitethedust
orfumes.
C.Keepchildrenandbystandersawaywhileoperatinga
powertool.Distractionscancauseyoutolosecontrol.
2.Electricalsafety
A.Powertoolplugsmustmatchtheoutlet.Nevermodify
thepluginanyway.Donotuseanyadapterplugswith
earthed(grounded)powertoolsUnmodiedplugsand
matchingoutletswillreduceriskofelectricshock.
B.Avoidbodycontactwithearthedorgroundedsurfaces
suchaspipes,radiators,rangesandrefrigerators.There
isanincreasedriskofelectricshockifyourbodyisearthed
orgrounded.
C.Donotexposepowertoolstorainorwetconditions.Water
enteringapowertoolwillincreasetheriskofelectricshock.
D.Donotabusethecord.Neverusethecordforcarrying,
pullingorunpluggingthepowertool.Keepcordaway
fromheat,oil,sharpedgesormovingpartsDamagedor
entangledcordsincreasetheriskofelectricshock.
E.Whenoperatingapowertooloutdoors,useanextension
cordsuitableforoutdooruse.Useofacordsuitablefor
outdoorusereducestheriskofelectricshock.
F.Ifoperatingapowertoolinadamplocationisunavoidable,
usearesidualcurrentdevice(RCD)protectedsupply.Use
ofanRCDreducestheriskofelectricshock.
G.Disconnecttheplugfromthepowersourcewhenthe
applianceisnotinuse.
3.Personalsafety
A.Stayalert,watchwhatyouaredoingandusecommon
sensewhenoperatingapowertool.Donotuseapower
toolwhileyouaretiredorundertheinuenceofdrugs,
alcoholormedication.Amomentofinattentionwhile
operatingpowertoolsmayresultinseriouspersonalinjury.
B.Usepersonalprotectiveequipment.Alwaysweareye
protection.Protectiveequipmentsuchasdustmask,
non-skidsafetyshoes,hardhat,orhearingprotectionusedfor
appropriateconditionswillreducepersonalinjuries.
C.Preventuninentionalstarting.Ensuretheswitchisinthe
off-positionbeforeconnectingtopowersourceand/or
batterypack,pickinguporcarryingthetool.Carrying
powertoolswithyourngerontheswitchorenergisingpower
toolsthathavetheswitchoninvitesaccidents.
D.Removeanyadjustingkeyorwrenchbeforeturningthe
powertoolon.Awrenchorakeyleftattachedtoarotating
partofthepowertoolmayresultinpersonalinjury.
E.Donotoverreach.Keepproperfootingandbalanceat
alltimes.Thisenablesbettercontrolofthepowertoolin
unexpectedsituations.
F.Dressproperly.Donotwearlooseclothingorjewelry.
Keepyourhair,clothingandglovesawayfrommoving
parts.Looseclothes,jewelry,orlonghaircanbecaughtin
movingparts.
G.Ifdevicesareprovidedfortheconnectionofdust
extractionandcollectionfacilities,ensuretheseare
connectedandproperlyused.Useofthesedevicescan
reducedust-relatedhazards.
H.Keephandsandfeetawayfromthecuttingarea.
4.Powertooluseandcare
A.Donotforcethepowertool.Usethecorrectpowertool
foryourapplication.Thecorrectpowertoolwilldothejob
betterandsaferattherateforwhichitwasdesigned.
B.Donotusethepowertooliftheswitchdoesnotturniton
andoff.Anypowertoolthatcannotbecontrolledwiththe
switchisdangerousandmustberepaired.
C.Disconnecttheplugfromthepowersourceand/orthe
batterypackfromthepowertoolbeforemakingany
adjustments,changingaccessories,orstoringpower
tools.Suchpreventivesafetymeasuresreducetheriskof
startingthepowertoolaccidentally.
D.Storeidlepowertoolsoutofthereachofchildrenanddo
notallowpersonsunfamiliarwiththepowertoolorthese
instructionstooperatethepowertool.Powertoolsare
dangerousinthehandsofuntrainedusers.
E.Storeidleappliancesindoors.Whennotinuse,appliances
shouldbestoredindoorsinadryandhighorlocked-upplace,
outofthereachofchildren.
©2011—TheToro®Company
8111LyndaleAvenueSouth
Bloomington,MN55420
Registeratwww.Toro.com.
OriginalInstructions(EN)
PrintedinChina.
AllRightsReserved

F.Maintainpowertools.Checkformisalignmentorbinding
ofmovingparts,breakageofpartsandanyother
conditionthatmayaffectthepowertoolsoperation.If
damaged,havethepowertoolrepairedbeforeuse.Many
accidentsarecausedbypoorlymaintainedpowertools.
G.Keepcuttingtoolssharpandclean.Properlymaintained
cuttingtoolswithsharpcuttingedgesarelesslikelytobind
andareeasiertocontrol.
H.Usethepowertool,accessoriesandtoolbitsetc.,in
accordancewiththeseinstructionsandinthemanner
intendedfortheparticulartypeofpowertool,taking
intoaccounttheworkingconditionsandtheworktobe
performed.Useofthepowertoolforoperationsdifferentfrom
thoseintendedcouldresultinahazardoussituation.
I.Keepguardsinplaceandinworkingorder.
5.Service
Haveyourpowertoolservicedbyaqualiedrepairperson
usingonlyidenticalreplacementparts.Thiswillensurethatthe
safetyofthepowertoolismaintained.
SAVETHESEINSTRUCTIONS
ExtensionCord
WARNING
Toreducetheriskofelectricalshockusethetrimmeronlywithan
extensioncordintendedforoutdooruse,suchasanextension
cordofcordtypeSW-A,SOW-A,STW-A,STOW-A,SJW-A,
SJOW-A,SJTW-A,orSJTOW-A.
Ensurethatyourextensioncordisingoodcondition.Whenusing
anextensioncord,useoneheavyenoughtocarrythecurrentyour
productwilldraw.Anundersizedextensioncordwillcauseadropin
linevoltageresultinginlossofpowerandoverheating.Thefollowing
tableliststhecorrectcordsizedependingonthelengthofthecord.
Ifyouareindoubt,usethenextheaviergage.Thesmallerthegage
numbertheheavierthegage.
ExtensionCordLengthMinimumWireGage(A.W.G.)
100ft.
16
150ft.
14
Note:Donotuseanextensioncordover150feet.
Toreducetheriskofdisconnectionoftheextensioncordduring
use,connecttheextensioncordtothetrimmerasillustratedinthe
Operationsectionofthismanual.
SafetyandInstructionalDecals
Safetydecalsandinstructionsareeasilyvisibletotheoperatorandarelocatednearanyareaofpotentialdanger.Replace
anydecalthatisdamagedorlost.
Symbol
Name
Designation/Explanation
AC
Alternatingcurrent
Typeofcurrent
AAmperes
Current
HzHertz
Frequency(cyclespersecond)
RPMRevolutionsperminute
Speedofstring
VVoltsVoltage
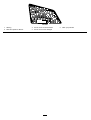
ID-1006
ID-1009
2

ID-1007
1.Warning3.Donotuseinwetenvironments.5.Weareyeprotection
2.ReadtheOperator'sManual.4.Donotuseifcordisdamaged
3

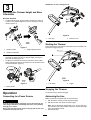
Setup
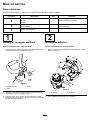
LooseParts
Usethechartbelowtoverifythatallpartshavebeenshipped.
ProcedureDescription
Qty.
Use
Auxiliaryhandle1
Latch1
1
Brace1
Installingauxiliaryhandle.
Guard
1
2
Phillipsheadscrew1
Mountingtheguardtothebaseofthe
trimmer.
3
Nopartsrequired
–
1
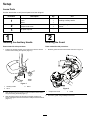
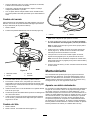
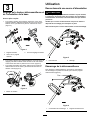
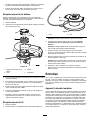
InstallingtheAuxiliaryHandle
Partsneededforthisprocedure:
1.Positiontheauxiliaryhandleontheshaftofthetrimmerwiththe
smoothsurfacefacingtheoperator(Figure1).
G017277
Figure1
1.Auxiliaryhandle3.Brace
2.Latch
2.Slidethebraceintotheauxiliaryhandlesothatthebracerestsin
thegroovealongtheshaft(Figure1).
3.Slidethelatchfromtheleftthroughthehandleandbraceas
shownandtightenthelatchscrewwithaPhillipsheadscrewdriver
(Figure1).
2
InstallingtheGuard
Partsneededforthisprocedure:
1.SlidetheguardontothetrimmerbaseasshowninFigure2.
G017622
Figure2
1.Phillipsheadscrew
2.Guard
2.SecuretheguardusingaPhillipsheadscrew.
4

3
AdjustingtheTrimmerHeightandBase
Orientation
NoPartsRequired
•Toadjusthandleheight,iptheauxiliaryhandlelatch,slideitup
ordowntothedesiredheight,thensecureitinplacebyclosing
thelatch(Figure3).
G015655
Figure3
1.Auxiliaryhandle3.Heightadjustmentlatch
2.Auxiliaryhandlelatch
•Toadjustthetrimmerheight,opentheheightadjustmentlatch,
thenslidetheshaftupordowntodesiredheight,securingitin
placewiththelatch(Figure3).
•Toadjusttheorientationofthebase,pressdownontherotator
buttonlocatedatthebaseoftheshaft,thenmovethebasetoface
thedesireddirection(Figure4).
G017507
Figure4
1.Rotatorbutton
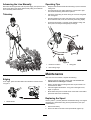
Operation
ConnectingtoaPowerSource
WARNING
Ifyoudonotfullyseattheextensioncordontheinletplug,the
looseplugcouldleadtooverheatingandcauseare,possibly
burningyouorothers.
Ensurethatyoufullyseatthecordontheplugandusethecord
lockfeaturetosecurethecord.
NOTICE!Donotuseadamagedcord.
1
2
Figure5
1.Inletplug2.Extensioncord
StartingtheTrimmer
Tostartthetrimmer,slidethelockswitchbacktotheOnposition,then
squeezethetrigger(Figure6).
1
2
G015658
Figure6
1.Lockswitch2.Trigger
StoppingtheTrimmer
Tostopthetrimmer,releasethetrigger.
AdvancingtheLine
Note:Thetrimmerisequippedwithanauto-feedhead.
1.Withthetrimmerrunning,releasetheswitchtrigger.
2.Waittwoseconds,thenpresstheswitchtrigger.
Note:Thelinewillextendapproximately1/4in.(6mm)witheach
stopandstartoftheswitchtrimmeruntilthelinereachesthelength
ofthegrassdeectorblade.
3.Resumetrimming.
5

AdvancingtheLineManually
Disconnectthestringtrimmerfromthepowersupply,thenpushthered
buttonatthebaseofthespoolretainerwhilepullingonthetrimmer
linetomanuallyadvancetheline.
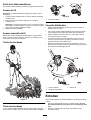
Trimming
G016254
Figure7
Edging
Asanedger,presstherotatorbuttonandrotatetheheadasshown
inFigure8.
G017509
Figure8
1.Rotatorbutton
OperatingTips
•Keepthetrimmertiltedtowardtheareabeingcut;thisisthebest
cuttingarea.
•Thestringtrimmercutswhenpassingtheunitfromlefttoright.
Thiswillavoidthrowingdebrisattheoperator.
•Usethetipofthestringtodothecutting;donotforcestringhead
intouncutgrass.
•Wireandpicketfencescauseextrastringwear,evenbreakage.
Stoneandbrickwalls,curbs,andwoodmaywearstringrapidly.
•Avoidtreesandshrubs.Treebark,woodmoldings,siding,and
fencepostscaneasilybedamagedbythestrings.
G017508
Figure9
1.Directionofrotation3.Stringpath
2.Idealcuttingrange
Maintenance
Aftereachuseofthetrimmer,completethefollowing:
•Wipethetrimmercleanwithadampcloth.Donothosethe
trimmerdownorsubmergeitinwater.
•Wipeorscrapecleanthecuttingheadareaanytimethereisan
accumulationofdebris.
•Checkandtightenallfasteners.Ifanypartisdamagedorlost,
repairorreplaceit.
•Brushdebrisawayfromairintakeventsonthebackoftheshaftto
preventthemotorfromoverheating.
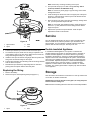
ReplacingtheSpool
Useonly.065in.(1.65mm)diametermonolamentstring.Useoriginal
manufacturer’sreplacementstringforbestperformance(Toropart
number88512).
1.Removethebattery.
2.Pushinthetabsonthesideofthespoolretainer(Figure10).
6

G017510
Figure10
1.Spoolretainer3.Slots
2.Spool
4.Tabs
3.Pullthespoolretaineruptoremoveitandremovethespool.
4.Toinstallthenewspool,makesurethestringiscapturedinone
oftheretainingslotsonthenewspool.Makesuretheendofthe
stringextendsapproximately6in.(152mm).
5.Installthenewspoolsothatthestringalignswiththeeyeletinthe
stringhead.Threadthestringintotheeyelet.
6.Pullthestringextendingfromthestringheadsothestringreleases
fromtheslotinthespool.
7.Reinstallthespoolretainerbydepressingtabsintoslotsand
pushingdownuntilspoolretainerclicksintoplace.
ReplacingtheString
1.Removethebattery.
2.Removethespool.SeeReplacingtheSpool(Figure11).
1
2
G015662
Figure11
1.Spool
2.Hole
Note:Removeanyoldstringremainingonthespool.
3.Thespoolwillacceptupto15feetofstring.Useonly.065in.
(1.65mm)diametermonolamentstring.
Note:Donotuseanyothergaugeortypeofstring,asthiscould
damagethetrimmer.
4.Insertthestringintotheanchorholeintheupperpartofthespool
(Figure11).Windthestringontothespoolinthedirectionshown
bythearrowsonthespool.
5.Placethestringintheslotontheupperspoolange,leavingabout
6in.(152mm)extendedbeyondtheslot.
Note:Donotoverll.Afterwindingthestring,thereshouldbeat
least1/4in.(6mm)betweenthewoundstringandtheoutside
edgeofthespool.
6.Replacethespoolandthespoolretainer.RefertoSpool
Replacementearlierinthismanual.
Service
Torohasdesignedthisproducttogiveyouyearsoftroublefreeuse.
Shoulditneedservice,taketheproducttoyourAuthorizedToro
ServiceDealer.YourToroDealerisspeciallytrainedtorepairToro
productsandwillensurethatyourTorostays“All”Toro.
Double-insulatedAppliance
Inadouble-insulatedappliance,twosystemsofinsulationare
providedinsteadofgrounding.Nogroundingmeansisprovidedon
adouble-insulatedappliance,norshouldameansforgrounding
beaddedtotheappliance.Servicingadouble-insulatedappliance
requiresextremecareandknowledgeofthesystem,andshouldbe
doneonlybythequaliedservicepersonnelatyourAuthorizedToro
ServiceDealer.Replacementpartsforadouble-insulatedappliance
mustbeidenticaltothepartstheyreplace.Adouble-insulated
applianceismarkedwiththewords“DoubleInsulation”or“Double
Insulated.”Thesymbol(squarewithinasquare)mayalsobemarked
ontheappliance.
Storage
Storethetrimmerandextensioncordindoorsinacooldrylocationand
outofreachofchildrenandanimals.
NOTICE!Donotrestthetrimmerontheguard,oritmaywarpand
interferewiththecuttingline.
Note:Devicesforretainingextensioncordsarecommerciallyavailable.
7

TheToroPromise-ElectricTrimmers
ATwo-YearFullWarrantyforResidentialUsefortheUnitedStatesandCanada
TheToroCompanyanditsafliate,ToroWarrantyCompany,pursuanttoanagreementbetweenthem,jointlywarrantthisproductfortwoyearsagainstdefects
inmaterialorworkmanshipwhenusedfornormalresidentialpurposes.*
•
Ifyouhavequestionsorproblems,orbeforereturningthisproduct,calltollfree:1-800-237–2654(US)or1-800-248-3258(Canada).
•
Toreceiveareplacementorrepair,atouroption,returnthecompleteunittotheseller.UnitedStatesandCanadacustomersmayreturntheirproduct,with
proofofpurchase,toanyAuthorizedServiceDealer.UnitedStatescustomersmayalsoreturntheirproduct,withproofofpurchase,postageprepaid,tothe
ToroServiceCenter,21350CedarAvenueS.,Lakeville,MN55044-9090.
Thiswarrantycoversproductdefectsonly.NeitherTheToroCompanynorToroWarrantyCompanyisliableforindirect,incidentalorconsequential
damagesinconnectionwiththeuseoftheToroProductscoveredbythiswarranty,includinganycostorexpenseofprovidingsubstituteequipment
orserviceduringreasonableperiodsofmalfunctionornon-usependingcompletionofrepairsunderthiswarranty.Somestatesdonotallow
exclusionsofincidentalorconsequentialdamages,sotheaboveexclusionsmaynotapplytoyou.Thiswarrantygivesyouspeciclegalrights,andyou
mayalsohaveotherrightswhichvaryfromstatetostate.
CountriesOtherthantheUnitedStatesandCanada
CustomerswhohavepurchasedToroproductsexportedfromtheUnitedStatesorCanadashouldcontacttheirToroDistributor(Dealer)toobtainguarantee
policiesforyourcountry,province,orstate.IfforanyreasonyouaredissatisedwithyourDistributor’sserviceorhavedifcultyobtainingguaranteeinformation,
contacttheToroimporter.Ifallotherremediesfail,youmaycontactusatToroWarrantyCompany.
*Residentialusemeansuseoftheproductonthesamelotasyourhome.PartNumber374-0279Rev.A
8

FormNo.3368-911Rev B
DesbrozadoraeléctricaTrimandEdgede36cm(14
pulgadas)
Nºdemodelo51480—Nºdeserie311000100ysuperiores
Manualdeloperador
Registresuproductoenwww.Toro.com
Siustedtienealgunapreguntaoalgúnproblema,
contáctenosenwww.Toro.comollamealteléfonogratuito
1-800-237-2654(EE.UU.)o1-800-248-3258(Canadá)antes
dedevolveresteproducto.
Normasgeneralesde
seguridad
ADVERTENCIA:Cuandoseutilizanaparatosdejardineríaeléctricos,
esnecesarioobservarunasnormasbásicasdeseguridad,incluyendo
lassiguientes,andereducirelriesgodeincendio,descargaeléctrica
ylesionespersonales:
Leatodaslasinstrucciones.
Eltérmino"herramientaeléctrica"queapareceenlasadvertencias
sereeresiempreaunaherramientaaccionadaporelsuministro
eléctricodelared(concable)ounaherramientaeléctricaaccionada
porbatería(sincable).
1.Seguridaddelazonadetrabajo
A.Mantengalazonadetrabajolimpiaybieniluminada.
Laszonasdesordenadasuoscurassonunainvitaciónal
accidente.
B.Noutiliceherramientaseléctricasenatmósferas
explosivas,comoporejemploenpresenciadelíquidos
inamables,gasesopolvo.Lasherramientaseléctricas
creanchispasquepuedeninamarelpolvoolosvapores.
C.Mantengaalejadosaniñosyotraspersonasmientras
utilizaunaherramientaeléctrica.Lasdistraccionespueden
hacerquepierdaelcontrol.
2.Seguridadeléctrica
A.Laclavijadelaherramientaeléctricadebeserdeltipo
correctoparaelenchufe.Nuncamodiqueelenchufeen
modoalguno.Noutiliceningúntipodeadaptadoresde
enchufeconherramientaseléctricascontomadetierraEl
usodeclavijassinmodicaryenchufesapropiadosreducirá
elriesgodedescargaeléctrica.
B.Evitetocarsuperciesconectadasatierra,talescomo
tuberías,radiadores,cocinasyrefrigeradores.Hayun
mayorriesgodedescargaeléctricasisucuerpohacetierra.
C.Noexpongalasherramientaseléctricasalalluviaoa
condicioneshúmedas.Sientraaguaenunaherramienta
eléctrica,elriesgodedescargaeléctricaaumenta.
D.Nomaltrateelcable.Noutiliceelcablenuncapara
transportar,arrastrarodesenchufarlaherramienta
eléctrica.Mantengaelcablealejadodelcalor,delaceite,
debordescortantesydepiezasmóvilesLoscables
dañadosoenredadosaumentanelriesgodedescarga
eléctrica.
E.Siutilizaunaherramientaeléctricaenelexterior,utilice
uncablealargadoradecuadoparaelusoenexteriores.El
usodeuncableapropiadoparaelusoenexterioresreduceel
riesgodedescargaeléctrica.
F.Sinoesposibleevitarelusodeunaherramientaeléctrica
enunlugarhúmedo,utiliceunsuministroeléctrico
protegidoporundispositivodecorrienteresidual(RCD).
ElusodeunRCDreduceelriesgodedescargaeléctrica.
G.Desconecteelaparatodelsuministroeléctricocuandono
seestáusando.
3.Seguridadpersonal
A.Manténgasealerta,estéatentoaloqueestáhaciendoy
utiliceelsentidocomúnmientrasutilizaunaherramienta
eléctrica.Noutiliceunherramientaeléctricasiestá
cansadoobajolainuenciadedrogas,alcoholo
medicamentos.Unabrevefaltadeatenciónmientrasutiliza
unaherramientaeléctricapuedeprovocarlesionespersonales
graves.
B.UtiliceequiposdeprotecciónpersonalLleveprotección
ocularsiempre.Elusodeequiposdeprotecciónpersonal
comomascarillas,calzadodeseguridadantideslizante,casco
yprotecciónauditiva,encondicionesapropiadas,reduciráel
riesgodelesionespersonales.
C.Eviteelencendidoaccidental.Asegúresedequeel
interruptorestáenlaposicióndeapagadoantesde
conectarlaherramientaalatomadecorrientey/oala
batería,yantesdelevantarotransportarlaherramienta.
Eltransportarlasherramientaseléctricasconeldedosobre
elinterruptoroenchufarherramientaseléctricasconel
interruptorenlaposicióndeencendidoesunainvitaciónal
accidente.
D.Retirecualquierllavedeajusteantesdeencenderla
herramientaeléctrica.Unallaveolvidadaenuncomponente
giratoriodeunaherramientaeléctricapuededarlugara
lesionespersonales.
E.Nointentealcanzarzonasdemasiadoalejadas.Piserme
ymantengaelequilibrioentodomomento.Estopermiteun
mayorcontroldelaherramientaensituacionesimprevistas.
F.Utilicelaropaadecuada.Nolleveropasojoyassueltas.
Mantengaelpelo,laropaylosguantesalejadosdelas
piezasmóviles.Laropasuelta,lasjoyasyelpelolargo
puedenquedaratrapadosenpiezasmóviles.
G.Siexistendispositivosparalaconexióndesistemasde
recogidayextraccióndepolvo,asegúresedeconectarlos
©2011—TheToro®Company
8111LyndaleAvenueSouth
Bloomington,MN55420
Registresuproductoenwww.Toro.com.
Traduccióndeloriginal(ES)
ImpresoenChina.
Reservadostodoslosderechos

yusarloscorrectamente.Elusodeestosdispositivospuede
reducirlosriesgosasociadosconelpolvo.
H.Mantengalasmanosylospiesalejadosdelazonade
corte.
4.Usoycuidadodelasherramientaseléctricas
A.Nofuercelaherramientaeléctrica.Utilicelaherramienta
eléctricaadecuadaparaeltrabajoarealizar.La
herramientaeléctricacorrectarealizaráeltrabajomejorycon
mayorseguridadalavelocidadparalaquefuediseñada.
B.Noutilicelaherramientaeléctricasielinterruptornola
enciendeyapaga.Cualquierherramientaeléctricaqueno
puedasercontroladaconelinterruptorespeligrosaydebe
serreparada.
C.Desconectelaclavijadelenchufey/odesconectela
bateríadelaherramientaeléctricaantesderealizar
cualquierajuste,cambiardeaccesoriooalmacenarla
herramienta.Estasmedidasdeseguridadpreventivas
reducenelriesgodeunarranqueaccidentaldelaherramienta
eléctrica.
D.Sinolaestáusando,guardelaherramientaeléctrica
fueradelalcancedelosniños,ynopermitaquelautilicen
personasnofamiliarizadasconlaherramientaeléctrica
oconestasinstruccionesdeusodelaherramienta
eléctrica.Lasherramientaseléctricassonpeligrosasen
manosdeusuariosinexpertos.
E.Guardebajotecholosaparatosquenoseestánutilizando.
Cuandonoseestánutilizando,losaparatosdebenguardarse
enunlugarseco,enaltoobajollave,yfueradelalcancede
losniños.
F.Mantenimientodelasherramientaseléctricas.Compruebe
quelaspiezasmóvilesestáncorrectamentealineadas
yquesemuevenlibrementesinagarrotarse,queno
haypiezasrotas,yquenohayotrascircunstanciasque
podríanafectaralusodelaherramientaeléctrica.Si
existendaños,hagarepararlaherramientaeléctricaantes
deusarla.Muchosaccidentessedebenaunmantenimiento
decientedelasherramientaseléctricas.
G.Mantengalasherramientasdecortealadasylimpias.
Unaherramientadecortebienmantenidaconlosbien
aladosesmásfácildecontrolaryhaymenosprobabilidades
dequeseagarrote.
H.Utilicelaherramienta,losaccesorios,lasbrocas,etc.,
segúnloindicadoenestasinstruccionesydelamanera
previstaparacadatipodeherramientaeléctrica,teniendo
encuentalascondicionesdetrabajoyeltrabajoarealizar.
Elusodelaherramientaeléctricaparaoperacionesdiferentes
delasprevistaspodríadarlugaraunasituacióndepeligro.
I.Mantengalosprotectorescolocadosyenbuenestadode
funcionamiento.
5.Mantenimiento
Elmantenimientodesuherramientaeléctricadebeser
realizadoporuntécnicodereparacionesdebidamente
cualicado,utilizandoúnicamentepiezasderepuesto
idénticas.Sólodeestamanerasegarantizaelmantenimientode
laseguridaddelaherramientaeléctrica.
GUARDEESTASINSTRUCCIONES
Cablealargador
ADVERTENCIA
Parareducirelriesgodedescargaeléctrica,utilicela
desbrozadoraúnicamenteconuncablealargadordiseñadopara
elusoenexteriores,comoporejemplouncablealargadortipo
SW-A,SOW-A,STW-A,STOW-A,SJW-A,SJOW-A,SJTW-A,o
SJTOW-A.
Asegúresedequesucablealargadorestáenbuenascondiciones.Si
utilizauncablealargador,utiliceunoquetengapotenciasuciente
paralacorrientequeconsumesuproducto.Uncablealargador
demasiadonoprovocaráunacaídadelatensióndelcable,con
pérdidadepotenciaysobrecalentamiento.Latablasiguientemuestra
eltamañodecableadecuado,dependiendodesulongitud.Encaso
deduda,utilicecabledelsiguientetamañosuperior.Cuantomenor
seaelcalibre,másgruesoeselcable.
Longituddelcablealargador
Secciónmínimadelconductor
30m(100pies)
16
46m(150pies)
14
Nota:Noutiliceunalargadordecabledemásde46m(150pies).
Parareducirelriesgodedesconexióndelcablealargadordurante
eluso,conecteelcablealargadoraladesbrozadoradelamanera
indicadaenlasecciónUsodeestemanual.
Pegatinasdeseguridadeinstrucciones
Laspegatinaseinstruccionesdeseguridadestánalavistadeloperadoryestánubicadascercadecualquierzonade
peligropotencial.Sustituyacualquierpegatinaqueestédañadaoquefalte.
Símbolo
Nombre
Designación/explicación
CACorrientealterna
Tipodecorriente
AAmperios
Corriente
HzHercios
Frecuencia(ciclosporsegundo)
RPMRevolucionesporminutoVelocidaddelhilo
VVoltios
Voltaje(Tensión)
2

ID-1006
ID-1009
ID-1007
1.Advertencia3.Nousarencondicioneshúmedas.5.Lleveprotecciónocular
2.LeaelManualdeloperador.4.Nousarsielcableestádañado
3

Montaje
Piezassueltas
Utilicelatablasiguienteparavericarquenofaltaningunapieza.
Procedimiento
DescripciónCant.
Uso
Empuñaduraauxiliar1
Pestillo1
1
Piezaderefuerzo
1
Instalacióndelaempuñaduraauxiliar.
Protector1
2
TornillodecabezaPhillips1
Montajedelprotectorenlabasedela
desbrozadora.
3
Nosenecesitanpiezas
–
1
Instalacióndelaempuñaduraauxiliar
Piezasnecesariasenestepaso:
1.Coloquelaempuñaduraauxiliarsobreelmástildeladesbrozadora
conlasupercielisahaciaeloperador(Figura1).
G017277
Figura1
1.Empuñaduraauxiliar
3.Piezaderefuerzo
2.Pestillo
2.Introduzcalapiezaderefuerzoenlaempuñaduraauxiliarde
maneraqueelrefuerzoencajeenlaranuradelmástil(Figura1).
3.Paseelpestillodesdelaizquierdaatravésdelaempuñadurayla
piezaderefuerzo,segúnseindica,yaprieteeltornillodelpestillo
conundestornilladordepuntaPhillips(Figura1).
2
Instalacióndelprotector
Piezasnecesariasenestepaso:
1.Desliceelprotectorsobrelabasedeladesbrozadora,segúnse
muestraenFigura2.
G017622
Figura2
1.TornillodecabezaPhillips2.Protector
2.SujeteelprotectorusandountornillodecabezaPhillips.
4

3
Ajustedelaalturadeladesbrozadoray
delaorientacióndelabase.
Nosenecesitanpiezas
•Paraajustarlaalturadelaempuñadura,abralapalancadel
pestillo,deslicelaempuñadurahaciaarribaohaciaabajohastala
alturadeseadaycierrelapalancadelpestillo(Figura3).
G015655
Figura3
1.Empuñaduraauxiliar3.Palancadeajustedela
altura
2.Pestillodelaempuñadura
auxiliar
•Paraajustarlaalturadeladesbrozadora,abralapalancade
ajusteydesliceelmástilhaciaarribaohaciaabajoalaaltura
deseada,luegocierrelapalanca(Figura3).
•Paraajustarlaorientacióndelabase,presionehaciaabajosobre
elbotóndegirosituadoenlabasedelmástil,luegogirelabasea
laorientacióndeseada(Figura4).
G017507
Figura4
1.Botóndegiro
Operación
Conexiónaunafuentedealimentación
ADVERTENCIA
Siustednoconectarmementeelcablealargadoralenchufe,
elenchufesueltopodríacalentarseycausarunincendio,
posiblementequemándoleaustedoaotraspersonas.
Asegúresedeconectarrmementeelcablealenchufeyutilice
lafuncióndebloqueoparajarelcable.
AVISONoutiliceelcablesiestádañado.
1
2
Figura5
1.Enchufedealimentación2.Cablealargador
Cómoarrancarladesbrozadora
Paraarrancarladesbrozadora,desliceelinterruptordebloqueohacia
atrásalaposicióndeEncendido,yaprieteelgatillo(Figura6).
1
2
G015658
Figura6
1.Interruptordebloqueo
2.Gatillo
5

Cómopararladesbrozadora
Parapararladesbrozadora,suelteelgatillo.
Avancedelhilo
Nota:Ladesbrozadoraincorporauncabezaldeavanceautomático.
1.Conladesbrozadoraenmarcha,suelteelgatillo.
2.Esperedossegundos,luegoaprieteelgatillo.
Nota:Elhiloavanzará1/4pulgada(6mm)aproximadamente
cadavezqueapagueyenciendaladesbrozadora,hastaqueel
hilolleguealacuchilladeldeectordehierba.
3.Sigausandoladesbrozadora.
Avancemanualdelhilo
Desenchufeladesbrozadoradelatomadecorriente,luegopulseel
botónrojoenlabasedelreténdelcarretemientrastiradelhilodela
desbrozadoraparaavanzarelhilomanualmente.
Desbrozado
G016254
Figura7
Arreglodebordes
Paraarreglarlosbordesdelcésped,pulseelbotóndelgiroygirela
basesegúnsemuestraenFigura8.
G017509
Figura8
1.Botóndegiro
Consejosdeoperación
•Mantengaladesbrozadorainclinadahacialazonaqueestá
cortando;éstaeslamejorzonadecorte.
•Ladesbrozadoradehilocortaalpasarelaparatodeizquierda
aderecha.Deestamaneraseevitaquearrojeresiduoshacia
eloperador.
•Utilicelapuntadelhiloparacortar;nointroduzcalabaseenteraa
lafuerzaenlahierbasincortar.
•Lasvallasdealambreomaderaprovocanundesgasteadicional
delhilo,einclusopuedenllegararomperlo.Losmurosde
piedraoladrillo,losbordillosylamaderapuededesgastarelhilo
rápidamente.
•Evitelosárbolesylosarbustos.Elhilopuedecausardesperfectos
enlacortezadelosárboles,yenmolduras,revestimientosy
postesdemadera.
G017508
Figura9
1.Sentidoderotación3.Caminodelhilo
2.Zonadecorteideal
Mantenimiento
Despuésdecadausodeladesbrozadora,completelosprocedimientos
siguientes:
•Limpieladesbrozadoraconunpañohúmedo.Nolavela
desbrozadoraconunamangueranilasumerjaenagua.
6

•Limpieelcabezaldecorteconunpaño,rascandosiesnecesario,
siobservaunaacumulaciónderesiduos.
•Compruebeyaprietetodaslasjaciones.Repareosustituya
cualquierpiezadañadaoquefalte.
•Conuncepillo,eliminecualquierresiduodelasentradasdeaire,
enlaparteposteriordelmástil,paraevitarquesesobrecalienteel
motor.
Cambiodelcarrete
Utilicesolamentehilomonolamentode0.065pulgadas(1.65mm)de
diámetro.Useelhiloderepuestodelfabricanteoriginalparaobtener
elmejorrendimiento(NºdepiezaToro88512).
1.Retirelabatería.
2.Presionelaspestañaslateralesdelreténdelcarrete(Figura10).
G017510
Figura10
1.ReténdelCarrete
3.Ranuras
2.Carrete
4.Pestañas
3.Tirehaciaarribadelreténpararetirarlo,yretireelcarrete.
4.Parainstalarelcarretenuevo,compruebequeelhiloestá
enganchadoenunadelasranurasderetencióndelcarretenuevo.
Asegúresedequeelextremolibredelhilomideunas6pulgadas
(15.2cm)delargo.
5.Instaleelcarretenuevoconelhiloalineadoconelojaldelcabezal.
Paseelhiloporelojal.
6.Tiredelhiloquesaledelcabezalhastaqueelhilosedesenganche
delaranuradelcarrete.
7.Vuelvaacolocarelreténdelcarreteintroduciendolaspestañas
enlasranurasypresionandohaciaabajohastaqueelreténse
engancheensusitio.
Cambiodelhilo
1.Retirelabatería.
2.Retireelcarrete.VerCambiodelcarrete(Figura11).
1
2
G015662
Figura11
1.Carrete
2.Taladro
Nota:Retirecualquierhiloquequedeenelcarrete.
3.Elcarreteaceptahasta15pies(5m)dehilo.Utilicesolamente
hilomonolamentode0.065pulgadas(1.65mm)dediámetro.
Nota:Noutiliceningúnotrotipoogrosordehilo,porquepodría
dañarladesbrozadora.
4.Inserteelhiloporeltaladrodeanclajeenlapartesuperiordel
carrete(Figura11).Enrolleelhiloenelcarreteenelsentido
indicadoporlasechasmarcadasenelcarrete.
5.Coloqueelhiloenlaranuradelabridasuperiordelcarrete,
dejandounas6pulgadas(15.2cm)dehilolibredelaranura.
Nota:Nolleneelcarretedemasiado.Despuésdeenrollarelhilo,
debequedaralmenos1/4pulgada(6mm)entreelhiloenrolladoy
elbordedelcarrete.
6.Vuelvaacolocarelcarreteyelretén.ConsulteCambiodelcarrete
enestemanual.
Mantenimiento
Torohadiseñadoesteproductoparaqueleproporcioneañosde
funcionamientosinproblemas.Sinecesitamantenimiento,lleveel
productoasuDistribuidorToroAutorizado.SuDistribuidorToroha
recibidoformaciónespecialenlareparacióndelosproductosToroy
seasegurarádequesuTorosigasiendo"Todo"Toro.
Aparatocondobleaislamiento
Enunaparatocondobleaislamiento,haydossistemasdeaislamiento
enlugardeunaconexiónatierra.Noseproporcionaningúnmedio
deconexiónatierraenunaparatocondobleaislamiento,ynose
debeañadiralaparatounaconexiónatierra.Elmantenimientodeun
aparatocondobleaislamientorequiereuncuidadoextremoyunbuen
conocimientodelsistema,ysólodebeserrealizadoporelpersonal
deserviciocualicadodeunServicioTécnicoAutorizadodeToro.
Laspiezasderepuestodeunaparatocondobleaislamientodeben
seridénticasalasquesustituyen.Unaparatocondobleaislamiento
llevalaspalabras"DoubleInsulation"o"DoubleInsulated".Elaparato
tambiénpuedellevarelsímbolo(uncuadradodentrodeotro).
7

Almacenamiento
Guardeladesbrozadorayelcablealargadorenelinterior,enunlugar
frescoysecoyfueradelalcancedeniñosyanimales.
AVISONoapoyeladesbrozadorasobreelprotector;éstepodría
doblarseyobstruirelhilodecorte.
Nota:Esposiblecomprardispositivosderetenciónparacables
alargadores.
LaPromesaToro-Desbrozadoraseléctricas
GarantíacompletadedosañosparaelusoresidencialenEstadosUnidosyCanadá
TheToroCompanyysualiado,ToroWarrantyCompany,bajounacuerdoentresí,garantizanconjuntamenteesteproductodurantedosañoscontradefectos
dematerialesomanodeobracuandoseutilizaconpropósitosresidencialesnormales.*
•
Siustedtienealgunapreguntaoalgúnproblema,oantesdedevolveresteproducto,llamealteléfonogratuito:1-800-237–2654(EE.UU.)o1-800-248-3258
(Canadá).
•
Parasustituirorepararelproducto,anuestradiscreción,devuelvalaunidadcompletaalvendedor.LosclientesdeEstadosUnidosyCanadápueden
devolversuproducto,conpruebadecompra,acualquierServicioTécnicoAutorizado.LosclientesdelosEstadosUnidostambiénpuedendevolversu
producto,conpruebadecompra,conportespagadosalToroServiceCenter,21350CedarAvenueS.,Lakeville,MN55044-9090.
Estagarantíacubredefectosdelproductosolamente.NiTheToroCompanyniToroWarrantyCompanysonresponsablesdedañosindirectos,
incidentalesoconsecuentesenconexiónconelusodelosproductosTorocubiertosporestagarantía,incluyendocualquiercosteogastoporla
provisióndeequiposdesustituciónoservicioduranteperiodosrazonablesdemalfuncionamientoonoutilizaciónhastalaterminacióndelas
reparacionesbajoestagarantía.Algunosestadosnopermitenexclusionesdedañosincidentalesoconsecuentes,demaneraquelasexclusiones
arribacitadaspuedennoseraplicablesausted.Estagarantíaleotorgaaustedderechoslegalesespecícos;esposiblequeustedtengaotrosderechos
quevaríandeunestadoaotro.
PaísesfueradeEstadosUnidosyCanadá
LosclientesquecompraronproductosToroexportadosdelosEstadosUnidosoCanadádebenponerseencontactoconsuDistribuidor(Concesionario)
Toroparaobtenerpólizasdegarantíaparasupaís,provinciaoestado.Siporcualquierrazónustednoestásatisfechoconelservicioofrecidoporsu
Distribuidor,ositienedicultadenobtenerinformaciónsobrelagarantía,póngaseencontactoconelimportadorToro.Sifallantodoslosdemásrecursos,
puedeponerseencontactoconnosotrosenlaToroWarrantyCompany.
*"Usoresidencial"signicaelusodelproductoenlamismaparcelaenqueseencuentrasuvivienda.Númerodepieza374-0279Rev.A
8

FormNo.3368-911Rev B
Débroussailleuseettaille-bordureélectriquede36cm
(14po)
N°demodèle51480—N°desérie311000100etsuivants
Manueldel'utilisateur
Enregistrezvotreproduitàwww.Toro.com
Pourtoutconseilourenseignement,contactez-nous
àwww.Toro.comouappeleznotrenumérovert
1-800-237-2654(États-Unis)ou1-800-248-3258(Canada)
avantderenvoyerceproduit.
Règlesgénéralesdesécurité
ATTENTION:L'utilisationd'outilsdejardinageélectriquesexigede
suivrecertainesprécautionsélémentairespourréduirelerisque
d'incendie,dechocélectriqueetdedommagecorporel,ycompris
cequisuit:
Liseztouteslesinstructions.
Leterme«outilélectrique»utilisédanstouteslesmisesengarde
renvoieàtoutoutilélectriquebranchésurlesecteur(câblé)ou
alimentéparbatterie(sansl).
1.Sécuritésurlazonedetravail
A.Lazonedetravaildoitêtrepropreetbienéclairée.Les
endroitssombresetencombréssontpropicesauxaccidents.
B.N'utilisezjamaisd'outilsélectriquesdansdes
atmosphèresexplosives,enprésencedeliquides,gazou
poussièreinammablesparexemple.Lesoutilsélectriques
produisentdesétincellesquipeuventenammerlapoussière
oulesvapeurs/émanations.
C.Tenezenfantsetspectateursàdistancependant
l'utilisationd'unoutilélectrique.Lesdistractionspeuvent
entraînerlapertedecontrôledel'outil.
2.Sécuritéélectrique
A.Lachedesoutilsélectriquesdoitcorrespondreautype
deprise.Nemodiezjamaislacheélectrique.N'utilisez
pasd'adaptateuraveclesoutilsélectriquesreliésàla
terreLeschesetprisescorrespondantesnonmodiées
réduisentlerisquedechocélectrique.
B.Éviteztoutcontactducorpsavecdessurfacesreliéesàla
terre/masse,parexempletuyaux,radiateurs,cuisinières
etréfrigérateurs.Lerisquedechocélectriqueaugmente
sivousêtesreliéàlaterre.
C.N'exposezpaslesoutilsélectriquesàlapluieouà
l'humidité.Touteinltrationd'eaudansunoutilélectrique
augmentelerisquedechocélectrique.
D.Nemaltraitezpaslecordond'alimentation.Nevous
servezjamaisducordonpourtransporter,tirerou
débrancherl'outilélectrique.Éloignezlecordondes
surfaceschaudes,delagraisse,desarêtesvivesoudes
piècesmobilesLescordonsendommagésouemmêlés
augmententlerisquedechocélectrique.
E.Sivousutilisezunoutilélectriqueàl'extérieur,utilisez
toujoursunerallongeadaptéeàl'usageextérieur.
L'utilisationd'unerallongeprévuepourl'usageextérieurréduit
lerisquedechocélectrique.
F.Sil'utilisationd'unoutilélectriquedansunendroithumide
nepeutêtreévitée,utilisezunealimentationprotégée
parundispositifdifférentielàcourantrésiduel(RCD).
L'utilisationd'unRCDréduitlerisquedechocélectrique.
G.Débranchezlachedelasourced'alimentationlorsque
ladébroussailleusen'estpasutilisée.
3.Sécuritépersonnelle
A.Restezvigilant,regardezoùvousallezetfaitespreuve
debonsenslorsquevousutilisezunoutilélectrique.
N'utilisezjamaisunoutilélectriquesivousêtesfatiguéou
sousl'emprisedel'alcool,dedroguesoudemédicaments.
Unseulmomentd'inattentionpendantl'utilisationpourrait
entraînerdesdommagescorporelsgraves.
B.Utilisezdeséquipementsdeprotectionindividuelle.
Porteztoujoursuneprotectionoculaire.Leséquipements
deprotectioncommelesmasquesantipoussières,les
chaussuresdesécuritéàsemelleantidérapante,lescasques
etlesprotectionsantibruitutilisésdemanièrepertinente
réduisentlesdommagescorporels.
C.Éviteztoutdémarrageaccidentel.Assurez-vousque
l'interrupteurmarche/arrêtestenpositionarrêtavantde
connecterl'outilàunesourced'alimentationet/ouàla
batterie,deleprendreenmainoudeletransporter.Des
accidentspeuventseproduiresivoustransportezunoutil
électriqueengardantledoigtsurl'interrupteurd'alimentation
ousivouslemettezsoustensionsansavoirplacél'interrupteur
enpositionhorstension.
D.Retireztoutecléderéglageouautreavantdemettrel'outil
enmarche.Unecléoubliéesurunepiècerotativedel'outil
électriquepourraitvousblesser.
E.Netravaillezpastroploindevantvous.Gardeztoujours
lespiedsbienposésàterreetfaitesensortedenepas
perdrel'équilibre.Vouspourrezainsigarderlecontrôlede
l'outilencasd'événementinattendu.
F.Portezdesvêtementsadéquats.Neportezpasde
vêtementsamplesoudebijouxpendants.N'approchez
paslescheveux,lesvêtementsetlesgantsdespiècesen
mouvement.Lesvêtementsamplesoulescheveuxlongs
peuventseprendredanslespiècesmobiles.
G.Sidesdispositifssontfournispourleraccordement
d'équipementsdedépoussiérageetderécupération,
assurez-vousqu'ilssontconnectésetutilisés
correctement.L'utilisationdecetypededispositifspeut
réduirelesrisquesassociésauxpoussières.
©2011—TheToro®Company
8111LyndaleAvenueSouth
Bloomington,MN55420
Enregistrezvotreproduitàwww.Toro.com.Traductiondutexted'origine(FR)
ImpriméenChine.
Tousdroitsréservés

H.N'approchezpaslespiedsetlesmainsdelazonede
coupe.
4.Utilisationetentretiendesoutilsélectriques
A.Nefaitespasforcerl'outilélectrique.Utilisezl'outil
électriquecorrectpourlatâcheàaccomplir.Unoutil
électriqueadaptédonnerademeilleursrésultatsetseramoins
dangereuxs'ilestutilisédansleslimitesprévues.
B.Nevousservezpasdel'outilélectriquesilecommutateur
nepermetpasdelemettreenmarcheetdel'arrêter
correctement.Unoutilélectriquequinepeutpasêtre
commandéparlecommutateurestdangereuxetdoitêtre
réparé.
C.Débranchezl'outildelasourced'alimentationet/oule
bloc-batteriedel'outilavantd'effectuerdesréglages,
dechangerd'accessoireoudeleranger.Cesmesures
desécuritépréventivesréduisentlerisquededémarrage
accidenteldel'outil.
D.Rangezlesoutilsélectriquesnonutiliséshorsdela
portéedesenfantsetneconezleurutilisationqu'àdes
personnesconnaissantleurmaniementetayantluces
instructions.Lesoutilsélectriquessontdangereuxs'ilssont
misentrelesmainsd'utilisateursnovices.
E.Rangezlesoutilsélectriquesàl'intérieurlorsqu'ils
neserventpas.Lorsquelesoutilsnesontpasutilisés,
rangez-lesdansunlocalsecenhauteurousousclé,hors
deportéedesenfants.
F.Maintenezlesoutilsélectriquesenétatdemarche.
Vériezsidespiècessontmalalignées,grippées,
casséesouprésententtoutautredéfautsusceptible
d'affecterlebonfonctionnementdel'outilélectrique.S'il
estendommagé,faitesréparerl'outilélectriqueavantde
l'utiliser.Denombreuxaccidentssontcauséspardesoutils
électriquesenmauvaisétat.
G.Gardezlesoutilsdecoupepropresetbienaffûtés.Des
outilsdecoupeentretenuscorrectementetbienaffûtéssont
moinssusceptiblesdecoinceretsontplusfacilesàcontrôler.
H.Utilisezl'outilélectrique,lesaccessoires,outilsrapportés,
etc.,enconformitéaveccesinstructionsetdelamanière
prévuepourcetyped'outilspécique,entenantcompte
desconditionsdetravailetdelatâcheàréaliser.
L'utilisationdel'outilélectriquepourdesopérationsautresque
cellesprévuespeutengendrerunesituationdangereuse.
I.Lesdéecteursdoiventtoujoursêtreenplaceetenbon
état.
5.Entretien
Conezl'entretiendevotreoutilélectriqueàunréparateur
qualiéutilisantexclusivementdespiècesderechange
identiques.Lasécuritédevotreoutilélectriqueseraainsi
maintenue.
CONSERVEZCESINSTRUCTIONS
Rallonge
ATTENTION
Anderéduirelesrisquesd'électrocution,n'utilisezla
débroussailleusequ'avecunerallongeconçuepourêtreutilisée
enextérieur,tellequ'unerallongedetypeSW-A,SOW-A,STW-A,
STOW-A,SJW-A,SJOW-A,SJTW-AouSJTOW-A.
Assurez-vousquevotrerallongeestenbonétat.Sivousutilisezune
rallonge,choisissez-enunesufsammentpuissantepoursupporterle
courantrequisparvotreproduit.Unerallongedecapacitéinsufsante
provoqueraunechutedetensionsecteurpouvantentraîneruneperte
depuissanceetunesurchauffe.Letableausuivantindiquelecalibre
derallongecorrectenfonctiondelalongueurdelarallonge.Encas
dedoute,utilisezunerallongeducalibresupérieur.Pluslenumérode
jaugeestpetit,pluslecalibreestélevé.
Longueurdelarallonge
Calibredelminimum(A.W.G.)
30m(100pieds)
16
45m(150pieds)
14
Remarque:N'utilisezpasderallongedeplusde45m(150pieds).
Anderéduirelerisquequelarallongesedébrancheencoursde
fonctionnement,branchez-laàladébroussailleusecommeillustrédans
lasectionFonctionnementduprésentmanuel.
Autocollantsdesécuritéetd'instruction
Desautocollantsdesécuritéetdesinstructionsbienvisiblessontplacésprèsdetouslesendroitspotentiellement
dangereux.Remplaceztoutautocollantendommagéoumanquant.
Symbole
Nom
Désignation/Explication
CACourantalternatif
Typedecourant
AAmpères
Courant
HzHertz
Fréquence(cyclesparseconde)
tr/min
ToursparminuteVitessedecorde
VVoltsTension
ID-1006
ID-1009
2

ID-1007
1.Attention3.Nepasutiliserdansleslieuxhumides.5.Portezuneprotectionoculaire
2.LisezleManueldel'utilisateur.4.Nepasutilisersilecordonest
endommagé
3

Miseenservice
Piècesdétachées
Reportez-vousautableauci-dessouspourvériersitouteslespiècesontétéexpédiées.
Procédure
Description
Qté
Utilisation
Poignéeauxiliaire1
Verrou1
1
Renfort
1
Montezlapoignéeauxiliaire.
Déecteur
1
2
Viscruciforme
1
Montezledéecteuràlabasedela
débroussailleuse.
3
Aucunepiècerequise
–
1
Montagedelapoignéeauxiliaire
Piècesnécessairespourcetteopération:
1.Placezlapoignéeauxiliairesurl'arbredeladébroussailleuse,la
surfacelissetournéeversl'utilisateur(Figure1).
G017277
Figure1
1.Poignéeauxiliaire
3.Renfort
2.Verrou
2.Glissezlerenfortdanslapoignéeauxiliairejusqu'àcequ'ilsoit
engagédanslarainuredel'arbre(Figure1).
3.Glissezleverrouparlagauchedanslapoignéeetlerenfort
commeillustré,puisserrezlavisduverrouàl'aided'untournevis
àpointecruciforme(Figure1).
2
Montagedudéecteur
Piècesnécessairespourcetteopération:
1.Glissezledéecteursurlabasedeladébroussailleuse,comme
illustréàlaFigure2.
G017622
Figure2
1.Viscruciforme2.Déecteur
2.Fixezledéecteuràl'aidedelaviscruciforme.
4
La page est en cours de chargement...
La page est en cours de chargement...
La page est en cours de chargement...
La page est en cours de chargement...
-
 1
1
-
 2
2
-
 3
3
-
 4
4
-
 5
5
-
 6
6
-
 7
7
-
 8
8
-
 9
9
-
 10
10
-
 11
11
-
 12
12
-
 13
13
-
 14
14
-
 15
15
-
 16
16
-
 17
17
-
 18
18
-
 19
19
-
 20
20
-
 21
21
-
 22
22
-
 23
23
-
 24
24


Toro 14in Electric Trimmer Manuel utilisateur
- Catégorie
- Coupe-herbe
- Taper
- Manuel utilisateur
dans d''autres langues
Documents connexes
-
Toro 14in Electric Trimmer Manuel utilisateur
-
-
-
-
-
-
-
-
-