Toro 51484 Manuel utilisateur
- Catégorie
- Coupe-herbe
- Taper
- Manuel utilisateur
Ce manuel convient également à

FormNo.3377-755RevA
12inCordlessTrimmer
ModelNo.51484—SerialNo.313000001andUp
ModelNo.51484T—SerialNo.313000001andUp
Operator'sManual
Model51484Tdoesnotincludeabatteryoracharger.
Ifyouhavequestionsorproblems,contactusatwww.Toro.comor
calltollfree1-800-237-2654(US)or1-800-248-3258(Canada)before
returningthisproduct.
GeneralSafetyRules
WARNING
CALIFORNIA
Proposition65Warning
Batteryposts,terminals,andrelated
accessoriescontainleadandleadcompounds,
chemicalsknowntotheStateofCalifornia
tocausecancerandreproductiveharm.
Washhandsafterhandling.
WARNING:Whenusingelectricgardeningappliances,basic
safetyprecautionsshouldalwaysbefollowedtoreducetheriskof
re,electricshock,andpersonalinjury,includingthefollowing:
Readallinstructions.
Theterm“powertool”inallofthewarningsreferstoyour
mains-operated(corded)powertoolorbattery-operated(cordless)
powertool.
1.Workareasafety
A.Keepworkareacleanandwelllit.Clutteredordark
areasinviteaccidents.
B.Donotoperatepowertoolsinexplosive
atmospheres,suchasinthepresenceofammable
liquids,gasesordust.Powertoolscreatesparks
whichmayignitethedustorfumes.
C.Keepchildrenandbystandersawaywhileoperating
apowertool.Distractionscancauseyoutolose
control.
2.Electricalsafety
A.Powertoolplugsmustmatchtheoutlet.Never
modifythepluginanyway.Donotuseany
adapterplugswithearthed(grounded)powertools.
Unmodiedplugsandmatchingoutletswillreducerisk
ofelectricshock.
B.Avoidbodycontactwithearthedorgrounded
surfaces.Thereisanincreasedriskofelectricshockif
yourbodyisearthedorgrounded.
C.Donotabusethecord.Neverusethecordfor
carrying,pullingorunpluggingthepowertool.
Keepcordawayfromheat,oil,sharpedgesor
movingparts.Damagedorentangledcordsincrease
theriskofelectricshock.
D.Donotexposepowertoolstorainorwetconditions.
Waterenteringapowertoolwillincreasetheriskof
electricshock.
E.Ifoperatingapowertoolinadamplocationis
unavoidable,useasupplyprotectedbyaresidual
currentdevice(RCD)inAUSoragroundfault
interrupt(GFI)intheUSA.
UseofanRCDorGFIreducestheriskofelectricshock.
3.Personalsafety
A.Stayalert;watchwhatyouaredoinganduse
commonsensewhenoperatingapowertool.Do
notuseapowertoolwhileyouaretiredorunderthe
inuenceofdrugs,alcoholormedication.Amoment
ofinattentionwhileoperatingpowertoolsmayresult
inseriouspersonalinjury.
B.Usepersonalprotectiveequipment.Alwayswear
eyeprotection.Protectiveequipmentsuchasdust
mask,non-skidsafetyshoes,hardhat,orhearing
protectionusedforappropriateconditionswillreduce
personalinjuries.
C.Preventunintentionalstarting.Ensuretheswitch
isintheoff-positionbeforeconnectingtopower
sourceand/orbatterypack,pickinguporcarrying
thetool.Carryingpowertoolswithyourngeronthe
switchorenergizingpowertoolsthathavetheswitch
oninvitesaccidents.
D.Donotoverreach.Keepproperfootingandbalance
atalltimes.Thisenablesbettercontrolofthepower
toolinunexpectedsituations.
E.Dressproperly.Donotwearlooseclothingor
jewelry.Keepyourhair,clothingandglovesaway
frommovingparts.Looseclothes,jewelry,orlonghair
canbecaughtinmovingparts.
F.Keephandsandfeetawayfromthecuttingarea.
4.Powertooluseandcare
©2013—TheToro®Company
8111LyndaleAvenueSouth
Bloomington,MN55420
Registeratwww.Toro.com.
OriginalInstructions(EN)
PrintedinChina
AllRightsReserved
*3377-755*A

A.Donotforcethepowertool.Usethecorrectpower
toolforyourapplication.Thecorrectpowertoolwill
dothejobbetterandsaferattherateforwhichitwas
designed.
B.Donotusethepowertooliftheswitchdoesnotturn
itonandoff.Anypowertoolthatcannotbecontrolled
withtheswitchisdangerousandmustberepaired.
C.Removethebatterypackfromthepowertoolbefore
makinganyadjustments,changingaccessories,or
storingpowertools.Suchpreventivesafetymeasures
reducetheriskofstartingthepowertoolaccidentally.
D.Storeidlepowertoolsoutofthereachofchildren
anddonotallowpersonsunfamiliarwiththepower
toolortheseinstructionstooperatethepowertool.
Powertoolsaredangerousinthehandsofuntrained
users.
E.Storeidleappliancesindoors.Whennotinuse,
appliancesshouldbestoredindoorsinadryandhigh
orlocked-upplace,outofthereachofchildren.
F.Maintainpowertools.Checkformisalignmentor
bindingofmovingparts,breakageofpartsand
anyotherconditionthatmayaffectthepowertools
operation.Ifdamaged,havethepowertoolrepaired
beforeuse.Manyaccidentsarecausedbypoorly
maintainedpowertools.
G.Keepcuttingtoolssharpandclean.Properly
maintainedcuttingtoolswithsharpcuttingedgesare
lesslikelytobindandareeasiertocontrol.
H.Usethepowertoolinaccordancewiththese
instructionsandinthemannerintendedforthe
particulartypeofpowertool,takingintoaccountthe
workingconditionsandtheworktobeperformed.
Useofthepowertoolforoperationsdifferentfromthose
intendedcouldresultinahazardoussituation.
I.Keepguardsinplaceandinworkingorder.
5.Service
Haveyourpowertoolservicedbyaqualiedrepair
personusingonlyidenticalreplacementparts.Thiswill
ensurethatthesafetyofthepowertoolismaintained.
6.BatterySafety
A.Donotchargeapplianceinrain,orinwetlocations.
B.Donotusebattery-operatedapplianceintherain.
C.Useonlythefollowingtypeandsizebattery(ies):Toro
batterymodel88502.
D.Removeordisconnectthebatterybeforeservicing,
cleaning,orremovingmaterialfromthegardening
appliance.
E.Donotdisposeofthebattery(ies)inare.Thecellmay
explode.Checkwithlocalcodesforpossiblespecial
disposalinstructions.
F.Donotopenormutilatethebattery(ies).Released
electrolyteiscorrosiveandmaycausedamagetothe
eyesorskin.Itmaybetoxicifswallowed.
G.Exercisecareinhandlingbatteriesinordernottoshort
thebatterywithconductingmaterialssuchasrings,
bracelets,andkeys.Thebatteryorconductormay
overheatandcauseburns.
SAVETHESEINSTRUCTIONS
2

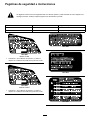
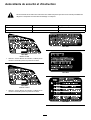
SafetyandInstructionalDecals
Safetydecalsandinstructionsareeasilyvisibletotheoperatorandarelocatednearanyareaofpotentialdanger.
Replaceanydecalthatisdamagedorlost.
Symbol
Name
Designation/Explanation
DC
Directcurrent
Typeofcurrent
VVoltsVoltage
125–3281
Model51484
1.Warning—readtheOperator’sManual;donotoperatein
wetconditions;weareyeprotection.
121–7657
Model51484T
1.Warning—readtheOperator’sManual;donotoperatein
wetconditions;weareyeprotection.
125–3280
121–7615
125–3293
3

125–3279
125–3295
4

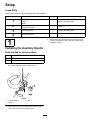
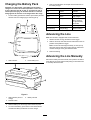
Setup
LooseParts
Usethechartbelowtoverifythatallpartshavebeenshipped.
ProcedureDescription
Qty.
Use
Auxiliaryhandle1
Latch1
1
Brace1
Installingauxiliaryhandle.
Guard
1
2
Phillipsheadscrew1
Mountingtheguardtothebaseofthe
trimmer.
3
Wireedgeguard1Installingtheedgeguard
4
Nopartsrequired
–
1
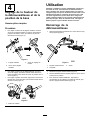
InstallingtheAuxiliaryHandle
Partsneededforthisprocedure:
1Auxiliaryhandle
1Latch
1Brace
1.Positiontheauxiliaryhandleontheshaftofthetrimmerwith
thesmoothsurfacefacingtheoperator(Figure1).
G017277
Figure1
1.Auxiliaryhandle3.Brace
2.Latch
2.Slidethebraceintotheauxiliaryhandlesothatthebrace
restsinthegroovealongtheshaft(Figure1).
3.Slidethelatchfromtheleftthroughthehandleandbrace
asshownandtightenthelatchscrewwithaPhillipshead
screwdriver(Figure1).
5

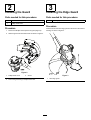
2
InstallingtheGuard
Partsneededforthisprocedure:
1
Guard
1Phillipsheadscrew
Procedure
1.RemovethePhillipsthatistapedtotheguard(Figure2).
2.SlidetheguardontothetrimmerbaseasshowninFigure2.
G017506
Figure2
1.Phillipsheadscrew
2.Guard
3.SecuretheguardusingaPhillipsheadscrew.
3
InstallingtheEdgeGuard
Partsneededforthisprocedure:
1Wireedgeguard
Procedure
Inserttheendsofthewireedgeguardintotheholesinthetrimmer
housing,asshowninFigure3.
g017642
1
Figure3
1.Wireedgeguard
6

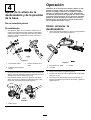
4
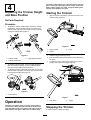
AdjustingtheTrimmerHeight
andBasePosition
NoPartsRequired
Procedure
•Toadjusttheauxiliaryhandleheight,releasetheauxiliary
handlelatch,slidetheauxiliaryhandleupordowntothe
desiredheight,thensecuretheauxiliaryhandleinplaceby
closingtheauxiliarylatch(Figure4).
G015655
Figure4
1.Auxiliaryhandle3.Heightadjustmentlatch
2.Auxiliaryhandlelatch
•Toadjustthetrimmerheight,opentheheightadjustment
latch,thenslidetheshaftupordowntodesiredheight,
securingitinplacewiththelatch(Figure4).
•Toadjustthepositionofthebase,pressdownontherotator
buttonlocatedatthebaseoftheshaft,thenmovethebase
tofacethedesireddirection(Figure5).
G017507
Figure5
1.Rotatorbutton
Operation
Important:Thebatterypackisnotfullychargedwhenit
ispurchased.Beforeusingthetrimmerforthersttime,
placethebatterypackinthechargerandchargeuntilthe
LEDindicatorsturngreen.Makesuretoreadallsafety
precautions.Withregularuse,itwillneedshortercharging
time.Ifstoringforaprolongedperiodoftime,removethe
battery.Whenreadytouseagain,chargethebatterypack
untiltheLEDindicatorsturngreen.
StartingtheTrimmer
1.Alignthetongueofthebatterypackwiththecavityinthe
handlehousing(Figure6).
1
2
3
G016190
Figure6
1.Triggerhandle3.Latch
2.Tongue
2.Graspthetriggerhandle(Figure6).
3.Pushthebatterypackintothehandleuntilthelatchlocks
intoplace.
4.Tostartthetrimmer,slidethelockswitchbacktotheOn
position,thensqueezethetrigger(Figure6).
G016189
1
2
Figure7
1.Lockswitch2.Trigger
StoppingtheTrimmer
Tostopthetrimmer,releasethetrigger.
7

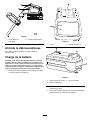
ChargingtheBatteryPack
Important:Forbestresults,yourbatterytoolshouldbe
chargedinalocationwherethetemperatureismorethan0°
C(32°F)butlessthan40°C(104°F).Toreducetheriskof
seriouspersonalinjury,donotstoreoutsideorinvehicles.
Chargingtimewillincreaseifnotchargedwithinthisrange.
1.Turnthebatteryupsidedownandlineupthebatteryterminal
withtheslotinthecharger(Figure8andFigure9).
Figure8
1.LEDindicators2.Insertbatteryhere
G016223
1
2
3
Figure9
1.LEDindicators(levelof
charge)
3.Batteryterminal
2.Releasebutton
2.Slidethebatteryintothechargeruntilitclicksintoplace.
3.Toremovethebattery,pressdownonthereleasebutton
andslidethebatterybackwardsoutofthecharger.
4.RefertothetablebelowtointerprettheLEDindicatorson
thebatterycharger.
LEDCOLOR
TopBottomIndicates:
RedRedBatteryischarging
Red
Green
Fullycharged
Red
Orange
Batteryistoo
warm:Remove
forapproximately
30minutes
Red
Green
Nobatterypresent
Red(blinking)Red(blinking)Defectivebattery
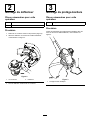
AdvancingtheLine
Note:Thetrimmerisequippedwithanauto-feedhead.
1.Withthetrimmerrunning,releasetheswitchtrigger.
2.Waittwoseconds,thenslidethelockswitchbacktotheOn
positionandsqueezethetrigger.
Note:Thelinewillextendapproximately1/4inch(6mm)
witheachstopandstartoftheswitchtrimmeruntiltheline
reachesthelengthofthegrassdeectorblade.
3.Resumetrimming.
AdvancingtheLineManually
Removethebatteryfromthetrimmerk,thenpushtheredbutton
atthebaseofthespoolretainerwhilepullingonthetrimmerline
tomanuallyadvancetheline.
8

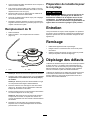
Trimming
G016254
Figure10
Edging
Asanedger,presstherotatorbuttonandrotatetheheadas
showninFigure11.
G017509
Figure11
1.Rotatorbutton
OperatingTips
•Keepthetrimmertiltedtowardtheareabeingcut;thisisthe
bestcuttingarea.
•Thestringtrimmercutswhenpassingtheunitfromleftto
right.Thiswillavoidthrowingdebrisattheoperator.
•Usethetipofthestringtodothecutting;donotforcestring
headintouncutgrass.
•Wireandpicketfencescauseextrastringwear,even
breakage.Stoneandbrickwalls,curbs,andwoodmaywear
stringrapidly.
•Avoidtreesandshrubs.Treebark,woodmoldings,siding,
andfencepostscaneasilybedamagedbythestrings.
G017508
Figure12
1.Directionofrotation3.Stringpath
2.Idealcuttingrange
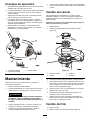
Maintenance
Aftereachuseofthetrimmer,completethefollowing:
1.Removethebatteryfromthetrimmer.
2.Wipethetrimmercleanwithadampcloth.Donothosethe
trimmerdownorsubmergeitinwater.
CAUTION
Thelinecut-offbladeonthedeectorissharpand
cancutyou.Donotuseyourhandstocleanthe
deectorshieldandblade.
3.Wipeorscrapecleanthecuttingheadareaanytimethereis
anaccumulationofdebris.
4.Checkandtightenallfasteners.Ifanypartisdamagedor
lost,repairorreplaceit.
5.Brushdebrisawayfromairintakeventsonmotorhousing
topreventthemotorfromoverheating.
9

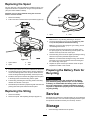
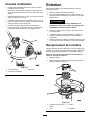
ReplacingtheSpool
Useonly.065inch(1.65mm)diametermonolamentstring.Use
originalmanufacturer’sreplacementstringforbestperformance
(Toropartnumber88532or88524).
Important:Useofalargerdiameterstringwillcausethe
motortooverheatandfail.
1.Removethebattery.
2.Pushinthetabsonthesideofthespoolretainer(Figure13).
G017510
Figure13
1.Spoolretainer3.Slots
2.Spool
4.Tabs
3.Pullthespoolretaineruptoremoveitandremovethespool.
4.Toinstallthenewspool,makesurethestringiscapturedin
oneoftheretainingslotsonthenewspool.Makesurethe
endofthestringextendsapproximately6inches(152mm).
5.Installthenewspoolsothatthestringalignswiththeeyelet
inthestringhead.Threadthestringintotheeyelet.
6.Pullthestringextendingfromthestringheadsothestring
releasesfromtheslotinthespool.
7.Reinstallthespoolretainerbydepressingtabsintoslotsand
pushingdownuntilspoolretainerclicksintoplace.
ReplacingtheString
1.Removethebattery.
2.Removethespool.SeeReplacingtheSpool(Figure13).
1
2
G015662
Figure14
1.Spool
2.Hole
Note:Removeanyoldstringremainingonthespool.
3.Thespoolwillacceptupto15feetofstring.Useonly.065
inch(1.65mm)diametermonolamentstring.
Note:Donotuseanyothergaugeortypeofstring,asthis
coulddamagethetrimmer.
4.Insertthestringintotheanchorholeintheupperpartof
thespool(Figure14).Windthestringontothespoolinthe
directionshownbythearrowsonthespool.
5.Placethestringintheslotontheupperspoolange,leaving
about6inch(152mm)extendedbeyondtheslot.
Note:Donotoverll.Afterwindingthestring,thereshould
beatleast1/4inch(6mm)betweenthewoundstringand
theoutsideedgeofthespool.
6.Replacethespoolandthespoolretainer.RefertoSpool
Replacementearlierinthismanual.
PreparingtheBatteryPackfor
Recycling
WARNING
Beforerecycling,covertheterminalsofthebattery
packwithheavy-dutyadhesivetape.Donotattempt
todestroyordisassemblethebatterypackorremove
anyofitscomponents.Lithium-ionbatteriesmustbe
recycledordisposedofproperlyatthenearestbattery
recyclingfacility.
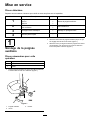
Service
Shouldthisitemneedservice,taketheproducttoyourAuthorized
ToroServiceDealer.YourToroDealerisspeciallytrainedtorepair
ToroproductsandwillensurethatyourTorostays“AllToro.”
Storage
•Cleanallforeignmaterialfromtheproduct.
10

•Storeitinawell-ventilatedplacethatisinaccessibleto
children.
•Keepawayfromcorrosiveagentssuchasgardenchemicals
andde-icingsalts.
Troubleshooting
Usingthebatterywhenitishotcanreducetheoperatingtime.
Thebatterywillautomaticallystopworkingwhenitisoverheated
topreventdamagetoit.Removethebatteryfromthechargerand
allowittocoolbeforeplacingitbackintothetrimmer.
Usingthebatterywhenthereismoistureontheleadscancause
thetrimmertomalfunction.Allowthebatterytodryorwipeitdry
beforeplacingitbackintothetrimmer.
11

TheToroPromise-ElectricProducts
ATwo-YearFullWarrantyforResidentialUsefortheUnitedStatesandCanada
TheToroCompanyanditsafliate,ToroWarrantyCompany,pursuanttoanagreementbetweenthem,jointlywarrantthisproductfortwoyearsagainst
defectsinmaterialorworkmanshipwhenusedfornormalresidentialpurposes.*
IfyouthinkyourToroProductcontainsadefectinmaterialsorworkmanship,ifyouhavequestionsorproblems,andbeforereturningthisproductcall
tollfree:
Trimmers:Blowers:
Snowthrowers:
1-800-237-2654(US)
1-800-248-3258(Canada)
1-888-367-6631(US)
1-888-430-1687(Canada)
1-800-574-3312(Mexico)
1-800-808-2963(US)
1-800-808-3072(Canada)
Toreceiveareplacementorrepair,atouroption,returnthecompleteunittotheseller.UnitedStatesandCanadacustomersmayreturntheirproduct,
withproofofpurchase,toanyAuthorizedServiceDealer.UnitedStatescustomersmayalsoreturntheirproduct,withproofofpurchase,postage
prepaid,totheToroServiceCenter,5500SEDelaware,Ankeny,IA50021.
Thiswarrantycoversproductdefectsonly.NeitherTheToroCompanynorToroWarrantyCompanyisliableforindirect,incidental,or
consequentialdamagesinconnectionwiththeuseoftheToroProductscoveredbythiswarranty,includinganycostorexpenseofproviding
substituteequipmentorserviceduringreasonableperiodsofmalfunctionornon-usependingcompletionofrepairsunderthiswarranty.
Somestatesdonotallowexclusionsofincidentalorconsequentialdamages,sotheaboveexclusionsmaynotapplytoyou.Thiswarranty
givesyouspeciclegalrights,andyoumayalsohaveotherrightswhichvaryfromstatetostate.
CountriesOtherthantheUnitedStatesandCanada
CustomerswhohavepurchasedToroproductsexportedfromtheUnitedStatesorCanadashouldcontacttheirToroDistributor(Dealer)toobtain
guaranteepoliciesforyourcountry,province,orstate.IfforanyreasonyouaredissatisedwithyourDistributor’sserviceorhavedifcultyobtaining
guaranteeinformation,contacttheToroimporter.Ifallotherremediesfail,youmaycontactusatToroWarrantyCompany.
AustralianConsumerLaw
AustraliancustomerswillnddetailsrelatingtotheAustralianConsumerLaweitherinsidetheboxoratyourlocalToroDealer.
*Residentialusemeansuseoftheproductonthesamelotasyourhome.PartNumber374-0262Rev.D
374-0262RevD

FormNo.3377-755RevA
Desbrozadorainalámbricade30cm(12pulgadas)
Nºdemodelo51484—Nºdeserie313000001ysuperiores
Nºdemodelo51484T—Nºdeserie313000001ysuperiores
Manualdeloperador
ElModelo51484Tnoincluyenibateríanicargador.
Siustedtienealgunapreguntaoalgúnproblema,contáctenosen
www.Toro.comollamealteléfonogratuito1-800-237-2654(EE.UU.)o
1-800-248-3258(Canadá)antesdedevolveresteproducto.
Normasgeneralesde
seguridad
ADVERTENCIA
CALIFORNIA
AdvertenciadelaPropuesta65
Losbornes,terminalesyotrosaccesorios
delabateríacontienenplomoycompuestos
deplomo,productosquímicosreconocidos
porelEstadodeCaliforniacomocausantes
decáncerydañosreproductivos.Láveselas
manosdespuésdemanejarelmaterial.
ADVERTENCIA:Cuandoseutilizanaparatosdejardinería
eléctricos,esnecesarioobservarunasnormasbásicasde
seguridad,incluyendolassiguientes,andereducirelriesgode
incendio,descargaeléctricaylesionespersonales:
Leatodaslasinstrucciones.
Eltérmino"herramientaeléctrica"queapareceenlasadvertencias
sereeresiempreaunaherramientaaccionadaporelsuministro
eléctricodelared(concable)ounaherramientaeléctrica
accionadaporbatería(sincable).
1.Seguridaddelazonadetrabajo
A.Mantengalazonadetrabajolimpiaybieniluminada.
Laszonasdesordenadasuoscurassonunainvitación
alaccidente.
B.Noutiliceherramientaseléctricasenatmósferas
explosivas,comoporejemploenpresencia
delíquidosinamables,gasesopolvo.Las
herramientaseléctricascreanchispasquepueden
inamarelpolvoolosvapores.
C.Mantengaalejadosaniñosyotraspersonas
mientrasutilizaunaherramientaeléctrica.Las
distraccionespuedenhacerquepierdaelcontrol.
2.Seguridadeléctrica
A.Laclavijadelaherramientaeléctricadebeserdel
tipocorrectoparaelenchufe.Nuncamodiqueel
enchufeenmodoalguno.Noutiliceadaptadoresde
enchufeconherramientaseléctricascontomade
tierra.Elusodeclavijassinmodicaryenchufescon
tomadetierrareduciráelriesgodedescargaeléctrica.
B.Eviteelcontactodelcuerpoconsupercies
conectadasatierra(masa).Hayunmayorriesgode
descargaeléctricasisucuerpohacetierra.
C.Nomaltrateelcable.Noutiliceelcablenuncapara
transportar,arrastrarodesenchufarlaherramienta
eléctrica.Mantengaelcablealejadodelcalor,del
aceite,delosbordescortantesydelaspiezas
móviles.Loscablesdañadosoenredadosaumentan
elriesgodedescargaeléctrica.
D.Noexpongalasherramientaseléctricasalalluvia
oacondicioneshúmedas.Sientraaguaenuna
herramientaeléctrica,elriesgodedescargaeléctrica
aumenta.
E.Sinoesposibleevitarusarunaherramienta
eléctricaenunlugarhúmedo,utiliceunsuministro
eléctricoprotegidoporundispositivodecorriente
residual(RCD)enAUSoporundispositivode
interrupcióndemasa(GFI)enEE.UU.
ElusodeunRCDoGFIreduceelriesgodedescarga
eléctrica.
3.Seguridadpersonal
A.Manténgasealerta;estéatentoaloqueestá
haciendoyutiliceelsentidocomúnmientrasutiliza
unaherramientaeléctrica.Noutiliceunherramienta
eléctricasiestácansadoobajolainuenciade
drogas,alcoholomedicamentos.Unabrevefalta
deatenciónmientrasutilizaunaherramientaeléctrica
puedeprovocarlesionespersonalesgraves.
B.UtiliceequiposdeprotecciónpersonalLleve
protecciónocularsiempre.Elusodeequiposde
protecciónpersonalcomomascarillas,calzadode
seguridadantideslizante,cascoyprotecciónauditiva,
encondicionesapropiadas,reduciráelriesgode
lesionespersonales.
C.Eviteelencendidoaccidental.Asegúresedequeel
interruptorestáenlaposicióndeapagadoantes
deconectarlaherramientaalatomadecorriente
y/oalabatería,yantesdelevantarotransportarla
©2013—TheToro®Company
8111LyndaleAvenueSouth
Bloomington,MN55420
Registresuproductoenwww.Toro.com.
Traduccióndeloriginal(ES)
ImpresoenChina
Reservadostodoslosderechos
*3377-755*A

herramienta.Transportarlasherramientaseléctricas
coneldedosobreelinterruptoroenchufarherramientas
eléctricasconelinterruptorenlaposicióndeencendido
esunainvitaciónalaccidente.
D.Nointentealcanzarzonasdemasiadoalejadas.Pise
rmeymantengaelequilibrioentodomomento.
Estopermiteunmayorcontroldelaherramientaen
situacionesimprevistas.
E.Utilicelaropaadecuada.Nolleveropasojoyas
sueltas.Mantengaelpelo,laropaylosguantes
alejadosdelaspiezasmóviles.Laropasuelta,las
joyasyelpelolargopuedenquedaratrapadosen
piezasmóviles.
F.Mantengalasmanosylospiesalejadosdelazona
decorte.
4.Usoycuidadodelasherramientaseléctricas
A.Nofuercelaherramientaeléctrica.Utilicela
herramientaeléctricaadecuadaparaeltrabajoa
realizar.Laherramientaeléctricacorrectarealizaráel
trabajomejoryconmayorseguridadalavelocidad
paralaquefuediseñada.
B.Noutilicelaherramientaeléctricasielinterruptor
nolaenciendeyapaga.Cualquierherramienta
eléctricaquenopuedasercontroladaconelinterruptor
espeligrosaydebeserreparada.
C.Retirelabateríadelaherramientaeléctricaantes
derealizarcualquierajuste,cambiardeaccesorio
oalmacenarlaherramienta.Estasmedidasde
seguridadpreventivasreducenelriesgodeunarranque
accidentaldelaherramientaeléctrica.
D.Sinolaestáusando,guardelaherramientaeléctrica
fueradelalcancedelosniños,ynopermita
quelautilicenpersonasnofamiliarizadasconla
herramientaeléctricaoconestasinstruccionesde
usodelaherramientaeléctrica.Lasherramientas
eléctricassonpeligrosasenmanosdeusuarios
inexpertos.
E.Guardebajotecholosaparatosquenoseestán
utilizando.Cuandonoseestánutilizando,losaparatos
debenguardarseenunlugarseco,enaltoobajollave,
yfueradelalcancedelosniños.
F.Mantenimientodelasherramientaseléctricas.
Compruebequelaspiezasmóvilesestán
correctamentealineadasyquesemueven
librementesinagarrotarse,quenohaypiezasrotas,
yquenohayotrascircunstanciasquepodrían
afectaralusodelaherramientaeléctrica.Si
existendaños,hagarepararlaherramientaeléctrica
antesdeusarla.Muchosaccidentessedebena
unmantenimientodecientedelasherramientas
eléctricas.
G.Mantengalasherramientasdecortealadasy
limpias.Unaherramientadecortebienmantenidacon
losbienaladosesmásfácildecontrolaryhaymenos
probabilidadesdequeseagarrote.
H.Utilicelaherramientaeléctricasegúnloindicado
enestasinstruccionesydelamaneraprevista
paracadatipodeherramientaeléctrica,teniendo
encuentalascondicionesdetrabajoyeltrabajo
arealizar.Elusodelaherramientaeléctricapara
operacionesdiferentesdelasprevistaspodríadarlugar
aunasituacióndepeligro.
I.Mantengalosprotectorescolocadosyenbuen
estadodefuncionamiento.
5.Mantenimiento
Elmantenimientodesuherramientaeléctricadebeser
realizadoporuntécnicodereparacionesdebidamente
cualicado,utilizandoúnicamentepiezasderepuesto
idénticas.Sólodeestamanerasegarantizael
mantenimientodelaseguridaddelaherramientaeléctrica.
6.Seguridaddelasbaterías
A.Nocargueelaparatobajolalluviaoenlugares
húmedos.
B.Noutiliceaparatosalimentadosporbateríabajola
lluvia.
C.Utiliceúnicamentebateríasdelsiguientetipoytamaño:
BateríaToroModelo88502.
D.Retireodesconectelabateríaantesderealizar
tareasdemantenimientoolimpieza,yantesderetirar
materialesdelaparatodejardinería.
E.Notirelasbateríasalfuego.Lasceldaspueden
explosionar.Compruebesilanormativalocalcontiene
algunainstrucciónespecialsobrelaeliminacióndelas
baterías.
F.Noabranimutilelasbaterías.Elelectrolitoliberadoes
corrosivoypuedecausardañosenlosojosolapiel.
Puedesertóxicosiesingerido.
G.Almanejarlasbaterías,tengacuidadodenohacer
cortacircuitoconmaterialesconductores,talescomo
anillos,pulserasollaves.Labateríaoelconductor
puedenrecalentarseycausarquemaduras.
GUARDEESTASINSTRUCCIONES
2

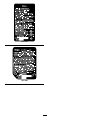
Pegatinasdeseguridadeinstrucciones
Laspegatinaseinstruccionesdeseguridadestánalavistadeloperadoryestánubicadascercadecualquierzona
depeligropotencial.Sustituyacualquierpegatinaqueestédañadaoquefalte.
Símbolo
Nombre
Designación/explicación
CCCorrientecontinua
Tipodecorriente
VVoltios
Voltaje(Tensión)
125–3281
Modelo51484
1.Advertencia–leaelManualdeloperador;noutilicela
máquinaencondicioneshúmedas;lleveprotecciónocular.
121–7657
Modelo51484T
1.Advertencia–leaelManualdeloperador;noutilicela
máquinaencondicioneshúmedas;lleveprotecciónocular.
125–3280
121–7615
125–3293
3

125–3279
125–3295
4

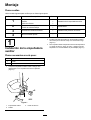
Montaje
Piezassueltas
Utilicelatablasiguienteparavericarquenofaltaningunapieza.
Procedimiento
DescripciónCant.
Uso
Empuñaduraauxiliar1
Pestillo1
1
Piezaderefuerzo
1
Instalacióndelaempuñaduraauxiliar.
Protector1
2
TornillodecabezaPhillips1
Montajedelprotectorenlabasedela
desbrozadora.
3
Protectordebordesdealambre1Instalacióndelprotectordebordes
4
Nosenecesitanpiezas
–
1
Instalacióndelaempuñadura
auxiliar
Piezasnecesariasenestepaso:
1Empuñaduraauxiliar
1Pestillo
1
Piezaderefuerzo
1.Coloquelaempuñaduraauxiliarsobreelmangodela
desbrozadoraconlasupercielisahaciaeloperador
(Figura1).
G017277
Figura1
1.Empuñaduraauxiliar
3.Piezaderefuerzo
2.Pestillo
2.Introduzcalapiezaderefuerzoenlaempuñaduraauxiliar
demaneraqueelrefuerzoencajeenlaranuradelmango
(Figura1).
3.Paseelpestillodesdelaizquierdaatravésdelaempuñadura
ylapiezaderefuerzo,segúnseindica,yaprieteeltornillo
delpestilloconundestornilladordepuntaPhillips(Figura1).
5

2
Instalacióndelprotector
Piezasnecesariasenestepaso:
1Protector
1TornillodecabezaPhillips
Procedimiento
1.RetireeltornillodecabezaPhillipssujetaconcintaal
protector(Figura2).
2.Desliceelprotectorsobrelabasedeladesbrozadora,
segúnsemuestraenFigura2.
G017506
Figura2
1.TornillodecabezaPhillips2.Protector
3.SujeteelprotectorusandountornillodecabezaPhillips.
3
Instalacióndelprotectorde
bordes
Piezasnecesariasenestepaso:
1Protectordebordesdealambre
Procedimiento
Introduzcalosextremosdelprotectordebordesdealambreen
lostaladrosdelacarcasadeladesbrozadora,segúnsemuestra
enFigura3.
g017642
1
Figura3
1.Protectordebordesdealambre
6

4
Ajustedelaalturadela
desbrozadoraydelaposición
delabase.
Nosenecesitanpiezas
Procedimiento
•Paraajustarlaalturadelaempuñaduraauxiliar,abrael
pestillodelaempuñaduraauxiliar,deslicelaempuñadura
auxiliarhaciaarribaohaciaabajohastaobtenerlaaltura
deseadaysujetelaempuñaduraensusitiocerrandoel
pestillo(Figura4).
G015655
Figura4
1.Empuñaduraauxiliar3.Palancadeajustedela
altura
2.Pestillodelaempuñadura
auxiliar
•Paraajustarlaalturadeladesbrozadora,abralapalancade
ajusteydesliceelmástilhaciaarribaohaciaabajoalaaltura
deseada,luegocierrelapalanca(Figura4).
•Paraajustarlaposicióndelabase,presionehaciaabajo
sobreelbotóndegirosituadoenlabasedelmango,luego
girelabasealaorientacióndeseada(Figura5).
G017507
Figura5
1.Botóndegiro
Operación
Importante:Enelmomentodelacompralabateríanoestá
totalmentecargada.Antesdeusarladesbrozadorapor
primeravez,coloquelabateríaenelcargadorycárguela
hastaqueelindicadorLEDcambieaverde.Asegúresede
leertodaslasprecaucionesdeseguridad.Conelusonormal,
eltiempodecargaserámenor.Sivaaalmacenarelaparato
duranteunperiododetiempoprolongado,retirelabatería.
Antesdeusarelaparatodenuevo,carguelabateríahasta
queelindicadorLEDcambieaverde.
Cómoarrancarla
desbrozadora
1.Alineelalengüetadelabateríaconelhuecocorrespondiente
delacarcasadelaempuñadura(Figura6).
1
2
3
G016190
Figura6
1.Empuñaduracongatillo3.Pestillo
2.Lengüeta
2.Sujetelaempuñaduracongatillo(Figura6).
3.Introduzcalabateríaenlaempuñadurahastaqueelpestillo
encajeensusitio.
4.Paraarrancarladesbrozadora,desliceelinterruptorde
bloqueohaciaatrásalaposicióndeEncendido,yaprieteel
gatillo(Figura6).
7

G016189
1
2
Figura7
1.Interruptordebloqueo
2.Gatillo
Cómopararladesbrozadora
Parapararladesbrozadora,suelteelgatillo.
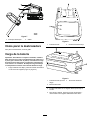
Cargadelabatería
Importante:Paraobtenerlosmejoresresultados,labatería
debecargarseenunlugarcuyatemperaturaseasuperiora0°
C(32°F)peroinferiora40°C(104°F).Parareducirelriesgo
delesionespersonalesgraves,noalmacenelaherramienta
enelexterioroenvehículos.Eltiempodecargaserámayor
silatemperaturanoestáenesteintervalodurantelacarga.
1.Pongalabateríabocaabajoyalineeelterminaldelabatería
conlaranuradelcargador(Figura8yFigura9).
Figura8
1.IndicadoresLED2.Introduzcalabateríaaquí
G016223
1
2
3
Figura9
1.IndicadoresLED(nivelde
carga)
3.Terminaldelabatería
2.Botóndeliberación
2.Introduzcalabateríaenelcargadorhastaqueencajeen
susitio.
3.Pararetirarlabatería,presioneelbotóndeliberacióny
retirelabateríadelcargadordeslizándolahaciaatrás.
8
La page est en cours de chargement...
La page est en cours de chargement...
La page est en cours de chargement...
La page est en cours de chargement...
La page est en cours de chargement...
La page est en cours de chargement...
La page est en cours de chargement...
La page est en cours de chargement...
La page est en cours de chargement...
La page est en cours de chargement...
La page est en cours de chargement...
La page est en cours de chargement...
La page est en cours de chargement...
La page est en cours de chargement...
La page est en cours de chargement...
La page est en cours de chargement...
-
 1
1
-
 2
2
-
 3
3
-
 4
4
-
 5
5
-
 6
6
-
 7
7
-
 8
8
-
 9
9
-
 10
10
-
 11
11
-
 12
12
-
 13
13
-
 14
14
-
 15
15
-
 16
16
-
 17
17
-
 18
18
-
 19
19
-
 20
20
-
 21
21
-
 22
22
-
 23
23
-
 24
24
-
 25
25
-
 26
26
-
 27
27
-
 28
28
-
 29
29
-
 30
30
-
 31
31
-
 32
32
-
 33
33
-
 34
34
-
 35
35
-
 36
36


Toro 51484 Manuel utilisateur
- Catégorie
- Coupe-herbe
- Taper
- Manuel utilisateur
- Ce manuel convient également à
dans d''autres langues
- English: Toro 51484 User manual
- español: Toro 51484 Manual de usuario
Documents connexes
-
Toro 12in Cordless Single-Line Trimmer Manuel utilisateur
-
-
-
-
-
-
-
-
-