
THERMADOR.COM
Use and care
GUIDE
Professional Series Rangetops


THERMADOR.COM
Use and care
GUIDE
Table of contents (English) ................................................................ 3
Table de matières (Français)............................................................ 33
Models |
Modèles:
PCG305W
PCG366W
PCG364WD
PCG364WL
PCG486WL
PCG486WD
Professional Series Rangetops

Page. 2
Congratulations!
Congratulations on your recent Thermador purchase!
Whether you are a dedicated chef or simply a connoisseur
of the art of cooking, owning a Thermador kitchen is the
ultimate expression of personal style, good taste and an
appreciation for the complete culinary experience. Our
award-winning products have been empowering culinary
enthusiasts for more than eleven decades.
Before you begin using your new Thermador product,
please take a moment to review the Use and Care Guide.
You will find the answers to all of your questions as well as
some very important safety information. Pay special
attention to the Important Safety Instructions located at
the beginning of the manual. Your Thermador product is
ready and waiting to be used for your next gourmet
creation!
Our products are handcrafted with the highest quality
authentic materials to ensure years of reliable service. In
the unlikely event that you have a service question, please
have your model and serial numbers of your product
available (see the “Before Calling For Service” section for
location).
We realize that you have made a considerable investment
in your kitchen. Please feel free to share your Thermador
kitchen photos and remodeling stories with us. Follow us
on Twitter or post your kitchen photos on Facebook. We
would love to hear from you!
Thermador wishes you many years of creative cooking.
Félicitations!
Félicitations pour votre récent achat Thermador! Que vous
soyez un chef enthousiaste ou un simple connaisseur de
l’art culinaire, le fait de posséder une cuisine Thermador
représente l’expression ultime de votre style personnel,
de votre bon goût et de votre intérêt à vivre une
expérience culinaire complète. Nos produits primés
permettent à des adeptes de la bonne bouffe d’atteindre
de nouveaux sommets depuis plus de onze décennies.
Avant de commencer à utiliser votre nouveau produit
Thermador, veuillez prendre un moment pour examiner ce
guide d’utilisation et d’entretien. Vous trouverez des
réponses à toutes vos questions ainsi que quelques
renseignements essentiels en matière de sécurité. Portez
une attention particulière aux Instructions de sécurité
importantes se trouvant au début du guide. Votre produit
Thermador est prêt et n’attend plus que vous l’utilisiez
pour votre prochaine création gastronomique!
Nos produits sont fabriqués à la main avec des matériaux
authentiques de haute qualité afin d’assurer des années
de service fiable. Dans l’éventualité improbable où vous
auriez une question relativement à l’entretien, veuillez
avoir à la portée de la main le numéro de série et de
modèle de votre produit (reportez vous “Avant d’appeler
le service technique”).
Nous savons bien que vous avez investi une somme
considérable dans votre cuisine. N’hésitez pas à partager
avec nous les photos de votre cuisine Thermador et les
anecdotes relatives au remodelage de votre cuisine.
Suivez-nous sur Twitter ou affichez des photos de votre
cuisine sur Facebook. Nous serions ravis d’avoir de vos
nouvelles!
Thermador vous souhaite de nombreuses années de
gastronomie créative.

Page. 3
This THERMADOR
®
appliance is made by
BSH Home Appliances Corporation
1901 Main Street, Suite 600
Irvine, CA 92614
Questions?
1-800-735-4328
www.thermador.com
We look forward to hearing from you!
Table of
CONTENTS
Safety ......................................................................................4
Important safety instructions...........................................4
Description..............................................................................9
Rangetop identification...................................................9
Before you begin ....................................................................12
Getting started ...............................................................12
Using the rangetop.................................................................13
Sealed STAR
®
burners.....................................................13
ExtraLow
®
burners ..........................................................14
Electric griddle ................................................................20
Electric grill......................................................................23
Care and maintenance............................................................26
Appliance cleaning tips ...................................................26
Before calling for service ........................................................29
Troubleshooting ..............................................................29
Service information..........................................................30
Product registration.........................................................30
Statement of limited product warranty .................................31
Support, parts and accessories ..................................back page
Safety
DEFINITIONS
9 WARNING
This indicates that death or serious injuries may occur as a
result of non-observance of this warning.
9 CAUTION
This indicates that minor or moderate injuries may occur as a
result of non-observance of this warning.
NOTICE: This indicates that damage to the appliance or
property may occur as a result of non-compliance with this
advisory.
Note: This alerts you to important information and/or tips.

Page. 4
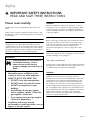
Safety
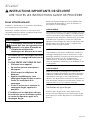
9 IMPORTANT SAFETY INSTRUCTIONS
READ AND SAVE THESE INSTRUCTIONS
Please read carefully
Installer: Please leave this guide with this unit for the
owner.
Owner: Please retain this guide for future reference. Use
t
he appliance only for its intended purpose as described
in this manual.
WARNING
When properly cared for, your new appliance has been
designed to be safe and reliable. Read all instructions
carefully before use. These precautions will reduce the risk
of burns, electric shock, fire, and injury to persons. When
using kitchen appliances, basic safety precautions must be
followed, including these in the following pages.
WARNING
If the information in this manual is
not followed exactly, a fire or
explosion may result causing
property damage, personal injury or
death.
• DO NOT try to light any appliance.
• DO NOT touch any electrical switch.
• DO NOT use any phone in your
building.
• Immediately call your gas supplier
from a neighbor’s phone. Follow the
gas supplier’s instructions.
• If you cannot reach your gas supplier,
call the fire department.
WARNING
Improper installation, adjustment, alteration, service or
maintenance can cause injury or property damage. Refer
to this manual. For assistance or additional information
consult a qualified installer, service agency, manufacturer
or the gas supplier.
WARNING
Before servicing or cleaning the unit, switch power off at
service panel and lock service panel. This will prevent
power from being switched on accidentally. When the
service panel cannot be locked, securely fasten a
prominent warning device, such as a tag to the service
panel.
Examine the appliance after unpacking it. In the event of
transport damage, do not plug it in.
Gas type verification
Verify the type of gas supplied to the location. Ensure that
the appliance is connected to the type of gas for which it
is certified. Refer to the product rating label.
WARNING
If a gas conversion kit is used, the kit shall be installed by
qualified service personnel in accordance with the
manufacturer’s instructions and all applicable codes and
requirements of the authority having jurisdiction. If the
information in the instructions is not followed exactly, a
fire, explosion or production of carbon monoxide may
result causing property damage, personal injury or loss of
life. The qualified service personnel is responsible for the
proper installation of the kit. The installation is not proper
and complete until the operation of the converted
appliance is checked as specified in the manufacturer’s
instructions supplied with the kit.
-- DO NOT store or use gasoline or other
flammable vapors and liquids in the
vicinity of this or any other appliance.
-- WHAT TO DO IF YOU SMELL GAS
-- Installation and service must be
performed by a qualified installer, service
agency or the gas supplier.

Page. 5
9 IMPORTANT SAFETY INSTRUCTIONS
READ AND SAVE THESE INSTRUCTIONS
CAUTION
When connecting the unit to propane gas, make certain
the propane gas tank is equipped with its own high-
pressure regulator in addition to the pressure regulator
supplied with the appliance. The maximum gas pressure
to this appliance must not exceed 14.0'' water column
(34.9 mb) from the propane gas tank to the pressure
regulator.
For Massachusetts installations
1. Installation must be performed by a qualified or
licensed contractor, plumber or gas fitter qualified or
licensed by the state, province or region where this
appliance is being installed.
2. Shut-off valve must be a “T” handle gas cock.
3. Flexible gas connector must not be longer than 36''
(914 mm).
Ensure proper installation and servicing. Follow the
Installation Instructions provided with this product. Have
the appliance installed and electrically grounded by an
authorized service provider.
In the event a burner goes out and gas escapes, open a
window or a door. DO NOT attempt to use the appliance
until the gas has had time to dissipate. Wait at least 5
minutes before using the appliance.
DO NOT repair or replace any part of the appliance unless
specifically recommended in this manual. All servicing
should be referred to a qualified technician.
Electrical requirements
WARNING
IN CASE OF AN ELECTRICAL FAILURE
If for any reason a gas control knob is turned
ON and there is no electrical power to operate
the electronic igniters on the burners, turn OFF
the gas control knob and wait 5 minutes for the
gas to dissipate before lighting the burner
manually.
To light the burners manually, carefully hold a lighted
match to the burner ports and turn the gas control knob
to HI
. During a power failure, you can use the standard
burners, but each must be lit with a match.
DO NOT attempt to light the XLO
®
burners manually.
These burners are equipped with the ExtraLow
®
feature
and cannot be lit manually.
The appliance must be electrically grounded in
accordance with local codes or, in the absence of local
codes, with the National Electrical Code, NFPA 70 or the
Canadian Electric Code, CSA C22.1-02.
WARNING
Never Operate the Top Surface Cooking Section of this
Appliance Unattended
• Failure to follow this warning statement could result
in fire, explosion, or burn hazard that could cause
property damage, personal injury, or death.
• If a fire should occur, keep away from the appliance
and immediately call your fire department. DO NOT
ATTEMPT TO EXTINGUISH AN OIL/GREASE FIRE
WITH WATER.
Always disconnect the electrical plug from the outlet
before servicing this unit.
See the Installation Instructions for electrical requirements
and grounding instructions.
Have the installer show you where the electric circuit
breaker and the gas supply shut off valve are located so
you know how and where to turn off the gas and electricity
to the appliance.
Installation and maintenance must be carried out correctly.
Follow the instructions in the Installation Instructions
supplied with the product. Make sure that a qualified
electrician installs and performs grounding of the
appliance.
This appliance complies with the following Safety
Codes and Standards:
• UL 858, The Standard for the Safety of Household
Electric Ranges
• ANSI Z21.1, The American National Standard for
Household Cooking Gas Appliances
• CAN1-1.1-M81, Domestic Gas Ranges
• CSA C22.2 No. 61, Household Cooking Ranges
Installation must conform with local codes or, in the
absence of local codes, with the National Fuel Gas Code,
ANSI Z223.1/NFPA 54 or, in Canada, the Natural Gas and
Propane Installation Code, CSA B149.1.
Installation of appliances designed for manufactured
(mobile) home installation must conform with the
Manufactured Home Construction and Safety Standard,
Title 24 CFR, Part 3280 [formerly the Federal Standard for
Mobile Home Construction and Safety, Title 24, HUD (Part
280)] or with local codes where applicable.

Page. 6
9 IMPORTANT SAFETY INSTRUCTIONS
READ AND SAVE THESE INSTRUCTIONS
Installation of appliances designed for recreational park
trailers must conform with state or other codes or, in the
absence of such codes, with the Standard for Recreational
Park Trailers, ANSI A119.5.
It is the responsibility of the owner and the installer to
determine if additional requirements and/or standards
apply to specific installations.
Clearances from non-combustible materials are not part of
the ANSI Z21.1 scope and are not certified by
CSA.
Clearances under 6 inches should be approved by
the local codes and/or by the local authority having
jurisdiction.
Child safety
When children become old enough to use the appliance,
it is the responsibility of the parents or guardians to ensure
that they are instructed in safe operation of the appliance
by qualified persons.
WARNING
DO NOT store items of interest to children above or at the
back of the appliance. If children should climb onto the
appliance to reach these items, they could be seriously
injured.
DO NOT allow anyone to climb, stand, lean, sit, or hang
on any part of an appliance. This can damage the
appliance, and the unit may tip over, potentially causing
severe injury.
DO NOT allow children to use this appliance unless
closely supervised by an adult.
Children and pets should not be left alone or unattended
in the area where the appliance is in use. They should
never be allowed to play in its vicinity, whether or not the
appliance is in use.
General safety
WARNING
To eliminate risk of burns or fire caused by reaching over
heated surface units, cabinet storage located above the
surface units should be avoided.
WARNING
This unit is designed as a cooking appliance. Based on
safety considerations, never use it for warming or heating
a room.
WARNING
TO REDUCE THE RISK OF INJURY TO PERSONS, IN
THE EVENT OF A GREASE FIRE, OBSERVE THE
FOLLOWING:
• Smother flames with a close-fitting lid, cookie sheet,
or other metal tray, then turn off the gas burner or the
electric element. Be careful to prevent burns. If the
flames do not go out immediately, evacuate and call
the fire department.
• Never pick up a flaming pan — You may be burned.
• DO NOT USE WATER, including wet dish cloths or
towels — a violent steam explosion will result.
• Use an extinguisher only if:
• You know you have a class ABC extinguisher and
you already know how to operate it.
• The fire is small and contained in the area where it
started.
• The fire department is being called.
• You can fight the fire with your back to an exit.
WARNING
TO REDUCE THE RISK OF A GREASE FIRE
• Never leave surface units unattended at high settings.
Boilovers cause smoking and greasy spillovers that
may ignite. Heat oils slowly on low or medium
settings.
• Always turn hood ON when cooking at high heat or
when flambéing food (i.e. Crepes Suzette, Cherries
Jubilee, Peppercorn Beef Flambé).
• Clean hood filters frequently. Grease should not be
allowed to accumulate on fan or filter.
• Use proper pan size. Always use cookware
appropriate for the size of the burner.
• NEVER use any part of the appliance for storage.
Flammable materials can catch fire and plastic items
may melt or ignite. DO NOT hang articles from any
part of the appliance. Some fabrics are quite
flammable and may catch on fire.

Page. 7
9 IMPORTANT SAFETY INSTRUCTIONS
READ AND SAVE THESE INSTRUCTIONS
If the appliance is near a window, be certain the curtains
do not blow over or near the appliance burners; they
could catch on fire.
ALWAYS have a working smoke detector near the kitchen.
In the event that personal clothing or hair catches fire,
drop and roll immediately to extinguish flames.
Have an appropriate fire extinguisher available nearby,
highly visible, and easily accessible near the cooking
appliance.
Smother flames from food fires, other than grease fires,
with baking soda. Never use water on cooking fires.
Whenever possible, do not operate the ventilation system
during a fire. However, DO NOT reach through fire to turn
it off.
NEVER let clothing, potholders, or other flammable
materials come in contact with or too close to any burner
or burner grate until it has cooled. Fabric may ignite and
result in personal injury.
Use only dry potholders: moist or damp potholders on hot
surfaces may cause burns from steam. DO NOT use a
towel or other bulky cloth in place of potholders. DO NOT
let potholders touch hot burners or burner grates.
For personal safety, wear proper apparel. Loose fitting
garments or hanging sleeves should never be worn while
using this appliance. Some synthetic fabrics are highly
flammable and should not be worn while cooking.
DO NOT use aluminum foil to line any part of the
appliance. Use of a foil liner could result in a shock or fire
hazard, or the obstruction of the flow of combustion and
ventilation air. Foil is an excellent heat insulator and heat
will be trapped beneath it. This will impact the cooking
performance and can damage the finish of the appliance.
WARNING
The appliance is for cooking. Based on safety
considerations, never use the appliance to warm or heat a
room. Doing so may result in carbon monoxide poisoning
and overheating of the unit. Also, such use can damage
the appliance parts.
When using the appliance: DO NOT TOUCH THE
BURNER GRATES OR THE IMMEDIATE SURROUNDING
AREA. Areas adjacent to the burners may become hot
enough to cause burns.
Never leave the appliance unattended when using high
flame settings. Boil overs cause smoking and greasy
spillovers that may ignite. Also, if the burner flames and
igniter are smothered with spillage, unburned gas will
escape into the room. See
page 4 regarding gas leaks.
Only certain types of glass, heatproof glass-ceramic,
ceramic, earthenware, or other glazed cookware are
suitable for cooking on the burners. This type of cookware
may break with sudden temperature changes. Use only on
low or medium heat settings according to the utensil
manufacturer’s directions.
DO NOT heat or warm unopened food containers. Build-
up of pressure may cause the container to burst and cause
injury.
WARNING
During cooking, set the burner control so that the flame
heats only the bottom of the pan and does not extend
beyond the bottom of the pan. This instruction is based on
safety considerations.
Use caution to ensure that drafts like those from forced air
vents or fans do not blow flammable material toward the
flames or push the flames so that they extend beyond the
edges of the pot.
Always use pots and pans that have flat bottoms large
enough to cover the burner. The use of undersized pots
and pans could expose a portion of the flame and may
result in ignition of clothing.
WARNING
Avoid using high flame setting with a pan larger than the
grate or with one that spans more than one burner, such
as a griddle, for prolonged periods of time. This can result
in poor combustion that generates harmful by-products.
DO NOT use pots or pans on the griddle/grill plate
accessory (purchased separately). Bakeware, such as large
casserole pans, cookie sheets, etc., should never be used
on the griddle/grill plate accessory.
DO NOT use flammable cleaners to clean the appliance.
Remove the optional cutting board or griddle/grill cover
accessory, which is stored on top of the griddle/grill plate,
before operating the griddle/grill or any adjacent burners.

Page. 8
9 IMPORTANT SAFETY INSTRUCTIONS
READ AND SAVE THESE INSTRUCTIONS
GREASE IS FLAMMABLE. Let hot grease cool before
attempting to handle it. Avoid letting grease deposits
collect. Clean after each use.
For proper lighting and performance of the burners, keep
t
he igniter ports clean. It is necessary to clean the ports
when there is a boil over or when the burner does not light
even though the electronic igniters activate.
Clean the appliance with caution. Avoid steam burns; DO
NO
T use a wet sponge or cloth to clean the appliance
while it is hot. Some cleaners produce noxious fumes if
applied to a hot surface. Follow directions provided by the
cleaner manufacturer.
WARNING
After a spill or boil over, turn off the burner and using
caution due to possible hot surfaces, clean around the
burner and burner ports. After cleaning, check for proper
operation.
WARNING
DO NOT block or obstruct the flow of air
through the ventilation openings. The vent is
locate
d at the back of the appliance. The
vent needs to be unobstructed and open to
provide necessary airflow that is important
for proper performance.
DO NOT touch ven
t area while the appliance is on and for
several minutes after the appliance is off. Some parts of
the vent and surrounding areas become hot enough to
cause burns. Allow appliance sufficient time to cool before
touching or cleaning vent areas.
DO NOT position plastic
or other heat-sensitive items on
or near the vent. These items could melt or ignite.
To avoid a fire hazard, grease accumulation must be
prevented by frequently cleaning the appliance.
In case of fire or when intentionally
“flaming” liquor or
other spirits on the rangetop, follow manufacturer’s
instructions. Use caution when cooking foods with high
alcohol content (e.g. rum, brandy, bourbon). Alcohol
evaporates at high temperatures. There is a risk of burning
as the alcohol vapors may catch fire. Use only small
quantities of alcohol in foods.
Be sure all controls are turned off and the appliance is cool
be
fore using any type of aerosol cleaner on or around the
appliance. The chemical that produces the spraying action
could, in the presence of heat, ignite or cause metal parts
to corrode.
DO NOT obstruct the flow
of combustion or ventilation
air.
Service should only be done
by authorized service
providers. Service providers must disconnect the power
supply before servicing this unit.
DO NOT
use the grill plate accessory for cooking
excessively fatty meats or products which promote flare-
ups.
When cooking fatty or oily foods on burners,
the grill, or
the griddle, adjacent gas burners can ignite airborne
fumes. Use caution to avoid burns.
DO NOT
store or use corrosive chemicals, vapors,
flammables, or nonfood products in or near this appliance.
It is specifically designed for use when heating or cooking
food. The use of corrosive chemicals while heating or
cleaning will damage the appliance and could result in
injury.
WARNING
This appliance should not be installed with a ventilation
system that directs air in a downward direction toward the
range. This type of ventilation system may cause ignition
and combustion problems with the appliance resulting in
personal injury, property damage, or unintended
operation. Ventilating systems that direct the air upwards
do not have any restriction.
An air curtain or other over
head range hood, which
operates by blowing a downward airflow onto a range,
shall not be used in conjunction with a gas range unless
the hood and range have been designed and tested in
accordance with the Standard for Domestic Gas Ranges,
ANSI Z21.1 • CSA 1.1, and listed by an independent
testing laboratory for combination use.
IMPORTANT: There is a possibility to discolor the back
wall under certain cooking conditions.
Proposition 65 Warning
This product may contain a chemical known to the State of
California, which can cause cancer or reproductive harm.
Therefore, the packaging of your product may bear the
following label as required by California:
State of California Proposition 65 Warning:
: WARNING
Cancer and Reproductive Harm -
www.P65Warnings.ca.gov

Page. 9
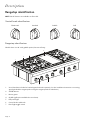
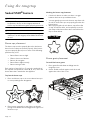
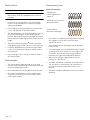
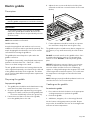
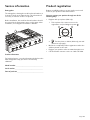
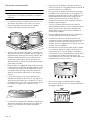
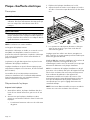
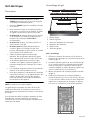
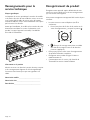
Description
Rangetop identification
NOTE: Not all features are available on all models.
Control knob identification
ExtraLow
® Standard Griddle Grill
Rangetop identification
1
2
3
4
6
5
7
Model shown is a 48'' with griddle option (features will vary).
1 Vent (island trim included or low backguard ordered separately. See the Installation Instructions concerning
spacing behind the rangetop when using the rangetop with the island trim.)
2 STAR
®
bu
rners
3 Burner grates
4 Griddle (grill option available but not shown)
5 LED panel light
6 Control knobs and bezels
7 Panel light toggle switch

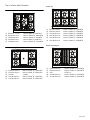
Page. 10
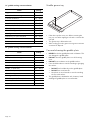
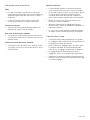
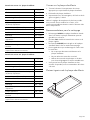
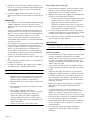
Top surface identification
Model 305
33
55
11
22
44
(1) ExtraLow
®
burner Natural 8000, LP 6000 BTU
(2) ExtraLow burner Natural 18000, LP 14000 BTU
(3) Standard burner Natural 10000, LP 9100 BTU
(4) Standard burner Natural 8000, LP 6000 BTU
(5) Standard burner Natural 15000, LP 11000 BTU
Model 364 with griddle
33
55
11
22
44
(1) ExtraLow burner Natural 15000, LP 11000 BTU
(2) ExtraLow burner Natural 18000, LP 15000 BTU
(3) Griddle 1,630W
(4) Standard burner Natural 15000, LP 11000 BTU
(5) Standard burner Natural 18000, LP 15000 BTU
Model 366
33
44
66
11
22
55
(1) ExtraLow burner Natural 15000, LP 11000 BTU
(2) ExtraLow burner Natural 18000, LP 15000 BTU
(3) Standard burner Natural 15000, LP 11000 BTU
(4) Standard burner Natural 18000, LP 15000 BTU
(5) Standard burner Natural 15000, LP 11000 BTU
(6) Standard burner Natural 18000, LP 15000 BTU
Model 364 with grill
33
55
11
22
44
(1) ExtraLow burner Natural 15000, LP 11000 BTU
(2) ExtraLow burner Natural 18000, LP 15000 BTU
(3) Grill 815W x 2
(4) Standard burner Natural 15000, LP 11000 BTU
(5) Standard burner Natural 18000, LP 15000 BTU

Model 486 with grill
33
44
77
11
22
66
55
(1) ExtraLow
®
burner Natural 15000, LP 11000 BTU
(2) ExtraLow burner Natural 18000, LP 15000 BTU
(3) Standard burner Natural 15000, LP 11000 BTU
(4) Standard burner Natural 18000, LP 15000 BTU
(5) Grill 815W x 2
(6) Standard burner Natural 15000, LP 11000 BTU
(7) Standard burner Natural 18000, LP 15000 BTU
Model 486 with griddle
33
44
77
11
22
66
55
(1) ExtraLow burner Natural 15000, LP 11000 BTU
(2) ExtraLow burner Natural 18000, LP 15000 BTU
(3) Standard burner Natural 15000, LP 11000 BTU
(4) Standard burner Natural 18000, LP 15000 BTU
(5) Griddle 1,630W
(6) Standard burner Natural 15000, LP 11000 BTU
(7) Standard burner Natural 18000, LP 15000 BTU
Page. 11

Page. 12
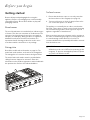
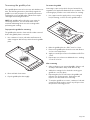
Before you begin
Getting started
Remove all tape and packaging before using the
appliance. Dispose of packaging in an environmentally-
responsible manner. Never allow children to play with
packaging material.
Brand names
The use of brand names is intended only to indicate a type
of cleaner. This does not constitute an endorsement. The
omission of any brand name cleaner does not imply its
adequacy or inadequacy. Many products are regional in
distribution and can be found in local markets. It is
imperative that all cleaning products be used in strict
accordance with the instructions on its package.
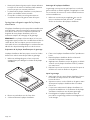
Rating plate
Record the model and serial number on page 30. The
model and serial numbers are found on the rating plate.
T
he rating plate is located as shown in the figure below.
The model and serial number must be provided when
call
ing Customer Support for assistance. Enter this
information on the product registration card included with
this product then mail it to the indicated address.
Surface burners
1. Ensure that the burner caps are correctly seated on
the burner bases of the rangetop (see page 13).
2. Turn on each burner to check for proper flame color.
Se
e “Flame description” for details.
The appliance occasionally has an
odor or smoke when
first used. These odors or smoke comes from the burning
off of manufacturing residues and is typical of any new
appliance regardless of manufacturer.
Please note that some pets or humans can be sensitive to
th
e odors created during any high heat cooking whether it
is a manufacturing residue burn off or food so it is
recommended that those potentially affected be removed
from the kitchen area.
9 WARNING
All knobs must be set to OFF before powering up the
rangetop. To prevent unintended operation at power
up, please set all knobs to OFF.

Page. 13
Using the rangetop
Sealed STAR
®
burners
9 WARNING
To prevent flare-ups and avoid the creation of harmful
by-products, do not use the rangetop without all
burner caps and all burner grates properly positioned.
9 WARNING
To prevent burns, do not touch burner caps or grates
while hot. Turn the rangetop off and allow the burners
to cool.
Burner cap placement
The burner caps must be properly placed on the burner
bases for the cooktop to function properly. If the burner
cap is not properly placed, one or more of the following
problems may occur:
• Burner flames are too high.
• Flames shoot out of burners.
• Burners do not ignite.
• Burner flames light unevenly.
• Burner emits gas odor.
Each cap has a letter (B, D, or F) cast in the underside of
th
e cap that corresponds to a letter (B, D, or F) cast in the
burner base that is attached to the appliance.
To place the burner caps
1. Place each burner cap on its correct burner base per
its corresponding letter
designation.
2. Place burner cap gently on top of base so that the
prongs of the burner base fit snugly into the groove of
the burner cap.
Checking the burner cap placement
• Check each burner to make sure there is no gap
be
tween the burner cap and burner base.
• You may gently try to move the burner caps from side
to sid
e to check if the caps are properly placed on the
burner bases.
• When properly placed, each burner
cap will rest flat
on top of its burner base, and completely cover the
star-shape of the burner base when viewed from the
top as shown below.
Burner grate placement
To install the burner grates
1. Place grates flat-side down and align into the
ra
ngetop recess.
2. Grates should rest flush against each other and
against the sides of
the recess.

Page. 14
Control knobs
The control knobs for two sealed gas burners, one in front
and one in the rear, are located directly in front of and
below the pair of burners on the control panel.
Operation of the burners
To turn on the burners
1. Press in on the knob and turn it counter-clockwise HI.
– The igniter for the selected burner clicks and
sparks.
–
After burner ignition, the igniter stops clicking.
2. Rotate the knob to any flame setting between HI an
d
LO.
LED panel light (select models)
Positioned below the bullnose, the LED panel light
provides task lighting with a theatrical ambiance.
The panel light toggle switch on th
e control panel turns
the light on and off.
ExtraLow
®
burners
The drawing shows that the
control knob has an
additional range after the
XLO setting. When the knob
is set within this range, the
flame cycles off and on.
By varying the length of time the flame is off and on, the
he
at is reduced even further to cook delicate foods. For
example, these very low settings are suitable for
simmering and poaching, melting chocolate and butter,
holding cooked foods at temperatures without scorching
or burning, etc.
Operation of the ExtraLow
®
burners
• XLO, the very lowest setting, is achieved by cycling
th
e flame on for approximately 10 seconds and off for
50 seconds of each minute.
• When the knob is set just below the XLO setting, the
flame
will cycle on for approximately 50 seconds and
off for 10 seconds of each minute.
• To vary the amount of low heat to suit the food and
qu
antity, the control can be set anywhere within the
XLO range marked on the knob.
ExtraLow
®
techniques
• To maintain a low or simmer heat, bring food to a
rolling boil.
Stir well, then cover the pan and lower the
heat to a setting just below XLO.
• If a large pan is used, the simmer action may occur
m
ainly in the center of the pan. To equalize the
temperature throughout the food, stir the food
around the outer edges of the pan into the food in the
center.
• It is normal to stir food occasionally while simmering.
This is
especially important when simmering for
several hours, such as for a homemade spaghetti
sauce or beans.
• If the setting is too low to hold a simmer, bring the
f
ood back to a boil before re-setting to a higher heat.
Automatic re-ignition
9 CAUTION
DO NOT touch the burners when the igniters are
sparking.
Each burner has its own electronic igniter that sparks
when the burner is turned on. Each burner should light in
four seconds or less. If a burner does not light, check to
see that the cap is positioned correctly on the base.
If any one or more burners blow out, the electronic igniter
a
utomatically activates to re-light the flame. Do not touch
the burners when the igniters are active.
IMPORTANT
• For proper combustion do not use the rangetop
withou
t the burner grates in place.
• There is a slight sound associated with gas
combustion and ignition. This is a normal
condition.
• On rangetops using propane gas (LP), a slight “pop”
soun
d may be heard at the burner ports a few seconds
after the burner has been turned off.

Page. 15
Power failure
9 WARNING
In the event of a power failure, turn all knobs to the
OFF position. Only the standard burners can be lit
manually.
• In the event of a power failure, only the standard
burners can be manually lit. It is necessary to light
each one individually.
• If the rangetop is being used when the power failure
occurs,
turn all knobs to the OFF position.
• The standard burners can be lit by holding a match at
th
e ports and turning the control knob to the HI
position. Wait until the flame is burning all around the
burner cap before adjusting the flame to the desired
height.
• The burners with the ExtraLow
®
feature cannot be
used during a power failure. Be sure to turn them off.
• If a burner with ExtraLow is on when a power failure
occu
rs, it cannot be turned back on until the knob is
first turned off.
• If you smell gas, refer to safety precautions listed in
t
he Safety chapter.
Flame height
• The correct flame height depends on 1) size and
material of pan being used; 2) food being cooked; and
3) amount of liquid in the pan.
• Never extend the flame beyond the base of the pan.
• Use a low or medium flame for pan materials that
con
duct the heat slowly, such as porcelain coated
steel or glass-ceramic.
Flame description
Yellow flames:
Further adjustment is
re
quired.
Yellow tips on outer cones:
Normal for LP Gas
Soft blue flames:
Normal for natural gas
• If the flame is completely or mostly yellow, verify that
the regulator is set for the correct fuel. After
adjustment, retest.
• Some orange-colored streakin
g is normal during the
initial start-up.
• The burner flame color should be blue with no yellow
on t
he tips. It is not uncommon to see orange in the
flame color; this indicates the burning of airborne
impurities in the gas and will disappear with use.
• With propane (LP) gas, slight yellow
tips on the
primary cone are normal.
• The flame should burn completely around the burner
ca
p. If it doesn’t, check that the cap is positioned
correctly on the base and that the ports are not
blocked.
• The flame should be stable with no excessive noise or
flu
ttering.
Flame characteristics

Page. 16
Cookware recommendations
9 WARNING
To avoid risk of serious injury, damage to appliance or
cookware, please observe the following:
• Bakeware, such as large casserole pans, cookie sheets,
etc. should never be used on the rangetop.
• Placement of large stock pots should be staggered
wh
en used on the rangetop.
• Select the base diameter to match the diameter of the
flame. The diameter of the flame should be the same
size as the pan base or slightly smaller. Oversize or
under size pans sacrifice cooking performance. A 5½''
(140 mm) base size is generally the smallest
recommended.
• Avoid using high flame setting with a pan larger than
t
he grate or with one that spans more than one
burner, such as a griddle, for prolonged periods of
time. This can result in poor combustion that
generates harmful by-products.
• Balance is important for stability and even
cooking.
The handle must not be heavier than the pan and tilt it
unevenly. A pan must sit level on the grate without
rocking or wobbling.
• Food packaged in aluminum foil should not be placed
directly on the burner grate. Aluminum foil can melt
during cooking.
• DO N
OT let plastic, paper, or cloth come in contact
with a hot burner grate. They may melt or catch fire.
• Professional quality pans with metal handles are
re
commended because plastic handles can melt or
blister if the flame extends up the side of the pan.
• All cookware should have the
se characteristics: good
heat conductivity, good balance, correctly sized base
diameter, a heavy, flat base, and a proper fitting lid.
• For best cooking results, th
e flame should be
contained under the bottom of the pan.
• Aluminum and copper are pan materials that conduct
th
e heat quickly and evenly. These metals are
sometimes attached to the base or in the core
between stainless steel.
• A heavy, flat base is more apt to remain flat when
he
ated. Pan bases that are warped, dented, ridged or
too lightweight will heat unevenly. Heat and cool pans
gradually to avoid sudden temperature changes which
tend to distort cookware. DO NOT add cold water to
a hot pan.
• A properly fitting lid will shorten cooking time and
make it possible to use lower heat settings.

Page. 17
Specialty cookware
Woks
• Either flat-based or round-bottom woks with the
accessory ring can be used on all models. Round
bottom woks must be used with a support ring.
• The wok pan and the porcelain-coated cast iron wok
support ring must be purchased separately.
Canners and stock pots
• Select one with a base diameter that extends no more
than 2'' (51 mm) beyond the grate.
Standard size water bath canner
• 21 to 22 quarts (19.95 to 20.9 liters), with an 11'' to
12'' base (279 – 305 mm) and a 9'' to 11'' depth
(229 – 279 mm).
Standard size pressure canner
• 8 to 22 quarts (7.6 to 20.9 liters), with an 8'' to 11''
base (203 – 279 mm) and a 6½'' to 12'' depth
(165 – 305 mm).
Canning tips
• A flat base pan is preferred to one with a concave,
convex or rippled base.
• When using two canners at the same time, use
staggered burners. DO NOT block air to the burners.
A flame needs the right amount of air for complete
combustion.
• Use a cover on the canner when bringing the contents
to a boil.
• Once the contents have reached a boil on HI, use the
lowest flame possible to maintain the boil or pressure.
• Canning produces a large amount of steam. Take
precautions to prevent burns.
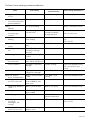
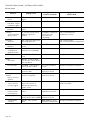
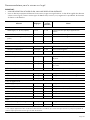
Suggestions for using the surface burner
cooking recommendations
• Use the chart beginning on page 18 as a guide. The
settings you use will vary depending on the pans
selected and the starting temperature of the food.
• On the chart, the “Finish setting” has been separated
for the standard and ExtraLow
®
burners. There may or
may not be a change between the two burner
settings.
• The ExtraLow setting can be either a cooking or a
holding setting.
• Raise or lower the flame setting gradually. Allow time
for the pan and the food to adjust to the new setting.

Page. 18
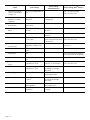
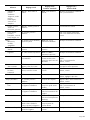
Surface burner cooking recommendations
Food Start setting
Finish setting
standard burners
Finish setting XLO
®
burners
Beverages
Cocoa
MED – heat milk, cover LO – finish heating XLO – keep warm, cover
Breads
French toast, pancakes,
grilled sandwiches
MED – preheat skillet LO to MED – cook Same as for standard burners
Butter
Melting
LO – to start melting Allow 5 – 10 minutes to melt
Cereals
Cornmeal, grits,
oatmeal
HI – cover, bring water to a
boil, add cereal
LO to MED – finish
cooking according to
package directions
Same as for standard burners
XLO – to hold, cover
Chocolate
Melting
XLO – may be stirred to
hasten melting
XLO – allow 10 – 15 minutes to
melt
XLO – to hold
Desserts
Candy
LO to MED – cook following
recipe
LO to MED Same as for standard burners
Pudding and pie filling
mix
LO to MED LO – cook
according to package
directions
LO Same as for standard burners
Pudding LO to MED LO – bring milk
to a boil
LO Same as for standard Burners
Eggs
Cooked in shell
MED HI – cover eggs with
water, add lid, bring to boil
Fried, scrambled LO to MED – melt butter,
add eggs
LO finish cooking Same as for standard burners
XLO – to hold for a short
period
Poached HI – bring water to the
boiling point, add eggs
LO to MED – finish heating Same as for standard burners
Meat, fish, poultry
bacon, sausage patties
MED HI – until meat starts
to sizzle
LO to MED – finish
cooking
Same as for standard burners
Braising: Swiss steak,
pot roast, stew meat
MED HI – melt fat, then
brown on MED HI, add
liquid, cover
XLO – Simmer until tender
Quick frying: Breakfast
steaks
MED HI – preheat skillet MED HI – fry quickly Same as for standard burners
Frying: Chicken MED HI – heat oil, then
brown on MED
LO – cover, finish cooking Same as for standard burners
Deep frying: Shrimp MED HI – heat oil MED to MED HI – to
maintain temperature
Same as for standard burners
Pan frying: Lamb chops,
thin steaks,
hamburgers, link
sausage
MED HI – preheat skillet MED – brown meat Same as for standard burners
XLO – to hold
Poaching: Chicken,
whole or pieces, fish
MED HI – Cover, bring
liquids to a boil
To finish cooking
La page charge ...
La page charge ...
La page charge ...
La page charge ...
La page charge ...
La page charge ...
La page charge ...
La page charge ...
La page charge ...
La page charge ...
La page charge ...
La page charge ...
La page charge ...
La page charge ...
La page charge ...
La page charge ...
La page charge ...
La page charge ...
La page charge ...
La page charge ...
La page charge ...
La page charge ...
La page charge ...
La page charge ...
La page charge ...
La page charge ...
La page charge ...
La page charge ...
La page charge ...
La page charge ...
La page charge ...
La page charge ...
La page charge ...
La page charge ...
La page charge ...
La page charge ...
La page charge ...
La page charge ...
La page charge ...
La page charge ...
La page charge ...
La page charge ...
La page charge ...
La page charge ...
La page charge ...
La page charge ...
La page charge ...
La page charge ...
-
 1
1
-
 2
2
-
 3
3
-
 4
4
-
 5
5
-
 6
6
-
 7
7
-
 8
8
-
 9
9
-
 10
10
-
 11
11
-
 12
12
-
 13
13
-
 14
14
-
 15
15
-
 16
16
-
 17
17
-
 18
18
-
 19
19
-
 20
20
-
 21
21
-
 22
22
-
 23
23
-
 24
24
-
 25
25
-
 26
26
-
 27
27
-
 28
28
-
 29
29
-
 30
30
-
 31
31
-
 32
32
-
 33
33
-
 34
34
-
 35
35
-
 36
36
-
 37
37
-
 38
38
-
 39
39
-
 40
40
-
 41
41
-
 42
42
-
 43
43
-
 44
44
-
 45
45
-
 46
46
-
 47
47
-
 48
48
-
 49
49
-
 50
50
-
 51
51
-
 52
52
-
 53
53
-
 54
54
-
 55
55
-
 56
56
-
 57
57
-
 58
58
-
 59
59
-
 60
60
-
 61
61
-
 62
62
-
 63
63
-
 64
64
-
 65
65
-
 66
66
-
 67
67
-
 68
68


Thermador PCG486WL Mode d'emploi
- Catégorie
- Barbecues
- Taper
- Mode d'emploi
dans d''autres langues
- English: Thermador PCG486WL User guide
Documents connexes
Autres documents
-
GE ZGU48L6DHSS Le manuel du propriétaire
-
GE ZGU364LDP3SS Le manuel du propriétaire
-
GE ZGU484LGP1SS Le manuel du propriétaire
-
 Eureka! Griddle Le manuel du propriétaire
-
Miele KM 344 Le manuel du propriétaire
-
 Eureka! SPRK Camp Grill Care Guide Le manuel du propriétaire
-
Twin Eagles Teppanyaki Griddle Le manuel du propriétaire
-
Silvercrest SPW 1000 B2 Operating Instructions Manual

