Sauder Litter Box Credenza Manuel utilisateur
- Taper
- Manuel utilisateur

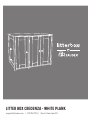
Litter Box Credenza - White Plank
support@litterbox.com | 1.877.250.7729 | Mon-Fri, 9am-7pm EST

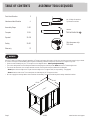
Table OF CONtents Assembly Tools Required
Part Identi cation
Hardware Identi cation
Assembly Steps
Français
Español
Safety
Warranty
Hammer
Not actual size
No. 2 Phillips Screwdriver
Tip Shown Actual Size
Skip the power trip.
This time.
3
4
5-20
21-24
25-28
29-30
31
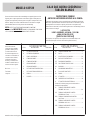
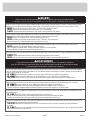
Use of a TV that is too heavy or large is hazardous. A TV that is too heavy will create a risk of a tip-over that can cause severe injury or death.
A TV that is too large for the available space might be accidentally pushed or bumped off the furniture, or subject to tip-over.
• Check the size and weight of your TV. Compare it to the diagram below – before you begin assembly!
• This unit is designed for use with at panel televisions weighing less than 50 pounds. Never use with a TV that weighs more.
• The size of the television, front-to-back and side-to-side, must t within the space de ned in the diagram.
• Never place the front edge of the TV past the front edge of the TV support shelf (or stop molding – if equipped)
• Never allow the sides of the TV to extend past the side edges of the TV support surface.
• Be sure to apply the warning label as instructed later in assembly. The label provides important safety related information.
WARNING
!
50 lbs.
50 lbs.
28-1/8"
28-1/8"
43-1/8"
43-1/8"
425539 www.litterbox.com/supportPage 2

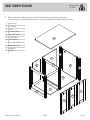
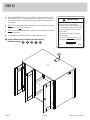
å While not all parts are labeled, some of the parts will have a label or an inked letter on the edge
to help distinguish similar parts from each other. Use this part identi cation to help identify similar parts.
Now you know
our ABCs.
Part IdentificATION
A RIGHT END (1)
B LEFT END (1)
C TOP (1)
D LARGE BOTTOM (1)
E SMALL BOTTOM (1)
F LARGE BACK (1)
G SMALL BACK (1)
H RIGHT FRONT LEG (1)
J RIGHT BACK LEG (1)
K UPRIGHT (1)
L DOOR (3)
A
B
C
D
E
F
G
H
J
K
L
L
L
425539www.litterbox.com/support Page 3

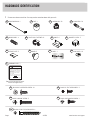
Hardware IdentificATION
å Screws are shown actual size. You may receive extra hardware with your unit.
BLACK 9/16" PAN HEAD SCREW - 1
51S
GOLD 1" MACHINE SCREW - 3
50S
BLACK 9/16" LARGE HEAD SCREW - 24
1S
FOOT - 1
1E
HINGE - 6
2H
KNOB - 3
5K
CAM COVER - 18
72P
BLACK 1/2" FLAT HEAD SCREW - 3
11S
CAM SCREW - 30
8F
MAGNETIC CATCH - 3
3I
WOOD DOWEL - 4
15F
STRIKE PLATE - 3
6I
HIDDEN CAM - 30
1F
BLACK 1-15/16" FLAT HEAD SCREW - 4
113S
37F
TWIST-LOCK
®
FASTENER -12
USB POWER HUB - 1
9D
LABEL - 1
17L
WARNING
For use with televisions weighing 50 lbs.
(22.6 kg) or less. Use with heavier
televisions may result in instability causing
tip over resulting in death or serious injury.
-Never allow children to climb on audio/
video furniture.
Refer to instruction book for complete
safety information.
Note: This is a permanent label. Do not
try to remove. Surface will be damaged.
11/18 5 2 4 9 2 8 524928
WARNING LABEL - 1
1L
(Refer to the last step for proper
location and application)
425539 www.litterbox.com/supportPage 4

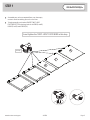
Step 1
A
B
F
G
K
(12 used)
37F
Do not tighten the TWIST-LOCK® FASTENERS in this step.
å
Assemble your unit on a carpeted oor or on the empty
carton to avoid scratching your unit or the oor.
å
To begin assembly, push twelve SAUDER TWIST-LOCK®
FASTENERS (37F) into the large holes in the ENDS (A and B),
BACKS (F and G), and UPRIGHT (K).
425539www.litterbox.com/support Page 5
View our assembly video at
www.litterbox.com/support

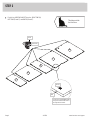
Step 2
A
D
E
F
G
å
Push thirty HIDDEN CAMS (1F) into the RIGHT END (A),
BOTTOMS (D and E), and BACKS (G and F).
1F
(30 used)
Arrow
Arrow
The arrow in the HIDDEN CAM
must point toward the hole in
the edge of the board.
Hole
Thinking outside
the litter box.
425539 www.litterbox.com/supportPage 6

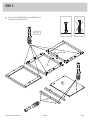
Step 3
A
K
K
B
J
H
8F
8F
8F
å
Turn thirty CAM SCREWS (8F) into the ENDS (A and B)
LEGS (H and J) and UPRIGHT (K).
(30 used)
425539www.litterbox.com/support Page 7
F
L
I
P
O
V
E
R
F
L
I
P
O
V
E
R

å
Insert two WOOD DOWELS (15F) into the long edges of the
RIGHT END (A).
å
Fasten the RIGHT END (A) to the RIGHT REAR LEG (J).
Tighten three HIDDEN CAMS.
å
Fasten the RIGHT FRONT LEG (H) to the RIGHT END (A).
Tighten three HIDDEN CAMS.
Step 4
A
H
J
15F
15F
Surface with HIDDEN CAMS
1
2
These surfaces
should be even.
425539 www.litterbox.com/supportPage 8

å
Insert a WOOD DOWEL (15F) into the hole in the RIGHT
REAR LEG (J).
å
Fasten the LARGE BACK (F) to the RIGHT REAR LEG (J).
Tighten three HIDDEN CAMS.
Step 5
J
15F
Surface with HIDDEN CAMS
1
2
F
Rounded edge
425539www.litterbox.com/support Page 9

å
Fasten the LARGE BOTTOM (D) to the RIGHT END (A).
Tighten three HIDDEN CAMS.
å
Fasten the LARGE BOTTOM (D) to the LARGE BACK (F). Use
two BLACK 1-15/16" FLAT HEAD SCREWS (113S).
å
Fasten the FOOT (1E) to the LARGE BOTTOM (D). Use the
BLACK 9/16" PAN HEAD SCREW (51S).
Step 6
BLACK 9/16" PAN HEAD SCREW
(1 used in this step)
51S
1E
D
A
BLACK 1-15/16" FLAT HEAD SCREW
(2 used in this step)
113S
F
1
2
Surface with
HIDDEN CAMS
425539 www.litterbox.com/supportPage 10

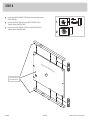
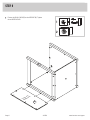
å
Fasten the UPRIGHT (K) to the LARGE BACK (F) and LARGE
BOTTOM (D). Tighten six HIDDEN CAMS.
Step 7
D
F
K
Surface without
TWIST-LOCK®
FASTENERS
1
2
425539www.litterbox.com/support Page 11

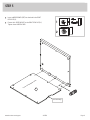
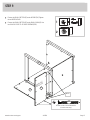
å
Fasten the SMALL BACK (G) to the UPRIGHT (K). Tighten
three HIDDEN CAMS.
Step 8
Surface with
HIDDEN CAMS
1
2
K
G
425539 www.litterbox.com/supportPage 12

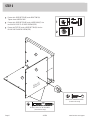
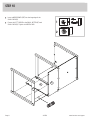
å
Fasten the SMALL BOTTOM (E) to the UPRIGHT (K).Tighten
three HIDDEN CAMS.
å
Fasten the SMALL BOTTOM (E) to the SMALL BACK (G). Use
two BLACK 1-15/16" FLAT HEAD SCREWS (113S).
Step 9
1
2
K
G
E
Surface with
HIDDEN CAMS
Notch
BLACK 1-15/16" FLAT HEAD SCREW
(2 used in this step)
113S
425539www.litterbox.com/support Page 13

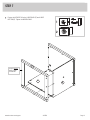
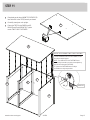
å
Insert a WOOD DOWEL (15F) into the long edge of the
SMALL BACK (G).
å
Fasten the LEFT END (B) to the SMALL BOTTOM (E) and
SMALL BACK (G). Tighten six HIDDEN CAMS.
Step 10
G
E
B
15F
1
2
425539 www.litterbox.com/supportPage 14

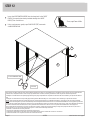
Step 11
425539www.litterbox.com/support Page 15
å
Completely push three MAGNETIC CATCHES (3I)
into the holes in the TOP (C) exactly as shown.
å
Carefully stand your unit upright.
å
Fasten the TOP (C) to the ENDS (A and B),
BACKS (F and G) and UPRIGHT (K). Tighten
twelve TWIST-LOCK® FASTENERS.
How to use the SAUDER TWIST-LOCK® FASTENER
1. Insert the dowel end of the FASTENER into the
hole of the adjoining part.
NOTE: The dowel end of the FASTENER must
remain fully inserted in the hole of the adjoining
part while locking the FASTENER.
2. Tighten the FASTENER with a Phillips
screwdriver as tight as possible.
Dowel end
C
A
B
K
F
G
C
3I

Step 12
å
Insert the USB POWER HUB (9D) into the large hole in the RIGHT
END (A). An opening has been provided through the LARGE
BACK (F) for cord access.
å
Using your hammer, gently tap a CAM COVER (72P) onto each
visible HIDDEN CAM.
This device complies with part 15 of the FCC Rules. Operation is subject to the following two conditions: (1) This device may not cause harmful
interference, and (2) this device must accept any interference received, including interference that may cause undesired operation.
"Changes or modi cations not expressly approved by the party responsible for compliance could void the user's authority to operate this device".
OR
"Changes or modi cations not expressly approved by Sauder Woodworking Co. could void the user's authority to operate this device".
NOTE: This equipment has been tested and found to comply with the limits for a Class B digital device, pursuant to part 15 of the FCC Rules.
These limits are designed to provide reasonable protection against harmful interference in a residential installation. This equipment generates,
uses, and can radiate radio frequency energy and, if not installed and used in accordance with the instructions, may cause harmful interference
to radio communications. However, there is no guarantee that interference will not occur in a particular installation. If this equipment
does cause harmful interference to radio or television reception, which can be determined by turning the equipment off and on, the user is
encouraged to try to correct the interference by one or more of the following measures:
-Reorient or relocate the receiving antenna.
-Increase the separation between the equipment and receiver.
-Connect the equipment into an outlet on a circuit different from that to which the receiver is connected.
-Consult the dealer or an experienced radio/TV technician for help.
F
A
9D
To cover HIDDEN CAMS
72P
(18 used)
425539 www.litterbox.com/supportPage 16
Go on, spoil 'em a little.

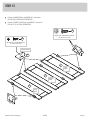
Step 13
425539www.litterbox.com/support Page 17
å
Fasten six HINGES (2H) to the DOORS (L). Use twelve
BLACK 9/16" LARGE HEAD SCREWS (1S).
å
Fasten a STRIKE PLATE (6I) to each DOOR (L). Use three
BLACK 1/2" FLAT HEAD SCREWS (11S).
2H
2H
BLACK 9/16" LARGE HEAD SCREW
(12 used in this step)
1S
6I
Indented holes
L
L
L
LEFT
DOOR
RIGHT
DOOR
CENTER
DOOR
BLACK 1/2" FLAT HEAD SCREW
(3 used in this step)
11S

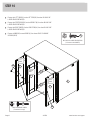
å
Fasten the LEFT DOOR (L) to the LEFT END (B). Use four BLACK 9/16"
LARGE HEAD SCREWS (1S).
å
Fasten the CENTER DOOR (L) to the UPRIGHT (K). Use four BLACK 9/16"
LARGE HEAD SCREWS (1S).
å
Fasten the RIGHT DOOR (L) to the RIGHT END (A). Use four BLACK 9/16"
LARGE HEAD SCREWS (1S).
å
Fasten a KNOB (5K) to each DOOR (L). Use three GOLD 1" MACHINE
SCREWS (50S).
Step 14
BLACK 9/16" LARGE HEAD SCREW
(12 used for the HINGES)
1S
GOLD 1" MACHINE SCREW
(3 used in this step)
50S
5K
5K
L
L
L
LEFT
DOOR
CENTER
DOOR
RIGHT
DOOR
A
B
K
425539 www.litterbox.com/supportPage 18

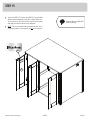
Step 15
425539www.litterbox.com/support Page 19
å
Apply the LABEL (17L) to the left DOOR (L). You should be
able to read the label when the door is open. When the
door is closed, it will hide the label. Peel off the backing
and apply the label as shown in the diagram.
å
NOTE: This is a permanent label intended to last for the
life of the product. Once applied, do not try to remove it.
17L
Almost time to celebrate!
With a cat nap.
L

Step 16
å
Apply the WARNING LABEL (1L) to the TOP (C). You should be able to read
the label when the TV is removed from the unit. When the TV is in place, it
should hide the label. Peel off the backing and apply the label as shown in
the diagram.
å
NOTE: This is a permanent label intended to last for the life of the product.
Once applied, do not try to remove it.
å
NOTE: Please read the back pages of the instruction booklet for important
safety information.
å
This completes assembly. Clean with a damp cloth. Wipe dry.
WARNING
For use with televisions weighing 50 lbs.
(22.6 kg) or less. Use with heavier
televisions may result in instability
causing tip over resulting in death
or serious injury.
-Never allow children to climb on audio/
video furniture.
Refer to instruction book for complete
safety information.
Note: This is a
permanent
label.
Do not try to remove. Surface
will be damaged.
11/18 5 2 4 9 2 8 524928
1L
WARNING
For use with televisions weighing 50 lbs.
(22.6 kg) or less. Use with heavier
televisions may result in instability causing
tip over resulting in death or serious injury.
-Never allow children to climb on audio/
video furniture.
Refer to instruction book for complete
safety information.
Note: This is a permanent label. Do not
try to remove. Surface will be damaged.
11/18 5 2 4 9 2 8 524928
And to celebrate, why not share your success story
at litterbox.com or
50 lbs.
75 lbs.
425539 www.litterbox.com/supportPage 20
La page est en cours de chargement...
La page est en cours de chargement...
La page est en cours de chargement...
La page est en cours de chargement...
La page est en cours de chargement...
La page est en cours de chargement...
La page est en cours de chargement...
La page est en cours de chargement...
La page est en cours de chargement...
La page est en cours de chargement...
La page est en cours de chargement...
La page est en cours de chargement...
-
 1
1
-
 2
2
-
 3
3
-
 4
4
-
 5
5
-
 6
6
-
 7
7
-
 8
8
-
 9
9
-
 10
10
-
 11
11
-
 12
12
-
 13
13
-
 14
14
-
 15
15
-
 16
16
-
 17
17
-
 18
18
-
 19
19
-
 20
20
-
 21
21
-
 22
22
-
 23
23
-
 24
24
-
 25
25
-
 26
26
-
 27
27
-
 28
28
-
 29
29
-
 30
30
-
 31
31
-
 32
32


Sauder Litter Box Credenza Manuel utilisateur
- Taper
- Manuel utilisateur
dans d''autres langues
Documents connexes
-
Sauder Litter Box Hutch Manuel utilisateur
-
-
-
-
-
-
-
-
-