Sauder Litter Box Hutch Manuel utilisateur
- Taper
- Manuel utilisateur

Litter Box Hutch - Coffee Oak
support@litterbox.com | 1.877.250.7729 | Mon-Fri, 9am-7pm EST

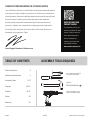
Table of Contents Assembly Tools Required
Part Identifi cation
Hardware Identifi cation
Assembly Steps
Français
Español
Safety
Warranty
No. 2 Phillips Screwdriver
Tip Shown Actual Size
Hammer
Not actual size
3
4
5-27
28-32
33-37
38
39
Electric drill with 1/4" bit
(ONLY in indicated step)
Thank you for purchasing the Litter Box Hutch!
I am thrilled that Litterbox.com and Sauder furniture have partnered together
to bring you the highest-quality cat furniture. At Litterbox.com, we believe in
offering products that are thoughtfully designed and carefully curated to best
meet your needs. Litterbox.com and Sauder products are made with
environmentally responsible materials and world-class manufacturing
processes. Together, our companies are bringing pet parents a premium
line of stylish yet functional cat furniture that is built to last. We are your
destination for cat products. Enjoy!
Jacob Zuppke, Founder of Litterbox.com
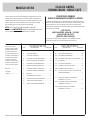
register your new
product online
For immediate service, our
website is available 24 hours
per day, 7 days per week, to
order replacement parts,
access assembly tips,
register your product and
view Sauder products.
www.sauder.com/service
425766 www.litterbox.com/supportPage 2

Now you know
our ABCs.
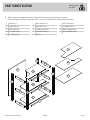
Part IdentificATION
å While not all parts are labeled, some of the parts will have a label or an inked letter on the edge
to help distinguish similar parts from each other. Use this part identi cation to help identify similar parts.
A TOP SHELF (1)
B MIDDLE SHELF (1)
C BOTTOM SHELF (1)
D LEFT FRONT LEG (1)
E LEFT REAR LEG (1)
F RIGHT FRONT LEG (1)
G RIGHT REAR LEG (1)
H LOWER SIDE SKIRT (2)
J UPPER SIDE SKIRT (4)
K BACK (1)
L SHELF MOLDING (3)
M TOP RUBBER MAT (1)
N MIDDLE RUBBER MAT (1)
O BOTTOM RUBBER MAT (1)
A
B
C
D
E
F
G
H
J
K
L
M
N
O
J
H
J
J
L
L
425766www.litterbox.com/support Page 3

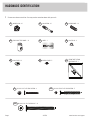
Hardware IdentificATION
å Screws are shown actual size. You may receive extra hardware with your unit.
BLACK 2-3/4" FLAT HEAD BOLT - 12
143S
HIDDEN CAM - 16
1F
CAM SCREW - 16
8F
WOOD DOWEL - 12
15F
CROSS SLOTTED DOWEL - 12
24F
HOLE PLUG - 2
11P
CAM COVER - 12
12P
SCREW COVER - 3
20P
BLACK 1-1/4" FLAT HEAD SCREW - 4
7S
BLACK 1-15/16" FLAT HEAD SCREW - 3
113S
FURNITURE TIPPING
RESTRAINT KIT - 1
97
LABEL - 1
17L
425766 www.litterbox.com/supportPage 4

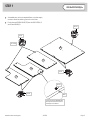
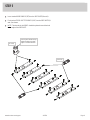
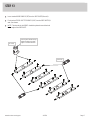
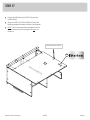
Step 1
View our assembly video at
www.litterbox.com/support
å
Assemble your unit on a carpeted oor or on the empty
carton to avoid scratching your unit or the oor.
å
Push sixteen HIDDEN CAMS (1F) into the SHELVES (A, B,
and C) and BACK (K).
A
B
C
K
(16 used)
Arrow
Hole
The arrow in the HIDDEN CAM
must point toward the hole in
the edge of the board.
1F
Arrow
1F
Arrow
1F
Arrow
1F
Arrow
425766www.litterbox.com/support Page 5

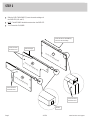
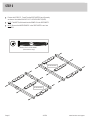
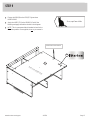
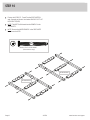
Step 2
å
Slide the SHELF MOLDINGS* (L) onto the notched edges of
the SHELVES (A, B, and C).
å
NOTE: The MOLDINGS should be centered on the SHELVES.
å
*U.S. Patent No. 5,499,886
A
B
C
L
L
L
Slide the SHELF MOLDING (L)
onto the notched edge.
Surface with HIDDEN CAMS
These surfaces
should be even.
These surfaces
should be even.
Notched edge
Surface with HIDDEN CAMS
Surface with HIDDEN CAMS
These surfaces
should be even.
Groove
425766 www.litterbox.com/supportPage 6

Step 3
å
You have the option of switching the TOP SHELF and the MIDDLE
SHELF. Follow the correct steps according to your choice.
Steps 4-11 and 20-23
Steps 12-23
Thinking outside the
litter box.
425766www.litterbox.com/support Page 7

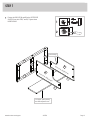
Step 4
å
NOTE: Pay close attention to two of the UPPER SIDE
SKIRTS (J) in this step.
å
Turn sixteen CAM SCREWS (8F) into the exact holes shown
in the LEGS (E and G) and SIDE SKIRTS (H and J).
E
G
H
J
J
H
J
J
8F
(16 used)
This hole is closer
to this edge.
Do not use this hole.
The three small CAM
SCREW holes are
closer to this edge.
The three small CAM
SCREW holes are
closer to this edge.
425766 www.litterbox.com/supportPage 8

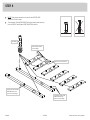
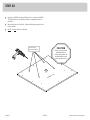
å
Insert twelve WOOD DOWELS (15F) into the SIDE SKIRTS (H and J).
å
Push twelve CROSS-SLOTTED DOWELS (24F) into the SIDE SKIRTS (H
and J) as shown.
å
NOTE: The threads in the DOWEL should be pointed toward the hole
in the edge of the SIDE SKIRT.
H
J
J
H
J
J
Step 5
15F
(12 used)
15F
24F
The long slot should face up
and be parallel to the long
edges of the SIDE SKIRTS.
(12 used)
425766www.litterbox.com/support Page 9

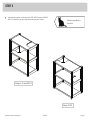
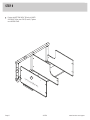
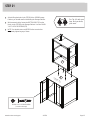
Step 6
å
Fasten the LEGS (D, E, F, and G) to the SIDE SKIRTS (H and J) exactly
as shown. Use twelve BLACK 2-3/4" FLAT HEAD BOLTS (143S).
å
NOTE: The BOLTS will thread into the DOWELS in the SIDE SKIRTS.
å
NOTE: Be sure the WOOD DOWELS in the SIDE SKIRTS insert into
the LEGS.
H
J
J
H
J
J
E
G
D
F
BLACK 2-3/4" FLAT HEAD BOLT
(12 used in this step)
143S
No CAM SCREW
No CAM SCREW
425766 www.litterbox.com/supportPage 10

å
Fasten the SHELVES (A and B) to the UPPER SIDE
SKIRTS (J) on the LEGS (F and G). Tighten three
HIDDEN CAMS.
Step 7
A
B
L
L
F
G
Surface with HIDDEN CAMS
Surface with HIDDEN CAMS
For support, place packing
foam and magazines here.
Curved edge
1
2
J
J
425766www.litterbox.com/support Page 11

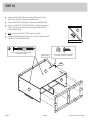
å
Fasten the BOTTOM SHELF (C) to the LOWER
SIDE SKIRT (H) on the LEGS (F and G). Tighten
two HIDDEN CAMS.
Step 8
G
H
C
Surface with HIDDEN CAMS
F
425766 www.litterbox.com/supportPage 12

å
Fasten the BACK (K) to the LEG (G). Tighten three
HIDDEN CAMS.
å
Apply the LABEL (17L) to the BACK (K). Peel off the
backing and apply the label as shown in the diagram.
å
NOTE: This is a permanent label intended to last for the
life of the product. Once applied, do not try to remove it.
Step 9
G
K
Surface with HIDDEN CAMS
These holes must be here.
17L
Go on, spoil 'em a little.
425766www.litterbox.com/support Page 13

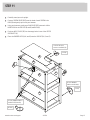
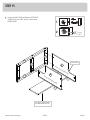
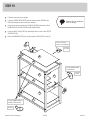
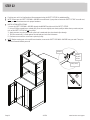
Step 10
å
Fasten the SIDE SKIRTS (H and J) on the LEGS (D and E) to the
SHELVES (A, B, and C). Tighten ve HIDDEN CAMS.
å
Fasten the LEG (E) to the BACK (K). Tighten three HIDDEN CAMS.
å
Open the FURNITURE TIPPING RESTRAINT KIT (97) and fasten the
SAFETY STRAP to the BACK (K). Use the provided BLACK 9/16"
LARGE HEAD SCREW.
å
NOTE: Position the SAFETY STRAP exactly as shown.
å
Fasten the BACK (K) to the SHELVES (A, B, and C). Use three BLACK
1-15/16" FLAT HEAD SCREWS (113S).
A
B
C
K
H
J
J
D
E
BLACK 9/16" LARGE HEAD SCREW
(1 used for the SAFETY STRAP)
Safety strap
97
113S
BLACK 1-15/16" FLAT HEAD SCREW
(3 used in this step)
113S
425766 www.litterbox.com/supportPage 14

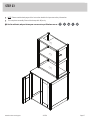
Step 11
å
Carefully stand your unit upright.
å
Center a SCREW COVER (20P) over the head of each SCREW in the
BACK (K) and gently tap in with your hammer.
å
Using your hammer, gently tap a CAM COVER (12P) onto each visible
HIDDEN CAM in the SHELVES (A and B) and BACK (K).
å
Push two HOLE PLUGS (11P) into the empty holes in two of the UPPER
SIDE SKIRTS (J).
å
Place the RUBBER MATS (M, N, and O) onto the SHELVES (A, B, and C).
A
B
C
M
N
O
K
To cover the three
screws in the BACK (K)
20P
(3 used)
To cover HIDDEN
CAMS in the BACK (K)
12P
(6 used)
(6 used)
To cover HIDDEN CAMS in
the SHELVES (A and B)
12P
11P
11P
J
J
425766www.litterbox.com/support Page 15

Step 12
å
NOTE: Pay close attention to two of the UPPER SIDE
SKIRTS (J) in this step.
å
Turn sixteen CAM SCREWS (8F) into the exact holes shown
in the LEGS (E and G) and SIDE SKIRTS (H and J).
E
G
H
J
J
H
J
J
8F
(16 used)
This hole is closer
to this edge.
Do not use this hole.
The three small CAM
SCREW holes are
closer to this edge.
The three small CAM
SCREW holes are
closer to this edge.
425766 www.litterbox.com/supportPage 16

å
Insert twelve WOOD DOWELS (15F) into the SIDE SKIRTS (H and J).
å
Push twelve CROSS-SLOTTED DOWELS (24F) into the SIDE SKIRTS (H
and J) as shown.
å
NOTE: The threads in the DOWEL should be pointed toward the hole
in the edge of the SIDE SKIRT.
H
J
J
H
J
J
Step 13
15F
(12 used)
15F
24F
The long slot should face up
and be parallel to the long
edges of the SIDE SKIRTS.
(12 used)
425766www.litterbox.com/support Page 17

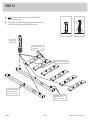
Step 14
å
Fasten the LEGS (D, E, F, and G) to the SIDE SKIRTS (H
and J) exactly as shown. Use twelve BLACK 2-3/4" FLAT
HEAD BOLTS (143S).
å
NOTE: The BOLTS will thread into the DOWELS in the
SIDE SKIRTS.
å
NOTE: Be sure the WOOD DOWELS in the SIDE SKIRTS
insert into the LEGS.
H
J
J
H
J
J
E
G
D
F
BLACK 2-3/4" FLAT HEAD BOLT
(12 used in this step)
143S
No CAM SCREW
No CAM SCREW
425766 www.litterbox.com/supportPage 18

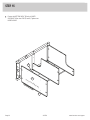
Step 15
å
Fasten the SHELVES (A and B) to the UPPER SIDE
SKIRTS (J) on the LEGS (F and G). Tighten three
HIDDEN CAMS.
B
A
L
L
F
G
Surface with HIDDEN CAMS
Surface with HIDDEN CAMS
For support, place packing
foam and magazines here.
Curved edge
1
2
J
J
425766www.litterbox.com/support Page 19

Step 16
å
Fasten the BOTTOM SHELF (C) to the LOWER
SIDE SKIRT (H) on the LEGS (F and G). Tighten two
HIDDEN CAMS.
G
H
C
L
Surface with HIDDEN CAMS
F
425766 www.litterbox.com/supportPage 20
La page est en cours de chargement...
La page est en cours de chargement...
La page est en cours de chargement...
La page est en cours de chargement...
La page est en cours de chargement...
La page est en cours de chargement...
La page est en cours de chargement...
La page est en cours de chargement...
La page est en cours de chargement...
La page est en cours de chargement...
La page est en cours de chargement...
La page est en cours de chargement...
La page est en cours de chargement...
La page est en cours de chargement...
La page est en cours de chargement...
La page est en cours de chargement...
La page est en cours de chargement...
La page est en cours de chargement...
La page est en cours de chargement...
La page est en cours de chargement...
-
 1
1
-
 2
2
-
 3
3
-
 4
4
-
 5
5
-
 6
6
-
 7
7
-
 8
8
-
 9
9
-
 10
10
-
 11
11
-
 12
12
-
 13
13
-
 14
14
-
 15
15
-
 16
16
-
 17
17
-
 18
18
-
 19
19
-
 20
20
-
 21
21
-
 22
22
-
 23
23
-
 24
24
-
 25
25
-
 26
26
-
 27
27
-
 28
28
-
 29
29
-
 30
30
-
 31
31
-
 32
32
-
 33
33
-
 34
34
-
 35
35
-
 36
36
-
 37
37
-
 38
38
-
 39
39
-
 40
40


Sauder Litter Box Hutch Manuel utilisateur
- Taper
- Manuel utilisateur
dans d''autres langues
- English: Sauder Litter Box Hutch User manual
- español: Sauder Litter Box Hutch Manual de usuario
Documents connexes
-
Sauder Litter Box Credenza Manuel utilisateur
-
-
-
-
-
-
-
-
-
