Powermate 8886 Mode d'emploi
- Catégorie
- Pulvérisateur de peinture
- Taper
- Mode d'emploi
Ce manuel convient également à

SAVE THIS MANUAL FOR FUTURE REFERENCE
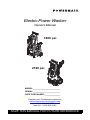
Electric Power Washer
Owner’s Manual
011521
011525
1800 psi
2100 psi
MODEL:________________________
SERIAL:________________________
DATE PURCHASED:______________
Register your Powermate product at:
www.powermate.com/register.php
US: 1-888-922-8482
Non-US: 1-262-953-5155

Table of Contents
Section 1 Introduction and Safety 1
Safety Rules .................................... 1
Safety Symbols and Meanings ........ 1
Section 2 General Information and
Setup .............................................. 3
Know Your Power Washer .............. 3
Remove Contents from Carton ....... 3
Assembly ......................................... 3
Assembly ......................................... 4
Connections .................................... 5
Water Supply ................................... 5
Connect Water Supply .................... 5
Connect High-Pressure Hose and
Lance .............................................. 5
Spray Gun ....................................... 6
Nozzle ............................................. 6
Connect Power Supply .................... 6
Electrical Plug ................................. 6
Safety Devices ................................ 7
Section 3 Operation .......................8
Operation and Use Questions .........8
Before Starting Unit .........................8
Power Washer Start-Up ...................8
Power Washer Shut Down ..............8
Using Adjustable Nozzle ..................9
Apply Detergent ...............................9
Rinsing ...........................................10
Clean Detergent Siphoning Tube ..10
Section 4 Maintenance and
Troubleshooting ..........................11
Maintenance ..................................11
Maintenance Schedule ..................11
Preventive Maintenance ................11
Storage ..........................................12
(000393a)
WARNING
CANCER AND REPRODUCTIVE HARM
www.P65Warnings.ca.gov.

Introduction and Safety
Owner’s Manual for Power Washer 1
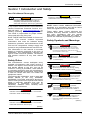
Section 1 Introduction and Safety
Read This Manual Thoroughly
If any section of this manual is not understood,
contact Powermate Customer Service at 1-
800-445-1805, or www.powermate.com for
starting, operating, and servicing procedures.
The owner is responsible for proper mainte-
nance and safe use of the unit.
SAVE THESE INSTRUCTIONS for future ref-
erence. This manual contains important
instructions that must be followed during
placement, operation, and maintenance of the
unit and its components. Always supply this
manual to any individual that will use this unit.
The information in this manual is accurate
based on products produced at the time of
publication. The manufacturer reserves the
right to make technical updates, corrections,
and product revisions at any time without
notice.
Safety Rules
The manufacturer cannot anticipate every
possible circumstance that might involve a
hazard. The alerts in this manual, and on tags
and decals affixed to the unit, are not all
inclusive. If using a procedure, work method,
or operating technique that the manufacturer
does not specifically recommend, verify that it
is safe for others and does not render the
equipment unsafe.
Throughout this publication, and on tags and
decals affixed to the unit, DANGER,
WARNING, CAUTION, and NOTE blocks are
used to alert personnel to special instructions
about a particular operation that may be
hazardous if performed incorrectly or
carelessly. Observe them carefully. Alert
definitions are as follows:
NOTE: Notes contain additional information
important to a procedure and will be found
within the regular text of this manual.
These safety alerts cannot eliminate the
hazards that they indicate. Common sense
and strict compliance with the special
instructions while performing the action or
service are essential to preventing accidents.
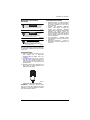
Safety Symbols and Meanings
(000100a)
Consult Manual. Read and understand manual
completely before using product. Failure to
completely understand manual and product
could result in death or serious injury.
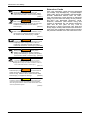
WARNING
(000001)
DANGER
Indicates a hazardous situation which, if not avoided,
will result in death or serious injury.
(000002)
WARNING
Indicates a hazardous situation which, if not avoided,
could result in death or serious injury.
(000003)
CAUTION
Indicates a hazardous situation which, if not avoided,
could result in minor or moderate injury.
(000145)
DANGER
Electrocution. In the event of electrical accident,
immediately shut power OFF. Use non-conductive
implements to free victim from live conductor. Apply
first aid and get medical help. Failure to do so will
result in death or serious injury.
(000104)
DANGER
Electrocution. Water contact with a power
source, if not avoided, will result in death
or serious injury.
DANGER
Electrocution. DO NOT use the unit if
electrical cord is cut or worn through. Doing
so will result in death or serious injury.
(000263a)
(000187)
WARNING
Electrocution. Potentially lethal voltages are generated
by this equipment. Render the equipment safe before
attempting repairs or maintenance. Failure to do so
could result in death or serious injury.
(000106b)
Fluid Injection. This machine produces
high-pressure fluid streams that can pierce
skin. Fluid injection could result in death or
serious injury.
WARNING
Vision Loss. Eye goggles are required to be
worn when using this machine. Failure to
wear eye goggles could result in permanent
vision loss.
(000101)
WARNING

Introduction and Safety
2 Owner’s Manual for Power Washer
Extension Cords
Only use extension cords that are approved
for outside use identified by “ACCEPTABLE
FOR USE WITH OUTDOOR APPLIANCES;
STORE INDOORS WHILE NOT IN USE”.
Only use extension cords having an electrical
rating not less than the rating of the product.
DO NOT use damaged extension cords.
Examine extension cord before using and
replace if damaged. Do not abuse extension
cord and do not yank on any cord to
disconnect it. Keep cord away from heat and
sharp edges. Always disconnect the extension
cord from the receptacle before disconnecting
the pressure washer from the extension cord.
(000111)
WARNING
Moving Parts. Keep clothing, hair, and
appendages away from moving parts. Failure
to do so could result in death or serious injury.
(000112)
WARNING
Risk of Falling. Use of machine creates wet
areas and trip hazards. Be aware of work area
conditions. A fall could result in death or
serious injury.
(000114)
WARNING
Risk of Falling. Do not use this machine or any
components on elevated surfaces. Doing so
can result in a fall, serious injury, or death.
(000100a)
Consult Manual. Read and understand manual
completely before using product. Failure to
completely understand manual and product
could result in death or serious injury.
WARNING
(000115)
Moving Parts. Do not wear jewelry when
starting or operating this product. Wearing
jewelry while starting or operating this product
could result in death or serious injury.
WARNING
(000117c)
WARNING
Personal injury. Risk of fluid injection. Do not aim
spray gun at people, animals, electrical devices, or
fragile items. Keep out of reach of children. Failure to
do so could cause death or serious injury.
(000244)
Personal Injury / Equipment Damage. Place wand in
holster and verify that handle is locked into place
before moving. Failure to do so could result in death,
serious injury, or equipment damage.
WARNING
(000740)
CAUTION
Protective clothing. Eye and hearing protection along with
protective clothing (pants and shoes) are recommended
when using this machine. Failure to wear these items could
result in permanant injuries.

General Information and Setup
Owner’s Manual for Power Washer 3
Section 2 General Information and Setup
Know Your Power Washer
Remove Contents from Carton
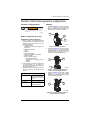
2100 psi Units
1. Remove and verify carton contents prior to
assembly. Carton contents should contain
one each of the following:
•Main Unit
• Handle with High Pressure Hose Reel
• Spray Gun
•Lance
•Nozzle
• Cable Hook
• Spray Gun Hook
•Screw Bag
• Parts Bag (includes):
– Owner's Manual
– Nozzle Cleaning Tool
– Warranty
2. Call Powermate Customer Service at 1-
800-445-1805 with the unit model and
serial number for any missing carton
contents.
3. Record model, serial number, and date of
purchase on front cover of this manual.
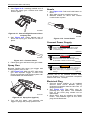
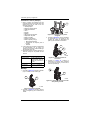
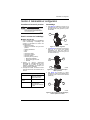
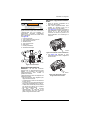
Assembly
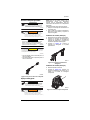
1. See Figure 2-1. Attach handle (A) to unit
using two screws (B). Insert Nozzle
Cleaning Tool (C) into accessory rack.
Figure 2-1. Attach Handle
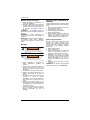
2. See Figure 2-2. Snap Cable Hook (A) and
Spray Gun Hook (B) onto sides of unit.
Screw short hose fitting onto front outlet
(C).
Figure 2-2. Attach Cable and Spray Gun
Hooks
3. See Figure 2-3. Hang electric cord on
cable/hose hook (A) and insert gun and
lance into gun holster (B).
Figure 2-3. Hang Electric Cord, Holster
Gun and Lance
2100 psi Specifications
Max Pressure 2100 psi at initial discharge
per CSA internal pressure
testing
Working Pressure 1550 psi
Max Flow 1.35 GPM with gun in soap
dispensing configuration
(000100a)
Consult Manual. Read and understand manual
completely before using product. Failure to
completely understand manual and product
could result in death or serious injury.
WARNING
011521
A
B
C
011524
A
B
C
011525
A
B

General Information and Setup
4 Owner’s Manual for Power Washer
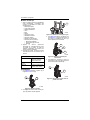
1800 psi Units
4. Remove and verify carton contents prior to
assembly. Carton contents should contain
one each of the following:
•Main Unit
• High Pressure Hose
• Spray Gun
•Lance
•Nozzle
• Handle
• Hose Hook
• Soap Dispenser
•Screw Bag
• Accessory Shelf
• Parts Bag (includes):
– Owner's Manual
– Nozzle Cleaning Tool
– Warranty
5. Call Powermate Customer Service at 1-
800-445-1805 with the unit model and
serial number for any missing carton
contents.
6. Record model, serial number, and date of
purchase on front cover of this manual.
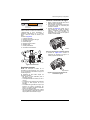
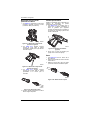
Assembly
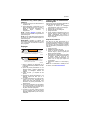
1. See Figure 2-4. Attach handle (A) to unit
using two screws (B).
Figure 2-4. Attach Handle
2. See Figure 2-5. Snap hose hook (A) onto
side of unit.
Figure 2-5. Attach Hose Hook
3. See Figure 2-6. Attach Accessory Shelf (A)
to unit using two screws (B). Insert soap
dispenser (C) into accessory shelf.
Figure 2-6. Attach Accessory Shelf
4. See Figure 2-7. Hang hose on hose hook
(A) and insert gun and lance into gun
holster (B).
Figure 2-7. Hang Hose, Holster Gun and
Lance
1800 psi Specifications
Max Pressure 1800 psi at initial discharge
per CSA internal pressure
testing
Working Pressure 1450 psi
Max Flow 1.3 GPM with soap nozzle
installed
011518
A
B
011519
A
011520
A
B
C
011521
A
B

General Information and Setup
Owner’s Manual for Power Washer 5
Connections
Call Powermate Customer Service at 1-800-
445-1805 for any assembly issues or
concerns. Please have model and serial
number available.
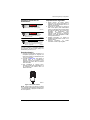
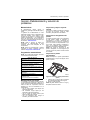
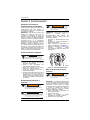
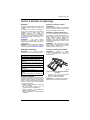
See Figure 2-8.
1. Pressure Cleaner
2. Water Supply Hose
3. Water Supply
4. Water Inlet
5. High Pressure Hose
6. Water Outlet
7. Spray Gun
8. Power Supply
Figure 2-8. Connections
Water Supply
NOTE: DO NOT run unit without sufficient
water supply. Failure to follow water supply
requirements will void unit warranty.
Water supply must meet the following
requirements:
• DO NOT siphon standing water for the
water supply.
• Water temperature must be less than
100°F (38ºC).
• Water supply hose length must not exceed
50 ft (15.2 m).
• Water must be greater than 2.5 gallons per
minute (9.5 liters per minute) and no less
than 20 psi (137.8 kPa).
• DO NOT use a one-way valve, vacuum
breaker, or check valve in any part of the
water supply.
Connect Water Supply
1. Remove and discard shipping cap from
the pump water outlet.
2. Run water supply for 30 seconds prior to
connection to eliminate debris.
3. See Figure 2-9. Inspect inlet screen for
debris. Clean screen or replace as
necessary. DO NOT run power washer if
inlet screen is damaged or missing.
Figure 2-9. Inspect Inlet Screen
4. See Figure 2-10. Connect water supply
hose to unit and hand-tighten.
Figure 2-10. Connect Water Supply Hose
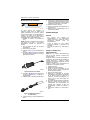
Connect High-Pressure Hose
and Lance
1. See Figure 2-11. Connect high-pressure
hose to unit and hand-tighten (1800 psi
model only).
Figure 2-11. Connect High-Pressure Hose
to Unit
(000100a)
Consult Manual. Read and understand manual
completely before using product. Failure to
completely understand manual and product
could result in death or serious injury.
WARNING
011532
7
1
5
8
3
2
4
6
011498
011499
011500

General Information and Setup
6 Owner’s Manual for Power Washer
2. See Figure 2-12. Inserting barbed end of
hose into spray gun. Confirm that hose
locks in place.
Figure 2-12. Connect High-Pressure Hose
to Spray Gun
3. See Figure 2-13. Insert barbed end of
lance into spray gun and turn to lock in
place.
Figure 2-13. Connect Lance
4. Place spray gun and lance into gun holder.
Spray Gun
Become familiar with spray gun trigger and
locking system prior to use.
1. See Figure 2-14. With unit OFF, hold spray
gun and squeeze trigger to learn how
trigger mechanism and locking system can
be activated and deactivated.
Figure 2-14. Spray Gun (typical)
2. Turn ON the water, and squeeze the
trigger to purge the pump system of air.
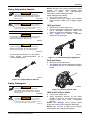
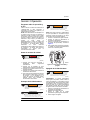
Nozzle
1. See Figure 2-15. Push and hold button on
lance.
2. Align tabs and push nozzle into lance.
3. Release button on lance and confirm
nozzle locks in place.
Figure 2-15. Insert Nozzle
Connect Power Supply
Connect unit to an isolated Ground Fault
Circuit Breaker (GFCI) protected receptacle
rated at 120 volts, 15 amps.
Electrical Plug
1. Connect power washer to an isolated
Ground Fault Circuit Breaker (GFCI)
protected receptacle rated at 120 volts, 15
amps (minimum).
2. See Figure 2-16. Test GFCI plug by
pressing the Test button. The indicator
light on the GFCI plug should not be
illuminated.
3. Reset GFCI plug by pressing the Reset
button. The indicator light on the GFCI
plug should illuminate.
011506
011507
011513
011508
(000104)
DANGER
Electrocution. Water contact with a power
source, if not avoided, will result in death
or serious injury.
DANGER
Electrocution. DO NOT use the unit if
electrical cord is cut or worn through. Doing
so will result in death or serious injury.
(000263a)
WARNING
(000711a)
Electrocution. Never use an extension cord that is
not rated for outdoor use. Doing so could result in
death, serious injury, or equipment or property
damage.

General Information and Setup
Owner’s Manual for Power Washer 7
Figure 2-16. Test GFCI
NOTE: Contact customer service if the Test
button does not turn off the indicator light, or if
the Reset button does not turn on the indicator
light. Do not use the product.
Safety Devices
1. Thermal Sensor - A thermal sensor
protects the motor against overloading.
The machine will restart after the motor
has cooled.
2. Ground Fault Circuit Interrupter (GFCI)
protection - This power washer is supplied
with a ground-fault circuit interrupter
(GFCI) built into the plug on the power
supply. This device provides additional
protection from risk of electrical shock. If
the cord needs to be replaced, use
identical replacement parts.
3. Auto Shut-off - The unit will automatically
shut off when the gun is not triggered.
4. Auto Start-up - When the trigger is pressed
the unit will run.
011678

Operation
8 Owner’s Manual for Power Washer
Section 3 Operation
Operation and Use Questions
Call Powermate Customer Service at 1-800-
445-1805 with questions or concerns about
unit operation and maintenance.
NOTE: This power washer is equipped with a
water flow sensor which will start or stop the
unit. When the gun trigger is pulled, the unit
motor will start. When the gun trigger is
released, the water flow and the unit will stop
to protect the motor from over heating. When
the unit is ON but not in use, the hose and gun
may slowly release pressure. The motor will
periodically start to reestablish pressure in the
hose and gun. This momentary starting is
normal to the operation of the unit.
Before Starting Unit
1. Verify all fittings and couplers are properly
secured.
2. Verify sufficient water supply is properly
connected.
3. Verify unit is secure on level ground.
4. Verify unit is connected to power supply.
5. Test plug GFCI function by depressing the
Test button on the plug body. Indicator
light on plug body should turn off. Press
Reset to resume unit operation.
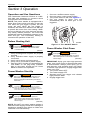
Power Washer Start-Up
NOTE: DO NOT run power washer without a
sufficient water supply turned ON. Damage to
equipment resulting from failure to follow this
instruction will void warranty.
1. Connect a sufficient water supply.
2. Connect power cord to power supply.
3. Turn power switch to ON. See Figure 3-1.
4. Pull gun trigger to spray. Unit will
automatically shut off when gun is not
triggered.
Figure 3-1. Turn ON/OFF Switch
Power Washer Shut Down
IMPORTANT: Spray gun traps high-pressure
water, even when motor is stopped and water
is disconnected. Always point spray gun in
safe direction, and squeeze spray gun trigger
to release high-pressure. Engage trigger lock
when not in use.
1. Turn power switch OFF.
2. Turn water supply OFF.
3. Squeeze spray gun trigger and release
high-pressure water.
4. Engage trigger lock.
(000104)
DANGER
Electrocution. Water contact with a power
source, if not avoided, will result in death
or serious injury.
Vision Loss. Eye goggles are required to be
worn when using this machine. Failure to
wear eye goggles could result in permanent
vision loss.
(000101)
WARNING
(000117c)
WARNING
Personal injury. Risk of fluid injection. Do not aim
spray gun at people, animals, electrical devices, or
fragile items. Keep out of reach of children. Failure to
do so could cause death or serious injury.
(000106b)
Fluid Injection. This machine produces
high-pressure fluid streams that can pierce
skin. Fluid injection could result in death or
serious injury.
WARNING
011509
(000106b)
Fluid Injection. This machine produces
high-pressure fluid streams that can pierce
skin. Fluid injection could result in death or
serious injury.
WARNING

Operation
Owner’s Manual for Power Washer 9
Using Adjustable Nozzle
• Twist nozzle clockwise for a fan stream.
• Twist nozzle counterclockwise for a
concentrated stream.
Figure 3-2. Adjust Nozzle Stream
Apply Detergent
NOTE: DO NOT use caustic liquid with power
washer. Use ONLY power washer safe
detergents. Follow all manufacturer's
instructions on the detergent label.
Apply detergent as follows:
1. Turn power switch OFF.
2. Squeeze spray gun trigger and release
high-pressure water and engage trigger
lock.
1800 psi Units
3. Remove lance from spray gun.
4. Prepare detergent solution as required by
job in detergent applicator bottle and
attach to detergent applicator nozzle.
5. See Figure 3-3. Attach detergent
applicator to spray gun.
Figure 3-3. Attach Detergent Applicator
2100 psi Units
6. Remove nozzle from lance.
7. See Figure 3-4. Prepare detergent solution
as required by job in on-board detergent
bottle.
Figure 3-4. Fill On-board Tank
1800 and 2100 psi Units
8. Turn power switch ON.
9. Apply detergent starting at the lower
portion of area to be washed and work
upward using long, even, overlapping
strokes.
NOTE: See Rinsing. Rinse heavily soiled
areas with water before applying detergent.
NOTE: Use a brush to lightly scrub heavily
soiled areas after applying detergent.
(000106b)
Fluid Injection. This machine produces
high-pressure fluid streams that can pierce
skin. Fluid injection could result in death or
serious injury.
WARNING
(000117c)
WARNING
Personal injury. Risk of fluid injection. Do not aim
spray gun at people, animals, electrical devices, or
fragile items. Keep out of reach of children. Failure to
do so could cause death or serious injury.
Personal Injury. Do not adjust spray nozzles, valves,
or hoses when pump engine is running. Doing so
could result in death or serious injury.
(000383)
WARNING
(000125a)
CAUTION
Property damage. This nozzle can permanently
damage work surfaces. Do not hold nozzle too
close or in one position for a long time period.
011510
(000106b)
Fluid Injection. This machine produces
high-pressure fluid streams that can pierce
skin. Fluid injection could result in death or
serious injury.
WARNING
(000117c)
WARNING
Personal injury. Risk of fluid injection. Do not aim
spray gun at people, animals, electrical devices, or
fragile items. Keep out of reach of children. Failure to
do so could cause death or serious injury.
011511
011533

Operation
10 Owner’s Manual for Power Washer
IMPORTANT: Flush the detergent siphoning
system after each use. Contact Customer
Service with questions.
Rinsing
1. Remove detergent applicator from spray
gun (1800 psi units).
2. Point spray gun in safe direction and
squeeze trigger to flush remaining
detergent from system.
3. Install lance and high pressure nozzle.
4. Keep spray gun a safe distance from area
you plan to spray.
5. Spray gun may kick back when using high
pressure spray. To avoid injury, firmly
grasp spray gun with both hands.
6. Apply a high-pressure spray to a small
area and then inspect surface for damage.
If no damage is found, continue rinsing.
7. Start at top of area to be rinsed, working
down with same overlapping strokes as
used for cleaning.
Clean Detergent Siphoning
Tube
Flush detergent siphoning tube after each use
before turning unit OFF.
1. Rinse detergent tank thoroughly and fill
with clean water.
2. Flush for 1-2 minutes.
3. Remove detergent applicator.
4. Turn unit OFF.
5. Point spray gun in a safe direction,
squeeze spray gun trigger to release
retained high water pressure. Engage
trigger lock.
After Each Use
DO NOT allow water to remain in unit for long
periods of time. Sediments or minerals can
deposit on pump parts and freeze pump.
Follow these procedures after every use:
1. Shut unit OFF.
2. Turn water supply OFF.
3. Point spray gun in a safe direction, and
squeeze trigger to relieve trapped
pressure.
4. Disconnect hoses from spray gun and
high-pressure outlet on pump. Drain water
from hoses, spray gun, and lance. Use a
rag to wipe off components.
5. Store unit in a clean, dry area.
NOTE: If storing for more than 30 days, see
Storage.
(000112)
WARNING
Risk of Falling. Use of machine creates wet
areas and trip hazards. Be aware of work area
conditions. A fall could result in death or
serious injury.
(000114)
WARNING
Risk of Falling. Do not use this machine or any
components on elevated surfaces. Doing so
can result in a fall, serious injury, or death.

Maintenance and Troubleshooting
Owner’s Manual for Power Washer 11
Section 4 Maintenance and Troubleshooting
Maintenance
Regular maintenance will improve perfor-
mance and extend motor/equipment life.
Power washer warranty does not cover items
subjected to operator abuse or negligence. To
receive full warranty value, operator must
maintain power washer as instructed in this
manual, including proper storage as detailed
in Storage.
NOTE: Call Powermate Customer Service at
1-800-445-1805 with questions about
component replacement.
NOTE: All required service and adjustments
should be completed as detailed in
Maintenance Schedule.
Maintenance Schedule
NOTE: Adverse conditions will require more
frequent service.
Preventive Maintenance
Dirt or debris can cause improper operation
and equipment damage. Clean power washer
daily or before each use. Inspect all cooling air
openings on power washer.
• Use a damp cloth to wipe exterior surfaces
clean.
• DO NOT insert any objects through cooling
air openings.
• Use a soft bristle brush to loosen caked on
dirt.
• Use a vacuum to pick up loose dirt and
debris.
Inspect and Clean Inlet Screen
Inspect inlet screen on pump water inlet.
Clean clogged screen and replace screen if
damaged.
Inspect High-Pressure Hose
High-pressure hoses can develop leaks from
wear, kinking, or abuse. Inspect hoses before
each use. Inspect for cuts, leaks, abrasions,
bulging, and damage or movement of
couplings. If these conditions exist, replace
hose immediately.
NOTE: DO NOT repair high-pressure hose.
Replace with hose that meets or exceeds
maximum pressure rating of unit.
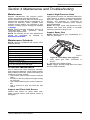
Inspect Spray Gun
NOTE: Replace spray gun immediately if it
fails any test steps.
Figure 4-1.Test Spray Gun (typical)
1. Verify spray gun hose connection is
secure.
2. Squeeze and release trigger.
NOTE: Trigger should spring back into place
and lock when released.
Before Each Use
Inspect/clean water inlet screen*
Inspect high-pressure hose**
Inspect detergent siphoning hose/filter
Inspect spray gun and assembly for leaks
Clean debris
Test GFCI plug with Test/Reset buttons*
Inspect electrical cord**
* Clean if clogged. Replace if perforated or torn.
** Do not operate unit if damaged.
011513

Maintenance and Troubleshooting
12 Owner’s Manual for Power Washer
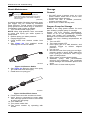
Nozzle Maintenance
A pulsing sensation felt when squeezing spray
gun trigger may be caused by excessive
pump pressure. Typical causes of excessive
pump pressure are nozzle clog or restriction.
Immediately clean nozzle as follows:
1. Turn unit and water supply OFF.
NOTE: Keep high-pressure hose connected
to pump and spray gun while system is
pressurized.
2. Relieve spray gun water pressure.
3. Engage trigger lock.
4. Press button and remove nozzle from
lance.
5. See Figure 4-2. Use supplied nozzle
cleaning tool to remove debris.
Figure 4-2.Remove Debris
6. See Figure 4-3. Remove lance from spray
gun and back flush thoroughly.
7. Install lance on spray gun.
Figure 4-3.Back Flush Lance
8. Press button and click nozzle onto lance.
9. Verify hose is connected to pump water
inlet, and high-pressure hose is connected
to spray gun and pump.
10. Turn water ON.
11. Turn power switch ON.
12. Test power washer by operating with
nozzle.
Storage
General
• DO NOT place a storage cover on a hot
power washer. Allow unit to cool to room
temperature before storage.
• Cover unit with a suitable protective,
moisture resistant cover.
• Store unit in a clean and dry area.
Prepare Pump for Storage
NOTE: If not using power washer for more
than 30 days, prepare pump for storage.
Protect unit from freezing temperatures.
Failure to do so will permanently damage
pump and render unit inoperable. Freeze
damage is not covered under warranty.
Protect unit from freezing temperatures as
follows:
1. Turn unit OFF.
2. Turn water supply OFF.
3. Point spray gun in a safe direction, and
squeeze trigger to relieve trapped
pressure.
4. Let unit cool.
5. Disconnect hose from spray gun and high-
pressure outlet on pump. Drain water from
hose, spray gun, and lance. Use a rag to
wipe off components.
6. Empty pump of all remaining liquids.
7. Winterize pump with RV-antifreeze
(alcohol free antifreeze). This minimizes
freeze damage and lubricates pistons and
seals.
8. Store unit in a clean and dry area.
(000106b)
Fluid Injection. This machine produces
high-pressure fluid streams that can pierce
skin. Fluid injection could result in death or
serious injury.
WARNING
011512
011515

Maintenance and Troubleshooting
Owner’s Manual for Power Washer 13
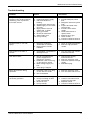
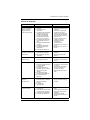
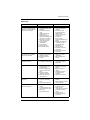
Troubleshooting
Problem Cause Correction
Pump fails to produce
pressure, has erratic pressure,
chattering, loss of pressure,
low water volume.
1. Water inlet is obstructed.
2. Inadequate water supply.
3. Inlet hose kinked or
leaking.
4. Clogged hose inlet screen.
5. Water supply is over 100ºF
(37.8ºC).
6. High-pressure hose is
obstructed, or leaks.
7. Spray gun leaks.
8. Nozzle is obstructed.
9. Water seals worn.
10. Pump is faulty.
1. Clean inlet.
2. Provide adequate water
flow.
3. Straighten inlet hose, patch
leak.
4. Inspect and clean inlet
hose screen.
5. Provide cooler water
supply.
6. Clear obstructions or
replace hose.
7. Replace spray gun.
8. Clean nozzle.
9. Contact Customer Service.
10. Contact Customer Service.
Detergent fails to mix with
spray.
1. Detergent applicator
obstructed or cracked.
2. High-pressure nozzle
installed.
1. Clean or replace applicator.
2. Remove high-pressure
nozzle.
Unit begins to smolder or
smoke.
1. Overheated, overloaded or
damaged motor.
1. Turn unit OFF and contact
Customer Service.
Unit will not start. 1. Unit is not plugged into
power supply or not
plugged in correctly.
2. Extension cord is too long
or wire size too small.
3. Main voltage supply too
low.
4. GFCI plug is tripped.
1. Check power supply,
socket and fuse.
2. Remove extension cord.
3. Check for sufficient voltage
supply.
4. Rest GFCI plug.
Motor shuts down during
operation.
1. Extension cord is too long
or wire size too small.
2. Unit overheated.
1. Remove extension cord.
2. Turn unit OFF and let cool.
Pump does not reach
necessary pressure.
1. Water inlet filter is clogged.
2. Pump is sucking air from
hose connections
3. Nozzle is worn.
4. Pump is faulty.
1. Clean water inlet filter.
2. Confirm connections and
locking ring are tight.
3. Replace nozzle.
4. Contact Customer Service.


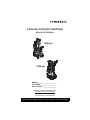
GUARDE ESTE MANUAL COMO REFERENCIA FUTURA
Hidrolavadora eléctrica
Manual del propietario
011521
011525
124 bar
145 bar
MODELO:________________________
SERIE:________________________
FECHA DE COMPRA:______________
Registre su producto Powermate en:
www.powermate.com/register.php
EE. UU.: 1-888-922-8482
Fuera de EE. UU.: 1-262-953-5155

Índice
Sección 1 Introducción y
seguridad ....................................... 1
Normas de seguridad ...................... 1
Símbolos de seguridad y
significados ..................................... 1
Sección 2 Información general
y configuración ............................. 3
Conozca su hidrolavadora .............. 3
Retire el contenido de la caja .......... 3
Montaje ........................................... 3
Montaje ........................................... 4
Conexiones ..................................... 5
Suministro de agua ......................... 5
Conecte el suministro de agua ........ 5
Conecte la manguera de alta
presión y la lanza ............................ 6
Pistola pulverizadora ....................... 6
Boquilla ........................................... 6
Conecte el suministro de
alimentación .................................... 7
Enchufe eléctrico .............................7
Dispositivos de seguridad ................7
Sección 3 Operación .....................8
Preguntas sobre la operación
y el uso ............................................8
Antes de arrancar la unidad ............8
Arranque de la hidrolavadora ..........8
Apagado de la hidrolavadora ...........8
Uso de la boquilla ajustable .............9
Aplique detergente ..........................9
Enjuague .......................................10
Limpie el tubo de sifonamiento
de detergente ................................10
Sección 4 Mantenimiento y
solución de problemas ...............11
Mantenimiento ...............................11
Programa de mantenimiento .........11
Mantenimiento preventivo .............11
Almacenamiento ............................12
(000393a)
ADVERTENCIA
PRODUCE CÁNCER Y
DAÑOS REPRODUCTIVOS
www.P65Warnings.ca.gov.

Introducción y seguridad
Manual del propietario de la hidrolavadora 1
Sección 1 Introducción y seguridad
Lea este manual cuidadosamente
Si no comprende alguna sección de este
manual, comuníquese con el Servicio al
Cliente de Generac al 1-800-445-1805 o en
www.powermate.com para obtener
información sobre los procedimientos de
arranque, operación y mantenimiento. El
propietario es responsable del mantenimiento
adecuado y uso seguro de la unidad.
GUARDE ESTAS INSTRUCCIONES para
consultarlas en el futuro. Este manual
contiene instrucciones importantes que se
deben seguir durante la instalación, operación
y mantenimiento de la unidad y sus
componentes. Siempre entregue este manual
a cualquier persona que vaya a usar esta
unidad.
La información que aparece en este manual
es precisa y está basada en productos
fabricados en el momento en el que se editó
esta publicación. El fabricante se reserva el
derecho de hacer las actualizaciones
técnicas, las correcciones y las revisiones de
los productos que considere necesarias sin
previo aviso.
Normas de seguridad
El fabricante no puede prever todas las
posibles circunstancias que pueden suponer
un peligro. Las alertas que aparecen en este
manual, y en las etiquetas y los adhesivos
pegados en la unidad no incluyen todos los
peligros. Si se utiliza un procedimiento,
método de trabajo o técnica de
funcionamiento no recomendados
específicamente por el fabricante, compruebe
que sean seguros para otros usuarios y que
no pongan en peligro el equipo.
En esta publicación y en las etiquetas y
adhesivos pegados en la unidad, los bloques
PELIGRO, ADVERTENCIA, PRECAUCIÓN y
NOTA se utilizan para alertar al personal
sobre instrucciones especiales relacionadas
con un funcionamiento que puede ser
peligroso si se realiza de manera incorrecta o
imprudente. Léalos atentamente y respete sus
instrucciones. Las definiciones de alertas son
las siguientes:
NOTA: Las notas incluyen información
adicional importante para un procedimiento y
se incluyen en el texto normal de este manual.
Estos avisos de seguridad no pueden eliminar
los peligros que indican. Para evitar
accidentes, es importante el sentido común y
el seguimiento estricto de las instrucciones
especiales cuando se realice la acción o la
operación de mantenimiento.
Símbolos de seguridad y
significados
(000100a)
ADVERTENCIA
Consulte el manual. Lea y comprenda completamente
el manual antes de usar el producto. No comprender
completamente el manual puede provocar la muerte
o lesiones graves.
(000001)
PELIGRO
Indica una situación peligrosa que, si no se evita,
ocasionará la muerte o lesiones graves.
(000002)
ADVERTENCIA
Indica una situación peligrosa que, si no se evita,
podría ocasionar la muerte o lesiones graves.
(000003)
PRECAUCIÓN
Indica una situación riesgosa que, si no se evita,
puede producir lesiones leves o moderadads.
(000145)
PELIGRO
Electrocución. En caso de un accidente eléctrico, APAGUE de
inmediato la alimentación eléctrica. Use implementos no
conductores para liberar a la víctima del conductor alimentado.
Aplique primeros auxilios y obtenga ayuda médica. No hacerlo
ocasionará la muerte o lesiones graves.
(000104)
PELIGRO
Electrocución. Si no se evita el contacto del
agua con una fuente de alimentación,
ocasionará la muerte o lesiones graves.
PELIGRO
Electrocución. NO use la unidad si el
cable eléctrico está cortado o agujereado.
De lo contrario se producirán lesiones
graves o la muerte.
(000263a)
(000187)
Electrocución. Este equipo genera voltajes potencialmente
letales. Coloque el equipo en condición segura antes de
intentar reparaciones o mantenimiento. No hacerlo puede
ocasionar la muerte o lesiones graves.
ADVERTENCIA

Introducción y seguridad
2 Manual del propietario de la hidrolavadora
Cables de extensión
Solo use cables de extensión que estén
aprobados para su uso en exteriores,
mediante la siguiente identificación:
“ACEPTABLE PARA USO CON EQUIPOS
PARA EXTERIORES; ALMACENAR EN
INTERIORES MIENTRAS NO ESTÁ EN
USO”. Solo use cables de extensión que
tengan una clasificación eléctrica no inferior a
la clasificación del producto. NO use cables
de extensión dañados. Examine el cable de
extensión antes de usarlo y reemplácelo si
está dañado. No maltrate el cable de
extensión y no jale ningún cable para
desconectarlo. Siempre manténgalo alejado
del calor y de bordes afilados. Siempre
desconecte el cable de extensión del
receptáculo antes de desconectar la
hidrolavadora del cable de extensión.
Inyección de líquido a presión. Esta máquina genera
flujos de líquido a alta presión que pueden penetrar
en la piel. El líquido a presión, si penetra en la piel,
puede ocasionar la muerte o lesiones graves.
(000106b)
ADVERTENCIA
(000101)
Pérdida de visión. Se requiere el uso de gafas de
VHJXULGDGDOXVDUHႋDPiTXLQD1RXVDUJDIDVGH
seguridad puede ocasionar pérdida de visión
SHUPDQHQWH
ADVERTENCIA
Piezas en movimiento. Mantenga la ropa, cabello,
y extremidades alejados de las piezas en
movimiento. No hacerlo puede ocasionar la
muerte o lesiones graves.
(000111)
ADVERTENCIA
(000112)
Riesgo de caídas. El uso de la máquina crea zonas
PRMDGDV\ULHVJRVGHGLVSDUR(ႋpDWHQWRDODV
FRQGLFLRQHVGHOD]RQDGHWUDEDMR8QDFDtGDSXHGH
RFDVLRQDUODPXHUWHROHVLRQHVJUDYHV
ADVERTENCIA
(000114)
Riesgo de caídas. No use esta máquina o
cualquiera de sus componentes en superficies
elevadas. Hacerlo puede ocasionar una caída,
lesiones graves o la muerte.
ADVERTENCIA
(000100a)
ADVERTENCIA
Consulte el manual. Lea y comprenda completamente
el manual antes de usar el producto. No comprender
completamente el manual puede provocar la muerte
o lesiones graves.
(000115)
ADVERTENCIA
Piezas en movimiento. No use alhajas cuando ponga
en marcha o trabaje con este producto. Usar alhajas al
poner en marcha o trabajar con este producto puede
ocasionar la muerte o lesiones graves.
Lesiones personales. Riesgo de penetración de líquidos.
No apunte con la pistola pulverizadora a personas, animales,
dispositivos eléctricos o artículos frágiles. Mantenga la
máquina fuera del alcance de los niños. En caso de no
hacerlo, podría causar la muerte o lesiones graves.
(000117c)
ADVERTENCIA
(000244)
Lesiones/Daños al equipo. Coloque la varilla en el
portador y verifique que el asa esté trabada en su
lugar antes de mover. No hacerlo puede ocasionar la
muerte, lesiones graves y daños al equipo.
ADVERTENCIA
PRECAUCIÓN
(000740)
Ropa de protección. Se recomienda usar protección ocular
y auditiva, junto con ropa de protección (pantalones y
zapatos) cuando use esta máquina. No usar estos
elementos podría provocar lesiones permanentes.
La page est en cours de chargement...
La page est en cours de chargement...
La page est en cours de chargement...
La page est en cours de chargement...
La page est en cours de chargement...
La page est en cours de chargement...
La page est en cours de chargement...
La page est en cours de chargement...
La page est en cours de chargement...
La page est en cours de chargement...
La page est en cours de chargement...
La page est en cours de chargement...
La page est en cours de chargement...
La page est en cours de chargement...
La page est en cours de chargement...
La page est en cours de chargement...
La page est en cours de chargement...
La page est en cours de chargement...
La page est en cours de chargement...
La page est en cours de chargement...
La page est en cours de chargement...
La page est en cours de chargement...
La page est en cours de chargement...
La page est en cours de chargement...
La page est en cours de chargement...
La page est en cours de chargement...
La page est en cours de chargement...
La page est en cours de chargement...
-
 1
1
-
 2
2
-
 3
3
-
 4
4
-
 5
5
-
 6
6
-
 7
7
-
 8
8
-
 9
9
-
 10
10
-
 11
11
-
 12
12
-
 13
13
-
 14
14
-
 15
15
-
 16
16
-
 17
17
-
 18
18
-
 19
19
-
 20
20
-
 21
21
-
 22
22
-
 23
23
-
 24
24
-
 25
25
-
 26
26
-
 27
27
-
 28
28
-
 29
29
-
 30
30
-
 31
31
-
 32
32
-
 33
33
-
 34
34
-
 35
35
-
 36
36
-
 37
37
-
 38
38
-
 39
39
-
 40
40
-
 41
41
-
 42
42
-
 43
43
-
 44
44
-
 45
45
-
 46
46
-
 47
47
-
 48
48


Powermate 8886 Mode d'emploi
- Catégorie
- Pulvérisateur de peinture
- Taper
- Mode d'emploi
- Ce manuel convient également à
dans d''autres langues
- English: Powermate 8886 User guide
- español: Powermate 8886 Guía del usuario