
GC4700 SERIES
4239.000.7344.1.indd 1 10-08-2009 09:36:57

2
4239.000.7344.1.indd 2 10-08-2009 09:36:58

3
A B C D E G/HF I
M L
J K
1
4239.000.7344.1.indd 3 10-08-2009 09:36:59

4
4239.000.7344.1.indd 4 10-08-2009 09:36:59

GC4700 SERIES
ENGLISH 6
FRANÇAIS 13
25
31
4239.000.7344.1.indd 5 10-08-2009 09:36:59

6
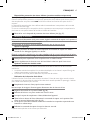
Introduction
Congratulations on your purchase and welcome to Philips! To fully benet from the support that
Philips offers, register your product at www.philips.com/welcome.
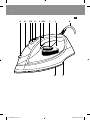
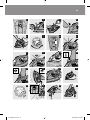
General description (Fig. 1)
A Spray nozzle
B Cap of lling opening
C Steam boost
D Spray button
E Steam control
F Ionic DeepSteam trigger (specic types only)
G Amber temperature light
H Auto-off light (specic types only)/Ionic DeepSteam light (specic types only)
I Temperature dial
J Water tank (specic types only: with light and auto-off indication)
K Mains cord
L Type plate
M Soleplate
Not shown: Filling cup
Not shown: Heat-resistant protective cover (specic types only)
Not shown: Delicate fabric protector (specic types only)
Important
Read this user manual carefully before you use the appliance and save it for future reference.
Danger
Never immerse the iron in water.
Warning
Check if the voltage indicated on the type plate corresponds to the local mains voltage before
you connect the appliance.
Do not use the appliance if the plug, the mains cord or the appliance itself shows visible damage,
or if the appliance has been dropped or leaks.
If the mains cord is damaged, you must have it replaced by Philips, a service centre authorised by
Philips or similarly qualied persons in order to avoid a hazard.
Never leave the appliance unattended when it is connected to the mains.
This appliance is not intended for use by persons (including children) with reduced physical,
sensory or mental capabilities, or lack of experience and knowledge, unless they have been given
supervision or instruction concerning use of the appliance by a person responsible for their
safety.
Children should be supervised to ensure that they do not play with the appliance.
Do not let the mains cord come into contact with the hot soleplate of the iron.
Caution
Only connect the appliance to an earthed wall socket.
Check the mains cord regularly for possible damage.
The soleplate of the iron can become extremely hot and may cause burns if touched.
When you have nished ironing, when you clean the appliance, when you ll or empty the
water tank and also when you leave the iron even for a short while: set the steam control to
position 0, put the iron on its heel and remove the mains plug from the wall socket.
Always place and use the iron on a stable, level and horizontal surface.
Do not put perfume, vinegar, starch, descaling agents, ironing aids or other chemicals in the
water tank.
-
-
-
-
-
-
-
-
-
-
-
-
-
-
-
-
-
ENGLISH
4239.000.7344.1.indd 6 10-08-2009 09:37:00

This appliance is intended for household use only.
Electromagnetic elds (EMF)
This Philips appliance complies with all standards regarding electromagnetic elds (EMF). If handled
properly and according to the instructions in this user manual, the appliance is safe to use based on
scientic evidence available today.
Preparing for use
Note: Remove the cardboard cover from the soleplate before you use the iron for the rst time.
Filling the water tank
Type of water to be used
You can use normal tap water to ll the water tank.
Tip: If the tap water in your area is very hard, we advise you to mix it with an equal amount of distilled
water or to use distilled water only.
1 Make sure the appliance is unplugged.
2 Set the steam control to position 0 (= no steam) (Fig. 2).
3 Openthecapofthellingopening(Fig.3).
4 Tilttheironbackwardsandllthewatertankwithtapwateruptothemaximumlevel
withthellingcup(Fig.4).
Do not ll the water tank beyond the MAX indication.
Donotputperfume,vinegar,starch,descalingagents,ironingaidsorotherchemicalsinthewater
tank.
5 Closethecapofthellingopening(‘click’)(Fig.5).
Selecting temperature and steam setting
Temperature and steam settings
Fabric type Temperature
setting
Steam setting Steam boost Ionic DeepSteam
(specictypes
only)
Linen Max.
; \
yes
Cotton 3
; \
yes
Wool 2
l
N.A. yes
Silk 1 0 N.A. N.A.
Synthetic fabrics (e.g.
acrylic, nylon,
polyamide, polyester)
1 0 N.A. N.A.
1 Specictypesonly:removetheheat-resistantprotectivecover(Fig.6).
Donotleavetheheat-resistantprotectivecoveronthesoleplateduringironing.
2 Put the iron on its heel.
-
ENGLISH 7
4239.000.7344.1.indd 7 10-08-2009 09:37:00

3 To set the required ironing temperature, turn the temperature dial to the appropriate
position(see‘Temperatureandsteamsettings’table)(Fig.7).
Check the laundry care label for the fabric type.
If you do not know what kind or kinds of fabric an article is made of, determine the right ironing
temperature by ironing a part that is not visible when you wear or use the article.
Silk, woollen and synthetic materials: iron the reverse side of the fabric to prevent shiny patches. To
prevent stains, do not use the spray function.
Start ironing the articles that require the lowest ironing temperature, such as those made of
synthetic bres.
4 Settheappropriatesteamsetting(see‘Temperatureandsteamsettings’table)(Fig.8).
Note: Make sure that the steam setting you select is suitable for the set ironing temperature.
5 Put the mains plug in an earthed wall socket.
The amber temperature light goes on (Fig. 9).
6 When the amber temperature light has gone out, wait a while before you start ironing.
The temperature light goes on from time to time during ironing.
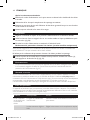
Using the appliance
Ironing without steam
1 Set the steam control to position 0 (= no steam).
2 Settherequiredironingtemperature(seechapter‘Preparingforuse’,section‘Selecting
temperatureandsteamsetting’).
Steam ironing
Note: The iron may give off some smoke when you use it for the rst time. This ceases after a short while.
1 Make sure that there is enough water in the water tank.
2 Settherequiredironingtemperature(seechapter‘Preparingforuse’,section‘Selecting
temperatureandsteamsetting’)(Fig.7).
3 Settheappropriatesteamsetting(seechapter‘Preparingforuse’,section‘Selecting
temperatureandsteamsetting’)(Fig.8).
Note: The iron starts to produce steam as soon as it reaches the set temperature.
Ironing with Ionic DeepSteam (specic types only)
When you use the Ionic DeepSteam function during steam ironing, the steam produced is ner than
during regular steam ironing. Fine steam reaches deeper, especially into thick fabrics. This helps you
to remove stubborn creases easily.
1 Make sure that there is enough water in the water tank.
2 Settherequiredironingtemperature(seechapter‘Preparingforuse’,section‘Selecting
temperatureandsteamsetting’)(Fig.7).
3 Settheappropriatesteamsetting(seechapter‘Preparingforuse’,section‘Selecting
temperatureandsteamsetting’).(Fig.8)
4 Press and hold the Ionic DeepSteam trigger (Fig. 10).
The blue Ionic DeepSteam light goes on and you hear a humming sound (Fig. 11).
5 TheironnowproducesIonicDeepSteamtohelpyouremoveeventhetoughest
creases (Fig. 12).
,
,
ENGLISH8
4239.000.7344.1.indd 8 10-08-2009 09:37:00

Note: The Ionic DeepSteam function is only effective when it is used in combination with a steam setting
and a temperature setting between
2 and MAX.
Note: Do not use the Ionic DeepSteam function when you iron without steam and/or at low temperature
settings. However, ironing at low temperatures without steam with the Ionic DeepSteam function
switched on will not damage the iron.
Note: The Ionic DeepSteam output may vary from time to time, depending on the ironing temperature.
Features
Spray function
You can use the spray function to moisten the article to be ironed. This helps remove stubborn
creases.
1 Make sure that there is enough water in the water tank.
2 Pressthespraybuttonseveraltimestomoistenthearticletobeironed(Fig.13).
Steam boost function
A steam boost from the special Steam Tip soleplate helps remove stubborn creases. The steam
boost enhances the distribution of steam into every part of the article to be ironed.
The steam boost function can only be used at temperature settings between 3 and MAX.
1 Make sure that there is enough water in the water tank.
2 Press and release the steam boost button (Fig. 14).
You can also use the steam boost function when you hold the iron in vertical position. This is
useful for removing creases from hanging clothes, curtains etc. (Fig. 15)
Drip stop
This iron is equipped with a drip-stop function: the iron automatically stops producing steam when
the temperature is too low, to prevent water from dripping out of the soleplate. When this happens,
you may hear a sound.
Automatic shut-off function
The automatic shut-off function automatically switches off the iron if it has not been moved for a
while.
Specic types only: The tank light ashes to indicate that the iron has been switched off by the
automatic shut-off function (Fig. 16).
Sspecic types only: The red auto-off light ashes to indicate that the iron has been switched off
by the automatic shut-off function.
To let the iron heat up again, pick up the iron or move it slightly. The tank light (specic types
only) or auto-off light (specic types only) stops ashing.
Delicate fabric protector (specic types only)
The delicate fabric protector protects delicate fabrics from heat, damage and shiny patches.
With the delicate fabric protector you can iron delicate fabrics (silk, wool and nylon) at temperature
settings 3 to MAX in combination with all steam functions available on the iron.
The delicate fabric protector reduces the soleplate temperature instantly, thus allowing you to iron
delicate fabrics safely.
If you do not know what kind or kinds of fabric an article is made of, determine the right ironing
temperature by ironing a part that is not visible when you wear or use the article.
1 Puttheirononthedelicatefabricprotector(‘click’)(Fig.17).
-
-
-
-
ENGLISH 9
4239.000.7344.1.indd 9 10-08-2009 09:37:00

Cleaning and maintenance
Removethemainsplugfromthewallsocket,setthesteamcontroltoposition0andlettheiron
cool down before you clean it.
Donotputvinegarorotherdescalingagentsinthewatertank.
After ironing
1 Wipeakesandanyotherdepositsoffthesoleplatewithadampclothandanon-abrasive
(liquid) cleaning agent.
Tokeepthesoleplatesmooth,avoidhardcontactwithmetalobjects.Neveruseascouringpad,
vinegarorotherchemicalstocleanthesoleplate.
2 Clean the upper part of the iron with a damp cloth.
3 Regularlyrinsethewatertankwithwater.Emptythewatertankafteryouhaverinsedit.
Double-Active Calc System
The Double-Active Calc System consists of an Anti-Calc tablet inside the water tank combined with
the Calc-Clean function.
1 The Anti-Calc tablet prevents scale from clogging the steam vents. This tablet is constantly active
and does not need to be replaced.
2 The Calc-Clean function removes the scale particles from the iron.
Using the Calc-Clean function
Use the Calc-Clean function once every two weeks. If the water in your area is very hard (i.e. when
akes come out of the soleplate during ironing), use the Calc-Clean function more frequently.
1 Fillthewatertanktothemaximumlevel.
Donotputvinegarorotherdescalingagentsinthewatertank.
2 SetthetemperaturedialtoMAX(Fig.18).
3 Put the plug in an earthed wall socket.
4 Unplug the iron when the temperature light goes out.
5 Holdtheironoverthesink.PushthesteamcontroltotheCalc-Cleanpositionandholdit.
Gently shake the iron to and fro (Fig. 19).
Steamandboilingwatercomeoutofthesoleplate.Impuritiesandakes(ifany)areushed
out.
6 Release the steam control as soon as all the water in the tank has been used up.
Repeat the Calc-Clean process if the iron still contains a lot of impurities.
After the Calc-Clean process
1 Put the plug in the wall socket and let the iron heat up to let the soleplate dry.
2 Unplug the iron when it has reached the set ironing temperature.
3 Movethehotirongentlyoverapieceofusedclothtoremoveanywaterstainsthatmay
haveformedonthesoleplate.
4 Let the iron cool down before you store it.
Storage
1
Set the steam control to position 0, unplug the iron and let it cool down.
2 Empty the water tank and store the iron on its heel on a stable surface. (Fig. 20)
,
ENGLISH10
4239.000.7344.1.indd 10 10-08-2009 09:37:00

3 Windthemainscordandxitwiththecordbinder.
Heat-resistant protective cover (specic types only)
You can store the iron on the heat-resistant protective cover immediately after ironing. It is not
necessary to let the iron cool down rst.
Donotusetheheat-resistantprotectivecoverduringironing.
1 Insertthetipofthesoleplateintotheheat-resistantprotectivecover(1)andthenpress
down the heel of the iron (2) (Fig. 21).
Environment
Do not throw away the appliance with the normal household waste at the end of its life, but
hand it in at an ofcial collection point for recycling. By doing this, you help to preserve the
environment (Fig. 22).
Guarantee & service
If you need service or information or if you have a problem, please visit the Philips website at
www.philips.com or contact the Philips Consumer Care Centre in your country (you nd its phone
number in the worldwide guarantee leaet). If there is no Consumer Care Centre in your country,
go to your local Philips dealer.
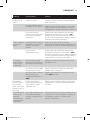
Frequently asked questions
If the appliance does not work or does not work properly, rst check the list below. If the problem
is not mentioned in this list, the appliance probably has a defect. In that case we advise you to take
the appliance to your dealer or to an authorised Philips service centre.
Problem Possible cause Solution
The iron is
plugged in, but
the soleplate is
cold.
There is a connection
problem.
Check the mains cord, the plug and the wall
socket.
The temperature dial is set
to MIN.
Set the temperature dial to the required
position.
The iron does not
produce any
steam.
There is not enough water
in the water tank.
Fill the water tank (see chapter ‘Preparing for
use’, section ‘Filling the water tank’).
The steam control is set to
position 0.
Set the steam control to
l or ; (see
chapter ‘Preparing for use’, section ‘Selecting
temperature and steam setting’).
The iron is not hot enough
and/or the drip-stop
function has been activated.
Set an ironing temperature that is suitable for
steam ironing ( 2 to MAX). Put the iron on
its heel and wait until the amber temperature
light has gone out before you start ironing.
The iron does not
produce a steam
boost.
You have used the steam
boost function too often
within a short period.
Continue ironing in horizontal position and
wait a while before you use the steam boost
function again.
-
ENGLISH 11
4239.000.7344.1.indd 11 10-08-2009 09:37:01

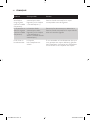
Problem Possible cause Solution
The iron is not hot enough. Set an ironing temperature at which the steam
boost function can be used ( 3 to MAX).
Put the iron on its heel and wait until the
amber temperature light has gone out before
you use the steam boost function.
Water droplets
drip onto the
fabric during
ironing.
You have not closed the
cap of the lling
opening properly.
Press the cap until you hear a click.
You have put an additive in
the water tank.
Rinse the water tank and do not put any
additive in the water tank.
You have used the steam
boost function at a
temperature setting below
3.
Set the temperature dial to a setting between
and 3 and MAX.
Water drips from
the soleplate after
the iron has
cooled down or
has been stored.
The iron has been put in
horizontal position with
water still left in the water
tank.
Empty the water tank before you store the
iron. Store the iron on its heel.
Flakes and
impurities come
out of the
soleplate during
ironing.
Hard water forms akes
inside the soleplate.
Use the Calc-Clean function one or more
times (see chapter ‘Cleaning and maintenance’,
section ‘Using the Calc-Clean function’).
The red auto-off
light ashes
(specic types
only).
The automatic shut-off
function has switched off
the iron (see chapter
‘Features’).
Move the iron slightly to deactivate the
automatic shut-off function. The red auto-off
light stops ashing.
The blue tank
light ashes
(specic types
only).
The automatic shut-off
function has switched off
the iron (see chapter
‘Features’, section
‘Automatic shut-off
function’).
Move the iron slightly to deactivate the
automatic shut-off function. The blue tank light
stops ashing.
The iron makes a
humming sound.
The Ionic DeepSteam
function is on.
If you hear the humming sound when you iron
without steam, stop pressing the Ionic
DeepSteam trigger. The Ionic DeepSteam
function has no effect when you iron without
steam.
ENGLISH12
4239.000.7344.1.indd 12 10-08-2009 09:37:01

13
Introduction
Félicitations pour votre achat et bienvenue dans l’univers Philips ! Pour proter pleinement de
l’assistance Philips, enregistrez votre produit sur le site à l’adresse suivante : www.philips.com/
welcome.
Description générale (g. 1)
A Spray
B Bouchon de l’orice de remplissage
C Effet pressing puissant
D Bouton spray
E Commande de vapeur
F Gâchette Ionic DeepSteam (certains modèles uniquement)
G Voyant de température orange
H Voyant d’arrêt automatique (certains modèles uniquement)/Voyant Ionic DeepSteam (certains
modèles uniquement)
I Thermostat
J Réservoir d’eau (certains modèles uniquement : avec voyant et indicateur d’arrêt automatique)
K Cordon d’alimentation
L Plaque signalétique
M Semelle
Non illustré : godet de remplissage
Non illustré : revêtement de protection résistant à la chaleur (certains modèles uniquement)
Non illustré : dispositif de protection des tissus délicats (certains modèles uniquement)
Important
Lisez attentivement ce mode d’emploi avant d’utiliser l’appareil et conservez-le pour un usage
ultérieur.
Danger
Ne plongez jamais le fer dans l’eau.
Avertissement
Avant de brancher l’appareil, vériez que la tension indiquée sur la plaque signalétique
correspond à la tension secteur locale.
N’utilisez pas l’appareil si la che, le cordon d’alimentation ou l’appareil lui-même est
endommagé ou s’il est tombé et/ou si de l’eau s’en écoule.
Si le cordon d’alimentation est endommagé, il doit être remplacé par Philips, un Centre Service
Agréé Philips ou un technicien qualié an d’éviter tout accident.
Ne laissez jamais l’appareil sans surveillance pendant qu’il est branché.
Cet appareil n’est pas destiné à être utilisé par des personnes (notamment des enfants) dont les
capacités physiques, sensorielles ou intellectuelles sont réduites, ou par des personnes manquant
d’expérience ou de connaissances, à moins que celles-ci ne soient sous surveillance ou qu’elles
n’aient reçu des instructions quant à l’utilisation de l’appareil par une personne responsable de
leur sécurité.
Veillez à ce que les enfants ne puissent pas jouer avec l’appareil.
Évitez tout contact entre le cordon d’alimentation et la semelle du fer à repasser lorsqu’elle est
chaude.
Attention
Branchez l’appareil uniquement sur une prise secteur mise à la terre.
Vériez régulièrement l’état du cordon d’alimentation.
La semelle du fer à repasser peut devenir très chaude et peut par conséquent provoquer des
brûlures si vous la touchez.
-
-
-
-
-
-
-
-
-
-
-
-
-
-
FRANÇAIS
4239.000.7344.1.indd 13 10-08-2009 09:37:01

Lorsque vous avez ni de repasser, pendant que vous nettoyez, remplissez ou videz le réservoir
d’eau, et même si vous laissez le fer pour un bref instant, réglez la commande de vapeur sur la
position 0, placez le fer à repasser sur le talon et débranchez l’appareil.
Placez et utilisez toujours le fer à repasser sur une surface stable, plane et horizontale.
Ne mettez pas de parfum, de vinaigre, d’amidon, de détartrants, de produits d’aide au repassage
ou autres agents chimiques dans le réservoir d’eau.
Cet appareil est destiné à un usage domestique uniquement.
Champs électromagnétiques (CEM)
Cet appareil Philips est conforme à toutes les normes relatives aux champs électromagnétiques
(CEM). Il répond aux règles de sécurité établies sur la base des connaissances scientiques actuelles
s’il est manipulé correctement et conformément aux instructions de ce mode d’emploi.
Avant l’utilisation
Remarque : Ôtez la protection en carton de la semelle du fer avant la première utilisation.
Remplissage du réservoir
Type d’eau préconisé
Vous pouvez utiliser de l’eau du robinet pour remplir le réservoir.
Conseil : Si l’eau du robinet dans votre région est très calcaire, il est conseillé de la mélanger avec de
l’eau déminéralisée ou d’utiliser de l’eau déminéralisée.
1 Assurez-vousquel’appareilestdébranché.
2 Réglezlacommandedevapeursurlaposition0(pasdevapeur)(g.2).
3 Ouvrezlebouchondel’oricederemplissage(g.3).
4 Inclinezleferenarrièreet,àl’aidedugodetderemplissage,remplissezleréservoiravecde
l’eaudurobinet,jusqu’auniveaumaximal(g.4).
Ne remplissez pas le réservoir au-delà de l’indication MAX.
Nemettezpasdeparfum,devinaigre,d’amidon,dedétartrants,deproduitsd’aideaurepassage
ouautresagentschimiquesdansleréservoird’eau.
5 Fermezlebouchondel’oricederemplissage(clic)(g.5).
Sélection de la température et réglage de la vapeur
Réglages de la température et de la vapeur
Type de tissu Réglagede
température
Réglagede
vapeur
Effet pressing
puissant
Ionic DeepSteam
(certains modèles
uniquement)
Lin Quantité
; \
oui
Coton 3
; \
oui
Laine 2
l
S.O. oui
Soie 1 0 S.O. S.O.
Fibres synthétiques
(par ex. acrylique,
nylon, polyamide,
polyester)
1 0 S.O. S.O.
-
-
-
-
FRANÇAIS14
4239.000.7344.1.indd 14 10-08-2009 09:37:01

1 Certainsmodèlesuniquement:retirezlerevêtementdeprotectionrésistantàla
chaleur(g.6).
Nelaissezpascelui-cisurlasemellependantlerepassage.
2 Posez le fer à repasser sur son talon.
3 Pourréglerlatempératurederepassage,tournezlethermostatsurlapositionadéquate(voir
letableau«Réglagesdelatempératureetdelavapeur»)(g.7).
Consultez l’étiquette de lavage pour connaître le type de tissu.
Si vous ne connaissez pas la composition du tissu, repassez en commençant par la température la
plus basse sur une partie interne de l’article et invisible de l’extérieur.
Soie, laine et autres bres synthétiques : repassez sur l’envers pour éviter de les lustrer. Évitez
d’utiliser la fonction Spray pour ne pas faire de taches.
Commencez toujours le repassage par les articles en bres synthétiques nécessitant la température
la plus basse.
4 Sélectionnezleréglagevapeurdevotrechoix(voirletableau«Réglagesdelatempérature
etdelavapeur»)(g.8).
Remarque : Assurez-vous que le réglage vapeur est adapté à la température de repassage choisie.
5 Branchezlecordond’alimentationsuruneprisesecteurmiseàlaterre.
Levoyantdetempératureoranges’allume(g.9).
6 Unefoislevoyantdetempératureorangeéteint,patientezuncourtinstantavantde
commencer à repasser.
Le voyant de température s’allume de temps en temps pendant le repassage.
Utilisation de l’appareil
Repassage sans vapeur
1 Réglezlacommandedevapeursurlaposition0(pasdevapeur).
2 Sélectionnezlatempératurederepassagerecommandée(voirlechapitre«Avant
utilisation»,section«Réglagesdelatempératureetdelavapeur»).
Repassage à la vapeur
Remarque : Lors de la première utilisation, le fer peut dégager un peu de fumée. Ce phénomène est
normal et cesse après un bref instant.
1 Assurez-vousqu’ilyasufsammentd’eaudansleréservoir.
2 Sélectionnezlatempératurederepassagerecommandée(voirlechapitre«Avant
utilisation»,section«Réglagesdelatempératureetdelavapeur»)(g.7).
3 Sélectionnezleréglagevapeurrecommandé(voirlechapitre«Avantutilisation»,section
«Réglagesdelatempératureetdelavapeur»)(g.8).
Remarque : Le fer commence à dégager de la vapeur dès que la température réglée est atteinte.
Repassage avec la fonction Ionic DeepSteam (certains modèles uniquement)
Lors du repassage à la vapeur avec la fonction Ionic DeepSteam, la vapeur produite est plus ne.
Cette ne vapeur pénètre au cœur des bres (même des tissus épais) pour favoriser l’élimination
des faux plis.
1 Assurez-vousqu’ilyasufsammentd’eaudansleréservoir.
2 Sélectionnezlatempératurederepassagerecommandée(voirlechapitre«Avant
utilisation»,section«Réglagesdelatempératureetdelavapeur»)(g.7).
,
FRANÇAIS 15
4239.000.7344.1.indd 15 10-08-2009 09:37:02

3 Sélectionnezleréglagevapeurrecommandé(voirlechapitre«Avantutilisation»,section
«Réglagesdelatempératureetdelavapeur»).(g.8)
4 AppuyezsurlagâchetteIonicDeepSteametmaintenez-laenfoncée(g.10).
LevoyantIonicDeepSteambleus’allumeetvousentendezunbourdonnement(g.11).
5 Leferémetdelavapeurionisantepourvouspermettred’éliminerlesfauxplislesplus
tenaces(g.12).
Remarque : La fonction Ionic DeepSteam ne fonctionne efcacement qu’en combinaison avec un réglage
de vapeur et un réglage de température compris entre
2 et MAX.
Remarque : N’utilisez pas la fonction Ionic DeepSteam lorsque vous repassez sans vapeur et/ou à basse
température. Toutefois, le repassage à basse température sans vapeur alors que la fonction
Ionic DeepSteam est activée n’endommagera pas le fer à repasser.
Remarque : Le débit de vapeur Ionic DeepSteam peut varier en fonction de la température de repassage.
Caractéristiques
Fonction Spray
Vous pouvez utiliser la fonction Spray an d’humidier l’article à repasser et favoriser l’élimination
des faux plis.
1 Assurez-vousqu’ilyasufsammentd’eaudansleréservoir.
2 Appuyezàplusieursreprisessurleboutondusprayand’humidierl’articleà
repasser(g.13).
Fonction Effet pressing
Le jet de vapeur émis par la pointe à vapeur additionnelle spéciale permet d’éliminer les faux plis. Il
améliore la distribution de la vapeur : vous pouvez ainsi atteindre les moindres recoins.
La fonction Jet de vapeur peut être utilisée uniquement à des températures situées entre 3 et
MAX.
1 Assurez-vousqu’ilyasufsammentd’eaudansleréservoir.
2 AppuyezsurleboutonEffetpressing,puisrelâchez-le(g.14).
Vous pouvez également utiliser la fonction Effet pressing lorsque vous tenez le fer en position
verticale. Cela peut s’avérer utile pour enlever les faux plis des vêtements sur cintre, des rideaux,
etc. (g. 15)
Système anti-goutte
Ce fer à repasser est doté d’un système anti-goutte : en cas de température trop basse, la
production de vapeur est interrompue an d’éviter tout écoulement d’eau de la semelle. Le cas
échéant, vous entendez un clic.
Fonction d’arrêt automatique
Cette fonction éteint automatiquement le fer s’il reste immobile pendant quelques temps.
Certains modèles uniquement : le voyant du réservoir clignote pour indiquer que le fer a été
éteint par la fonction d’arrêt automatique (g. 16).
Certains modèles uniquement : le voyant d’arrêt automatique rouge clignote pour indiquer que
le fer a été éteint par la fonction d’arrêt automatique.
Pour que le fer se réchauffe, prenez-le en main ou déplacez-le légèrement. Le voyant du
réservoir (certains modèles uniquement) ou le voyant d’arrêt automatique (certains modèles
uniquement) cesse de clignoter.
,
-
-
-
-
FRANÇAIS16
4239.000.7344.1.indd 16 10-08-2009 09:37:02

Dispositif de protection des tissus délicats (certains modèles uniquement)
Ce dispositif protège les tissus délicats du lustrage et des dommages dus à une chaleur excessive.
Grâce à ce dispositif de protection, vous pouvez repasser des tissus délicats (soie, laine et nylon) à
des températures comprises entre 3 et MAX en utilisant les fonctions de vapeur du fer à
repasser.
Le dispositif de protection des tissus délicats réduit instantanément la température de la semelle
pour éviter tout dommage.
Si vous ne connaissez pas la composition du tissu, repassez en commençant par la température la
plus basse sur une partie interne de l’article et invisible de l’extérieur.
1 Placezlefersurledispositifdeprotectiondestissusdélicats(clic)(g.17).
Nettoyage et entretien
Retirezlached’alimentationdelaprisesecteur,réglezlacommandedevapeursurlaposition0
etlaissezleferrefroidiravantdelenettoyer.
Neversezpasdevinaigrenid’autresagentsdétartrantsdansleréservoird’eau.
Après le repassage
1 Ôtezlesparticulesdecalcaireetautresimpuretésdelasemelleaumoyend’unchiffon
humideetd’undétergent(liquide)non-abrasif.
Évitezlecontactdelasemelleavectoutobjetmétalliqueandenepasl’endommager.N’utilisez
jamaisdetamponsàrécurer,vinaigreouautresproduitschimiquespournettoyerlasemelle.
2 Nettoyezlapartiesupérieureduferàrepasseravecunchiffonhumide.
3 Rincezrégulièrementleréservoiravecdel’eau.Videzleréservoiraprèsl’avoirrincé.
Système anticalcaire double action
Ce système est constitué d’une tablette anticalcaire située dans le réservoir et de la fonction
anticalcaire.
1 La tablette anticalcaire empêche l’accumulation de dépôts sur les évents à vapeur. Elle agit de
manière permanente et ne doit pas être remplacée.
2 La fonction Calc-Clean permet d’éliminer les particules de calcaire.
Utilisation de la fonction Calc-Clean
Utilisez la fonction Calc-Clean toutes les deux semaines. Si l’eau de votre région est très calcaire
(par exemple, si des particules de calcaire s’écoulent de la semelle pendant le repassage), n’hésitez
pas à utiliser cette fonction plus souvent.
1 Remplissezleréservoird’eaujusqu’auniveaumaximal.
Neversezpasdevinaigrenid’autresagentsdétartrantsdansleréservoird’eau.
2 RéglezlethermostatsurlapositionMAX(g.18).
3 Branchezlachesuruneprisemuraleavecmiseàlaterre.
4 Lorsquelevoyantdetempératures’éteint,débranchezl’appareil.
5 Tenezleferau-dessusdel’évier.MaintenezlacommandedevapeursurlapositionCalc-
Clean,etsecouezlégèrementlefer(g.19).
Delavapeuretdel’eaubouillantesortentdelasemelle.Lesimpuretésetparticulessont
évacuéesenmêmetemps.
6 Relâchezlacommandedevapeurlorsqueleréservoirestvide.
Répétez cette opération aussi souvent que nécessaire.
,
FRANÇAIS 17
4239.000.7344.1.indd 17 10-08-2009 09:37:02

Après le traitement anticalcaire
1 Branchezlecordond’alimentationsurlaprisesecteuretlaissezleferchaufferandesécher
la semelle.
2 Débranchezleferlorsquelatempératurederepassageestatteinte.
3 Repassezunmorceaudetissuand’éliminerlesdernièresgouttesd’eauquisesontformées
surlasemellelecaséchéant.
4 Laisseztoujoursrefroidirleferavantdeleranger.
Rangement
1
Réglezlacommandedevapeursurlaposition0,débranchezleferetlaissez-lerefroidir.
2 Videzleréservoird’eauetrangezlefersurunesurfacestableenl’ayantpréalablementposé
sursontalon.(g.20)
3 Enroulezlecordond’alimentationetattachez-leàl’aidedelabride.
Revêtement de protection résistant à la chaleur (certains modèles uniquement)
Vous pouvez ranger le fer sur le revêtement de protection résistant à la chaleur immédiatement
après utilisation. Il n’est pas nécessaire de le laisser refroidir.
N’utilisezpaslerevêtementdeprotectionrésistantàlachaleurpendantlerepassage.
1 Insérezlapointedelasemelledanslerevêtementdeprotectionrésistantàlachaleur(1),
puisappuyezsurletalondufer(2)(g.21).
Environnement
Lorsqu’il ne fonctionnera plus, ne jetez pas l’appareil avec les ordures ménagères, mais déposez-
le à un endroit assigné à cet effet, où il pourra être recyclé. Vous contribuerez ainsi à la
protection de l’environnement (g. 22).
Garantie et service
Si vous souhaitez obtenir des informations supplémentaires ou faire réparer l’appareil, ou si vous
rencontrez un problème, rendez-vous sur le site Web de Philips à l’adresse www.philips.com ou
contactez le Service Consommateurs Philips de votre pays (vous trouverez le numéro de téléphone
correspondant sur le dépliant de garantie internationale). S’il n’existe pas de Service
Consommateurs Philips dans votre pays, renseignez-vous auprès de votre revendeur Philips local.
Foire aux questions
Si l’appareil ne fonctionne pas (correctement), consultez d’abord la liste ci-dessous. Si le problème
rencontré ne gure pas dans la liste, l’appareil est probablement défectueux. Dans ce cas, contactez
votre revendeur ou un Centre Service Agréé Philips.
Problème Cause possible Solution
Le fer à repasser
est branché, mais
la semelle est
froide.
Il s’agit d’un problème de
branchement.
Vériez le cordon d’alimentation, la che et la
prise secteur.
Le thermostat est réglé sur
MIN.
Réglez le thermostat sur la température requise.
-
FRANÇAIS18
4239.000.7344.1.indd 18 10-08-2009 09:37:03

Problème Cause possible Solution
L’appareil ne
produit pas de
vapeur.
Il n’y a pas assez d’eau dans
le réservoir d’eau.
Remplissez le réservoir d’eau (voir le chapitre
« Avant utilisation », section « Remplissage du
réservoir d’eau »).
La commande de vapeur
est réglée sur la position 0.
Réglez la commande de vapeur sur l ou ;
(voir le chapitre « Avant utilisation », section
« Réglages de la température et de la vapeur »).
La semelle n’est pas
sufsamment chaude et/ou
la fonction anti-goutte a
été activée.
Sélectionnez une température de repassage
appropriée au repassage à la vapeur ( 2 à
MAX). Placez le fer sur son talon et attendez
que le voyant de température orange s’éteigne
avant de commencer le repassage.
Le fer ne produit
pas de jet de
vapeur.
La fonction Effet pressing a
été utilisée trop souvent
pendant une courte
période.
Continuez à utiliser le fer en position
horizontale et patientez quelques instants avant
d’utiliser de nouveau la fonction Effet pressing.
Le fer n’est pas
sufsamment chaud.
Sélectionnez une température de repassage
appropriée à la fonction Jet de vapeur ( 3
to MAX). Placez le fer sur son talon et attendez
que le voyant de température orange s’éteigne
avant d’utiliser la fonction Jet de vapeur.
Des gouttes
d’eau tombent
sur le tissu lors
du repassage.
Vous n’avez pas fermé
correctement le bouchon
de l’orice de remplissage.
Appuyez sur le bouchon jusqu’à ce que vous
entendiez un clic.
Vous avez ajouté un additif
dans le réservoir d’eau.
Rincez le réservoir. À l’avenir, ne mettez plus
d’additifs dans le réservoir.
Vous avez utilisé la fonction
Effet pressing à une
température inférieure à
3.
Réglez le thermostat sur une position située
entre
3 et MAX.
Des gouttes
d’eau s’écoulent
de la semelle
après que le fer a
refroidi ou qu’il a
été rangé.
Le fer a été placé en
position horizontale alors
que le réservoir d’eau
n’était pas vide.
Videz le réservoir d’eau avant de ranger le fer.
Rangez le fer en l’ayant préalablement posé sur
son talon.
Des particules de
calcaire et des
impuretés
s’écoulent de la
semelle pendant
le repassage.
L’eau trop calcaire favorise
la formation de dépôts
calcaires à l’intérieur de la
semelle.
Utilisez la fonction Calc-Clean (anticalcaire) une
ou plusieurs fois (voir le chapitre « Nettoyage
et entretien », section « Utilisation de la
fonction Calc-Clean »).
FRANÇAIS 19
4239.000.7344.1.indd 19 10-08-2009 09:37:03

Problème Cause possible Solution
Le voyant d’arrêt
automatique
rouge clignote
(certains modèles
uniquement).
La fonction d’arrêt
automatique a éteint
l’appareil (voir le chapitre
« Caractéristiques »).
Remuez le fer doucement pour désactiver la
fonction d’arrêt automatique. Le voyant
correspondant cesse de clignoter.
Le voyant bleu du
réservoir clignote
(certains modèles
uniquement).
La fonction d’arrêt
automatique a éteint
l’appareil (voir le chapitre
« Caractéristiques »,
section « Fonction d’arrêt
automatique »).
Remuez le fer doucement pour désactiver la
fonction d’arrêt automatique. Le voyant bleu du
réservoir cesse de clignoter.
Le fer émet un
bourdonnement.
La fonction
Ionic DeepSteam est
activée.
Si vous entendez un bourdonnement alors que
vous repassez sans vapeur, relâchez la gâchette
Ionic DeepSteam. La fonction Ionic DeepSteam
n’a aucun effet si vous repassez sans vapeur.
FRANÇAIS20
4239.000.7344.1.indd 20 10-08-2009 09:37:03
La page est en cours de chargement...
La page est en cours de chargement...
La page est en cours de chargement...
La page est en cours de chargement...
La page est en cours de chargement...
La page est en cours de chargement...
La page est en cours de chargement...
La page est en cours de chargement...
La page est en cours de chargement...
La page est en cours de chargement...
La page est en cours de chargement...
La page est en cours de chargement...
La page est en cours de chargement...
La page est en cours de chargement...
La page est en cours de chargement...
La page est en cours de chargement...
-
 1
1
-
 2
2
-
 3
3
-
 4
4
-
 5
5
-
 6
6
-
 7
7
-
 8
8
-
 9
9
-
 10
10
-
 11
11
-
 12
12
-
 13
13
-
 14
14
-
 15
15
-
 16
16
-
 17
17
-
 18
18
-
 19
19
-
 20
20
-
 21
21
-
 22
22
-
 23
23
-
 24
24
-
 25
25
-
 26
26
-
 27
27
-
 28
28
-
 29
29
-
 30
30
-
 31
31
-
 32
32
-
 33
33
-
 34
34
-
 35
35
-
 36
36


Philips GC 4711 Le manuel du propriétaire
- Catégorie
- Fers
- Taper
- Le manuel du propriétaire
dans d''autres langues
- English: Philips GC 4711 Owner's manual
Documents connexes
-
Philips HD1134 Manuel utilisateur
-
Philips GC3590/02 Manuel utilisateur
-
Philips GC1480/02 Manuel utilisateur
-
-
Philips GC4855/22 Manuel utilisateur
-
Philips GC1630 Le manuel du propriétaire
-
Philips GC4621 Manuel utilisateur
-
-
Philips Steam Iron Manuel utilisateur
-
Philips GC4440/27 Manuel utilisateur
Autres documents
-
Hoover TIM2500EU Manuel utilisateur
-
Schneider SCGS26 Le manuel du propriétaire
-
Rowenta DW95X Manuel utilisateur
-
-
Black & Decker BXIR2402E Manuel utilisateur
-
-
CONTINENTAL EDISON CECV2400BB Manuel utilisateur
-
 ESSENTIELB EFV 2501 DIGITALIS Le manuel du propriétaire
