Danby DERM240WC Le manuel du propriétaire
- Taper
- Le manuel du propriétaire

DANBY PRODUCTS LIMITED, ONTARIO, CANADA N1H 6Z9
DANBY PRODUCTS INC., FINDLAY, OHIO, USA 45840
OWNER’S MANUAL
MANUAL DEL PROPIETARIO
www.Danby.com
2020.03.11
COMPACT ELECTRIC RANGE
Owner’s Manual.............................1 - 16
GAMME ELECTRIQUE COMPACTE
Manuel du propriétaire ................17 - 32
ESTUFAS ELECTRICAS COMPACTAS
Manuel du propriétaire.................33 - 48
MODEL • MODÈLE • MODELO
DERM240WC
DERM240BC
DERM240BSSC

1
Welcome
Welcome to the Danby family. We are proud of our quality products and we believe in
dependable service. We suggest that you read this owner’s manual before plugging in your new
appliance as it contains important operation information, safety information, troubleshooting and
maintenance tips to ensure the reliability and longevity of your appliance.
Visit www.Danby.com to access self service tools, FAQs and much more. For additional assistance
call 1-800-263-2629.
Note the information below; you will need this information to obtain service under warranty.
You must provide the original purchase receipt to validate your warranty and receive service.
Model Number: _________________________________________________
Serial Number: _________________________________________________
Date of Purchase: _______________________________________________
Need Help?
Before you call for service, here are a few things you can do to help us serve you better.
Read this owner’s manual:
It contains instructions to help you use and maintain your appliance properly.
If you receive a damaged appliance:
Immediately contact the retailer or builder that sold you the appliance.
Save time and money:
Check the troubleshooting section at the end of this manual before calling. This section
will help you solve common problems that may occur.
1-800-26- Danby
(1-800-263-2629)

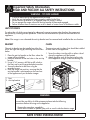
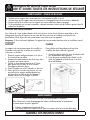
BRACKET
The anti-tip bracket can be installed on either the
left or the right rear leg by following the instructions
below.
1. Place the anti-tip bracket on the fl oor where the
range will be installed.
2. Mark the locations of the two holes in the anti-tip
bracket.
3. Use a 5/16” masonry drill bit to drill a hole in
the fl oor and insert the provided plastic anchor.
4. Secure the bracket to the fl oor using the
provided screws.
5. Slide the range into position, ensuring that the
anti-tip bracket is positioned over the rear foot
of the appliance as per the below images.
1
2
WARNING - TIP OVER HAZARD
• A child or adult can tip the appliance and be killed.
• Verify the anti-tip bracket has been properly installed to the fl oor.
• Ensure the anti-tip bracket is re-engaged when the range is moved.
• Do not operate the range without the anti-tip bracket in place and engaged.
• Failure to follow these instructions can result in death or serious burns to children or adults.
1. Foot
2. Anti-tip bracket
ANTI-TIP DEVICE
To reduce the risk of the range tipping by abnormal usage or improper door loading, the range must
be secured by installing an anti-tip device. There are two difference anti-tip devices included with this
appliance.
Note: If the range is ever relocated the anti-tip bracket must be removed and installed at the new location.
CHAIN
There are two anti-tip chains that should be installed
on both sides of the appliance.
1. Screw the chains into the walls on either side of
where the appliance will be located.
2. Attach the other ends of the chains to the sides
of the appliance using a screw and locking nut.
WARNING
SUFFOCATION AND RISK OF CHILD ENTRAPMENT
To avoid the possibility of child entrapment please take the following
precautions before throwing out the appliance:
• Remove the oven door completely
• Never allow children to operate, play with or crawl inside the electric range
Important Safety Information
READ AND FOLLOW ALL SAFETY INSTRUCTIONS
SAVE THESE INSTRUCTIONS!

3
DANGER - GREASE FIRES
In the event of a fi re, never pick up a fl aming pot
or pan. Turn the burner off if it is safe to do so.
Extinguish the fi re with a dry chemical or foam-
type extinguisher.
Do not use water on grease fi res. Water will
spread the grease and will not extinguish the fi re.
Smother the fi re with a tight fi tting pot lid, cookie
sheet or fl at tray or use dry chemical or foam-type
extinguisher.
If there is a fi re in the oven during baking,
smother the fi re by closing the oven door and
turning the oven off or use dry chemical or foam-
type extinguisher.
DANGER - FIRE RISK
• It is recommended that this appliance be
connected to a separate circuit that is not
shared with any other appliance.
• Never clean appliance parts with fl ammable
fl uids. These fumes can create a fi re hazard
or explosion. Never use or store gasoline or
other fl ammable vapors or liquids inside or in
the proximity of this appliance, failing to do so
may result in a fi re hazard or explosion.
• Before cleaning or servicing this appliance,
unplug the appliance completely from the
electrical outlet. Failure to do so can result in
electrical shock or death.
• Do not attempt to repair or replace any part
of your appliance unless it is specifi cally
recommended in this manual. All other
servicing should be referred to a qualifi ed
service technician.
• For your safety, this appliance should never be
used as a source of heat or as a space heater.
The stove top elements should not be operated
without proper cookware.
• All openings in the wall behind the appliance
and the fl oor under the appliance shall be
sealed.
• Keep the area around the appliance clear and
free from combustible materials, gasoline and
other fl ammable vapors.
• Do not obstruct the fl ow of air around the
appliance.
• Always disconnect the electrical supply to the
appliance before servicing.
• Never use your appliance for warming or
heating the room.
• Storage in or on the appliance: fl ammable
materials should not be stored in an oven or
near surface burners.
NOTICE - BEFORE FIRST TIME USE
Before use of this range for the fi rst time, the
heating elements have a protective coating, which
must be burned off before use. To do this:
• Open the oven door and set the temperature
control knob to 450°F.
• Turn the function selector to the bake
element and the broil element separately for
approximately 15 minutes.
• It is important to ensure adequate ventilation
during this period.
The burners also have a protective coating which
must be burned off before use. To do this:
• Set the burner selector to the maximum setting
for 5 minutes.
• It is important to ensure adequate ventilation
during this period.
• Switch off the burners after 5 minutes and
allow to cool completely.
Important Safety Information
READ AND FOLLOW ALL SAFETY INSTRUCTIONS
SAVE THESE INSTRUCTIONS!

4
GENERAL SAFETY REQUIREMENTS
Ensure the appliance is properly installed and
grounded by a qualifi ed technician.
Children should not be left alone or unattended in
the area where the appliance is in use. Children
should never be allowed to sit or stand on any part
of the appliance.
Do not store items of interest to children in cabinets
above a range or on the back guard of a range.
Children climbing on the range to reach items could
be seriously injured.
To eliminate the risk of burns or fi re by reaching
over heated surface units, cabinet storage space
located above the surface units should be avoided.
If cabinet storage is to be provided, the risk can be
reduced by installing a range hood that projects
horizontally a minimum of 5 inches (12.7 cm)
beyond the bottom of the cabinets.
Loose fi tting or hanging garments should never be
worn while using the appliance.
Use only dry pot holders. Moist or damp pot holders
on hot surfaces may result in burns from steam. Do
not let the pot holder touch hot heating elements. Do
not use a towel or other bulky cloth.
If power is lost to an electric cooktop while a surface
element is ON, the surface element will turn back on
as soon as power is restored. In the event of power
loss, failure to turn all surface element knobs to the
OFF position may result in ignition of items on or
near the cooktop, leading to serious injury or death.
To avoid the possibility of a burn or an electric
shock, always be certain that the controls for all
surface elements are at the OFF position, and that
all coils are cool before attempting to lift or remove
a coil cooking element.
This range is designed and manufactured solely
for the cooking of domestic (household) food and
is not suitable for any non domestic application
and therefore should not be used in a commercial
environment. The range warranty will be void if the
range is used within a non domestic environment.
DO NOT TOUCH HEATING ELEMENTS OR
AREAS NEAR THEM
Heating elements on the surface or in the interior
of the appliance may be hot even though they are
dark in colour. Areas near the heating elements
may become hot enough to cause burns. During
and after use do not touch or let clothing or other
fl ammable materials contact the heating elements
or areas near them until they have had suffi cient
time to cool. Surfaces of the appliance may
become hot enough to cause burns, among them
are the oven vent openings and surfaces near
these openings, oven doors and oven windows.
WARNING
To reduce the risk of burns, do not move this
appliance while it is hot. To reduce the risk of
injury due to tipping of the appliance, verify
the re-installation of this appliance into the
anti-tipping device provided after returning the
appliance to the original installed position.
WARNING
The manufacturer declines all liability for injury to
persons or damage to property cause by incorrect
or improper use of the range.
Important Safety Information
READ AND FOLLOW ALL SAFETY INSTRUCTIONS
SAVE THESE INSTRUCTIONS!

5
SAVE THESE INSTRUCTIONS!
OVEN SAFETY REQUIREMENTS
Use care when opening the door. Allow hot air or
steam to escape before removing or replacing food.
Do not heat unopened food containers. Build up of
pressure may cause the container to burst and result
in injury.
Keep oven vents unobstructed.
Always place oven racks in the desired location
while the oven is cool. If the rack must be moved
while the oven is hot, do not let the pot holder
contact the hot heating element in the oven.
Do not use the oven if a heating element develops
a glowing spot during use or shows other signs
of damage. A glowing spot indicates the heating
element may fail and present a potential burn, fi re,
or shock hazard. Turn the oven off immediately and
have the heating element replaced by a qualifi ed
service technician.
Do not line the oven walls, racks or burner bowls
with aluminum foil.
Do not place shelves, pans, backing trays, broil
trays or other cooking utensils in the bottom of the
oven chamber. Always place on an oven shelf.
Never clean the oven with any high pressure steam
cleaning devices.
Do not leave anything on the top of the oven vent.
Never cover the oven vent opening with aluminum
foil or any other material.
COOK TOP SAFETY REQUIREMENTS
Use the proper pan size. This appliance is equipped
with four burners of different sizes. Select utensils
that have fl at bottoms large enough to cover
the surface of the heating element. The use of
undersized utensils will expose a portion of the
heating element to direct contact and may result in
ignition of clothing. Proper relationship of utensil to
burner will also improve effi ciency.
Never leave the appliance unattended while in use.
Boil over causes smoking and greasy spills can
ignite.
Never leave oil unattended while frying. If allowed
to heat beyond its smoking point, oil may ignite
resulting in fi re that may spread to surrounding
cabinets. Use a deep fat thermometer whenever
possible to monitor oil temperature.
To avoid oil spillover and fi re, use a minimum
amount of oil when shallow pan-frying and avoid
cooking frozen foods with excessive amounts of ice.
Ensure that refl ector pans or drip bowls are in
place. Absence of these pans or bowls during
cooking may subject wiring or components
underneath to damage.
Only certain types of glass, ceramic, earthenware
or other glazed utensils are suitable for range top
service without breaking due to sudden change in
temperature.
To reduce risk of burns, ignition of fl ammable
materials and spillage due to unintentional contact,
the handle of a utensil should be positioned so
that it is turned inward and does not extend over
adjacent burners.
Removable heating elements should never be
immersed in water.
Do not cook on broken cooktop. If the cooktop
should break, cleaning solutions and spill overs
may penetrate the broken cooktop and create a
risk of electric shock. Contact a qualifi ed technician
immediately.
Important Safety Information
READ AND FOLLOW ALL SAFETY INSTRUCTIONS

6
BEFORE BEGINNING
Carefully unpack the appliance and ensure there
is no damage to the oven, cooktop or structure
and that the oven door opens and closes properly.
Remove all packing materials such as plastic bags,
polystyrene foam, packing straps, etc. Keep packing
materials out of reach of children at all times to
prevent possible serious injury. The range has been
thoroughly tested for safe and effi cient operation.
However, as with any appliance, there are specifi c
installation and safety precautions that must be
followed to ensure safe and satisfactory operation.
Keep these instructions for future reference.
Installation of this appliance requires basic
mechanical skills and roughly 1 to 3 hours of time.
Proper installation is the responsibility of the
installer. Product failure due to improper installation
is nor covered under the warranty.
Before beginning the installation, switch power
off at the service panel and lock the service
disconnecting means to prevent power from being
switched on accidentally. If the service disconnecting
means cannot be locked, securely fasten a warning
device such as a tag to the service panel.
Important Safety Information
READ AND FOLLOW ALL SAFETY INSTRUCTIONS
GROUNDING INSTRUCTIONS
This appliance must be grounded. Grounding
reduces the risk of electrical shock by providing an
escape wire for the electrical current.
This appliance has a power cord that has a
grounding wire with a 4-prong plug. The power
cord must be plugged into an outlet that is properly
grounded. If the outlet is a 2-prong wall outlet, it
must be replaced with a properly grounded 4-prong
wall outlet. The rating plate indicates the voltage
and frequency the appliance is designed for.
WARNING - Improper use of the grounding plug
can result in a risk of electric shock. Consult a
qualifi ed electrician if the grounding instructions are
not completely understood, or if doubt exists as to
whether the appliance is properly grounded.
Do not connect the appliance to extension cords,
adapters or together with another appliance in the
same wall outlet.
Do not splice the power cord. Do not under any
circumstances cut or remove the ground prong from
the power cord.
If the power supply cord is damaged, it must be
replaced by the manufacturer, its service agent or
similar qualifi ed person in order to avoid hazard.
Note: Turning the appliance off does not disconnect
the appliance from the power supply.
It is recommended that the power cord and the plug
be placed parallel with the fl oor so that the cord
runs parallel with the fl oor.
SAVE THESE INSTRUCTIONS!

INSTALLATION INSTRUCTIONS
7
B
C
A
D
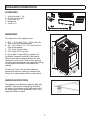
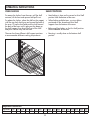
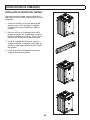
DIMENSIONS
This dimensions of this appliance are:
A. 40.9 ~ 41.3 inches (104 ~ 105 cm) from the
fl oor to the top of the backguard
B. 36 ~ 36.4 inches (91.5 ~ 92.5 cm) from the
fl oor to the cooktop
C. 19.3 inches (49 cm) deep
D. 23.4 inches (59.5 cm) wide
It is the installer’s responsibility to comply with
installation clearances specifi ed in the manual.
The minimum cabinet opening dimensions and
clearances must be used. The minimum spacings
must be maintained between the appliance cooking
surface and the horizontal surface above the
cooktop.
30 inches (65 cm) is the minimum clearance
between the top of the cooking surface and the
bottom of an unprotected wood or metal cabinet.
LEVELING INSTRUCTIONS
The appliance must be level to operate safely and
properly. There are four leveling legs located at
the corners of the bottom of the appliance. Adjust
the leveling legs until the appliance is level. Use a
carpenter’s level to confi rm.
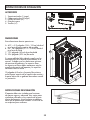
ACCESSORIES
1. Anti-tip bracket (1 set)
2. Anti-tip chain (2 sets)
3. Oven racks (x2)
4. Backguard
5. Screws (x7)

8
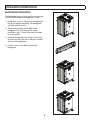
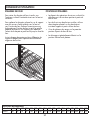
BACKGUARD INSTALLATION
The backguard acts as a heat vent for the oven and
must be installed before the appliance is used.
1. Install three screws in the back of the appliance
but do not tighten completely. The backguard
will slide onto the screws.
2. There are three holes on the back of the
backguard that will slide over the screws
installed in step 1. These holes may be hidden
by a rear panel.
3. Install the backguard from the top. Ensure that
the holes are over the screws then push toward
the front of the appliance.
4. Install 4 screws in the back to secure the
backguard.
INSTALLATION INSTRUCTIONS

9
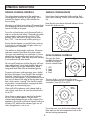
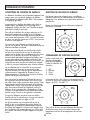
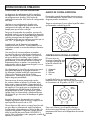
OPERATING INSTRUCTIONS
The oven has three
available functions that
can be set using the
function selector knob.
1. OFF
2. Light
3. Bake
4. Broil
WARM /
RÉCHAUD
To use the oven, turn the function selector knob to
bake and turn the oven temperature knob to the
desired cooking temperature.
1
2
3
4
The oven knob is used to choose the oven
cooking temperature and is marked in 50 degree
increments, from 200°F to 450°F.
SURFACE COOKING CONTROLS
The surface heating elements of the appliance
are designed for a variety of heat settings. MAX
indicates the highest setting. MIN indicates the
lowest setting.
Changing to a higher heat setting will happen faster
than changing to a lower heat setting as it will take
time for the heat to dissipate.
To use the surface burner, push the control knob in
and turn to the desired setting. The knob only needs
to be pushed in when moving out of the “OFF”
position. When the knob is in any position other
than “OFF”, it can be turned without pushing in.
Ensure that the element is turned off when cooking
is fi nished. An indicator light will glow when any
heating element is turned on.
Use medium or heavyweight cookware. Aluminum
cookware conducts heat faster than other metals.
Cast-iron and coated cast-iron cookware is slow to
absorb heat, but generally cooks evenly at low or
medium heat settings. Steel pans may cook unevenly
if not combined with other metals.
Do not overfi ll cookware with fat that may spill over
when adding food. Frosty foods bubble vigorously.
Watch foods frying at high temperatures. Keep
range and hood clean from accumulated grease.
To conserve the most cooking energy, pans should
be fl at on the bottom, have straight sides and tight-
fi tting lids. Match the size of the saucepan to the
size of the surface element. A pan that extends more
than an inch beyond the edge of the drip pan traps
heat, which causes “crazing” (fi ne hairline cracks)
on porcelain, and discoloration ranging from blue
to dark gray on chrome drip pans.
Wipe spills off the elements with a damp cloth as
soon as they cool down. Be sure the control knob is
set to OFF.
Never leave an empty pot or one that has boiled
dry on a hot surface element. The pot could
overheat and damage the pot or the surface of the
appliance. Always be sure that all control knobs are
turned to OFF and that the indicator lights are off
when the appliance is not in use.
SURFACE COOKING KNOB
Never leave food unattended while cooking. Boil
overs cause smoking. Greasy spill overs may catch
fi re.
Note that the icon above the knob indicates which
burner the knob controls.
MAX MIN
OVEN COOKING CONTROLS

10
OPERATING INSTRUCTIONS
OVEN BROILING
Broiling involves cooking food by intense radiant
heat from the upper element in the oven. Most fi sh
and tender cuts of meat can be broiled. Follow these
steps to keep spattering and smoking to a minimum.
1. If the meat has fat or gristle around the edge,
cut vertical slashes through both about 2” apart.
If desired, fat may be trimmed, leaving a layer
about 1/8” thick.
2. Place the meat on a broiler grid in a broiler pan
designed for broiling. Always use the grid so
the fat drips into the broiler pan; otherwise the
juices may become hot enough to catch fi re.
3. Place the shelf in one of the top two positions for
most broiling.
4. Place the food in the oven and close the door.
Always broil with the door closed.
5. Turn the oven function selector knob to BROIL.
6. Turn the oven temperature knob to the desired
cooking temperature.
7. Food can be turned during broiling if necessary.
Be cautious of hot air or steam when opening
the oven door.
8. Make sure to turn the oven temperature knob to
OFF once broiling is complete.
BROILING TIPS
• If desired, marinate meats or chicken before
broiling or brush with barbecue sauce in the last
5 - 10 minutes of cooking.
• When arranging food on a pan, do not let fatty
edges hang over the sides as the dripping fat
will soil the oven as it cooks.
OVEN BAKING AND ROASTING
1. Position the shelves in the oven. If cooking on
two shelves at the same time, stagger the pans
for the best heat circulation.
2. Close the oven door. Turn the function selector
knob to bake. Turn oven temperature knob to the
desired temperature.
3. Allow the oven to preheat if required.
4. Place the food on the center of the oven shelf.
Allow at least 2 inches between the end of the
pan and the oven wall or any adjacent pans.
5. Check the food regularly. Remove once done
and ensure the oven is turned off.
BAKING AND ROASTING TIPS
• Follow a tested recipe and measure the
ingredients carefully. If you are using a package
mix, follow label directions.
• Do not open the oven door while baking or
roasting. Heat will be lost and the cook time
might need to be extended. If you must open the
door, open it partially and close it as quickly as
possible.
• Roasting is cooking by dry heat. Tender meat
or poultry can be roasted uncovered. Roasting
temperatures, which should be low and steady,
keep spattering to a minimum. When roasting,
it is not necessary to sear, baste, cover, or add
water to the meat.
• Frozen roasts of meat can be cooked without
thawing, but allow 10 to 25 minutes of
additional time per pound of meat (10 minutes
per pound for roasts under 5 pounds, more time
for larger roasts).
• Thaw frozen poultry before roasting to ensure
even cooking. Some commercial frozen poultry
can be cooked successfully without thawing.
Follow directions given on package label.

11
OPERATING INSTRUCTIONS
OVEN SHELVES
To remove the shelves from the oven, pull the shelf
outward, tilt the front end upward and pull it out.
To replace the shelves, place the shelf on the support
with the stop locks facing up and toward the back of
the oven. Tilt up the front and push the shelf toward
the back of the oven until it goes past the bump on
the shelf support, then lower the front of the shelf
and push it all the way into the oven.
The oven has three different shelf support positions
to accommodate different cooking requirements.
SHELF POSITIONS
• Most baking is done on the second or third shelf
position from the bottom of the oven.
• When baking multiple items, use two shelves
positioned on the second and third shelf
supports from the bottom of the oven.
• Bake angel food cakes on the fi rst shelf position
from the bottom of the oven.
• Roasting is usually done on the bottom shelf
position.
Temperature Conversions
Fahrenheit 140 150 170 200 250 275 300 325 350 375 400 425 450 475 500 525 550
Celsius 60 65 75 95 120 135 150 160 175 190 205 220 230 245 260 275 290

12
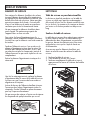
CARE & MAINTENANCE
SURFACE ELEMENTS
To clean the surface heating elements, turn the
temperature control knob to the highest setting for
one minute; this will burn off any food residue. Note
that this could cause smoke, it is advisable to open
a window or turn on a fan to avoid smoke build up.
Do not immerse the heating elements in liquids of
any kind. Do not put any part of the appliance into
a dishwasher.
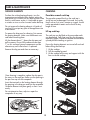
To remove the drip pans for cleaning, fi rst remove
the heating elements. Make sure the elements are
cool before touching them.
Lift the element about 1” above the drip pan and
pull to remove. Do not lift the element more than
1” as this can bend internal components and the
element may not lie fl at when it is replaced.
Remove the drip pan and clean as necessary.
Once cleaning is complete, replace the drip pan in
the recess in the cook top. Make sure the opening in
the pan lines up with the receptacle.
Insert the terminals on the heating element through
the opening in the drip pan and into the receptacle.
Guide the element into place gently so that is rests
evenly.
Do not attempt to clean, adjust or repair the
receptacles in any way.
CLEANING
Porcelain enamel cook top
The porcelain enamel fi nish on the cook top is
sturdy but can be damaged if misused. Any acidic
foods such as fruit juices, tomato or vinegar, should
not be permitted to remain on the fi nish for any
length of time.
Lift up cook top
The cook top can be lifted so the area underneath
can be cleaned. Spills that over fl ow the drip pans,
especially grease, should be cleaned to avoid build
up and possible smoking or ignition.
Ensure the heating elements are turned off and cool
before lifting the cook top.
1. Lift the cooktop.
2. Pull the cooktop forward.
3. Lift the cooktop all the way and support with the
bars inside the cooktop.

CARE & MAINTENANCE
13
Oven shelves
Clean the shelves with an abrasive cleaner or steel
wool. After cleaning, rinse the shelves with clean
water and dry with a clean cloth.
Oven heating elements
Do not clean the bake element or the broil element.
Any food residue will burn off when the elements
are heated.
Control knobs
The control knobs may be removed for easier
cleaning. Make sure the knobs are in the “OFF”
position and then pull straight off the stems for
cleaning.
The knobs can be cleaned by hand. Make sure the
insides of the knobs are dry before replacing on the
appliance.
Painted surfaces
The painted surfaces include the sides, the control
panel and the door. Clean these with soap and
water or a vinegar and water solution.
Do not use commercial oven cleaners, cleansing
powders, steel wool or harsh abrasives on any
painted surface.
Porcelain oven interior
With proper care, the porcelain enamel interior will
retain its fi nish for many years.
Soap and water can be used to clean the interior.
Heavy splattering or spills may require cleaning
with a mild abrasive cleaner.
Do not allow spills with high acid content such as
milk, tomatoes, fruit juices or pie fi lling, to remain
on the surface. They may cause dull spots even after
cleaning.
Household ammonia may make cleaning easier.
Place 1/2 cup of ammonia in a shallow glass pan
and leave in a cold oven over night. The ammonia
fumes will help loosen burned on grease and food.
Cautions about using spray-on oven cleaners
Do not spray oven cleaner on the electrical controls
and switches as it could cause a short circuit and
result in sparking or fi re.
Do not spray oven cleaner directly onto the oven
heating elements.
Do not allow a fi lm from the oven cleaner to remain
on the temperature sensor as it could cause the oven
to heat improperly. The sensor is located on the rear
of the oven. Carefully wipe the bulb clean after each
oven cleaning, being careful not to move the sensor
since a change in its position could affect how the
oven bakes.
Do not spray oven cleaner on the outside of the
oven door, handles or any exterior surface of the
oven, cabinet or painted surfaces. The cleaner can
damage these surfaces.

CARE & MAINTENANCE
14
REMOVABLE OVEN DOOR
The oven door is removable but it is heavy. It
is recommended that at least two people work
together to remove it.
To remove the door:
1. Open the door to the full open position.
2. Pull the hinge locks up over the hinge hooks on
both sides.
3. Grasp the door fi rmly on both sides, lift slightly
and pull it straight out and away from the oven.
To replace the door:
1. Firmly grasp both sides of the door at the top.
2. Insert and seat the upper and lower hinge arms
into the oven slots.
3. Push the hinge locks down from the hinge hooks.
4. Close the oven door and make sure it is working
properly. If it seems uneven or does not close
completely, remove it again and repeat the steps
to replace it.
Note: Do not attempt to close the door until it is
properly installed. The hinges could be damaged.
REMOVABLE STORAGE DRAWER
To clean the lower storage drawer, pull it out until it
cannot be pulled any further and then lift upwards.
To replace the storage drawer in the appliance,
place the shelf on the side rails and push inward.
OVEN LIGHT REPLACEMENT
Important: Before replacing the oven light bulb,
make sure the electrical power is disconnected from
the appliance. Failure to do so may result in electric
shock or burn.
Be sure to let the light cover and bulb cool
completely before replacing.
Removing the oven door can make this process
easier.
To replace the light bulb:
1. Remove the protective light cover. Do not remove
any screws to remove the light cover.
2. Do not touch the light bulb with a wet cloth.
Replace the light bulb with an appliance light
bulb suitable for high temperature and having
the same specifi cations: 230V, 60Hz, 25W, G9.
3. Replace the protective cover.
Important note: It is normal for the interior light to
be on during operation of the oven.
GLASS DOOR WINDOW
To clean the outside of the glass door window, use a
glass cleaner. Rinse and polish with a dry cloth.
Avoid scratching or impacting the glass window.
Doing so may cause the glass to break.

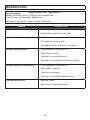
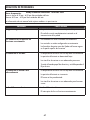
PROBLEM POSSIBLE CAUSE
No power • A fuse may be blown or the circuit breaker tripped
• Plug not fully inserted into the wall outlet
Surface elements not working properly • The elements are not properly installed
• The controls are not set correctly
• The drip pans are not set securely in the cook top
Food does not broil properly • Oven temperature is not properly set
• Shelf position is too low
• Cookware is not suited for broiling
• Aluminum foil is being used and is blocking air fl ow
Food does not bake or roast properly • Oven temperature is not properly set
• Shelf position is incorrect
• Oven was not pre-heated
• Cookware is not suited for baking or roasting
Oven light does not work • Light bulb is loose
• Light switch is not operating correctly
TROUBLESHOOTING
Danby Consumer Care: 1-800-263-2629
Hours of operation:
Monday to Thursday 8:30 am - 6:00 pm Eastern Standard Time
Friday 8:30 am - 4:00 pm Eastern Standard Time
Information in this manual is subject to change without notice.
15

LIMITED IN-HOME APPLIANCE WARRANTY
This quality product is warranted to be free from manufacturer’s defects in material and workmanship, provided that the unit is used under the normal operating
conditions intended by the manufacturer.
This warranty is available only to the person to whom the unit was originally sold by Danby Products Limited (Canada) or Danby Products Inc. (U.S.A.) (hereafter
“Danby”) or by an authorized distributor of Danby, and is non-transferable.
TERMS OF WARRANTY
Plastic parts, are warranted for thirty (30) days only from purchase date, with no extensions provided.
First Year
During the rst twelve (12) months, any functional parts of this product found to be defective, will be repaired or replaced, at warrantor’s
option, at no charge to the ORIGINAL purchaser.
To obtain
Danby reserves the right to limit the boundaries of “In Home Service” to the proximity of an Authorized Service Depot. Any app liance
Service
requiring service outside the limited boundaries of “In Home Service” , it will be the consumer’s responsibility to transport the appliance (at
their own expense) to the original retailer (point of purchase) or a service depot for repair. See “Boundaries of In Home Serv ice” below.
Contact your dealer from whom your unit was purchased, or contact your nearest authorized Danby service depot, where service
must be performed by a qualied service technician.
If service is performed on the units by anyone other than an authorized service depot, or the unit is used for commercial appli cation, all
obligations of Danby under this warranty shall be void.
Boundaries of
If the appliance is installed in a location that is 100 kilometers (62 miles) or more from the nearest service center your unit must be
In Home Service
delivered to the nearest authorized Danby Service Depot, as service must only be performed by a technician qualied and certif ied for
warranty service by Danby. Transportation charges to and from the service location are not protected by this warranty and are t he
responsibility of the purchaser.
Nothing within this warranty shall imply that Danby will be responsible or liable for any spoilage or damage to food or other c ontents of this appliance, whether due
to any defect of the appliance, or its use, whether proper or improper.
EXCLUSIONS
Save as herein provided, Danby, there are no other warranties, conditions, representations or guarantees, express or implied, m ade or intended by Danby or its
authorized distributors and all other warranties, conditions, representations or guarantees, including any warranties, conditio ns, representations or guarantees
under any Sale of Goods Act or like legislation or statue is hereby expressly excluded. Save as herein provided, Danby shall no t be responsible for any damages
to persons or property, including the unit itself, howsoever caused or any consequential damages arising from the malfunction o f the unit and by the purchase of
the unit, the purchaser does hereby agree to indemnify and hold harmless Danby from any claim for damages to persons or propert y caused by the unit.
GENERAL PROVISIONS
No warranty or insurance herein contained or set out shall apply when damage or repair is caused by any of the following:
1) Power failure.
2) Damage in transit or when moving the appliance.
3) Improper power supply such as low voltage, defective house wiring or inadequate fuses.
4) Accident, alteration, abuse or misuse of the appliance such as inadequate air circulation in the room or abnormal operating con ditions
(extremely high or low room temperature).
5) Use for commercial or industrial purposes (ie. If the appliance is not installed in a domestic residence).
6) Fire, water damage, theft, war, riot, hostility, acts of God such as hurricanes, oods etc.
7) Service calls resulting in customer education.
8) Improper Installation (ie. Building-in of a free standing appliance or using an appliance outdoors that is not approved for out door application).
Proof of purchase date will be required for warranty claims; so, please retain bills of sale. In the event warranty service is required, present this document to our
AUTHORIZED SERVICE DEPOT.
Danby Products Limited
PO Box 1778, Guelph, Ontario, Canada N1H 6Z9
Telephone: (519) 837-0920 FAX: (519) 837-0449
Danby Products Inc.
PO Box 669, Findlay, Ohio, U.S.A. 45840
Telephone: (419) 425-8627 FAX: (419) 425-8629
04/09
1-800-263-2629
Warranty Service
In-home
Danby reserves the right to limit the boundaries of “In Home Service” to the proximity of an authorized service
depot. Any appliance requiring service outside the limited boundaries of “In Home Service”, will be the consumer’s
responsibility to transport at their own expense to the original point of purchase or a service depot for repair. If the
appliance is installed in a location that is 100 kilometers (62 miles) or more from the nearest service center, it must
be delivered to the nearest authorized Danby Service Depot by the purchaser.
Transportation charges to and from the service location are not protected by this warranty and are the
responsibility of the purchaser.
During the first twenty four (24) months, any functional parts of this product found to be defective, will be repaired
or replaced, at warrantor’s option, at no charge to the original purchaser.
Contact the dealer where the unit was purchased, or contact the nearest authorized Danby service depot, where
service must be performed by a qualified service technician. If service is performed on the unit by anyone other
than an authorized service depot, all obligations of Danby under this warranty shall be void.
First 24 months
To obtain service
Boundaries of
in-home service
LIMITED “IN HOME” WARRANTY
This quality product is warranted to be free from manufacturer’s defects in material and workmanship, provided that the unit is used
under the normal operating conditions intended by the manufacturer.
This warranty is available only to the person to whom the unit was originally sold by Danby Products Limited (Canada) or Danby
Products Inc. (U.S.A.) (hereafter “Danby”) or by an authorized distributor of Danby, and is non-transferable.
TERMS OF WARRANTY
Plastic parts are warranted for thirty (30) days from the date of purchase, with no extensions provided.
Nothing within this warranty shall imply that Danby will be responsible or liable for any spoilage or damage to food or other
contents of this appliance, whether due to any defect of the appliance, or its use, whether proper or improper.
EXCLUSIONS
Save as herein provided, by Danby, there are no other warranties, conditions, representations or guarantees, express or implied, made
or intended by Danby or its authorized distributors and all other warranties, conditions, representations or guarantees, including any
warranties, conditions, representations or guarantees under any Sale of Goods Act or like legislation or statute is hereby expressly
excluded. Save as herein provided, Danby shall not be responsible for any damages to persons or property, including the unit itself,
howsoever caused or any consequential damages arising from the malfunction of the unit and by the purchase of the unit, the
purchaser does hereby agree to indemnify and hold harmless Danby from any claim for damages to persons or property caused by
the unit.
GENERAL PROVISIONS
No warranty or insurance herein contained or set out shall apply when damage or repair is caused by any of the following:
1) Power failure.
2) Damage in transit or when moving the appliance.
3) Improper power supply such as low voltage, defective house wiring or inadequate fuses.
4) Accident, alteration, abuse or misuse of the appliance such as inadequate air circulation in the room or abnormal operating
conditions (ie. extremely high or low room temperature).
5) Use for commercial or industrial purposes (ie. If the appliance is not installed in a domestic residence).
6) Fire, water damage, theft, war, riot, hostility, acts of God such as hurricanes, floods etc.
7) Service calls resulting in customer education.
8) Improper Installation (ie. Building-in of a free standing appliance or using an appliance outdoors that is not approved for outdoor
application, including but not limited to: garages, patios, porches or anywhere that is not properly insulated or climate controlled).
Proof of purchase date will be required for warranty claims; retain bills of sale. In the event that warranty service is required, present
the proof of purchase to our authorized service depot.
Warranty Service
In Home
Danby Products Limited
PO Box 1778, Guelph, Ontario, Canada N1H 6Z9
Telephone: (519) 837-0920 FAX: (519) 837-0449
Danby Products Inc.
PO Box 669, Findlay, Ohio, U.S.A. 45840
Telephone: (419) 425-8627 FAX: (419) 425-8629
1-800-263-2629
04/17

17
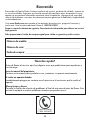
Bienvenue
Bienvenue à la famille Danby. Nous sommes fi ers de la qualité de nos produits et nous croyons au
service fi able. Nous vous suggérons de lire ce manual d’utilisation avant de brancher votre nouvel
appareil, car il contient des informations inportantes sur l’utilisation, la sécurité, le dépannage et
la maintenance, afi n d’assurer la fi abilité et la longévité de votre appareil.
Visitez www.Danby.com pour accéder aux outils d’autoservice, aux FAQ et bien plus encore. Pour
obtenir de l’aide supplémentaire, composez le 1-800-263-2629.
Notez les informations ci-dessous; Vous aurez besoin de cette information pour obtenir un
service sous garantie.
Vous devez fournir le reçu d’achat original pour valider votre garantie et recevoir le service.
Numéro de modèle : _____________________________________________
Numéro de serie : _______________________________________________
Date d’achat : __________________________________________________
Besoin d’assistance?
Avant d’appeler pour le service, voici quelques choses que vous pouvez faire pour nous
aider à mieux vous servir.
Lire ce manuel du propriétaire :
Il contient des instructions pour vous aider à utiliser et à entretenir votre appareil
correctement.
Si vous recevez un appareil endommagé :
Contactez immédiatement le revendeur ou l’entrepreneur qui vous a vendu l’appareil.
Gagnez du temps et de l’argent :
Avant d’appeler pour le service, consultez la section de dépannage à la fi n de ce
manuel. Cette section vous aidera à résoudre les problèmes courants pouvant survenir.
1-800-26- Danby
(1-800-263-2629)

AVERTISSEMENT - RISQUE DE BASCULE
• Un enfant ou un adulte peut faire basculer l’appareil et être tué.
• Vérifi ez que le support anti-renversement est correctement installé sur le sol.
• Assurez-vous que le support anti-renversement est ré-engagé lorsque la cuisinière est déplacée.
• Ne pas utiliser la cuisinière sans le support anti-renversement en place et engagé.
• Si ces précautions ne sont pas respectées, cela peut entraîner la mort ou des brûlures graves chez les
enfants ou les adultes.
AVERTISSEMENT
SUFFOCATION ET RISQUE D’ENTRAPPEMENT D’ENFANT
Afi n d’éviter tout risque de piégeage de l’enfant, veuillez prendre les précautions
suivantes avant de jeter l’appareil.
• Enlevez complètement la porte du four
• Ne laissez jamais les enfants utiliser, jouer ou ramper dans la cuisinière électrique
GARDEZ CES INSTRUCTIONS!
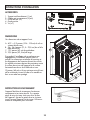
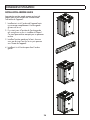
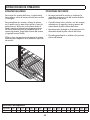
SUPPORT
Le support anti-renversement peut être installé sur
la jambe arrière gauche ou droite en suivant les
instructions ci-dessous.
1. Placez le support antibasculement sur le sol où
la cuisinière sera installée.
2. Marquez les emplacements des deux trous dans
le support anti-renversement.
3. Utilisez un foret de maçonnerie de 5/16 po
pour percer un trou dans le sol et insérez
l’ancrage en plastique fourni.
4. Fixez le support au sol à l’aide des vis fournies.
5. Faites glisser la cuisinière en position, en vous
assurant que le support antibasculement est
positionné sur le pied arrière de l’appareil,
comme indiqué sur les images ci-dessous.
1
2
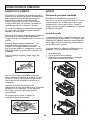
CHAÎNE
Deux chaînes anti-basculement doivent être
installées des deux côtés de l’appareil.
1. Vissez les chaînes dans les murs de chaque côté
de l’emplacement de l’appareil.
2. Fixez les autres extrémités des chaînes sur les
côtés de l’appareil à l’aide d’une vis et d’un
écrou de blocage.
SUPPORT ANTI-BASCULEMENT
Pour réduire le risque de basculement de la cuisinière en raison d’une utilisation anormale ou d’un
chargement incorrect de la porte, la cuisinière doit être sécurisée en installant un dispositif anti-
basculement. Deux dispositifs anti-renversement sont inclus avec cet appareil.
Remarque: Si la cuisinière est déplacée, le support anti-renversement doit être retiré et installé au nouvel
emplacement.
Consignes de sécurité importantes
LIRE ET SUIVRE TOUTES LES INSTRUCTIONS DE SÉCURITÉ

19
DANGER - INCENDIE DE GRAISSE
En cas d’incendie, ne prenez jamais de casserole
ou de casserole en feu. Éteignez le brûleur s’il
est sécuritaire de le faire. Éteignez le feu avec un
extincteur à poudre chimique ou à mousse.
Ne pas utiliser d’eau sur les feux de graisse.
L’eau répandra la graisse et n’éteindra pas le feu.
Étouffez le feu avec un couvercle hermétique, une
plaque à biscuits ou un plateau plat ou utilisez un
extincteur à poudre ou à mousse.
En cas de feu dans le four pendant la cuisson,
étouffez-le en fermant la porte du four et en
l’éteignant ou utilisez un extincteur à poudre
chimique ou à mousse.
DANGER - RISQUE D’INCENDIE
• Il est recommandé de connecter cet appareil à un
circuit séparé qui n’est partagé avec aucun autre
appareil.
• Ne nettoyez jamais les pièces de l’appareil
avec des liquides infl ammables. Ces émanations
peuvent créer un risque d’incendie ou
d’explosion. N’utilisez ni ne stockez jamais
d’essence ou d’autres liquides ou vapeurs
infl ammables à l’intérieur ou à proximité de cet
appareil. Sinon, vous risqueriez de provoquer un
incendie ou une explosion.
• Avant de nettoyer ou d’entretenir cet appareil,
débranchez-le complètement de la prise de
courant. Ne pas le faire peut entraîner un choc
électrique ou la mort.
• N’essayez pas de réparer ou de remplacer
une partie de votre appareil à moins que cela
ne soit spécifi quement recommandé dans ce
manuel. Tout autre entretien doit être confi é à un
technicien qualifi é.
• Pour votre sécurité, cet appareil ne doit jamais
être utilisé comme source de chaleur ou
comme chauffage d’appoint. Les éléments de
la cuisinière ne doivent pas être utilisés sans
batterie de cuisine appropriée.
• Toutes les ouvertures dans le mur derrière
l’appareil et le sol sous l’appareil doivent être
scellées.
• Gardez la zone autour de l’appareil dégagée et
exempte de matériaux combustibles, d’essence et
d’autres vapeurs infl ammables.
• Ne pas obstruer le fl ux d’air autour de l’appareil.
• Débranchez toujours l’alimentation électrique de
l’appareil avant tout entretien.
• N’utilisez jamais votre appareil pour chauffer ou
chauffer la pièce.
• Stockage dans ou sur l’appareil: les matériaux
infl ammables ne doivent pas être stockés dans un
four ou à proximité de brûleurs de surface.
AVIS - AVANT LA PREMIÈRE UTILISATION
Avant d’utiliser cette cuisinière pour la première
fois, les éléments chauffants ont un revêtement
protecteur qui doit être brûlé avant d’être utilisé.
Pour faire ça:
• Ouvrez la porte du four et réglez le bouton de
contrôle de la température à 450°F.
• Tournez le sélecteur de fonction sur l’élément
de cuisson et l’élément de gril séparément
pendant environ 15 minutes.
• Il est important d’assurer une ventilation
adéquate pendant cette période.
Les brûleurs ont également un revêtement
protecteur qui doit être brûlé avant utilisation.
Pour faire ça:
• Réglez le sélecteur de brûleur sur le réglage
maximum pendant 5 minutes.
• Il est important d’assurer une ventilation
adéquate pendant cette période.
• Éteignez les brûleurs au bout de 5 minutes et
laissez-les refroidir complètement.
Consignes de sécurité importantes
LIRE ET SUIVRE TOUTES LES INSTRUCTIONS DE SÉCURITÉ
GARDEZ CES INSTRUCTIONS!
La page est en cours de chargement...
La page est en cours de chargement...
La page est en cours de chargement...
La page est en cours de chargement...
La page est en cours de chargement...
La page est en cours de chargement...
La page est en cours de chargement...
La page est en cours de chargement...
La page est en cours de chargement...
La page est en cours de chargement...
La page est en cours de chargement...
La page est en cours de chargement...
La page est en cours de chargement...
La page est en cours de chargement...
La page est en cours de chargement...
La page est en cours de chargement...
La page est en cours de chargement...
La page est en cours de chargement...
La page est en cours de chargement...
La page est en cours de chargement...
La page est en cours de chargement...
La page est en cours de chargement...
La page est en cours de chargement...
La page est en cours de chargement...
La page est en cours de chargement...
La page est en cours de chargement...
La page est en cours de chargement...
La page est en cours de chargement...
La page est en cours de chargement...
La page est en cours de chargement...
La page est en cours de chargement...
La page est en cours de chargement...
-
 1
1
-
 2
2
-
 3
3
-
 4
4
-
 5
5
-
 6
6
-
 7
7
-
 8
8
-
 9
9
-
 10
10
-
 11
11
-
 12
12
-
 13
13
-
 14
14
-
 15
15
-
 16
16
-
 17
17
-
 18
18
-
 19
19
-
 20
20
-
 21
21
-
 22
22
-
 23
23
-
 24
24
-
 25
25
-
 26
26
-
 27
27
-
 28
28
-
 29
29
-
 30
30
-
 31
31
-
 32
32
-
 33
33
-
 34
34
-
 35
35
-
 36
36
-
 37
37
-
 38
38
-
 39
39
-
 40
40
-
 41
41
-
 42
42
-
 43
43
-
 44
44
-
 45
45
-
 46
46
-
 47
47
-
 48
48
-
 49
49
-
 50
50
-
 51
51
-
 52
52


Danby DERM240WC Le manuel du propriétaire
- Taper
- Le manuel du propriétaire
dans d''autres langues
- English: Danby DERM240WC Owner's manual
- español: Danby DERM240WC El manual del propietario
Documents connexes
Autres documents
-
Bertazzoni MAST365DFMXE DL 3378edb90b4448c3f3f3947d0c60
-
Bertazzoni PROF244GASXELP Le manuel du propriétaire
-
Bertazzoni PROF304INMXE Le manuel du propriétaire
-
-
Bertazzoni MAST366GASXT Use & Care Full Gas Ranges
-
Electrolux High Speed Grill Manuel utilisateur