
USER MANUAL
Safety Precautions
Operating Instructions
Installation Instructions
Care and Cleaning
Troubleshooting Tips
Warning notices: Before using this product,
please read this manual carefully and keep
it for future reference.
change without prior notice for product
improvement. Consult with your dealer or
the manufacturer for details.
moc.elytsefilabihsot-su9102 - 10 - B noisrev
S
a
O
I
n
C
a
T
r
TDDP2213ES2C
TDDP5013ES2C

Page 2 User Manual
Read This Manual
Inside you’ll find many helpful hints on how to use and maintain your dehumidifier properly. Just
a little preventive care on your part can save you a great deal of time and money over the life of
your dehumidifier. You’ll find many answers to common problems in the troubleshooting tips -
you should be able to fix most of them quickly before calling service. These instructions may not
cover every possible condition of use, so common sense and attention to safety is required when
installing, operating and maintaining this product.
User Manual
CAUTION
Safety Precautions ..................................................................................................................... 3
Operating Instructions ............................................................................................................. 6
Installation Instructions ......................................................................................................... 11
Care and Cleaning ................................................................................................................... 12
Troubleshooting Tips .............................................................................................................. 13
• Contact an authorized service technician for repair or maintenance of this unit.
• The unit is not intended for use by young children or persons with reduced physical,
sensory or mental capabilities without supervision.
• Young children should be supervised to ensure that they do not play with the unit.
• If the power cord needs to be replaced, please contact our consumer service or an
authorized technician.
• Electrical installation, if needed, must be performed in accordance to national regulation
standards by quali ed personnel only.

User Manual Page 3
SAFETY PRECAUTIONS
WARNING: This symbol indicates the possibility of death or serious injury.
CAUTION: This symbol indicates the possibility of injury or damage to property.
Safety
Precautions
To prevent injury to the user or other people and property damage, the following instructions
must be followed. Incorrect operation due to ignoring of instructions may cause harm or damage.
The level of risk is shown by the following indications.
WARNING
• Plug in power cord plug properly.
Otherwise, it may cause electric shock or re due to excess heat generation.
• Do not modify power cord length or share the outlet with other appliances as it may
cause electric shock or re due to overheating.
• Always ensure e ective grounding.
Incorrect grounding may cause electric shock.
• Unplug the unit if you notice unusual sounds or smells, or smoke comes from it.
A damaged product may cause re and electric shock.
• Ventilate room before operating the unit if there is a gas leak from other appliances.
• Do not operate or stop the unit by inserting or pulling out the power cord plug.
It may cause electric shock.
• Do not allow water to come into contact with any electric parts.
It may cause failure or electric shock.
• Do not use the wall outlet if it is loose or damaged.
It may cause re and electric shock.
• Do not use or keep the power cord close to heating appliances or heat sources such
as replaces.
It may cause re and electric shock.
• Do not disassemble or modify unit.
It may cause failure and electric shock.
• Do not damage or use an alternate power cord.
It may cause re and electric shock.
• If the power cord is damaged, it must be replaced by the manufacturer or an
authorized service center or a similarly quali ed person in order to avoid electrical risk.
• Do not use the unit near ammable gas or combustibles, such as gasoline, benzene,
thinner, etc.
It may cause re.
• Before cleaning, turn o the power and unplug the unit.
• Do not take the water bucket out during operation, the bucket full protection may
be activated and risk electric shock.

Page 4 User Manual
CAUTION
Safety
Precautions
• Do not use the unit in small spaces.
Lack of ventilation can cause overheating and re.
• Do not use in places where water may splash onto the unit.
Water may enter the unit and degrade the insulation. It may cause an electric shock or re.
• Place the unit on a level, sturdy section of the oor.
If the unit falls over, it may cause water to spill and damage belongings, or cause
electrical shock or re.
• Never insert your nger or other foreign objects into grills or openings. Take special care
to warn children of these dangers.
It may cause failure or electric shock.
• Do not climb up on or sit on the unit.
You may be injured if you fall or if the unit falls over.
• Always insert the lters securely, and take caution to avoid injuries to hand and ngers.
Clean lter once every two weeks.
• If water enters the unit, turn the unit o and disconnect the power, contact a quali ed
service technician.
• Do not place ower vases or other water containers on top of the unit.
Water may spill inside the unit, causing insulation failure and electrical shock or re.
• If the unit is knocked over during use, turn o the unit and unplug it from the main
power supply immediately. Visually inspect the unit to ensure there is no damage. If you
suspect the unit has been damaged, contact a customer service or a quali ed technician.
• In a thunderstorm, the power must be cut o to avoid damage to the unit due to
lightning.
• Do not run cord under carpeting. Do not cover cord with throw rugs, runners, or similar
coverings. Do not route cord under furniture or appliances. Arrange cord away from
tra c area and where it will not be tripped over.

User Manual Page 5
Safety
Precautions
WARNING - Electrical Information
• The manufacturer’s nameplate is located on the rear panel of the unit and contains
electrical and other technical data speci c to this unit.
• Be sure the unit is properly grounded. To minimize shock and re hazards, proper
grounding is important. The power cord is equipped with a three-prong grounding
plug for protection against shock hazards.
• Your unit must be used in a properly grounded wall receptacle. If the wall receptacle
you intend to use is not adequately grounded or protected by a time delay fuse or
circuit breaker, have a quali ed electrician install the proper receptacle.
• Ensure the receptacle is accessible after the unit installation.
• Do not use extension cords or an adapter plugs with this unit. However, if it is
necessary to use an extension cord, use an approved “dehumidi er” extension cord
only (available at most local hardware stores).
• To avoid the possibility of personal injury, always disconnect the the unit from power
supply, before installing and/or servicing.
WARNING - For your safety
• Do not store or use gasoline or other ammable vapors and liquids in the vicinity of
this or any other appliance.
• Avoid re hazard or electric shock. Do not use an extension cord or an adaptor plug.
Do not remove any prong from the power cord.

Page 6 User Manual
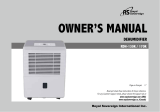
Product Overview
Acessories
Control panel
Panel
Handle
(both sides)
Air intake
Air filter
(behind the grill)
Water bucket
Water level
window
Caster Power cord
Power plug
Air outlet
Continuous
drain hose outlet Power cord buckle
(placed in the water
bucket, used only
when storing the unit.)
Installed as shown below
RearFront
Power cord buckle (1 pc)
Insert the power cord buckle into the unit.
Fig. 1
Fig. 2
NOTE
All the pictures in this manual are for illustrative
purposes only. The actual shape of the unit
you purchased may be slightly di erent, but its
operations and fuctions are similar.
OPERATING INSTRUCTIONS
Operating
Instructions

User Manual Page 7
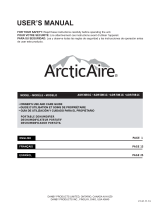
Key Pad Features
Control Pads
Operating
Instructions
Comfort dehumidifying
operation on indicator light
Bucket full
indicator
light
Timer on/
indicator
light
High fan
indicator
light
Continuous operation
on indicator light
Auto defrost
operation
on indicator
light
lter
indicator
light
LED
Display
When you push the button to change operation modes, the unit will make a beep sound to indicate
that it is changing modes.
CAUTION
Clean your unit occasionally to keep it looking new. Be sure to unplug the unit before
cleaning to prevent shock or re hazards.
NOTE
The appearance of the control panel may vary slightly by model.
COMFORT Button
Press to activate the comfort dehumidifying
operation. The dehumidier will automatically
set to a preset humidity and fan level. To exit
comfort mode, adjust the humidity to desired
level.
NOTE
When CONTINUOUS function is turned on,
set humidity level is automatic and cannot
be changed manually.
FILTER Button
This feature is a reminder to clean the Air Filter
for more operation. The LED (light)
will illuminate after 250 hours of fan motor
operation. To reset after cleaning the ter, press
the Filter button and the light will go o .
CONT (continuous) Button
Press to activate the continuous dehumidifying
operation.
PLEIN
FULL

Page 8 User Manual
TURBO Button
Control the Turbo speed. Press to select either
Turbo or normal fan speed. Set the Turbo control
to high for maximum moisture removal. When
room humidity is at your preferred level, it is
advised to turn o Turbo speed.
TIMER Button
Starts the Timer ON and Timer OFF function setting.
Up/Down Buttons ( / )
• Humidity Set Control Buttons
The humidity level can be set within a range
of 35% RH (Relative Humidity) to 85% RH
(Relative Humidity) in 5% increments.
For drier air, press the button and set to a
lower value (%).
For damper air, press the button and set a
higher value (%).
• TIMER Set Control Buttons
Use the and key buttons to set the Timer
ON or Timer OFF from 0 to 24 hours.
POWER Button
Press to turn the dehumidi er on and o .
LED Display
Shows the set % humidity level from 35% to 85%
or auto start/stop time (0 ~ 24) while setting,
then shows the actual (+/- 5% accuracy) room
% humidity level in a range of 30% RH (Relative
Humidity) to 90% RH (Relative Humidity).
Error Codes and Protection Code:
AS - Humidity sensor error - Unplug the unit
and plug it back in. If error persists, contact
Customer Service.
ES - Tube Temperature sensor of the evaporator
error - Unplug the unit and plug it back in. If
error persists, contact Customer Service.
P2 - Bucket is full or bucket is not in right
position - Empty the bucket and replace it
in the right position. (only available for the
unit with no pump feature.)
E3 - Unit malfunction - Unplug the unit and plug
it back in. If error persists, contact Customer
Service.
Eb - Bucket is removed or not in right position -
Replace the bucket in the right position. (only
available for the unit with pump feature.)
Bucket Full Light
Lights up when the bucket is ready to be emptied.
Auto Shut Off
The dehumidi er shuts o when the bucket is full,
or when the bucket is removed or not replaced in
the proper position. When the setting humidity is
reached, the compressor will be shut o
automatically. The fan motor will continue
operating additional 3 minutes.
Other Features
Auto Defrost
When frost builds up on the evaporator coils,
the compressor will cycle o and Auto Defrost
function will run automatically.
Wait 3 minutes before resuming operation
After the unit has stopped, it can not be restarted
in the rst 3 minutes to protect compressor
operation. The unit will restart automatically after
3 minutes.
Auto-Restart
If the unit stops unexpectedly due to a power cut,
it will restart with the previous function setting
automatically when the power resumes.
Operating
Instructions

User Manual Page 9
Removing Collected Water
There are two ways to remove collected water:
1. Use the bucket
• When the unit is o , if the bucket is full, the Full indicator
light will light.
• When the unit is on, if the bucket is full, the compressor and
the fan turn o , and the Full indicator light will light, the
digital display shows P2.
• Slowly pull out the bucket. Grip the left and right handles
securely, and carefully pull out straight so water does not
spill. Do not put the bucket on the as because the bottom of
the bucket is uneven. Otherwise water may be spilled.
• Throw away the water and reposition the bucket.
• The unit will restart operation when the bucket back in place.
1. Pull out the bucket.
2. Hold both sides of the
bucket evenly, and pull
it out from the unit.
Fig. 5
Setting the Timer ON and Timer OFF
• When the unit is on, rst press the Timer
button, the Timer OFF indicator light
illuminates. It indicates the Timer OFF program
is initiated. Press it again the Timer ON
indicator light illuminates.It indicates the Timer
ON is initiated.
• When the unit is o , rst press the Timer
button, the Timer ON indicator light
illuminates. It indicates the Timer ON program
is initiated. Press it again the Timer OFF
indicator light illuminates. It indicates the
Timer OFF is initiated.
• Press or hold the and key buttons to
change the Timer by 0.5 hour increments, up
to 10 hours, then at 1 hour increments up to
24 hours. The control will count down the time
remaining until start.
• The selected time will register in 5 seconds and
the system will automatically revert back to
display the previous humidity setting.
• When the Timer ON and Timer OFF times
are set, within the same program sequence,
indicator lights illuminate identifying both ON
and OFF times are now programmed.
•
Turning the unit ON or OFF at any time or
adjusting the timer setting to 0.0 will cancel
the Timer function.
•
When LED display window displays the code
of P2, the Auto Start/Stop function will also
be cancelled.
NOTES
•
When first using the dehumidifier, operate
the unit continuously 24 hours. Make sure
the plastic cover on the continuous drain
hose outlet install stightly properly so there
are no leaks.
•
This unit is designed to operate with a
working environment between 5°C/41°F
and 32°C/90°F.
•
Make sure the water bucket is positioned
correctly so that the unit can operate
properly. When the water in the bucket
reaches to a certain level, please be careful
to move the unit to avoid it spill.
Operating
Instructions

Page 10 User Manual
3. Pour the water out.
Fig. 6
NOTES
• When you remove the bucket, do not touch any parts inside
the unit. Doing so may damage the product.
• Be sure to push the bucket gently all the way into the unit.
• When the unit is on, if the bucket is removed, the compressor
and the fan turn o , then the unit will beep 8 times and the
digital display shows Eb.
• When the unit is off, if the bucket is removed, the unit will
beep 8 times and the digital display shows Eb.
NOTE
When the continuous draining feature is not being used,
remove the drain hose from the outlet, and dry the water in
the continuous drain hose outlet.
2. Continuous draining
• Water can be automatically emptied into a oor drain by
attaching the unit with a water hose (Id Ø 5/16”, not included)
with a female threaded end (ID: M = 1”, not included).
• Remove the plastic cover from the back drain outlet of the
unit and set aside, then insert the drain hose through the
drain outlet of the unit and lead the drain hose to the oor
drain or a suitable drainage facility. (See Fig. 7 and Fig. 8)
• When you remove the plastic cover, if there is some water in
the back drain outlet of the unit you must dry it. Make sure
the hose is secure so there are no leaks and the end of the
hose is level or down to let the water ow.
• Direct the hose toward the drain, making sure that there are
no kinks that will stop the warter owing.
• Select the desired humidity setting and fan speed on the
unit for continuous draining to start.
Fig. 7
Remove the
plastic cover
rotating counter-clockwise
Fig. 8
Drain hose
Removing Collected Water (cont.)
Operating
Instructions
NOTE
Do not use this operation when the outdoor temperature is
equal to or less than 32°F (0°C), otherwise water may freeze
causing blockages and the unit may cease to function properly.
Make sure to empty the bucket at least once a week when
using the pump draining feature. When the pump draining
feature is not being used, remove the pump drain hose from
the outlet.

User Manual Page 11
INSTALLATION INSTRUCTIONS
Installation
Instructions
Positioning the Unit
more than 16”
Air outlet
more than
16”
more than 8”
more than
8”
more than
8”
A dehumidier operating in a basement will have little or no eect in drying an adjacent enclosed
storage area, such as a closet, unless there is adequate circulation of air in and out of the area.
(See Fig. 9)
• Do not use outdoors.
• This dehumidifer is intended for indoor
residential applications only. This
dehumidier should not be used for
commercial or industrial applications.
• Place the dehumidier on a smooth, level
oor strong enough to support the unit
with a full bucket of water.
• Allow at least 8 inches of air space on all
sides of the unit for air circulation (at least
16 inches for air outlet).
• This unit is designed to operate with a
working environment between 5°C (41°F)
and 32°C (90°F), and between 30%(RH)
and 80%(RH).
The coils can become covered with frost at
at lower temperatures, which may reduce
performance.
• Place the unit away from any clothes dryer,
heater or radiator.
• Close all doors, windows and other outside
openings to the room.
Fig. 9

Page 12 User Manual
CARE AND CLEANING
Care and Cleaning
CAUTION
Turn the dehumidifier off and disconnect the plug from the wall before cleaning.
DO NOT operate the dehumidi er without a lter to avoid loss
of performance and damage to the unit.
1. Clean the Grill and Case
• Use water and a mild detergent. Do not use bleach or
abrasives.
• Do not splash water directly onto the unit. Doing so may
cause an electrical shock, cause the insulation to deteriorate,
or cause the unit to rust.
• The air intake and outlet may get dirty during operation, use
a vacuum cleaner or brush to clean.
2. Clean the bucket
Every few weeks, clean the bucket thoroughly to prevent
growth of mold, mildew and bacteria. Partially fill the bucket
with clean water and mild detergent. Swish it around in the
bucket, empty and rinse.
3. Clean the air filter
• To remove the lter, pull lter outwards (See Fig. 10).
• Wash the lter with clean water then dry.
• Re-install the lter, replace bucket.
4. When not using the unit for long time periods
• Before storing the unit, let it rest for one full day so that the
system can dry out naturally.
• Clean the unit, water bucket and air lter.
• Wrap the cord with the power cord buckle.
• Cover the unit with a plastic bag.
• Store the unit upright in a dry, well-ventilated place.
Fig. 10
NOTE
Do not use a dishwasher to clean the bucket.

User Manual Page 13
TROUBLESHOOTING TIPS
Troubleshooting
Tips
Before calling for service, review this list. It may save you time and money. This list includes common
occurrences that are not the result of defective workmanship or materials in this appliance.
Problem Solution
Unit does not start
Make sure the dehumidi ers plug is connected rmly into the wall outlet.
Check the house fuse/circuit breaker box.
Dehumidi er has reached its preset level or bucket is full.
Water bucket is not in the proper position.
Dehumidi er does
not dry the air as it
should
Not enough time to remove the moisture.
Make sure there are no curtains, blinds or furniture blocking the front or back of the
dehumidi er.
The humidity control may not be set low enough.
Check that all doors, windows and other openings are securely closed.
Room temperature is too low, below 41°F (5°C).
There is a water vapor source in the room.
The unit makes a
loud noise when
operating
Air lter may be dirty. Clean lter. Refer to Care and Cleaning section.
The unit is tilted instead of upright as it should be.
The oor surface is not level.
Frost appears on
the coils This is normal. The dehumidi er has Auto defrost feature.
Water on oor
Hose to connector or hose connection may be loose.
Intend to use the bucket to collect water, but the back drain plug is removed.
ES, AS, P2, Eb
and E3 appear in
the display
These are error codes and protection code. Check Operating Instructions.


Mesure de Sécurité
Instructions d’Utilisation
Instructions d’Installation
Entretien et nettoyage
Des conseils de dépannage
Avertissement : Avant d’utiliser ce produit,
veuillez lire attentivement ce manuel et le
conserver pour référence ultérieure.
La conception et les spécications sont
sujettes à modication sans préavis pour
améliorer le produit. Consultez votre
revendeur ou le fabricant pour plus de
détails.
us-toshibalifestyle.com
MANUEL
UTILISATEUR
Déshumidicateur
version B - 01 - 2019
TDDP2213ES2C
TDDP5013ES2C

Page 16 Guide d’Utilisateur
Lire Ce Manuel
À l'intérieur, vous trouverez de nombreux conseils utiles sur l'utilisation et l'entretien de votre
déshumidicateur. Un peu de soins préventifs de votre part peut vous faire économiser beaucoup
de temps et d’argent sur la durée de vie de votre déshumidicateur. Vous trouverez de
nombreuses solutions aux problèmes courants dans les conseils de dépannage. Vous devriez
pouvoir résoudre la plupart rapidement avant de contacter le service d'assistance. Ces
instructions ne peuvent pas couvrir toutes les conditions d’utilisation possibles ; vous devez donc
faire preuve de bon sens et de sécurité pour l'installation, l'utilisation et la maintenance de ce
produit.
Manuel Utilisateur
AVERTISSEMENT
Mesure de Sécurité ....................................................................................................................3
Instructions d’Utilisation .............................................................................................................6
Instructions d’Installation ........................................................................................................11
Entretien et Nettoyage ...............................................................................................................12
Des conseils de dépannage ........................................................................................................13
• Contactez un technicien de maintenance agréé pour la réparation ou l’entretien de cet appareil.
• L'appareil n'est pas destiné à être utilisé sans supervision par des jeunes enfants ou des
personnes ayant des capacité physiques, sensorielles ou mentales réduites.
• Les enfants doivent être surveillés pour s'assurer qu'ils ne jouent pas avec l'appareil.
• Si le cordon d'alimentation doit être remplacé, veuillez contacter notre service clientèle ou un
technicien agréé.
• Si nécessaire, l'installation électrique doit être eectuée conformément aux normes
réglementaires nationales et par un personnel qualié.

Page 17
MERSURE DE SÉCURITÉ
AVERTISSEMENT : Ce symbole indique la possibilité de blessures graves, voire mortelles.
AVERTISSEMENT : Ce symbole indique la possibilité de blessures ou de dommages matériels.
Mesure de
Sécurité
Pour éviter des blessures à l'utilisateur ou à d'autres personnes et des dommages matériels, les
instructions suivantes doivent être suivies. Un fonctionnement incorrect dû au non-respect des
instructions peut causer des dommages corporels ou des dommages à l’appareil. Le niveau de
risque est indiqué par les indications suivantes.
AVERTISSEMENT
• Branchez correctement le cordon d'alimentation.
Sinon, cela pourrait provoquer un choc électrique ou un incendie en raison de la génération de chaleur excessive.
• Ne modifiez pas la longueur du cordon d'alimentation et ne partagez pas la prise avec d'autres appareils, car cela
pourrait provoquer une décharge électrique ou un incendie en raison d'une surchauffe.
• Toujours assurer une mise à la terre efficace.
Une mise à la terre incorrecte peut provoquer un choc électrique.
• Débranchez l'appareil si vous remarquez des bruits ou des odeurs inhabituels ou si de la fumée s'en dégage. Un
produit endommagé peut provoquer un incendie et un choc électrique.
• Aérez la pièce avant de faire fonctionner l'appareil s'il y a une fuite de gaz provenant d'autres appareils.
• Ne faites pas fonctionner ni n'arrêtez l'appareil en insérant ou en débranchant le cordon d'alimentation. Cela
pourrait provoquer un choc électrique.
• Ne laissez pas l'eau entrer en contact avec des pièces électriques. Cela pourrait provoquer une panne ou un choc
électrique.
• N'utilisez pas la prise murale si elle est desserrée ou endommagée. Cela pourrait provoquer un incendie et un
choc électrique.
• N'utilisez pas et ne gardez pas le cordon d'alimentation à proximité d'appareils de chauffage ou de sources de
chaleur telles que des foyers.
Cela pourrait provoquer un incendie et un choc électrique.
• Ne pas démonter ni modifier l’unité.
Cela pourrait provoquer une panne et un choc électrique.
• Ne pas endommager ou utiliser un autre cordon d'alimentation. Cela pourrait provoquer un incendie et un choc
électrique.
• Si le cordon d’alimentation est endommagé, il doit être remplacé par le fabricant, un centre de service agréé ou une
personne de qualification similaire pour éviter tout risque électrique.
• N'utilisez pas l'appareil à proximité de gaz inflammable ou de matières combustibles telles que l'essence, le
benzène, les diluants, etc.
Cela pourrait provoquer un incendie.
• Avant le nettoyage, éteignez et débranchez l'appareil.
• Ne sortez pas le seau d'eau pendant le fonctionnement, la protection totale du seau pourrait être activée et
risquer de vous électrocuter.
Guide d’Utilisateur

Page 18
AVERTISSEMENT
Mesure de
Sécurité
• N'utilisez pas l'appareil dans de petits espaces.
Un manque de ventilation peut provoquer une surchauffe et un incendie.
• Ne pas utiliser dans des endroits où de l'eau pourrait éclabousser l'appareil.
De l'eau peut pénétrer dans l'appareil et dégrader l'isolation. Cela pourrait provoquer un choc électrique ou un incendie.
• Placez l'appareil sur une section plane et solide du sol.
Si l’appareil tombe, de l’eau pourrait se renverser et endommager des biens personnels, ou provoquer un choc
électrique ou un incendie.
• N'insérez jamais vos doigts ou d'autres objets étrangers dans les grilles ou les ouvertures. Faites
particulièrement attention aux enfants de ces dangers.
Cela pourrait provoquer une panne ou un choc électrique.
• Ne montez pas et ne vous asseyez pas sur l'appareil.
Vous pourriez être blessé si vous tombiez ou si l'unité tombait.
• Insérez toujours bien les filtres et faites attention à ne pas vous blesser les mains et les doigts. Nettoyez
le filtre une fois toutes les deux semaines.
• Si de l'eau pénètre dans l'appareil, éteignez-le et débranchez-le, contactez un technicien qualifié.
• Ne placez pas de vases à fleurs ou d’autres réservoirs d’eau sur le dessus de l’appareil.
De l'eau pourrait se répandre à l'intérieur de l'appareil, provoquant une défaillance de l'isolation et un choc
électrique ou un incendie.
• Si l’appareil est renversé pendant l'utilisation, éteignez l'appareil et débranchez-le immédiatement
de l'alimentation principale. Inspectez visuellement l'unité pour vous assurer qu'elle n'est pas
endommagée. Si vous pensez que l'appareil a été endommagé, contactez un service clientèle ou un
technicien qualifié.
• En cas d'orage, le courant doit être coupé pour éviter que l'appareil ne soit endommagé par l’éclair.
• Ne pas faire passer le cordon sous la moquette. Ne couvrez pas le cordon avec des carpettes, des
glissières ou des revêtements similaires. Ne pas acheminer le cordon sous des meubles ou des
appareils ménagers. Éloignez le cordon du secteur de la circulation et des endroits où il ne risque pas
de trébucher.
Guide d’Utilisateur

Page 19
Mesure de
Sécurité
AVERTISSEMENT - Informations électriques
• La plaque signalétique du fabricant est située sur le panneau arrière de l’appareil et contient les
données électriques et autres caractéristiques techniques spécifiques à cet appareil.
• Assurez-vous que l'appareil est correctement mis à la terre. Afin de minimiser les risques
d'électrocution et d'incendie, une mise à la terre appropriée est importante. Le cordon d'alimentation
est équipé d'une prise de terre à trois broches pour la protection contre les risques d'électrocution.
• Votre appareil doit être utilisé dans une prise murale correctement mise à la terre. Si la prise murale que
vous souhaitez utiliser n'est pas correctement mise à la terre ou protégée par un fusible temporisé ou
un disjoncteur, demandez à un électricien qualifié d'installer la prise appropriée.
• Assurez-vous que le réceptacle est accessible après l'installation de l'appareil.
• N'utilisez pas de rallonges ni d’adapteurs électriques avec cet appareil. Cependant, s'il est nécessaire
d'utiliser une rallonge, utilisez uniquement une rallonge approuvée « déshumidificateur » (disponible
dans la plupart des quincailleries locales).
• Pour éviter tout risque de blessure, débranchez toujours l’appareil de son alimentation électrique avant
de procéder à l’installation et / ou à l’entretien.
AVERTISSEMENT – Pour votre Sécurité
• N'entreposez pas et n'utilisez pas d'essence ou d'autres liquides ou vapeurs inflammables à proximité
de cet appareil ou de tout autre appareil.
•Évitez les risques d'incendie et de choc électrique N'utilisez pas de rallonge ni d'adapteur électrique.
Ne retirez aucune broche du cordon d'alimentation.
Guide d’Utilisateur

Page 20
INSTRUCTIONS D’UTILISATION
Panneau
Poignée
(deux côtés)
Prise d'air
Filtre à air
(derrière le gril)
Seau d'eau
Fenêtre de
niveau d'eau
Roulette
Cordon d’alimentation
Fiche d’alimentation
Sortie d’air
Sortie de tuyau de
vidange continue
Boucle de cordon
d'alimentation
(placée dans le seau
d'eau, utilisée
uniquement pour
stocker l'appareil.)
Installé comme indiqué ci-
dessous
Arrière Devant
Accessoires
Boucle de cordon d'alimentation (1 pièce)
Insérez la boucle du cordon d'alimentation dans
l'appareil.
Illustration 1
Illustration 2
NOTE
Toutes les images de ce manuel sont fournies à titre
indicatif uniquement. La forme réelle de l'appareil que
vous avez acheté peut-être légèrement différente,
mais son fonctionnement et ses fonctions sont
similaires.
Instructions
d’Utilisation
Vue d’ensemble des produits
INSTRUCTIONS D’UTILISATION
Panneau de contrôle
Guide d’Utilisateur
La page est en cours de chargement...
La page est en cours de chargement...
La page est en cours de chargement...
La page est en cours de chargement...
La page est en cours de chargement...
La page est en cours de chargement...
La page est en cours de chargement...
La page est en cours de chargement...
-
 1
1
-
2
-
3
-
4
-
5
-
6
-
7
-
8
-
9
-
10
-
11
-
12
-
13
-
14
-
15
-
16
-
17
-
18
-
19
-
20
-
21
-
22
-
23
-
24
-
25
-
26
-
27
-
28
- Catégorie
- Déshumidificateurs
- Taper
- Manuel utilisateur
- Ce manuel convient également à
Autres documents
-
 Royal Sovereign International RDH-170K Le manuel du propriétaire
-
BLACK+DECKER BDT30WTB Manuel utilisateur
-
Danby DDR45B1GP Manuel utilisateur
-
-
-
 Arctic Aire by Danby ADR50B1G Mode d'emploi
-
-
Danby Premiere DDR30B3WP Le manuel du propriétaire
-
commercial cool CCD25JW Manuel utilisateur

