BLACK+DECKER BDT30WTB Manuel utilisateur
- Catégorie
- Déshumidificateurs
- Taper
- Manuel utilisateur

INSTRUCTION MANUAL
PORTABLE DEHUMIDIFIER
Thank you for choosing BLACK+DECKER!
PLEASE READ BEFORE RETURNING THIS PRODUCT FOR
ANY REASON.
If you have a question or experience a problem with your BLACK+DECKER
purchase, go to www.blackanddecker.com/instantanswers
If you can’t find the answer or do not have access to the Internet, call
844-299-0879 from 10:30 a.m. to 6:30 p.m. EST Mon. - Fri. to speak with an
agent. Please have the catalog number available when you call.
SAVE THIS MANUAL FOR FUTURE REFERENCE.
CATALOG NUMBER
BDT20WTB
BDT30WTB
BDT40WTB
BDT50WTB
BDT50PWTB

Page 2
Thank you for purchasing our
BLACK+DECKER product. This
easy-to-use manual will guide you
in getting the best use of your
portable dehumidier.
Remember to record the model
and serial numbers. They are on a
label on the rear.
Staple your receipt to your manual.
You will need it to obtain warranty service.
Model number
Serial number
Date of purchase
PRODUCT REGISTRATION
CONTENTS
SAFETY INFORMATION
Important Safety Instructions ..........................................................................................................................................3-4
Grounding Instructions .........................................................................................................................................................4
Safety Guidelines ....................................................................................................................................................4
Power Cord Operation ..........................................................................................................................................4
SET UP & USE
Parts & Features ....................................................................................................................................................................... 5
Control Panel ............................................................................................................................................................ 6
Installation Guide .................................................................................................................................................... 7
Before First Operation .......................................................................................................................................... 8
Operation Instructions .................................................................................................................................... 9-14
Specications ..........................................................................................................................................................15
CLEANING & CARE ..............................................................................................................................................16
TROUBLE SHOOTING & WARRANTY
Before You Call For Service ...............................................................................................................................17
Customer Service ...................................................................................................................................................17
Troubleshooting ...............................................................................................................................................18-19
Limited Warranty ..................................................................................................................................................................20

Page 3
SAFETY INFORMATION
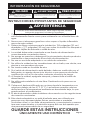
IMPORTANT SAFETY INSTRUCTIONS
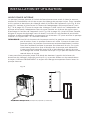
1. Always place the unit on a level surface strong enough to support
the unit with a full bucket of water
2. Never use or store gasoline or other ammable vapor or liquid near
this unit
3. Minimum installation clearance: 11.8 inches around the unit and 17.7
inches above the unit. Do not block or cover air inlet or outlet grills.
4. The unit must be connected to a correctly grounded power supply.
5. Do not start or stop the unit by inserting or pulling out the power
plug.
6. Do not use an adapter plug or extension cord.
7. Do not use the unit in the immediate surroundings of a bath, a
shower, swimming pool or clothes dryer.
8. Do not insert anything into the air outlet.
9. If the supply cord is damaged, it must be replaced by the
manufacturer, its service agent or similar qualied person in order to
avoid a hazard.
10. When cleaning the unit, always turn the unit off and unplug the
power cord.
11. Do not use outdoors. Intended for indoor use only.
12. Place the dehumidier in an area where the temperature will not fall
below 41˚ Fahrenheit. The coils can become covered with frost if the
room temperature is too low, which may reduce performance.
13. The appliance shall be installed in accordance with national wiring
regulations.
14. The appliance is not intended for use by persons (including children)
with reduced physical, sensory or mental capabilities, or lack of
experience and knowledge, unless they have been given supervision
or instruction concerning use of the appliance by a person
responsible for their safety.
SAVE THESE INSTRUCTIONS
HOUSEHOLD USE ONLY
WARNING
WARNING - Hazards or unsafe
practices which COULD result in
severe personal injury or death
DANGER
DANGER - Immediate hazards
which WILL result in severe
personal injury or death
CAUTION
CAUTION - Hazards or unsafe
practices which COULD result in
minor personal injury
WARNING
When using electrical appliances, basic safety precautions
should be followed, including the following

Page 4
SAFETY INFORMATION
GROUNDING INSTRUCTIONS
ELECTRICAL REQUIREMENTS
The electrical requirements are a 115 volt 60 Hz, dehumidier only, 15 amp. It is
recommended that a separate circuit serving only the product be provided. The
product is equipped with a 3-wire cord having a 3-prong grounding plug. It must
be plugged into a wall receptacle that is properly installed and grounded.
This appliance must be grounded. In the event of an electrical short circuit,
grounding reduces risk of electric shock by providing an escape wire for the
electric current. The cord provided with this appliance is equipped with a
grounding wire and a grounding plug. The plug must be plugged into an outlet
that is properly installed and grounded.
Avoid the use of three prong adapters or cutting off the third grounding prong
in order to accommodate a two prong outlet. This is a dangerous practice since
it provides no effective grounding for the air conditioner and may result in shock
hazard.
Consult a qualied electrician or serviceman if:
1) The grounding instructions are not completely understood.
2) You are unsure that the appliance is properly grounded.
3) You have any questions about the grounding or electrical instructions.
POWER SUPPLY CORD
1. Avoid the use of an extension cord because of potential safety hazards under
certain conditions. Have a qualied electrician or serviceman to install an
outlet near the appliance.
2. If it is absolutely necessary to use longer cord sets or an extension cord,
extreme care must be exercised.
a) Use only a grounding type 3-wire extension cord that has a 3-blade
grounding plug and a 3-slot receptacle that will accept the plug on the
appliance.
b) The marked electrical rating of the cord set or extension cord must equal
to or greater than the electrical rating of the appliance. The longer cord
should be arranged so that it will not drape over the counter top or table
top where it can be pulled on by children or tripped over unintentionally.
NOTE: Neither BLACK+DECKER nor the dealer can accept any liability for damage to the
product or personal injury resulting from failure to observe the electrical connection
procedures.
WARNING
Improper use of the grounding plug can result in a risk
of electric shock.

Page 5
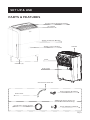
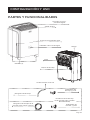
PARTS & FEATURES
Control Panel & Digital Display
Air Outlet
Water Collection Bucket
Water Level Indicator
Castors (4)
Handle
SET UP & USE
Drain Plug
Filter
Continuous Drain Kit
Additional Pump Drain Kit
(Model BDT50PWTB Only)
Drain Hose
Pump Drain Hose (16.4 ft)
Drain Adapter & Gasket
Pump Adapter & Gasket

Page 6
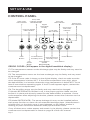
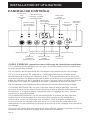
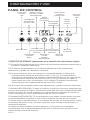
CONTROL PANEL
Clean Filter
LED Indicator
Timer ON
LED Indicator
Pump LED
Indicator (Model
BDT50PWTB)
SET UP & USE
High Fan Speed
LED Indicator
Continuous
Drain LED
Indicator
Digital
Humidistat
Display
Filter
Button
Fan
Speed
Button
Pump Button
(Model
BDT50PWTB)
Timer Button
Increase Room
Humidity Level
Decrease Room
Humidity Level
Power Button
ERROR CODES: (Will appear in the digital humidistat display)
E1: The temperature sensor on the discharge pipe may be faulty and may need to
be changed.
E2: The temperature sensor on the heat exchanger may be faulty and may need
to be changed.
E3: If the E3 error code is shown on the digital display, check to make sure the
room temperature is below 90˚F. If the room temperature is too high, place
the dehumidier in a location where the room temperature is below 90˚F for at
least 2 hours before operating again. If the E3 code appears again, contact the
customer service department.
EH: The humidity sensor may be faulty and may need to be changed.
P1 (Model BDT50PWTB): Bucket is not in the proper position. Make sure the
bucket is in place and securely seated for the dehumidier to operate. If error
code reappears after adjusting the bucket, please contact the customer service
department.
E5 (Model BDT50PWTB): The pump drainage kit may not be installed before
start pump function or users use non-standard drainage pipes. (Manufacturer's
original pipe), or the drain cover is not tightened, or the rubber washer is
missing, or poor connection between drain pipe and drain cover.
If any of these error codes appear and remain in the display, please contact the
customer service department as listed on page 18 of the user manual.
Timer OFF
LED Indicator
Bucket Full
LED Indicator
P
P

Page 7
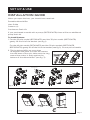
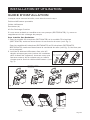
INSTALLATION GUIDE
When you open the box, you should have received:
Portable dehumidier
User Guide
Castors (4)
Continuous Drain Kit
If you purchased a model with a pump (BDT50PWTB) there will be an additional
pump drain kit
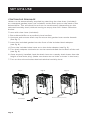
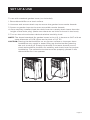
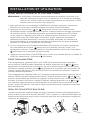
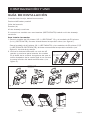
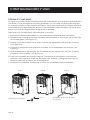
To Install Castors:
1. For the 20 pint model (BDT20WTB) and the 30 pint model (BDT30WTB)
gently lift the lid of the bucket (see g 1).
For the 40 pint model (BDT40WTB) and the 50 pint models (BDT50WTB,
BDT50PWTB) gently lift off the lid of the bucket (see g 2). Do not pull on handle.
2. Tilt the dehumidier no more than
45 degrees and push to insert the castors
into the base of the unit. Make sure the ring
around the castor is ush against the
bottom of the dehumidier. (see g. 3).
SET UP & USE
Fig. 2
Fig. 3
Fig. 1
Bucket
lid
Hole
Buckle
lid
Float
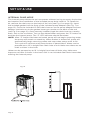
1.Using two hands gently remove lid
from the top of the bucket.
2.Remove casters
from bucket
3.Re-install the lid and be
sure that it is securely
clipped into the bucket
Important Note: Verify the plastic float
system on the top of the bucket is still
securely installed and swinging properly
before placing bucket back in the
dehumidifier
Castors a nd
other acc es sories
DE T
Castors a nd
other acc es sories

Page 8
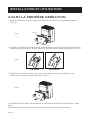
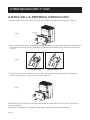
BEFORE FIRST OPERATION
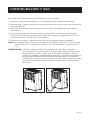
1. Grip each side of the bucket and pull to remove the bucket from the
dehumidier (Fig. 4).
2. Check inside the bucket to make sure the oat system is in the correct
position. If not, place the oat in the correct position (Fig. 5).
3. Re-insert the bucket once you have determined the oat system is in the
correct position (Fig. 6)
The oat in the bucket is essential to the “bucket full” system working properly.
Do not remove the oat and make sure the oat can rotate freely.
SET UP & USE
Fig. 4
Fig. 5
Fig. 6

OPERATION INSTRUCTIONS
NOTE: Unit may shut off automatically during 24 hour period if collection bucket
is full (see below). If continuous drainage mode is utilized, and drain hose
is connected, the unit will operate continuously (see page 12).
1. Press the POWER button once to turn the unit on. Press POWER button again
when you’re ready to turn it off.
2. Press the or buttons under the display to select the desired relative
humidity in the room. Each press will change the room humidity by 5%. The
room humidity is selectable from 35-80% or continuous. The unit will cycle on
and off to maintain the humidity level chosen on the digital display. After few
seconds, it will display the ambient humidity. When the ambient humidity is
lower than the set humidity, the compressor will stop running, and after few
minutes the fan will stop running.
3. If you want the dehumidier to operate continuously regardless of the room
humidity, press button until you see “CO” on the display. This will enable
continuous operation and the indicator will light up on the control panel.
4. Press the FAN SPEED button to select between High and Low Speeds. If HIGH
speed is selected the indicator will light up.
TIMER FUNCTION
To program the unit to automatically turn ON, press the TIMER button when
the unit is OFF. Press the or to increase the timer in 30 minute increments
up to 10 hours. After 10 hours, each press of the will increase the timer in 1
hour increments up to 24 hours. Once the desired time is reached, the unit will
automatically turn ON.
To program the unit to automatically turn OFF, press the TIMER button when
the unit is ON. Each press of the or buttons will change the timer setting
in 30 minute increments up to 10 hours. After 10 hours, each press of the or
buttons will increase or decrease the timer in 1 hour increments up to 24 hours.
Once the desired time is over, the unit will automatically power OFF.
FULL WATER COLLECTION BUCKET
When the water collection bucket is full, the unit will shut off automatically, make
a beeping noise and the BUCKET FULL indicator will light. The dehumidier will
not run again until the bucket is emptied and properly placed back inside the
unit.
SET UP & USE
Page 9

Page 10
NOTE: When the bucket is full or removed from the unit, the compressor will turn
off but the fan will continue to run for a few minutes. This is completely
normal. The dehumidier will not be removing moisture from the air at
this time.
Over time, the dehumidier will create a more stable humidity in the area it is
located.
The more moisture the dehumidier removes from the air, the more often you
may have to empty the bucket unless you choose to use the continuous drain
option. The number of times the bucket will need to be emptied daily will depend
on the dehumidier model.
CAUTION: Do not place the water collection bucket on the oor when it is full as
it is uneven on the bottom and may spill.
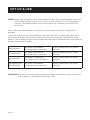
SET UP & USE
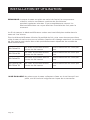
BDT20WTB
20 pints of moisture
removed every 24 hours
empty maximum of 3 times
per day
BDT30WTB
30 pints of moisture
removed every 24 hours
empty maximum of 4 times
per day
BDT40WTB
40 pints of moisture
removed every 24 hours
empty maximum of 3 times
per day
BDT50PWTB/
BDT50WTB
50 pints of moisture
removed every 24 hours
empty maximum of 4 times
per day

Page 11
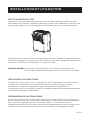
FILTER CLEANING
When the lter needs to be cleaned, the lter indicator light will come on (after
approximately 250 hours of use). Remove the lter from the back of the unit by
using your thumbs to press down on the lter tabs directly above the lter.
Clean the lter with warm, soapy water and dry thoroughly before putting back
in place. Once lter is back in the unit, press the FILTER button to reset the lter
indicator.
CAUTION: Do not clean the lter in a dishwasher. Do not operate the
dehumidier without the included lter in place.
AUTOMATIC DEFROST
When frost builds up on the evaporator coils, the compressor will cycle off
and the fan will continue to run until the frost disappears. When the coils
are completely defrosted, the compressor or fan (depending on model) will
automatically restart and dehumidication will resume.
AUTOMATIC RESTART
In the event of a power interruption such as a power outage or the plug being
disconnected from the outlet, your dehumidier will automatically restart in
the same setting once power has been restored to the unit. The only functions/
features that will have to be restored manually upon resumption of power are
the timer function and the child lock mode.
SET UP & USE

Page 12Page 12
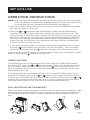
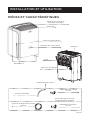
CONTINUOUS DRAINAGE
Water can be automatically emptied by attaching the clear hose (included)
or a standard garden hose (not included) to the drain port on the back of the
dehumidier. This will allow the unit to run continuously (depending on the
selected humidity level) without having to empty the unit’s water collection
bucket.
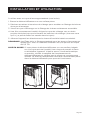
To use with clear hose (included)
1. Place dehumidier on a perfectly level surface.
2. Unscrew and remove drain cap to access the garden hose nozzle threads.
(See g. 7)
3. Insert the included gasket into the front of the included drain adapter
(see g. 8).
4. Force the included clear hose on to the drain adapter (see g. 9).
5. Turn drain adapter clockwise on to the nozzle thread on the back of the unit
(see g. 9).
6. Once securely installed, lead the drain hose to a nearby drain lower than the
height of the drain plug. (Make sure there are no kinks or knots in the hose)
7. Turn on the unit and select desired relative humidity level.
SET UP & USE
Fig. 7 Fig. 8 Fig. 9
Drain Adaptor
Gasket
Drain Hose 16.4 feet (5 meters)

Page 13
To use with standard garden hose (not included)
1. Place dehumidier on a level surface.
2. Unscrew and remove drain cap to access the garden hose nozzle threads.
3. Screw on garden hose to the now accessible nozzle threads.
4. Once securely installed, lead the drain hose to a nearby drain lower than the
height of the drain plug. (Make sure there are no kinks or knots in the hose)
5. Turn on the unit and select desired relative humidity level.
NOTE: The thread standard for garden hoses in the U.S. is known as GHT with an
outer diameter of 11/16 inches and a pitch of 11.5 TPI.
CAUTION: Placing the dehumidier on an uneven surface or improper hose
installation may result in water lling up the bucket and causing
the unit to shut off. Empty the bucket if the auto shutoff occurs,
check dehumidier location for stability and check hose for proper
installation. The collection bucket must be properly placed in the
dehumidier for it to operate.
SET UP & USE

Page 14
SET UP & USE
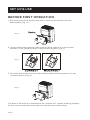
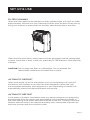
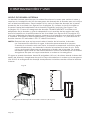
INTERNAL PUMP MODE
The internal pump allows the unit to operate without having to empty the bucket
and requires the installation of the included pump drain hose kit. To install the
kit, remove the drain cap on the back of the unit (see Fig. 6 on page 12). Insert
the included gasket into the front of the included pump adapter (see Fig. 7 on
page 12). Force the included CLEAR drain hose on to the pump adapter and turn
adapter clockwise on to the garden hose type nozzle on the back of the unit
(see Fig. 8 on page 12). Once securely installed, lead the drain hose to a nearby
drain, sink or out a window. Turn on the dehumidier and press the "P" button to
activate the internal pump. The “P” LED indicator should illuminate.
NOTE: After "P" button has been activated, pump will not begin removing water,
the pump will remain on stand-by. When bucket is almost full, pump will
automatically begin removing water and stop when pump work 4 min.
This cycle will continue until pump button is deactivated. Water can be
pumped up to 16' in height from drain hole of unit. Make sure there are no
kinks or knots in the hose.
Water can be pumped up to 16’ in height from base of drain plug. Make sure
there are no kinks or knots in the hose. ONLY use included clear drain hose when
utilizing the internal pump.
Fig. 10

Page 15
SET UP & USE
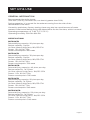
GENERAL INFORMATION
Recommended humidity levels:
30%-50% (Too dry, less than 15%, too humid, greater than 50%)
During operation, it is normal for the exhaust coming from the side of the
dehumidier to be warm.
Caused by preliminary factory testing, there may also be a small amount of water
present in the bucket before using the dehumidier for the rst time, which is normal.
Operating temperature: 41˚F-90˚F (5˚C-32˚C)
Operating humidity: 30% RH-90% RH
SPECIFICATIONS
BDT20WTB
Dehumidifying capacity: 20 pints per day
Bucket capacity: 8 pints
Air ow volume (high/low): 182/155 CFM
Power: 115v, 60 Hz, 3.5A
Power consumption: 260 watts
BDT30WTB
Dehumidifying capacity: 30 pints per day
Bucket capacity: 8 pints
Air ow volume (high/low): 182/155 CFM
Power: 115v, 60 Hz, 4.2A
Power consumption: 330 watts
BDT40WTB
Dehumidifying capacity: 40 pints per day
Bucket capacity: 14.3 pints
Air ow volume (high/low): 182/155 CFM
Power: 115v, 60 Hz, 5.0A
Power consumption: 395 watts
BDT50WTB
Dehumidifying capacity: 50 pints per day
Bucket capacity: 14.3 pints
Air ow volume (high/low): 182/155 CFM
Power: 115v, 60 Hz, 7.0A
Power consumption: 540 watts
BDT50PWTB
Dehumidifying capacity: 50 pints per day
Bucket capacity: 14.3 pints
Air ow volume (high/low): 182/155 CFM
Power: 115v, 60 Hz, 7.0A
Power consumption: 540 watts

Page 16
CARE & CLEANING
CARE AND CLEANING GUIDE
NOTE: Make sure power is off and power cord is not plugged into electrical outlet
prior to performing and cleaning to the unit
The water collection bucket should be cleaned every few weeks to prevent the
growth of mold, mildew and bacteria. Use a mild detergent to clean the bucket. Once
clean, completely dry the bucket and place it back inside the humidier.
To keep the unit housing clean, keep the unit from being exposed directly to the sun
or to prevent color fading. Clean the surface with a damp cloth and dry with a soft
towel.
STORING FOR EXTENDED PERIOD OR TRANSPORTING THE UNIT
1. Unplug the unit.
2. Clean or replace lter.
3. Empty any excess water from water collection bucket.
4. Store in dry place.

Page 17
TROUBLESHOOTING & WARRANTY
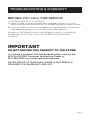
BEFORE YOU CALL FOR SERVICE
IF THE APPLIANCE FAILS TO OPERATE:
A) Check to make sure that the heater/fan is plugged in securely. If it is not,
remove the plug from the outlet, wait 10 seconds and plug it in again securely.
B) Check for a blown circuit fuse or a tripped main circuit breaker. If these seem
to be operating properly, test the outlet with another appliance.
IF NONE OF THE ABOVE SOLVES THE PROBLEM, CONTACT A QUALIFIED
TECHNICIAN. DO NOT TRY TO ADJUST OR REPAIR THE APPLIANCE
YOURSELF.
IMPORTANT
DO NOT RETURN THIS PRODUCT TO THE STORE
If you have a problem with this product, please contact the
BLACK+DECKER Customer Satisfaction Center at
844-299-0879 or service@equitybrands.com
DATED PROOF OF PURCHASE, MODEL # AND SERIAL #
REQUIRED FOR WARRANTY SERVICE

Page 18
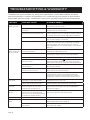
TROUBLESHOOTING & WARRANTY
Troubleshoot your problem by using the chart below. If the dehumidier still does
not work properly, contact W Appliance Co. customer service center or the nearest
authorized service center. Customers must never troubleshoot internal components.
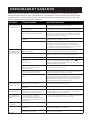
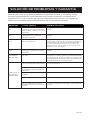
TROUBLE POSSIBLE CAUSE POSSIBLE REMEDY
Dehumidier
does not start
The dehumidier is unplugged Make sure the dehumidier’s plug is pushed
completely into the outlet
The fuse is blown/circuit breaker
is tripped
Check the house fuse/circuit breaker box and
replace fuse or reset breaker
Dehumidier has reached its
present level or the bucket is full
The dehumidier automatically turns off when
either condition occurs. Change to a lower setting
or empty the water bucket and replace properly
Bucket is not in the proper position The bucket must be in place and securely seated
for the dehumidier to operate
Power failure There is a protective time delay (up to 3 min.)
to prevent tripping of the compressor overload.
For this reason, the unit may not start normal
dehumidication for 3 minutes after it is powered
back on
Dehumidier
does not dry the
air as it should
Not enough time allowed for unit
to remove moisture
When rst installed, allow at least 24 hours to
maintain the desired dryness
Airow is restricted Make sure there are no curtains, blinds, or furniture
blocking the front or back of the dehumidier.
Dirty lter See the FILTER CLEANING section on page 10
The humidity control may not be
set low enough
For drier air, press the button to lower the
percent humidity desired in the room or set the
dehumidier to CO for maximum dehumidication
Doors and windows may not be
closed tightly
Check that all doors, windows and other openings
are securely closed
Clothes dryer may be blowing
moist air into the room
Install the dehumidier away from the dryer. The
dryer should be vented outside.
Room temperature is too low Moisture removal is best at higher room
temperatures. Lower room temperatures will
reduce the moisture removal rate. This model is
designed to operate at temperatures above 41˚F
Dehumidier runs
too much
The area is too large for the
capability of the dehumidier
The capacity of your dehumidier may not be
adequate for the room size
Doors and windows are open Close all doors and windows to the outside
Frost appears on
the coils
The dehumidier has recently
been turned on or the room
temperature is below 41˚F
This is normal. Frost will usually disappear within
60 minutes. For details, see “AUTO DEFROST”
section on page 11
Controls cannot
be set
The compressor will turn off
and the fan will automatically
continue to run for approximately
3 minutes at a xed setting
This is normal. Wait approximately 3 minutes and
set the fan speed at the desired level
Fan noise Air is moving through the unit This is normal
Water on the
oor
Hose connection may be loose Check the hose connection. See the CONTINUOUS
DRAINAGE SECTION on page 12
Hose is attached but not draining
into a drain
Disconnect the hose if using the bucket or place
the hose near a drain

Page 19
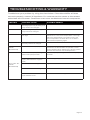
TROUBLESHOOTING & WARRANTY
Troubleshoot your problem by using the chart below. If the dehumidier still does
not work properly, contact W Appliance Co. customer service center or the nearest
authorized service center. Customers must never troubleshoot internal components.
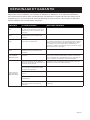
TROUBLE POSSIBLE CAUSE POSSIBLE REMEDY
Error Code “E1” The temperature sensor on the
discharge pipe may be faulty and
may need to be changed.
Contact the customer service center.
Error Code “E2” Heat exchanger may be faulty and
may need to be changed.
Contact the customer service center.
Error Code “E3” The room temperature may be
too high.
Check to make sure the room temperature is
below 90˚F. If the room temperature is too high,
place the dehumidier in a location where the
room temperature is below 90˚F for at least 2
hours before operating again.
Error Code “EH” The humidity sensor may be faulty
and may need to be changed
Contact the customer service center.
Error Code “P1”
(Model
BDT50PWTB)
Bucket is not in the proper position. Make sure the bucket is in place and securely
seated for the dehumidier to operate. If error
code reappears after adjusting the bucket, please
contact the customer service department.
Error Code “E5”
(Model
BDT50PWTB)
Didn't install the pump drainage kit
before start pump function.
Install the pump drainage kit before start pump
function.
Users use non-standard drainage
pipes. (Manufacturers' original
pipe)
Use the original pipe.
The drain cover is not tightened. Tighten the cover.
The rubber washer is missing. Re-install the washer in cover.
Poor connection between drain
pipe and drain cover.
Check the connection of pipe and drain cover.

Page 20
TROUBLESHOOTING & WARRANTY
LIMITED WARRANTY
Any repair, replacement, or warranty service,
and all questions about this product should be
directed to BLACK+DECKER at 844-299-0879
from the USA or Puerto Rico.
BLACK+DECKER warrants to the original purchaser
that the product will be free from defects in material,
parts and workmanship for the period designated for
this product. The warranty commences the day the
product is purchased and covers up to a period of 1
year (12 months) for labor/1 year (12 months) for parts
(manufacturing defects only).
BLACK+DECKER agrees that it will, at its option,
replace the defective product with either a new
or remanufactured unit equivalent to your original
purchase during the warranty period.
Exclusions: This warranty does not apply to the
below:
1. If the appearance or exterior of
the product has been damaged or
defaced, altered or modified in design or
construction.
2. If the product original serial number
has been altered or removed or cannot
be readily determined.
3. If there is damaged due to power line
surge, user damage to the AC power
cord or connection to improper voltage
source.
4. If damage is due to general misuse,
accidents or acts of God.
5. If repair attempts are done by
unauthorized service agents, use of
parts other than genuine parts or parts
obtained from persons other than
authorized service companies.
6. On units that have been transferred
from the original owner.
7. On products that have been purchased
as refurbished, like new, second-hand, in
a “As-Is” or “Final Sale” terms.
8. To products used in a commercial or
rental setting.
9. To products used in settings other than
ordinary household use or used other
than in accordance with the provided
instructions.
10. To damages for service calls for
improper installations.
11. Transportation and shipping costs
associated with the replacement of the
unit.
12. Service calls to instruct you how to use
your product.
13. Service calls to repair or replace the
house fuse, reset the circuit breaker or
correct the wiring in the house.
REPAIR OR REPLACEMENT AS PROVIDED UNDER
THIS WARRANTY IS THE EXCLUSIVE REMEDY OF
THE CUSTOMER; BLACK+DECKER. SHALL NOT BE
LIABLE FOR ANY INCIDENTAL OR CONSEQUENTIAL
DAMAGES FOR BREACH OF ANY EXPRESS OR
IMPLIED WARRANTY ON THIS PRODUCT, EXCEPT
TO THE EXTENT PROHIBITED BY APPLICABLE LAW.
ANY IMPLIED WARRANTY OF MERCHANTABILITY
OF FITNESS FOR A PARTICULAR PURPOSE ON THIS
PRODUCT IS LIMITED TO THE DURATION OF THE
WARRANTY.
Some states do not allow the exclusion or limitations
of incidental or consequential damages, or limitations
on how long the warranty lasts. In these cases the
above exclusions or limitations may not apply to you.
This warranty gives you specific legal rights and you
may also have other rights which vary from state to
state.
Obtaining Service: To obtain service, product
literature, supplies or accessories please call
844-299-0879 to create a ticket for exchange/repair.
Please make sure to provide the date of purchase,
model number and a brief description of the problem.
Our customer service representative
will contact you or send detailed return instructions.
BLACK+DECKER does not warrant that the appliance will work
properly in all environmental conditions, and makes no warranty
and representation, either implied or expressed, with respect
to the quality, performance, merchantability, or fitness for a
particular purpose other than the purpose identified within this
user’s manual. BLACK+DECKER has made every eort to ensure
that this user’s manual is accurate and disclaims liability for any
inaccuracies or omissions that may have occurred. Information in
this user’s manual is subject to change without notice and does
not represent a commitment on the part of BLACK+DECKER.
BLACK+DECKER reserves the right to make improvements to
this user’s manual and/or to the products described in this user’s
manual at any time without notice. If you find information in this
manual that is incorrect, misleading, or incomplete, please contact
us at 844-299-0879.
W Appliance Co.
1356 Broadway
New York, NY 10018
La page est en cours de chargement...
La page est en cours de chargement...
La page est en cours de chargement...
La page est en cours de chargement...
La page est en cours de chargement...
La page est en cours de chargement...
La page est en cours de chargement...
La page est en cours de chargement...
La page est en cours de chargement...
La page est en cours de chargement...
La page est en cours de chargement...
La page est en cours de chargement...
La page est en cours de chargement...
La page est en cours de chargement...
La page est en cours de chargement...
La page est en cours de chargement...
La page est en cours de chargement...
La page est en cours de chargement...
La page est en cours de chargement...
La page est en cours de chargement...
La page est en cours de chargement...
La page est en cours de chargement...
La page est en cours de chargement...
La page est en cours de chargement...
La page est en cours de chargement...
La page est en cours de chargement...
La page est en cours de chargement...
La page est en cours de chargement...
La page est en cours de chargement...
La page est en cours de chargement...
La page est en cours de chargement...
La page est en cours de chargement...
La page est en cours de chargement...
La page est en cours de chargement...
La page est en cours de chargement...
La page est en cours de chargement...
La page est en cours de chargement...
La page est en cours de chargement...
La page est en cours de chargement...
La page est en cours de chargement...
La page est en cours de chargement...
La page est en cours de chargement...
La page est en cours de chargement...
La page est en cours de chargement...
La page est en cours de chargement...
La page est en cours de chargement...
-
 1
1
-
 2
2
-
 3
3
-
 4
4
-
 5
5
-
 6
6
-
 7
7
-
 8
8
-
 9
9
-
 10
10
-
 11
11
-
 12
12
-
 13
13
-
 14
14
-
 15
15
-
 16
16
-
 17
17
-
 18
18
-
 19
19
-
 20
20
-
 21
21
-
 22
22
-
 23
23
-
 24
24
-
 25
25
-
 26
26
-
 27
27
-
 28
28
-
 29
29
-
 30
30
-
 31
31
-
 32
32
-
 33
33
-
 34
34
-
 35
35
-
 36
36
-
 37
37
-
 38
38
-
 39
39
-
 40
40
-
 41
41
-
 42
42
-
 43
43
-
 44
44
-
 45
45
-
 46
46
-
 47
47
-
 48
48
-
 49
49
-
 50
50
-
 51
51
-
 52
52
-
 53
53
-
 54
54
-
 55
55
-
 56
56
-
 57
57
-
 58
58
-
 59
59
-
 60
60
-
 61
61
-
 62
62
-
 63
63
-
 64
64
-
 65
65
-
 66
66


BLACK+DECKER BDT30WTB Manuel utilisateur
- Catégorie
- Déshumidificateurs
- Taper
- Manuel utilisateur
dans d''autres langues
- English: BLACK+DECKER BDT30WTB User manual
- español: BLACK+DECKER BDT30WTB Manual de usuario
Documents connexes
Autres documents
-
Toshiba TDDP2213ES2C Dehumidifier Manuel utilisateur
-
GE APEL70LTL1 Le manuel du propriétaire
-
Royal Sovereign RDH-230 Le manuel du propriétaire
-
BLACK DECKER BFB09W 9 Inch Frameless Box Fan Manuel utilisateur
-
Danby SHCC6026 Le manuel du propriétaire
-
-
Electrolux EXD15DN3W Manuel utilisateur
-
-
-