commercial cool CCD25JW Manuel utilisateur
- Catégorie
- Déshumidificateurs
- Taper
- Manuel utilisateur

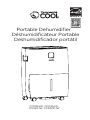
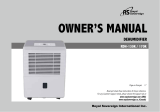
Portable Dehumidier
CCD25JW, CCD35JW,
CCD50JW, CCD50PJW
Déshumidicateur Portable
Deshumidicador portátil

Page 2
Thank you for purchasing our
COMMERCIAL COOL product.
This easy-to-use manual will guide
you in getting the best use of your
portable dehumidier.
Remember to record the model
and serial numbers. They are on a
label on the rear.
Staple your receipt to your manual.
You will need it to obtain warranty service.
Model number
Serial number
Date of purchase
PRODUCT REGISTRATION
CONTENTS
SAFETY INFORMATION
Important Safety Instructions ..........................................................................................................................................3-4
Grounding Instructions .........................................................................................................................................................5
Use of Extension Cords with Dehumidier ...................................................................................................6
SET UP & USE
Parts & Features ...................................................................................................................................................................7-8
Control Panel ............................................................................................................................................................ 9
Operation Instructions ....................................................................................................................................10-11
Draining the Collected Water ..................................................................................................................... 12-15
CLEANING & CARE ..............................................................................................................................................16
TROUBLESHOOTING & WARRANTY
Before You Call For Service ...............................................................................................................................17
Customer Service ...................................................................................................................................................17
Troubleshooting .....................................................................................................................................................18
Limited Warranty ....................................................................................................................................................................19

Page 3
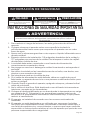
SAFETY INFORMATION
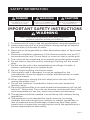
IMPORTANT SAFETY INSTRUCTIONS
1. To reduce risk of injury, read this guide before using the appliance.
2. Always place the unit on a level surface strong enough to support
the unit with a full bucket of water.
3. Never use or store gasoline or other ammable vapor or liquid near
this unit.
4. Minimum installation clearance: 11.8 inches around the unit and 17.7
inches above the unit. Do not block or cover air inlet or outlet grills.
5. The unit must be connected to a correctly grounded power supply.
6. Do not start or stop the unit by inserting or pulling out the power
plug.
7. Do not use the unit in the immediate surroundings of a bath, a
shower, swimming pool or clothes dryer.
8. Do not insert anything into the air outlet.
9. If the supply cord is damaged, it must be replaced by the
manufacturer, its service agent or similar qualied person in order
to avoid a hazard.
10. When cleaning or storing the unit, always turn the unit off and
unplug the power cord.
11. Do not use outdoors. Intended for indoor use only, except for
laundry rooms.
12. Place the dehumidier in an area where the temperature will not fall
below 41˚ Fahrenheit. The coils can become covered with frost if the
room temperature is too low, which may reduce performance.
13. The appliance shall be installed in accordance with national wiring
regulations.
14. The appliance is not intended for use by persons (including
children) with reduced physical, sensory or mental capabilities, or
lack of experience and knowledge, unless they have been given
supervision or instruction concerning the use of the appliance by a
person responsible for their safety.
WARNING
WARNING - Hazards or unsafe
practices which COULD result in
severe personal injury or death
DANGER
DANGER - Immediate hazards
which WILL result in severe
personal injury or death
CAUTION
CAUTION - Hazards or unsafe
practices which COULD result in
minor personal injury
WARNING
When using electrical appliances, basic safety precautions
should be followed, including the following

Page 4
SAFETY INFORMATION
15. Do not place the unit close to heat-generating devices or near
ammable and dangerous materials.
16. Do not insert ngers or any object into the intake or discharge
ducts.
17. Do not sit or stand on the unit.
18. Discard water that has collected in the tank as required.
19. Do not operate in a closed area such as inside a closet.
20.Do not use near edible items, objects of art or scientic materials.
21. Install drain piping at a downhill grade to make sure that condensed
water can be drained continuously.
22. If the power supply cord is damaged, it must be replaced by the
manufacturer or a similarly qualied person in order to avoid a
hazard.
23. The appliance must be positioned so that the plug is accessible.
24. The appliance cannot be used in public transportation.
25. This appliance can be used by children aged from 8 years and
above and persons with reduced physical, sensory or mental
capabilities or lack of experience and knowledge if they have been
given supervision or instruction concerning use of the appliance in
a safe way and understand the hazards involved. Children shall not
play with the appliance. Cleaning and user maintenance shall not be
made by children without supervision.
26. Children should be supervised to ensure that they do not play with
the appliance.
27. Appliances that are obviously damaged must not be operated.
SAVE THESE INSTRUCTIONS
HOUSEHOLD USE ONLY

Page 5
SAFETY INFORMATION
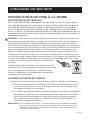
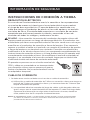
GROUNDING INSTRUCTIONS
ELECTRICAL REQUIREMENTS
In the event of malfunction or breakdown, grounding provides a path of
least resistance for electric current to reduce the risk of electric shock. The
appliance must be connected to a cord having an equipment-grounding
conductor and a grounding plug. The plug must be plugged into an
appropriate outlet that is properly installed and grounded in accordance
with all local codes and ordinances.
DANGER - Improper connection of the equipment grounding conductor
can result in a risk of electric shock. The conductor with insulation
having an outer surface that is green with or without yellow stripes is the
equipment grounding conductor. If repair or replacement of the cord or
plug is necessary, do not connect the equipment-grounding conductor to
a live terminal. Check with a qualied electrician or service person if the
grounding instructions are not completely understood, or if in doubt as
to whether the appliance is properly grounded. Do not modify the plug
connected to the appliance – if it will not t the outlet, have a proper outlet
installed by a qualied electrician.
The appliance is for use on a nominal 120V circuit
and should be connected to a grounding outlet
that looks like the one illustrated to the right. The
use of a temporary adaptor is not recommended.
POWER SUPPLY CORD
1. Extreme care must be exercised with the use of an
extension cord:
a) Use only a grounding type 3-wire extension cord that has a 3-blade grounding
plug and a 3-slot receptacle that will accept the plug on the appliance.
b) The marked electrical rating of the cord set or extension cord must be equal
to or greater than the electrical rating of the appliance. The longer cord should
be arranged so that it will not drape over the counter top or table top where it
can be pulled on by children or tripped over unintentionally.
NOTE: Neither COMMERCIAL COOL nor the dealer can accept any liability for damage to the
product or personal injury resulting from failure to observe the electrical connection
procedures.

Page 6
SAFETY INFORMATION
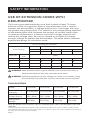
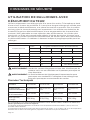
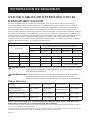
USE OF EXTENSION CORDS WITH
DEHUMIDIFIER
Only use a grounded extension cord that is rated at least 7.8 amps
and has a third-wire ground. When a long extension cord is used to
connect the dehumidier, a voltage drop occurs. The longer the cord,
the greater the voltage drop. This results in less voltage being supplied
to the dehumidier and increases the amount of current (amp) draw
or reduces performance. A heavier cord with a larger wire size will
reduce the voltage drop. Be sure to choose a cord that will supply
enough voltage to operate the dehumidier. The table below indicates
appropriate gauge for extension cords.
WARNING: Keep electrical cords in good condition. Do not use worn, bare, or
frayed cords because they can cause electrical shock.
WARNING: Operating equipment at low voltage can cause it to overheat. Using
an excessively long extension cord can cause the cord to overheat.
Technical Data
Minimum Gauge for Cord Sets
Ampere Rating
Volts Total Length of Cord in Feet (meters)
120V 25 (7.6) 50 (15.2) 100 (30.5) 150 (45.7)
240V 50 (15.2) 100 (30.5) 200 (61.0) 300 (91.4)
More than Not more
than AWG
0 6 18 16 16 14
610 18 16 14 12
10 12 16 16 14 12
12 16 14 12 Not Recommended
Model CCD25JW CCD35JW CCD50JW CCD50PJW
Dehumidifying
Capacity 25 Pints/day 35 Pints/day 50 Pints/day 50 Pints/day
Power Source 115V~ 60Hz 115V~ 60Hz 115V~ 60Hz 115V~ 60Hz
Refrigerant/
charge R32/90g R32/150g R32/150g R32/150g
These specifications are for reference only. For actual data, please refer to the rating label on the back
of the unit.
The dehumidication capacity is rated at a room temperature of 86˚F (30˚C) with a relative humidity of 80%.
The operational temperature is in the range of 44.6˚F (7˚C) to 95˚F (35˚C). If the room temperature is outside of
this range, the unit will not operate normally.

Page 7
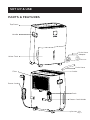
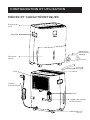
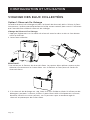
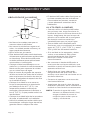
PARTS & FEATURES
SET UP & USE
Top Panel
Handle
Water Tank
Filter
Power Cord
Drain
Power Cord Holder
Casters (4)
Outlet
Drain Hose
Drain Hose
Adapter
CCD50PJW
CCD25JW, CCD35JW,
CCD50JW

Page 8
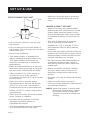
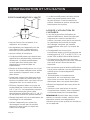
POSITIONING THE UNIT
• Do not force casters to move over
the carpet.
• Do not move the unit with water in
the bucket. The unit may tip over and
water may spill.
• Do not use outdoors.
• This dehumidier is intended for
indoor residential applications only.
This dehumidier should not be
used for commercial or industrial
applications.
• Place the dehumidier on a smooth,
level oor strong enough to support
the unit with a full bucket of water.
• Allow at least 8 in. of air space on
all sides of the unit for good air
circulation (at least 16 in. of air space
on air outlet).
• Place the unit in an area where
the temperature will not fall below
41˚F(5˚C). The coils can become
covered with frost at temperatures
below 41˚F(5˚C), which may reduce
performance.
• Place the unit away from the clothes
dryer, heater or radiator.
• Use the unit to prevent moisture
damage anywhere books or
valuables are stored.
• The dehumidier must be operated
in an enclosed area to be most
effective. Close all doors, windows
and other outside openings to the
room.
WHEN USING THE UNIT
• When rst using the dehumidier,
operate the unit continuously for 24
hours. Make sure the plastic cover
on the continuous drain hose outlet
is installed properly so there are no
leaks.
• This unit is designed to operate
with a working environment
between 41˚F/5˚C and 90˚F/32˚C,
and between 35% to 80% relative
humidity.
• If the unit has been switched off and
needs to be switched on again, allow
approximately three minutes for the
correct operation to resume.
• Do not connect the dehumidier to
a multiple socket outlet, which is
also being used for other electrical
appliances.
• Select a suitable location, making
sure you have easy access to an
electrical outlet into an electrical
socket.
• Plug the unit into an electrical socket
outlet.
• Make sure the water bucket is
correctly tted otherwise the unit will
not operate properly.
NOTE: When the water in the bucket
reaches a certain level, please
be careful when moving the
machine to avoid it falling and
spilling.
SET UP & USE

Page 9
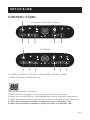
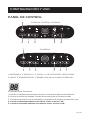
CONTROL PANEL
CCD25JW, CCD35JW, CCD50JW
CCD50PJW
1. POWER 2. DISPLAY 3. FILTER 4. FAN SPEED 5.MODE 6.TIMER
7. PUMP (for Model CCD50PJW only)
The indicator features 3 functions:
1. When the unit is plugged in, it will indicate the room humidity level.
2. When you set the humidity, it will indicate the humidity that you have selected.
3. When you program the time for the unit to turn on and off, it will show the hours.
4. When the environment humidity is lower than 20%, it will display "20".
5. When the environment humidity is higher than 90%, it will display "90".
1
2
2 3
3 4
4 5
5 6
6 7
1
SET UP & USE

Page 10
SET UP & USE
OPERATION INSTRUCTIONS
1. POWER
Power display is always on. In STANDBY mode, the display will turn on for 3s and turn
off with only the POWER indicator light on. The default running operation is 50%RH on
Low fan speed. When operating a PRESET mode, the machine will resume the previous
operating function when switched off and on. During auto operation (four LED lights
in Auto mode are off), the unit will automatically turn off and enter STANDBY mode.
After resuming from STANDBY, the system will reset to the Auto mode 50% with low
fan speed.
2. FAN SPEED
Press “FAN SPEED” button as follows:
When the fan speed needs to be adjusted, press the fan speed button to adjust the
Low, Mid and High fan speed. When the corresponding indicator light is on, the current
speed has been set.
3. "UP" and "DOWN"
Press "UP" and "DOWN" to enter the Auto dehumidication operation. The humidity is
set to 35%-- 80%, with 5%RH added and decreased each time.
4. MODE
Press "MODE" to select the Preset Mode: Sleeping Area (55%), Living Space (50%),
Basement (45%), Continuous switch the sequential cycle, and the corresponding mode
indicator light is on.
5. TIMER
Press “Timer” button to set the timer up to 24 hours.
(1) In startup state, press the Timer button to set the startup function. The Timer light
will be on, and the display will initially display 0.5. Press "UP" and "DOWN" to adjust
the time. The timer indicator is on when the timer function is active. Press the Timer
key again to cancel the timing function.
(2) In the shutdown state, press the Timer button to set the shutdown function. The
display will show "0.5" on the control panel as default. At this point, press the "UP"
and "DOWN" keys to adjust the timing time.
(3) The range of time is 0.5h-24h. Press "UP" and "DOWN" to adjust ±0.5h between
0.5h-10h, while ±1h between 10h-24h.
6. FILTER
Reset the “Filter” key:
After the dehumidier starts up and runs for 250 hrs. the indicator light for cleaning the
lter screen will be on. Refer to CLEANING & CARE section for Filter instructions. After
lter has been cleaned, press the FILTER button to remove the indicator light and reset
the timer.
7. PUMP (Only with model CCD50PJW)
Press the button to enter the PUMP function, the PUMP indicator light is on, press
again, exit the function, and the PUMP indicator light is off; (Before starting the pump,
it is necessary to install the pump detection device. At this time, the DRAIN TUBE
CONNECTED light is on.)

Page 11
SET UP & USE
OTHER FEATURES
Bucket Full Light
When the water collection bucket is full, the unit will shut off automatically, make a
beeping noise and the BUCKET FULL indicator will light up. The dehumidier will not
run again until the bucket is emptied and properly placed back inside the unit.
Auto Shut-Off
The dehumidier shuts off when the bucket is full, or when the bucket is removed or
not replaced in the proper position. The fan motor will continue to run for 4 minutes.
Wait 3 minutes before resuming operation. This is to protect the unit. Operation will
automatically start after 3 minutes.
Auto-Restart
If the unit turns off unexpectedly due to a power outage, it will restart with the
previous function setting automatically when the power resumes.
Child Lock Feature
Press the Timer button for 3 seconds, the lock key function is turned on, the lock light
is on, and the other keys are invalid after the lock key; Press the Timer button again
for 3 seconds to cancel the lock button function.
Display
Backlit display on the front of the dehumidier that shows the actual humidity level in
the room to be easily seen from across the room, Press the "DISPLAY" button to turn
the Mirage Display on and once again to turn the Mirage Display off.

Page 12
SET UP & USE
DRAINING THE COLLECTED WATER
Option 1: Drain Tank
When the drainage tank is full, the tank full indicator light will turn on, the operation
will stop automatically and the buzzer will sound to alert the user, that the water
needs to be emptied from the drainage tank.
Emptying the Drainage Tank
1. Lightly press on the sides of the tank with both hands and pull the tank out gently.
2. Discard the collected water.
NOTE:
1. Do not remove the float from the water tank. The water full sensor will no longer be
able to detect the water level correctly without the float and water may leak from
the water tank.
2. If the drainage tank is dirty, wash it with cold or lukewarm water. Do not use
detergent, scouring pads, chemically treated dust cloths, gasoline, benzene, thinner,
or other solvents, as these can scratch and damage the tank and cause water
leakage.

Page 13
SET UP & USE
3. When replacing the drainage tank, press the tank firmly into place with both hands.
If the tank is not positioned properly, the “BUCKET FULL” sensor will be activated,
and the dehumidifier will not operate.
IMPORTANT NOTES:
Placing the dehumidifier on an uneven surface or improper hose installation may
result in water filling up the tank and cause the unit to shut off. Empty tank if shut-off
occurs, then check dehumidifier location and hose for proper setup. The tank must be
in place and securely seated for the dehumidifier to operate.
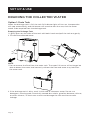
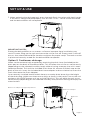
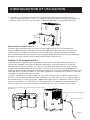
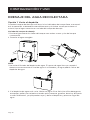
Option 2: Continuous drainage
Water can be automatically emptied by attaching the drain hose (included) to the
drain port on the back of the dehumidifier. This will allow the unit to run continuously
(depending on the selected humidity level) without having to empty the unit's water
collection bucket. To install the included Drain Hose Kit, remove the drain cap on the
back of the unit. Insert the included drain hose adapter and turn clockwise, Insert the
Drain Hose onto the Drain Adapter.
Once securely installed, lead the drain hose to a nearby drain lower than the height
of the drain plug. (Make sure there are no kinks or knots in the hose). Turn on the unit
and press the MODE button until set to CONTINUOUS. This will allow the unit to run
continuously (depending on the selected humidity level) without having to empty the
water bucket.
Drain Hose Adapter Storage Compartment
Drain Hose Adapter
Drain Hose

Page 14
NOTE: When the continuous draining feature is not being used, remove the drain
hose from the outlet, and dry the water in the continuous drain hose outlet.
NOTE: The pump may make a loud noise when it starts to work for 3~5 minutes. This
is normal.
• Make sure the hose is secure so there are no leaks.
• Direct the hose toward the drain, making sure that there are no kinks that will stop
the water owing.
• Select the desired humidity setting and fan speed on the unit for pump draining to
start.
SET UP & USE
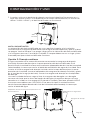
Pump draining (Pump model CCD50PJW only)
The internal pump allows the unit to operate without having to empty the bucket.
To install the included Drain Hose Kit, remove the drain cap on the back of the unit.
Insert the included drain hose adapter and turn clockwise, Insert the Drain Hose onto
the Drain Adapter.
Once securely installed, lead the drain hose to a nearby drain, sink or out of a window
up to 16 ft height from the base of the unit. (Make sure there are no kinks or knots in
the hose).
Turn on the unit and press the pump button to activate the internal pump. When the
water tank is detected to be full of water, the pump automatically begins removing
water and will stop after 90 seconds. The cycle will continue until the pump button is
pressed again and deactivated. If the drain kit is not installed and the pump button is
not activated, the pump will not work.
CAUTION: PUMP MODE WILL ONLY OPERATE WITH THE INCLUDED DRAIN HOSE
AND DRAIN ADAPTER

Page 15
SET UP & USE
NOTE: The pump operation light blinks every second when the pump is failing to
operate. Please turn off the unit and plug the power cord out. Check the
following things:
• Cleaning the lter of the pump. Remove the bucket from the unit, take down the
pump and clean the lter of the pump.
• Empty the water of the bucket.
• Reinstall the pump hose if it drops and reinstall the bucket properly. Turn on the
unit.
NOTE: Do not use this operation when the temperature is equal to or less than 32˚F
(0˚C), otherwise the water will freeze and will cause the water hose to be
blocked and the unit will fail to operate. Make sure to empty the bucket once a
week when using the pump draining feature. When the pump draining feature
is not being used, remove the pump drain hose from the outlet.
• Press the pump drain hose outlet in and take the pump drain hose out from it. Make
sure to not let the water in the pump hose drip to the oor.

Page 16
CLEANING & CARE
CARE AND MAINTENANCE
Care and cleaning of the dehumidier.
CAUTION - Turn the dehumidier off and remove the plug from the wall outlet
before cleaning.
CLEAN THE GRILL AND CASE
• Use water and a mild detergent. Do not use bleach or abrasives.
• Wipe clean with a soft damp cloth.
• Do not splash water directly onto the main unit. Doing so may cause an electrical
shock, cause the insulation to deteriorate, or cause the unit to rust.
• The air intake and outlet grills get soiled easily, so use a vacuum attachment or
brush to clean.
CLEAN THE BUCKET
• Every few weeks, clean the bucket to prevent growth of mold, mildew and bacteria.
Partially ll the bucket with clean water. Swish it around in the bucket, empty and
rinse.
NOTE: Do not use a dishwasher to clean the bucket. After clean, the bucket must be
in place and securely seated for the dehumidier to operate.
CLEAN THE AIR FILTER
• Remove the lter every two weeks based on normal operating conditions.
• To remove the lter, rst open the inlet grill and then pull lter outwards.
• Wash the lter with clean water then dry.
• Re-install the lter, replace inlet grill smoothly.
CAUTION: DO NOT operate the dehumidier without a lter because dirt and lint
will clog it and reduce performance.
Unit should be turned off and unplugged to clean lter.
WHEN NOT USING THE UNIT FOR LONG TIME PERIODS
• After turning off the unit, wait one day before emptying the bucket.
• Clean the main unit, water bucket and air lter.
• Wrap the cord around the power cord holder.
• Cover the unit with a plastic bag.
• Store the unit upright in a dry, well-ventilated place.

Page 17
TROUBLESHOOTING & WARRANTY
BEFORE YOU CALL FOR SERVICE
IF THE APPLIANCE FAILS TO OPERATE:
A) Check to make sure that the dehumidifier is plugged in securely. If it is not,
remove the plug from the outlet, wait 10 seconds and plug it in again securely.
B) Check for a blown circuit fuse or a tripped main circuit breaker. If these seem
to be operating properly, test the outlet with another appliance.
IF NONE OF THE ABOVE SOLVES THE PROBLEM, CONTACT A QUALIFIED
TECHNICIAN. DO NOT TRY TO ADJUST OR REPAIR THE APPLIANCE
YOURSELF.
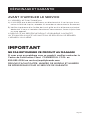
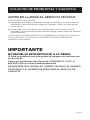
IMPORTANT
DO NOT RETURN THIS PRODUCT TO THE STORE
If you have a problem with this product, please contact the
COMMERCIAL COOL Customer Satisfaction Center at
855-855-0294 or service@equitybrands.com
DATED PROOF OF PURCHASE, MODEL # AND SERIAL #
REQUIRED FOR WARRANTY SERVICE

Page 18
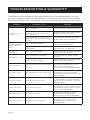
TROUBLESHOOTING & WARRANTY
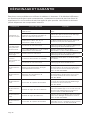
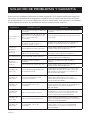
Troubleshoot your problem by using the chart below. If the dehumidier still does
not work properly, contact W Appliance Co. customer service center or the nearest
authorized service center. Customers must never troubleshoot internal components.
Problem Possible Cause Solution
The unit doesn't
operate
Has the power cord been
disconnected? Plug the power cord into the outlet.
Is the tank full indication lamp
blinking? (The tank is full or in a
wrong position.)
Empty the water in the drainage tank
and then reposition the tank.
Is the temperature of the room
above 95˚F (35˚C) or below 44.6˚F
(7˚C)?
The protection device is activated
and the unit cannot be started.
The dehumidifying
function doesn't
work
Is the air filter clogged? Clean the air filter as instructed under
"Cleaning the dehumidifier".
Is the intake duct or discharge duct
obstructed?
Remove the obstruction from the
discharge duct or intake duct.
No air is
discharged Is the air filter clogged? Clean the air filter as instructed under
"Cleaning the dehumidifier".
Operation is noisy
Is the unit tilted or unsteady? Move the unit to a stable, sturdy
location.
Is the air filter clogged? Clean the air filter as instructed under
"Cleaning the dehumidifier".
"E1" Error Code Abnormal exhaust pipe temperature
sensor
There may be an issue with the
exhaust pipe temperature sensor
and related circuit. Contact
Customer Service at 855-855-0294.
"E2" Error Code Coil temperature sensor abnormal
There may be an issue with the coil
temperature sensor and related
circuit. Contact Customer Service at
855-855-0294.
"E3" Error Code Humidity sensor anomaly
There may be an issue with the PCB
or the related circuit of the display
panel. Contact Customer Service at
855-855-0294.
"E4" Error Code Connecting line fault
There may be an issue with the
display panel or the related circuit of
the display panel. Contact Customer
Service at 855-855-0294.
"E5" Error Code Detection line fault
There may be a problem with the
water pump or wiring. Contact
Customer Service at 855-855-0294.
"EH" Error Code Humidity sensor anomaly
There may be a problem with the
humidity sensor related circuit.
Contact Customer Service at
855-855-0294.

Page 19
TROUBLESHOOTING & WARRANTY
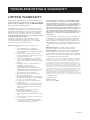
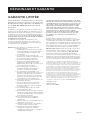
LIMITED WARRANTY
Any repair, replacement, or warranty service,
and all questions about this product should be
directed to W Appliance Co. at 855-855-0294
from the USA or Puerto Rico.
W Appliance Co. warrants to the original purchaser
that the product will be free from defects in material,
parts and workmanship for the period designated for
this product. The warranty commences the day the
product is purchased and covers up to a period of 1
year (12 months) for labor/1 year (12 months) for parts
(manufacturing defects only).
W Appliance Co. agrees that it will, at its option,
replace the defective product with either a new
or remanufactured unit equivalent to your original
purchase during the warranty period.
Exclusions: This warranty does not apply to the
below:
1. If the appearance or exterior of
the product has been damaged or
defaced, altered or modified in design or
construction.
2. If the product original serial number
has been altered or removed or cannot
be readily determined.
3. If there is damaged due to power line
surge, user damage to the AC power
cord or connection to improper voltage
source.
4. If damage is due to general misuse,
accidents or acts of God.
5. If repair attempts are done by
unauthorized service agents, use of
parts other than genuine parts or parts
obtained from persons other than
authorized service companies.
6. On units that have been transferred
from the original owner.
7. On products that have been purchased
as refurbished, like new, second-hand, in
a “As-Is” or “Final Sale” terms.
8. To products used in a commercial or
rental setting.
9. To products used in settings other than
ordinary household use or used other
than in accordance with the provided
instructions.
10. To damages for service calls for
improper installations.
11. Transportation and shipping costs
associated with the replacement of the
unit.
12. Service calls to instruct you how to use
your product.
13. Service calls to repair or replace the
house fuse, reset the circuit breaker or
correct the wiring in the house.
REPAIR OR REPLACEMENT AS PROVIDED UNDER
THIS WARRANTY IS THE EXCLUSIVE REMEDY OF
THE CUSTOMER; W Appliance Co.. SHALL NOT BE
LIABLE FOR ANY INCIDENTAL OR CONSEQUENTIAL
DAMAGES FOR BREACH OF ANY EXPRESS OR
IMPLIED WARRANTY ON THIS PRODUCT, EXCEPT
TO THE EXTENT PROHIBITED BY APPLICABLE LAW.
ANY IMPLIED WARRANTY OF MERCHANTABILITY
OF FITNESS FOR A PARTICULAR PURPOSE ON THIS
PRODUCT IS LIMITED TO THE DURATION OF THE
WARRANTY.
Some states do not allow the exclusion or limitations
of incidental or consequential damages, or limitations
on how long the warranty lasts. In these cases the
above exclusions or limitations may not apply to you.
This warranty gives you specific legal rights and you
may also have other rights which vary from state to
state.
Obtaining Service: To obtain service, product
literature, supplies or accessories please call
855-855-0294 to create a ticket for exchange/repair.
Please make sure to provide the date of purchase,
model number and a brief description of the problem.
Our customer service representative will contact you
or send detailed return instructions.
W Appliance Co. does not warrant that the appliance will work
properly in all environmental conditions, and makes no warranty
and representation, either implied or expressed, with respect
to the quality, performance, merchantability, or fitness for a
particular purpose other than the purpose identified within this
user’s manual. W Appliance Co. has made every eort to ensure
that this user’s manual is accurate and disclaims liability for any
inaccuracies or omissions that may have occurred. Information in
this user’s manual is subject to change without notice and does
not represent a commitment on the part of W Appliance Co.. W
Appliance Co. reserves the right to make improvements to this
user’s manual and/or to the products described in this user’s
manual at any time without notice. If you find information in this
manual that is incorrect, misleading, or incomplete, please contact
us at 855-855-0294.
W Appliance Co.
1356 Broadway
New York, NY 10018

Page 20
Merci d’avoir acheté notre produit
COMMERCIAL COOL. Ce manuel
facile à utiliser vous guidera pour
tirer le meilleur parti de votre
déshumidicateur portable.
N'oubliez pas d'enregistrer les
numéros de modèle et de série.
Ils sont sur une étiquette à l'arrière.
Agrafez votre reçu à votre manuel.
Vous en aurez besoin pour obtenir le service
de garantie.
Numéro de modèle
Numéro de série
Date d’achat
ENREGISTREMENT DU PRODUIT
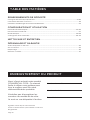
TABLE DES MATIÈRES
RENSEIGNEMENTS DE SÉCURITÉ
Consignes De Sécurité Importantes .........................................................................................................................21-22
Instructions De Mise À La Terre .......................................................................................................................................23
Utilisation De Rallonges Avec Déshumidicateur ........................................................................................24
CONFIGURATION ET UTILISATION
Pièces Et Caractéristiques ........................................................................................................................................... 25-26
Panneau De Commande .......................................................................................................................................27
Mode d’Emploi..................................................................................................................................................28-29
Vidange De l’Eau Collectée ........................................................................................................................30-33
NETTOYAGE ET ENTRETIEN .............................................................................................................. 34
DÉPANNAGE ET GARANTIE
Avant d’Appeler Le Service .................................................................................................................................35
Service Client ..........................................................................................................................................................35
Dépannage ..............................................................................................................................................................36
Garantie Limitée .....................................................................................................................................................................37
La page est en cours de chargement...
La page est en cours de chargement...
La page est en cours de chargement...
La page est en cours de chargement...
La page est en cours de chargement...
La page est en cours de chargement...
La page est en cours de chargement...
La page est en cours de chargement...
La page est en cours de chargement...
La page est en cours de chargement...
La page est en cours de chargement...
La page est en cours de chargement...
La page est en cours de chargement...
La page est en cours de chargement...
La page est en cours de chargement...
La page est en cours de chargement...
La page est en cours de chargement...
La page est en cours de chargement...
La page est en cours de chargement...
La page est en cours de chargement...
La page est en cours de chargement...
La page est en cours de chargement...
La page est en cours de chargement...
La page est en cours de chargement...
La page est en cours de chargement...
La page est en cours de chargement...
La page est en cours de chargement...
La page est en cours de chargement...
La page est en cours de chargement...
La page est en cours de chargement...
La page est en cours de chargement...
La page est en cours de chargement...
La page est en cours de chargement...
La page est en cours de chargement...
La page est en cours de chargement...
La page est en cours de chargement...
-
 1
1
-
 2
2
-
 3
3
-
 4
4
-
 5
5
-
 6
6
-
 7
7
-
 8
8
-
 9
9
-
 10
10
-
 11
11
-
 12
12
-
 13
13
-
 14
14
-
 15
15
-
 16
16
-
 17
17
-
 18
18
-
 19
19
-
 20
20
-
 21
21
-
 22
22
-
 23
23
-
 24
24
-
 25
25
-
 26
26
-
 27
27
-
 28
28
-
 29
29
-
 30
30
-
 31
31
-
 32
32
-
 33
33
-
 34
34
-
 35
35
-
 36
36
-
 37
37
-
 38
38
-
 39
39
-
 40
40
-
 41
41
-
 42
42
-
 43
43
-
 44
44
-
 45
45
-
 46
46
-
 47
47
-
 48
48
-
 49
49
-
 50
50
-
 51
51
-
 52
52
-
 53
53
-
 54
54
-
 55
55
-
 56
56


commercial cool CCD25JW Manuel utilisateur
- Catégorie
- Déshumidificateurs
- Taper
- Manuel utilisateur
dans d''autres langues
- English: commercial cool CCD25JW User manual
- español: commercial cool CCD25JW Manual de usuario
Autres documents
-
Royal Sovereign RDH-230 Le manuel du propriétaire
-
BLACK+DECKER BDT30WTB Manuel utilisateur
-
Danby DDR70B3PWP Product Manual (3.13 MB)
-
mundoclima Series MH-V9 Le manuel du propriétaire
-
NOMA 50 Pint 2-Speed LED Le manuel du propriétaire
-
-
Toshiba TDDP2213ES2C Dehumidifier Manuel utilisateur
-
 Royal Sovereign International RDH-170K Le manuel du propriétaire
-
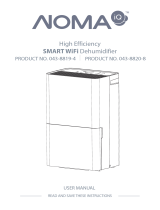 NOMA iQ 50 Pint 2-Speed ENERGY STAR Most Efficient Le manuel du propriétaire
-

