Dometic DVF Holding Tank Vent Filter Mode d'emploi
- Taper
- Mode d'emploi

DVF Holding Tank Vent Filter
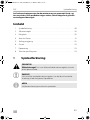
Ventilation filter
Installation and Operating Manual. . . . . . . . 4
Entlüftungsfilter
Montage- und Bedienungsanleitung . . . . . . 9
Filtre d'aération
Instructions de montage
et de service . . . . . . . . . . . . . . . . . . . . . . . . . 14
Filtro de desaireación
Instrucciones de montaje y de uso . . . . . . . 19
Filtro de ventilação
Instruções de montagem e manual de
instruções . . . . . . . . . . . . . . . . . . . . . . . . . . .24
Filtro di sfiato
Istruzioni di montaggio e d’uso . . . . . . . . .29
Ontluchtingsfilter
Montagehandleiding en
gebruiksaanwijzing . . . . . . . . . . . . . . . . . . .34
Udluftningsfilter
Monterings- og betjeningsvejledning . . . .39
Ventilationsfilter
Monterings- och bruksanvisning . . . . . . . .44
Ventilasjonsfilter
Monterings- og bruksanvisning . . . . . . . . .49
Ilmanpoistosuodatin
Asennus- ja käyttöohje . . . . . . . . . . . . . . . . 54
Воздушный фильтр
Инструкция по монтажу и эксплуатации . 59
Filtr odpowietrzający
Instrukcja montażu i obsługi. . . . . . . . . . . . 64
Odvzdušňovací filter
Návod na montáž a uvedenie
do prevádzky. . . . . . . . . . . . . . . . . . . . . . . . 69
Protipachový filtr
Návod k montáži a obsluze . . . . . . . . . . . . 74
Szellőztetőszűrő
Szerelési és használati útmutató . . . . . . . . 79
EN
DE
FR
ES
PT
IT
NL
DA
SV
NO
FI
RU
PL
SK
CS
HU
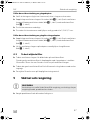
SANITATION
ACCESSORIES
DVF-IO-16s.book Seite 1 Mittwoch, 5. Oktober 2016 1:53 13

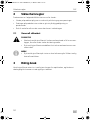
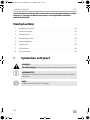
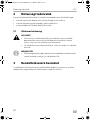
DVF
2
1
1
2
3
2
5a
5b
5c
3
DVF-IO-16s.book Seite 2 Mittwoch, 5. Oktober 2016 1:53 13

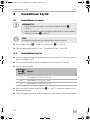
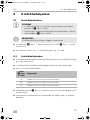
DVF
3
1 2 3
4
21 3 42
5
DVF-IO-16s.book Seite 3 Mittwoch, 5. Oktober 2016 1:53 13

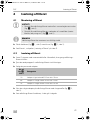
EN
Explanation of symbols DVF
4
Please read this instruction manual carefully before installation and first
use, and store it in a safe place. If you pass on the product to another
person, hand over this instruction manual along with it.
Table of contents
1 Explanation of symbols. . . . . . . . . . . . . . . . . . . . . . . . . . . . . . . . . . . . . . . . . . .4
2 Safety instructions . . . . . . . . . . . . . . . . . . . . . . . . . . . . . . . . . . . . . . . . . . . . . . .4
3 Intended use . . . . . . . . . . . . . . . . . . . . . . . . . . . . . . . . . . . . . . . . . . . . . . . . . . .5
4 Inserting the filter. . . . . . . . . . . . . . . . . . . . . . . . . . . . . . . . . . . . . . . . . . . . . . . .5
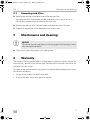
5 Maintenance and cleaning . . . . . . . . . . . . . . . . . . . . . . . . . . . . . . . . . . . . . . . .7
6 Warranty . . . . . . . . . . . . . . . . . . . . . . . . . . . . . . . . . . . . . . . . . . . . . . . . . . . . . .7
7 Disposal . . . . . . . . . . . . . . . . . . . . . . . . . . . . . . . . . . . . . . . . . . . . . . . . . . . . . . .8
8 Technical data . . . . . . . . . . . . . . . . . . . . . . . . . . . . . . . . . . . . . . . . . . . . . . . . . .8
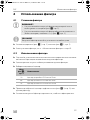
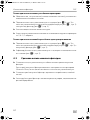
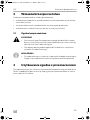
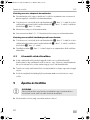
1 Explanation of symbols
!
A
I
2 Safety instructions
The manufacturer accepts no liability for damage in the following cases:
• Damage to the product resulting from mechanical influences and excess voltage
• Alterations to the product without express permission from the manufacturer
• Use for purposes other than those described in the operating manual
CAUTION!
Safety instruction: Failure to observe this instruction can lead to injury.
NOTICE!
Failure to observe this instruction can cause material damage and impair
the function of the product.
NOTE
Supplementary information for operating the product.
DVF-IO-16s.book Seite 4 Mittwoch, 5. Oktober 2016 1:53 13

EN
DVF Intended use
5
2.1 General safety
!
CAUTION!
• Do not use the vent filter for on-board tanks with waste from on-board
waste water systems that use chlorine or other strong oxidizing
agents.
• Replace the vent filter immediately if the on-board tank overflows
accidentally.
I
NOTE
• Replace the vent filter at the beginning of each boating season for
optimum odour control.
3 Intended use
The vent filter is inserted into the vent hose of waste holding tanks and prevents the
escape of odours when flushing the toilet.
4 Inserting the filter
4.1 Fitting the filter
A
I
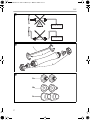
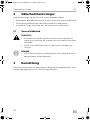
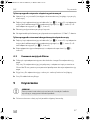
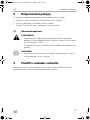
➤ Attach the holder (fig. 2 1, page 2) with screws (fig. 2 2, page 2).
➤ Insert the filter, see chapter “Inserting the filter” on page 6.
NOTICE!
• Do not insert the vent filter underneath or at the same height as the
tank (fig. 1, page 2).
• Do not insert the vent filter near any heat sources (engine blocks,
lighting etc.) (fig. 1, page 2).
NOTE
The vent filter can be fitted at any angle.
DVF-IO-16s.book Seite 5 Mittwoch, 5. Oktober 2016 1:53 13

EN
Inserting the filter DVF
6
4.2 Inserting the filter
➤ Grease the O-ring on each connector of the vent filter using a lubricant or silicone
grease.
➤ Remove the red stoppers from both connectors of the vent filter.
➤ Select a suitable adapter:
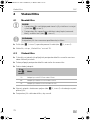
➤ Screw the selected adapter together with the hose couplings (fig. 2 3, page 2)
on the vent filter.
➤ Insert the vent filter into the holder so that it latches into place.
For using thread adaptors only
➤ Check that there are seals (not included in delivery) in the connectors of the
hoses.
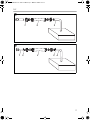
➤ Connect the vent hose from the tank (fig. 4 3, page 3) and the vent hose to the
hull vent pipes (fig. 4 1, page 3) with the vent filter (fig. 4 2, page 3).
➤ Tighten the connectors by hand.
➤ Tighten the connectors further by a 1/4 to 1/2 a turn using a tool.
For using threadless hose adaptors only
➤ Connect the vent hose from the tank (fig. 5 4, page 3) and the vent hose to the
hull vent pipes (fig. 5 1, page 3) with the vent filter (fig. 5 3, page 3).
➤ Secure the vent hoses on the adapters with hose clips (fig. 5 2, page 3).
No. in
fig. 3,
page 2
Description
5a Adapter for thread with Ø 16 mm or 19 mm
5b Adapter for hose with Ø 16 mm or 19 mm
5c Adapter for hose with Ø 25 mm or 38 mm
DVF-IO-16s.book Seite 6 Mittwoch, 5. Oktober 2016 1:53 13

EN
DVF Maintenance and cleaning
7
4.3 Removing used filters
➤ Remove the vent hose from both ends of the old vent filter.
If the old vent filter is connected with hose adapters with a size of 16 mm or
19 mm, they should remain attached to the vent hose.
➤ Remove the old vent filter from the holder and close the ends with tape.
➤ Dispose of the old filter in the appropriate recycling waste.
5 Maintenance and cleaning
A
➤ Occasionally clean the product with a damp cloth.
6Warranty
The statutory warranty period applies. If the product is defective, please contact the
manufacturer's branch in your country (see the back of the instruction manual for the
addresses) or your retailer.
For repair and guarantee processing, please include the following documents when
you send in the device:
• A copy of the receipt with purchasing date
• A reason for the claim or description of the fault
NOTICE!
Do not use sharp or hard objects or cleaning agents for cleaning as these
may damage the product.
DVF-IO-16s.book Seite 7 Mittwoch, 5. Oktober 2016 1:53 13

EN
Disposal DVF
8
7Disposal
➤ Place the packaging material in the appropriate recycling waste bins wherever
possible.
M
If you wish to finally dispose of the product, ask your local recycling centre
or specialist dealer for details about how to do this in accordance with the
applicable disposal regulations.
8 Technical data
DVF
Ref. no.: 9108849515
Weight: 0.68 kg
Dimensions (L x W x H) : 500 x 89 x 89 mm
DVF-IO-16s.book Seite 8 Mittwoch, 5. Oktober 2016 1:53 13

DE
DVF Erklärung der Symbole
9
Bitte lesen Sie diese Anleitung vor Einbau und Inbetriebnahme sorgfältig
durch und bewahren Sie sie auf. Geben Sie sie im Falle einer Weitergabe
des Produktes an den Nutzer weiter.
Inhaltsverzeichnis
1 Erklärung der Symbole . . . . . . . . . . . . . . . . . . . . . . . . . . . . . . . . . . . . . . . . . . .9
2 Sicherheitshinweise . . . . . . . . . . . . . . . . . . . . . . . . . . . . . . . . . . . . . . . . . . . .10
3 Bestimmungsgemäßer Gebrauch . . . . . . . . . . . . . . . . . . . . . . . . . . . . . . . . .10
4 Filter einsetzen . . . . . . . . . . . . . . . . . . . . . . . . . . . . . . . . . . . . . . . . . . . . . . . . 11
5 Pflegen und Reinigen . . . . . . . . . . . . . . . . . . . . . . . . . . . . . . . . . . . . . . . . . . .12
6 Gewährleistung. . . . . . . . . . . . . . . . . . . . . . . . . . . . . . . . . . . . . . . . . . . . . . . .13
7 Entsorgung . . . . . . . . . . . . . . . . . . . . . . . . . . . . . . . . . . . . . . . . . . . . . . . . . . .13
8 Technische Daten . . . . . . . . . . . . . . . . . . . . . . . . . . . . . . . . . . . . . . . . . . . . . .13
1 Erklärung der Symbole
!
A
I
VORSICHT!
Sicherheitshinweis: Nichtbeachtung kann zu Verletzungen führen.
ACHTUNG!
Nichtbeachtung kann zu Materialschäden führen und die Funktion des
Produktes beeinträchtigen.
HINWEIS
Ergänzende Informationen zur Bedienung des Produktes.
DVF-IO-16s.book Seite 9 Mittwoch, 5. Oktober 2016 1:53 13

DE
Sicherheitshinweise DVF
10
2 Sicherheitshinweise
Der Hersteller übernimmt in folgenden Fällen keine Haftung für Schäden:
• Beschädigungen am Produkt durch mechanische Einflüsse und Über-
spannungen
• Veränderungen am Produkt ohne ausdrückliche Genehmigung vom Hersteller
• Verwendung für andere als die in der Anleitung beschriebenen Zwecke
2.1 Allgemeine Sicherheit
!
VORSICHT!
• Verwenden Sie den Entlüftungsfilter nicht für Bordtanks mit Abfällen
aus Bordkläranlagen, die Chlor oder andere starke Oxidationsmittel
verwenden.
• Ersetzen Sie den Entlüftungsfilter sofort, wenn der Bordtank ver-
sehentlich überläuft.
I
HINWEIS
• Ersetzen Sie den Entlüftungsfilter am Anfang jeder Bootssaison zur
bestmöglichen Geruchskontrolle.
3 Bestimmungsgemäßer Gebrauch
Der Entlüftungsfilter wird in den Entlüftungsschlauch von Fäkalientanks eingesetzt
und verhindert das Ausströmen schlechter Gerüche beim Betätigen der Toiletten-
spülung.
DVF-IO-16s.book Seite 10 Mittwoch, 5. Oktober 2016 1:53 13

DE
DVF Filter einsetzen
11
4 Filter einsetzen
4.1 Filter montieren
A
I
➤ Bringen Sie die Halterung (Abb. 2 1, Seite 2) mit Schrauben an (Abb. 2 2,
Seite 2).
➤ Setzen Sie den Filter ein, siehe Kapitel „Filter einsetzen“ auf Seite 11.
4.2 Filter einsetzen
➤ Fetten Sie die O-Ringe an jedem Anschluss des Entlüftungsfilters mit Schmier-
mittel oder Silikonfett.
➤ Entfernen Sie die roten Stopfen von beiden Anschlüssen des Entlüftungsfilters.
➤ Wählen Sie den passenden Adapter:
➤ Schrauben Sie den gewählten Adapter mit den Schlauchmuffen (Abb. 2 3,
Seite 2) an den Entlüftungsfilter.
➤ Setzen Sie den Entlüftungsfilter in die Halterung ein, sodass er einrastet.
ACHTUNG!
• Setzen Sie den Entlüftungsfilter nicht unterhalb oder auf gleicher
Höhe zum Tank ein (Abb. 1, Seite 2).
• Setzen Sie den Entlüftungsfilter nicht in der Nähe von Wärmequellen
(Motorblöcke, Beleuchtung usw.) ein (Abb. 1, Seite 2).
HINWEIS
Der Entlüftungsfilter kann in einem beliebigen Winkel montiert werden.
Nr. in
Abb. 3,
Seite 2
Bezeichnung
5a Adapter für Gewinde mit Ø 16 mm oder 19 mm
5b Adapter für Schlauch mit Ø 16 mm oder 19 mm
5c Adapter für Schlauch mit Ø 25 mm oder 38 mm
DVF-IO-16s.book Seite 11 Mittwoch, 5. Oktober 2016 1:53 13

DE
Pflegen und Reinigen DVF
12
Nur bei Verwendung von Gewindeadaptern
➤ Stellen Sie sicher, dass die Dichtungen (nicht im Lieferumfang enthalten) in den
Anschlussstücken der Schläuche vorhanden sind.
➤ Verbinden Sie den Entlüftungsschlauch vom Tank (Abb. 4 3, Seite 3) und den
Entlüftungsschlauch zum Rumpfentlüftungsstutzen (Abb. 4 1, Seite 3) mit dem
Entlüftungsfilter (Abb. 4 2, Seite 3).
➤ Ziehen Sie die Anschlussstücke handfest an.
➤ Ziehen Sie die Anschlussstücke mit Werkzeug etwa 1/4 bis 1/2 Umdrehung
weiter an.
Nur bei Verwendung von gewindelosen Schlauchadaptern
➤ Verbinden Sie den Entlüftungsschlauch vom Tank (Abb. 5 4, Seite 3) und den
Entlüftungsschlauch zum Rumpfentlüftungsstutzen (Abb. 5 1, Seite 3) mit dem
Entlüftungsfilter (Abb. 5 3, Seite 3).
➤ Sichern Sie die Entlüftungsschläuche an den Adaptern mit Schlauchschellen
(Abb. 5 2, Seite 3).
4.3 Gebrauchten Filter entfernen
➤ Entfernen Sie den Entlüftungsschlauch von beiden Enden des alten Entlüftungs-
filters.
Falls der alte Entlüftungsfilter mit Schlauchadaptern mit einer Größe von16 mm
oder 19 mm verbunden ist, sollten diese am Entlüftungsschlauch angebracht
bleiben.
➤ Entfernen Sie den alten Entlüftungsfilter aus der Halterung und verschließen Sie
die Enden mit Klebeband.
➤ Entsorgen Sie den alten Filter im entsprechenden Recycling-Müll.
5 Pflegen und Reinigen
A
➤ Reinigen Sie das Produkt gelegentlich mit einem feuchten Tuch.
ACHTUNG!
Keine scharfen oder harten Gegenstände oder Reinigungsmittel zur
Reinigung verwenden, da dies zu einer Beschädigung des Produktes
führen kann.
DVF-IO-16s.book Seite 12 Mittwoch, 5. Oktober 2016 1:53 13

DE
DVF Gewährleistung
13
6Gewährleistung
Es gilt die gesetzliche Gewährleistungsfrist. Sollte das Produkt defekt sein, wenden
Sie sich bitte an die Niederlassung des Herstellers in Ihrem Land (Adressen siehe
Rückseite der Anleitung) oder an Ihren Fachhändler.
Zur Reparatur- bzw. Gewährleistungsbearbeitung müssen Sie folgende Unterlagen
mitschicken:
• eine Kopie der Rechnung mit Kaufdatum,
• einen Reklamationsgrund oder eine Fehlerbeschreibung.
7Entsorgung
➤ Geben Sie das Verpackungsmaterial möglichst in den entsprechenden
Recycling-Müll.
M
Wenn Sie das Produkt endgültig außer Betrieb nehmen, informieren Sie
sich bitte beim nächsten Recyclingcenter oder bei Ihrem Fachhändler
über die zutreffenden Entsorgungsvorschriften.
8 Technische Daten
DVF
Art.-Nr.: 9108849515
Gewicht: 0,68 kg
Abmessungen (L x B x H): 500 x 89 x 89 mm
DVF-IO-16s.book Seite 13 Mittwoch, 5. Oktober 2016 1:53 13

FR
Explication des symboles DVF
14
Veuillez lire attentivement cette notice avant le montage et la mise en
service. Veuillez ensuite la conserver. En cas de passer le produit, veuillez
le transmettre au nouvel acquéreur.
Sommaire
1 Explication des symboles . . . . . . . . . . . . . . . . . . . . . . . . . . . . . . . . . . . . . . . .14
2 Consignes de sécurité . . . . . . . . . . . . . . . . . . . . . . . . . . . . . . . . . . . . . . . . . .15
3 Usage conforme . . . . . . . . . . . . . . . . . . . . . . . . . . . . . . . . . . . . . . . . . . . . . . .15
4 Utilisation du filtre . . . . . . . . . . . . . . . . . . . . . . . . . . . . . . . . . . . . . . . . . . . . . .16
5 Entretien et nettoyage . . . . . . . . . . . . . . . . . . . . . . . . . . . . . . . . . . . . . . . . . .17
6 Garantie. . . . . . . . . . . . . . . . . . . . . . . . . . . . . . . . . . . . . . . . . . . . . . . . . . . . . .18
7 Traitement des déchets . . . . . . . . . . . . . . . . . . . . . . . . . . . . . . . . . . . . . . . . .18
8 Caractéristiques techniques . . . . . . . . . . . . . . . . . . . . . . . . . . . . . . . . . . . . . .18
1 Explication des symboles
!
A
I
ATTENTION !
Consigne de sécurité : le non-respect de ces consignes peut entraîner
des blessures.
AVIS !
Le non-respect de ces consignes peut entraîner des dommages
matériels et des dysfonctionnements du produit.
REMARQUE
Informations complémentaires sur l'utilisation du produit.
DVF-IO-16s.book Seite 14 Mittwoch, 5. Oktober 2016 1:53 13

FR
DVF Consignes de sécurité
15
2 Consignes de sécurité
Le fabricant décline toute responsabilité pour des dommages dans les cas suivants :
• des influences mécaniques et des surtensions ayant endommagé le matériel
• des modifications apportées au produit sans autorisation explicite de la part du
fabricant
• une utilisation différente de celle décrite dans la notice
2.1 Consignes générales de sécurité
!
ATTENTION !
• N'utilisez pas le filtre d'aération pour les réservoirs de bord contenant
des déchets issus d'installations de traitement des eaux usées qui
utilisent du chlore ou d'autres produits fortement oxydants.
• Remplacez immédiatement le filtre d'aération si le réservoir de bord
déborde accidentellement.
I
REMARQUE
• Remplacez le filtre d'aération au début de chaque saison de naviga-
tion afin de garantir un contrôle optimal des mauvaises odeurs.
3Usage conforme
Le filtre d'aération est utilisé dans le flexible d'aération du réservoir à eaux noires et
empêche l'évacuation de mauvaises odeurs lors de l'actionnement de la chasse
d'eau.
DVF-IO-16s.book Seite 15 Mittwoch, 5. Oktober 2016 1:53 13

FR
Utilisation du filtre DVF
16
4 Utilisation du filtre
4.1 Montage du filtre
A
I
➤ Fixez le support (fig. 2 1, page 2) avec des vis (fig. 2 2, page 2).
➤ Mettez le filtre en place, voir chapitre « Utilisation du filtre », page 16.
4.2 Utilisation du filtre
➤ Graissez les joints toriques au niveau de chaque raccordement du filtre d'aéra-
tion avec du lubrifiant ou de la graisse de silicone.
➤ Retirez les bouchons rouges des deux raccordements du filtre d'aération.
➤ Choisissez l'adaptateur adéquat :
➤ Vissez l'adaptateur choisi avec les manchons (fig. 2 3, page 2) sur le filtre
d'aération.
➤ Introduisez le filtre d'aération dans le support pour qu'il s'y enclenche.
AVIS !
• N'utilisez pas le filtre d'aération en dessous ou à la même hauteur
que le réservoir (fig. 1, page 2).
• N'utilisez pas le filtre d'aération à proximité de sources de chaleur
(blocs moteurs, éclairage, etc.) (fig. 1, page 2).
REMARQUE
Il est possible de monter le filtre d'aération selon un angle au choix.
N° sur la
fig. 3,
page 2
Désignation
5a Adaptateur pour filetage de Ø 16 mm ou 19 mm
5b Adaptateur pour flexible de Ø 16 mm ou 19 mm
5c Adaptateur pour flexible de Ø 25 mm ou 38 mm
DVF-IO-16s.book Seite 16 Mittwoch, 5. Oktober 2016 1:53 13

FR
DVF Entretien et nettoyage
17
Uniquement en cas d'utilisation d'adaptateurs filetés
➤ Assurez-vous que les joints (non fournis à la livraison) sont présents dans les
pièces de raccordement des flexibles.
➤ Raccordez le flexible d'aération venant du réservoir (fig. 4 3, page 3) et le
flexible d'aération allant vers la tubulure d'aération de la coque (fig. 4 1,
page 3) au filtre d'aération (fig. 4 2, page 3).
➤ Serrez les pièces de raccordement à la main.
➤ Resserrez les pièces de raccordement avec un outil, de 1/4 à 1/2 tour
supplémentaire.
Uniquement en cas d'utilisation d'adaptateurs de flexibles sans filetages
➤ Raccordez le flexible d'aération venant du réservoir (fig. 5 4, page 3) et le
flexible d'aération allant vers la tubulure d'aération de la coque (fig. 5 1,
page 3) au filtre d'aération (fig. 5 3, page 3).
➤ Fixez les flexibles d'aération aux adaptateurs avec des colliers (fig. 5 2,
page 3).
4.3 Retrait du filtre usagé
➤ Retirez le flexible d'aération des deux extrémités du filtre d'aération usagé.
Si le filtre d'aération usagé est raccordé avec des adaptateurs de flexibles de
16 mm ou 19 mm, ceux-ci doivent rester montés sur le flexible d'aération.
➤ Retirez le filtre d'aération usagé du support et fermez les extrémités avec du
ruban adhésif.
➤ Jetez le filtre usagé dans les déchets à recycler correspondants.
5 Entretien et nettoyage
A
➤ Nettoyez le produit avec un tissu humide.
AVIS !
N’utilisez aucun objet coupant ou dur, ni de détergents pour le
nettoyage. Cela pourrait endommager le produit.
DVF-IO-16s.book Seite 17 Mittwoch, 5. Oktober 2016 1:53 13

FR
Garantie DVF
18
6 Garantie
Le délai légal de garantie s'applique. Si le produit s'avérait défectueux, veuillez vous
adresser à la filiale du fabricant située dans votre pays (voir adresses au verso du
présent manuel) ou à votre revendeur spécialisé.
Veuillez y joindre les documents suivants pour la gestion des réparations et de la
garantie :
• une copie de la facture avec la date d'achat,
• le motif de la réclamation ou une description du dysfonctionnement.
7 Traitement des déchets
➤ Jetez les emballages dans les conteneurs de déchets recyclables prévus à cet
effet.
M
Lorsque vous mettrez votre produit définitivement hors service, informez-
vous auprès du centre de recyclage le plus proche ou auprès de votre
revendeur spécialisé sur les prescriptions relatives au retraitement des
déchets.
8 Caractéristiques techniques
DVF
N° de produit : 9108849515
Poids : 0,68 kg
Dimensions (L x l x h) : 500 x 89 x 89 mm
DVF-IO-16s.book Seite 18 Mittwoch, 5. Oktober 2016 1:53 13

ES
DVF Explicación de los símbolos
19
Lea detenidamente estas instrucciones antes de llevar a cabo la instalación
y puesta en funcionamiento, y consérvelas en un lugar seguro. En caso de
vender o entregar el producto a otra persona, entregue también estas
instrucciones.
Índice
1 Explicación de los símbolos . . . . . . . . . . . . . . . . . . . . . . . . . . . . . . . . . . . . . .19
2 Indicaciones de seguridad . . . . . . . . . . . . . . . . . . . . . . . . . . . . . . . . . . . . . . 20
3 Uso adecuado. . . . . . . . . . . . . . . . . . . . . . . . . . . . . . . . . . . . . . . . . . . . . . . . 20
4 Colocar el filtro . . . . . . . . . . . . . . . . . . . . . . . . . . . . . . . . . . . . . . . . . . . . . . . .21
5 Mantenimiento y limpieza . . . . . . . . . . . . . . . . . . . . . . . . . . . . . . . . . . . . . . 22
6 Garantía legal . . . . . . . . . . . . . . . . . . . . . . . . . . . . . . . . . . . . . . . . . . . . . . . . 23
7 Gestión de residuos . . . . . . . . . . . . . . . . . . . . . . . . . . . . . . . . . . . . . . . . . . . 23
8 Datos técnicos. . . . . . . . . . . . . . . . . . . . . . . . . . . . . . . . . . . . . . . . . . . . . . . . 23
1 Explicación de los símbolos
!
A
I
¡ATENCIÓN!
Indicación de seguridad: su incumplimiento puede acarrear
lesiones.
¡AVISO!
Su incumplimiento puede acarrear daños materiales y perjudicar el
correcto funcionamiento del producto.
NOTA
Información adicional para el manejo del producto.
DVF-IO-16s.book Seite 19 Mittwoch, 5. Oktober 2016 1:53 13

ES
Indicaciones de seguridad DVF
20
2 Indicaciones de seguridad
El fabricante declina toda responsabilidad ante daños ocurridos en los siguientes
casos:
• daños en el producto debido a influencias mecánicas y sobretensiones
• modificaciones realizadas en el producto sin el expreso consentimiento del
fabricante
• utilización del aparato para fines distintos a los descritos en las instrucciones
2.1 Seguridad general
!
¡ATENCIÓN!
• No utilice el filtro de desaireación para depósitos de a bordo con resi-
duos procedentes de sistemas de tratamiento de aguas residuales de
a bordo que utilicen cloro u otros agentes fuertemente oxidantes.
• Cambie inmediatamente el filtro si el depósito de a bordo se
desborda.
I
NOTA
• Cambie el filtro de desaireación al principio de temporada para así
combatir de la mejor manera posible los olores.
3Uso adecuado
El filtro de desaireación se inserta en la manguera de desaireación de depósitos de
aguas fecales para evitar que se propaguen malos olores al activar la cisterna.
DVF-IO-16s.book Seite 20 Mittwoch, 5. Oktober 2016 1:53 13
La page est en cours de chargement...
La page est en cours de chargement...
La page est en cours de chargement...
La page est en cours de chargement...
La page est en cours de chargement...
La page est en cours de chargement...
La page est en cours de chargement...
La page est en cours de chargement...
La page est en cours de chargement...
La page est en cours de chargement...
La page est en cours de chargement...
La page est en cours de chargement...
La page est en cours de chargement...
La page est en cours de chargement...
La page est en cours de chargement...
La page est en cours de chargement...
La page est en cours de chargement...
La page est en cours de chargement...
La page est en cours de chargement...
La page est en cours de chargement...
La page est en cours de chargement...
La page est en cours de chargement...
La page est en cours de chargement...
La page est en cours de chargement...
La page est en cours de chargement...
La page est en cours de chargement...
La page est en cours de chargement...
La page est en cours de chargement...
La page est en cours de chargement...
La page est en cours de chargement...
La page est en cours de chargement...
La page est en cours de chargement...
La page est en cours de chargement...
La page est en cours de chargement...
La page est en cours de chargement...
La page est en cours de chargement...
La page est en cours de chargement...
La page est en cours de chargement...
La page est en cours de chargement...
La page est en cours de chargement...
La page est en cours de chargement...
La page est en cours de chargement...
La page est en cours de chargement...
La page est en cours de chargement...
La page est en cours de chargement...
La page est en cours de chargement...
La page est en cours de chargement...
La page est en cours de chargement...
La page est en cours de chargement...
La page est en cours de chargement...
La page est en cours de chargement...
La page est en cours de chargement...
La page est en cours de chargement...
La page est en cours de chargement...
La page est en cours de chargement...
La page est en cours de chargement...
La page est en cours de chargement...
La page est en cours de chargement...
La page est en cours de chargement...
La page est en cours de chargement...
La page est en cours de chargement...
La page est en cours de chargement...
La page est en cours de chargement...
La page est en cours de chargement...
-
 1
1
-
 2
2
-
 3
3
-
 4
4
-
 5
5
-
 6
6
-
 7
7
-
 8
8
-
 9
9
-
 10
10
-
 11
11
-
 12
12
-
 13
13
-
 14
14
-
 15
15
-
 16
16
-
 17
17
-
 18
18
-
 19
19
-
 20
20
-
 21
21
-
 22
22
-
 23
23
-
 24
24
-
 25
25
-
 26
26
-
 27
27
-
 28
28
-
 29
29
-
 30
30
-
 31
31
-
 32
32
-
 33
33
-
 34
34
-
 35
35
-
 36
36
-
 37
37
-
 38
38
-
 39
39
-
 40
40
-
 41
41
-
 42
42
-
 43
43
-
 44
44
-
 45
45
-
 46
46
-
 47
47
-
 48
48
-
 49
49
-
 50
50
-
 51
51
-
 52
52
-
 53
53
-
 54
54
-
 55
55
-
 56
56
-
 57
57
-
 58
58
-
 59
59
-
 60
60
-
 61
61
-
 62
62
-
 63
63
-
 64
64
-
 65
65
-
 66
66
-
 67
67
-
 68
68
-
 69
69
-
 70
70
-
 71
71
-
 72
72
-
 73
73
-
 74
74
-
 75
75
-
 76
76
-
 77
77
-
 78
78
-
 79
79
-
 80
80
-
 81
81
-
 82
82
-
 83
83
-
 84
84


