Chef’sChoice 8540000 Manuel utilisateur
- Catégorie
- Petit gâteau
- Taper
- Manuel utilisateur
Ce manuel convient également à

International
Classic WafflePro
®
Taste/Texture Select
®
WITH
Instructions & Recipes for Model 854
Instructions et recettes pour le modèle 854
© 2013 EdgeCraft Corp.
GB F

2
IMPORTANT SAFEGUARDS
When using electrical appliances, basic safety precautions should always be
followed including the following:
1. Read all instructions before using the Classic WafflePro
®
.
2. Do not touch hot surfaces. Always use plastic handle on lid and do not touch
stainless cover when hot.
3. To protect against fire, electric shock and injury to persons, do not immerse
cord, plug or Classic WafflePro
®
in water or other liquid.
4. Close supervision is necessary when any appliance is used by or near children.
5. Before use, unwind the power cord completely and keep the cord away from
hot parts of the appliance.
6. Do not let power cord hang over edge of table or counter or touch hot surfaces.
7. Do not place on or near hot gas or electric burner, or in a heated oven.
8. Extreme caution must be used when moving an appliance containing hot oil or
other hot liquids.
9. Only operate the Classic WafflePro
®
on a dry, flat, non-slip surface.
10. Do not use the Classic WafflePro
®
outdoors.
11. Do not operate the Classic WafflePro
®
with a damaged cord or plug. If it
malfunctions or has been damaged in any manner, return the Classic
WafflePro
®
to the EdgeCraft Corporation Service Department for examination,
repair or adjustment.
12. The use of accessory attachments not recommended by the EdgeCraft
Corporation may result in fire, electric shock or injury to persons.
13. Always unplug the Classic WafflePro
®
from electrical outlet when not in
use and before cleaning, to avoid accidental electrical shock. Allow to cool
before cleaning.
14. As long as the appliance is hot, even if unplugged, there is the danger of
someone getting burned. Do not touch and do not put it into storage while hot.
15. Do not use the Classic WafflePro
®
for other than intended use.
16. For use only on 120V 60HZ power. Use a socket with a good ground
connection. Do not use a three to two way adapter on the three prong power
cord provided.
17. For household use only.
18.
SAVE THESE INSTRUCTIONS.

3
YOU MADE
A GOOD
CHOICE
The Classic WafflePro
®
Taste/Texture Select
®
Model 854 comes to
you from Chef’sChoice
®
, the maker of the world’s finest professional
household gourmet products. The Classic WafflePro
®
brings to the
home features found only in commercial waffle makers. Its unique
Quad
®
Baking System allows you to select that “just right” texture
and taste. A highly versatile waffle maker, Classic WafflePro
®
will
for example bake rapidly for a crisp golden brown exterior while
retaining a moist interior, like crusty bread hot from the oven. Or,
with the flick of a switch, you can make a crunchy waffle with a
uniform texture throughout.
Remember when waffles were only for the weekends when Mom
and Dad had more time? The Classic WafflePro
®
puts waffles back
on the menu everyday! It heats up while the coffee is being brewed
and your first waffle is ready when your coffee is poured. And,
because it heats so rapidly, you’ll be making waffles just about as
fast as they can be eaten.
Imagine waffles with the natural aroma and taste of freshly baked
bread and pastries. Make up a batch of a quick Basic Waffle
recipe the night before so it’s ready to bake in the heated Classic
WafflePro
®
every morning. Enjoy!

4
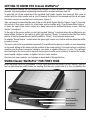
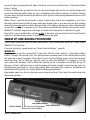
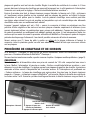
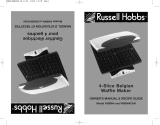
GETTING TO KNOW THE Classic WafflePro
®
Take a minute to identify the key features and controls of Classic WafflePro
®
, (Figure 1) made of high
strength, high temperature engineering plastics with a brushed stainless steel lid.
To open the lid, lift the underside of the insulated front plastic handle. Your hand will first come in
contact with the latch handle, and as you lift upward, the latch will be released and the lid will open.
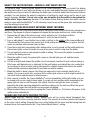
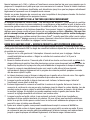
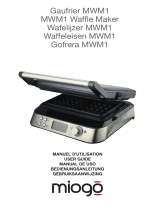
Electronic controls are on the front control panel, Figure 2.
Take a moment to understand the use of the circular black Rocker Switch, Figures 1 and 2. Press the
left portion of the rocker switch for a fast bake and for waffles with “Crisp Exterior/Moist Interior”,
or press the right of the rocker switch for a deep bake and for waffles that have a more “Uniform
Texture” throughout.
To the right of the rocker switch is a red light marked “Baking” to indicate when the waffle plates are
being heated. Further to the right is a green light marked “Ready” to indicate either that the waffle
plate is at baking temperature or that the waffle is “Ready” to be removed and served.
An audible “Ready Beeper” sounds when the green light comes on to further indicate when the waffle
is ready to serve.
The color control dial is graduated numerically. The waffle will be darker or lighter in color depending
on the exact setting of this wheel and the position of the rocker switch. This control wheel is relatively
sensitive and fractional numerical changes can make a notable difference in color. The optimum
exact setting for the color control depends on the type of waffle you are baking. To darken the waffle,
move toward a higher number; to lighten, turn to a lower number.
Provision has been made for cord storage as described in Storage Section.
USING Classic WafflePro
®
FOR FIRST TIME
Insert the power cord into a grounded 120 volt outlet and close the cover. The red “baking” light will
turn on indicating the waffle plates are heating. Set the color control dial to 4. You can shorten the
Figure 1. Classic WafflePro
®
Taste/Texture Select
®
.
Control Panel
(See Figure 2)
Handle for Lid with
Locking Latch
Rocker Switch
Color Control Dial

5
warm-up time by pressing the left side of the black round rocker switch to the “Crisp Exterior/Moist
Interior” setting.
In about 5 minutes the red light will turn off, the green Ready light will turn on and the Beeper will
sound indicating the waffle plates are up to temperature and ready for baking. On the first heating
you may sense a slight odor during the heat-up cycle, typical of new heating elements with non-stick
surface coatings.
When “Ready”, open the lid and brush or spray a light coating of non stick vegetable or corn oil on
the entire surface area of both the upper and lower heated grids (or you may use non-stick cooking
spray that does not contain lecithin). Because both of the baking surfaces are factory finished with
an non-stick coating, it is necessary to oil the surfaces only before the first time you use the Classic
WafflePro
®
and after long periods of storage. It should not be necessary to otherwise oil again.
Pour about 1 cup of waffle batter onto the middle of the lower grid and close the lid. Discard the first
waffle as it will absorb any excess oil which you used on the grids.
WARM UP AND BAKING PROCEDURE
If the Classic WafflePro
®
has not been used before, follow instructions above for “Using Classic
WafflePro
®
for First Time.”
If you are looking for a good recipe, see “Some Favorite Recipes”, (page 9).
WARM-UP
Plug the power cord into a grounded 120 volt outlet. Set the rocker switch to “Crisp Exterior/Moist
Interior” to begin the heat-up cycle. This setting places maximum heat on the waffle grids and they
will warm up in about 5 minutes. If the switch is set to Uniform Texture, warm up time will be about
twice that long. The red “Baking” light will come on when the WafflePro
®
is plugged in. Set the
color control dial between 2 and 3. When the heat-up period is complete the red light will go off,
the green “Ready” light will come on and the beeper will briefly sound to remind you the grid is up
to temperature and ready for you to begin baking. When the green light comes on, the heaters are
deactivated until the grids cool slightly below the baking temperature.
Keep hands away from the hot stainless cover and grid surfaces. Touch only the control panel and
the handle provided.
Figure 2. Control Panel.
Rocker Switch • Press here for deep bake
• Press here for fast bake
“Ready” Light
and Audible Beeper
Color Control Dial

6
SELECT THE TASTE/TEXTURE – WHICH IS JUST RIGHT FOR YOU
The versatile Quad
®
Baking System unique to the Classic WafflePro
®
lets you control the baking
condition best suited to your taste and allows you to vary and modify the taste, texture and aroma of
the waffles any time you wish. By adjusting the batter you can further widen the flavors and textures
available. You can develop the perfect combination of settings for each recipe and for any of your
favorite toppings. Caution - Do not rely on the age-old notion that the waffle is done when the
waffle maker stops steaming. Because of the unique Quad
®
Baking System the waffle may be
ready to serve while the WafflePro
®
is still steaming. Learn to rely on the green light and beeper and
vary the settings to your taste.
MAKING WAFFLES WITH CRISP EXTERIOR/ MOIST INTERIOR
Waffles made with the Crisp Exterior/Moist Interior setting will retain more of the freshly–baked aroma
and flavor. The degree of exterior crispness will depend on the recipe and the color control setting.
1. Depress the left side of the black circular rocker switch to the “Crisp Exterior/Moist
Interior” setting. Set the color control between 2 and 3 for the first waffle.
2. Pour or ladle about 1 cup of batter from a ladle or pitcher in the middle of the lower waffle grid.
A thicker batter, that pours slowly works best. Avoid putting too much batter on grid as that will
cause an overflow and increase clean up time.
3. Close the lid and latch immediately after adding batter so as to spread out the batter uniformly.
Press down lightly on the lid handle for several seconds in order to help level the batter.
4. The red light will come on indicating the waffle is baking. This means the heater is powered to
continue the baking process.
5. When the waffle is ready, the green light comes on, the red light goes off, and the beeper
sounds briefly.
6. Lift the lid slightly and inspect the waffle color. If necessary close the lid and continue baking a
little longer until desired color is obtained. On the next baking cycle adjust the color control dial
as necessary to obtain a better setting. Movement to a higher number will darken the waffle.
Commonly the necessary adjustment is less than one whole number.
7. When the waffle is done, remove it by lifting one edge with a heat-resistant plastic fork or
spatula. (If you use a metal fork, use care not to contact grid surfaces as that might scratch the
non-stick surface and decrease its effectiveness.)
8. After removal of waffle, the Classic WafflePro
®
can be immediately refilled with batter or it can
be closed until you are ready to bake again. If you do not start another waffle immediately the
green light will stay on until the grids cool slightly, then the red light will come on briefly
indicating the grids are being reheated to maintain readiness for the next use. When the green
light comes on again the next waffle can be poured and baked.
9. When finished baking, be certain to unplug the Classic WafflePro
®
. Only then is the power to the
waffle maker switched off.
MAKING WAFFLES WITH UNIFORM TEXTURE
Waffles made with the “Uniform Texture” baking cycle will be evenly baked throughout their
thickness. They will have a crunchy and drier texture. The amount of moisture retention will depend
on the color control setting. Generally the color control setting will be lower and the baking time will
be about twice that expected with the “Crisp Exterior/Moist Interior” setting.

7
1. Depress the right side of the black circular rocker switch to the “Uniform Texture” setting.
Set the color control dial to about 2 for the first waffle.
2. Pour or ladle about 1 cup of batter from a ladle or pitcher in the middle of the lower waffle grid.
A thicker batter, that pours slowly works best. Do not overfill the grid.
3. Close the lid immediately after adding the batter so that the lid will level out the batter.
4. The red light will come on within 30 seconds indicating the waffle is baking.
5. When the waffle is ready the red light goes off, the green light comes on, and the beeper
sounds briefly.
6. Lift the lid and inspect the waffle. If you want a slightly browner waffle, close the lid and bake
for another 20 seconds or so.
7. When color is right, remove waffle with a plastic spatula or fork. As needed, increase or
decrease the color control for the next cycle. Once you establish the optimum color setting,
it will not require any change in the future unless you alter the waffle recipe or switch to
“Crisp Exterior/ Moist Interior.”
8. Add batter for the next waffle or close lid until you are again ready to bake. The green light will
remain on until the waffle plates cool slightly. Then the red light will alternately come on to keep
the grids hot until you are ready for the next waffle.
9. When finished baking, be certain to unplug the Classic WafflePro
®
. Only then is the power to the
waffle maker switched off.
Always unplug the Classic WafflePro
®
immediately after use. Never leave it unattended when plugged
in. Children should not be allowed to use a waffle maker except in the presence of an attentive adult.
The waffle maker cools faster when its lid is left fully open. Store only when cold.
WAFFLE BASICS
Superb waffles begin with a good recipe but depend on a versatile waffle maker to fully develop the
flavor, texture and aroma. A perfect waffle is no accident. It is the combination of a brownish crisp
exterior and an interior texture baked the way you like it. Some of us prefer a waffle with a moist
interior like freshly baked bread. Such a waffle has the greatest flavor and aroma. Others want a
uniformly crunchy waffle, one that is baked slowly with less interior moisture. You may like to bake
breakfast waffles that are crisp on the outside and fluffy inside or you may want a chocolate dessert
waffle, destined to be served with a scoop of ice cream, that is crunchy throughout.
The Classic WafflePro
®
incorporates the unique Quad
®
baking system to ensure a waffle baked the
way you prefer. You select either a fast bake or a deep bake. Then you select a color control setting.
And the color control adjusts for either baking setting to give you a toasty, brown exterior and the
interior texture you want.
The Quad
®
baking system on the Classic WafflePro
®
works as follows: The “Crisp Exterior/Moist
Interior” setting gives you a fast bake while the “Uniform Texture” setting gives a slow deep bake. The
Color Control setting controls the surface temperature of the waffle and determines its color.
To get a crisp exterior with a contrasting steamy aromatic interior, you need a waffle iron with a fast
bake. The Classic WafflePro
®
is unique among all waffle makers in its ability to bake rapidly enough
to create this delectable combination.

8
WAFFLE INGREDIENTS AND TECHNIQUES
Sugar in waffle batter enhances the browning of the waffle especially on the surface where the
temperatures are highest. If your diet permits, a small amount of sugar can do wonders for the waffles.
Cornmeal in waffle batter adds extra crunch. Only a few tablespoons are needed to add texture.
Butter and oil enhance flavor and can increase the darkening of the waffle. But too much liquid
inhibits surface browning.
Eggs add their own flavor to the mix and importantly they reduce the tendency of waffles to “split”.
The consistency of your batter will effect the end result. A slightly thick batter, one which pours slowly,
some say like slow moving lava, works the best. If the batter pours freely, add more flour to thicken.
Regardless of the recipe, the Classic WafflePro
®
works best with slightly less than a level 1 cup of
batter. This amount fills the waffle iron without risk of overflow. Use a measuring cup, a pitcher or
ladle to pour batter onto the WafflePro
®
grids.
When making waffle batter, add milk slowly and mix with a power mixer or by hand until the right
consistency is reached. You may not need to use all of the milk or liquid called for in a recipe. If you
add too much liquid, simply stir in additional flour (or dry mix) to thicken the batter.
Some recipes may call for separating the eggs, beating the whites and folding them in at the end
of the mix. This step gives a slightly lighter waffle with a less uniform texture but it is not essential.
Whole eggs may be used.
Always fully preheat the Classic WafflePro
®
before adding the batter. Set the Color Control between
2 and 3 if you are just getting started, otherwise set it to your own preference. Read the instructions
beginning on Page 4 before making your first waffles.
Remember, when the green light and beeper signal that the waffle is “Ready”, you can briefly lift the
lid to check the degree of browning and, if desired, close the lid to bake the waffle for another 20 to
30 seconds for more crispness.
Because this waffle maker heats and bakes so rapidly on the “Crisp Exterior/Moist Interior” setting,
you will be able to prepare waffles about as fast as they can be eaten. Waffles taste best “hot off the
griddle” but you might let them cool on a wire rack for 20 to 30 seconds before serving. This gives the
waffle a chance to release some steam and stiffen slightly. (If a waffle is placed directly on a plate,
the steam condenses under the waffle causing the crisp exterior to soften.)
Delicious Fruit Additions to the Basic Waffle Recipes
Spicy Banana
Fold in ½ cup of mashed ripe bananas and ½ teaspoon cinnamon.
Country Apple
Fold in ¼ cup of finely chopped (peeled) apples and ¼ cup of chopped pecans or walnuts.
Blueberry
Fold in ½ cup Maine (small) blueberries and a pinch of nutmeg.

9
SOME FAVORITE RECIPES
Basic Wheat Flour Waffles
A simple recipe which produces a light and crisp waffle.
2 cups all-purpose flour 2 eggs
3 tablespoons sugar ¼ cup melted butter
1 tablespoon baking powder 1½ cups milk, as needed
1 teaspoon salt 1 teaspoon vanilla
Makes 3-4 whole waffles (4 squares each)
1. Place the flour, sugar, baking powder and salt in a small bowl. Stir with a wire whisk to evenly
distribute the ingredients. Add the melted butter, eggs and about 1½ cups of milk. Blend with a wire
whisk until smooth and free from lumps. Batter should be thick but still pour slowly from a ladle or
measuring cup. Add more milk as needed to obtain a thick but pourable consistency. If the batter
becomes too thin, stir in a teaspoon or two of additional flour.
2. Preheat the Classic WafflePro
®
at: “Crisp Exterior/Moist Interior” at Color Control 2 - 3 or “Uniform
Texture” at Color Control 2
3. Pour 1 cup of batter onto center of preheated waffle grid. Close the lid, press it down lightly to level
batter. Bake until the signals indicate waffle is done.
4. Remove waffle and place on a wire rack for about 30 seconds, then serve immediately.
Note: Waffles may be kept warm in a preheated 300°F oven for 5 to10 minutes but their consistency may change.
Batter can be held overnight under refrigeration. If it thickens, add milk to restore to the desired consistency.
European Home Style Waffles
For those who like the tang of buttermilk, this recipe makes a light waffle with a delicate golden color.
2 cups all purpose flour ½ cup buttermilk
½ teaspoon baking soda 2 eggs, separated
1 ½ teaspoons baking powder 4 tablespoons butter, melted
½ teaspoon salt 1 cup milk, more if needed
2 tablespoons sugar
Makes 3-4 whole waffles (4 squares each)
1. Stir together the flour, baking soda, baking powder, salt and sugar. Set aside.
2. In a small bowl combine the egg yolks, buttermilk, milk and melted butter. Using a rubber spatula,
gently fold the liquid into the dry ingredients,
3. In a separate bowl, beat the egg whites until they are foamy and hold soft peaks. Gently, fold the egg
whites into the batter.
4. Preheat the Classic WafflePro
®
at: “Crisp Exterior/Moist Interior” at Color Control 3 or “Uniform
Texture” at Color Control 2.
5. Pour 1 cup waffle batter onto center of preheated waffle grid. Close the lid and bake until signal
indicates waffle is done.
6. Remove waffle and place on a wire rack for about 30 seconds, then serve immediately.
Note: Waffles may be kept warm in a preheated 300°F oven for 5 to 10 minutes, but their consistency may change.

10
Cornmeal Waffles
The crunchy yet airy texture of this waffle is matched by it’s excellent taste.
1½ cups all purpose flour ½ teaspoon baking soda
½ cup yellow cornmeal 2 eggs, lightly beaten
1 tablespoon baking powder 5 tablespoons vegetable oil
2 tablespoons sugar 1 cup milk, depending on batter consistency
1 teaspoon salt
Makes 3 whole waffles (4 squares each)
1. Combine all dry ingredients in a large bowl. Stir to blend well.
2. Make a well in the center of the dry ingredients. Add the eggs and oil. Slowly pour in the milk, mixing
constantly until a thick batter is obtained.
3. Preheat the Classic WafflePro
®
at: “Crisp Exterior/Moist Interior” at Color Control 3 or “Uniform
Texture” at Color Control 2
4. Pour 1 cup waffle batter onto center of preheated waffle grid. Close the lid and bake until signal
indicates waffle is done.
5. Remove waffle and place on a wire rack for about 30 seconds then serve immediately.
Note: Waffles may be kept warm in a preheated 300°F oven for 5 to 10 minutes but their consistency may change.
If you prefer more of a cornbread style waffle, substitute more cornmeal for some of the flour in the recipe.
½ cup of flour to 1½ cups of cornmeal is ideal. Add more milk to make a thick batter and bake as directed.
RECIPES FOR THE CHOCOLATE LOVER
Chocolate Chip Waffle
A light waffle full of chocolate surprises, this recipe is sure to become one of your family’s favorites.
2 cups all purpose flour 2 eggs, lightly beaten
2 tablespoons sugar 4 tablespoons vegetable oil
2 teaspoons baking powder ½ cup small chocolate chips
½ teaspoon salt 1¼ cup milk
Makes 3 whole waffles (4 squares each)
1. Combine all dry ingredients in a large bowl. Stir to blend well.
2. Add the eggs and oil then slowly pour in the milk while stirring constantly with a rubber spatula. Add
just enough milk to make a batter which mounds slightly when poured. Stir in the chocolate chips and
blend to distribute them evenly.
3. Preheat the Classic WafflePro
®
at: “Crisp Exterior/Moist Interior” at Color Control 2 - 3 or “Uniform
Texture” at Color Control 2
4. Spoon 1 cup waffle batter onto center of preheated waffle grid. Close the lid and bake until signal
indicates waffle is done.
5. Remove waffle and place on a wire rack to cool for about 30 seconds then serve immediately.
6. This batter may leave some melted chocolate on the waffle grids. To clean, let the WafflePro
®
cool and
wipe off chocolate with a warm moist cloth.
Note: Waffles may be kept in a preheated 300°F oven for 5 to 10 minutes but their consistency may change.
For a lighter waffle, the eggs in this recipe can be separated and the yolks added to the batter along with
the milk. The whites can be beaten stiff, then folded into the batter.

11
Waffle Brownies
The child in everyone will love this waffle as a tea-time snack or baked-to-order dessert. For a special treat,
serve these with whipped cream, or in a Brownie Sundae with ice cream and hot fudge sauce. Superb!!
3 oz. (3 squares) unsweetened chocolate melted
2
/3 cup sugar
½ cup (8 tablespoons), butter or shortening, melted 1 teaspoon vanilla
3 eggs 1 ½ cups all purpose flour
½ teaspoon salt 1 cup milk
½ - ¾ cup chopped nuts, (walnuts or pecans) powdered sugar, optional
Makes 3 whole waffles (4 squares each)
1. Preheat the Classic WafflePro
®
at: “Crisp Exterior/Moist Interior” at Color Control 3 or “Uniform
Texture” at Color Control 2
2. Place the chocolate and butter or shortening in a small saucepan. Melt over low heat. Set aside to cool.
3. In a separate bowl, beat the eggs and salt until light in color. Add the sugar and vanilla. Beat by hand to
combine then fold in the cooled chocolate mixture.
4. Stir in the flour and nuts. Slowly add just enough milk to make a thick batter spoonable into the waffle grid.
5. Spoon 1 cup waffle batter onto center of preheated waffle grid. Close the lid and bake until signal
indicates waffle is done.
6. Remove waffle and serve immediately. Dust with powdered sugar if using.
Note: Waffle brownies will store well for several days if wrapped in plastic.
CORD SAFETY
A short power supply cord is provided with this appliance to reduce the risk resulting from the cord
becoming entangled in or tripping over a longer cord and causing the Classic WafflePro
®
to overturn,
spilling its hot contents. While EdgeCraft does not recommend it, extension cords are available and
may be used if care is exercised in their use. If an extension cord is used, it must have an integral
ground wire, a three prong plug and the marked electrical rating of the extension cord should be at
least 15 amperes. The longer cord should be arranged so that it will not hang over the counter top or
tabletop where it can be pulled on by children or pets or tripped over.

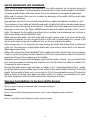
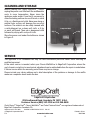
CLEANING AND STORAGE
Before cleaning the Classic WafflePro
®
, always
unplug the power cord. Wait until the wafflemaker
cools to room temperature. Never clean the
appliance under water. If you find it necessary to
clean the baking surface use a soft brush, a moist
Q-tip, or a flexible moist cloth. Never use sharp or
pointed tools as they will damage the non-stick
surfaces. The exterior can be safely cleaned with
a mild detergent on a damp soft cloth, a Q-tip,
or small soft brush. Then use a dampened cloth
followed by drying with a dry soft cloth.
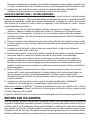
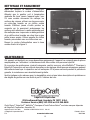
Store the power cord under the bottom as shown
in Figure 3.
SERVICE
This appliance is for household use only. No user-serviceable parts are inside. Refer servicing to
qualified personnel.
In the event service is needed, return your Classic WafflePro
®
to EdgeCraft Corporation, where the
cost of repair or electrical or mechanical adjustment can be estimated before the repair is undertaken.
If failure occurs within the warranty period there may be no charge.
Please include your return address and a brief description of the problem or damage to the waffle
maker on a separate sheet inside the box.
Chef’sChoice
®
, EdgeCraft
®
, Classic WafflePro
®
and Taste//Texture Select
®
are registered trademarks of
EdgeCraft Corporation, Avondale, PA.
Conforms to UL Std. 1083 Certified to CAN/CSA Std. C22.2 No. 64
© EdgeCraft Corporation 2013 Printed in China.
F13 www.chefschoice.com W854200
EdgeCraft Corporation
825 Southwood Road, Avondale, PA 19311 U.S.A.
Customer Service (800) 342-3255 or 610-268-0500
12
Figure 3. Cord clips under base.
Loop cord here
ClipClip

International
WafflePro
®
Classique
Taste/Texture Select
®
Sélecteur de
goût/de texture
WITH
Instructions et recettes pour le modèle 854
© 2013 EdgeCraft Corp.
F

2
CONSIGNES DE SÉCURITÉ IMPORTANTES
Lors de l’utilisation d’appareils électriques, des précautions élémentaires de sécurité
doivent toujours être respectées, notamment :
1. Lisez intégralement les instructions avant d’utiliser le WafflePro
®
Classique.
2. Ne touchez pas les surfaces chaudes. Utilisez toujours la poignée en plastique sur
le couvercle et ne touchez pas le couvercle en acier inoxydable lorsqu’il est chaud.
3. Afin d’éviter les risques d’incendies, d’électrocutions et de blessures corporelles,
veuillez ne pas immerger le cordon d’alimentation, la prise ou le WafflePro
®
Classique dans l’eau ou dans tout autre liquide.
4. Une surveillance étroite est nécessaire lorsque tout appareil est utilisé par ou à
proximité des enfants.
5. Avant l’utilisation, déroulez complètement le câble d’alimentation et maintenez-le
éloigné des parties chaudes de l’appareil.
6. Ne laissez pas pendre le câble d’alimentation au-dessus des bords d’une table ou
d’un comptoir, ou toucher des surfaces chaudes.
7. Ne posez pas l’appareil sur ou près d’une plaque chauffante électrique, d’un
brûleur à gaz ou dans un four chaud.
8. Une prudence extrême doit être observée lors du déplacement d’un appareil
contenant de l’huile chaude ou d’autres liquides chauds.
9. Utilisez le WafflePro
®
Classique uniquement sur des surfaces sèches, planes et
non glissantes.
10. N›utilisez pas le WafflePro
®
Classique à l›extérieur.
11. N’utilisez pas le WafflePro
®
Classique si le câble ou la prise sont endommagés. S’il
est défectueux ou a subi un quelconque dommage, veuillez renvoyer le WafflePro
®
Classique au département après-vente d’EdgeCraft Corporation afin qu’il soit
inspecté, réparé ou réglé.
12. L›utilisation d›accessoires non recommandés par l’entreprise EdgeCraft Corporation
peut causer des incendies, des électrocutions ou des blessures.
13. Débranchez toujours le WafflePro
®
Classique de l’alimentation électrique lorsqu’il
n’est pas utilisé ou lors du nettoyage afin d’éviter un choc électrique accidentel.
Laissez-le refroidir avant de le nettoyer.
14. Tant que l’appareil est chaud, même s›il est débranché, il y a des risques de
brûlure. Ne touchez pas les surfaces chaudes et ne rangez pas l’appareil tant qu’il
est chaud.
15. N›utilisez pas le WafflePro
®
Classique pour d’autres raisons que celles pour
lesquelles il est prévu.
16. Utilisez uniquement sur une alimentation de 120V 60Hz. Utilisez une prise
comportant une bonne mise à la terre. N›utilisez pas un adaptateur de 3 à 2
broches sur le cordon d›alimentation à trois broches fourni.
17. Pour usage domestique uniquement.
18.
CONSERVEZ CES INSTRUCTIONS.

3
VOUS AVEZ
FAIT LE BON
CHOIX
Le WafflePro
®
Classique Taste/Texture Select
®
Sélecteur de goût/de
texture Modèle 854 vous est fourni par Chef’sChoice
®
, le fabricant
de produits domestiques professionnels pour gourmets de qualité
mondialement reconnue. Le WafflePro
®
Classique vous permet de
bénéficier chez vous de caractéristiques réservées uniquement
aux gaufriers professionnels. Son système exclusif de cuisson
Quad
®
vous permet d’obtenir le «parfait équilibre» entre la texture
et le goût. Le WafflePro
®
Classique est un gaufrier extrêmement
polyvalent qui vous permettra par exemple de cuire rapidement vos
gaufres afin de leur donner une surface brune dorée et croquante
tout en gardant un cœur moelleux, comme du pain croustillant
sortant du four. Sinon, par simple pression sur un interrupteur, vous
pouvez faire une gaufre croustillante à la texture uniforme.
Vous rappelez-vous quand les gaufres étaient réservées unique-
ment aux fins de semaines, lorsque papa et maman avaient plus
de temps libre? Le WafflePro
®
Classique remet tous les jours les
gaufres au menu! Il chauffe pendant que votre café est brassé et
votre première gaufre est prête quand il est servi. Et, il chauffe si
rapidement que vous ferez des gaufres presque aussi rapidement
qu’elles peuvent être mangées.
Imaginez des gaufres à l’arôme et au goût naturels du pain et des
pâtisseries fraîchement sorties du four. Préparez la veille une four-
née de gaufres simples en suivant une recette rapide afin qu’elles
soient prêtes à cuire dans le WafflePro
®
Classique chaud tous les
matins. Dégustez!

4
SE FAMILIARISER AVEC LE WafflePro
®
Classique
Prenez un instant pour identifier les fonctions et les commandes principales du WafflePro
®
Classique,
(Figure 1), fabriqué à partir de plastiques rigides et extrêmement résistants aux hautes températures
et doté d’un couvercle en acier inoxydable poli.
Pour ouvrir le couvercle, soulevez le dessous de la poignée frontale isolée en plastique. Votre main
entrera d›abord en contact avec la poignée de verrouillage, et tandis que vous la soulevez, le loquet
se déverrouillera et le couvercle s›ouvrira. Les commandes électroniques se trouvent sur le panneau
de commandes (Figure 2).
Prenez quelques instants pour comprendre l›utilisation de l’interrupteur à bascule noir (Figures 1
et 2). Appuyez sur la partie gauche de l›interrupteur à bascule pour une cuisson rapide et pour des
gaufres ayant une «Surface croustillante/Intérieur moelleux» ou appuyez à droite de l’interrupteur à
bascule pour une cuisson en profondeur et pour des gaufres ayant plutôt une «Texture uniforme».
À droite de l’interrupteur à bascule se trouve un témoin lumineux rouge marqué «Cuisson » qui
indique que les plaques du gaufrier sont en train de chauffer. Un peu plus à droite de celui-ci se
trouve un témoin lumineux vert marqué «Prêt» qui indique que les plaques du gaufrier sont à la
température de cuisson ou que la gaufre est «prête» à être servie.
De plus, un avertisseur sonore émet un «bip» distinct lorsque le témoin vert s’allume pour signaler
que la gaufre est prête à être servie.
La molette de contrôle de la couleur possède des graduations numériques. La gaufre sera plus foncée
ou plus claire suivant le réglage exact de la molette et la position de l’interrupteur à bascule. Cette
molette de contrôle est relativement sensible et de très petites variations numériques peuvent
provoquer une différence notable de couleur. Le réglage exact optimal du contrôle de la couleur
dépend du type de gaufres que vous faites. Pour rendre la gaufre plus foncée, tournez la molette vers
un chiffre plus grand ; pour lݎclaircir, tournez-la vers un chiffre plus petit.
Un espace a été prévu pour ranger le câble comme décrit dans la section Entreposage.
PREMIÈRE UTILISATION DU WafflePro
®
Classique
Branchez le câble d’alimentation sur une prise de courant de 120 volts avec une mise à la terre
et fermez le couvercle. Le témoin lumineux rouge de « Cuisson » s’allumera pour indiquer que les
Figure 1. WafflePro
®
Classique Taste/Texture Select
®
.
Panneau de commandes
(Voir Figure 2)
Poignée du couvercle avec
loquet verrouillable
Interrupteur à bascule
Molette de contrôle
de la couleur

5
plaques du gaufrier sont en train de chauffer. Réglez la molette de contrôle de la couleur à 4. Vous
pouvez diminuer le temps de chauffage en appuyant fermement sur le côté gauche de l’interrupteur
à bascule noir rond pour le réglage «Surface croustillante/Intérieur moelleux».
Environ 5 minutes plus tard, le témoin lumineux rouge s’éteindra, le témoin vert « Prêt » s’allumera
et l’avertisseur sonore émettra un bip signalant que les plaques du gaufrier ont atteint la bonne
température et sont prêtes pour la cuisson. Lors du premier chauffage, vous sentirez peut-être
une légère odeur durant le cycle de montée en température qui est caractéristique des éléments
chauffants neufs avec un revêtement anti-adhésif.
Lorsque l’appareil indique qu’il est «Prêt», ouvrez le couvercle et étalez ou pulvérisez une fine
pellicule d’huile végétale ou de maïs sur les deux plaques chaudes, supérieure et inférieure (vous
pouvez également utiliser un pulvérisateur pour cuisson anti-adhésive). Comme les deux surfaces
de cuisson possèdent un revêtement anti-adhésif appliqué en usine, il n’est nécessaire d’huiler les
surfaces qu’une seule fois avant la première utilisation du WafflePro
®
Classique et après de longues
périodes d›entreposage. Autrement, il ne devrait pas être nécessaire d’huiler de nouveau.
Versez environ une (1) tasse de pâte à gaufre au milieu de la plaque inférieure et fermez le
couvercle. Jetez la première gaufre car elle aura absorbé l’excédent d’huile que vous avez utilisée
sur les plaques.
PROCÉDURE DE CHAUFFAGE ET DE CUISSON
Si le WafflePro
®
Classique n’a pas encore été utilisé auparavant, suivez les instructions ci-dessus
pour une «Première utilisation du WafflePro
®
Classique.»
Si vous cherchez une bonne recette, reportez-vous au chapitre «Quelques recettes préférées», (page 9).
CHAUFFAGE
Branchez le câble d’alimentation dans une prise de courant de 120 volts comportant une mise à
la terre. Mettez l’interrupteur à bascule en mode «Surface croustillante/Intérieur moelleux» pour
démarrer le cycle de chauffage. Ce réglage permet aux plaques du gaufrier de chauffer à puissance
maximale et elles seront à température en 5 minutes environ. Si l’interrupteur est positionné sur
« Texture uniforme », le temps de chauffage sera environ deux fois plus long. Le témoin lumineux
rouge de «Cuisson» s’allumera lorsque le WafflePro
®
est branché. Réglez la molette de contrôle de
la couleur entre 2 et 3. Quand le cycle de chauffage est terminé, le témoin lumineux rouge s’éteint, le
Figure 2. Panneau de commandes.
Interrupteur à bascule • Appuyez ici pour une
cuisson en profondeur
• Appuyez ici cuisson rapide
Avertisseur sonore et
témoin «Prêt»
Molette de contrôle
de la couleur

6
témoin lumineux vert «Prêt» s’allume et l’avertisseur sonore émet un bip pour vous rappeler que la
plaque est à température et prête pour que vous commenciez la cuisson. Quand le témoin lumineux
vert s’allume, les résistances chauffantes sont désactivées jusqu’à ce que les plaques refroidissent
légèrement et repassent sous la température de cuisson.
Gardez vos mains éloignées du couvercle en acier inoxydable et des plaques chaudes. Ne touchez
que les parties en plastique et les poignées fournies.
SÉLECTION DU GOÛT ET DE LA TEXTURE QUI VOUS CONVIENNENT
Le système polyvalent de cuisson Quad
®
, une exclusivité du WafflePro
®
, vous permet de contrôler
les conditions de cuisson les mieux adaptées à vos préférences et de modifier le goût, la texture et la
saveur des gaufres selon votre convenance. En modifiant la pâte à frire, vous pouvez élargir encore
la gamme de saveurs et de textures disponibles. Vous pouvez trouver la combinaison parfaite de
réglages pour chaque recette et pour chacun de vos nappages préférés. Attention - Ne vous fiez
pas au concept ancien qui veut que la gaufre soit prête lorsque le gaufrier arrête de dégager
de la vapeur. Grâce au système exclusif de cuisson Quad
®
, la gaufre peut être prête à servir même
lorsque le WafflePro
®
dégage encore de la vapeur. Apprenez à vous fier au témoin lumineux vert et à
l’avertisseur sonore et modifiez les réglages à votre convenance.
FAIRE DES GAUFRES AVEC « SURFACE CROUSTILLANTE/INTÉRIEUR MOELLEUX »
Les gaufres faites avec le réglage « Surface croustillante/Intérieur moelleux » conservent mieux l’arôme
d’une gaufre fraîchement cuite. Le degré de croustillant extérieur dépend de la recette et du réglage
du contrôle de la couleur.
1. Appuyez sur le côté gauche de l’interrupteur à bascule rond noir pour le réglage «Surface
croustillante/Intérieur moelleux». Réglez le contrôle de la couleur entre 2 et 3 pour la
première gaufre.
2. Versez le contenu d’environ 1 tasse de pâte à l’aide d’une louche ou d’une carafe au milieu de la
plaque inférieure du gaufrier. Une pâte plus épaisse, qui se verse doucement est idéale. Évitez de
mettre trop de pâte sur la plaque car elle pourrait déborder et augmenter le temps de nettoyage.
3. Fermez le couvercle immédiatement après avoir versé la pâte afin qu’elle se répande
uniformément. Appuyez légèrement sur la poignée du couvercle pendant quelques secondes
afin de mieux répartir la pâte.
4. Le témoin lumineux rouge s’allumera, indiquant que la gaufre est en train de cuire. Cela signifie
que le réchaud est alimenté pour la poursuite du processus de cuisson.
5. Lorsque la gaufre est prête, le témoin lumineux vert s’allume, le témoin rouge s’éteint et
l’avertisseur sonore émet un bref bip.
6. Soulevez légèrement le couvercle et contrôlez la couleur de la gaufre. Au besoin, fermez le
couvercle et continuez à cuire un peu plus longtemps jusqu’à obtenir la couleur désirée. Lors du
prochain cycle de cuisson, réglez la molette de contrôle de la couleur au besoin, afin d’obtenir
un meilleur réglage. Un réglage à un nombre supérieur rendra la gaufre plus foncée. Bien
souvent, le réglage nécessaire est inférieur à un nombre entier.
7. Lorsque la gaufre est prête, retirez-la en soulevant un bord à l’aide d’une fourchette en
plastique ou d’une spatule résistante à la chaleur. (Si vous utilisez une fourchette métallique,
veillez à ce qu’elle n’entre pas en contact avec la surface anti-adhésive des plaques car cela
pourrait la rayer et réduire son efficacité).
8. Après avoir enlevé la gaufre, vous pouvez immédiatement remplir à nouveau le WafflePro
®
Classique de pâte ou bien le fermer jusqu›à ce que vous soyez prêt à en cuire une autre. Si vous
ne commencez pas une nouvelle gaufre immédiatement, le témoin lumineux vert restera allumé
jusqu’à ce que les plaques refroidissent légèrement, et le témoin rouge s’allumera alors

7
brièvement, indiquant que les plaques sont chauffées de nouveau afin de maintenir le gaufrier prêt
à l’emploi. Lorsque le témoin vert s’allume à nouveau, la prochaine gaufre peut être versée et cuite.
9. Lorsque vous avez terminé la cuisson, assurez-vous de bien débrancher le WafflePro
®
Classique. C’est uniquement à ce moment que le gaufrier est hors tension.
FAIRE DES GAUFRES AVEC « TEXTURE UNIFORME »
Les gaufres faites avec le cycle de cuisson «Texture uniforme» seront cuites de la même manière
jusqu’au cœur de celles-ci. Elles auront une texture craquante et plus sèche. La quantité d’humidité
dépendra du réglage du contrôle de la couleur. Généralement, le réglage du contrôle de la couleur
sera inférieur et le temps de cuisson, deux fois supérieur à celui nécessaire en mode «Surface
croustillante/Intérieur moelleux».
1. Appuyez sur le côté droit de l’interrupteur à bascule rond noir pour le réglage «Texture
uniforme». Réglez la molette du contrôle de la couleur à 2 environ pour la première gaufre.
2. Versez environ 1 tasse de pâte à l’aide d’une louche ou d’une carafe au milieu de la plaque
inférieure du gaufrier. Une pâte plus épaisse, qui se verse doucement est idéale. Ne remplissez
pas trop la plaque.
3. Fermez le couvercle immédiatement après avoir versé la pâte afin qu’il répartisse mieux la pâte.
4. Le témoin lumineux rouge s’allumera environ 30 secondes après, indiquant que la gaufre est en
train de cuire.
5. Lorsque la gaufre est prête, le témoin lumineux rouge s’éteint, le témoin vert s’allume et
l’avertisseur sonore émet un bref bip.
6. Soulevez légèrement le couvercle et contrôlez la gaufre. Si vous désirez une gaufre légèrement
plus brune, fermez le couvercle et laissez cuire encore 20 secondes, voire davantage.
7. Lorsque la couleur vous convient, retirez la gaufre avec une fourchette ou une spatule en
plastique. Augmentez ou réduisez au besoin le contrôle de la couleur pour le prochain cycle.
Une fois que vous avez trouvé le réglage optimal de couleur, vous n’aurez plus besoin de le
modifier, à moins que vous ne changiez la recette ou basculiez en mode «Surface croustillante/
Intérieur moelleux.»
8. Versez la pâte pour la gaufre suivante ou fermez le couvercle jusqu’à ce que vous soyez de
nouveau prêt à cuire une nouvelle gaufre. Le témoin lumineux vert restera allumé jusqu’à ce
que les plaques du gaufrier refroidissent légèrement. Le témoin rouge s’allumera alors
alternativement pour maintenir les plaques chaudes jusqu’à ce que vous soyez prêt à préparer
la gaufre suivante.
9. Lorsque vous avez terminé la cuisson, assurez-vous de bien débrancher le WafflePro
®
Classique. C’est uniquement à ce moment que le gaufrier est hors tension.
Débranchez toujours le WafflePro
®
Classique immédiatement après son utilisation. Ne le laissez
jamais sans surveillance lorsqu’il est branché. N’autorisez pas les enfants à utiliser un gaufrier sauf
s’ils sont supervisés par un adulte.
Le gaufrier refroidit plus vite si son couvercle est laissé grand ouvert. Ne le rangez qu’une fois froid.
NOTIONS SUR LES GAUFRES
Faire de superbes gaufres commence par une bonne recette, mais cela dépend de la polyvalence
du gaufrier à développer pleinement la saveur, la texture et l’arôme. Une gaufre parfaite n’est pas le
fruit du hasard. C’est la combinaison d’une surface brunâtre croustillante et d’une texture intérieure
cuite comme vous l’aimez. Certains préfèrent une gaufre avec un cœur moelleux comme du pain
fraîchement sorti du four. Une telle gaufre possède une plus grande saveur et un meilleur arôme.
D’autres préfèrent une gaufre au croquant uniforme, cuite doucement avec un cœur moins moelleux.

8
Vous aurez peut-être envie de cuire des gaufres à la surface croustillante et au cœur moelleux pour
le petit déjeuner, ou vous pouvez aussi avoir envie de gaufres au chocolat pour le dessert, destinées
à être servies avec une boule de glace, qui soient entièrement croquantes.
Le WafflePro
®
Classique intègre le système exclusif de cuisson Quad
®
, qui garantit des gaufres
cuites comme vous les aimez. Vous sélectionnez une cuisson rapide ou en profondeur. Puis, vous
sélectionnez un réglage pour le contrôle de la couleur. Le contrôle de la couleur s’adapte à chacune
des cuissons afin de vous donner une surface grillée, brune et une texture intérieure désirée.
Le système de cuisson Quad
®
du WafflePro
®
Classique fonctionne de cette façon. Le mode «Surface
croustillante/Intérieur moelleux » permet une cuisson rapide, tandis que le réglage « Texture
uniforme» permet une cuisson lente en profondeur. Le réglage de la couleur contrôle la température
de surface de la gaufre et détermine sa couleur.
Pour obtenir une surface croustillante tout en gardant un cœur fumant et savoureux, vous avez besoin
d’un gaufrier à cuisson rapide. Le WafflePro
®
Classique se distingue de tous les gaufriers par sa
capacité à cuire de façon suffisamment rapide pour créer cette délicieuse combinaison.
TECHNIQUES ET INGRÉDIENTS POUR LES GAUFRES
Le sucre dans la pâte à gaufres augmente le brunissement des gaufres, particulièrement sur les
surfaces où la température est la plus élevée. Si votre régime le permet, une petite quantité de sucre
peut faire des merveilles pour les gaufres.
La farine de maïs dans la pâte donne plus de croustillant. Quelques cuillères à soupe suffisent pour
augmenter la texture.
Le beurre et l’huile rehaussent le goût et peuvent augmenter le brunissement de la gaufre.
Néanmoins, en excès, ces liquides peuvent empêcher le brunissement de la surface.
Les œufs ajoutent leur propre saveur au mélange et diminuent fortement la tendance des gaufres à
«se fendre».
Le résultat final dépend de la texture de votre pâte. Une pâte légèrement épaisse, qui coule
doucement, comme de la lave qui avance lentement comme disent certains, donne les meilleurs
résultats. Si la pâte est trop fluide, ajoutez de la farine pour l’épaissir.
Quelle que soit la recette, le WafflePro
®
Classique donne les meilleurs résultats avec une tasse de
pâte. Cette quantité remplit le moule à gaufre sans risque de débordement. Utilisez une carafe, un
verre doseur ou une louche pour verser la pâte sur les plaques du WafflePro
®
.
Lorsque vous préparez la pâte, ajoutez doucement le lait et mélangez avec un batteur électrique ou
à la main jusqu’à obtenir la bonne texture. Il est possible que vous n’ayez pas à utiliser tout le lait ou
le liquide recommandé dans une recette. Si vous versez trop de liquide, incorporez simplement plus
de farine (ou de préparation sèche) pour épaissir la pâte.
Certaines recettes peuvent demander de séparer les blancs des jaunes d’œufs et de battre les blancs en
neige pour les incorporer au mélange au dernier moment. Cette étape permet de faire des gaufres un peu
plus légères avec une texture moins uniforme, mais n’est pas essentielle. On peut utiliser des œufs entiers.
Préchauffez toujours le WafflePro
®
Classique avant d’y verser la pâte. Réglez le contrôle de la couleur
entre 2 et 3 si vous venez juste de commencer, sinon réglez-le à votre convenance. Veuillez lire les
instructions qui commencent à la page 4 avant de faire vos premières gaufres.
Rappelez-vous : lorsque le témoin lumineux vert et l’avertisseur sonore signalent que la gaufre est
«Prête», vous pouvez ouvrir brièvement le couvercle pour vérifier le degré de brunissement et, au besoin,
le refermer afin de cuire la gaufre de 20 à 30 secondes supplémentaires pour obtenir plus de croustillant.
Ce gaufrier chauffe si rapidement en mode «Surface croustillante/Intérieur moelleux» que vous pour-
rez préparer des gaufres presque aussi rapidement qu’elles peuvent être mangées. Les gaufres sont
La page est en cours de chargement...
La page est en cours de chargement...
La page est en cours de chargement...
La page est en cours de chargement...
-
 1
1
-
 2
2
-
 3
3
-
 4
4
-
 5
5
-
 6
6
-
 7
7
-
 8
8
-
 9
9
-
 10
10
-
 11
11
-
 12
12
-
 13
13
-
 14
14
-
 15
15
-
 16
16
-
 17
17
-
 18
18
-
 19
19
-
 20
20
-
 21
21
-
 22
22
-
 23
23
-
 24
24


Chef’sChoice 8540000 Manuel utilisateur
- Catégorie
- Petit gâteau
- Taper
- Manuel utilisateur
- Ce manuel convient également à
dans d''autres langues
- English: Chef’sChoice 8540000 User manual
Autres documents
-
Chef'sChoice 830B Mode d'emploi
-
-
-
Chef'sChoice 8520000 Manuel utilisateur
-
 Russell Hobbs RHBW4 Manuel utilisateur
-
Hamilton Beach 26201 Mode d'emploi
-
KitchenAid 5KWB110EAC5KWB110EER5KWB110EMS5KWB110EOB Le manuel du propriétaire
-
-
 Miogo Professionnel digital MWM1 Le manuel du propriétaire
-
Krups WD600851 Manuel utilisateur

