Mounting Dream MD5401 Manuel utilisateur
- Taper
- Manuel utilisateur

Please read this instruction carefully before installation.
Weight capacity: 5 kg (11 lbs).
MODEL:MD5401
INSTALLATION INSTRUCTION
(A6)

US WARNING!
安全警告:欢迎您选用空中视界音响架。为确保安全的使用MD5401型号产品,预防自身及其它人
员遭遇危险并防止财产受损,在使用前请仔细阅读此手册,如果您不理解这些说明或对安装的
安全性有任何疑问,请致电有资格的承包商或与空中视界客户服务部联系。组装前请仔细检查
以确保零件无缺少或缺陷,我们的客户服务代表会迅速为您的安装问题提供协助,以解决零件
的缺少或缺陷问题。通过授权经销商所购产品的替换零件将直接送货上门。切勿使用有缺陷的
零件,安装不正确可能会导致产品损坏或者身体严重受伤。切勿将本产品用于空中视界未明示
的任何其它目的,公司对于安装不正确、装配不正确或使用不当造成的产品损坏和身体受伤不
承担任何责任。
CN 警告!
ADVERTENCIA!
AVERTISSEMENT!
Safety Warning: Thank you for choosing Mounting Dream Speaker stand. For safe application of
model MD5401, and preventing yourself or others from danger or property loss, please read through
this manual before use. If you do not understand these instructions or have any doubt over safety of
installation, please contact qualified contractor or Mounting Dream customer service. Please check
carefully before assembly to ensure no parts missed or damaged. Our customer service representative
will assist you timely in installation to solve the issue of parts shortage or damage. Replacement parts
purchased through authorized distributor will be delivered to your door. Please do not use defective
parts. Incorrect installation may result in product damage or body injury. Do not apply this product to
any purpose not indicated by Mounting Dream. We shall bear no responsibility for any damage or
injury resulted from incorrect installation, incorrect assembly or misuse.
Avertissement de sécurité: Merci d'avoir choisi de montage support de rêve Président. Pour une application
sûre de modèle MD5401, et vous-même ou d'autres personnes prévenir du danger ou perte de biens, s'il vous
plaît lire ce manuel avant de l'utiliser. Si vous ne comprenez pas ces instructions ou avoir le moindre doute sur
la sécurité de l'installation, s'il vous plaît contacter entrepreneur qualifié ou montage service à la clientèle de
rêve. S'il vous plaît vérifier attentivement avant le montage afin d'assurer qu'aucune des parties manqués ou
endommagés. Notre représentant du service client vous répondra en temps opportun dans l'installation pour
résoudre la question de la pénurie de pièces ou de dommages. Les pièces de rechange achetées par le
distributeur agréé seront livrés à votre porte. S'il vous plaît ne pas utiliser les pièces défectueuses. Une
mauvaise installation peut entraîner des dommages matériels ou corporels du corps. Ne pas appliquer ce
produit à des fins non indiqué par Dream montage. Nous porterons aucune responsabilité pour tout dommage
ou blessure abouti à une mauvaise installation, l'assemblage ou une utilisation incorrecte.
Seguridad Advertencia: ¡Gracias por elegir el montaje soporte sueño altavoz ti. Para la aplicación segura de
modelo MD5401, y prevenir a sí mismo oa otros de peligro o pérdida de propiedad, por favor lea este manual
antes de usar. Si no entiende estas instrucciones o si tiene alguna duda sobre la seguridad de la instalación,
por favor póngase en contacto con el contratista calificado o montaje de servicio al cliente Sueño. Por favor,
revise cuidadosamente antes del montaje para asegurar sin piezas perdidas o dañadas. Nuestro representante
de servicio al cliente le ayudará a tiempo en la instalación para resolver el problema de la escasez o daño
partes. Los repuestos comprados a través de distribuidores autorizados serán entregados a su puerta. Por
favor, no utilice piezas defectuosas. La instalación incorrecta puede causar daños o lesiones cuerpo. No
aplique este producto a cualquier propósito no indicado por montaje sueño. Vamos a tener ningún tipo de
responsabilidad por los daños o lesiones causados por una incorrecta instalación, montaje incorrecto o mal
uso.
FR
ES

1
Band tape
2m Screwdriver Electrodrill
1/8"
2M
2M
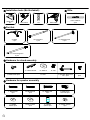
Installation tools (Not Included) :
A--Base
2 pcs
B--Fixed tube
2 pcs
C--Adjusting tube
2 pcs
H--M6X12 bolt 2pcs J--Speaker attachment
unit 2pcs
K--Knob screw
2pcs
L--M4X30 bolt
4pcs
M--M5X30 bolt
4pcs
N--M6X30 bolt
4pcs
I--2 sets
O--M6X16 key
hole bolt 2pcs
I3--Nut
Q--M6 washer
4pcs
P--M5/M4
washer 4pcs
R--M5/M4
spacer 4pcs
S--Plastic washer
4pcs
I2--WasherI1--Horizontal bar
Part list:
Hardware for stand assembly
Hardware for speaker assembly
Velcro cable tie
4pcs
Gifts:
D--Connecting tube
2 pcs

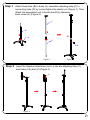
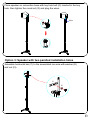
Step 1 Attach fixed tube (B) to base (A), assemble adjusting tube (C) to
connecting tube (D) by loosen/tighten the plastic nut (Figure 1). Then
attach the assembled unit to fixed tube (B) by fastening
knob screw (K) (Figure 2).
Step 2 Insert the Speaker attachment unit (J) into the adjusting tube (C)
and fasten it by bolt (H) (Figure 3).
K
A
B
JC
H
Figure 3
2
C
D
Figure 1 Figure 2

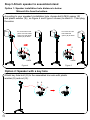
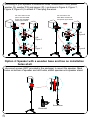
Step 3 Attach speaker to assembled stand
Option 1: Speaker installation hole distance is below
166mm/6.5in from the bottom
According to your speaker's installation hole, choose bolt L/M/N, spacer (R)
and plastic washer (S) ( as Figure 4 and Figure 5 shows) to attach it . Then plug
the wires.
Option 2: Speaker with a key hole
Attach key hole bolt (O) to the assembled iron wire with plastic
washer (S) and nut (I3).
O S
I3
3
L/M/N
R
S
L/M/N
R
Figure 4 Figure 5
For screw hole on flat
panel: Use bolt L/M/N ,
spacer (R) and plastic
washer (S) to attach.
For inset hole: Use
bolt L/M/N and
spacer (R) to attach.

Place speaker on connection base with key hole bolt (O) inserted in the key
hole, then tighten the round nut (I3) and plug the wires.
Assemble horizontal bar (I1) to the assembled iron wire with washer (I2)
and nut (I3).
Option 3: Speaker with two paralled installation holes
Wire
I1
I2
I3
4

Use wood screws (NOT provided in the package) to mount the speaker. Mark
holes on bottom of speaker and drill holes, attach speaker onto speaker stand.
According to your speaker's installation holes, choose bolt L/M/N, plastic
washer (S) ,washer P/Q and spacer (R) ( as shows in Figure 6, Figure 7,
Figure 8, Figure 9 ) to attach it. Then plug the wires.
Option 4: Speaker with a wooden base and has no installation
holes at all.
Screwdriver
Electrodrill
5
L/M
Figure 6
R
S
N
Figure 7
R
S
L/M
Figure 8
R
P
R
N
Figure 9
Q
For screw holes on flat
panel: Use bolt L/M/N ,
spacer (R) and plastic
washer (S) to attach.
For inset holes: Use
bolt L/M/N, washer P/Q
and spacer (R) to attach.

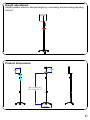
Height adjustment:
Adjust speaker stand to desired height by unscrewing and extending adjusting
tube(C).
Product dimensions:
MAX:1222mm(48")
MIN:902mm(35.5")
281mm
144mm
166mm
6
-
 1
1
-
 2
2
-
 3
3
-
 4
4
-
 5
5
-
 6
6
-
 7
7
-
 8
8


Mounting Dream MD5401 Manuel utilisateur
- Taper
- Manuel utilisateur
dans d''autres langues
- English: Mounting Dream MD5401 User manual
Documents connexes
-
Mounting Dream MD5402-2 Manuel utilisateur
-
-
-
Mounting Dream MD2295 Manuel utilisateur
-
-
-
-
-
-