Greenworks 3803702AZ Manuel utilisateur
- Catégorie
- Outils électroportatifs
- Taper
- Manuel utilisateur
Ce manuel convient également à

ISD401
EN OPERATOR MANUAL
FR MANUEL D’OPÉRATEUR
IMPACT DRIVER
PERCEUSE-VISSEUSE
ES MANUAL DEL OPERADORTALADRO ATORNILLADOR
IS24L00
www.greenworkstools.com
24V 1/4" Brushless Impact Driver


1 Description.........................................4
1.1 Purpose.............................................................. 4
1.2 Overview........................................................... 4
2 General power tool safety
warnings.............................................4
2.1 Work area safety................................................ 4
2.2 Electrical safety................................................. 4
2.3 Personal safety...................................................4
2.4 Power tool use and care.....................................5
2.5 Battery tool use and care................................... 5
2.6 Service............................................................... 5
2.7 Specific safety rules...........................................5
3 Symbols on the product.................... 6
4 Risk levels...........................................6
5 Proposition 65....................................6
6 Installation......................................... 7
6.1 Unpack the machine.......................................... 7
6.2 Install the battery pack.......................................7
6.3 Remove the battery pack................................... 7
6.4 Install the bit...................................................... 7
6.5 Remove the bit...................................................7
7 Operation........................................... 7
7.1 Start the machine............................................... 8
7.2 Stop the machine............................................... 8
7.3 LED light........................................................... 8
7.4 Speed selection.................................................. 8
7.5 Forward / reverse switch ...................................8
7.6 Operate the machine.......................................... 8
8 Maintenance.......................................9
8.1 Clean the machine............................................. 9
9 Technical data....................................9
10 Limited warranty.............................. 9
11 Exploded view..................................10
3
English
EN

1 DESCRIPTION
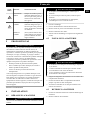
1.1 PURPOSE
The machine is used to
• drive long deck screws when you assemble a deck
• drive carriage bolts into deck posts
• drive screws into block walls and concrete
• drive screws into metal studs
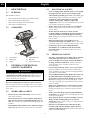
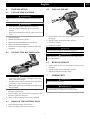
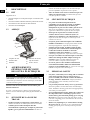
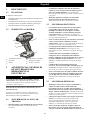
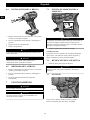
1.2 OVERVIEW
1
2
4
5
6
3
1
1/4" Coupler
2
LED Light
3
Trigger
4
Speed Selection
5
Belt Clip
6
Forward / Reverse
2 GENERAL POWER TOOL
SAFETY WARNINGS
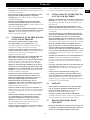
WARNING
Read all safety warnings, instructions, illustrations and
specifications provided with this power tool. Failure to
follow all instructions listed below may result in electric
shock, fire and/or serious injury.
Save all warnings and instructions for future reference.
The term "power tool" in the warnings refers to your mains-
operated (corded) power tool or battery-operated (cordless)
power tool.
2.1 WORK AREA SAFETY
• Keep work area clean and well lit. Cluttered or dark
areas invite accidents.
• Do not operate power tools in explosive atmospheres,
such as in the presence of flammable liquids, gases or
dust. Power tools create sparks which may ignite the dust
or fumes.
• Keep children and bystanders away while operating a
power tool. Distractions can cause you to lose control.
2.2 ELECTRICAL SAFETY
• Power tool plugs must match the outlet. Never modify
the plug in any way. Do not use any adapter plugs
with earthed (grounded) power tools. Unmodified plugs
and matching outlets will reduce risk of electric shock.
• Avoid body contact with earthed or grounded
surfaces, such as pipes, radiators, ranges and
refrigerators. There is an increased risk of electric shock
if your body is earthed or grounded.
• Do not expose power tools to rain or wet conditions.
Water entering a power tool will increase the risk of
electric shock.
• Do not abuse the cord. Never use the cord for
carrying, pulling or unplugging the power tool. Keep
cord away from heat, oil, sharp edges and moving
parts. Damaged or entangled cords increase the risk of
electric shock.
• When operating a power tool outdoors, use an
extension cord suitable for outdoor use. Use of a cord
suitable for outdoor use reduces the risk of electric shock.
• If operating a power tool in a damp location is
unavoidable, use a residual current device (RCD)
protected supply. Use of an RCD reduces the risk of
electric shock.
2.3 PERSONAL SAFETY
• Stay alert, watch what you are doing and use common
sense when operating a power tool. Do not use a
power tool while you are tired or under the influence
of drugs, alcohol or medication. A lapse of attention
while operating power tools may result in serious
personal injury.
• Use personal protection. Always wear eye protection.
Protective products such as dust mask, non-skid safety
shoes, hard hat or hearing protection used appropriately
will reduce personal injuries.
• Prevent unintentional starting. Ensure the switch is in
the off position before connecting to power source
and/or battery pack and when picking up or carrying
the tool. Carrying power tools with your finger on the
switch or energizing power tools that have the switch on
invites accidents.
• Remove any adjusting key or wrench before turning
the power tool on. A wrench or a key left attached to a
rotating part of the power tool may result in personal
injury.
• Do not over-reach. Keep proper footing and balance
at all times. This enables better control of the power tool
in unexpected situations.
• Dress properly. Do not wear loose clothing or jewelry.
Keep your hair, clothing and gloves away from
moving parts. Loose clothes, jewelry or long hair can be
caught in moving parts.
• If devices are provided for the connection of dust
extraction and collection facilities, ensure these are
connected and properly used. Use of dust collection can
reduce dust related hazards.
4
English
EN

• Do not let familiarity gained from frequent use of tools
allow you to become complacent and ignore tool safety
principles. A careless action can cause severe injury
within a fraction of a second.
2.4 POWER TOOL USE AND CARE
• Do not force the power tool. Use the correct power
tool for your application. The correct power tool will do
the job better and safer at the rate for which it was
designed.
• Do not use the power tool if the switch does not turn it
on and off. Any power tool that cannot be controlled with
the switch is dangerous and must be repaired.
• Disconnect the plug from the power source and/or the
battery pack from the power tool before making any
adjustments, changing accessories, or storing power
tools. Such preventive safety measures reduce the risk of
starting the power tool accidentally.
• Store idle power tools out of the reach of children and
do not allow persons unfamiliar with the power tool or
these instructions to operate the power tool. Power
tools are dangerous in the hands of untrained users.
• Maintain power tools and accessories. Check for
misalignment or binding of moving parts, breakage of
parts and any other condition that may affect the
power tool’s operation. If damaged, have the power
tool repaired before use. Many accidents are caused by
poorly maintained power tools.
• Keep cutting tools sharp and clean. Properly
maintained cutting tools with sharp cutting edges are less
likely to bind and are easier to control.
• Use the power tool, accessories and tool bits etc. in
accordance with these instructions, taking into
account the working conditions and the work to be
performed. Use of the power tool for operations different
from those intended could result in a hazardous situation.
• Keep handles and grasping surfaces dry, clean and
free from oil and grease. Slippery handles and grasping
surfaces do not allow for safe handling and control of the
tool in unexpected situations.
2.5 BATTERY TOOL USE AND CARE
• Recharge only with the charger specified by the
manufacturer. A charger that is suitable for one type of
battery pack may create a risk of fire when used with
another battery pack.
• Use power tools only with specifically designated
battery packs. Use of any other battery packs may create
a risk of injury and fire.
• When battery pack is not in use, keep it away from
other metal objects like paper clips, coins, keys, nails,
screws, or other small metal objects that can make a
connection from one terminal to another. Shorting the
battery terminals together may cause burns or fire.
• Under abusive conditions, liquid may be ejected from
the battery; avoid contact. If contact accidentally
occurs, flush with plenty of soap and water. If liquid
contacts eyes, immediately seek medical help.
Liquid
ejected from the battery may cause irritation or burns.
• Do not use a battery pack or tool that is damaged or
modified. Damaged or modified batteries may exhibit
unpredictable behaviour resulting in fire, explosion or
risk of injury.
• Do not expose a battery pack or tool to fire or
excessive temperature. Exposure to fire or temperature
above 130 °C may cause explosion.
• Follow all charging instructions and do not charge the
battery pack or tool outside the temperature range
specified in the instructions. Charging improperly or at
temperatures outside the specified range may damage the
battery and increase the risk of fire.
2.6 SERVICE
• Have your power tool serviced by a qualified repair
person using only identical replacement parts. This
will ensure that the safety of the power tool is maintained.
• Never service damaged battery packs. Service of
battery packs should only be performed by the
manufacturer or authorized service providers.
2.7 SPECIFIC SAFETY RULES
• Hold power tool by insulated gripping surfaces, when
performing an operation where the fastener may
contact hidden wiring or its own cord.Fasteners
contacting a "live" wire may make exposed metal parts of
the power tool "live" and could give the operator an
electric shock.
• Know your power tool. Read operator manual
carefully.Learn its applications and limitations, as well
as the specific potential hazards related to this power
tool. Obey this instruction will reduce shock, fire or
serious injury.
• Always wear safety glasses with side shields marked to
comply with ANSI Z87.1.Obey this instruction will
reduce the risk of serious injury.
• Protect your lungs. Wear a face or dust mask if the
operation is dustyObey this instruction will reduce the
risk of serious injury.
• Protect your hearing. Wear hearing protection during
extended periods of operation.Obey this instruction will
reduce the risk of serious injury.
• Battery tools do not have to be plugged into an
electrical outlet; thus, they are always in operating
condition. Be aware of possible hazards when not
using your battery tool or when changing
accessories.Obey this instruction will reduce the risk of
electric shock , fire, or serious injury,
• Do not place battery tools or their batteries near fire
or heat.This will reduce the risk of explosoion and
possibl injury.
• Do not crush, drop or damage battery pack. Do not
use a battery pack or charger that has been dropped
or received a sharp blow.A damaged battery is subject
5
English
EN

to explosion. Properly dispose of a dropped or damaged
battery immediately.
• Batteries can explode in the presence of a source of
ignition, such as a pilot light. To reduce the risk of
serious injury, never use any cordless product in the
presence of open flame.An exploded battery can propel
debris and chemicals. If exposed, flush with water
immediately.
• Do not charge battery tool in a damp or wet
location.Obey this instruction will reduce the risk of
electric shock.
• For best results, your battery tool should be charged
in a location where the temperature is more than 50°F
but less than 100°F.To reduce the risk of serious injury,
do not store outside or in vehicles.
• Under extreme usage or temperature conditions,
battery leakage may occur.If liquid comes in contact
with your sink, wash immediately with soap and water. If
liquid gets into your eyes, flush them with clean water for
at least 10 minutes, then seek immediate medical
attention. Obey this instruction will reduce the risk of
serious injury.
• Keep these instructions. Refer to them frequently and
use them to instruct others who may use this tool.If
you borrow someone this tool, loan them these
instructions also to prevent incorrect use of the machine
and possible injury.
3 SYMBOLS ON THE PRODUCT
Some of the following symbols may be used on this tool.
Please study them and learn their meaning. Proper
interpretation of these symbols will allow you to operate the
tool better and safer.
Symbol Explanation
V Voltage
Direct current
Read all safety warnings and all in-
structions.
Safety alert
Wear eye protection
Wear ear protection
Low speed
High speed
Symbol Explanation
Do not touch rotating part.
4 RISK LEVELS
The following signal words and meanings are intended to
explain the levels of risk associated with this product.
SYM-
BOL
SIGNAL MEANING
DANGER Indicates an imminently haz-
ardous situation,which, if not
avoided, will result in death
or serious injury.
WARNING Indicates a potentially hazard-
ous situation,which, if not
avoided, could result in death
or serious injury.
CAUTION Indicates a potentially hazard-
ous situation, which, if not
avoided, may result in minor
or moderate injury.
CAUTION (Without Safety Alert Sym-
bol) Indicates a situation that
may result in property dam-
age.
5 PROPOSITION 65
WARNING
This product contains a chemical known to the state of
California to cause cancer, birth defects or other
reproductive harm. Some dust created by power sanding,
sawing, grinding, drilling, and other construction activities
contains chemicals known to cause cancer, birth defects or
other reproductive harm. Some examples of these chemicals
are:
• Lead from lead-based paints;
• Crystalline silica from bricks and cement and other
masonry products;
• Arsenic and chromium from chemically treated lumber.
Your risk of exposure to these chemicals varies depending
on how often you do this type of work. To reduce your
exposure to these chemicals, work in a well-ventilated area,
and work with approved safety equipment, such as dust
masks that are specially designed to filter out microscopic
particles.
Save these instructions.
6
English
EN

6 INSTALLATION
6.1 UNPACK THE MACHINE
WARNING
Make sure that you correctly assemble the machine before
use.
WARNING
• If the parts have damage, do not use the machine.
• If you do not have all the parts, do not operate the
machine.
• If the parts are damaged or missing, speak to the service
center.
1. Open the package.
2. Read the documentation in the box.
3. Remove all the unassembled parts from the box.
4. Remove the machine from the box.
5. Discard the box and package in compliance with local
regulations.
6.2 INSTALL THE BATTERY PACK
WARNING
• If the battery pack or charger is damaged, replace the
battery pack or the charger.
• Stop the machine and wait until the motor stops before
you install or remove the battery pack.
• Read, know, and do the instructions in the battery and
charger manual.
1. Align the lift ribs on the battery pack with the grooves in
the battery compartment.
2. Push the battery pack into the battery compartment until
the battery pack locks into place.
3. When you hear a click, the battery pack is installed.
6.3 REMOVE THE BATTERY PACK
1. Push and hold the battery release button.
2. Remove the battery pack from the machine.
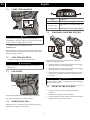
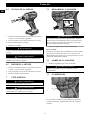
6.4 INSTALL THE BIT
1. Push forward / reverse switch in "neutral" position to lock
the trigger.
2. Pull the coupler forward and hold in position.
3. Put bit into coupler.
4. Release the coupler.
NOTE
Use only impact quality bits with a locking groove.
WARNING
Make sure that you attach the bit tight in the coupler before
you use the machine.
6.5 REMOVE THE BIT
1. Push forward / reverse switch in "neutral" position to lock
the trigger.
2. Pull the coupler forward and hold in position.
3. Pull the bit straight out of the coupler.
7 OPERATION
WARNING
Always wear eye protection.
WARNING
Do not use any attachments or accessories not
recommended by the manufacturer of this product.
7
English
EN

7.1 START THE MACHINE
NOTE
The machine can not work until the reverse switch is
pushed fully to the left or right. Do not operate the machine
at low speeds for extended periods of time.
1. Pull the trigger to turn the machine ON
Variable speed
The machine has a variable speed switch that delivers higher
speed with increased trigger pressure and lower speed with
decreased trigger pressure.
7.2 STOP THE MACHINE
1. Release the trigger to turn the machine OFF.
WARNING
Release the trigger and allow the machine to come to a
complete stop.
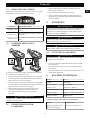
7.3 LED LIGHT
2
The LED light illuminates when the trigger is depressed.
It provides extra light for increased visibility.
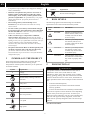
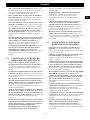
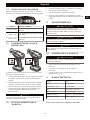
7.4 SPEED SELECTION
Push the button (1) to adjust the speed. The lights (2) will
illuminate according to the speed level.
Lights Speed level
3 Green Lights The machine is in "high speed" setting.
2 Green Lights
The machine is in "medium speed" set-
ting.
1 Green Light The machine is in "low speed" setting.
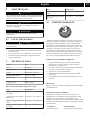
7.5 FORWARD / REVERSE SWITCH
The machine has the switch (forward/reverse) above the
trigger to change the rotation.
1. When the switch is on the left side of the switch trigger,
the bit direciton is forward (tightening).
2. When the switch is on the right side of the switch trigger,
the bit direction is reversed (loosening).
3. Put the switch in the OFF (center lock) position to help
decrease the possibility of accidental starting when not
operating.
WARNING
Let the coupler to come to a complete stop before changing
the direction of rotation.
7.6 OPERATE THE MACHINE
1. Put the (forward / reverse) in desired position for
operation.
2. Hold the machine firmly with your hand.
3. Insert desired bit into the coupler, and slowly depress the
trigger. Start slowly for more control.
8
English
EN
1
2 3
2 3
2
1

8 MAINTENANCE
CAUTION
Do not let brake fluids, gasoline, petroleum-based materials
touch the plastic parts. Chemicals can cause damage to the
plastic, and make the plastic unserviceable.
CAUTION
Do not use strong solvents or detergents on the plastic
housing or components.
WARNING
Remove the battery pack from the machine before
maintenance.
8.1 CLEAN THE MACHINE
CAUTION
The machine must be dry. Humidity can cause risks of
electrical shocks.
• Clear the unwanted material out of the air vent with a
vacuum cleaner.
• Do not spray the air vent or put the air vent in solvents.
• Clean the housing and the plastic components with a
moist and soft cloth.
9 TECHNICAL DATA
Voltage 24 V
Motor Brushless
No Load Speed 0 - 2800 RPM
Torque 2666 In-lbs. / 300 N.m
Weight Without Battery 2.6 lbs ( 1.18 kg)
Battery Model BAG711 and other BAG ser-
ies
Charger Model 29862 / 29972
The recommended ambient temperature range:
Item Temperature
Appliance storage tempera-
ture range
32°F (0°C) - 158°F (70°C)
Appliance operation temper-
ature range
32°F (0°C) - 104°F (40°C)
Battery charging temperature
range
39°F (4°C) - 104°F (40°C)
Charger operation tempera-
ture range
39°F (4°C) - 104°F (40°C)
Item Temperature
Battery storage temperature
range
32°F (0°C) - 73°F (23°C)
Battery discharging tempera-
ture range
32°F (0°C) - 113°F (45°C)
10 LIMITED WARRANTY
YEAR
ANS
AÑOS
LIMITED WARRANTY
GARANTIE LIMITÉE
GARANTÍA
LIMITADA
3
Greenworks hereby warranties this product, to the original
purchaser with proof of purchase, for a period of three (3)
years against defects in materials, parts or workmanship.
Greenworks, at its own discretion will repair or replace any
and all parts found to be defective, through normal use, free
of charge to the customer. This warranty is valid only for
units which have been used for personal use that have not
been hired or rented for industrial/commercial use, and that
have been maintained in accordance with the instructions in
the owners’ manual supplied with the product from new.
ITEMS NOT COVERED BY WARRANTY:
1. Any part that has become inoperative due to misuse,
commercial use, abuse, neglect, accident, improper
maintenance, or alteration; or
2. The unit, if it has not been operated and/or maintained in
accordance with the owner's manual; or
3. Normal wear, except as noted below;
4. Routine maintenance items such as lubricants, blade
sharpening;
5. Normal deterioration of the exterior finish due to use or
exposure.
HELPLINE:
Warranty service is available by calling our toll-free helpline,
at 1-888-909-6757.
TRANSPORTATION CHARGES:
Transportation charges for the movement of any power
equipment unit or attachment are the responsibility of the
purchaser. It is the purchaser’s responsibility to pay
transportation charges for any part submitted for replacement
under this warranty unless such return is requested in writing
by Greenworks.
USA address: Canadian address:
Greenworks Tools Greenworks Tools Canada Inc.
9
English
EN

P.O. Box 1238 1110 Stellar Drive Unit 102
Mooresville, NC 28115 Newmarket, ON, L3Y 7B7
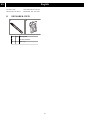
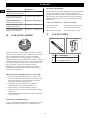
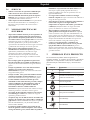
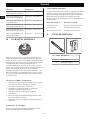
11 EXPLODED VIEW
1
2
No. QTY Description
1 1 Double Sided Bit
2. 1 Belt Clip
10
English
EN

1 Description.......................................12
1.1 But................................................................... 12
1.2 Aperçu............................................................. 12
2 Avertissements généraux de
sécurité des outils électriques......... 12
2.1 Sécurité de la zone de travail...........................12
2.2 Sécurité électrique........................................... 12
2.3 Personal safety.................................................12
2.4 Utilisation et entretien des outils électriques...13
2.5 Utilisation et entretien de l’outil sur batterie...13
2.6 Service............................................................. 13
2.7 Règles spécifiques de sécurité......................... 13
3 Symboles figurant sur la machine. 14
4 Niveaux de risques...........................14
5 Proposition 65..................................15
6 Installation....................................... 15
6.1 Déballez la machine ........................................15
6.2 Installez la batterie...........................................15
6.3 Retirez la batterie.............................................15
6.4 Installez la mèche............................................ 16
6.5 Retirez la mèche.............................................. 16
7 Utilisation.........................................16
7.1 Démarrez la machine.......................................16
7.2 Arrêtez la machine...........................................16
7.3 Lumière DEL...................................................16
7.4 Sélection de vitesse..........................................17
7.5 Interrupteur avant / arrière ..............................17
7.6 Faites fonctionner l'appareil.............................17
8 Entretien...........................................17
8.1 Nettoyez la machine........................................ 17
9 Données techniques......................... 17
10 Garantie limitée...............................18
11 Vue éclatées...................................... 18
11
Français
FR

1 DESCRIPTION
1.1 BUT
L'appareil sert à
• visser de longues vis à tête plate lorsque vous montez une
terrasse
• visser des boulons ordinaires dans des poteaux de terrasse
• visser dans les blocs de murs et dans du béton
• visser des clous métalliques
1.2 APERÇU
1
2
4
5
6
3
1
Coupleur de 1/4"
2
Lumière DEL
3
Gâchette
4
Sélection de vitesse
5
Clip de ceinture
6
Avant / arrière
2 AVERTISSEMENTS
GÉNÉRAUX DE SÉCURITÉ
DES OUTILS ÉLECTRIQUES
AVERTISSEMENT
Lisez tous les avertissements de sécurité et toutes les
instructions. Le non-respect de ces avertissements et de ces
instructions peut entraîner un choc électrique, un incendie
et/ou des blessures graves.
Conservez tous les avertissements et instructions pour
référence ultérieure.
Le terme « outil électrique » dans les avertissements fait
référence à votre outil électrique (sans fil) fonctionnant sur
batterie.
2.1 SÉCURITÉ DE LA ZONE DE
TRAVAIL
• Gardez la zone de travail propre et bien éclairée. Les
endroits encombrés ou sombres favorisent les accidents.
• N'utilisez pas les outils électriques dans des
environnements explosifs, par exemple en présence de
liquides, gaz ou poussières inflammables. La mise en
marche des outils électriques crée des étincelles qui
peuvent enflammer la poussière ou les vapeurs.
• Tenez les enfants et les curieux à l'écart lorsque vous
utilisez un outil électrique. Les distractions peuvent
vous faire perdre le contrôle.
2.2 SÉCURITÉ ÉLECTRIQUE
• Les prises de l'outil électrique doivent être
compatibles avec la prise de courant. Ne modifiez
jamais la prise d'aucune façon. N'utilisez pas
d'adaptateur de prise avec des outils à prise de terre.
Des prises non modifiées et leurs prises de courant
respectives réduisent les risques de choc électrique.
• Évitez que le corps n'entre en contact avec des
surfaces mises à la terre comme les tuyaux, les
radiateurs, les cuisinières et les réfrigérateurs. Il y a un
risque accru de choc électrique si votre corps est en
contact avec la terre.
• N'exposez pas les outils électriques à des conditions
humides ou mouillées. L'eau qui pénètre dans un outil
électrique augmente le risque de choc électrique.
• N'abusez pas du cordon. N'utilisez jamais le câble
pour porter, tirer ou débrancher l'outil. Éloignez le
cordon de la chaleur, de l'huile et des bords
tranchants ou des pièces mobiles. Les cordons
endommagés augmentent le risque d’un choc électrique.
• Lorsque vous utilisez un outil électrique en extérieur,
utilisez une rallonge de câble adaptée à l'usage en
extérieur. Utiliser un câble adapté à un usage en
extérieur réduit le risque de choc électrique.
• Si vous ne pouvez éviter d'utiliser l'outil dans un
environnement humide, utilisez une alimentation
protégée à courant différentiel. Le respect de cette règle
réduira le risque de chocs électriques.
2.3 PERSONAL SAFETY
• Stay alert, watch what you are doing and use common
sense when operating a power tool. Do not use a
power tool while you are tired or under the influence
of drugs, alcohol or medication. A lapse of attention
while operating power tools may result in serious
personal injury.
• Use personal protection. Always wear eye protection.
Protective products such as dust mask, non-skid safety
shoes, hard hat or hearing protection used appropriately
will reduce personal injuries.
• Prevent unintentional starting. Ensure the switch is in
the off position before connecting to power source
and/or battery pack and when picking up or carrying
the tool. Carrying power tools with your finger on the
switch or energizing power tools that have the switch on
invites accidents.
• Remove any adjusting key or wrench before turning
the power tool on. A wrench or a key left attached to a
rotating part of the power tool may result in personal
injury.
12
Français
FR

• Do not over-reach. Keep proper footing and balance
at all times. This enables better control of the power tool
in unexpected situations.
• Dress properly. Do not wear loose clothing or jewelry.
Keep your hair, clothing and gloves away from
moving parts. Loose clothes, jewelry or long hair can be
caught in moving parts.
• If devices are provided for the connection of dust
extraction and collection facilities, ensure these are
connected and properly used. Use of dust collection can
reduce dust related hazards.
• Do not let familiarity gained from frequent use of tools
allow you to become complacent and ignore tool safety
principles. A careless action can cause severe injury
within a fraction of a second.
2.4 UTILISATION ET ENTRETIEN DES
OUTILS ÉLECTRIQUES
• Ne forcez pas l’outil électrique. Utilisez l'outil
l’électrique adapté à votre application. L'outil
électrique approprié fera mieux le travail et sera plus
sécuritaire au rythme pour lequel il a été conçu.
• N’utilisez pas l'outil électrique si l'interrupteur ne le
met pas en marche ou à l'arrêt. Tout outil électrique qui
ne peut pas être contrôlé avec l'interrupteur est
dangereux et doit être réparé.
• Débranchez la prise de la source d’alimentation et/ou
de la batterie avant d'effectuer des réglages, de
changer des accessoires ou de ranger l'outil électrique.
De telles mesures de sécurité préventives réduisent le
risque d'un démarrage accidentel de l'outil électrique.
• Rangez les outils électriques inutilisés hors de portée
des enfants et ne laissez pas des personnes qui se sont
familiarisées avec l'outil électrique ou ces instructions
l’utiliser. Les outils électriques sont dangereux entre les
mains des utilisateurs non formés.
• Entretenez les outils électriques et les accessoires.
Vérifiez le désalignement des pièces mobiles ou la
fixation des pièces mobiles, la cassure des pièces et
toute autre condition qui pourrait affecter le
fonctionnement de l’outil électrique. Si il est
endommagé, faites réparer l'outil électrique avant de
l'utiliser. De nombreux accidents sont causés par des
outils électriques mal entretenus.
• Garder les outils de coupe propres et tranchants. Les
outils de coupe bien entretenus avec des bords tranchants
sont moins susceptibles de se coincer et sont plus faciles
à contrôler.
• Utilisez l'outil électrique, les accessoires, les mèches,
etc. conformément à ces instructions, en tenant
compte des conditions de travail et des travaux à
effectuer. L'utilisation de l'outil motorisé pour des
opérations différentes de celles prévues pourrait
entraîner une situation dangereuse.
• Veillez à ce que les poignées restent propres, sèches et
exemptes d’huile et de graisse. Les poignées et surfaces
de prise glissantes ne permettent pas de manipuler et de
contrôler l'outil dans des situations inattendues.
2.5 UTILISATION ET ENTRETIEN DE
L’OUTIL SUR BATTERIE
• Rechargez uniquement avec le chargeur spécifié par le
fabricant. Un chargeur adapté à un type de batterie peut
créer un risque d'incendie lorsqu'il est utilisé avec une
autre batterie.
• Utilisez les outils électriques uniquement avec des
batteries spécialement conçues à cet effet. L'utilisation
de toutes autres batteries peut créer un risque de blessure
et d'incendie.
• Lorsque la batterie n'est pas utilisée, éloignez-la des
autres objets métalliques tels qu’attaches trombones,
pièces de monnaie, clés, clous, vis ou autres petits
objets métalliques qui peuvent établir une connexion
d'une borne à une autre. Le court-circuitage des bornes
de la batterie peut provoquer des brûlures ou un incendie.
• Dans des conditions abusives, du liquide peut être
éjecté de la batterie ; évitez tout contact. En cas de
contact accidentel, rincez abondamment avec du
savon et de l’eau. En cas de contact du liquide avec les
yeux, consultez immédiatement un médecin. Le liquide
s'échappant des batteries peut causer des irritations ou
des brûlures.
• N'utilisez pas une batterie ou un outil endommagé ou
modifié. Les batteries endommagées ou modifiées
peuvent présenter un fonctionnement imprévisible et
provoquer un incendie, une explosion ou un risque de
blessure.
• N'exposez pas un bloc-batterie ou un outil au feu ou à
une température excessive. L'exposition au feu ou une
température supérieure à 130 °C peut provoquer une
explosion.
• Suivez toutes les instructions de recharge et ne
rechargez pas la batterie ou l'outil en dehors de la
plage de température spécifiée dans ces instructions.
Un rechargement incorrect ou à des températures en
dehors de la plage spécifiée peut endommager la batterie
et augmenter le risque d'incendie.
2.6 SERVICE
• Faites effectuer l'entretien de votre outil électrique
par un réparateur qualifié en n'utilisant que des
pièces de rechange identiques. Cela garantira le
maintien de la sécurité de l’outil électrique.
• Ne réparez jamais un bloc-batterie endommagé.
L'entretien d’un bloc-batterie ne doit être effectué que par
le fabricant ou des fournisseurs de service agréés.
2.7 RÈGLES SPÉCIFIQUES DE
SÉCURITÉ
• Maintenez l'outil par ses surfaces isolées, lorsque vous
accomplissez une tâche où la fixation pourrait être en
contact avec un câblage invisible ou son propre
13
Français
FR

câble.Les fixations en contact avec un câble sous tension
peuvent exposer des parties métalliques de l'outil et
pourraient causer un choc électrique.
• Connaissez bien votre outil. Lisez attentivement le
manuel de l'opérateur.Apprenez ses applications et ses
limites, ainsi que les risques potentiels liés à cet outil
électrique. Suivre les instructions réduit le risque de choc
électrique, d'incendie ou de blessures graves.
• Portez toujours des lunettes de protection avec des
protections latérales, conformes à la norme ANSI
Z87.1.Suivre cette instruction réduit le risque de blessure
grave.
• Protégez vos poumons. Portez un masque anti-
poussière si la tâche est dans un environnement
poussiéreux.Suivre cette instruction réduit le risque de
blessure grave.
• Protégez vos oreilles. Portez des protections pour
oreilles si la tâche est de longue durée.Suivre cette
instruction réduit le risque de blessure grave.
• Les outils à batterie ne doivent pas être branchés à
une prise de courant, par conséquent ils sont toujours
opérationnels. Faites attention aux risques possibles
lorsque vous n'utilisez pas votre outil à batterie ou
lorsque vous changez des accessoires.Suivre cette
instruction réduit le risque de choc électrique, d'incendie
ou de blessure grave.
• Ne placez pas les outils ou leur batterie près d'une
source de chaleur ou près d'un chauffageCela réduit le
risque d'explosion et de blessure possible.
• Ne pas écraser, faire tomber ou abîmer la batterie.
N'utilisez pas une batterie ou un chargeur qui et
tombé ou qui a reçu des coups.Une batterie abîmée
pourrait exploser. Débarrassez-vous immédiatement
d'une batterie qui est tombée ou abîmée.
• Les batteries peuvent exploser en présence d'une
source d'allumage, telle qu'un témoin lumineux. Pour
réduire les risques de blessure grave, n'utilisez jamais
un produit sans fil tout près d'une flamme. Une
batterie qui explose peut propulser des déchets et des
substances chimiques. Si vous êtes exposé, rincez
immédiatement à l'eau.
• Ne chargez pas la batterie de l'outil dans un
environnement humide.Suivre cette instruction réduit le
risque de choc électrique.
• Pour un meilleur rendement, votre batterie devrait
être chargée dans des endroits où la température est
au-dessus de 50°F mais inférieure à 100°F.Pour réduire
le risque de blessure, ne la rangez pas dehors ou dans un
véhicule.
• Dans des conditions de températures extrêmes, la
batterie peut se mettre à fuir.Si du liquide entre en
contact avec votre peau, lavez-vous immédiatement à
l'eau et au savon. Si vous recevez du liquide dans les
yeux, rincez-les à l'eau claire durant au moins 10
minutes, puis appelez un médecin. Suivre cette instruction
réduit le risque de blessure grave.
• Conservez ces instructions. Consultez-les
régulièrement et utilisez-les pour expliquer à d'autres
personnes comment utiliser cet outil.Si vous empruntez
cet outil, empruntez également ces instructions pour
éviter toute mauvaise utilisation de l'appareil et des
blessures possibles.
3 SYMBOLES FIGURANT SUR
LA MACHINE
Certains des symboles suivants peuvent être utilisés sur cet
outil. Veuillez les étudier et apprendre leur signification. Une
bonne interprétation de ces symboles vous permettra de
mieux utiliser l'outil et de manière plus sécuritaire.
Symbole Explication
V Voltage
Courant direct
Lisez tous les avertissements de sécur-
ité et toutes les instructions.
Alerte de sécurité
Portez des protections oculaires
Portez des protections auditives
Vitesse faible
Vitesse forte
Ne touchez pas les parties rotatives.
4 NIVEAUX DE RISQUES
Les termes de mise en garde suivants et leur signification ont
pour but d'expliquer les niveaux de risques associés à
l'utilisation de ce produit.
SYM-
BOLE
SIGNAL SIGNIFICATION
DANGER Indique une situation danger-
euse imminente qui, si elle
n'est pas évitée, peut entraîner
la mort ou des blessures
graves.
14
Français
FR

SYM-
BOLE
SIGNAL SIGNIFICATION
AVERTISSE-
MENT
Indique une situation poten-
tiellement dangereuse qui, si
elle n'est pas évitée, peut en-
traîner la mort ou des bles-
sures graves.
MISE EN
GARDE
Indique une situation poten-
tiellement dangereuse qui, si
elle n'est pas évitée, pourrait
causer des blessures mineures
ou modérées.
MISE EN
GARDE
(Sans symbole d'alerte de sé-
curité) Indique une situation
pouvant entraîner des dom-
mages matériels.
5 PROPOSITION 65
AVERTISSEMENT
Ce produit contient un produit chimique connu dans l'état
de Californie comme étant une cause de cancer, de
malformations congénitales ou d'autres problèmes de
reproduction. Certaines poussières produites par le ponçage
mécanique, le sciage, le meulage, le perçage et d'autres
activités de construction contiennent des produits chimiques
connus pour causer le cancer, des malformations
congénitales ou d'autres problèmes de reproduction. Voici
quelques exemples de ces produits chimiques :
• Plomb provenant de peintures à base de plomb;
• Silice cristalline provenant de briques, de ciment et
d'autres produits de maçonnerie;
• Arsenic et chrome provenant de bois traité
chimiquement.
Votre risque d'exposition à ces produits chimiques varie
selon la fréquence à laquelle vous faites ce type de travail.
Pour réduire votre exposition à ces produits chimiques,
travaillez dans un endroit bien ventilé et utilisez un
équipement de sécurité approuvé, comme des masques anti-
poussière spécialement conçus pour filtrer les particules
microscopiques.
Conservez ces instructions
6 INSTALLATION
6.1 DÉBALLEZ LA MACHINE
AVERTISSEMENT
Assurez-vous d'assembler correctement la machine avant de
l'utiliser.
AVERTISSEMENT
• Si les pièces sont endommagées, n'utilisez pas la
machine.
• Si vous n'avez pas toutes les pièces, n'utilisez pas la
machine.
• Si les pièces sont endommagées ou manquantes,
communiquez avec le centre de service.
1. Ouvrez l’emballage.
2. Lisez la documentation contenue dans la boîte.
3. Retirez toutes les pièces non assemblées de la boîte.
4. Retirez la machine de sa boîte.
5. Jetez la boîte et l'emballage en respectant les règlements
locaux.
6.2 INSTALLEZ LA BATTERIE
AVERTISSEMENT
• Si la batterie ou le chargeur est endommagé, remplacez-
le, au besoin.
• Arrêtez la machine et attendez que le moteur s'arrête
avant d'installer ou de retirer la batterie.
• Lisez, comprenez et suivez les instructions du manuel
de la batterie et du chargeur.
1. Alignez les languettes de la batterie avec les rainures du
compartiment de batterie.
2. Poussez la batterie dans le compartiment de batterie
jusqu'à ce qu'elle soit bien encliquetée.
3. Vous devriez entendre un clic lorsque la batterie sera
insérée correctement.
6.3 RETIREZ LA BATTERIE
1. Poussez et maintenez enfoncé le bouton de déblocage de
la batterie.
2. Retirez la batterie de la machine.
15
Français
FR

6.4 INSTALLEZ LA MÈCHE
1. Poussez l'interrupteur marche avant/arrière en position
« neutre » pour verrouiller la gâchette.
2. Tirez le coupleur vers l'avant et maintenez-le en place.
3. Placez la mèche dans le coupleur.
4. Relâchez le coupleur.
REMARQUE
Utilisez uniquement des mèches de qualité avec rainure de
blocage.
AVERTISSEMENT
Assurez-vous de fixer et de bien serrer la mèche dans le
mandrin avant d'utiliser l'appareil.
6.5 RETIREZ LA MÈCHE
1. Poussez l'interrupteur marche avant/arrière en position
« neutre » pour verrouiller la gâchette.
2. Tirez le coupleur vers l'avant et maintenez-le en place.
3. Retirez la mèche hors du mandrin.
7 UTILISATION
AVERTISSEMENT
Portez toujours des lunettes de protection.
AVERTISSEMENT
N'utilisez pas d'autres pièces ou d'accessoires non
recommandés par le fabricant de ce produit.
7.1 DÉMARREZ LA MACHINE
REMARQUE
La machine ne peut fonctionner qu'une fois que le bouton
marche arrière est entièrement poussé vers la gauche ou la
droite. Ne faites pas fonctionner l'appareil à vitesse lente
durant de longues périodes de temps.
1. Tirez sur la gâchette pour démarrer la machine.
Vitesse variable
La machine est équipée d'un commutateur à vitesse variable
qui produit une vitesse plus élevée avec une pression de
déclenchement plus élevée et une vitesse plus basse avec une
pression de déclenchement réduite.
7.2 ARRÊTEZ LA MACHINE
1. Relâchez la gâchette pour arrêter la machine.
AVERTISSEMENT
Relâchez la gâchette et laissez la machine s’arrêter
complétement.
7.3 LUMIÈRE DEL
2
Le voyant DEL s'allume lorsque la gâchette est enfoncée.
Il fournit une lumière supplémentaire pour une meilleure
visibilité.
16
Français
FR

7.4 SÉLECTION DE VITESSE
Appuyez sur le bouton (1) pour régler la vitesse. Les voyants
(2) s'allument en fonction du niveau de vitesse.
Lumières Niveau de la vitesse
3 lumières vertes
La machine est en position « haute vi-
tesse ».
2 lumières vertes
La machine est en position « vitesse
moyenne ».
1 lumière verte
La machine est en position « vitesse fa-
ible ».
7.5 INTERRUPTEUR AVANT /
ARRIÈRE
La machine possède l’interrupteur (avant/arrière) au-dessus
de la gâchette pour changer la rotation.
1. Lorsque l’interrupteur marche arrière se trouve à gauche
de l’interrupteur de la gâchette marche/arrêt, la direction
de la mèche est vers l'avant (serrage).
2. Lorsque l’interrupteur marche arrière se trouve à gauche
de l’interrupteur de la gâchette marche/arrêt, la direction
de la mèche est vers l'arrière (desserrage).
3. Placez l’interrupteur dans la position OFF (verrou
central) pour permettre de réduire les risques de
démarrage accidentel lorsque vous n'utilisez pas
l'appareil.
AVERTISSEMENT
Attendez que le mandrin s'arrête complètement avant de
changer le sens de rotation.
7.6 FAITES FONCTIONNER
L'APPAREIL
1. Placez l’interrupteur (avant/arrière) dans la position
désirée pour l’utilisation.
2. Tenez fermement la machine avec la main.
3. Insérez la mèche désirée dans le coupleur et appuyez
lentement sur la gâchette. Démarrez lentement pour un
meilleur contrôle.
8 ENTRETIEN
ATTENTION
Évitez que les liquides de freins, l'essence et les matériaux à
base de pétrole ne viennent en contact avec les pièces en
plastique. Les produits chimiques peuvent endommager le
plastique et le rendre inutilisable.
ATTENTION
N'utilisez pas de solvants ou de détergents puissants sur le
boîtier ou les composants en plastique.
AVERTISSEMENT
Retirez le bloc-batterie de la machine avant l’entretien.
8.1 NETTOYEZ LA MACHINE
ATTENTION
La machine doit être sèche. L'humidité peut provoquer des
risques de chocs électriques.
• Enlevez les matières indésirables de l'évent d'air à l'aide
d'un aspirateur.
• Ne vaporisez pas l'évent d'air et ne le plongez pas dans
des solvants.
• Nettoyez le boîtier et les composants en plastique avec un
chiffon doux et humide.
9 DONNÉES TECHNIQUES
Voltage 24 V
Moteur Sans balais
Vitesse à vide 0 - 2800 RPM
Clé de serrage 2666 po-lb. / 300 N.m
Poids sans batterie 2.6 lb ( 1.18 kg)
Batterie modèle BAG711 et autres séries BAG
Chargeur modèle 29862 / 29972
La plage de température ambiante recommandée :
Article Température
Plage de température d’en-
treposage de l'appareil
32°F (0°C) - 158°F (70°C)
17
Français
FR
1
2 3
2 3
2
1

Article Température
Plage de température de
fonctionnement de l'appareil
32°F (0°C) - 104°F (40°C)
Plage de température de re-
chargement de la batterie
39°F (4°C) - 104°F (40°C)
Plage de température de
fonctionnement du chargeur
39°F (4°C) - 104°F (40°C)
Plage de température d’en-
treposage de la batterie
32°F (0°C) - 73°F (23°C)
Plage de température de dé-
chargement de la batterie
32°F (0°C) - 113°F (45°C)
10 GARANTIE LIMITÉE
YEAR
ANS
AÑOS
LIMITED WARRANTY
GARANTIE LIMITÉE
GARANTÍA
LIMITADA
3
Greenworks garantit par la présente ce produit, à l'acheteur
original avec preuve d'achat, pour une période de trois (3) ans
contre tout défaut de matériaux, de pièces ou de main-
d'œuvre. Greenworks, à sa propre discrétion, réparera ou
remplacera toutes les pièces défectueuses, dans des conditions
normales d'utilisation, sans frais pour le client. Cette garantie
n'est valable que pour les appareils qui ont été utilisés à des
fins personnelles, qui n'ont pas été loués à des fins
industrielles ou commerciales et qui ont été entretenus
conformément aux instructions du manuel du propriétaire
fourni avec le produit neuf.
ARTICLES NON COUVERTS PAR LA GARANTIE :
1. Toute pièce qui est devenue inopérante en raison d'une
mauvaise utilisation, d'une utilisation commerciale, d'un
abus, d'une négligence, d'un accident, d'un entretien
inapproprié ou d'une modification ; ou
2. L'appareil, s'il n'a pas été utilisé et/ou entretenu
conformément au manuel du propriétaire ; ou
3. Usure normale, sauf comme indiqué ci-dessous ;
4. Articles d'entretien courant tels que lubrifiants, affûtage
des lames ;
5. Détérioration normale du fini extérieur due à l'utilisation
ou à l'exposition.
ASSISTANCE TÉLÉPHONIQUE :
Le service de garantie est disponible en appelant notre ligne
d'assistance téléphonique sans frais, au 1-888-909-6757.
FRAIS DE TRANSPORT :
Les frais de transport pour le déplacement de tout équipement
motorisé ou accessoire sont à la charge de l'acheteur. Il
incombe à l'acheteur de payer les frais de transport pour toute
pièce retournée pour remplacement en vertu de la présente
garantie, à moins qu'un tel retour soit demandé par écrit par
Greenworks.
Adresse aux Etats-Unis : Adresse au Canada :
Greenworks Tools Greenworks Tools Canada Inc.
P.O. Box 1238 1110 Stellar Drive Unit 102
Mooresville, NC 28115 Newmarket, ON, L3Y 7B7
11 VUE ÉCLATÉES
1
2
No Qté. Description
1 1 Embout Double Face
2. 1 Clip de ceinture
18
Français
FR

1 Descripción.......................................20
1.1 Finalidad.......................................................... 20
1.2 Perspectiva general..........................................20
2 Advertencias generales de
seguridad para herramientas
eléctricas...........................................20
2.1 Seguridad de la zona de trabajo.......................20
2.2 Seguridad eléctrica.......................................... 20
2.3 Seguridad personal.......................................... 20
2.4 Utilización y cuidado de herramientas
eléctricas.......................................................... 21
2.5 Utilización y cuidado de herramientas a
batería.............................................................. 21
2.6 Servicio............................................................22
2.7 Normas específicas de seguridad.....................22
3 Símbolos en el producto..................22
4 Niveles de riesgo.............................. 23
5 Propuesta 65.....................................23
6 Instalación........................................23
6.1 Desembalaje de la máquina ............................ 23
6.2 Instalación de la batería................................... 23
6.3 Retirada de la batería....................................... 23
6.4 Instalación de la broca..................................... 24
6.5 Retirada de la broca......................................... 24
7 Funcionamiento...............................24
7.1 Puesta en marcha de la máquina......................24
7.2 Detención de la máquina................................. 24
7.3 Luz LED.......................................................... 24
7.4 Selección de velocidad.................................... 25
7.5 Interruptor de avance / retroceso .................... 25
7.6 Funcionamiento de la máquina........................25
8 Mantenimiento.................................25
8.1 Limpieza de la máquina...................................25
9 Datos técnicos.................................. 25
10 Garantía limitada............................26
11 Vista despiezada.............................. 26
19
Español
ES

1 DESCRIPCIÓN
1.1 FINALIDAD
La máquina se utiliza para
• atornillar tornillos largos para plataformas cuando monta
una plataforma
• atornillar pernos de carrocería en postes de plataformas
• atornillar tornillos en paredes de bloques y hormigón
• atornillar tornillos en estructuras de metal
1.2 PERSPECTIVA GENERAL
1
2
4
5
6
3
1
Acoplamiento de 1/4"
2
Luz LED
3
Gatillo
4
Selección de velocidad
5
Pinza para cinturón
6
Avance / retroceso
2 ADVERTENCIAS GENERALES
DE SEGURIDAD PARA
HERRAMIENTAS
ELÉCTRICAS
AVISO
Lea todas las advertencias de seguridad y todas las
instrucciones. El incumplimiento de las advertencias e
instrucciones puede provocar descargas eléctricas,
incendios o lesiones graves.
Guarde todas las advertencias e instrucciones para su
consulta posterior.
El término “herramienta eléctrica” empleado en las
advertencias se refiere a su herramienta eléctrica con
funcionamiento a batería (inalámbrica).
2.1 SEGURIDAD DE LA ZONA DE
TRABAJO
• Mantenga limpia y bien iluminada la zona de trabajo.
Las zonas desordenadas u oscuras fomentan los
accidentes.
• No utilice herramientas eléctricas en atmósferas
explosivas, como en la presencia de líquidos, gases o
polvo que puedan inflamarse. Las herramientas
eléctricas generan chispas que pueden encender el polvo
o los gases.
• Mantenga alejados a los niños y los transeúntes
mientras utilice una herramienta eléctrica. Las
distracciones pueden hacer que pierda el control.
2.2 SEGURIDAD ELÉCTRICA
• Los enchufes de las herramientas eléctricas deben
corresponder con la toma de corriente. Nunca
modifique el enchufe en modo alguno. No utilice
enchufes adaptadores con herramientas eléctricas
conectadas a tierra. La utilización de enchufes no
modificados y de tomas de corriente adecuadas reducirá
el riesgo de descarga eléctrica.
• Evite el contacto del cuerpo con superficies conectadas
a tierra, como tuberías, radiadores, estufas y
refrigeradores. Existe un riesgo aumentado de descarga
eléctrica si su cuerpo está conectado a tierra.
• No exponga las herramientas eléctricas a la lluvia o a
condiciones de humedad. Si penetra agua en una
herramienta eléctrica, aumentará el riesgo de descarga
eléctrica.
• No abuse del cable. Nunca utilice el cable para
transportar, tirar o desenchufar la herramienta
eléctrica. Mantenga el cable alejado del calor, el aceite,
los bordes afilados y las piezas móviles. Los cables
dañados o enredados aumentan el riesgo de descarga
eléctrica.
• Cuando utilice una herramienta eléctrica en
exteriores, use un cable alargador adecuado para uso
en exterior. La utilización de un cable adecuado para
uso en exterior reduce el riesgo de descarga eléctrica.
• Si no es inevitable el uso de una herramienta eléctrica
en un lugar húmedo, utilice un suministro protegido
por un dispositivo de corriente residual (RCD). La
utilización de un RCD reduce el riesgo de descarga
eléctrica.
2.3 SEGURIDAD PERSONAL
• Manténgase alerta, observe lo que está haciendo y
emplee el sentido común cuando utilice una
herramienta eléctrica. No utilice una herramienta
eléctrica mientras esté cansado o bajo la influencia de
drogas, alcohol o medicamentos. Una falta de atención
durante el uso de herramientas eléctricas puede provocar
lesiones personales graves.
• Utilice protección personal. Lleve siempre protección
ocular. Si se utilizan correctamente productos de
protección como máscaras antipolvo, zapatos de
seguridad antideslizantes, cascos o protecciones
auditivas, se reducirán las lesiones personales.
• Evite el arranque accidental. Asegúrese de que el
interruptor esté en la posición de apagado antes de
conectar a la fuente de alimentación o a la batería y al
20
Español
ES
La page est en cours de chargement...
La page est en cours de chargement...
La page est en cours de chargement...
La page est en cours de chargement...
La page est en cours de chargement...
La page est en cours de chargement...
La page est en cours de chargement...
La page est en cours de chargement...
-
 1
1
-
 2
2
-
 3
3
-
 4
4
-
 5
5
-
 6
6
-
 7
7
-
 8
8
-
 9
9
-
 10
10
-
 11
11
-
 12
12
-
 13
13
-
 14
14
-
 15
15
-
 16
16
-
 17
17
-
 18
18
-
 19
19
-
 20
20
-
 21
21
-
 22
22
-
 23
23
-
 24
24
-
 25
25
-
 26
26
-
 27
27
-
 28
28


Greenworks 3803702AZ Manuel utilisateur
- Catégorie
- Outils électroportatifs
- Taper
- Manuel utilisateur
- Ce manuel convient également à
dans d''autres langues
- English: Greenworks 3803702AZ User manual
- español: Greenworks 3803702AZ Manual de usuario
Documents connexes
-
Greenworks IW24L00 Manuel utilisateur
-
-
Greenworks DD24L01 Mode d'emploi
-
-
-
Greenworks FN24A01 Manuel utilisateur
-
-
-
-
Greenworks 2417602CA Manuel utilisateur