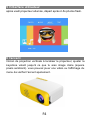
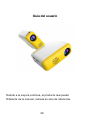
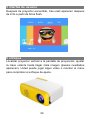
iRULU CS03 Manuel utilisateur
- Catégorie
- Projecteurs de données
- Taper
- Manuel utilisateur
Ce manuel convient également à

EN-0
User Guide
Due to continuous improvement,actual product may
Different from themanual,manual is for reference only.

EN-1
1 Safety notice:
1.1 Pleaseread use manualcarefuliybeforeyouuse projector
1.2 National standard power cable and power cord with grounding is
suggested,so as toensurestablepowersupply.
1.3 Pleaseusethe samepowerVoltage withthe projectormarked.
1.4 Please not open the projector,otherwise factory will not afford
warranty service.
1.5 No peeking to the projector lamp as the projector is
working,otherwiseeasy todamage youreyes.
1.6 In the projector ventilation holes,please don’t cover with the
cloth,carpet adn other materials.
1.7 No waterproof function,please keep projector away the rain or
moisture,andcan’tput some liquid items such asvase cup those.
1.8 In order prevent power shock,please keep away rain or water or
moisture.
1.9 Turn off,andcut off the power supply,if long time not use projector.
1.10 Use the originally foam or other unti-shock material to protect
projector,If you need transport thisprojector.
1.11 Contact with the agency,don’t repair by yourself,If you find the
projectorhave problem.
Maintain indication:
1 year warranty from factory,more warranty information,please contact
with agency (warranty service is not including the
frame,Manuel,package,and some subjective idea about the video
sound image aspects).

EN-2
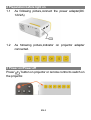
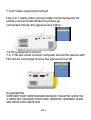
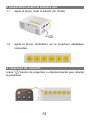
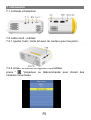
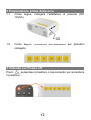
2 Preparation before light on
1.1 As following picture,connect the power adapter(DC
12V2A)
1.2 As following picture,indicator on projector adapter
connected.
3 Power on/Power off
Press“ ”button on projector or remote control to switch on
the projector.

EN-3
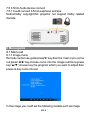
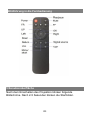
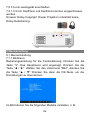
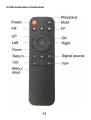
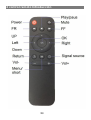
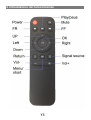
4 Remote control introduction

EN-4
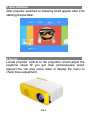
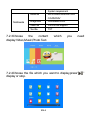
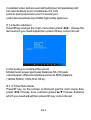
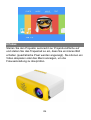
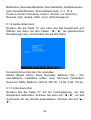
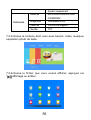
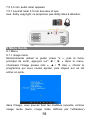
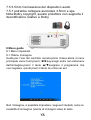
5 User Interface
After projector switched on,following UIwill appear after 2-5s
starting pictures flash.
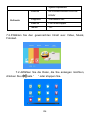
6 Focus
Locate projector vertical to the projection screen,adjust the
keystone wheel till you get clear picture(square pixels
appear).You can play some video or display the menu to
check focus adjustment.

EN-5
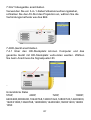
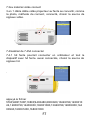
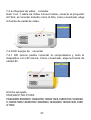
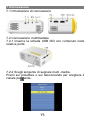
7 Connection
7.1 Connection Introduction
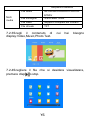
7.2 Multi-media Connection
7.2.1 Insert USB/SD card with content to relevant ports.
7.2.2 Choose multi-media signal source.
Press“ ” on projector or remote control to choose relevant
channel.

EN-6
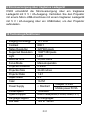
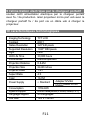
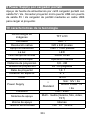
Systemrequirement
Multimedia
Audiofile
MP3/WMA/OGG/AAC/FLA
C/APE/WAV
Image files
JPEG/BMP/PNG
Video file
FullFormatSupport
Text file
TXT
7.2.3Choose the content which you need
display:Video,Music,PhotoText.
7.2.4Choose the file which you want to display,press“ ”
display or stop.

EN-7
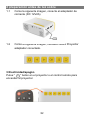
7.3AV Video equipment connect
Use 3 in 1 cablevideo convert cable,connect projectorAV
slot,the connect method like the picture,as
connected,choose the signal source Video.
7.4 HD equipment connect
7.4.1 HD slot could connect computer and all the device with
HD slot.As connected,choose the signal source HD.
Supported file
576P,480P,720P,1080P,640X480,800X600,1024X768,1280X102
4,1280X720,1440X900,1920X1080,1366X768,1280X800,1440X
960,1600X1200,1680X1050

EN-8
7.5 3.5mmAudiodevice connect
7.5.1Couldconnect 3.5mm earphone and spe
Notice:Dolby copyright,this projector not support Dolby related
decode.
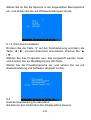
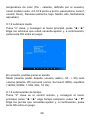
8 Menu guide
8.1 Menu set
8.1.1 Image menu
Remote control use guide:press“≡” key,then the main menu come
out,press“◄/►”key,choose come into the image submenu,press
key“▲/▼”,choose key the program which you want to adjust,then
pressok keycome into set.
Inthe image,you couldset the following models,such asimage

EN-9
mode(text video picture user defined)colourtemperature(cold
hot,user defined),zoom model(auto,4:3,16:9
point-to-point,panoramic,zoom1,zoom2,just
scan),denoise(close,low,middle,high,tacitly approve)
8.1.2Audiosubmenu
Press“≡”key,and get the main menu,then press“◄/►” choose the
items which youneed adjust,then pressOK key come into set.
Inthe audio,you couldset the sound
Mode(music,power,sport,user,balance(-50-+50),auto
volume(open,off)surround(close,surround,SRS),balance
(120Hz,500Hz,1.5Hz,5Hz,10Hz).
8.1.3Time Sub-menu
Press“≡” key on the remote control,and get the main menu,then
press“◄/►”choose time submenu,press“▲/▼”choose theitems
whichyou need adjust,then press OK key come intoset.

EN-10
In the set,set the language in menu language set,back to factory
set andsoffware upgrade.
8.1.4 Set Sub-menu
Press“≡”key on the remote control,then press“◄/►”key to set
submenu;press “▲/▼”
Key choose the program which need adjust,and press OK key
come toset.
Set the projector language,back to factory set and software
upgrade.
8.2 Display menu use guide
You could control the content by the display menu.

EN-11
9 Power supply by portable charger
CS03 support power supply by portable charger with 5V/2A
output.Connect projector Mirco USB port with portable
charger 5V/2A out port via USB cable to charge the
projector.
10 Technology features
ImagingTechnology
TFTLCD
Contrast
800:1
NativeResolution
320*240 pixels
Supported Resolution
1920*1080 pixels
Light
LED
LED LifeTime
30,000 hours
FocusMode
Manual operation
ProjectionDistance
0.8-2M
ProjectionSize
24-60 inches
Projector Ratio
1.6:1
AspectRatio
4:3
Color
16.7M
PowerSupply
□ Standard
Adapter:12V/2A
Mobile
power:5V/2A
Consumption
10W-24W
System support
Multi-media(Music,Picture,Video,TXT)
Language support
23Languages
UnitSize
129*91*52mm

D
0
Benutzerhandbuch
Aufgrund der ständigen Verbesserung kann das tatsächliche
Produkt
Im Gegensatz zum Handbuch dient das Handbuch nur als
Referenz

D
1
1 Sicherheitshinweis:
1.1 Bitte lesen Sie die Bedienungsanleitung sorgfältig durch,
bevor Sie den Projektor verwenden
1.2 Es wird ein nationales Standard-Stromkabel und ein
Stromkabel mit Erdung empfohlen, um eine stabile
Stromversorgung zu gewährleisten.
1.3 Bitte verwenden Sie für den Projektor die gleiche
Stromspannung.
1.4 Bitte öffnen Sie den Projektor nicht. Andernfalls leistet das
Werk keinen Garantieservice.
1.5 Kein Blick auf die Projektorlampe, da der Projektor
funktioniert, andernfalls können Ihre Augen leicht beschädigt
werden.
1.6 Decken Sie sich in den Lüftungsöffnungen des Projektors
nicht mit Stoff, Teppich und anderen Materialien ab.
1.7 Keine wasserdichte Funktion. Bitte halten Sie den Projektor
von Regen oder Feuchtigkeit fern und können keine flüssigen
Gegenstände, wie z.
1.8 Um einen Stromschlag zu vermeiden, halten Sie bitte
Regen, Wasser oder Feuchtigkeit fern.
1.9 Schalten Sie die Stromversorgung aus und unterbrechen
Sie die Stromversorgung, wenn Sie den Projektor längere Zeit
nicht benutzen.
1.10 Verwenden Sie zum Schutz des Projektors den
Originalschaumstoff oder ein anderes Unterschockmaterial.
Wenn Sie diesen Projektor transportieren müssen.
1.11 Kontaktieren Sie die Agentur, reparieren Sie nicht selbst.
Wenn Sie feststellen, dass der Projektor Probleme hat.

D
2
Anzeige beibehalten:
1 Jahr Garantie ab Werk, weitere Informationen zur Garantie,
wenden Sie sich bitte an die Agentur (der Garantieservice
umfasst nicht den Rahmen, das Paket von Manuel, das Paket
und einige subjektive Vorstellungen über die Bildqualität des
Videotons).
2 Vorbereitung vor dem Einschalten
1.1 Schließen Sie das folgende Netzteil an (DC 12V2A)
1.2 Als folgendes Bild, Anzeige am Projektoradapter
angeschlossen.
3 Einschalten / Ausschalten
Drücken Sie die Taste “ ” am Projektor oder auf der
Fernbedienung, um den Projektor einzuschalten.

D
3
4Einführung in die Fernbedienung
5 Benutzeroberfläche
Nach dem Einschalten des Projektors blinken folgende
Bildschirme. Nach 2-5 Sekunden blinken die Startbilder.

D
4
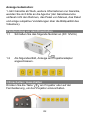
6 Fokus
Stellen Sie den Projektor senkrecht zur Projektionsfläche auf
und stellen Sie das Trapezrad so ein, dass Sie ein klares Bild
erhalten (quadratische Pixel werden angezeigt). Sie können ein
Video abspielen oder das Menü anzeigen, um die
Fokuseinstellung zu überprüfen.

D
5
7 Verbindung
7.1 Anschluss Einführung
7.2 Multimedia-Verbindung
7.2.1 Stecken Sie eine USB- / SD-Karte mit Inhalt in die
entsprechenden Anschlüsse.
7.2.2 Wählen Sie eine Multimedia-Signalquelle.
Drücken Sie am Projektor oder auf der Fernbedienung die Taste
“ ”, um den entsprechenden Kanal auszuwählen.

D
6
Systemrequirement
Multimedia
Audio file
MP3/WMA/OGG/AAC/FLAC/AP
E/WAV
Image files
JPEG/BMP/PNG
Videofile
FullFormatSupport
Textfile
TXT
7.2.3Wählen Sie den gewünschten Inhalt aus: Video, Musik,
Fototext.
7.2.4Wählen Sie die Datei, die Sie anzeigen möchten,
drücken Sie die Taste “ ” oder stoppen Sie.

D
7
7.3AV Videogeräte anschließen
Verwenden Sie ein 3-in-1-Kabel-Videokonvertierungskabel,
schließen Sie den AV-Slot des Projektors an, wählen Sie die
Verbindungsmethode wie das Bild.
7.4HD-Gerät anschließen
7.4.1 Über den HD-Steckplatz können Computer und das
gesamte Gerät mit HD-Steckplatz verbunden werden. Wählen
Sie beim Anschluss die Signalquelle HD.
、
Unterstützte Datei
576P, 480P, 720P, 1080P,
640X480,800X600,1024X768,1280X1024,1280X720,1440X900,
1920X1080,1366X768,1280X800,1440X960,1600X1200,1680X
1050
La page charge ...
La page charge ...
La page charge ...
La page charge ...
La page charge ...
La page charge ...
La page charge ...
La page charge ...
La page charge ...
La page charge ...
La page charge ...
La page charge ...
La page charge ...
La page charge ...
La page charge ...
La page charge ...
La page charge ...
La page charge ...
La page charge ...
La page charge ...
La page charge ...
La page charge ...
La page charge ...
La page charge ...
La page charge ...
La page charge ...
La page charge ...
La page charge ...
La page charge ...
La page charge ...
La page charge ...
La page charge ...
La page charge ...
La page charge ...
La page charge ...
La page charge ...
La page charge ...
La page charge ...
La page charge ...
La page charge ...
-
 1
1
-
 2
2
-
 3
3
-
 4
4
-
 5
5
-
 6
6
-
 7
7
-
 8
8
-
 9
9
-
 10
10
-
 11
11
-
 12
12
-
 13
13
-
 14
14
-
 15
15
-
 16
16
-
 17
17
-
 18
18
-
 19
19
-
 20
20
-
 21
21
-
 22
22
-
 23
23
-
 24
24
-
 25
25
-
 26
26
-
 27
27
-
 28
28
-
 29
29
-
 30
30
-
 31
31
-
 32
32
-
 33
33
-
 34
34
-
 35
35
-
 36
36
-
 37
37
-
 38
38
-
 39
39
-
 40
40
-
 41
41
-
 42
42
-
 43
43
-
 44
44
-
 45
45
-
 46
46
-
 47
47
-
 48
48
-
 49
49
-
 50
50
-
 51
51
-
 52
52
-
 53
53
-
 54
54
-
 55
55
-
 56
56
-
 57
57
-
 58
58
-
 59
59
-
 60
60


iRULU CS03 Manuel utilisateur
- Catégorie
- Projecteurs de données
- Taper
- Manuel utilisateur
- Ce manuel convient également à
dans d''autres langues
- italiano: iRULU CS03 Manuale utente
- español: iRULU CS03 Manual de usuario
- Deutsch: iRULU CS03 Benutzerhandbuch
Autres documents
-
Panasonic CQVD7003N Mode d'emploi
-
-
 Evo Fitness XGA Manuel utilisateur
-
AIPTEK MobileCinema Q20 Manuel utilisateur
-
JVC DLA-G150CLE Manuel utilisateur
-
LG LG HX300G Manuel utilisateur
-
LG PG60G Le manuel du propriétaire
-
Proxima ASA UltraLight X350 Manuel utilisateur
-
 Proxima UltraLight X350 Manuel utilisateur
-
 Proxima UltraLight X350 Manuel utilisateur


