Panasonic MC-V7319 Le manuel du propriétaire
- Catégorie
- Aspirateurs
- Taper
- Le manuel du propriétaire

FULL
VAC
GAUGE
VACUUM CLEANER
Aspirateur
Aspiradora
MC-V7319
Operating Instructions
Manuel d’utilisation
Instrucciones de operación
Before operating your vacuum cleaner,
please read these instructions completely.
Antes de usar su aspiradora, lea
completamente estas instrucciones por favor.
Avant d’utiliser l’appareil, il est recommandé
de lire attentivement ce manuel.

Please read IMPORTANT SAFETY INSTRUCTIONS on page 5 before
use. Read and understand all instructions.
TO OUR VALUED CUSTOMER
We are very pleased to welcome you to the Panasonic family of products.Thank you for
purchasing this product. Our intent is that you become one of our many satisfied customers.
Proper assembly and safe use of your vacuum cleaner are your responsibilities.Your vacuum
cleaner is intended only for household use.The cleaner should be stored in a dry, indoor area.
Read the Operating Instructions carefully for important use and safety information.
Special care is required when vacuuming certain types of carpet or floor covering. Al
ways
check the carpet or floor covering manufacturer's recommended cleaning instructions before
vacuuming.
PLEASE PAY CLOSE ATTENTION TO ALL
WARNING AND CAUTION STATEMENTS.
WARNING
TO AVOID ELECTRICAL SHOCK
Never vacuum damp or wet surfaces or liquids.
DO NOT store machine outdoors.
Replace worn or frayed power cord immediately.
Unplug from outlet when not in use and before servicing.
TO AVOID ACCIDENTS
Except for hand-held cleaners, keep machine on floor - not chairs, tables, steps, stairs, etc.
Store machine promptly after each use to prevent accidents such as tripping over power cord or machine.
Use machine and accessories only in a manner intended by the manufacturer.
The use of an extension cord is not recommended.
CONSUMER INFORMATION
WARNING
WARNING statements are designed to alert you to the
possibility of personal injury, loss of human life, and/or
damage to the vacuum cleaner and/or personal
property if the instructions given are not followed.
CAUTION statements are designed to alert you to the
possibility of damage to the vacuum cleaner and/or
personal property if the instructions given are not
followed.
CAUTION
© 2005 Panasonic Home Appliances Company of North America,
Division of Panasonic Corporation of North America. All rights reserved.
- 2 -

- 5 -
When using vacuum cleaner, basic precautions should always
be followed, including the following:
READ ALL INSTRUCTIONS BEFORE USING THIS VACUUM CLEANER
WARNING
To reduce the risk of fire, electrical shock, injury:
1. DO NOT leave vacuum cleaner when plugged in. Unplug from outlet when not
in use and before servicing.
2. To reduce the risk of fire, electric shock - DO NOT use outdoors or on wet
surfaces.
3. DO NOT allow to be used as a toy. Close attention is necessary when used
by or near children.
4. Use only as described in this manual. Use only manufacturer's recommended
tools.
5. DO NOT use with damaged cord or plug. If vacuum cleaner is not working as
it should, has been dropped, damaged, left outdoors, or dropped into water,
return it to an authorized Panasonic Servicenter.
6. DO NOT pull or carry by cord, use cord as a handle, close door on cord, or
pull cord around sharp edges or corners. DO NOT run vacuum cleaner over
cord. Keep cord away from heated surfaces.
7. DO NOT unplug by pulling on cord.To unplug, grasp the plug, not the cord.
8. DO NOT handle plug or vacuum cleaner with wet hands.
9. DO NOT put any objects into openings.DO NOT use with any opening
blocked; keep free of dust, lint, hair, and anything that may reduce air flow.
10.Keep hair, loose clothing, fingers, and all parts of body away from openings
and moving parts.
11.DO NOT pick up anything that is burning or smoking, such as cigarettes,
matches, or hot ashes.
12.DO NOT use without dust bag and/or filters in place.
13.Turn off all controls before unplugging.
14.Use extra care when cleaning on stairs.
15.DO NOT use cleaner to pick up flammable or combustible liquids such as
gasoline or use in areas where they may be present.
SAVE THESE INSTRUCTIONS
THIS VACUUM CLEANER IS INTENDED
FOR HOUSEHOLD USE ONLY
Note: Before you plug in your Panasonic vacuum cleaner, make sure that the voltage
indicated on the rating plate located at the back of the vacuum cleaner is the same as your
local supply.
IMPORTANT SAFETY INSTRUCTIONS

TABLE OF CONTENTS
CONSUMER INFORMATION.................................................................................................... 2
IMPORTANT SAFETY
INSTRUCTIONS .........................................................................................................................5
PARTS IDENTIFICATION........................................................................................................ 10
FEATURE CHART....................................................................................................................11
ASSEMBLY...............................................................................................................................12
Attaching Handle................................................................................................................ 12
FEATURES.............................................................................................................................. 14
Using Cord Hook................................................................................................................ 14
Tool Storage.........................................................................................................................14
Automatic Self Adjusting Nozzle...................................................................................... 16
Edge Cleaning .................................................................................................................... 16
Vac Gauge........................................................................................................................... 16
Carpet-Bare Floor Selector.................................................................................................18
Thermal Protector................................................................................................................20
Hose Ring and Hose Ring Mount ......................................................................................22
TO OPERATE CLEANER.........................................................................................................22
Power Cord ........................................................................................................................ 22
ON-OFF Switch.................................................................................................................. 22
Handle Adjustments ......................................................................................................... 24
Using Tools ..........................................................................................................................24
Tool Usage ...........................................................................................................................26
ROUTINE CARE OF CLEANER .............................................................................................28
Cleaning Secondary Foam Filter .......................................................................................28
Replacing HEPA Exhaust Filter..........................................................................................28
Changing Dust Bag.............................................................................................................30
Removing and Installing Lower Plate ...............................................................................32
Replacing Belt .....................................................................................................................34
Replacing Brushes..............................................................................................................36
Agitator Assembly...............................................................................................................38
Replacing Headlight Bulb...................................................................................................38
Cleaning Agitator ................................................................................................................40
Cleaning Exterior and Tools...............................................................................................40
Removing Clogs................................................................................................................. 42
BEFORE REQUESTING SERVICE..........................................................................................44
WARRANTY ............................................................................................................................47
WHAT TO DO WHEN SERVICE IS NEEDED.......................................................................... 52
- 8 -

- 10 -
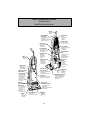
PARTS IDENTIFICATION
Nomenclature
Identificación de piezas
F
U
L
L
VA
C
G
A
U
G
E
Dust Cover
(Dust Bag Inside)
Cubierta de bolsa (Bolsa
está adentro)
Couvercle (du sac
à poussière)
Vac Gauge
Indicador de aspiración
Indicateur de sac plein
Hose
Manguera
Tuyau
Furniture Guard
Protector de muebles
Pare-chocs
Secondary Filter
(Inside Dust
Compartment)
Filtro secundario
(Dentro de cubierta
de bolsa)
Filtre secondaire
(à l’interieur du
logement du sac
à poussière)
Nozzle
Boquilla
Tête
d’aspiration
Crevice Tool
Herramienta
para hendiduras
Suceur plat
Headlight
Dispositif
d’éclairage
Luz
Exhaust
Filter (Inside
Dust Cover)
Filtro de escape
(Dentro de
cubierta de bolsa)
Filtre d’évacuation
(à l’intérieur du
couvercle)
On-Off Switch
Interruptor de
encindido-apagado
Interrupteur
Handle
Manche
Mango
Quick Release
Cord Hook
Crochet de rangement
du cordon
Sujetador de liberación
rapide del cordón
Power Cord
Cordon
d’alimentation
Cordón
eléctrico
Handle Screw
Carry Handle
Cover (Suction
Inlet)
Hose Ring
Mount
Vis du manche
Poignée de transport
Couvercle (l’entrée
d’aspiration)
Support de
l’anneau
du tuyau
Tornillo de mango
Mango para
transportar
Cubierta (abertura
de aspiración)
Soporte para la
manguera
Carpet/Bare
Floor Selector
Sélecteur tapis/plancher
Control para
alfombra/sin alfombra
Handle Release Pedal
Pédale de réglage de
l’inclinaison du manche
Pedal de liberación
del mango
Hose Ring
Anneau du tuyau
Anillo para la
manguera
Dusting Brush
Brosse à
épousseter
Cepillo para
sacudir
Upholstery Tool
Suceur pour
capionnage
Herramienta
para tapices
Rating Plate
Plaque
signalétique
Voltimetro
Wand
Tubo
Tube

- 11 -
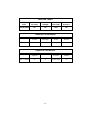
Power Vac Gauge Headlight Cord Length Bare Floor
120V AC(60Hz)
Yes Yes 35 Ft Yes
FEATURE CHART
Diagrama de características
Tableau des caractéristiques
Voltaje Indicador de Luz Extensión Uso sin
aspiración de cordón alfombra
120 V c.a. (60 Hz)
Si Si 10,6 m (35pi) Si
Alimentation Indicateur de
Dispositif Longueur du Position
sac plein
d’éclairage cordon plancher
120 V c.a. (60 Hz)
Oui Oui 10,6 m (35 pi) Oui

- 12 -
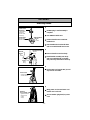
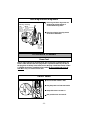
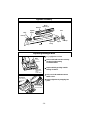
Attaching Handle
ASSEMBLY
Handle Assembly
Manche
Mango
Handle
Screw
Vis
Tornillo
Body
Body
Body
Power Cord
Cordon d’alimentation
Cordón eléctrico
Retainer
(Plug Head)
Agrafe de fixation
de la fiche du
cordon
Clavija
1)
➢
DO NOT plug in until assembly is
complete.
➢
Turn ON-OFF switch OFF.
➢
Remove handle base screw from
handle base.
➢
Insert handle tube into handle base
and secure with handle base screw.
2)
➢
Remove handle screw from body.
➢
Install handle assembly onto body
and secure with handle screw that
was previously removed for the body.
3)
➢
Push power cord into the two (2) cord
clips in back of handle.
4)
➢
Wrap power cord around lower cord
retainer and cord hook.
➢
Secure retainer (plug head) to power
cord.
Handle Base
Handle base
Handle base
Handle Tube
Assembly
Handle Tube
Assembly
Handle Tube
Assembly
Handle Base
Screw
Vis
Tornillo

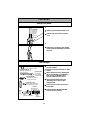
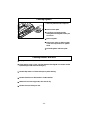
1)
➢
Detach plug head from power cord.
➢
Rotate cord hook down to release
cord.
2)
➢
Return the cord hook to the upright
position before attempting to rewind
the cord.
Using Cord Hook
FEATURES
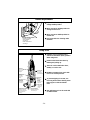
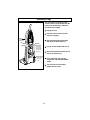
Tool Storage
Telescopic Wand
Rallonge télescopique
Tubo telescopico
Dusting Brush
Brosse à épousseter
Cepillo para sacudir
Crevice Tool
Suceur plat
Herramienta
para hendiduras
“J" Slot
Fente en “J”
Ranura en "J”
Raised Tab
Saillie
Lengüeta levantada
Upholstery Tool
Suceur pour capitonnage
Herramienta para tapices
Wand
Tubo
Tube
Hose
Tuyau
Manguera
➢
Some tools may already be stored on
vacuum cleaner.
➢
Place hose in front of handle on hose
holder.
➢
Attach wand to hose by aligning the
two (2) raised tabs on wand with “J”
slots in hose, guide tabs along
grooves, twist to lock in place.
➢
Store wand, dusting brush and
upholstery tool in rear of dust
compartment.
➢
Place crevice tool into front slot of
tool holder.
➢
Refer to PARTS IDENTIFICATION
section for tool location.
- 14 -
Cord Hook
Crochet de
rangement
du cordon
Sujetador
del cordón

- 16 -
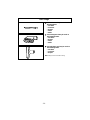
➢
Edge cleaning feature provides for
improved cleaning of carpets near
walls and furniture.
Edge Cleaning
Automatic Self Adjusting Nozzle
➢
The nozzle of your Panasonic upright
vacuum cleaner automatically
adjusts to any carpet pile height.
➢
Feature allows nozzle to float evenly
over carpet pile surfaces.
➢
No manual adjustments required.
Shallow
Pile Carpet
Alfombra de
pelo corto
Moquette à
poils courts
Deep Pile
Carpet
Alfombra de
pelo largo
Moquette à
poils longs
Nozzle
Boquilla
Tête d'aspiration
Pivot Point
Point
d’articulation
Botón de
liberación
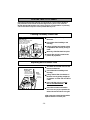
➢
The vac gauge detects when dust
bag needs changing or the vacuum
is clogged.
➢
Check dust bag when vac gauge
indicates FULL.
➢
If dust bag is full, change bag
according to CHANGING DUST BAG
section.
➢
If dust bag is not full, check for clogs
according to REMOVING CLOGS
section.
Vac Gauge

- 18 -
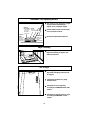
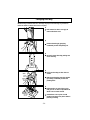
Carpet-Bare Floor Selector
Carpet-Bare
Floor Selector
Sélecteur
tapis/plancher
Selector carpet-
bare floor
To Clean Bare Floor Or Use Tools
Position plancher ou avec accessoires
Para aspirar sobre un suelo
sin alfombra o usar los accesorios
➢
Selector should be placed in BARE
FLOOR (TOOLS) position when using
cleaner on bare floors and when
using tools.
➢
The agitator does not rotate in the
BARE FLOOR (TOOLS) position.
➢
Selector should be placed in
CARPET position when using cleaner
on carpeted floors.
➢
For longer belt life, turn vacuum off
before moving selector.
➢
Otherwise, take care when selecting
either position to ensure selector is
pushed as full
y and quickly as
possible to desired position.
➢
Failure to do so can cause belt to rub
on selector shaft and result in belt
becoming hot and creating a burning
rubber smell.
To Clean Carpet
Position tapis
Para aspirar sobre
una alfombra

- 20 -
➢
If a clog prevents the normal flow of air to the motor, the thermal protector turns the
motor off automatically to allow the motor to cool in order to prevent possible
damage to the vacuum.
➢
During this time the headlight remains on.
➢
To correct problem, turn off and unplug vacuum, remove clogs, and/or clean/replace
filters.
➢
Replace full bag if necessary.
➢
Wait approximately thirty (30) minutes, plug vacuum in, turn on to see if thermal
protector has reset.Thermal protector will not reset if vacuum is not turned off even
if vacuum cools down.
Thermal Protector

- 22 -
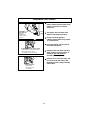
Hose Ring and Hose Ring Mount
➢
Hose ring and hose ring mount are
designed to prevent tipping of
vacuum while using tools.
➢
Place hose ring in hose ring mount
as shown in illustration.
Hose Ring
Anneau du
tuyau
Anillo para
manguera
Hose Ring
Knob
Crochet de
l’anneau
Botón del
anillo para
manguera
Hose Ring
Mount
Support de l’anneau
du tuyau
Soporte para anillo
para manguera
Note:To reduce the risk of electrical shock, this vacuum has a polarized plug, one
blade is wider than the other.This plug will fit in a polarized outlet only one way. If
the plug does not fit fully in the outlet, reverse the plug. If it still does not fit, contact
a qualified electrician to install the proper outlet. DO NO
T CHANGE THE PLUG IN
ANYWAY. Only use outlets near the floor.
Power Cord
TO OPERATE CLEANER
➢
Ensure ON-OFF switch is OFF.
➢
Plug the power cord into 120V outlet.
➢
ON position turns vacuum on.
➢
OFF position turns vacuum off.
ON-OFF Switch
ON
OFF

- 24 -
Handle Adjustments
Using Tools
➢
ALWAYS place Carpet-Bare Floor
selector in Bare Floor (tools) position
when using tools.
➢
Remove wand from short hose by
twisting and pulling up.
➢
The tools can be attached to hose,
wand(s) or crevice tool.
➢
DO NOT overextend your reach with
hose as it could tip vacuum.
➢
To prevent tipping of vacuum, use
hose ring mount when cleaning areas
below upper cord hook with the
tools.
➢
The upholstery tool can be used with
or without brush.
Hose Ring
Mount
Support de
l’anneau
du tuyau
Soporte para la
manguera
Handle Release Pedal
Pédale de réglage de
l’inclinaison du manche
Pedal de liberación
del mango
Hose Ring
Anneau du tuyau
Anillo para la
manguera
Dusting Brush
Brosse à
épousseter
Cepillo para
sacudir
Upholstery Tool
Suceur pour
capionnage
Herramienta
para tapices
Telescopic Wand
Rallonge télescopique
Tubo telescópico
Crevice Tool
Suceur plat
Herramienta
para hendiduras
Short Hose
Tuyau court
Manguera
corta
Handle Release Pedal
Pédale de réglage
de l’inclinaison
du manche
Pedal de liberación
del mango
➢
Step on handle release pedal to
change handle position.
➢
Move vacuum to upright position for
storage and tool use.
➢
Move vacuum to middle position for
normal use.
➢
Use low position for cleaning under
furniture.

Note: Always clean tools before using.
Tool Usage
➢
The Crevice Tool may be used on the
following items:
• Furniture
• Cushions
• Drapes
• Stairs
• Walls
➢
The Dusting Brush may be used on
the following items:
• Furniture
• Drapes
• Stairs
• Walls
➢
The Upholstery Tool may be used on
the following items:
• Furniture
• Cushions
• Drapes
- 26 -

- 28 -
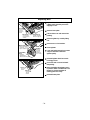
Replacing HEPA Exhaust Filter
➢
The HEPA exhaust filter removes dirt
from recirculated air.
➢
Check filter when installing a new
dust bag.
➢
If dirty, remove filter from bottom of
the dust cover by pulling straight up
on retainers on frame. Lift one side at
a time.
➢
Place new filter in dust cover DO
NOT CLEAN WITH WATER*.
➢
Place filter in frame and install in
dust cover. For proper operation the
white side must face dust cover grill.
*Filter cannot be cleaned and should be
replaced at least once each year.
Dust
Cover
Cubierta
de polvo
Couvercle
C
AR
P
E
T
BARE
F
L
OO
R
(TO
OL
S
)
Retainers
Lengüetas
Taquets
Exhaust Filter
and Frame
Filtro de escape
HEPA y el marco
Filtre d’évacuation
(HEPA) et cadre
HEPA
➢
The secondary foam filter protects
the motor.
➢
Check filter when installing a new
dust bag.
➢
If dirty, pull filter from bottom of dust
compartment and clean by rinsing in
water.
➢
When dry, slide filter back into place.
➢
Ensure filter is fully inserted under
plastic rib projections.
ROUTINE CARE OF CLEANER
Performing the following tasks will keep your new Panasonic vacuum cleaner operating at
peak performance levels and will ensure these high levels for years to come. Check the
BEFORE REQUESTING SERVICE section in this manual for recommendations on performing
some of these tasks to help solve various problems that may occur.
Cleaning Secondary Foam Filter
Secondary HEPA Filter
(White Side Up)
Filtre secondaire de type HEPA
(Côté blanc sur le dessus)
Filtro de HEPA secundario
(Blanca hacia arriba)
Rib Projections
Rainures
Lengüetas

- 30 -
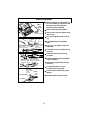
5)
➢
Reinsert tabs on end of dust cover
into grooves on dust compartment to
allow cover to rotate closed.
➢
Rotate dust cover up into closed
position and press into place without
pinching dust bag.
3)
➢
Spread out new dust bag, taking care
not to tear bag.
4)
➢
Fold new dust bag to clear slots as
shown.
➢
Attach new dust bag onto bag holder
by holding cardboard portion and
pushing back.
Slots
Ranuras
Fentes
Fold
Plier
Doble
Groove
Ouverture
Ranura
Changing Dust Bag
1)
➢
Pull outward on dust cover grip to
remove the dust cover.
2)
➢
Remove dust bag by grasping
cardboard portion and pulling out.
PO
W
E
R
C
O
N
T
R
O
L
M
A
X
Always operate vacuum with genuine Panasonic Type U3 Standard, U6 Electrostatic or U10
HEPA dust bags installed. Panasonic dust bags may be purchased through any authorized
Panasonic dealer or ordered from service company.

- 32-
Removing and Installing Lower Plate
Lower Plate
Plaque inférieure
Base inferior
Rear Belt
Cover
Couvercle de la
courroie
Cubierta de
la correa trasera
Latches
Loquets
Lengüetas
➢
Bef
ore servicing any parts, disconnect
vacuum from electrical outlet.
➢
Place paper under nozzle whenever
lower plate is removed to protect floor.
➢
Place handle in upright position and
turn vacuum over to expose lower plate.
➢
Release lower plate by pressing two
(2) latches inward.
➢
Remove lower plate and remove any
residue that may exist in belt area.
➢
Close the rear belt cover and reinstall
lower plate by hooking front end of
lower plate into the front of nozzle
housing.
➢
Make sure all wires are routed
properly and not pinched.
➢
Press lower plate into place then
push two (2) latches outward.
WARNING Electrical Shock or Personal Injury Hazard
Disconnect the electrical supply before servicing or cleaning the unit. Failure to
do so could result in electrical shock or personal injury from cleaner suddenly
starting.
Rear Belt
Cover
Couvercle de la
courroie
Cubierta de
la correa trasera
Tabs
Languettes
Lengüetas
Lower Plate
Plaque inférieure
Base inferior
Latches
Loquets
Lengüetas

Replacing Belt
- 34 -
Felt Packing
Cale en feutre
Empaquetadura
de fieltro
Lift Agitator Up
Soulever l’agitateur
Unidad del agitador
Belt Cover
Couvercle de
la courroie
Cubierta de
la banda
Install
New Belt
Poser la
nouvelle
courroie
Instalación
de la correa
Motor Shaft
Arbre d’entraînement
du moteur
Eje del motor
Selector alfombra-piso
Carpet/Bare
Floor
Sélecteur
tapis/plancher
Groove
Ouverture
Ranura
End Cap
Bouchon
Tapa de
extremo
➢
Replace belt whenever a burning
rubber smell caused by excessive
slippage occurs.
➢
Remove lower plate.
➢
Lift rear belt cover and remove felt
packing.
➢
Remove agitator by carefully lifting
out.
➢
Remove worn or broken belt.
➢
Clean agitator.
➢
Loop new belt (Panasonic Type UB8
only) around motor shaft and
agitator pulley.
➢
Reinstall agitator back into nozzle
housing grooves.
➢
Close rear belt cover and reinstall
felt packing.
➢
After reinstalling the agitator, turn it
by hand to make sure that belt is not
twisted or pinched and that all
rotating parts turn freely.
➢
Reinstall lower plate.

Replacing Brushes
E-Clip
Sujetador
de E
Bride en E
Agitator Shaft
Eje del agitador
Arbre d’entraînement
Right End Cap
Tapa de extremo
derecho
Bouchon droit
Agitator Holder
Soporte del’agitador
Support de l’agitateur
Agitator Pulley
Polea para correa
Poulie de la courroie
Brush
Cepillo
Brosse
Push Off
Empuje hacia
fuera
Pousser
➢
When the bristles on the agitator are
so worn that they do not touch a card
held across the lower plate, the
brushes should be replaced.
➢
Remove lower plate and agitator.
➢
Remove the E-clip from agitator shaft
and end cap.
➢
Do not bend agitator shaft or lose E-
clip.
➢
Pull agitator shaft out of agitator
body.
➢
Pull, or pry out, agitator holder and
belt pulley.
➢
Push each brush out of agitator body
as shown.
➢
Install new brushes by reversing
procedure.
➢
Reinstall agitator holder and agitator
pulley completely.
➢
Reinstall the agitator shaft, end cap
and E-clip.
➢
See enlarged view for correct
assembly of parts (page 38).
➢
Position belt over belt pulley on the
agitator.
➢
Reinstall agitator and lower plate.
- 36 -
Card
Tarjeta
Carte

- 38 -
E-Clip
Filter
Agitator
Pulley
Shaft
Filter
End Cap
End Cap
Agitator
Holder
Spacer
Brushes
Brush
Spacers (3)
Agitator Assembly
Replacing Headlight Bulb
Slots
Fentes
Ranuras
Light Lens
Lentille de la
lampe
Lentes de luz
To Reinstall
Pour réinstaller
Para reinstalarse
To Remove
Pour enlever
Para quitar
➢
Pry up light lens at slots.
➢
Remove old bulb from the socket by
pushing in while turning
counterclockwise.
➢
Replace bulb by pushing in while
turning clockwise.
➢
Only use a bulb rated 130 V AC-15
Watts or less.
➢
Replace light lens by snapping into
place.
La page est en cours de chargement...
La page est en cours de chargement...
La page est en cours de chargement...
La page est en cours de chargement...
La page est en cours de chargement...
La page est en cours de chargement...
-
 1
1
-
 2
2
-
 3
3
-
 4
4
-
 5
5
-
 6
6
-
 7
7
-
 8
8
-
 9
9
-
 10
10
-
 11
11
-
 12
12
-
 13
13
-
 14
14
-
 15
15
-
 16
16
-
 17
17
-
 18
18
-
 19
19
-
 20
20
-
 21
21
-
 22
22
-
 23
23
-
 24
24
-
 25
25
-
 26
26


Panasonic MC-V7319 Le manuel du propriétaire
- Catégorie
- Aspirateurs
- Taper
- Le manuel du propriétaire
dans d''autres langues
- English: Panasonic MC-V7319 Owner's manual
Documents connexes
-
Panasonic MC-V7388 Manuel utilisateur
-
-
Panasonic MC-V7319 Manuel utilisateur
-
-
-
-
-
-
-