L'Or Barista L'Or Barista LM8014 / 80 Manuel utilisateur
- Catégorie
- Accessoires de préparation de café
- Taper
- Manuel utilisateur


6
7
8
10
11
12
9
5
2
1
3
4
20
19
21
18
17
14
16 15
13

English 7
Deutsch 27
Español 47
Français 67
Nederlands 87
Português 107

English
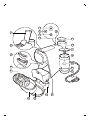
Machine overview
1 On/off button
2 Ristretto button
3 Espresso button
4 Lungo button
5 Water tank lid
6 Water tank
7 Milk frother lid
8 Whisk holder
9 Whisk
10 On/off button of milk frother
11 Base of milk frother
12 Mains cord with plug
13 Used capsule drawer
14 Waste water drawer
15 Lower drip tray
16 Drip tray
17 Cup platform
18 Coffee outlet
19 Coffee dispensing spout cap
20 Capsule compartment
21 Lever
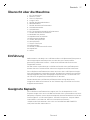
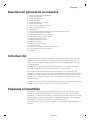
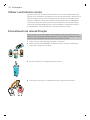
Introduction
Welcome to the L'OR Barista world! The L'OR Barista coffee system is the
only capsule coffee system that allows you to brew two cups of coffee at the
same time thanks to a coffee dispensing spout with double outlet.
The new and exclusive L'OR Barista double-shot coffee capsules allow you
to brew two cups of coffee or a double shot of coffee.
The L'OR Barista coffee machine is also compatible with the L'OR Espresso
single-shot coffee capsules. Thanks to the Dual Capsule Recognition
technology, the machine automatically recognizes the capsule size and
adapts the volume accordingly. All you need to do is press the button for
the type of coffee you desire.
This model of the L'OR Barista coffee machine has an integrated milk frother
to brew coffee with fresh, frothed milk.
Capsule compatibility
The L'OR Barista coffee machine has been designed to work with L’OR
Espresso single-shot capsules and L’OR Barista double-shot capsules, as
well as with Nespresso* capsules and aluminum capsules from coffee
brands produced by Jacobs Douwe Egberts, such as Douwe Egberts,
JACOBS, Jacqmotte, Jacques Vabre, Grand Mère, L'OR, Marcilla, Moccona,
Saimaza and Senseo.
*brand of a third party not connected to JACOBS DOUWE EGBERTS and / or
PHILIPS
7
English

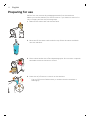
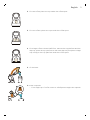
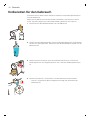
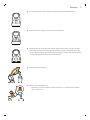
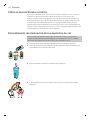
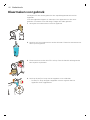
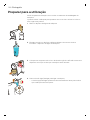
Preparing for use
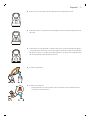
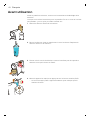
Before first use, remove all packaging materials from the machine.
When you use the machine for the first time or if you have not used it for 1
day or longer, perform the following steps:
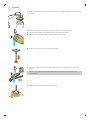
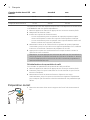
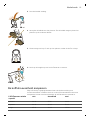
1 Remove the water tank from the machine.
2 Rinse and fill the water tank under the tap. Place the water tank back
onto the machine.
3 Place a bowl under the coffee dispensing spout. Do not insert a capsule
and make sure that the lever is closed.
25 sec
°C
4 Press the on/off button to switch on the machine.
-
The on/off button flashes slowly to indicate that the machine is
heating up.
8
English

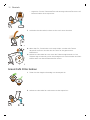
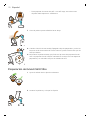
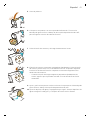
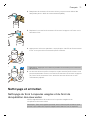
5 When all buttons light up continuously, press the lungo button.
-
Water flows from the coffee dispensing spout.
Note: When the internal water circuit is empty, the machine produces a
humming sound. When the machine dispenses water, it produces a less
loud humming sound. This is normal.
6 The machine is ready when all buttons light up continuously.
7 Empty the drip tray and waste water drawer (see 'Cleaning the used
capsule drawer and waste water drawer').
The machine is now ready for use.
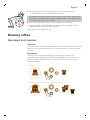
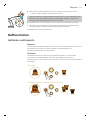
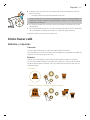
Brewing coffee
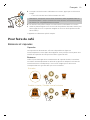
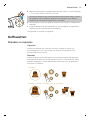
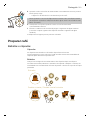
Beverages and capsules
Capsules
L’OR aluminum capsules are available online at www.lorespresso.com and in
shops. You can choose from a variety of coffee capsules for different types
of coffee.
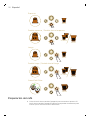
Beverages
Thanks to the Dual Capsule Recognition technology, the machine
automatically recognizes the capsule size and adapts the volume of your
drink accordingly. All you need to do is press the button for the type of
coffee you desire.
25 ml
Ristretto
2x 25 ml
50 ml
Double ristretto / Double shot of ristretto
9
English

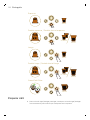
40 ml
Espresso
2x 40 ml
80 ml
Double espresso / Double shot of espresso
110 ml
Lungo
2x 110 ml
220 ml
Double lungo / Double shot of lungo
220 ml
Grand Café Filtre
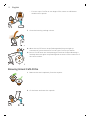
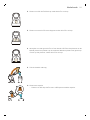
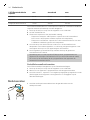
Preparing coffee
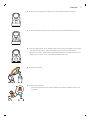
1 Press the on/off button to switch on the machine. The on/off button
starts flashing to indicate that the machine is heating up.
10
English

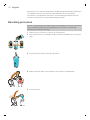
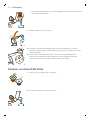
2 For one coffee, place one cup under the coffee spout.
3 For two coffees, place two cups under the coffee spout.
4 For a large coffee or Grand Café Filtre, remove the cup platform and the
drip tray, place the cup platform on the lower drip tray and place a large
cup or mug on the cup platform under the coffee spout.
5 Lift the lever.
6 Insert a capsule.
-
For a single cup of coffee, insert a L'OR Espresso single-shot capsule.
11
English

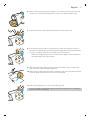
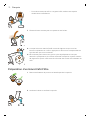
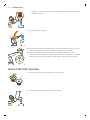
-
For two cups of coffee or one large coffee, insert a L'OR Barista
double-shot capsule.
7 Close the lever by pushing it down.
8 When the on/off button stops flashing and all buttons light up
continuously, press the button for the type of coffee you desire.
9 Do not lift the lever until the brewing process has finished. Brewing is
finished when the lights stop flashing and no more coffee comes out of
the coffee outlets.
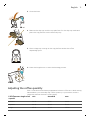
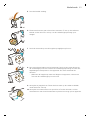
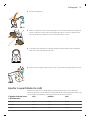
Brewing Grand Café Filtre
1 Remove the seal completely from the capsule.
2 Lift the lever and insert the capsule.
12
English

3 Close the lever.
4 Remove the drip tray with the cup platform. Put the drip tray aside and
place the cup platform on the lower drip tray.
5 Place a large cup or mug on the cup platform under the coffee
dispensing spout.
6 Press the lungo button to start the brewing process.
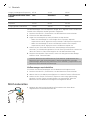
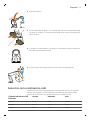
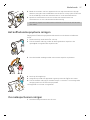
Adjusting the coffee quantity
Each coffee button has been programmed to brew coffee at its ideal setting.
Nevertheless, you can adapt the coffee quantity to your wishes, within a
range that ensures the best coffee quality.
L'OR Espresso single-shot
capsule
min standard max
Ristretto 20 ml 25 ml 40 ml
Espresso 30 ml 40 ml 50 ml
Lungo 85 ml 110 ml 135 ml
13
English

L'OR Barista double-shot
capsule
min standard max
Ristretto 40 ml 50 ml 60 ml
Espresso 60 ml 80 ml 100 ml
Lungo/Grand Café Filtre 170 ml 220 ml 270 ml
The coffee quantities for L'OR Espresso single-shot and L'OR Barista
double-shot capsules are adjusted separately:
1 Press the on/off button to switch on the machine.
2 Fill the water tank.
3 Insert a capsule and close the lever.
-
If you want to adjust the quantity for L'OR single-shot espresso
capsules, insert a normal L'OR Espresso capsule.
-
If you want to adjust the quantity for a L'OR Barista double-shot
capsule, insert a L'OR Barista capsule.
4 Press and hold the button of the coffee whose quantity you want to
adjust for 3 seconds until the button flashes quickly. Then release the
button. The machine starts brewing coffee.
5 Press the same button again when the cup contains the desired quantity
of coffee.
Note: If you press the coffee button too early, the machine programs the
minimum quantity of coffee shown in the table above. If you do not press
the coffee button, the machine programs the maximum quantity of
coffee.
Resetting the coffee quantities
To reset the coffee quantities to their factory settings:
1 Press the on/off button to switch on the machine.
2 Wait until the machine has heated up and all buttons light up.
3 Press and hold the ristretto, espresso and lungo buttons simultaneously
until all buttons flash quickly to show that the machine has been reset to
factory settings.
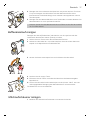
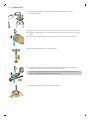
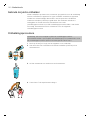
Preparing milk
1 Remove the milk frother lid with the whisk holder attached from the milk
frother.
14
English

2 Fill the milk frother with milk to the desired level. Do not fill beyond the
MAX level.
3 Place the milk frother lid with whisk holder back onto the milk frother.
1 sec
4 Press the button for 1 second to heat and froth the milk. The light in the
on/off button comes on.
3 sec
Note: Press the button for 3 seconds for cold frothed milk.
5 The milk froth is ready when the light in the on/off light goes off. You can
now remove the milk frother lid with the whisk holder attached from the
milk frother. Pour the frothed milk onto the freshly brewed coffee.
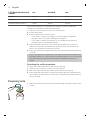
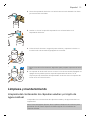
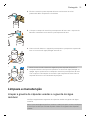
Cleaning and maintenance
Cleaning the used capsule drawer and waste water drawer
Check the used capsule drawer and waste water drawer regularly.
Note: For optimal hygiene, pull up the lever after use to ensure the last used
capsule falls into used capsule drawer.
15
English

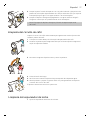
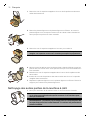
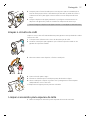
1 Pull the used capsule drawer and the waste water drawer out of the
machine.
2 Remove the drip tray from the lower drip tray and rinse the drip tray and
the cup tray under a warm tap. Do not clean these parts in the
dishwasher.
3 Remove the used capsule drawer by pulling it up and empty it.
Caution: Be careful when you remove the used capsule drawer.
Capsules are still hot immediately after brewing.
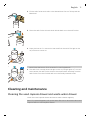
4 Rinse all parts under a warm tap. Dry all parts with a soft cloth. You can
also clean all these parts in the dishwasher.
5 Reinsert the used capsule drawer into the waste water drawer.
6 Insert the waste water drawer with the used capsule drawer into the
machine.
7 Place the drip tray back onto the lower drip tray. Place the cup platform
onto the drip tray.
Cleaning other parts of the machine
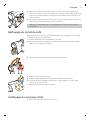
1 Clean the outside of the machine with a soft damp cloth.
Caution: Never use scouring pads, abrasive cleaning agents or
aggressive liquids such as petrol or acetone to clean the machine.
Warning: Do not insert a finger into the capsule compartment
to avoid injury. There is an invisible piercer inside.
16
English

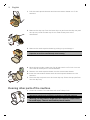
2 Clean the front of the machine with a soft damp cloth and clean the two
parts of the coffee dispensing spout (the coffee outlet and the spout
cover) under a warm tap or in the dishwasher.
3 Clean the water tank by rinsing it under a warm tap. The water tank is not
dishwasher-proof.
Note: Rinse the water tank and fill it with fresh water every 24 hours.
Cleaning the coffee circuit
Clean the coffee circuit every week to ensure you get coffee with an
optimum quality and taste.
1 Place a cup under the coffee dispensing spout.
2 Lift the lever to ensure the last used capsule falls into the used capsule
drawer.
3 Do not insert a new capsule and close the lever.
4 Press the lungo button.
5 Empty the cup after the machine has finished dispensing water.
6 Open the lever and repeat steps 3 to 5 to ensure proper cleaning of the
coffee circuit.
The machine is now ready for use.
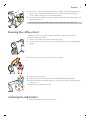
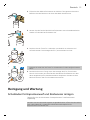
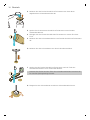
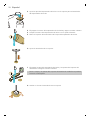
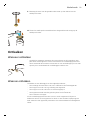
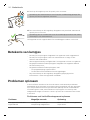
Cleaning the milk frother
1 Remove the milk frother from its base.
17
English

2 Remove the milk frother lid with the whisk holder attached from the milk
frother.
°C
3 Rinse the inside of the milk frother under hot running water.
4 Clean the outside of the milk frother with a moist cloth.
5 Remove the whisk holder from the milk frother lid.
6 Remove the whisk from the whisk holder.
°C
7 Rinse the milk frother lid and the whisk holder parts under hot running
water.
Note: The lid and the whisk holder parts can also be cleaned in the
dishwasher.
1
2
8 Reattach the whisk to the whisk holder.
18
English

9 Reattach the shaft of the whisk holder to the milk frother lid.
10 Place the milk frother lid with whisk holder back into the milk frother.
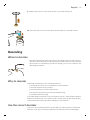
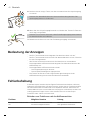
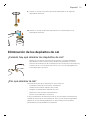
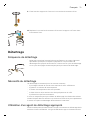
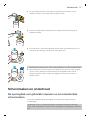
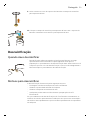
Descaling
When to descale
-
Descale the machine when the ristretto and lungo button flash quickly a
few times after brewing. The descaling procedure takes up to 40 minutes
and consists of a descaling cycle and a rinsing cycle. Do not interrupt the
descaling procedure.
Why to descale
Descaling is essential for the following reasons:
-
It prolongs the life of your L'OR Barista coffee machine
-
It ensures maximum cup volume
-
It ensures maximum coffee temperature
-
The machine produces less sound during brewing
-
It prevents malfunctioning
If the descaling procedure is not performed correctly, scale residue remains
behind in the machine. This causes scale to build up more quickly and may
cause permanent and irreparable damage to the machine.
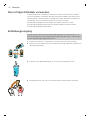
Use the correct descaler
Only citric acid-based descalers are suitable for descaling the L'OR Barista
machine. This type of descaler descales the machine without damaging it.
19
English

We advise you to use the dedicated L'OR Barista liquid descaler (CA6530). It
is available in bottles that contain liquid descaler for two descaling
procedures. You need half a bottle for one descaling procedure and can
store the other half for the next descaling procedure.
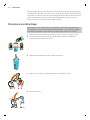
Descaling procedure
Note: If something goes wrong during the descaling procedure, e.g. because
you accidentally interrupt the descaling cycle, you have to restart the
descaling procedure from step 1.
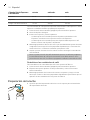
1 Press the on/off button to switch on the machine.
2 Pour half a bottle of L'OR Barista liquid descaler (CA6530) into the water
tank.
3 Fill up the water tank with fresh tap water.
4 Make sure that there is no capsule in the capsule compartment.
5 Close the lever.
20
English

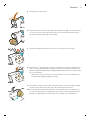
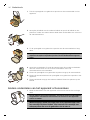
1.5L
6 Place a bowl with a minimum capacity of 1.5 liters on the lower drip tray
under the coffee dispensing spout to collect the descaling solution.
7 Press the ristretto and lungo button briefly at the same time.
8 The ristretto button starts to flash quickly. Press the ristretto button to
activate the descaling cycle.The machine dispenses the entire descaling
solution at regular intervals. This takes up to 30 minutes.
-
When the lungo button starts to flash quickly again, the first phase of
the descaling cycle has finished.
9 Remove and empty the bowl. Place the bowl back onto the lower drip
tray under the coffee dispensing spout.
10 Remove the water tank and rinse it under the tap. Fill the water tank with
cold tap water and place it back onto the machine.
11 Press the lungo button to start the flushing cycle.
Note: The water tank will be emptied without interruption. The flushing
cycle lasts about 3 minutes.
21
English

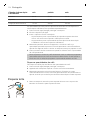
12 When the flushing cycle has finished, the ristretto and lungo button flash
a few times.
Note: It is normal that some water remains behind in the water tank after
the descaling procedure.
The machine switches off. The descaling procedure is finished.
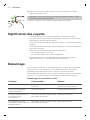
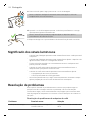
Meaning of light signals
-
The on/off button flashes slowly: the machine is heating up.
-
The on/off button flashes quickly: the water tank is empty, fill the water
tank with tap water.
-
All buttons light up continuously: the machine is ready for use.
-
The selected coffee button flashes slowly: the machine is preparing the
coffee recipe.
-
The selected coffee button flashes quickly:
-
Programming is activated.
-
The new coffee quantity is saved.
-
The ristretto and lungo button flash simultaneously after brewing coffee:
you need to descale the machine.
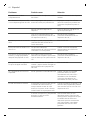
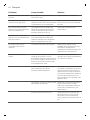
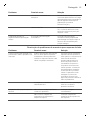
Troubleshooting
This chapter summarizes the most common problems you could encounter
with your machine. If you are unable to solve the problem with the
information below, visit www.lorbarista.com/support for a list of frequently
asked questions or contact the Consumer Care Center in your country.
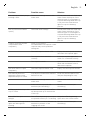
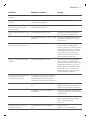
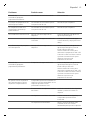
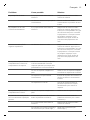
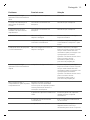
Troubleshooting coffee machine
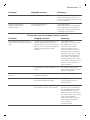
Problem
Possible cause Solution
The machine does not switch
on.
The machine is not connected to
the mains.
Put the plug in an earthed wall
socket.
The on/off button is flashing
slowly.
The machine is heating up. This is normal.
The brewing time is longer
than before.
The machine is clogging up with
scale.
Descale the machine.
The temperature of freshly
brewed coffee gradually
decreases.
The machine is clogging up with
scale.
Descale the machine.
The pump makes a lot of
noise.
There is not enough water in the
water tank.
Fill the water tank with fresh tap
water.
The water tank is not placed
correctly.
Place the water tank correctly
and push it downwards.
22
English

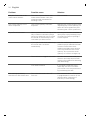
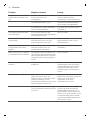
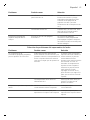
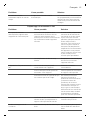
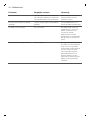
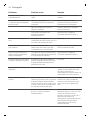
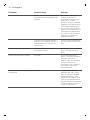
Problem Possible cause Solution
The machine suddenly stops
brewing coffee.
There is not enough water in the
water tank.
Fill the water tank with fresh tap
water. Press the button of the
selected type of coffee again to
continue brewing. When the cup
is full, press the same button
again to stop the brewing
process.
The on/off button flashes
quickly.
The water tank is empty. Fill the water tank with fresh tap
water. Press the button of the
selected type of coffee again to
continue brewing. When the cup
is full, press the same button
again to stop the brewing
process.
I cannot close the capsule
compartment lever
completely.
Check if you use the
recommended L'OR capsule. Other
capsules may cause problems
during use..
The used capsule drawer is full. Empty the used capsule drawer
and insert the capsule again.
The capsule is not inserted
correctly.
Insert the capsule again and
check if it is inserted correctly.
The capsule is stuck. Open and close the lever a few
times with moderate force to
remove the capsule.
The lever does not open
completely.
The used capsule drawer is full. Empty the used capsule drawer.
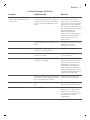
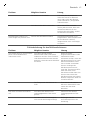
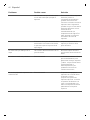
The machine does not
dispense coffee or only
dispenses drops of coffee.
You have not flushed the machine
before first use.
Flush the machine before first
use (see 'Preparing for use').
There is not enough water in the
water tank.
Fill the water tank with fresh tap
water.
Scale has built up inside the
machine (see 'Descaling').
Descale the machine (see
'Descaling').
Coffee grounds end up in the
cup of coffee.
A small amount of ground coffee
will always end up on the bottom
of the cup.
This is normal.
The coffee flow splits or is not
straight.
The coffee dispensing spout cap is
not placed correctly or it is missing.
Snap the coffee dispensing
spout onto the coffee outlets.
The ristretto and lungo button
lights are flashing after
brewing.
This means it is time to descale the
machine to prevent it from
clogging with scale.
Descale the machine (see
'Descaling').
23
English
La page charge ...
La page charge ...
La page charge ...
La page charge ...
La page charge ...
La page charge ...
La page charge ...
La page charge ...
La page charge ...
La page charge ...
La page charge ...
La page charge ...
La page charge ...
La page charge ...
La page charge ...
La page charge ...
La page charge ...
La page charge ...
La page charge ...
La page charge ...
La page charge ...
La page charge ...
La page charge ...
La page charge ...
La page charge ...
La page charge ...
La page charge ...
La page charge ...
La page charge ...
La page charge ...
La page charge ...
La page charge ...
La page charge ...
La page charge ...
La page charge ...
La page charge ...
La page charge ...
La page charge ...
La page charge ...
La page charge ...
La page charge ...
La page charge ...
La page charge ...
La page charge ...
La page charge ...
La page charge ...
La page charge ...
La page charge ...
La page charge ...
La page charge ...
La page charge ...
La page charge ...
La page charge ...
La page charge ...
La page charge ...
La page charge ...
La page charge ...
La page charge ...
La page charge ...
La page charge ...
La page charge ...
La page charge ...
La page charge ...
La page charge ...
La page charge ...
La page charge ...
La page charge ...
La page charge ...
La page charge ...
La page charge ...
La page charge ...
La page charge ...
La page charge ...
La page charge ...
La page charge ...
La page charge ...
La page charge ...
La page charge ...
La page charge ...
La page charge ...
La page charge ...
La page charge ...
La page charge ...
La page charge ...
La page charge ...
La page charge ...
La page charge ...
La page charge ...
La page charge ...
La page charge ...
La page charge ...
La page charge ...
La page charge ...
La page charge ...
La page charge ...
La page charge ...
La page charge ...
La page charge ...
La page charge ...
La page charge ...
La page charge ...
La page charge ...
La page charge ...
La page charge ...
-
 1
1
-
 2
2
-
 3
3
-
 4
4
-
 5
5
-
 6
6
-
 7
7
-
 8
8
-
 9
9
-
 10
10
-
 11
11
-
 12
12
-
 13
13
-
 14
14
-
 15
15
-
 16
16
-
 17
17
-
 18
18
-
 19
19
-
 20
20
-
 21
21
-
 22
22
-
 23
23
-
 24
24
-
 25
25
-
 26
26
-
 27
27
-
 28
28
-
 29
29
-
 30
30
-
 31
31
-
 32
32
-
 33
33
-
 34
34
-
 35
35
-
 36
36
-
 37
37
-
 38
38
-
 39
39
-
 40
40
-
 41
41
-
 42
42
-
 43
43
-
 44
44
-
 45
45
-
 46
46
-
 47
47
-
 48
48
-
 49
49
-
 50
50
-
 51
51
-
 52
52
-
 53
53
-
 54
54
-
 55
55
-
 56
56
-
 57
57
-
 58
58
-
 59
59
-
 60
60
-
 61
61
-
 62
62
-
 63
63
-
 64
64
-
 65
65
-
 66
66
-
 67
67
-
 68
68
-
 69
69
-
 70
70
-
 71
71
-
 72
72
-
 73
73
-
 74
74
-
 75
75
-
 76
76
-
 77
77
-
 78
78
-
 79
79
-
 80
80
-
 81
81
-
 82
82
-
 83
83
-
 84
84
-
 85
85
-
 86
86
-
 87
87
-
 88
88
-
 89
89
-
 90
90
-
 91
91
-
 92
92
-
 93
93
-
 94
94
-
 95
95
-
 96
96
-
 97
97
-
 98
98
-
 99
99
-
 100
100
-
 101
101
-
 102
102
-
 103
103
-
 104
104
-
 105
105
-
 106
106
-
 107
107
-
 108
108
-
 109
109
-
 110
110
-
 111
111
-
 112
112
-
 113
113
-
 114
114
-
 115
115
-
 116
116
-
 117
117
-
 118
118
-
 119
119
-
 120
120
-
 121
121
-
 122
122
-
 123
123
-
 124
124


L'Or Barista L'Or Barista LM8014 / 80 Manuel utilisateur
- Catégorie
- Accessoires de préparation de café
- Taper
- Manuel utilisateur
dans d''autres langues
Documents connexes
-
L'Or Barista LM8012/60 Manuel utilisateur
-
L'Or Barista LM8012/80R1 Manuel utilisateur
-
 L OR 25168623 Premium Latte Coffee Capsule Machine Manuel utilisateur
-
-
-
L'Or Barista CA6530/00 Product Datasheet
-
Philips LM9012/20R1 Manuel utilisateur
-

Autres documents
-
Philips Expresso L'OR BARISTA LM8012/80 Le manuel du propriétaire
-
Philips L� Or Barista LM8012/41 Blue Le manuel du propriétaire
-
 L'Or BARISTA SUBLIME LM9012/60 KAPSELMASKIN, SVART Le manuel du propriétaire
-
Princess 249450.01.001 Manuel utilisateur
-
Princess 3456787965345334 Manuel utilisateur
-
Princess 3456787935345334 Manuel utilisateur
-
Mestic ME-80 Manuel utilisateur
-
-
Russell Hobbs 19721-56 Manuel utilisateur
-
Silvercrest SMA 500 B1 Le manuel du propriétaire
