
Total Enterprise Access & Mobility (TEAM)
Business Smartphone
EWP1000 & 2000 Series
Quick Start Guide
a
Toll quality mobile PBX telephony extension & data
Complete push-to-talk services over WiFi
QRC-new-layout.book Page -1 Thursday, August 7, 2008 5:57 PM

QRC-new-layout.book Page 0 Thursday, August 7, 2008 5:57 PM

English
1
Welcome
Greetings upon receiving your new Enterprise WiFi
Phone (EWP). This state-of-the-art Windows
Mobile
®
6.1 based business smartphone delivers
the features and benefits of your enterprise TEAM
solution, enabling enhanced communication on the
move.
The EWP seamlessly combines security and
connectivity in a stylish device that fits in your
pocket.
Meet the smartphone
Your EWP is designed to operate throughout the
wireless network coverage of your enterprise
environment. You can use the smartphone as you
would any normal office phone. This means that
you can dial local office phone extensions just as
you could with a wired desk phone, using
abbreviated extension phone numbers.
The EWP smartphone also includes voice
recognition for hands-free dialing, group and
individual push-to-talk (PTT), text messaging, email,
contacts, calendar, tasks and many other built-in
tools to help you manage your busy work style.
The EWP can also access server based enterprise
applications, standard mobile Internet browser, and
has the ability to pair with Bluetooth
®
headsets
and other Bluetooth devices such as personal
computers.
The EWP is available in two models; the semi-
rugged EWP2000 series and the professional
EWP1000 series. Both models have identical
functional and operational features and differ in
ruggedness and outward appearance.
For detailed information on the EWP features, refer
to the EWP1000/2000 Series User’s Guide P/N
6871009P12-A or visit www.motorola.com.
QRC-new-layout.book Page 1 Thursday, August 7, 2008 5:57 PM

2
English
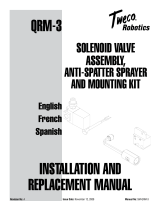
EWP1000 Anatomy
1. Speaker key a
2. Volume up/down
3. PTT button
4. Programmable key
5. Rapid Travel Charger jack/USB cable port
6. Earpiece
7. Navigation key
S
8. Select key s
9. Left soft key
10. Home key
11. Call/Answer key N
12. Lower microphone
13. Speakerphone
14. Upper microphone
15. Right soft key
16. Back key
17. Power/End key O
18. Lanyard point
19. Headset Jack (supports PTT)
1
13
2
3
4
5
14
10
7
8
9
15
16
17
11
6
12
19
18
QRC-new-layout.book Page 2 Thursday, August 7, 2008 5:57 PM

English
3
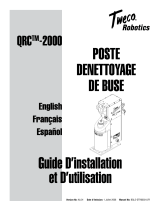
EWP2000 Anatomy
1. Speaker key a
2. Holster latches
3. Volume up/down
4. PTT button
5. Programmable key
6. Rapid Travel Charger jack/USB cable port
7. Desktop Charger Contacts
8. Earpiece/Upper Microphone
9. Navigation key
S
10. Select key s
11. Left soft key
12. Home key
13. Call/Answer key N
14. Speakerphone/Lower Microphone
15. Right soft key
16. Back key
17. Power/End key O
18. Lanyard point
19. Headset Jack (supports PTT)
1
8
14
15
3
4
5
6
7
16
17
19
7
18
2
9
11
10
12
13
QRC-new-layout.book Page 3 Thursday, August 7, 2008 5:57 PM

4
English
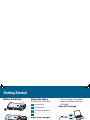
Getting Started
Battery Installation Charge the battery
Battery status indications:
Rapid travel charger
1. Plug the Rapid Travel Charger
into the smartphone’s USB port
and plug into a standard 110/
220 VAC wall outlet.
2. When charging is completed,
remove the charger from the
wall outlet.
Using a PC to charge
1. Plug the USB cable into the
smartphone and the PC.
2. When charging is completed,
remove the cable from the
computer USB port.
1
3
4
2
EWP2000 only
N
Low battery
L
Battery level
O
Charging in progress
^
Charging completed
a
R
QRC-new-layout.book Page 4 Thursday, August 7, 2008 5:57 PM

English
5
Basics
Power on
Press and hold O for 1-2 seconds. Allow a few
seconds for Home screen to appear.
Power off
Press and hold O for 1-2 seconds.
First time network connection
Press: Start > Settings > Connections > Wireless
manager > Menu > Wifi Settings. Enter password
and press Go to access. Enter your network name,
encryption method (AES), authentication method
(EAP-TLS) and press Save.
Wait until “Full Service” shows on the screen.
View your smartphone number
Press: Start > Settings > Phone > Call Options.
Home screen
Use the Navigation key
S
to scroll and move
between the sceen
items. Press the Select
key sto access.
Open programs
From the Home screen, press: Start to access
recently used programs. Use the Navigation key S
to scroll and press the Select key s to open. To
see all programs, press: Start > All Programs.
Contacts (phonebook)
From the Home screen, press: Contacts to access
a contact registry. Use the Navigation key S
to
scroll, press the Select key s
to open and press
N to call. To add a new contact, press: Contacts >
New > Outlook Contact.
Important status indicators
On the top of the Home screen, you may find the
following status indicators:
0
Full wireless service
B
New Voicemail
5
No wireless service
Q
Silent mode
6
Wireless is turned off
<
Vibrate mode
A
New email/text message
h
Bluetooth on
QRC-new-layout.book Page 5 Thursday, August 7, 2008 5:57 PM

6
English
Basics Phone
Screen Time out
Your screen turns off to save
battery power. To set the screen
time out, press: Start > Settings >
More > Power Management >
Display time out.
Lock & unlock keypad
To lock, press and hold X for a
second. Press Lock.
To unlock, press: Unlock > *.
Make a call
Enter phone number and press
N.
Answer/End a call
Press: N to answer a call.
Press: O to end a call.
Make a PTT call
Enter phone number. Press and
hold PTT. Begin talking after
hearing a chirping sound. Release
PTT to listen.
Redial
Press: N to see last calls and
Contacts.
Highlight entry and press N or
PTT.
PTT call request
PTT call request let the recipient
know you want to talk on a PTT
call. Enter phone number. Select:
Menu > Request Call Alert.
Receive/Answer a PTT call
Your smartphone emits a tone or
vibrates. Wait for the caller to
finish speaking. Press and hold
PTT. Begin talking after hearing a
chirping sound. Release PTT to
listen.
Make a call from Contacts
Press: Start > Contacts. Scroll to a
contact and press the Select key
s. Scroll to a type of contact
(mobile, home etc.) and press N.
Set earpiece volume
During a call, press the volume
up/down keys.
QRC-new-layout.book Page 6 Thursday, August 7, 2008 5:57 PM

English
7
Phone
Set ring volume
Press: Start > Settings > Profiles.
Scroll to a profile. Select: Menu >
Edit. Scroll to Ring volume to set
level.
Speakerphone
During an active call, press the
speaker key a to turn on/off the
speakerphone.
Vibrate mode
Press and hold X. Select: More
> Vibrate.
Silent mode
Press and hold X. Select: Silent.
Normal mode
Press and hold X. Select:
Normal.
Check Voicemail
When B shows, you have voice
message
. Press and hold 1.
Scroll to Voicemail and press N.
Follow the Voicemail prompts.
Conference call
During an active call, press: Menu
> Conference With. Select a
number from Contacts or Recent
call or Phone number and press
Done.
Make a PTT group call
Press: Contacts > Start > Contact.
Scroll to the talkgroup. Press and
hold PTT and begin talking after
hearing a chirping sound. Release
PTT to listen.
Join an active PTT group
Press: Start > Contacts. Select the
talkgroup you want to join. Press:
Menu > Join PTT group.
Press and hold PTT and begin
talking after hearing a chirping
sound. Release PTT to listen.
Transfer a call
During an active call, press: Menu
> Transfer to. Scroll to a contact
and press the Select key s.
The smartphone displays “Would
you like to speak to (contact
number) before transferring the
call?” Press: Yes to speak to the
contact before transferring the
call.
Press: No > Transfer for direct
transfer.
Forward calls to Voicemail
To send your incoming calls to
voicemail, press: Start > Settings
> Phone > Call Forwarding.
Set Speed Dial numbers
Press: Start > Contacts. Select a
contact. Press: Menu > Add to
Speed Dial > Keypad assignment.
QRC-new-layout.book Page 7 Thursday, August 7, 2008 5:57 PM

8
English
Voice Recognition
Voice dial
1. Press and hold the Speaker key a for 2
seconds.
2. When prompted, say “Call” followed by a
number or contact name.
Send message
You may also say “Send text” or “Send email”
followed by a contact name or number to send a
text message.
Look up a contact name
Say “Look up” and then the name or number in your
contacts list.
Open program
1. Press and hold the Speaker key a for two
seconds.
2. When prompted, say “Open” and then the name
of a program you want to go to.
To add a program to your selection list, press: Start
> Voice Recognition > Settings > Application
Launcher.
Adapt your voice
To adapt your voice for better recognition, press:
Start > Voice Recognition > Settings > Digit Dialing
> Adapt Digits.
QRC-new-layout.book Page 8 Thursday, August 7, 2008 5:57 PM

English
9
Text Messaging / Email
Read new message
Press: Start > Messaging > Text Messages or
Outlook E-mail.
Create a text message
1. Press: Start > Messaging > Text Messages or
Outlook E-mail > Menu > New.
2. Place your cursor on the To: line and press the
Select keys to add recipients from Contacts.
3. When you are done creating a message, press:
Send.
Letter, underline letter and numeric
Repeatedly, press and hold * for 2 seconds and
release to switch between Letters
Á, underline
letters
Á and numbers 123.
Note: the switch between letters, underline letters,
numbers, uppercase and lowercase is indicated on
the upper right corner of the screen.
Uppercase, lowercase and caps lock
Press and hold and repeatedly press
*. The
status indicator switches between
Á
,
á
and
Â
.
Underline letter
1. Switch to underline letters.
2. Press and hold and repeatedly press and
hold * for 2 seconds and release. The status
indicator switches between Á
, á and Â.
Special character
In Letters mode, repeatedly press 1 to switch
between the following characters
. , ? ! -_’ @ :
Enter symbols
Press and hold #
for 2 seconds. Select a symbol or
a special character. When done, the smartphone
returns to previous text mode.
Enter space - Press #.
Delete text - Press .
Start a new line - Press the Select key s.
Text setup (Language, Word completion)
Press and hold
# for 2 seconds > Setup.
0 +
0 +
QRC-new-layout.book Page 9 Thursday, August 7, 2008 5:57 PM

10
English
Personalize
Add entry to Contacts
1. From the Home screen, press: Contacts > New >
Outlook Contact.
2. Enter Work, Mobile, PTT, Home, and E-mail
information. Also, you can assign Ring Tone and
Picture Caller ID to the contact.
Edit Contacts entry
Press: Start > Contacts. Scroll to a Contact.
Press: Menu > Edit.
Change the appearance of your screen
From the Home screen, press: Start > Settings >
Display.
You can change the Home screen layout, color
scheme, Home screen image, screen time out,
system font size.
Change sounds
1. From the Home screen, press: Start > Settings >
Sounds.
2. You can change the sound of the ring tone,
reminders, new e-mail, new text message, new
instant message, PTT call request, incoming PTT,
exclamation, questions, warnings, keypad
control, service tone, call drop tone, minute beep.
QRC-new-layout.book Page 10 Thursday, August 7, 2008 5:57 PM

English
11
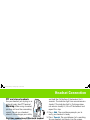
Headset Connection
PTT and stereo headsets
Use your headset jack to plug in an
optional hands-free PTT headset.
Warning: When using a headset,
you may not hear the surrounding
sounds. Do not use a headset
where it can endanger your safety.
First time connection of Bluetooth headset
• The headset must be charged prior to starting
• Bluetooth headset must be turned Off.
1. To turn on Bluetooth: press Start > Settings >
Connections > Wireless Manager and check the
Enable Bluetooth box. The
h indicator appears
in the Home screen.
2. From the Home screen, press: Start > All
Programs > Bluetooth > Bluetooth Manager >
Hands-free.
3. Place the headset in pairing mode (Refer to the
Bluetooth Pairing Instructions included with the
headset.). When using Motorola headset, press
and hold the Call button of the headset for 5
seconds. The indicator light turns on and remains
steady. If the indicator light is flashing or does
not remain steadily lit, turn off the headset and
repeat this step.
4. Press: Add. The smartphone prompts you to
verify your headset is ready.
5. Press: Search. The smartphone starts searching
for your headset and shows it on the screen.
6. Press: Select to connect the headset.
7. When prompted, enter the device passkey
provided with your headset (such as 0000) and
press Accept.
When your headset successfully pairs, the indicator
light changes from steady to flashing blue. After
you have successfully paired your smartphone and
headset, you do not need to repeat these steps.
To pair the headset again, verify that your
smartphone’s Bluetooth is enabled (See step 1.) and
turn on the headset.
QRC-new-layout.book Page 11 Thursday, August 7, 2008 5:57 PM

12
English
Synchronize with PC Memory Card
You can use Microsoft
®
ActiveSync version 4.5 and
beyond or Windows
®
Mobile Device Center to
synchronize information between your smartphone
and a computer. ActiveSync can synchronize your
contacts, calendar, email, tasks, favorites and show
the content of your smartphone on your computer.
You can move files between your computer and
smartphone, download and install applications and
service your smartphone (for free download, go to
Microsoft web site or contact your administrator).
To Synchronize with your PC:
1. Turn on the smartphone and PC.
2. Connect your smartphone to your PC using a USB
cable. ActiveSync starts to synchronize
automatically with your smartphone.
3. Follow the instructions shown on your PC screen
and select the items you want to synchronize,
such as email, contacts, calendar, favorites and
other information.
A
B
1
3
4
2
* Removable microSD "optional" - sold separately
*
QRC-new-layout.book Page 12 Thursday, August 7, 2008 5:57 PM

English
13
Grant of Equipment Authorization
FCC INTERFERENCE
NOTE: This equipment has been tested and found to comply with the
limits for a Class B digital device, pursuant to Part 15 of the FCC Rules.
These limits are designed to provide reasonable protection against
harmful interference in a residential installation. This equipment
generates, uses and can radiate radio frequency energy and, if not
installed and used in accordance with the instructions, may cause harmful
interference to radio communications. However, there is no guarantee
that interference will not occur in a particular installation. If this
equipment does cause harmful interference to radio or television
reception, which can be determined by turning the equipment off and on,
the user is encouraged to try to correct the interference by one or more of
the following measures:
• Reorient or relocate the receiving antenna.
• Increase the separation between the equipment and receiver.
• Connect the equipment into an outlet on a circuit different from that to
which the receiver is connected.
• Consult the dealer or an experienced radio/TV technician for help.
This device complies with Part 15 of the FCC Rules. Operation is subject
to the following two conditions:
(1) This device may not cause harmful interference.
(2) This device must accept any interference received, including
interference that may cause undesired operation.
FCC Notice
IMPORTANT: Unauthorized repairs or modifications could result in
permanent damage to the equipment and void your warranty and your
authority to operate this device under Part 15 of the FCC Rules.
Radio Frequency and Power
FCC Grant of Equipment Authorization
Industry Canada Grant of Equipment Authorization
This Class B digital apparatus complies with Canadian ICES-003.
IMPORTANT: In the band 5150- 5250 MHz, the device may only be used
indoors to reduce potential for harmful interference to co-channel mobile
satellite systems.
Changes or modifications made in the smartphone, not expressly
approved by Motorola, will void the user's authority to operate the
equipment.
Radio Network Freq Band Rated Power
802.11a WLAN 5.15-5.25 GHz
5.25-5.35 GHz
5.47-5.725 GHz
5.725-5.825 GHz
15.8mW at 54Mbps
802.11b WLAN 2412-2462MHz 63mW at 11Mbps,
802.11g WLAN 2412-2462MHz 17.8mW at 54 Mbps
Bluetooth WPAN 2402-2480MHz 1mW
Model FCC ID
EWP1000 AZ489FT7031
EWP2000 AZ489FT7032
Model ID
EWP1000 109U-89FT7031
EWP2000 109U-89FT7032
032374o
QRC-new-layout.book Page 13 Thursday, August 7, 2008 5:57 PM

14
English
Accessories
SYN6371C
Mini USB Data Cable
SPN5202C
Rapid Travel
Charger
SNN5754A
Standard
(1480mAh) Battery
EWP1000 Series –SYN2682A
EWP2000 Series –SYN2685A
Carry Case w/ Clip
SNN5793A
Extra Capacity
(1750mAh) Battery
NNTN5211B
Surveillance + PTT
NNTN5330B
Ear bud + PTT
NNTN5774A
Stereo + PTT
SYN2162
H375 Bluetooth
Headset
SYN2467
H12 Crystal Talk
Bluetooth Headset
SYN2679A
Universal Pouch
DCH1000
Single Unit
Desktop Charger
DCH6000
Multi-Unit
Desktop Charger
EWP1000 Series –SYN2683A
EWP2000 Series –SYN2680A
Holster
QRC-new-layout.book Page 14 Thursday, August 7, 2008 5:57 PM

Total Enterprise Access & Mobility (TEAM)
Téléphone intelligent professionnel
Séries EWP1000 & 2000
Guide de démarrage rapide
a
Poste d'autocommutateur voix-données
mobile
de qualité commerciale
Services de messagerie vocale
instantanée complets sur WiFi
QRC-new-layout.book Page 15 Thursday, August 7, 2008 5:57 PM

16
Français
Bienvenue
Félicitations! Vous venez de recevoir un nouveau téléphone
EWP (Enterprise WiFi Phone). Ce téléphone intelligent
professionnel de pointe fonctionnant sous Windows
Mobile
®
6.1 offre les fonctions et les avantages de votre
solution TEAM d'entreprise qui permettent d'améliorer les
communications de votre personnel mobile.
Le téléphone EWP allie de façon transparente la sécurité et
la connectivité dans un appareil élégant qui tient dans votre
poche.
Découvrez le téléphone intelligent
Votre téléphone EWP est conçu pour fonctionner sur le
réseau sans fil de votre environnement d'entreprise. Vous
pouvez utiliser le téléphone intelligent comme tout
téléphone de bureau ordinaire. C'est donc dire que vous
pouvez composer des numéros de postes téléphoniques
locaux comme vous le feriez avec un téléphone de bureau
filaire en utilisant des numéros de poste abrégés.
Le téléphone intelligent EWP comporte aussi des fonctions
de reconnaissance vocale permettant la composition mains
libres, la messagerie vocale instantanée (PTT pour
Push-to-Talk) de groupe et individuelle, la messagerie texte,
le courrier électronique, les contacts, le calendrier, les
tâches et bien d'autres outils intégrés afin de vous aider à
gérer votre façon de travailler.
Le téléphone EWP vous permet aussi d'accéder aux
applications d'entreprise et à un navigateur Internet mobile
standard, et de l'utiliser avec des écouteurs Bluetooth
®
et
d'autres appareils Bluetooth tels que des ordinateurs
personnels.
Le téléphone EWP est offert en deux modèles : le EWP2000
semi-robuste et le EWP1000 professionnel. Tous deux sont
dotés de caractéristiques fonctionnelles et opérationnelles
identiques et se distinguent par leur robustesse et leur
apparence extérieure.
Pour obtenir de plus amples renseignements sur les
fonctions du téléphone EWP, veuillez consulter le manuel de
l'utilisateur des téléphones EWP1000/2000 (n(o) de pièce :
6871009P12-A) ou visitez le site www.motorola.com.
QRC-new-layout.book Page 16 Thursday, August 7, 2008 5:57 PM

17
Français
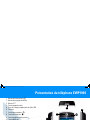
Présentation du téléphone EWP1000
1. Bouton de haut-parleur a
2. Bouton de réglage du volume
3. Bouton PTT
4. Touche programmable
5. Prise de chargeur rapide/port de câble USB
6. Écouteur
7. Touche de navigation
S
8. Touche de sélection s
9. Touche programmable gauche
10. Touche d'accueil
11. Touche appel/réponse N
12. Microphone inférieur
13. Activer ou désactiver le haut-parleur
14. Microphone supérieur
15. Touche programmable droite
16. Touche arrière
17. Touche de mise sous tension/fin d'appel O
18. Œillet pour dragonne
19. Prise de casque (compatible avec la messagerie
vocale instantanée)
1
13
2
3
4
5
14
10
7
8
9
15
16
17
11
6
12
19
18
QRC-new-layout.book Page 17 Thursday, August 7, 2008 5:57 PM

18
Français
Présentation du téléphone EWP2000
1. Bouton de haut-parleur a
2. Loquets pour étui
3. Bouton de réglage du volume
4. Bouton PTT
5. Touche programmable
6. Prise de chargeur rapide/port de câble USB
7. Contacts du chargeur de bureau
8. Écouteur/Microphone supérieur
9. Touche de navigation
S
10. Touche de sélection s
11. Touche programmable gauche
12. Touche d'accueil
13. Touche appel/réponse N
14. Haut-parleur/Microphone inférieur
15. Touche programmable droite
16. Touche arrière
17. Touche de mise sous tension/fin d'appel O
18. Œillet pour dragonne
19. Prise de casque (compatible avec la messagerie
vocale instantanée)
1
8
14
15
3
4
5
6
7
16
17
19
7
18
2
9
11
10
12
13
QRC-new-layout.book Page 18 Thursday, August 7, 2008 5:57 PM
La page charge ...
La page charge ...
La page charge ...
La page charge ...
La page charge ...
La page charge ...
La page charge ...
La page charge ...
La page charge ...
La page charge ...
La page charge ...
La page charge ...
-
 1
1
-
 2
2
-
 3
3
-
 4
4
-
 5
5
-
 6
6
-
 7
7
-
 8
8
-
 9
9
-
 10
10
-
 11
11
-
 12
12
-
 13
13
-
 14
14
-
 15
15
-
 16
16
-
 17
17
-
 18
18
-
 19
19
-
 20
20
-
 21
21
-
 22
22
-
 23
23
-
 24
24
-
 25
25
-
 26
26
-
 27
27
-
 28
28
-
 29
29
-
 30
30
-
 31
31
-
 32
32


Motorola 2000 Series Guide de démarrage rapide
- Taper
- Guide de démarrage rapide
- Ce manuel convient également à
dans d''autres langues
Documents connexes
Autres documents
-
Samsung GH68-12074A Manuel utilisateur
-
 Tweco Robotics QRC-3000LS QRC-3000IO Ultrasonic Nozzle Cleaning Station Manuel utilisateur
-
 Tweco Robotics QRC™-2000 Nozzle Cleaning Station Guide d'installation
-
Topcom Twintalker 1300 Manuel utilisateur
-
 Tweco Robotics QWT-3 Quick Wire Trim Unit Guide d'installation
-
 Tweco Robotics QRM-3 Solenoid Valve Assembly Guide d'installation
-
Kyosho No.33101NITRO TRACKER Manuel utilisateur
-
 Tweco Robotics QRM-100 Anti-Spatter Mist Applicator Guide d'installation
-
 Tweco Robotics QRC™-2000 Nozzle Cleaning Station Guide d'installation


