
English ...................... 2
Français ................... 17
Español ................... 31
Stand Mixer
Batteur sur socle
Batidora de
Pedestal
READ BEFORE USE
LIRE AVANT UTILISATION
LEA ANTES DE USAR
hamiltonbeach.com
For recipes, tips and product
information.
hamiltonbeach.ca
Pour des recettes, des conseils
et des renseignements sur le
produit.
hamiltonbeach.com.mx
Para recetas, consejos, y
información del producto.
ENTER TO WIN $100
TO SPEND ON WEBSITE
Scan code or visit:
register.hamiltonbeach.com
PARTICIPEZ POUR COURIR LA CHANCE DE
GAGNER UN MONTANT DE 100 $
À DÉPENSER SUR NOTRE SITE WEB
Balayez le code ou visitez le
register.hamiltonbeach.com
INGRESE PARA TENER LA OPORTUNIDAD
DE GANAR $100 PARA GASTAR EN
NUESTRO SITIO WEB
Escanee el código o visite
register.hamiltonbeach.com
Open to US customers only • Ce concours
s’adresse aux clients des États-Unis
seulement • Este concurso está disponible
sólo a clientes de los Estados Unidos
Le invitamos a leer cuidadosamente este
instructivo antes de usar su aparato.

2
IMPORTANT SAFEGUARDS
1. Read all instructions.
2. This appliance is not intended for use by persons with
reduced physical, sensory, or mental capabilities, or lack
of experience and knowledge, unless they are closely
supervised and instructed concerning use of the appliance
by a person responsible for their safety.
3. This appliance shall not be used by children. Keep the
appliance and its cord out of reach of children.
4. Close supervision is necessary when any appliance is
used near children. Children should be supervised to
ensure that they do not play with the appliance.
5. To protect against risk of electrical shock, do not put cord,
plug, base, or motor in water or other liquid.
6. Turn the appliance OFF( ), then unplug from outlet when
not in use, before putting on or taking off parts, and
before cleaning. To unplug, grasp the plug and pull from
the outlet. Never pull from the power cord.
7. Avoid contacting moving parts. Keep hands, hair, and
clothing, as well as spatulas and other utensils, away
from beaters during operation to reduce risk of injury to
persons and/or damage to mixer. Do not place fingers in
hinge area.
8. Remove beaters from mixer before washing.
9. Do not let cord hang over edge of table or counter or
touch hot surfaces, including stove.
10. Do not operate any appliance with a damaged supply
cord or plug, or after the appliance malfunctions or has
been dropped or damaged in any manner. Supply cord
replacement and repairs must be conducted by the
manufacturer, its service agent, or similarly qualified
persons in order to avoid a hazard. Contact Customer
Service for information on examination, repair, or
adjustment as set forth in the Limited Warranty.
11. The use of attachments not recommended or sold by the
appliance manufacturer may cause fire, electric shock, or
injury.
12. Do not use outdoors.
13. Do not place on or near a hot gas or electric burner, or in
a heated oven.
14. Check that the appliance is OFF ( ) before plugging cord
into wall outlet. To disconnect, turn the control to OFF
( ); then remove plug from wall outlet. To unplug, grasp
the plug and pull from the outlet. Never pull from the
power cord.
15. Do not use appliance for other than intended purpose.
16. CAUTION! In order to avoid a hazard due to inadvertent
resetting of the thermal cut-out, this appliance must not be
supplied through an external switching device, such as a
timer, or connected to a circuit that is regularly switched
on and off by the utility.
17. Do not leave Stand Mixer unattended while it is operating.
When using electrical appliances, basic safety precautions should always be followed to reduce the risk of fire, electric shock,
and/or injury to persons, including the following:
SAVE THESE INSTRUCTIONS

3
Other Consumer Safety Information
This appliance is intended for household use only.
w WARNING
Electrical Shock Hazard: This appliance is
provided with a polarized plug (one wide blade) to reduce
the risk of electric shock. The plug fits only one way into a
polarized outlet. Do not defeat the safety purpose of the plug
by modifying the plug in any way or by using an adapter. If
the plug does not fit fully into the outlet, reverse the plug. If it
still does not fit, have an electrician replace the outlet.
The length of the cord used on this appliance was selected to
reduce the hazards of becoming tangled in or tripping over
a longer cord. If a longer cord is necessary, an approved
extension cord may be used. The electrical rating of the
extension cord must be equal to or greater than the rating of
the appliance. Care must be taken to arrange the extension
cord so that it will not drape over the countertop or tabletop
where it can be pulled on by children or accidentally tripped
over.
w CAUTION
Moving Parts Hazard.
To reduce the risk of personal injury, always unplug mixer
before inserting or removing attachments.
WATTAGE/PEAK POWER INFORMATION
The marked rating of the stand mixer is defined by agency
safety standards as the maximum stabilized power
consumption of the stand mixer at high speed under a
loaded condition.
Peak power is an average of the maximum wattage a stand
mixer may consume during initial operation at high speed.

4
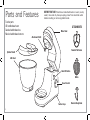
Parts and Features
Mixer Head
Nonstick Dough Hook
BEFORE FIRST USE: Wash bowl and attachments in warm, sudsy
water; rinse and dry. Always unplug mixer from electrical outlet
before inserting or removing attachments.
ATTACHMENTS
Attachment Shaft
4-Qt. Bowl
Splatter Shield
Head Lift Button
Speed Control
Suction Cups
Whisk
Nonstick Flat Beater
To order parts:
US: hamiltonbeach.com
Canada: hamiltonbeach.ca
Mexico: hamiltonbeach.com.mx

5
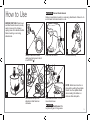
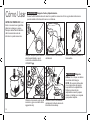
How to Use
1
3
4
2
5
Push attachment up onto
attachment shaft and turn
clockwise.
NOTE: Attachment must be in
place before adding the splatter
shield. Use the splatter shield
when making thin batters or
mixtures that will splash.
Always make sure mixer is
unplugged and speed control
is set to OFF ( ).
Press head lift button. Tilt mixer head up.
BEFORE FIRST USE: Wash bowl
and attachments in warm, sudsy
water; rinse and dry. Always
unplug mixer from electrical outlet
before inserting or removing
attachments.
w WARNING
Cut and Crush Hazard.
Unplug mixer before inserting or removing attachments. Failure to do
so can result in broken bones or cuts.
Press head lift button. Tilt the
mixer head down.
w CAUTION
Pinch Hazard: Do
not place fingers in hinge area.
6

6
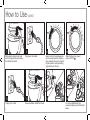
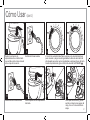
How to Use (cont.)
9
11
8
Plug mixer into outlet.
10
Speed control should always be
set on lowest speed for starting,
then gradually moved to desired
higher speed to avoid splashing
ingredients out of bowl.
When finished, turn speed
control to OFF ( ).
Unplug from outlet.
13 1412
To remove attachment, turn
counterclockwise and pull straight
down.
Remove splatter shield from bowl.
Slide splatter shield over bowl
until it is against the area above
the attachment shaft.
7

7
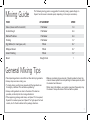
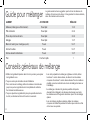
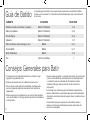
Mixing Guide
The following mixing guide is a suggestion for selecting mixing speeds. Begin on
Speed 1 and increase to desired speed, depending on the recipe consistency.
• Place liquid ingredients in bowl first and then add dry ingredients.
• Always stay near mixer during use.
• To begin mixing, use the lower speeds until the ingredients are
thoroughly combined. This will reduce splattering.
• Always add ingredients as close to the sides of the bowl as
possible, not directly into the moving attachment.
• When preparing package cake mixes, use Speed 1 for low speed,
Speed 4 for medium speed, and Speed 7 for high speed. For best
results, mix for the time stated on the package directions.
• Mixtures containing large amounts of liquid ingredients should be
mixed at lower speeds to avoid splashing. Increase speed only after
the mixture has thickened.
• When mixing thin batters, use medium speeds and frequently stop
the mixer to scrape the sides of the bowl with a spatula.
FOOD
Cakes (mixes and from scratch)
Cookie Dough
Mashed Potatoes
Frosting
Egg Whites (for meringues, etc.)
Whipped Cream
Instant Pudding
Bread
General Mixing Tips
ATTACHMENT
Flat Beater
Flat Beater
Flat Beater
Flat Beater
Whisk
Whisk
Whisk
Dough Hook
SPEED
1–3
2–4
2–4
1–7
5–7
5–7
1–7
1

8
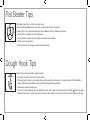
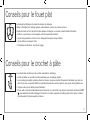
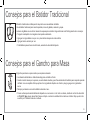
Flat Beater Tips
Dough Hook Tips
Flat beater is used for most of your mixing needs.
Use the flat beater attachment to mix cakes, cookie dough, fudge, or potatoes.
Cookie dough is one of the thickest doughs to mix. Make it easier by following these tips:
• Have butter or margarine at room temperature.
• Add ingredients one at a time, thoroughly mixing after each addition.
• Add flour one cup at a time.
• If the mixer seems to struggle, increase the speed setting.
Dough hook is for recipes that requires kneading.
• The mixer head locks down for thorough mixing.
• When mixing thin batters, use medium speeds and frequently stop the mixer to scrape the sides of the bowl with a
spatula. Place liquid ingredients in the bowl first and then add dry ingredients.
• Always stay near mixer during use.
• If a spoon is accidentally caught in an attachment or the motor stalls, turn the speed control to OFF ( ) and then unplug.
Clear the obstruction or reduce the amount of mixture in the bowl. Let the motor cool for 5 minutes before continuing.

9
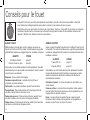
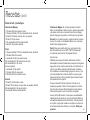
• The whisk is designed to whip liquids, such as egg whites and cream. Do not use the whisk for mixing thick mixtures,
such as dough, fudge, or mashed potatoes.
• Your mixer is designed to whisk a minimum of 2 large egg whites or 1 cup (237 ml) of cream. Mixer performance
is enhanced as the tip of the whisk is immersed into the liquid. If smaller quantities are needed, a hand mixer is
recommended.
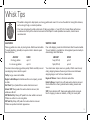
Whisk Tips
EGG WHITES
Place egg whites in a clean, dry mixing bowl. Attach bowl and whisk.
To avoid splashing, gradually turn speed control to desired speed.
See chart below.
AMOUNT SPEED
2 to 4 egg whites up to 7
6 or more egg whites up to 5
Your stand mixer whips egg whites quickly. Watch carefully to avoid
overwhipping. Here is what to expect:
Frothy: Large, uneven air bubbles.
Begins to Hold Shape: Air bubbles are fine and compact; product
is white.
Soft Peak: Tips of peaks fall over when whisk is removed.
Almost Stiff: Sharp peaks form when whisk is removed, but
whites are still soft.
Stiff But Not Dry: Sharp, stiff peaks form when whisk is removed.
Whites are uniform in color and glisten.
Stiff and Dry: Sharp, stiff peaks form when whisk is removed.
Whites are speckled and dull in appearance.
WHIPPED CREAM
Pour cold whipping cream into chilled bowl. Attach bowl and whisk.
To avoid splashing, gradually turn to designated speed and whip to
desired stage. See chart below.
AMOUNT SPEED
1 cup (237 ml) up to 7
1 pint (473 ml) up to 5
Your stand mixer whips cream very quickly. Watch cream closely
during whipping because there are just a few seconds between
whipping stages. Look for these characteristics:
Begins to Thicken: Cream is thick and custard-like.
Holds Its Shape: Cream forms soft peaks when whisk is removed.
Can be folded into other ingredients when making desserts and
sauces.
Stiff: Cream stands in stiff, sharp peaks when whisk is removed.
Use for topping on cakes or desserts, or filling for cream puffs.

10
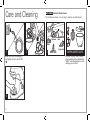
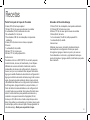
Care and Cleaning
1 2
3
4
w WARNING
Electrical Shock Hazard.
Do not immerse mixer, cord, or plug in water or any other liquid.
Make sure mixer is unplugged
and speed control is set to OFF
( ).
Whisk
Bowl
Nonstick
Flat Beater
Nonstick
Dough Hook
Splatter Shield
DISHWASHER-SAFE
DO NOT use the “SANI” setting
when washing in the dishwasher.
“SANI” cycle temperatures could
damage your product.

11
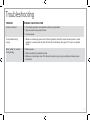
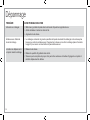
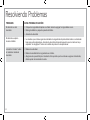
PROBLEM
Food is not mixed.
Food splatters during
mixing.
Mixer “walks” on counter
during mixing.
PROBABLE CAUSE/SOLUTION
• Place liquid ingredients in bowl before adding dry ingredients.
• Stop mixer and scrape sides of bowl.
• Increase speed.
• Mixtures containing large amounts of liquid ingredients should be mixed at lower speeds to avoid
splashing. Increase speed only after the mixture has thickened. See page 6 for how to use splatter
shield.
• Reduce speed.
• Reduce quantity of ingredients in bowl.
• Make sure countertop is clean. This allows the suction cups to grip countertop and reduce mixer
movement.
Troubleshooting

12
Recipes
Chocolate Velvet Layer Cake
2 cups (473 ml) cake flour
1/2 cup (118 ml) unsweetened baking cocoa
2 teaspoons (10 ml) baking soda
1/4 teaspoon (1.2 ml) salt
10 tablespoons (148 ml) butter, room temperature
2 cups (473 ml) light brown sugar, packed
2 eggs
1 teaspoon (5 ml) vanilla
3/4 cup (177 ml) sour cream
3/4 cup (177 ml) cold brewed coffee
Directions:
Preheat oven to 350°F (180°C). In a small bowl, stir together flour,
cocoa, baking soda, and salt. Set aside. Using flat beater attachment,
cream butter and sugar on setting 4. Add eggs, one at a time, beating
well after each addition. Add vanilla. Reduce speed to setting 2.
Add half of flour mixture, then all of sour cream. Add remaining
flour mixture; then slowly pour in coffee. Mix on setting 2 for about
30 seconds. Turn off mixer and scrape sides and bottom of bowl.
Turn mixer on to setting 4 and mix until thoroughly blended. Divide
batter between 2 greased and wax paper-lined 9-inch (23-cm) round
cake pans. Bake 30 to 35 minutes or until tests done. Cool in pan
for 5 minutes; then remove from pans and cool on racks. Frost with
Bittersweet Chocolate Frosting.
Makes one 2-layer cake.
Bittersweet Chocolate Frosting
1/3 cup (79 ml) butter, room temperature
2 1/2 cups (591 ml) confectioners’ sugar
3/4 cup (177 ml) unsweetened baking cocoa
1/4 cup (59 ml) milk
1 to 2 tablespoons (15 to 30 ml) cold brewed coffee
1 teaspoon (5 ml) vanilla
Directions:
Using flat beater attachment, beat butter on setting 4 until smooth.
Add confectioners’ sugar and cocoa alternately with milk and
continue beating until smooth. Add vanilla and beat until smooth and
blended.

13
Recipes (cont.)
Best Ever Sugar Cookies
2 1/2 cups (591 ml) all-purpose flour
1 teaspoon (5 ml) baking powder
1/2 teaspoon (2.5 ml) baking soda
1/4 teaspoon (1.2 ml) salt
1/4 teaspoon (1.2 ml) nutmeg
3/4 cup (177 ml) butter, softened
3/4 cup (177 ml) sugar
1 egg
1 teaspoon (5 ml) vanilla
1/4 cup (59 ml) milk
Directions:
Preheat oven to 375°F (190°C). Mix together flour, baking powder,
baking soda, salt, and nutmeg and set aside. Using flat beater, cream
butter on high speed until light and fluffy. Reduce speed to lowest
setting. Add sugar, egg, and vanilla, mixing thoroughly. Gradually
add dry ingredients and milk; continue mixing until thoroughly
mixed. Form cookie dough into 1 1/2-inch (3.5-cm) diameter balls and
arrange balls on ungreased baking sheets. Flatten balls slightly with
the bottom of a drinking glass. Bake in oven for 6 to 7 minutes
or until lightly golden around edges. Cool on wire racks.
Makes about 4 dozen.
Cowboy Cookies
1 cup (237 ml) butter
1 cup (237 ml) sugar
1 cup (237 ml) light brown sugar
2 eggs
2 cups (473 ml) flour
1 teaspoon (5 ml) baking soda
1/2 teaspoon (2.5 ml) baking powder
1/2 teaspoon (2.5 ml) salt
2 cups (473 ml) oatmeal
1 tablespoon (15 ml) vanilla
12 ounces (340 g) chocolate chips
1 1/2 cups (355 ml) coconut
Directions:
Preheat oven to 350°F (180°C). With flat beater attachment, cream
together butter, sugar, and brown sugar at a medium setting until
well blended. Mix in vanilla and eggs. Reduce speed and gradually
add flour, baking soda, baking powder, and salt mix until smooth. On
a low setting, mix in oatmeal, chocolate chips, and coconut until well
mixed. Drop rounded spoonful onto ungreased cookie sheet. Bake on
middle rack of oven for 12 to 14 minutes.
Makes 3 dozen cookies.

14
Recipes (cont.)
Sour Cream Coffee Cake
Crumb Topping
1 1/2 cups (355 ml) all-purpose flour
1 1/2 sticks (3/4 cup [177 ml]) unsalted butter, softened
1/3 cup (79 ml) packed light brown sugar
1/3 cup (79 ml) sugar
1 1/4 teaspoons (6.2 ml) ground cinnamon
1 cup (237 ml) pecans, chopped
Cake
1 1/2 sticks (3/4 cup [177 ml]) unsalted butter, softened
1 1/4 cups (296 ml) sugar
1 tablespoon (15 ml) baking powder
3/4 teaspoon (3.7 ml) baking soda
3/4 teaspoon (3.7 ml) salt
4 large eggs
1 tablespoon (15 ml) vanilla
1 1/2 cups (355 ml) sour cream
2 1/4 cups (532 ml) all-purpose flour
Streusel
1/3 cups (79 ml) all-purpose flour
1/2 cup (118 ml) packed light brown sugar, divided
3/4 teaspoon (3.7 ml) ground cinnamon
3 tablespoons (44 ml) cold butter
Crumb Topping: In a small bowl, combine flour, butter, brown sugar,
granulated sugar, and cinnamon; mix with fork until large crumbs are
formed. Add pecans and mix to incorporate.
Streusel: In another small bowl, combine flour, brown sugar,
cinnamon, and butter. Mix with fork until large crumbs are formed.
Cake: Lower oven rack to lowest position. Preheat oven 350°F
(180°C). Grease 10-inch (26-cm) bundt pan with butter.
Directions:
Using the flat beater attachment, cream butter on medium speed
until smooth. Add sugar, baking powder, baking soda, and salt. Beat
on medium speed for 3 minutes. With mixer on low speed, add in
eggs, one at a time, until well blended. Mix in vanilla and sour cream.
Gradually add flour. Continue to mix until well blended.
Spread about 2 cups (473 ml) of batter into the bottom of prepared
pan. Sprinkle evenly with half of streusel mixture. Repeat. Spread
remaining batter over and top with crumb topping.
Bake 50 to 60 minutes or until a toothpick inserted into the center
of the cake comes out clean. Cool on wire rack 30 minutes. Invert
cake onto plate and then flip on wire rack with topping side up. Cool
completely.
Makes one cake.

15
Recipes (cont.)
Simple Yeast Rolls
1 cup (237 ml) warm water, 100° to 110°F (38° to 43°C)
.25-ounce (8-g) package active dry yeast
1/4 cup (59 ml) butter, melted and cooled
3 Tablespoons (44 ml) sugar
1 teaspoon (5 ml) salt
1 egg
3 to 3 1/2 cups (710 to 828 ml) flour
Directions:
Pour water into mixing bowl. Add yeast and let dissolve for
5 minutes. Add butter, sugar, salt, and egg. Using dough hook, mix
on speed 2 for about 30 seconds. Add 3 cups (710 ml) of the flour
and mix on speed 4 for about 2 minutes. Add additional flour, if
necessary, to make a soft dough. Cover and let rise in a warm place
for about 1 hour.
Preheat oven to 350°F (180°C). Stir down the dough and dump onto
lightly floured surface. Divide the dough into 4 equal portions; then
divide each portion into 4 golf ball-sized balls. Place the 16 balls in
a greased 9- x 13-inch (23- x 33-cm) baking pan. Let rise in a warm
place for about 30 minutes. Bake 25 to 30 minutes.
Makes 16 rolls.

16
This warranty applies to products purchased and used in the U.S. and Canada. This is the only express warranty for this product and
is in lieu of any other warranty or condition.
This product is warranted to be free from defects in material and workmanship for a period of five (5) years from the date of original
purchase in Canada and one (1) year from the date of original purchase in the U.S. During this period, your exclusive remedy is repair
or replacement of this product or any component found to be defective, at our option; however, you are responsible for all costs
associated with returning the product to us and our returning a product or component under this warranty to you. If the product or
component is no longer available, we will replace with a similar one of equal or greater value.
This warranty does not cover glass, filters, wear from normal use, use not in conformity with the printed directions, or damage to
the product resulting from accident, alteration, abuse, or misuse. This warranty extends only to the original consumer purchaser or
gift recipient. Keep the original sales receipt, as proof of purchase is required to make a warranty claim. This warranty is void if the
product is used for other than single-family household use or subjected to any voltage and waveform other than as specified on the
rating label (e.g., 120V ~ 60 Hz).
We exclude all claims for special, incidental, and consequential damages caused by breach of express or implied warranty. All
liability is limited to the amount of the purchase price. Every implied warranty, including any statutory warranty or condition
of merchantability or fitness for a particular purpose, is disclaimed except to the extent prohibited by law, in which case such
warranty or condition is limited to the duration of this written warranty. This warranty gives you specific legal rights. You may have
other legal rights that vary depending on where you live. Some states or provinces do not allow limitations on implied warranties or
special, incidental, or consequential damages, so the foregoing limitations may not apply to you.
To make a warranty claim, do not return this appliance to the store. Please write Hamilton Beach Brands, Inc., Customer Service
Department, 4421 Waterfront Dr., Glen Allen, VA 23060, or visit hamiltonbeach.com/customer-service in the U.S. or hamiltonbeach.ca/
customer-service in Canada. For faster service, locate the model, type, and series numbers on your appliance.
Limited Warranty

17
PRÉCAUTIONS IMPORTANTES
1. Lire toutes les instructions.
2. Cet appareil n’est pas destiné à être utilisé par des
personnes dont les capacités physiques, sensorielles ou
mentales sont réduites, ou manquant d’expérience et de
connaissance, sauf si elles sont étroitement surveillées et
instruites sur l’utilisation de l’appareil par une personne
responsable de leur sécurité.
3. Cet appareil ne devrait pas être utilisé par des enfants.
Garder l’appareil et son cordon hors de la portée des
enfants.
4. Une surveillance étroite est requise pour tout appareil
utilisé près des enfants. Surveiller que les enfants ne
jouent pas avec l’appareil.
5. Pour éviter les risques d’électrocution, ne pas immerger
le cordon, la fiche, la base ou le moteur dans l’eau ou tout
autre liquide.
6. Fermer l’appareil ( ), puis le débrancher de la prise
lorsqu’il n’est pas utilisé, avant d’assembler ou de
désassembler des pièces ou avant de le nettoyer. Pour le
débrancher, tenir la fiche et la retirer de la prise. Ne jamais
tirer sur le cordon.
7. Éviter le contact avec les pièces mobiles. Garder les
mains, les cheveux et les vêtements, de même que
les spatules et autres ustensiles, loin des fouets durant
l’opération pour réduire le risque de blessure aux
personnes et/ou des dommages au batteur. Ne pas mettre
vos doigts du côté des charnières.
8. Enlever les fouets du batteur avant le lavage.
9. Ne pas laisser le cordon pendre du bord d’une table
ou d’un comptoir, ou toucher des surfaces chaudes, y
compris la cuisinière.
10. Ne pas faire fonctionner un appareil électroménager
avec un cordon ou une fiche endommagée, ou lorsque
l’appareil ne fonctionne pas bien ou a été échappé ou
endommagé d’une manière quelconque. Le remplacement
et la réparation du cordon d’alimentation doivent être
faits par le fabricant, son agent de service ou toute
personne qualifiée de façon à éviter tout danger. Veuillez
communiquer avec le service à la clientèle pour obtenir de
l’information concernant l’inspection, la réparation ou le
réglage, comme précisé dans la garantie limitée.
11. L’utilisation d’accessoires non recommandés ou vendus
par le fabricant de l’appareil peut provoquer un incendie,
un choc électrique ou blesser quelqu’un.
12. Ne pas utiliser à l’extérieur.
13. Ne pas placer l’appareil sur ou près d’un brûleur à gaz ou
d’un élément électrique chaud, ou dans un four chauffé.
14. S’assurer que l’appareil est OFF ( /arrêt) avant de
brancher la fiche dans la prise de courant. Pour
débrancher, tourner la commande à et mettre à OFF
( /arrêt) puis débrancher la fiche de la prise de courant.
Pour débrancher, saisir la fiche et la retirer de la prise. Ne
Pour utiliser un appareil électroménager, vous devez toujours prendre des mesures élémentaires de sécurité pour réduire le
risqued’incendie, d’électrocution et/ou de blessure corporelle, en particulier les mesures suivantes :
CONSERVER CES INSTRUCTIONS

18
Autres consignes de sécurité pour le consommateur
Cet appareil est destiné à un usage domestique uniquement.
w AVERTISSEMENT
Risque de choc électrique : Cet appareil
est fourni avec une fiche polarisée (une broche large) pour
réduire le risque d’électrocution. Cette fiche n’entre que dans
un seul sens dans une prise polarisée. Ne contrecarrez pas
l’objectif sécuritaire de cette fiche en la modifiant de quelque
manière que ce soit ou en utilisant un adaptateur. Si vous
ne pouvez pas insérer complètement la fiche dans la prise,
inversez la fiche. Si elle refuse toujours de s’insérer, faire
remplacer la prise par un électricien.
La longueur du cordon installé sur cet appareil a été
sélectionnée afin de réduire les risques d’enchevêtrement
ou de faux pas causés par un fil trop long. L’utilisation
d’une rallonge approuvée est permise si le cordon est trop
court. Les caractéristiques électriques de la rallonge doivent
être équivalentes ou supérieures aux caractéristiques de
l’appareil. Prendre toutes les précautions nécessaires pour
installer la rallonge de manière à ne pas la faire courir sur le
comptoir ou sur une table pour éviter qu’un enfant ne tire sur
le cordon ou trébuche accidentellement.
w
ATTENTION
Risque de pièces en mouvement.
Pour réduire le risque de blessure corporelle, débrancher
toujours votre batteur avant d’y introduire ou d’en enlever
des accessoires.
RENSEIGNEMENTS SUR LA PUISSANCE/PUISSANCE
DE CRÊTE
Les caractéristiques nominales gravées sur le pied du
mélangeur sont définies par une agence de normes de
sécurité comme étant la puissance de consommation
stabilisée du mélangeur sur socle à vitesse élevée lorsqu’à
pleine puissance.
La puissance de crête est la puissance maximum moyenne
consommée par le batteur pendant son fonctionnement
initialà grande vitesse.
pas tirer sur le cordon d’alimentation.
15. Ne pas utiliser l’appareil pour un usage autre que celui
auquel il est destiné.
16. ATTENTION ! Afin d’éviter un danger découlant d’une
réinitialisation accidentelle du rupteur thermique, se
dispositif ne doit pas être alimenté par l’entremise d’un
appareil de connexion externe, comme une minuterie, ou
connecté à un circuit qui est régulièrement mis sous et
hors tension par le service public.
17. Ne pas laisser le mélangeur sans surveillance lorsqu’il
fonctionne.

19
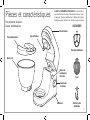
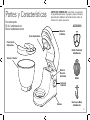
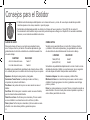
Pièces et caractéristiques
AVANT LA PREMIÈRE UTILISATION : Laver le bol et
accessoires dans de l’eau chaude savonneuse; rincer
et essuyer. Toujours débrancher le batteur de la prise
électrique avant d’insérer ou de retirer les accessoires.
Tête du batteur
Crochet à pâte
antiadhésive
ACCESSOIRES
Tige de fixation
Bol de 4 qt.
Pare-éclaboussures
Bouton de
soulèvement
de la tête
Commande
de vitesse
Ventouses
Fouet
Fouet plat antiadhésive
Pour commander des pièces :
Canada : hamiltonbeach.ca

20
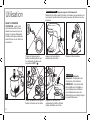
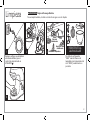
Utilisation
Insérer l’accessoire sur la tige de
fixation et tourner vers la droite.
Toujours s’assurer que le
batteur est débranché et que
la commande de vitesse est
en position ARRÊT ( ).
Appuyer sur le bouton de
soulèvement de la tête.
Relever la tête du batteur.
AVANT LA PREMIÈRE
UTILISATION : Laver le bol
et accessoires dans de l’eau
chaude savonneuse; rincer et
essuyer. Toujours débrancher
le batteur de la prise électrique
avant d’insérer ou de retirer les
accessoires.
w AVERTISSEMENT
Risque de coupure et d’écrasement.
Débrancher le batteur avant d’insérer ou d’enlever des accessoires. Le
non-respect de cette instruction peut provoquer des fractures ou des
coupures.
1
32
4 5
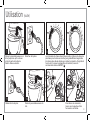
w CAUTION
Risque de
pincement : Ne pas placer les
doigts près de la charnière.
REMARQUE : L’accessoire doit
être installé avant d’installer le
pare-éclaboussures. Utiliser le
pare-éclaboussures avec les
pâtes légères ou mélanges légers
pouvant éclabousser.
Appuyer sur le bouton de
soulèvement de la tête. Incliner
la tête du batteur vers le bas.
6
La page charge ...
La page charge ...
La page charge ...
La page charge ...
La page charge ...
La page charge ...
La page charge ...
La page charge ...
La page charge ...
La page charge ...
La page charge ...
La page charge ...
La page charge ...
La page charge ...
La page charge ...
La page charge ...
La page charge ...
La page charge ...
La page charge ...
La page charge ...
La page charge ...
La page charge ...
La page charge ...
La page charge ...
La page charge ...
La page charge ...
La page charge ...
La page charge ...
-
 1
1
-
 2
2
-
 3
3
-
 4
4
-
 5
5
-
 6
6
-
 7
7
-
 8
8
-
 9
9
-
 10
10
-
 11
11
-
 12
12
-
 13
13
-
 14
14
-
 15
15
-
 16
16
-
 17
17
-
 18
18
-
 19
19
-
 20
20
-
 21
21
-
 22
22
-
 23
23
-
 24
24
-
 25
25
-
 26
26
-
 27
27
-
 28
28
-
 29
29
-
 30
30
-
 31
31
-
 32
32
-
 33
33
-
 34
34
-
 35
35
-
 36
36
-
 37
37
-
 38
38
-
 39
39
-
 40
40
-
 41
41
-
 42
42
-
 43
43
-
 44
44
-
 45
45
-
 46
46
-
 47
47
-
 48
48


Hamilton Beach 63390 Mode d'emploi
- Catégorie
- Mélangeurs
- Taper
- Mode d'emploi
dans d''autres langues
- English: Hamilton Beach 63390 User guide
- español: Hamilton Beach 63390 Guía del usuario
Documents connexes
-
Hamilton Beach 63392 Mode d'emploi
-
Hamilton Beach 63390 Mode d'emploi
-
-
Hamilton Beach 63221 Mode d'emploi
-
-
-
Hamilton Beach 63329 Mode d'emploi
-
Hamilton Beach 63327 Manuel utilisateur
-