Toro Flex-Force Power System 60V MAX String Trimmer Manuel utilisateur
- Catégorie
- Coupe-herbe
- Taper
- Manuel utilisateur

FormNo.3434-285RevB
Flex-ForcePowerSystem™60VMAXStringTrimmer
51835T
Flex-ForcePowerSystem™60VMAX
Faden-Freischneider
51835T
Flex-ForcePowerSystem™–Desbrozadoradehilo
60VMAX
51835T
DébroussailleuseàlFlex-ForcePowerSystem™60
VMAX
51835T
DecespugliatoreFlex-ForcePowerSystem™60V
MAX
51835T
Flex-ForcePowerSystem™60VMAXDraadtrimmer
51835T
Flex-ForcePowerSystem™-trådtrimmer,maks.60V
51835T
KosażyłkowaFlex-ForcePowerSystem™60VMAX
51835T
Flex-ForcePowerSystem™60VMAXtrådtrimmer
51835T
www.T oro.com.
*3434-285*B


FormNo.3432-903RevB
Flex-ForcePowerSystem
™
60V
MAXStringTrimmer
ModelNo.51835T—SerialNo.319000001andUp
Registeratwww.Toro.com.
OriginalInstructions(EN)
*3432-903*B

Forassistance,pleasesee
www.Toro.com/support
forinstructionalvideos
orcontact1-888-384-9939
beforereturningthis
product.
Introduction
Thistrimmerisintendedtobeusedbyresidential
homeownerstotrimgrassasneededoutdoors.It
isdesignedprimarilytouselithium-ionbatterypack
Model81825,81860or81875.Usingthisproduct
forpurposesotherthanitsintendedusecouldprove
dangeroustoyouandbystanders.
Readthisinformationcarefullytolearnhowtooperate
andmaintainyourproductproperlyandtoavoid
injuryandproductdamage.Youareresponsiblefor
operatingtheproductproperlyandsafely.
Visitwww.Toro.comforproductsafetyandoperation
trainingmaterials,accessoryinformation,helpnding
adealer,ortoregisteryourproduct.
Model51835Tdoesnotincludeabatteryora
charger.
Safety
WARNING—Whenusingelectricgardening
appliances,alwaysreadandfollowbasicsafety
warningsandinstructionstoreducetheriskofre,
electricshock,andpersonalinjury,includingthe
following:
IMPORTANTSAFETY
INSTRUCTIONS
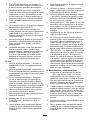
I.Training
1.Theoperatoroftheapplianceisresponsiblefor
anyaccidentsorhazardsoccurringtoothersor
theirproperty.
2.Donotallowchildrentouseorplaywiththe
appliance,batterypack,orthebatterycharger;
localregulationsmayrestricttheageofthe
operator.
3.Donotallowpeoplewithreducedphysical,
sensory,ormentalcapabilitiesorwithout
experienceandknowledgetousetheappliance,
batterypack,orbatterychargerunlessthey
receiveinstructionorsupervisiononusingit
safelyandunderstandthehazardsinvolved
whileusingit.
4.Beforeusingtheappliance,batterypack,and
batterycharger,readalltheinstructionsand
cautionarymarkingsontheseproducts.
5.Becomefamiliarwiththecontrolsandproper
useoftheappliance,batterypack,andbattery
charger.
II.Preparation
1.Keepbystandersandchildrenawayfromthe
operatingarea.
2.UseonlythebatterypackspeciedbyToro.
Usingotheraccessoriesandattachmentsmay
increasetheriskofinjuryandre.
3.Pluggingthebatterychargerintoanoutletthat
isnot100to240Vcancauseareorelectric
shock.Donotplugthebatterychargerintoan
outletotherthan100to240V.Foradifferent
styleofconnection,useanattachmentplug
adapterofthepropercongurationforthepower
outletifneeded.
4.Donotuseadamagedormodiedbattery
packorbatterycharger,whichmayexhibit
unpredictablebehaviorthatresultsinre,
explosion,orriskofinjury.
5.Ifthesupplycordtothebatterychargeris
damaged,contactanAuthorizedServiceDealer
toreplaceit.
6.Donotusenon-rechargeablebatteries.
©2019—TheToro®Company
8111LyndaleAvenueSouth
Bloomington,MN55420
2
Contactusatwww.Toro.com.
PrintedinChina
AllRightsReserved

7.Chargethebatterypackwithonlythebattery
chargerspeciedbyT oro.Achargersuitablefor
onetypeofbatterypackmaycreateariskofre
whenusedwithanotherbatterypack.
8.Chargethebatterypackinawell-ventilatedarea
only.
9.Donotexposeabatterypackorbatterycharger
toreortotemperatureshigherthan68°C
(154°F).
10.Followallcharginginstructionsanddo
notchargethebatterypackoutsideofthe
temperaturerangespeciedintheinstructions.
Otherwise,youmaydamagethebatterypack
andincreasetheriskofre.
11.Donotoperatetheappliancewithoutallguards
andothersafetyprotectivedevicesinplaceand
functioningproperlyontheappliance.
12.Dressproperly—Wearappropriateclothing,
includingeyeprotection;longpants;substantial,
slip-resistantfootwear;andhearingprotection.
Tiebacklonghairanddonotwearloosejewelry
thatcangetcaughtinmovingparts.Weara
dustmaskindustyoperatingconditions.
III.Operation
1.Avoiddangerousenvironments—Donotusethe
applianceinrainorindamporwetlocations.
2.Usetheproperapplianceforyour
application—Usingtheappliancefor
purposesotheranitsintendedusecouldprove
dangeroustoyouandbystanders.
3.Preventunintentionalstarting—Ensurethatthe
switchisintheOFFpositionbeforeconnecting
tothebatterypackandhandlingtheappliance.
Donotcarrytheappliancewithyourngeron
theswitchorenergizetheappliancewiththe
switchintheONposition.
4.Operatetheapplianceonlyindaylightorgood
articiallight.
5.Removethebatterypackfromtheappliance
beforeadjustingitorchangingaccessories.
6.Keepyourhandsandfeetawayfromthecutting
areaandallmovingparts.
7.Stoptheappliance,removethebatterypack
fromtheappliance,andwaitforallmovement
tostopbeforeadjusting,servicing,cleaning,or
storingtheappliance.
8.Removethebatterypackfromtheappliance
wheneveryouleaveitunattended.
9.Donotforcetheappliance—Allowtheappliance
todothejobbetterandsaferattheratefor
whichitwasdesigned.
10.Donotoverreach—Keepproperfootingand
balanceatalltimes,especiallyonslopes.Walk,
neverrunwiththeappliance.
11.Stayalert—Watchwhatyouaredoinganduse
commonsensewhenoperatingtheappliance.
Donotusetheappliancewhileill,tired,orunder
theinuenceofalcoholordrugs.
12.Ensurethattheventilationopeningsarekept
clearofdebris.
13.Underabusiveconditions,thebatterypackmay
ejectliquid;avoidcontact.Ifyouaccidently
comeintocontactwiththeliquid,ushwith
water.Iftheliquidcontactsyoureyes,seek
medicalhelp.Liquidejectedfromthebattery
packmaycauseirritationorburns.
14.CAUTION—Amistreatedbatterypackmay
presentariskofreorchemicalburn.Donot
disassemblethebatterypack.Donotheatthe
batterypackabove68°C(154°F)orincinerate
it.ReplacethebatterypackwithagenuineT oro
batterypackonly;usinganothertypeofbattery
packmaycauseareorexplosion.Keep
batterypacksoutofthereachofchildrenand
intheoriginalpackaginguntilyouarereadyto
usethem.
IV.MaintenanceandStorage
1.Maintaintheappliancewithcare—Keepitclean
andingoodrepairforbestperformanceandto
reducetheriskofinjury.Followtheinstructions
forlubricatingandchangingaccessories.Keep
handlesdry,clean,andfreefromoilandgrease.
2.Whenthebatterypackisnotinuse,keepit
awayfrommetalobjectssuchaspaperclips,
coins,keys,nails,andscrewsthatcanmakea
connectionfrom1terminaltoanother.Shorting
thebatteryterminalsmaycauseburnsorare.
3.Keepyourhandsandfeetawayfrommoving
parts.
4.Stoptheappliance,removethebatterypack
fromtheappliance,andwaitforallmovement
tostopbeforeadjusting,servicing,cleaning,or
storingtheappliance.
5.Checktheappliancefordamagedparts—Ifthere
aredamagedguardsorotherparts,determine
whetheritwilloperateproperly.Checkfor
misalignedandbindingmovingparts,broken
parts,mounting,andanyotherconditionthat
mayaffectitsoperation.Unlessindicatedinthe
instructions,haveanAuthorizedServiceDealer
repairorreplaceadamagedguardorpart.
6.Donotreplacetheexistingnon-metalliccutting
meansontheappliancewithametalliccutting
means.
3

7.Donotattempttoserviceorrepairtheappliance,
batterypack,orbatterychargerexceptas
indicatedintheinstructions.HaveanAuthorized
ServiceDealerperformserviceusingidentical
replacementpartstoensurethattheproductis
safelymaintained.
8.Storeanidleapplianceindoorsinaplacethatis
dry,secure,andoutofthereachofchildren.
9.Donotdisposeofthebatteryinare.The
cellmayexplode.Checkwithlocalcodesfor
possiblespecialdisposalinstructions.
SAVETHESE
INSTRUCTIONS
4

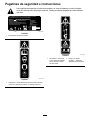
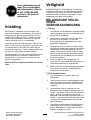
SafetyandInstructionalDecals
Safetydecalsandinstructionsareeasilyvisibletotheoperatorandarelocatednearanyarea
ofpotentialdanger.Replaceanydecalthatisdamagedormissing.
Serial Number:
Numéro de série :
Model:
Modèle :
Date Code:
Code de date :
51835T
PATENT: www.ttcopats.com
*Battery manufacturer rating = 60V maximum & 54V nominal.
Actual voltage varies with load.
*Tension indiquée par le fabricant de la batterie = 60 V max.,
54 V nominale. La tension réelle varie en fonction de la charge.
0.095” (2.4mm) diameter twisted nylon line / l en nylon torsadée de 2,4 mm (0.095”) de diamètre
0.08” (2.0mm) diameter nylon line / l en nylon de 2,0 mm (0.08”) de diamètre
60V MAX* DC STRING TRIMMER / DÉBROUSSAILLEUSE À FIL
Country of Origin: PRC / Pays d'origine : PRC
THE TORO COMPANY
TORO EUROPE NV
B-2260 OEVEL-WESTERLOO
BELGIUM
decal139-5220
139-5220
1.Donotdiscardimproperly.
decal139-8262
139-8262
1.Warning—readtheOperator’sManual;weareyeprotection;
wearhearingprotection;donotexposetorain.
decal139-8263
139-8263
1.Warning—keep
bystandersawayfromthe
machineinalldirections.
2.Thrownobject
hazard—keepbystanders
away.
5

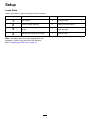
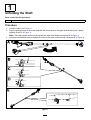
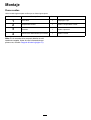
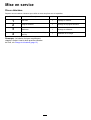
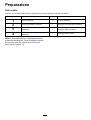
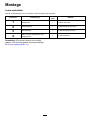
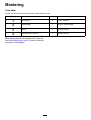
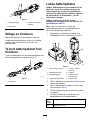
Setup
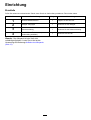
LooseParts
Usethechartbelowtoverifythatallpartshavebeenshipped.
ProcedureDescription
Qty.
Use
1
Allenwrench1
Unfoldtheshaft.
2
Auxiliaryhandleassembly1Installtheauxiliaryhandle.
3
Guard
1Installtheguard.
4
Stringtrimmerstrap(Notincluded)
1Installthestrap.
Note:Thebatterypackisnotfullychargedwhenyou
purchaseit.Beforeusingthetoolforthersttime,
refertoChargingtheBatteryPack(page11).
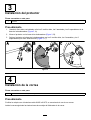
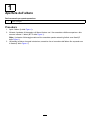
6

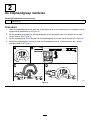
1
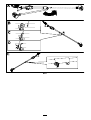
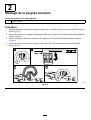
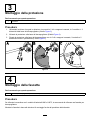
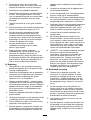
UnfoldingtheShaft
Partsneededforthisprocedure:
1Allenwrench
Procedure
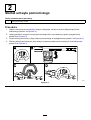
1.Unfoldtheshaft(AofFigure1).
2.Alignthelockingbuttononthelowershaftwiththeslottedholeontheuppershaftandslidethe2shafts
together(BandCofFigure1).
Note:Thelockingbuttonclicksintotheslottedholewhenbothshaftsaresecured(DofFigure1).
3.UsingtheprovidedAllenwrench,tightenthescrewontheshaftconnectoruntilitissecure(EofFigure1).
g280969
Figure1
7

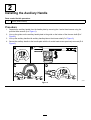
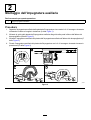
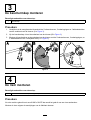
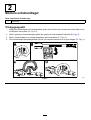
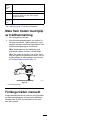
2
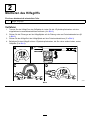
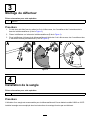
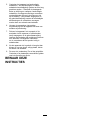
InstallingtheAuxiliaryHandle
Partsneededforthisprocedure:
1Auxiliaryhandleassembly
Procedure
1.Separatetheauxiliaryhandlefromthehandleplatebyremovingthe4socketheadscrewsusingthe
providedAllenwrench(AofFigure2).
2.Lineuptheguidesontheauxiliaryhandleplatetotheguideonthebottomofthetrimmershaft(Bof
Figure2).
3.Lineuptheauxiliaryhandlewithauxiliaryhandleplateonthetrimmershaft(CofFigure2).
4.Securetheauxiliaryhandletothehandleplatewiththe4socketheadscrewspreviouslyremoved(Dof
Figure2).
g292825
Figure2
8

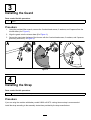
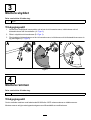
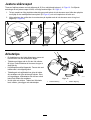
3
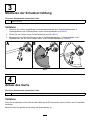
InstallingtheGuard
Partsneededforthisprocedure:
1
Guard
Procedure
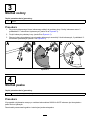
1.UsingtheprovidedAllenwrench,removethe2socketheadscrews,2washers,and2spacersfromthe
trimmerbase(AofFigure3).
2.Aligntheguardontothetrimmerbase(BofFigure3).
3.Securetheguardontothebaseofthetrimmerwiththe2socketheadscrews,2washers,and2spacers
previouslyremoved(CofFigure2).
g293134
Figure3
4
InstallingtheStrap
Partsneededforthisprocedure:
1
Stringtrimmerstrap(Notincluded)
Procedure
Ifyouareusingthemachinewithbatterymodel81860or81875,astringtrimmerstrapisrecommended.
Installthestrapaccordingtotheassemblyinstructionsprovidedbythestrapmanufacturer.
9

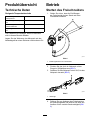
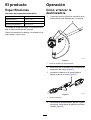
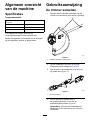
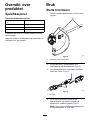
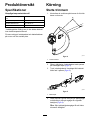
ProductOverview
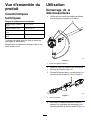
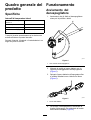
Specications
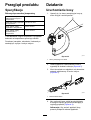
AppropriateTemperatureRanges
Charge/storethebatterypack
at
5°C(41°F)to40°C(104°F)*
Usethebatterypackat
-30°C(-22°F)to49°C(120°F)
Usethetrimmerat
0°C(32°F)to49°C(120°F)
Storethetrimmerat0°C(32°F)to49°C(120°F)*
*Chargingtimewillincreaseifyoudonotchargethe
batterywithinthisrange.
Storethetool,batterypack,andbatterychargerinan
enclosedclean,dryarea.
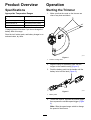
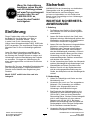
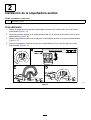
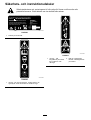
Operation
StartingtheTrimmer
1.Makesurethattheventsonthetrimmerare
clearofanydustanddebris.
g293133
Figure4
1.Trimmerventingareas
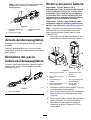
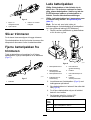
2.Alignthecavityinthebatterypackwiththe
tongueonthehandlehousing(Figure5).
3.Pushthebatterypackintothehandleuntilthe
batterylocksintothelatch(Figure5).
g268418
Figure5
1.Batterylatch
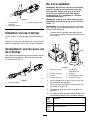
4.Tostartthetrimmer,squeezethelockouttrigger,
thensqueezethevariable-speedtrigger(Figure
6).
Note:Slidethespeedrangeswitchtochange
thespeedofthetrimmer.
10

g268420
Figure6
1.Speedrangeswitch
3.Variable-speedtrigger
2.Lockouttrigger
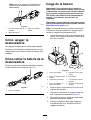
ShuttingOfftheTrimmer
Toshutoffthetrimmer,releasebothtriggers.
Wheneveryouarenotusingthetrimmerorare
transportingthetrimmertoorfromtheworkarea,
removethebatterypack.
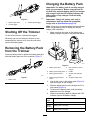
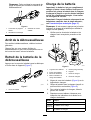
RemovingtheBatteryPack
fromtheTrimmer
Pressthebatterylatchtoreleasethebatterypackand
slidethebatterypackoutofthemachine(Figure7).
g268419
Figure7
1.Batterylatch
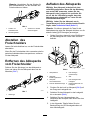
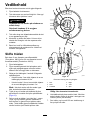
ChargingtheBatteryPack
Important:Thebatterypackisnotfullycharged
whenyoupurchaseit.Beforeusingthetoolfor
thersttime,placethebatterypackinthecharger
andchargeituntiltheLEDdisplayindicatesthe
batterypackisfullycharged.Readallsafety
precautions.
Important:Chargethebatterypackonlyin
temperaturesthatarewithintheappropriate
range;refertoSpecications(page10).
Note:Atanytime,pressthebattery-charge-indicator
buttononthebatterypacktodisplaythecurrent
charge(LEDindicators).
1.Makesurethattheventsonthebatteryand
batterychargerareclearofanydustanddebris.
g290533
Figure8
1.Batterypackcavity
5.LEDindicators(current
charge)
2.Batterypackventingareas6.Handle
3.Batterypackterminals
7.ChargerLEDindicator
light
4.Battery-charge-indicator
button
8.Chargerventingareas
2.Lineupthecavityinthebatterypack(Figure8)
withthetongueonthecharger.
3.Slidethebatterypackintothechargeruntilitis
fullyseated(Figure8).
4.Toremovethebatterypack,slidethebattery
backwardoutofthecharger.
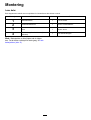
5.RefertothefollowingtabletointerprettheLED
indicatorlightonthebatterycharger.
Indicator
light
Indicates
Off
Nobatterypackinserted
Green
blinking
Batterypackischarging
Green
Batterypackischarged
11

Red
Batterypackand/orbatterychargerisoverorunder
theappropriatetemperaturerange
Red
blinking
Batterypackchargingfault*
*RefertoTroubleshooting(page16)formore
information.
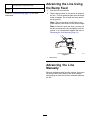
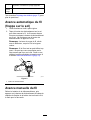
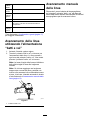
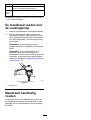
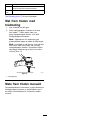
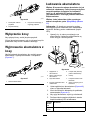
AdvancingtheLineUsing
theBumpFeed
1.Runthetoolatfullthrottle.
2.Tapthebumpbuttononthegroundtoadvance
theline.Thelineadvanceseachtimethebump
buttonistapped.Donotholdthebumpbutton
ontheground.
Note:Thelinetrimmingcut-offbladeonthe
grassdeectorcutsthelinetothecorrectlength.
Note:Ifthelineisworntooshort,youmaynot
beabletoadvancethelinebytappingitonthe
ground.Ifso,releasebothtriggersandreferto
AdvancingtheLineManually(page12).
g293135
Figure9
1.Bumpbutton
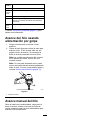
AdvancingtheLine
Manually
Removethebatterypackfromthetrimmer,thenpush
thebumpbuttonatthebaseofthespoolretainer
whilepullingonthetrimmerlinetomanuallyadvance
theline.
12

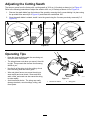
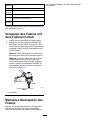
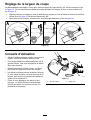
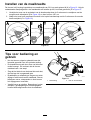
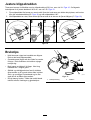
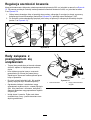
AdjustingtheCuttingSwath
Thetrimmercomesfromthefactorywithacuttingswathof36.6cm(14inches)asshowninAofFigure10.
Refertothefollowinginstructionstoadjusttheswathto40.6cm(16inches)asshowninDofFigure10.
1.Removetheswathbladefromthebottomoftheguardbyremovingthe2screwsholdingitinplaceusing
theprovidedAllenwrench(BofFigure10)androtatetheswathblade180°.
2.Oncetheswathbladeisrotated,installitontotheguardusingthe2screwspreviouslyremoved(Cof
Figure10).
g293137
Figure10
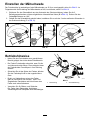
OperatingTips
•Keepthetrimmertiltedtowardtheareabeingcut;
thisisthebestcuttingarea.
•Thestringtrimmercutswhenyoumoveitfromleft
toright.Thispreventsthetrimmerfromthrowing
debrisatyou.
•Usethetipofthestringtodothecutting;donot
forcethestringheadintouncutgrass.
•Wireandpicketfencescancausethestringto
wearrapidlyandevenbreak.Stoneandbrick
walls,curbs,andwoodcanalsocausethestring
towearrapidly.
•Avoidtreesandshrubs.Thestringcaneasily
damagetreebark,woodmoldings,siding,and
fenceposts.
g293138
Figure11
1.Directionofrotation2.Stringpath
13

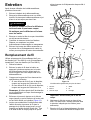
Maintenance
Aftereachuseofthetrimmer,completethefollowing:
1.Removethebatteryfromthetrimmer.
2.Wipethetrimmercleanwithadampcloth.Do
nothosethetrimmerdownorsubmergeitin
water.
CAUTION
Thelinecutoffbladeonthedeectoris
sharpandcancutyou.
Donotuseyourhandstocleanthe
deectorshieldandblade.
3.Wipeorscrapecleanthecuttingheadareaany
timethereisanaccumulationofdebris.
4.Checkandtightenallfasteners.Ifanypartis
damagedorlost,repairorreplaceit.
5.Brushdebrisawayfromairintakeventsand
exhaustonmotorhousingtopreventthemotor
fromoverheating.
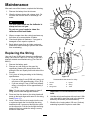
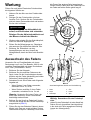
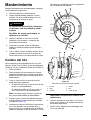
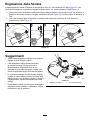
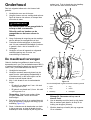
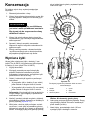
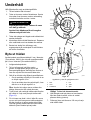
ReplacingtheString
Useonly2mm(0.080inch)diametermonolament
string(T oroPartNo.88611)or2.4mm(0.095inch)
diametertwistedmonolamentstring(T oroPartNo.
88612).
1.Removethebatterypack.
2.Removeanyoldstringonthespoolby
repetitivelypressingthebumpbuttonwhile
pullingthelineoutequallyfrombothsidesofthe
trimmer.
3.Cut1pieceofstringaccordingtothefollowing
specications.
•Ifyouareusing2mm(0.080inch)string,cut
onepieceoflineapproximately4.9m(16ft).
•Ifyouareusing2.4mm(0.095inch)twisted
string,cutonepieceoflineapproximately3
m(10ft).
Note:Donotuseanyothergaugeortypeof
string,asthiscoulddamagethetrimmer.
4.Pressandturntheknobonthestringheaduntil
arrowontheknobalignswitharrowonthestring
head(Figure12).
5.Insert1endofthelineatanangleintotheLINE
INeyeletandpushthelinethroughthestring
headtrackuntilitcomesoutthroughtheeyelet
ontheotherside.Pullthelinethoughthestring
headuntilthelineoutsidethestringisevenly
dividedoneachside.
g278518
g285202
Figure12
Disassembledviewshownforclarity
1.Arrows4.Eyelet
2.Knob
5.String
3.Stringhead
6.Track
Important:Donotdisassemblethetrimmer
head.
6.Holdthestringheadinplacewithonehand.With
yourotherhand,rotatetheknobinthedirection
shownbythearrows(counterclockwise).
7.Windtheline,leavingabout102mm(4inches)
extendingbeyondtheeyeletoneachside.
14

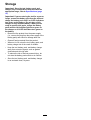
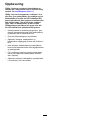
Storage
Important:Storethetool,batterypack,and
chargeronlyintemperaturesthatarewithinthe
appropriaterange;refertoSpecications(page
10).
Important:Ifyouarestoringthetoolforayearor
longer,removethebatterypackfromthetooland
chargethebatterypackuntil2or3LEDindicators
turngreenonthebattery.Donotstoreafully
chargedorfullydepletedbattery.Whenyouare
readytousethetoolagain,chargethebattery
packuntiltheleftindicatorlightturnsgreenon
thechargerorall4LEDindicatorsturngreenon
thebattery.
•Disconnecttheproductfromthepowersupply
(i.e.,removetheplugfromthepowersupplyorthe
batterypack)andcheckfordamageafteruse.
•Cleanallforeignmaterialfromtheproduct.
•Whennotinuse,storethetool,batterypack,and
batterychargeroutofthereachofchildren.
•Keepthetool,batterypack,andbatterycharger
awayfromcorrosiveagents,suchasgarden
chemicalsandde-icingsalts.
•T oreducetheriskofseriouspersonalinjury,do
notstorethebatterypackoutsideorinvehicles.
•Storethetool,batterypack,andbatterycharger
inanenclosedclean,dryarea.
15

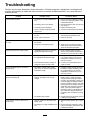
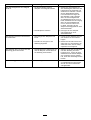
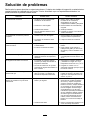
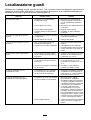
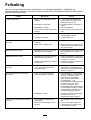
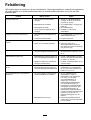
Troubleshooting
Performonlythestepsdescribedintheseinstructions.Allfurtherinspection,maintenance,andrepairwork
mustbeperformedbyanauthorizedservicecenterorasimilarlyqualiedspecialistifyoucannotsolvethe
problemyourself.
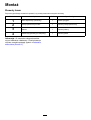
Problem
PossibleCauseCorrectiveAction
1.Thebatteryisnotfullyinstalledinthe
tool.
1.Removeandthenreplacethebattery
intothetool,makingsurethatitisfully
installedandlatched.
2.Thebatterypackisnotcharged.
2.Removethebatterypackfromthetool
andchargeit.
3.Thebatterypackisdamaged.3.Replacethebatterypack.
Thetooldoesnotstart.
4.Thereisanotherelectricalproblem
withthetool.
4.ContactanAuthorizedServiceDealer.
1.Thebatterypackchargecapacityis
toolow.
1.Removethebatterypackfromthetool
andfullychargethebatterypack.
Thetooldoesnotreachfullpower.
2.Theairventsareblocked.
2.Cleantheairvents.
1.Thereisdebrisonthedrumareaon
thetrimmer.
1.Cleananydebrisoffofthedrumarea.
Thetoolisproducingexcessivevibration
ornoise.
2.Thespoolisnotproperlywound.2.Advancethelineusingthetrigger
switchand/orremovethelineonthe
spoolandwindthespoolagain.
Thebatterypackloseschargequickly.1.Thebatterypackisoverorunderthe
appropriatetemperaturerange.
1.Movethebatterypacktoaplace
whereitisdryandthetemperatureis
between5°C(41°F)and40°C(104°F).
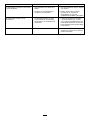
1.Thebatterychargerisoverorunder
theappropriatetemperaturerange.
1.Unplugthebatterychargerandmove
ittoaplacewhereitisdryandthe
temperatureisbetween5°C(41°F)
and40°C(104°F).
Thebatterychargerisnotworking.
2.Theoutletthatthebatterychargeris
pluggedintodoesnothavepower.
2.Contactyourlicensedelectricianto
repairtheoutlet.
TheLEDindicatorlightonthebattery
chargerisred.
1.Thebatterychargerand/orbattery
packisoverorundertheappropriate
temperaturerange.
1.Unplugthebatterychargerandmove
thebatterychargerandbatterypack
toaplacewhereitisdryandthe
temperatureisbetween5°C(41°F)
and40°C(104°F).
1.Thereisanerrorinthecommunication
betweenthebatterypackandthe
charger.
1.Removethebatterypackfromthe
batterycharger,unplugthebattery
chargerfromtheoutlet,andwait10
seconds.Plugthebatterychargerinto
theoutletagainandplacethebattery
packonthebatterycharger.IftheLED
indicatorlightonthebatterychargeris
stillblinkingred,repeatthisprocedure
again.IftheLEDindicatorlighton
thebatterychargerisstillblinkingred
after2attempts,properlydisposeof
thebatterypackatabatteryrecycling
facility.
TheLEDindicatorlightonthebattery
chargerisblinkingred.
2.Thebatterypackisweak.
2.Properlydisposeofthebatterypackat
abatteryrecyclingfacility.
1.Thereismoistureontheleadsofthe
batterypack.
1.Allowthebatterypacktodryorwipeit
dry.
Thetooldoesnotrunordoesnotrun
continuously.
2.Thebatteryisnotfullyinstalledintothe
tool.
2.Removeandthenreplacethebattery
intothetoolmakingsurethatitisfully
installedandlatched.
16

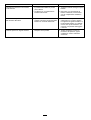
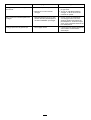
Problem
PossibleCauseCorrectiveAction
Itisdifculttoremovethebatterypack
fromthetool.
1.Thebatterypack/toolisneworthere
iscorrosioninthebatteryterminals
and/ortheterminalsonthetool.
1.Cleantheterminalsonthebattery
packandthetoolwithadryrag.Then
applydielectricgreasetothebattery
terminals;donotuseanyothertype
oflubricantasitcandamagethe
terminals.
Thetoolisproducingabeepingsound.1.Multiplepossiblecauses.1.Attempttheothertroubleshooting
actions,orcontactanAuthorized
ServiceDealer.
17

EEA/UKPrivacyNotice
Toro’sUseofYourPersonalInformation
TheToroCompany(“T oro”)respectsyourprivacy.Whenyoupurchaseourproducts,wemaycollectcertainpersonalinformationaboutyou,eitherdirectly
fromyouorthroughyourlocalTorocompanyordealer.T orousesthisinformationtofullcontractualobligations-suchastoregisteryourwarranty,
processyourwarrantyclaimortocontactyouintheeventofaproductrecall-andforlegitimatebusinesspurposes-suchastogaugecustomer
satisfaction,improveourproductsorprovideyouwithproductinformationwhichmaybeofinterest.Toromayshareyourinformationwithoursubsidiaries,
afliates,dealersorotherbusinesspartnersinconnectiontheseactivities.Wemayalsodisclosepersonalinformationwhenrequiredbylaworin
connectionwiththesale,purchaseormergerofabusiness.Wewillneversellyourpersonalinformationtoanyothercompanyformarketingpurposes.
RetentionofyourPersonalInformation
Torowillkeepyourpersonalinformationaslongasitisrelevantfortheabovepurposesandinaccordancewithlegalrequirements.Formoreinformation
aboutapplicableretentionperiodspleasecontact[email protected].
Toro’sCommitmenttoSecurity
YourpersonalinformationmaybeprocessedintheUSoranothercountrywhichmayhavelessstrictdataprotectionlawsthanyourcountryofresidence.
Wheneverwetransferyourinformationoutsideofyourcountryofresidence,wewilltakelegallyrequiredstepstoensurethatappropriatesafeguardsare
inplacetoprotectyourinformationandtomakesureitistreatedsecurely.
AccessandCorrection
Youmayhavetherighttocorrectorreviewyourpersonaldata,orobjecttoorrestricttheprocessingofyourdata.T odoso,pleasecontactusbyemail
at[email protected].IfyouhaveconcernsaboutthewayinwhichT orohashandledyourinformation,weencourageyoutoraisethisdirectlywithus.
PleasenotethatEuropeanresidentshavetherighttocomplaintoyourDataProtectionAuthority.
374-0282RevC
La page est en cours de chargement...
La page est en cours de chargement...
La page est en cours de chargement...
La page est en cours de chargement...
La page est en cours de chargement...
La page est en cours de chargement...
La page est en cours de chargement...
La page est en cours de chargement...
La page est en cours de chargement...
La page est en cours de chargement...
La page est en cours de chargement...
La page est en cours de chargement...
La page est en cours de chargement...
La page est en cours de chargement...
La page est en cours de chargement...
La page est en cours de chargement...
La page est en cours de chargement...
La page est en cours de chargement...
La page est en cours de chargement...
La page est en cours de chargement...
La page est en cours de chargement...
La page est en cours de chargement...
La page est en cours de chargement...
La page est en cours de chargement...
La page est en cours de chargement...
La page est en cours de chargement...
La page est en cours de chargement...
La page est en cours de chargement...
La page est en cours de chargement...
La page est en cours de chargement...
La page est en cours de chargement...
La page est en cours de chargement...
La page est en cours de chargement...
La page est en cours de chargement...
La page est en cours de chargement...
La page est en cours de chargement...
La page est en cours de chargement...
La page est en cours de chargement...
La page est en cours de chargement...
La page est en cours de chargement...
La page est en cours de chargement...
La page est en cours de chargement...
La page est en cours de chargement...
La page est en cours de chargement...
La page est en cours de chargement...
La page est en cours de chargement...
La page est en cours de chargement...
La page est en cours de chargement...
La page est en cours de chargement...
La page est en cours de chargement...
La page est en cours de chargement...
La page est en cours de chargement...
La page est en cours de chargement...
La page est en cours de chargement...
La page est en cours de chargement...
La page est en cours de chargement...
La page est en cours de chargement...
La page est en cours de chargement...
La page est en cours de chargement...
La page est en cours de chargement...
La page est en cours de chargement...
La page est en cours de chargement...
La page est en cours de chargement...
La page est en cours de chargement...
La page est en cours de chargement...
La page est en cours de chargement...
La page est en cours de chargement...
La page est en cours de chargement...
La page est en cours de chargement...
La page est en cours de chargement...
La page est en cours de chargement...
La page est en cours de chargement...
La page est en cours de chargement...
La page est en cours de chargement...
La page est en cours de chargement...
La page est en cours de chargement...
La page est en cours de chargement...
La page est en cours de chargement...
La page est en cours de chargement...
La page est en cours de chargement...
La page est en cours de chargement...
La page est en cours de chargement...
La page est en cours de chargement...
La page est en cours de chargement...
La page est en cours de chargement...
La page est en cours de chargement...
La page est en cours de chargement...
La page est en cours de chargement...
La page est en cours de chargement...
La page est en cours de chargement...
La page est en cours de chargement...
La page est en cours de chargement...
La page est en cours de chargement...
La page est en cours de chargement...
La page est en cours de chargement...
La page est en cours de chargement...
La page est en cours de chargement...
La page est en cours de chargement...
La page est en cours de chargement...
La page est en cours de chargement...
La page est en cours de chargement...
La page est en cours de chargement...
La page est en cours de chargement...
La page est en cours de chargement...
La page est en cours de chargement...
La page est en cours de chargement...
La page est en cours de chargement...
La page est en cours de chargement...
La page est en cours de chargement...
La page est en cours de chargement...
La page est en cours de chargement...
La page est en cours de chargement...
La page est en cours de chargement...
La page est en cours de chargement...
La page est en cours de chargement...
La page est en cours de chargement...
La page est en cours de chargement...
La page est en cours de chargement...
La page est en cours de chargement...
La page est en cours de chargement...
La page est en cours de chargement...
La page est en cours de chargement...
La page est en cours de chargement...
La page est en cours de chargement...
La page est en cours de chargement...
La page est en cours de chargement...
La page est en cours de chargement...
La page est en cours de chargement...
La page est en cours de chargement...
La page est en cours de chargement...
La page est en cours de chargement...
La page est en cours de chargement...
La page est en cours de chargement...
La page est en cours de chargement...
La page est en cours de chargement...
La page est en cours de chargement...
La page est en cours de chargement...
La page est en cours de chargement...
La page est en cours de chargement...
La page est en cours de chargement...
La page est en cours de chargement...
La page est en cours de chargement...
La page est en cours de chargement...
La page est en cours de chargement...
La page est en cours de chargement...
La page est en cours de chargement...
La page est en cours de chargement...
La page est en cours de chargement...
La page est en cours de chargement...
La page est en cours de chargement...
La page est en cours de chargement...
La page est en cours de chargement...
La page est en cours de chargement...
La page est en cours de chargement...
La page est en cours de chargement...
La page est en cours de chargement...
-
 1
1
-
 2
2
-
 3
3
-
 4
4
-
 5
5
-
 6
6
-
 7
7
-
 8
8
-
 9
9
-
 10
10
-
 11
11
-
 12
12
-
 13
13
-
 14
14
-
 15
15
-
 16
16
-
 17
17
-
 18
18
-
 19
19
-
 20
20
-
 21
21
-
 22
22
-
 23
23
-
 24
24
-
 25
25
-
 26
26
-
 27
27
-
 28
28
-
 29
29
-
 30
30
-
 31
31
-
 32
32
-
 33
33
-
 34
34
-
 35
35
-
 36
36
-
 37
37
-
 38
38
-
 39
39
-
 40
40
-
 41
41
-
 42
42
-
 43
43
-
 44
44
-
 45
45
-
 46
46
-
 47
47
-
 48
48
-
 49
49
-
 50
50
-
 51
51
-
 52
52
-
 53
53
-
 54
54
-
 55
55
-
 56
56
-
 57
57
-
 58
58
-
 59
59
-
 60
60
-
 61
61
-
 62
62
-
 63
63
-
 64
64
-
 65
65
-
 66
66
-
 67
67
-
 68
68
-
 69
69
-
 70
70
-
 71
71
-
 72
72
-
 73
73
-
 74
74
-
 75
75
-
 76
76
-
 77
77
-
 78
78
-
 79
79
-
 80
80
-
 81
81
-
 82
82
-
 83
83
-
 84
84
-
 85
85
-
 86
86
-
 87
87
-
 88
88
-
 89
89
-
 90
90
-
 91
91
-
 92
92
-
 93
93
-
 94
94
-
 95
95
-
 96
96
-
 97
97
-
 98
98
-
 99
99
-
 100
100
-
 101
101
-
 102
102
-
 103
103
-
 104
104
-
 105
105
-
 106
106
-
 107
107
-
 108
108
-
 109
109
-
 110
110
-
 111
111
-
 112
112
-
 113
113
-
 114
114
-
 115
115
-
 116
116
-
 117
117
-
 118
118
-
 119
119
-
 120
120
-
 121
121
-
 122
122
-
 123
123
-
 124
124
-
 125
125
-
 126
126
-
 127
127
-
 128
128
-
 129
129
-
 130
130
-
 131
131
-
 132
132
-
 133
133
-
 134
134
-
 135
135
-
 136
136
-
 137
137
-
 138
138
-
 139
139
-
 140
140
-
 141
141
-
 142
142
-
 143
143
-
 144
144
-
 145
145
-
 146
146
-
 147
147
-
 148
148
-
 149
149
-
 150
150
-
 151
151
-
 152
152
-
 153
153
-
 154
154
-
 155
155
-
 156
156
-
 157
157
-
 158
158
-
 159
159
-
 160
160
-
 161
161
-
 162
162
-
 163
163
-
 164
164
-
 165
165
-
 166
166
-
 167
167
-
 168
168
-
 169
169
-
 170
170
-
 171
171
-
 172
172
-
 173
173
-
 174
174
-
 175
175
-
 176
176


Toro Flex-Force Power System 60V MAX String Trimmer Manuel utilisateur
- Catégorie
- Coupe-herbe
- Taper
- Manuel utilisateur
dans d''autres langues
- italiano: Toro Flex-Force Power System 60V MAX String Trimmer Manuale utente
- español: Toro Flex-Force Power System 60V MAX String Trimmer Manual de usuario
- Deutsch: Toro Flex-Force Power System 60V MAX String Trimmer Benutzerhandbuch
- Nederlands: Toro Flex-Force Power System 60V MAX String Trimmer Handleiding
- dansk: Toro Flex-Force Power System 60V MAX String Trimmer Brugermanual
- polski: Toro Flex-Force Power System 60V MAX String Trimmer Instrukcja obsługi
- svenska: Toro Flex-Force Power System 60V MAX String Trimmer Användarmanual
Documents connexes
-
Toro Electric Battery String Trimmer 60V MAX* Flex-Force Power System 51835T - Tool Only Manuel utilisateur
-
-
Toro Flex-Force Power System 11in or 13in 60V MAX String Trimmer Manuel utilisateur
-
-
-
Toro Flex-Force Power System 24in 60V Hedge Trimmer Manuel utilisateur
-
Toro Flex-Force Power System 60V MAX Axial Blower Manuel utilisateur
-
-
-