Whirlpool AWG 995/1 Le manuel du propriétaire
- Catégorie
- Machines à laver
- Taper
- Le manuel du propriétaire
Ce manuel convient également à

HOW TO UNPACK, INSTALL AND GET THE
BEST FROM YOUR WASHING MACHINE
KEEP FOR FUTURE REFERENCE
UK
COMMENT DEBALLER, INSTALLER ET OBTENIR LES MEILLEURS
RESULTATS DE VOTRE MACHINE A LAVER LE LINGE
CONSERVER CE MANUEL POUR TOUTE CONSULTATION ULTERIEURE
F

SM34
UK
3
Important information
in order to obtain the best possible service from your
washing machine, observe the following
Index
Washing information
This section contains useful infor-
mation regarding various pro-
gramme and option possibilities,
the treatment of fibres and clothes,
and the use of laundry products.
Page
Washing information 8
Washing special items 9
Loading the clothes 10
Using laundry products 11
Using your machine 11
Completing the wash 12
Stain removal 13
Maintenance and fault
finding
Learn how to look after your ma-
chine, solve problems and sort out
any faults.
Page
Taking care of your machine 14
Dealing with emergencies 15
Unblocking the pump 15
Recovering the clothes 15
What to do if you think
your machine is faulty 16
Incorrect use 17
DO - always wash a full load.
DO - follow the detergent manufacturers recommendations for
detergent quantities.
DO - wash at the lowest possible temperature consistent with
obtaining satisfactory washing results.
Essential information
We strongly recommend you to
read through this section carefully
in order to ensure that your ma-
chine is efficiently and safely in-
stalled.
Page
Unpacking your machine 4
Electrical connections 5
Levelling your machine 6
Plumbing information 6
Using your machine
The enclosed programme explains:
The controls
Programme possibilities
Using the dryer function
Important information to safeguard the environment
Your new washing machine has been designed to use the minimum amount of electrical energy and water consistent with obtaining good
washing and rinsing results. You can further help protect the environment as follows:
DO NOT - dispose of packing material indiscriminately - take to
your local collection point for recycling.
DO NOT - use unnecessary additives. Modern detergents con-
tain all components for an efficient wash.
DO - Read carefully this instruction book before installing and
using the machine.
DO - Make sure the transport brackets are removed and the
machine is properly connected to water and electricity supplies.
If you are in doubt, consult an expert.
DO - Use the machine only in a domestic environment and for
washing textile items.
DO - Use only low - foaming detergents sol d specifically for use
in drum - type automatic washing machines.
DO - Remove all loose items such as pins, coins and paper hand-
kerchiefs from pockets before washing.
DO - Follow the advice given in these instructions or on the gar-
ment label for the maximum allowed wash temperature.
DO - Clean the machine regularly especially the detergent drawer
to remove any detergent remains.
DO - Keep an eye on fill and drain hoses to ensure that they are
not kinked or leaking.
DO NOT - Use the machine on an electricity supply different
from that stated on the machine rating plate.
DO NOT - Remove top or rear covers of the machine.
DO NOT - Wash woollen or delicate articles in the machine un-
less they are specifically labelled as being machine washable
DO NOT - Open the door during a programme unless absolutely
necessary since very hot water could overflow.
DO NOT - Force the door handle to open the door. If it does not
open easily switch off the machine and wait two to three minutes
for the safety lock to release.
DO NOT - Try to repair the machine yourself - call the manufac-
turer or other qualified service organization.

SM34
UK
4
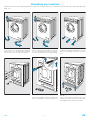
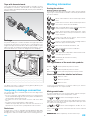
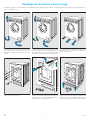
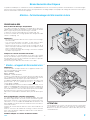
Unpacking your machine
Important: take care that all packing material is kept out of reach of children as it constitutes a potential risk (e.g. of suffocation by plastic
bags, etc.).
If the machine is supplied with mobility
wheels, these can be lowered by pulling
out the two levers. To raise wheels push
home so that the two handles fit into the
recess in the kick plate. Move the machine
as close as possible to its final operating
position. If using the mobility wheels, move
machine by pulling on the two lever han-
dles
Remove the 4 screws ( A-B-C-D )
Insert a screwdriver in the holes that have
been freed and tilt it to let the four spacers
(H) fall.
Incline the machine and put the four
spacers (H) aside, because if left inside
the appliance they could cause harm.
A
D
D
D
H
H

SM34
UK
5
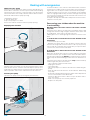
Electrical connections
This product is manufactured to comply with the radio interference requirements of the council directive 87/308/EEC. Before using this
appliance ensure that the voltage in your home corresponds with the voltage indicated on the machine rating plate, which can be found
inside the pump cover.
Warning - This appliance must be earthed
MOULDED PLUGS
For Great Britain only
If the mains lead of the appliance is fitted with a B.S. 1363A 13
Amp fused plug to change a fuse in this type of plug proceed as
follows:
1.Remove the fuse cover (A) and the fuse (Fig. 1A).
2.Fit a replacement fuse which should be a BS 1362 13A, A.S.T.A.
item (B) Fig. 1A.
Important:
- The fuse cover must be refitted when changing a fuse.
- In the event of a fuse cover being misplaced, the plug must not
be used until a correct replacement is fitted.
- Please ensure that the replacement fuse cover is of the same
colour as the insert or, as the colour embossed in words on the
base of the plug.
For replacement fuse covers please consult your Local Electri-
cal Store.
Please state the colour of the plug insert.
If the fitted plug is not suitable for your socket outlets, it should be
cut off and disposed of, to avoid a possible shock hazard should
it be inserted into a 13A socket elsewhere.
A suitable alternative plug should then be fitted to the cable.
“Warning - this appliance must be earthed”
Important:
The wires of the mains lead fitted to this appliance are coloured
in accordance with the following code:
GREEN & YELLOW - EARTH
BLUE - NEUTRAL
BROWN - LIVE
As the colour of the wires in the mains lead fitted to this appliance
may not correspond with the coloured markings identifying the
terminals in the plug, proceed as follows:
The wire which is coloured GREEN AND YELLOW must be con-
nected to the terminal in the plug which is marked with the letter
“E” or by the earth symbol or coloured GREEN or GREEN and
YELLOW
The wire which is coloured BLUE must be connected to the ter-
minal which is marked with the letter “N” or coloured BLACK. The
wire which is coloured BROWN must be connected to the termi-
nal which is marked with the letter “L” or coloured RED. If the
terminals in the plug are unmarked or you are in any doubt as to
the correct connections, consult a qualitied electrician
N.B. We raccomend the use of a good quality plug.
For the Republic of Ireland only
The information given in respect of Great Britain will frequently
apply, but a third type of plug and socket is also used, the 2-pin,
side earth type. In this case, the wire which is coloured GREEN
AND YELLOW must be connected to the EARTH contact, and
the other two wires to the two pins, irrespective of colour.
The supply to the socket must be fitted with a 16 amp. fuse.
For replacement fuse covers please consult your guarantee card
for the address of your local Service Centre.
Please state the colour of the plug insert
WARNING
Do not plug a tumble dryer and washing machine into an adap-
tor for connection to a single socket outlet. Plug the dryer and
washing machine into separate socket outlets .
B
A
Fig.1A

SM34
UK
6
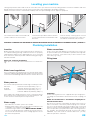
Levelling your machine
Having completed the water and electrical connections move your machine into its operating position. To minimise vibration and noise
during spinning your machine must be in firm contact with a well supported or preferably solid floor.
Failure to level the machine could lead to instability and consequent damage also to adjacent equipment.
PLEASE NOTE: IT IS IMPORTANT THAT YOUR MACHINE HAS ADEQUATE VENTILATION AND THAT THE AIR FLOW UNDER IT IS NOT IMPEDED IN ANY WAY eg CARPETING etc.
Plumbing installation
Water connections
All the connectors and adaptors mentioned in this section can
be purchased from your local builder or plumber, from large DIY
stores (e g. Payless, Texas Homecare) or from electrical chain
stores like (e.g. Currys)
Filling hose
Important
All our washing machines are supplied with special high pres-
sure filling hoses fitted with a 3/4 inch B.S.P female coupling (19
mm).
Under no circumstances should this coupling be re-
moved from the hose
We will not accept any responsibility for failure of the hoses or
water connections if the factory fitted couplings are removed.
The hoses are designed to be long enough to stay connected
while the machine is pulled forward for cleaning and servicing. If
this is not possible in your particular location 11 ft. Iong fill hoses
are available from Whiripool UK (Ltd). Ask for part number
53027059. If you also need an extension drain hose. you may
order this part at the same time.
Location
Modern washing machines spin at high speeds. To avoid exces-
sive vibration during spinning install the machine on a properly
supported floor. Always leave approximately 5 cm on each side
of the machine to allow for possible vibration during spinning of
unbalanced loads.
Space for servicing and fitting
Allow space on either side of the machine for access and servic-
ing.
Water board regulations
These instructions are intended only as a general guide and lo-
cal bylaws and Water Board regulations with respect to the water
connections to and drainage from the machine must be observed.
Water pressure
The machine will operate within a wide range of water pressures.
Hot water minimum 5 N/cm2 (0,5 Bars) (7 p.s.i.)
(it fitted) maximum 10 N/cm2 (1 Bars) (15 p.s.i.)
Cold water minimum 5 N/cm2 (0,5 Bars) (7 p.s.i.)
maximum 100 N/cm2 (10 Bars) (150 p.s.i.)
If the height of the storage tank in the house is a minimum of 8 ft.
above the top of the washing machine this will normally be suffi-
cient to meet the minimum pressure requirements.
Water supply
- Most domestic hot water systems are suitable.
- Multi point gas heaters can be used if sufficient water pressure
is available -check with the manufacturer.
- Instantaneous gas water heaters MUST NOT BE USED. If
you are in any doubt about the suitability of your hot water sys-
tem consult the manufacturer of the heating appliance or the
gas or Electricity Board.
One or both of the front feet should be ad-
justed in order to level the machine
Screw the foot up or down until the machine
is level in both front-to-rear and side-to-side
directions .
Lock the foot by screwing up the circular
locking rings so that they are in firm con-
tact with the underside of the machine

SM34
UK
7
Fitting the hoses
Remove the hoses from their storage in the drum and fit them to
the inlet valves situated on the rear panel of the machine. Re-
member to fit the red hose to the red valve and to insert the rub-
ber washers into the couplings.
Insert the filter washers in the other end of the filling hoses as
shown .
Screw the red hose to the hot tap and the other hose to the cold
tap. You should not need tools to effect a satisfactory seal. Ex-
cessive force may damage the connections.
Permanent plumbing
Please make provisions to shut off the water supply to the ma-
chine completely This will:
- avoid the possibility of flooding when the machine is not in use;
- allow the machine to be moved for cleaning and servicing. If
you do not have an existing installation for connecting your ma-
chine consult a qualified plumber. There are various methods
available
Temporary connections
It is best to avoid temporary connections. When the machine runs
from sink taps, it can mean that you are unable to use the sink for
over an hour while the machine completes a programme. Also
very hot water will be discharged from the drain hose into the
sink and this could be a safety hazard, especially if you have
children.
If you must execute a temporary connection be sure
to check the condition of your tap
The closing of the water valve in automatic machines is instanta-
neous and will cause a back pressure to the tap.
It is therefore essential that your taps are in good condition other-
wise they may leak during use. Even though your tap may be
adequate for everyday use it is advisable to check the spindle
sealing gland of the tap before connecting your machine for the
first time: To do this connect the machine fill hoses to the tap
using your chosen adaptor, making sure the hose sealing washer
is in place. If water escapes from the top of the tap the gland may
need tightening or replacing.
Mixer taps must not be used
Tap adaptors
Detailed below are a few examples of adaptors to fit the majority
of tap designs. Always ensure that the rubber sealing washer is
correctly positioned in the fill hose coupling.

SM34
UK
8
Man 60 cm
Max 90 cm
1
95°
95°
2
60°
60°
3
60°
60°
4
50°
50°
5
40°
40°
6
40° 40°
7
40° 40°
50°
8
30°
30°
Washing information
Sorting the clothes
Articles with a care label
You will find a care label on many of the clothes you buy indicat-
ing the type of wash treatment suitable. Commonly found exam-
ples are as follows:
White cotton and linen articles without special fin-
ishes
Cotton linen or viscose articles without special fin-
ishes where colours are fast at 60zC
(Not used in UK) White nylon and white polyester/
cotton mixtures are included in
Nylon, polyester/cotton mixture polyester, cotton
and viscose articles with special finishes, cotton/
acrylic mixtures
Cotton, linen and viscose articles, where colours
are fast at 40°C but not at 60°C
Acrylics, acetate and triacetate including mixtures
with wool, polyester/wool blends
Wool, wool mixed with other fibres, silk
(Not used in UK) See items included in
and
(Not applicable in UK) White cotton and linen arti-
cles with special finishes
Handwash (do not machine wash)
Do not wash
The significance of the wash tub symbols:
No bar normal (maximum) machine action
Bar reduced (medium) machine action
Broken bar much reduced (minimum) machine action
Wash tubs should be labelled as follows:
Wash as cotton
Wash as synthetics
Wash as wool
In each case a similar phrase, e.g. wash in cotton cycle, wash in
cotton programme. etc. may be found.
Mixing wash loads:
As a general guide you can mix wash labels without a bar pro-
vided you wash at the lowest temperature shown
e.g. and can be washed together at 40°C.
Likewise, you can mix wash labels with and without a bar pro-
vided that you wash at the lowest temperature. BUT you must
also reduce the washing action.
e.g. and can be washed together at 40°C at a re-
duced action.
Articles with must be washed as wool at a much reduced
action.
REMEMBER: “Wash separately” means what it says
40°
40°
95°
60°
40°
40°
60°
40°
Taps with threaded ends
These taps normally are fitted with 5/8" B.S.P. threads (17 mm).
An adaptor to convert the 5/8" thread to the required 3/4" (19
mm) is available from Whiripool UK (Ltd) or from your local builder/
plumber merchant.
Drainage
If a plastic stand pipe is used it should be of a high temperature
resistant type and not less than 32 mm (1 1/4") diameter. The
height of the pipe must be between 60 cm (24") and 90 cm (35")
above the floor. To avoid the possibility of syphoning it is essen-
tial that the drain hose IS NOT an airtight fit in the standpipe.
The drain must have a capacity of 61/2 gallons (30 litres) per
minute otherwise it will overflow.
Temporary drainage connection
The end of drain hose should be placed over the edge of the
sink. Ensure that:
- the hose cannot be easily displaced (a piece of string or wire
can be threaded through the hole in the plastic moulded hose
crook and then attached to the tap;
- the water level in the sink cannot cover the end of the drain
hose;
- the plug is removed and water is able to drain
- children are kept away from the sink while the machine is in
operation as very hot water is pumped out of the machine.
Drain hose
A longer hose (13 ft.) is available through Whiripool UK (Ltd),
and directions for connecting will come with the pack. When or-
dering please state the model number of the washing machine.

SM34
UK
9
Articles with no care label
- No label but the name of the material is given.
Sort according to the fabric, e.g. cotton or wool.
- No care label and the fibre content is mixed, e.g.
polyester/cotton.
When this happens sort the article into the group for the fibre
needing the lower wash temperature, e.g. polyester/cotton should
be washed as polyester.
- No care label and no clues.
The safest thing to do in this case would be to dry clean the
article especially if it is a favourite or its replacement would be
expensive. If you judge an article could be washed, then care-
fully handwash OR use a delicate or fine fabric programme on
the machine BUT REMEMBER if you wash instead of dry clean-
ing you take the risk that the garment could shrink or loose its
shape, or the colour could run.
Hand wash label
When the label shows a hand in the washtub it means that THE
ARTICLE CANNOT BE MACHINE WASHED.
The article must be washed by hand.
There are usually good reasons for a handwash label: to protect
the finish (e.g. pleats);
- because the colours can run even at the lowest temperature in
your machine;
- the trimmings, buttons, or edgings will not stand machine wash-
ing;
- it will shrink or lose its shape because even the agitation on the
most gentle programme is still too much. If the label says
“handwash” it is safest to do just that.
If you think that the garment can be machine washed then use
a delicate or fine fabric programme.
Do not wash label
This label, with the washtub crossed out means that THE ARTI-
CLE CANNOT BE WASHED AT ALL.
Preparing the clothes for the wash
Before loading the clothes into the machine, check the following
points:
Empty pockets: loose change or paper handker
chiefs may get caught in the
pump.
Close zippers and hooks: they may catch and snag other
articles being washed in the
same load.
Mend rips and tears: even gentle washing makes a
small hole bigger.
Tie belts or apron strings: to prevent garments wrapping
round each other.
Treat difficult stains: according to the stain removal
guide.
Measuring the load
A full load in the machine varies between 5 kg (11 Ibs) for cot-
tons, and 1 kg (2 Ibs) for fine fabrics. You can calculate a full load
either by volume or by weight. For each load try to mix large and
small items. This evens out the load to giving a better tumbling
action during the wash.
Measuring the load by volume
- Cottons.
You have a full load when the drum is loosely packed with wash-
ing. If you have to force an item in, leave it out - you already have
enough for that wash.
- Synthetic fabrics/wool.
You have a full load when the drum is half-filled.
Measuring the load by weight
Article Approximate dry weight
gms Ibs
|SinGle cotton sheet 800 1 3/4
Single polyster/cotton sheet 700 1 1/2
Double cotton sheet 1000 2 1/4
Double polyster/cotton sheet 800 1 3/4
Pillowslip 150 1/4
Hand towel 350 3/4
Bath towel 700 1 1/2
Tea towel 100 1/4
Large cotton tablecloth 700 1 1/2
Small cotton tablecloth 250 1 /2
Shirt 250 1/2
Cotton pyjamas 450 1
Vest 150 1/4
Baby’s nappy 100 1/4
Overloading
Don’t exceed the recommended loads. Excessive loading results
in the following
- white cotton will become grey and coloured cotton will become
dull and faded;
- synthetic will crease and the clothes will loose their drip dry
properties and require ironing.
Washing special items
Woollen clothes
Many woollen garments can now be safely washed in the ma-
chine. Check the label on your garment Here some exam
7
40°
P
Pure
new wool
Superwash MACHINE WASHABLE
7
40°
P
Pure
new wool
MACHINE WASHABLE (WOOL CYCLE)
7
40°
P
Pure
new wool
WASHABLE SHRINK RESISTANT

SM34
UK
10
The quality of woollen garments varies considerably and unless
the article is labelled there is no way of knowing if it is shrink
resistant or if the dye is fast.
Only woollen garments showing a machine washable label can
be washed in your machine.
If you have any doubts, garments should be hand washed or dry
cleaned.
Hand knitted bulky knit and delicate woollen garments should
always be handwashed or dry cleaned and should not be spun
in the machine.
No special detergent is needed in the machine for washing wool.
Choose the same detergent as you use for the rest of the wash
Note:
- Never delay the final spin when washing wool. The long soak
in rinse water could damage woollen garments.
- The half load option (if equipped) cannot be used on the wool
programme. The reduced water level causes an increase in
friction which could shrink woollen garments.
Blankets
Always check the label to see whether the blanket is machine
washable.
- Woollen blankets labelled machine washable should be washed
as wool.
- Cellular woollen blankets like those used for children shrink
easily and must be dry cleaned or hand washed.
- Blankets made from synthetic fibres (Acrylan, Orlon) should
be washed as synthetics.
- Double sized synthetic blankets may not fit into the wash drum
because of their bulk and will need to be dry cleaned.
Curtains
Curtain material is often weakened by daily exposure to dust and
sun light.
If you suspect the material has been affected wash the curtains
on a delicate wash or have them dry cleaned. Unfortunately once
the material has started to rot, splits may appear in weak areas of
the fabric however gently the curtains are handled.
Net curtains (white nylon/white polyester)
1 1/2 kg (3 Ibs) is the maximum amount you should wash in any
load; if you put in more, you will crease the curtains.
Use the rinse and spin programme (with the spin on a low set-
ting) to remove the dust then wash on a synthetic programme at
50°C-60°C
If white curtains eventually become yellow whiteness can be re-
stored by using a proprietary fabric whitener.
Follow the directions on the pack.
Loose covers
If you are unsure about the washing properties of the fabric, it is
always best to dry clean loose covers in case they shrink. Re-
member to close any zips or fastenings before you put the loose
covers in the machine.
Machine washable fabrics should first be rinsed in the machine
using the rinse and spin programme
- this will remove most of the loose dust.
After the wash, replace the covers slightly damp
- the material can then be pulled back into shape and the piping
straightened.
Wired bra’s
Unfortunately the wires in these bra’s often become detached
slip through the holes in the drum and may cause extensive dam-
age to the machine
The loose wire also rusts and then marks other gaments. Be-
cause of the high risk of machine damage, wash wired bra’s by
hand or see they are well secured inside a pillowslip or draw-
string bag during the wash.
Synthetic and drip dry fabrics
Your washing machine has programmes specifically designed
to wash these fabrics.
The special conditions that all these programmes have in com-
mon to avoid creasing are:
- High water level for the wash. This allows clothes to move freely
with the minimum agitation.
- Low wash loads are specified so that garments are not packed
tightly together
- We recommend that the final spin is delayed so that you can
be on hand to hang up the clothes as soon as they are spun
- A low spin speed is recommended. Washing synthetic fabrics
using the correct programme will give the best results Take
care when washing mixed loads or varying the programme
number, as creasing is caused by:
- overloading the drum:
- using a wash temperature which is too high;
- using a fast spin speed;
- leaving the clothes in the drum after having been spun.
Easy care cotton
Many household items like sheets, duvet covers, and curtains
are now made from easy care cotton materials.
Wash the article on the programme suggested but make sure
that:
- the maximum load is < 2 kg (4 1/2 Ibs);
- a slow spin speed is used.
Washing these materials as part of a larger load or spinning them
at high speed will cause them to crease.
Sports clothes
Track suits and dance outfits are made in materials which can
take hard wear but need to be treated gently in the washing ma-
chine. Always check the care label and wash synthetic stretch
materials at a maximum temperature of 40°C.
Loading the clothes
- Turn on both taps and leave them on throughout the programme.
- Make sure the machine is plugged in and the socket switched
on.
- Sort the clothes into loads according to the programme chart,
remember to empty pockets
- Open the door and put the clothes into the machine.
- Close the door firmly making sure it latches.
- Open the dispenser drawer by pulling it towards you and add
the detergent into the appropriate sections.
7
40°
40°
MACHINE HAND WASH
Warm Warm
minimum wash Do not rub
Spin. Do not hand wring

SM34
UK
11
1
2
Adding the detergent
It is important when filling the dispenser to see that each product
keeps to its own section and does not overflow. Detergent acci-
dentally poured in the fabric conditioner container will make the
final rinse soapy, will cause the fabric conditioner to become in-
effective and could result in white specks appearing on your
clothes. Fabric conditioner overflowing from its container will mix
with detergent during the wash and reduce its efficiency.
How much detergent to use
This fully automatic washing machine has been designed to take
account of the latest environmental advances in modern wash-
ing machine technology.
The type and quantity of detergent required depends on the type
of fabric size of load, level of soiling and also the water hardness.
The quality of water has been classified by water hardness range
(see water hardness table).
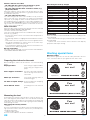
Table of water hardness
Information about the degree of hardness of your water supply
can be obtained from the local water board or council.
You will find the recommended amounts of detergent for the vari-
ous hardness ranges listed on the detergent packets.
Washing powder
We recommend the following amounts: For a full load:
amount recommended by detergent manufacturer.
For a half load: 3/4 of the recommended amount.
For small loads (approx. t kg): 1/2 the recommended
amount.
Liquid detergent
The amount recommended by the manufacturer should be put in
compartment (main wash only).
Note:
Excessive amounts of detergent causes excess suds and may
cause overflowing. Excess suds are detrimental to the washing
process and also cause unnecessary pollution.
Too little detergent causes whites to turn grey and calcium de-
posits to build up on the heating element and on the outside of
the drum.
When a programme ends, dark textiles in particular may show
white detergent residues. This is not due to inadequate rinsing
but to the insoluble water-softening agents used in some modern
phosphate-free detergents.
The white specks can normally be shaken or brushed off, but to
avoid them occurring, try a different washing powder or use liq-
uid detergent. Due to modern detergents (powder or liquid) some
foam may be seen during the final rinse or when spinning. This
does not make the rinse any less effective
Using other laundry products
Water softeners
Modern detergents contain water softeners, so if you live in a
hard water area just increase the quantity of detergent you use.
Adding water softeners increases the price of the wash and could
cause the detergent to foam.
Bleach
Detergents recommended for use in automatic washing machines
contain enough bleaching agent to remove stains. Using a sepa-
rate bleach will not damage the machine but unless it is used
carefully it can weaken and discolour some materials. Difficult
stains can be treated individually. See Stain Removal Chart.
Fabric conditioner
This gives a softer feel to towels, babies’ nappies, and woollen
garments, makes ironing easier and also reduces static cling in
synthetic fibres. After spin drying, clothes are marginally drier
when fabric conditioner has been used in the wash. Fill the con-
tainer up to the “max.” mark.
Dyes
There are dyes specially made to be used in automatic washing
machines. They give good results and are easy to use, but you
must follow the dye manufacturer’s instructions very carefully and
be aware that the dye could temporarily stain parts of the ma-
chine.
Check before you dye to see if the dye is colourfast. Unless the
instructions on the state otherwise all articles should be washed
separately once they have been dyed.
When you have finished dyeing, clean the machine using a cup
of household bleach and one tablespoon of detergent. Pour the
bleach straight into the drum, put the detergent in the wash sec-
tion of the dispenser (2) and let the machine run empty through
the hot wash programme.
This should remove the remains of the dye from the door seal
and from the pump so none is left in the machine to stain articles
from the next wash load.
Any dye stains left on the outside of the machine can be removed
by rubbing with a little bleach on a damp cloth.
Starch
Remove the wash load from the machine as usual at the end of
the programme. Treat separately those items you need to starch.
- Hot water starch - follow the instructions given on the packet.
- Aerosol starch - this is very convenient for treating small areas
like collars and cuffs, or if only one or two items need to be
starched.
- Aerosol resins/liquid cotton crisper - these are different from
the vegetable starches, they do not stiffen the clothes as much,
but they do last for more than one wash and are ideal for cotton
dresses or blouses which you like to look crisp.
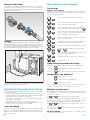
Using your machine
Note:
If your machine is equipped with “push-push” control knobs, push
once to extract knobs. After having set the required functions,
push the knobs again to return them to their original position.
a) Wash programme selector
Turn the programme knob clokwise until the desired pro-
gramme number or letter is in line with the vertical INDEX mark
on the control panel. Attention: do not force the knob in anticlock-
wise direction.
Category Charac. German degrees French degrees
of hardness
ºdH m-mol ºfH
1
sot
0-7 0-13 0-15
2
medium
-14 -2,5 -2,5
3
hard
-21 -3,8 -3,7
4
verv hard over
21
over
3,8
over
3,7
2

SM34
UK
12
b) Temperature selector (if fitted) (see note)
Select the required wash temperature by rotating the selector
knob
c) Variable spin speed selector (if fitted) (see note)
select the required spin speed by pushing the button
A
d) Selecting rinse hold before spin speed (if fitted ) (see note)
Instead of selecting spin speed as described in ( ) push the
rinse hold button , clothes will remain floating in water at the
end of the final rinse, in order to avoid creasing.
To complete the programme, simply push again the rinse hold
button. The machine will drain the rinse water and effect the final
spin.
e) Drying time selector (if fitted) (see note)
Select the required tumble drying time by rotating the drying time
selector knob .
f) Starting the programme
After having selected the wash programme, wash temperature,
spin speed, drying time and any other required options, start the
programme by pressing the on/off button
The on/off lamp and door locked lamp (if fitted) will light and the
machine will start.
Note:
if your machine includes a tumble dryer function, it is important
that you select the half load/wash and dry option by pushing the
button as well as selecting the drying time.
See the special instructions on the reverse side of the enclosed
programme chart.
g) Ending the programme
The machine will stop with one of the symbols “stop” on the pro-
gramme selector knob aligned with the vertical Index mark on
the control panel. If a door locked lamp is fitted, the door may be
opened when this lamp goes off.
Otherwise, turn off the machine by pressing the on/off button
and wait about 2 minutes for the release of the door safety lock,
after which time the door may be opened.
Remove the plug from the supply socket and close the water tap
(s).
Note:
If your machine is not provided with selector knobs for wash tem-
perature and spin speed, there is no cause for concern. By se-
lecting the desired programme using the programme selector
knob, the correct temperature and spin speed will be automati-
cally adapted to this programme.
Optional functions
It is possible to increase the choice of wash solutions using the
options listed hereunder. Press the relevant push button(s) to
select the chosen option(s). At the end of the programme, press
the button(s) again to deactivate the function(s) .
Not all machines are supplied with all options. For those avail-
able on your machine, please refer to the enclosed programme
chart.
Economy wash
Use on 90° C cotton wash when clothes are not very dirty. Re-
duces the wash temperature to save energy.
Gentle wash
Transforms normal wash action into a medium wash action to
take more care of delicate and expensive items.
Half load/Wash and dry
Reduces the quantity of water and energy used. May be used for
cotton and linen loads when the weight is below 2,5 Kg.
This option has a further function on machines which incorporate
a tumble drying function.
Press the button before selecting the required drying time,
otherwise the dryer function will not be activated.
Spin speed reduction
Allows the normal spin speed to be reduced, the possibilities
depend on the particular model and are shown on the enclosed
programme chart.
Spin Exclusion
Pressing this button results in completion of the programme cy-
cle without spin drying. Use for very delicate and drip dry items.
Rinse hold
Stops the machine at the end of the last rinse leaving clothes
floating in water to avoid creasing To complete the programme,
press again this button. The machine will drain the water and
effect the final spin.
Note:
Some machines do not have a rinse hold button but effect rinse
hold automatically on some delicate items. In this case, the sym-
bol “ ” on the programme selector knob will stop in line with
the vertical Index mark on the control panel. To complete the
programme, turn the programme selector knob clockwise by one
‘click”.
Extra rinse
Provides increased rinsing action. This option is useful when your
water is very soft or when using large quantities of detergent for
very dirty laundry.
Cold Wash
Excludes heating, thus carrying out the wash programme at the
temperature of the incoming water. Useful for washing items that
have been subject to a pre-cleaning treatment, e.g. bleach pre-
soak.
Special notes
Adding articles after the start of the programme
Articles that have been overlooked may be added to the main
wash providing the water level is below the bottom of the door by
proceeding as follows:
- stop the programme by pressing the on/off switch;
- wait about two minutes for the door lock to be released;
- open the door and add the articles;
- close the door and restart the machine.
Altering a programme
If you accidentally set the wrong programmes it can be changed.
To avoid possible damage to the clothes the change must be
made very early in the programme, especially if you have se-
lected a wash temperature which is too high for the load.
- stop the programme by pressing the on/off switch.
- select the correct programme.
- restart the machine.
Completing the wash
Drying
Even when it is possible, line drying is not a practical yearround
option. A washer dryer can reduce the time you need to spend
on the laundry by drying the clothes completely and eliminating
a large proportion of the ironing.
Good use of a dryer can:
- Eliminate the need to iron any synthetics, such as a polycotton
sheets and shirts.
The tumble in warm air helps remaining creases to fall out and
the clothes can then be folded and stored ready for use.
- Reduce the time needed to iron cottons as the creases are not
deep set
- Enhance the “feel” of material.
- The tumble action dries cotton and synthetics so they have a
soft and fluffy feel.
When clothes are line dried, 5-10 minutes tumble in the dryer
will overcome any fabric stiffness.
- “Air” clothes which are line dried or have not been worn for
some time. Warm towels or bed linen for babies, or when some-
one in the family is ill.
- Freshen clothes that have been in a smoky or muggy atmos-
phere.
- For use of the dryer function, refer to the separate programme
table.
Ironing
This is the care label code for ironing:
Cold Warm
Hot Do not iron
Guide to ironing different fabrics
Fibre Heal Setilng Condition
Acetate Cool Iron slightly damp
Cotton Lineri Hot Iron damp
Silk Warm Iron slightly damp but do not
Viscose rayon
Sprinkle or the material will watermark
Triacetate Cool Iron slightly damp
Woll Warm Iron slightly damp
500
1000
1/2
1/2
1/2

SM34
UK
13
Treat stains quickly before they have time to set. Wet the material
surrounding the stain with cold water: this prevents the stain from
spreading and developing a clearly defined ring round the edge.
Then if the garment is washable it should be washed as soon as
possible.
Use normal detergent or biological detergent if the stains are
caused by blood or food. If the stain is not removed by washing
then special stain removing chemicals can be applied Use the
stain remover outside the machine then rinse the garment thor-
oughly after it has been treated.
Stain removal
Many stain removers are poisonous or inflammable and should
always be used with care. Read any instructions printed on the
bottle and store all bottles well out of the reach of children Work
in a well ventilated room, away from open fires and do not smoke.
All types bleaches and chemicals may be used on white cotton
and linen materials, but in all other cases check the stain re-
mover first on part of the inside hem or seam of the garment to
make sure the material is not damaged or the colour affected .
REMARKS
Some adhesive manufactures
produce their own solvent.
Don’t soak in biological detergent:
a) Non-colourfast materials
b) Garments containing metal zips
c) Wool, silk, flameproof garments
Some types of ball point ink can
be removed with acetone but
this treatment should not be
used with acetate rayon.
If the material is white you may use
I bleach if some marks stitl remain.
Not to be used on acetate ma-
terials i.e. Tricel, Arnel, Dyne, try
seam of material first.
Scorched materials are often
permanently damaged and a
bad mark cannot be removed.
On cotton, linen and nylon use
hotter and if necessary more
concentrated solution .
If the paint has dried soften first
with lard or oil
STAIN
Adhesive tape
Blood, egg, meat juice
Ball point, biro
carbon paper
Candle wax
Chewing gum
Chocolate fatty/oily
stains, Iipstick
Grass
Iron mould
Make up (eye liner,
mascara foundation)
Nail varnish
Scorch marks
Oil (beach) car oil
Coffee, tea, fruit juice,
alcohol, wine
Emulsion paint
Oil paint
REMOVER
White spirit
Biological detergent
Methylated spirit
Methylated spirit
Dry cleaning solvent
Dry cleaning solvent
Methylated spirit
Manufactured remover
Dry cleaning solvent
Nail varnish remover
Borax
Paraffin, grease solvent
Borax
Water and detergent
mixture
White spirit
METHOD
1 ) Try dabbing with hot water-if
unsuccessfull
2) Dab with white spirit.
Soak for 2 hours in biological
detergent - then wash.
Rub gently until mark disap-
pears.
Scrape off excess with a dull knife. Place
stain between 2 sheets of blotting paper
and press with a warm iron if some colour
remains from the wax, treat with methyl-
ated spirit.
Rub with solvent-allow to dry
and launder-in hot suds if col-
our and fabric will allow.
Treat with solvent-allow to dry
and launder-in hot suds if col-
our and fabric will allow.
Dab with spirit, then wash
Use according to instructions
on the pack.
Dab material with solvent, wash
if necessary.
Dab liberally with nail varnish
remover or acetone.
Rinse under cold tap and then
sponge with solution of 1 des-
sertspoon borax dissolved in 1/
2 pint warm water.
Dad till stain removed, then
wash.
Soak first in cool suds, if not af-
fective soak up to 15 minutes in
a warm solution of
6 1 dessetspoon borax to 1/2
pint water.
Should be washed while the
paint is still wet-once the paint
has dried it cannot be removed
Sponge or soak in white spirit
and then wash.

SM34
UK
14
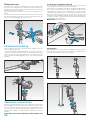
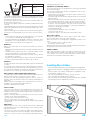
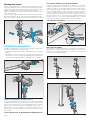
Taking regular care of your machine
- Position the drawer so that it slides into the left hand slot and
give a push. The drawer should now slide in easily If not, the
drawer has not been re- assembled correctly.
Cleaning behind the machine
From time to time you may need to clean behind the washing
machine. The fill and drain hoses are long enough to allow you
to move the machine without disconnecting them. After clean-
ing, check that the hose connections are still secure, then push
the machine back into place and make sure the machine is level
Cleaning the pump
We suggest you check the pump and clean it about every six
months. Have ready a shallow container that will fit underneath
the pump opening, and will hold about 1/4 litre (1/2 pint) of wa-
ter. Follow the directions for unblocking the pump (see “Unblock-
ing the pump”):
Avoiding problems
Overfoaming
Use only low lather detergents otherwise foam will overflow from
the machine and onto the floor.
Pump blockages
Before you do the washing go through all the pockets and make
sure they are empty. Most pump blockages are caused by items
like pins, coins and paper handkerchiefs Unblocking the pump
is messy, time consuming and can be expensive if part of the
machine has been damaged by metal objects.
Leaking hose connections
Keep an eye on the hose connections where they join the tap
and where they join the machine. With time the connection may
work loose and start to leak.
Keep your machine stable
An unstable machine is noisy, it can vibrate excessively and
even move along the floor. First check the location; the machine
must be placed on an even properly supported floor. Then make
sure the feet are correctly adjusted (see ‘Levelling your ma-
chine”). If the machine is moved for any reason make sure it
goes back to its original position. If the machine is fitted with a
trolley make sure the wheels are raised.
The machine has been designed to provide you with years of
trouble free washing. Your contribution is to see that the parts
that need attention the soap dispenser, the pump, and the water
filter on the inlet hose - are kept clear.
Cleaning the detergent dispenser: (powder only ver-
sion)
- Pull out the drawer as far as possible.
- Remove the drawer.
- Take the sections apart and rinse them in running water (the
number of pieces varies according to model).
- Dry the sections and refit in their original positions.
Replacing the drawer
- First locate the rib at the upper rear right hand corner into the
slot behind the control panel.
1
2

SM34
UK
15
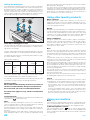
Dealing with emergencies
2. Remove buttons, coins, all traces of fluff and cotton, and rinse
the pump cover under the tap. Put your fingers in the pump open-
ing to make sure no objects remain in the interior of the pump.
3. Refit the pump cover. Press the cover inwards, check that both
sides are engaged and turn fully clockwise until tight. If the pump
cover hasn’t been properly locked, water will leak out of the ma-
chine during the next wash.
4. Replace the tap of the drain tube and push it into the machine.
5 Replace the kick plate.
Recovering your clothes when the machine
is not working
Warning! Take care! The water in the drum could be
very hot!
If the water in the drum is hot, wait until it cools down Have ready
a large bowl or bucket big enough to hold the clothes which will
be soaking wet. If the water is still quite hot wear
rubber gloves or use washing tongs to transfer the clothes to the
bowl.
1. If the water is below the level of the bottom of the
drum door.
- Push the bowl up to the door
- Normally you will be able to open the door 2 minutes after the
machine has stopped but if the machine is still very hot you may
have to wait up to a quarter of an hour before you open the door.
- Remove the clothes and shut the door.
2. If the water is above the level of the bottom of the
drum door.
Don’t open the drum door yet! You need to empty the water from
the machine before you can take out the clothes. Read the follow-
ing instructions right through before you start otherwise you won’t
know to stop the water flooding your floor when the first bucket is
full.
If the water in the drum is still quite hot be very careful and keep
children right away from the machine.
- Have a bucket ready to hold the water.
- Unplug the machine.
- Turn off the taps.
- Open the pump access door as described in “Unblocking the
pump”.
- Drain the water from the machine as described in “Unblocking
the pump”.
- Repeat the operation draining out the water until it drops below
the level of the bottom of the drum door.
- Follow the directions under 1 above to open the door and re-
move the clothes.
- Make sure the pump cover is firmly replaced.
- Replace the kick plate.
Unblocking the pump
First it is necessary to drain the water out of the drum. Before you
start read the instructions on how to prevent water from flooding
onto the floor. If the machine is full of hot water, it is safer to wait
until it cools down. Have ready a bucket and a shallow container
that will fit underneath the pump opening.
1 Unplug the machine.
2. Turn the tap(s) off.
3 Open the pump access door.
4 Place the shallow container under the pump opening.
Emptying the machine
Partially remove the pump cover by turning anticlockwise. Allow
water to flow into the container until full. Replace pump cover
and transfer the water from the container to a bucket. Repeat the
above operation until no more water flows from the machine.
Cleaning the pump
1 Remove the pump cover by turning fully anticlockwise .

SM34
UK
16
What to do if you think your machine is fautly
We describe below what your machine will be doing during normal operation
Programme times
Some times you may notice that programme times are longer or
shorter than normal. The programme time depends on the weight
of the load being washed and the temperature of the incoming
water. Your wash load will vary from week to week and the incom-
ing water temperature also varies. The bigger the load and the
lower the incoming water temperature the longer the wash will
take while the combination of a small wash load and high incom-
ing temperature could shorten the wash time considerably.
Opening the door
The door is locked at the end of each programme and can only
be opened after switching off the machine and waiting about two
minutes for the release mechanism to operate.
Do not try to force the door-serious damage could re-
sult.
Drum action
The drum revolves clockwise, then anticlockwise. This reverse
tumble action prevents the clothes from tangling. The drum re-
mains still for long periods as the water heats up and for most of
the wash time on the wool programme.
Water levels
On some programmes , such as delicates , the water level is
high and reaches the centre of the wash drum door. On other
programmes, Iike cottons, the water level is lower to increase
agitation and get the clothes clean. On low level programmes it
sometimes looks as though there is no water in the drum; this is
because the water is below the level of bottom of the drum door.
The spin
The machine may start to spin while the drum is still full of water.
This helps distribute the wash load and keep the machine bal-
anced during the spin and is quite normal.
Because the spin speed is electronically controlled you will hear
a change of sound as the drum changes from one speed to an-
other.
Power problems
Power cuts
If there is a power cut do not open the door because water could
flood out. If there is a possibility that the power will not be re-
stored for some time, follow the directions under “Recovering the
clothes”.
Power restored
When the power is restored the original programme will be com-
pleted automatically starting from the point at which it was inter-
rupted. The machine will also reheat the water if the interruption
has been of sufficient duration to cause cooling down of the wash-
ing water.
Has the fuse in
the plug blown?
If the factory fitted
plug has been
changed has it been
wrongly wired?
Is the socket faulty?
(Try another appliance in it)
Has a fuse blown OR a
circuit breaker tripped
in the household
consumer unit?
Is
the machine
plugged in and
switched on?
If YES
If YES
Do
the house
ligths work?
If NO
If NO
Plung in and switch on
There is a power cut

SM34
UK
17
Incorrect use
The chart below will help you identify the cause and remedy for some problems
Please read this carefully, it could save you money
It is inconvenient not to be able to use the machine until the service engineer calls, and to pay for the call if he finds nothing wrong. So
before you call for service: - check the lists carefuly to see if you can correct the fault yourself; - rerun the programme to check it the fault
has cleared itself. If the fault is repeated and you cannot correct it yourself you will have to ring for service. If you need to use the machine
it is possible that the particular fault may not apply to all programmes and it may be worth trying an alternative programme to get some
washing done before the engineer calls.
PROBLEM
Water appears on the floor round the ma-
chine.
No water visibible during the wash cycle.
Programme time is too long or too short.
Door won’t open.
Machine noisy or making a whining noise.
Machine makes an excessive noise and is
unstable during spinning.
Clothes are not well rinsed.
There is too much foam.
Detergent remains in the dispenser at the
end of the programme.
Some fabric conditioner remains in the dis-
penser at the end of the programme.
Clothes feel wet after spinning.
Grease deposits inside the door.
Programme does not proceed.
Timer stays in same position.
Machine heats insufficiently.
Machine does not drain or drains very
slowly .
LIKELY CASE
• Suds overflowing
• Pump cover has not been replaced se-
curely enough after cleaning
• Hose connections are not secure.
For many programmes the water level is
below the door and is not visible.
This often happens. The temperature of
the incoming hot and cold water supply
varies through the year. The lower the tem-
perature of the incoming water the longer
the machine takes to wash.
Safety lock in operation.
Probably nothing wrong, it may be caused
by spinning an uneven load or it may be
the drum’s normal noise as it increases
speed during the spin.
• Transit fitments have not been removed .
• Wash load is very small.
• Machine is not level.
• Wheels not raised if trolley fitted.
• Fioor is not firm enough.
Detergent has spilled into the fabric con-
ditioner container.
• The wrong detergent is being used.
• Too much detergent is being used.
• Tap(s) are not fully open.
• Water pressure is too low.
• Dispenser needs cleaning.
• Dispenser needs cleaning.
• Spin speed not selected correctly.
Repeated washing of very greasy articles
without a pre-wash, e.g. overalls, nappies
• Water not turned on.
• Timer in “stop’ position.
• Door not properly closed.
• Machine in heating phase.
• Variable thermostat turned down (if fitted).
• Hot and cold fill hoses transposed (if fit-
ted).
• Drain house kinked.
• Water is syphoning back into machine.
• Pump is blocked.
REMEDY
Change to a low lather detergent or use
less detergent.
See “Cleaning the pump”.
See”Avoiding probiems”
No action necessary - just check that the
tap (s) are fully opened.
Ensure machine is switched off, wait for 2
minutes and try again.
See unpacking instruction.
Retry with larger load.
See “Avoiding problems”.
Raise the wheels.
See”Avoiding problems .
When adding detergent make sure it is in
the correct compartment.
Change to a low lather detergent
Try using less detergent.
Open tap (s) fully.
See installation instructions.
See ‘’Cleaning the dispenser”.
See “Cleaning the dispenser”
Select correct speed and use the rinse &
spin programme.
Use pre-wash programme with detergent
regularly.
Open tap (s) fully.
Select correct programme.
Close door.
No action necessary - machine should pro-
ceed within 20 mins.
Select correct temperature.
Reconnect correctly water supply hoses.
Straighten drain hose.
Ensure drain hose is not an airtight fit in
stand pipe.
Clean the pump see “Unblocking the
pump”.

SM34
F
3
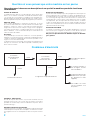
Index
Informations générales
Nous vous recommandons vive-
ment de lire attentivement toute
cette section afin de garantir une
installation efficace et en toute
sécurité de votre machine à laver
le linge.
Page
Déballage de la machine à laver 4
Branchements électriques 5
Mise à niveau 6
Plomberie 6
Utilisation de la machine à
laver
Le programme ci-joint explique :
Les commandes
Les possibilités de programme
L’utilisation de la fonction séchage
Informations lavage
Cette section contient des informa-
tions utiles concernant les diffé-
rents possibilités de programmes
et d’options, le traitement des fi-
bres et des vêtements et l’utilisa-
tion des détergents.
Page
Informations concernant le lavage 8
Lavage d’articles spéciaux 9
Chargement du linge 10
Utilisation détergents et autres produits
11
Utilisation de la machine à laver 11
Fin du lavage 12
Détachage 13
Entretien, anomalies et
remèdes
Instructions pour entretenir le ma-
chine à laver le linge, résoudre les
éventuels problèmes et anomalies.
Page
Entretien de la machine à laver 14
Faire face aux urgences 15
Débouchage de la pompe 15
Récupération du linge 15
Que faire si vous pensez que votre
machine à laver est en panne 16
Usage incorrect 17
Informations importantes pour la sauvegarde de l’environnement
Votre nouvelle machine à laver le linge a été conçue pour utiliser le minimum d’énergie électrique et d’eau tout en garantissant d’excel-
lents résultats de lavage et de rinçage. Vous pouvez contribuer à une meilleure protection de l’environnement comme suit :
LAVER toujours à machine pleine.
SUIVRE toujours les dosages recommandés par les fabricants
de détergents.
LAVER toujours à la plus basse température possible garantis-
sant des résultats de lavage satisfaisants.
NE PAS JETER les emballages n’importe où – les porter au point
de récolte le plus près pour être recyclés.
NE PAS UTILISER d’additifs inutiles. Les détergents modernes
contiennent tous les ingrédients pour un lavage efficace.
Informations importantes
Pour obtenir le meilleur service possible de votre machine à laver le linge,
observez les points suivants:
LIRE scrupuleusement ce manuel d’instruction avant d’installer et d’utiliser le machine à laver le linge.
S’ASSURER que les crochets de transport soient enlevés et que l’eau et l’électricité soient branchées. En cas de doute, consulter un
expert.
UTILISER la machine à laver le linge uniquement en milieu do-
mestique et pour laver des textiles.
UTILISER uniquement des détergents peu moussants spéciale-
ment conçus pour les machine à laver automatiques du type à
tambour.
VIDER les poches de tout article tel que épingles, pièces de
monnaie et mouchoirs en papier avant de laver.
SUIVRE les consignes de température maximum de lavage don-
nées dans ce manuel ou sur l’étiquette du vêtement.
NETTOYER périodiquement le machine à laver le linge surtout le
tiroir détergent pour éviter tout dépôt.
SURVEILLER les tuyaux d’arrivée et d’évacuation pour tout éven-
tuel entortillement ou perte.
NE PAS BRANCHER la machine à laver sur une tension électri-
que différente de celle indiquée sur la plaque de tension de la
machine.
NE PAS OTER le panneau supérieur ni postérieur de la machine
à laver.
NE PAS LAVER de lainages ou d’articles délicats dans le ma-
chine à laver le linge sauf indications contraires claires sur l’éti-
quette.
NE PAS OUVRIR le hublot pendant un programme sauf en cas
d’absolue nécessité car de l’eau très chaude pourrait couler.
NE PAS FORCER la poignée du hublot. S’il ne s’ouvre pas facile-
ment, éteindre le machine et attendre deux ou trois minutes pour
que la sécurité se débloque.
NE PAS ESSAYER de réparer vous-mêmes la machine à laver –
appeler le fabricant ou un technicien qualifié.

SM34
F
4
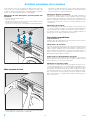
A
D
D
D
H
H
Déballage de la machine à laver le linge
Important : prendre soin de garder tout emballage hors de la portée des enfants en raison des risques potentiels (ex. suffocation avec
sacs en plastique, etc.)
Si la machine à laver est équipée de roues
de déplacement, celles-ci peuvent être
abaissées en tirant les deux leviers vers l’ex-
térieur.
Pour lever les roues, pousser jusqu’à ce que
les deux poignées s’encastrent dans la plin-
the. Déplacer la machine aussi près que
possible de sa position finale d’opération.
En cas d’utilisation des roues, déplacer la
machine à laver en tirant sur les deux poi-
gnées des leviers.
Oter les 4 vis ( A-B-C-D )
Insérer un tournevis dans les trous qui ont
été libérés et incliner pour faire tomber les
quatre joints en caoutchouc (H).
Incliner la machine et mettre les quatre joints
(H) de côté car ils pourraient endommager
le machine à laver s’ils restaient à l’intérieur.

SM34
F
5
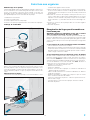
B
A
Branchements électriques
Ce produit est fabriqué en conformité à la norme 87/308/CEE du Conseil concernant les parasites. Avant d’utiliser cet électroménager,
assurez-vous que le voltage de votre maison corresponde bien au voltage indiqué sur la plaque de voltage de la machine à laver qui se
trouve à l’intérieur du couvercle de la pompe.
Attention – Cet électroménager doit être branché à la terre
PRISES MOULEES
Pour la Grande-Bretagne uniquement
Si le câble électrique de l’appareil est équipé d’une prise B.S.
1363A ayant un fusible de 13 Ampères, pour changer un fusible
dans ce type de prise procéder de la façon suivante :
1. Retirer le couvercle du fusible (A) et le fusible (Fig. 1A).
2. Insérer un fusible de rechange qui doit être du type BS 1362
13A, A.S.T.A (B) Fig. 1A.
Important :
- Le couvercle du fusible doit être remis en place à tout change-
ment de fusible.
- Si le couvercle du fusible est égaré, ne pas utiliser la prise
jusqu’à ce qu’un nouveau couvercle soit remis en place.
- Assurez-vous bien que le couvercle de rechange soit de la
même couleur que le boîtier ou de celle de l’inscription en relief
située à la base de la prise.
Pour les couvercles fusible de rechange, consulter le comptoir
électrique le plus proche.
Indiquer la couleur du boîtier du fusible
Si la prise fournie ne correspond pas à vos prises de courant
femelle, elle doit être coupée et jetée pour éviter tout risque d’élec-
trocution dans le case où elle serait branchée dans une prise de
courant de 13A située ailleurs.
Une nouvelle prise doit alors être montée sur le câble.
“Attention – cet appareil doit être branché à la terre”
Important :
Les fils du câble électrique monté sur cet appareil sont de cou-
leur correspondant au code suivant :
VERT & JAUNE – TERRE
BLEU – NEUTRE
MARRON – SOUS TENSION
Comme il est possible que la couleur des fils du câble montés
sur cet appareil ne corresponde pas aux marquages de couleur
identifiant les bornes de la prise, procéder comme suit :
le fil VERT & JAUNE doit être branché à la borne de la prise indi-
quant la lettre “ E ” ou le symbole de la terre ( ) ou VERT ou
encore VERT et JAUNE.
Le fil BLEU doit être branché à la borne indiquant la lettre “ N ” ou
NOIR. Le fil MARRON doit être branché à la borne indiquant la
lettre “ L ” ou ROUGE. Si les bornes de la prise ne présentent
aucun indication ou si vous avez des doutes quant à l’exactitude
des branchements, consulter un électricien qualifié.
N.B. nous recommandons l’utilisation d’une prise de bonne qua-
lité.
Pour la République d’Irlande uniquement
Les informations données pour la Grande Bretagne sont vala-
bles dans la plupart des cas, mais il existe un troisième type de
prises mâle et femelle, celui à 2 fiches avec la fiche terre sur le
côté. Dans ce cas, le fil VERT ET JAUNE doit être branché à la
borne TERRE et les deux autres fils aux deux fiches sans discer-
nement de couleur.
La prise de courant femelle doit être munie d’un fusible de 16
ampères.
Pour les couvercles de fusible de rechange, veuillez consulter
votre carte de garantie indiquant l’adresse du Centre d’Assis-
tance le plus proche.
Veuillez indiquer la couleur du boîtier fusible.
ATTENTION
Ne pas brancher le séchoir et la machine à laver le linge dans
une multi-prise puis dans une seule prise de courant femelle.
Brancher le séchoir et la machine à laver dans des prises de
courant distinctes.

SM34
F
6
Mise à niveau de la machine à laver le linge
Après avoir branché l’eau et l’électricité, placer le machine à laver dans sa position opérationnelle. Pour minimiser les vibrations et le
bruit pendant l’essorage, la machine doit reposer fermement sur un socle bien soutenu ou mieux à même le sol.
Une mauvaise mise à niveau de la machine pourrait entraîner un manque de stabilité et même endommager tout appareil ou meuble
placé en proximité.
Régler un ou les deux pieds antérieurs pour
mettre la machine à niveau.
Visser ou dévisser le pied jusqu’à ce que
la machine soit à niveau dans les directions
aussi bien avant-arrière que sur les côtés.
Bloquer le pied en vissant les rondelles de
blocage jusqu’à ce qu’elles soient bien
serrées contre le dessous de la machine à
laver.
A NOTER : IL EST IMPORTANT QUE LA MACHINE A LAVER SOIT BIEN VENTILEE ET QUE RIEN N’ENTRAVE LA
CIRCULATION D’AIR SOUS LA MACHINE par exemple: MOQUETTE etc.
PLOMBERIE
Emplacement
Les machines à laver modernes essorent à grande vitesse. Pour
éviter l’excès de vibrations pendant l’essorage, installer la ma-
chine sur un sol convenablement soutenu. Laisser toujours envi-
ron 5 cm d’espace libre de chaque côté de la machine à laver le
linge pour les éventuelles vibrations dues à l’essorage de char-
ges mal équilibrées.
Espace pour l’entretien et l’installation
Laisser un espace libre de chaque côté de la machine à laver le
linge pour l’accès et l’entretien.
Dispositions de la Compagnie des Eaux
Ces instructions s’entendent uniquement à titre général ; il con-
vient de respecter les arrêtés municipaux ainsi que le règlement
de la Compagnie des Eaux en matière de branchement au ré-
seau et évacuation des eaux usées de la machine à laver le linge.
Pression de l’eau
Le machine à laver le linge peut fonctionner selon une grande
fourchette de pressions :
Eau chaude minimum 5 N/cm2 (0,5 Bars) (7 p.s.i.)
(s’il y a lieu) maximum 10 N/cm2 (1 Bars) (15 p.s.i.)
Eau froide minimum 5 N/cm2 (0,5 Bars) (7 p.s.i.)
maximum 100 N/cm2 (10 Bars) (150 p.s.i.)
Une hauteur minimum de 2,4 m par rapport au dessus de la
machine suffira normalement à satisfaire les besoins minimum
en pression.
Approvisionnement en eau
- La plupart des systèmes domestiques d’eau chaude convien-
nent.
- Les chaudières à gaz peuvent être utilisés à condition que la
pression d’eau soit suffisante – vérifier avec le fabricant.
- Les chauffe-eau à gaz à production instantanée d’eau chaude
NE DOIVENT PAS ETRE UTILISES. En cas de doute
consulter le fabricant ou la Compagnie du gaz ou d’électricité.
Branchements d’eau
Tous les joints et raccords indiqués dans cette section sont en
vente auprès des revendeurs de matériaux du bâtiment ou de
plomberie, des grands magasins de bricolage (ex. Payless, Texas
Homecare) ou des chaînes d’électroménagers (ex. e.g. Currys).
Tuyau d’alimentation
Important
Toutes nos machines à laver le linge sont livrées avec des tuyaux
spéciaux à haute pression équipés d’un raccord femelle B.S.P.
de 19 mm.
Ce raccord ne doit être enlevé du tuyau en aucune
circonstance
Nous n’accepterons aucune responsabilité pour des tuyaux ou
des branchements défectueux si les raccords montés en usine
ont été enlevés. Ces tuyaux ont une longueur étudiée pour per-
mettre le déplacement de la machine lors d’opérations de net-
toyage et d’entretien sans avoir à les débrancher. Si cela n’est
pas possible pour des raisons propres à l’emplacement de vo-
tre machine, des tuyaux de 33,5 m sont disponibles auprès de
Whiripool UK (Ltd). Demander la pièce n° 53027059. Si vous
avez également besoin d’un tuyau de vidange plus long, vous
pouvez le commander en même temps.
) or from electrical chain stores like (
La page est en cours de chargement...
La page est en cours de chargement...
La page est en cours de chargement...
La page est en cours de chargement...
La page est en cours de chargement...
La page est en cours de chargement...
La page est en cours de chargement...
La page est en cours de chargement...
La page est en cours de chargement...
La page est en cours de chargement...
La page est en cours de chargement...
La page est en cours de chargement...
-
 1
1
-
 2
2
-
 3
3
-
 4
4
-
 5
5
-
 6
6
-
 7
7
-
 8
8
-
 9
9
-
 10
10
-
 11
11
-
 12
12
-
 13
13
-
 14
14
-
 15
15
-
 16
16
-
 17
17
-
 18
18
-
 19
19
-
 20
20
-
 21
21
-
 22
22
-
 23
23
-
 24
24
-
 25
25
-
 26
26
-
 27
27
-
 28
28
-
 29
29
-
 30
30
-
 31
31
-
 32
32


Whirlpool AWG 995/1 Le manuel du propriétaire
- Catégorie
- Machines à laver
- Taper
- Le manuel du propriétaire
- Ce manuel convient également à
dans d''autres langues
- English: Whirlpool AWG 995/1 Owner's manual
Documents connexes
Autres documents
-
Miele W1986 Le manuel du propriétaire
-
-
Candy GO W475-47 Manuel utilisateur
-
Zanussi ZKH2145 Manuel utilisateur
-
Otsein-Hoover DYN 9124DG/L-37 Manuel utilisateur
-
Hoover HF7 12 E Le manuel du propriétaire
-
Brandt LW6699U11 Le manuel du propriétaire
-
-
Faure FWG3125 Manuel utilisateur
-