Krups XP618050 Manuel utilisateur
- Catégorie
- Accessoires de préparation de café
- Taper
- Manuel utilisateur

Réalisation : Espace Graphique
XP6180
EN
FR
ES
WWW.KRUPS.COM
KR_ESPRESSO_XP6180_NC00023127-03_Mise en page 1 09/03/12 09:50 PageC2

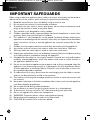
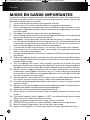
IMPORTANT SAFEGUARDS
When using an electrical appliance, basic safety instructions must always be observed to
reduce the risks of fire, electric shock and injury, in particular the following:
1. Read the instructions for use in full before using for the first time.
2. Do not touch hot surfaces. Use the handles or buttons.
3. To protect from fires, electric shocks and injuries, do not immerse the power cord,
plugs or the machine in water or any other liquid.
4. This machine is not designed for use by children.
5. Children should be closely supervised when the electrical appliance is used in their
proximity. Store away from the reach of children.
6. This appliance is not intended for use by people (including children) without prior
experience or knowledge with the machine, unless they are supervised or have been
given instructions on how to use the appliance by a person responsible for their
safety.
7. Children must be supervised to ensure that they do not play with the appliance.
8. Any contact with hot surfaces, hot water or steam can cause burns. Take care.
9. Take care when the steam spout is used as steam can cause burns.
10. Unplug from outlet when not in use and before cleaning. Allow to cool before putting
on or taking off parts, and before cleaning the appliance.
11. All appliances are subject to strict quality controls. Practical tests are conducted on
randomly selected appliances, which may explain small marks or coffee remains in
the appliances before first use.
12. Do not use an electrical appliance whose power cord or plug is damaged, when the
appliance is not functioning correctly or is damaged in any way whatsoever. Return
all faulty appliances to the Krups Service Center as soon as possible so that it can
be inspected, adjusted or repaired.
13. To reduce the risk of injury, do not leave the cord hanging over the table or counter,
where it can be pulled on by a child or trip someone.
14. The cord must not hang over the edge of table or counter or come into contact with
hot surfaces.
15. Never pour cold water in the tank immediately after a brew cycle. Let the appliance
cool down between preparations.
16. Do not open the lid during coffee production.
17. Do not place on or near a hot gas or electric burner, or in a heated oven.
18. To disconnect, turn any control to "off", then remove plug from wall outlet.
19. Do not use appliance for other than intended use.
20. WARNING: To prevent electric shock, unplug before cleaning.
21. Never immerse the appliance in water or any other liquid.
22. CAUTION: 60 minutes ON in a two-hour period.
English
2
KR_ESPRESSO_XP6180_NC00023127-03_Mise en page 1 09/03/12 09:50 Page2

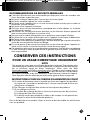
GENERAL SAFETY RECOMMENDATIONS
n The use of accessory attachments not recommended by Krups may result in fire, electric
shock or injury to persons.
n Never operate the appliance with wet hands.
n Never place the appliance near to or on a source of heat and avoid the cord from touching
hot surfaces.
n Never use the appliance outdoors.
n Ensure that the main voltage corresponds to that marked on the appliance’s name plate.
n To prevent excessive load on the electricity network, do not connect other high consumption
appliances on the same circuit.
n Check that the power cord is in perfect condition before each use.
n Never pull the power cord or the appliance itself to disconnect the appliance.
n Never leave the appliance unsupervised when connected.
n If the power cord should become damaged, this must be replaced by a professional from
an Approved Service Center to avoid any danger.
n In the event of a fault or malfunction, do not try to repair the appliance yourself, leave this
to a professional from an Approved Service Center.
n This appliance has been designed for domestic use only. Any misuse of the appliance
cancels the guarantee and could release the manufacturer from any liability.
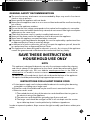
SAVE THESE INSTRUCTIONS
HOUSEHOLD USE ONLY
NOTE
This appliance is designed for domestic use only. Any maintenance other than cleaning
and normal upkeep of the appliance by the owner should be performed by Krups
approved personnel only. Visit our website www.krupsusa.com in the USA or
www.krups.ca in Canada, or contact customer services at your nearest service center.
To reduce risks of fire and electric shock, do not dismantle the base of the appliance.
All repairs should be performed by Krups approved personnel only.
INSTRUCTIONS FOR A SHORT POWER CORD
a/ A short power-supply cord is to be provided to reduce risks resulting from becoming
entangled in or tripping over a longer cord.
b/ Extension cords are available and may be used if care is exercised in their use.
c/ Extension cord is used:
1/ The marked electrical rating of the extension cord should be at least as great as
the electrical rating of the appliance;
2/ The extension cord should be a grounding-type 3-wire cord; and
3/ The longer cord should be arranged so that it will not drape over the counter
top or table top where it can be pulled on by children or tripped over.
In order to improve its products, Krups reserves the right to modify specifications without prior
notice.
English
3
KR_ESPRESSO_XP6180_NC00023127-03_Mise en page 1 09/03/12 09:50 Page3

a
b
i
d
c
e
h
f
j
k
l
m
g
n
p
q
o
r s
f
f
English
4
KR_ESPRESSO_XP6180_NC00023127-03_Mise en page 1 09/03/12 09:50 Page4

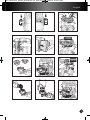
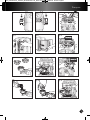
1
2
2
1
OFF
STEAM
2
fig. 4
fig. 6
fig. 1 fig. 2
fig. 10
fig. 7
fig. 9
fig. 8
fig. 11 fig. 12
fig. 5
1
2
fig. 3
English
5
KR_ESPRESSO_XP6180_NC00023127-03_Mise en page 1 09/03/12 09:50 Page5

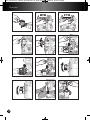
OFF
STEAM
1
2
fig. 16
fig. 18
fig. 13 fig. 14
fig. 22
fig. 19
fig. 15
fig. 17
fig. 21
fig. 20
fig. 23 fig. 24
English
6
KR_ESPRESSO_XP6180_NC00023127-03_Mise en page 1 09/03/12 09:50 Page6

f
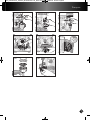
fig. 28
fig. 25 fig. 26
fig. 27
fig. 29
fig. 31
fig. 30
fig. 32
f
English
7
KR_ESPRESSO_XP6180_NC00023127-03_Mise en page 1 09/03/12 09:50 Page7

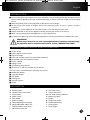
TABLE OF CONTENTS
IMPORTANT SAFEGUARDS.......................................................................................................................p. 2
ESPRESSO TIPS............................................................................................................................................p. 9
TECHNICAL CHARACTERISTICS AND ACCESSORIES .................................................................p. 9
DESCRIPTION.................................................................................................................................................p. 9
FEATURES OF YOUR ESPRESSO MACHINE .....................................................................................p. 10
BEFORE FIRST USE......................................................................................................................................p. 10
OPERATING THE APPLIANCE
PREPARING AN ESPRESSO..........................................................................................................p. 13
FROTHING MILK .................................................................................................................................p. 14
MAKING HOT WATER........................................................................................................................p. 15
PROGRAMMING ESPRESSO VOLUME ....................................................................................p. 15
RESETING THE FACTORY SETTINGS.........................................................................................p. 16
PROGRAMMING ESPRESSO THERMOBLOCK TEMPERATURE ....................................p. 17
PROGRAMMING STEAM THERMOBLOCK TEMPERATURE..............................................p. 17
PROGRAMMING STEAM WETNESS OR STEAM PUMP RATE ..........................................p. 18
FACTORY RESET.................................................................................................................................p. 18
CLEANING AND CARE.................................................................................................................................p. 19
DESCALING .....................................................................................................................................................p. 20
DISPOSING OF YOUR MACHINE............................................................................................................p. 21
MANUFACTURER’S WARRANTY..............................................................................................................p. 21
English
8
KR_ESPRESSO_XP6180_NC00023127-03_Mise en page 1 09/03/12 09:50 Page8

ESPRESSO TIPS
n For an intensely aromatic espresso, we recommend that you use freshly ground special espresso coffee
which is ideal for preparing this type of delicate beverage, as well as cups with a capacity not exceeding
50 ml.
n Keep the ground coffee in the refrigerator to preserve its aroma longer.
n Do not fill your filter holder to the brim, but use the measuring spoon (1 cup = 1 spoon –2 cups =
2 spoons).
n If you do not use the appliance for more than 5 days, rinse and drain the water tank.
n Always remember to turn off the appliance before removing the tank to fill or empty it.
n Make sure you always place the appliance on a flat stable surface.
n To obtain an espresso at exactly the right temperature, we recommend that you preheat your cups.
IMPORTANT!
Before using for the first use, after a prolonged period of inactivity or after descaling,
the appliance must be cleaned as described in section: “BEFORE FIRST USE”
TECHNICAL CARACTERISTICS AND ACCESSORIES
n Pump: 16 bar
n Steam and Hot water function
n Espresso Gauge
n Auto-stop after 60 minutes (environmental protection).
n Removable water tank (capacity 3 liters)
n Power: 1800W
n Voltage: 120V
n Overheating safety devices
n Dimensions: L 330 mm, W 330 mm, H 375 mm
This unit comes standard with the following accessories:
n double filter basket
n single filter basket
n filter holder
n cleaning pin
n measuring spoon
n tamper
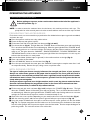
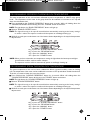
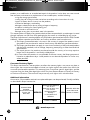
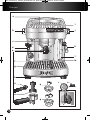
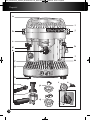
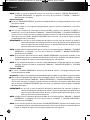
DESCRIPTION
English
a Warming plate
b Variable steam control dial
c Group head
d Steam nozzle
e Filter holder
f Espresso gauge
g Removable drip tray and grid
h Height adjustable rubber feet
i Programmable control panel
j Hot water control dial
k Hot water nozzle
l 3 liters water tank
m Low water warning indicator
n Measuring spoon
o Tamper
p Single filter basket
q Double filter basket
r Cleaning disc
s Cleaning pin
9
KR_ESPRESSO_XP6180_NC00023127-03_Mise en page 1 09/03/12 09:50 Page9

English
FEATURES OF YOUR ESPRESSO MACHINE
The machine offers a 16 bar pump, delivering the pressure required for a complete extraction.
Espresso Gauge
The espresso gauge is an indicator of the espresso quality and
should be used as a guide.
It measures the pressure of water arriving into the filter holder.
When the needle is near the target area on the gauge it indicates
there is no problem and the espresso pours regularly from the
distributor.
The crema should be dark golden in color.
Should the needle fail to reach the target area, this is an indication
that the shot of expresso is “under-extracted”. This occurs when water passes too quickly through the
tamped coffee grinds and that either the grind needs to be made finer or that the filter basket has been
under-dosed. The result of an under-extracted shot is a quick pour that is light in color with crema that is
thin wih a creamy light brown color.
When the needle goes beyond the target area it indicates that the espresso is ‘over-extracted’. This occurs
when the water passes very slowly through the tamped coffee ground. It indicates that the ground is too
fine or the filter basket has been over-dosed. In this situation the hot water is in contact with the coffee
ground for too long thus creating a burnt and bitter tasting espresso. This is characterised by the espresso
only slowly dripping during the entire pour and the crema is very dark.
Pre-Infusion
Pre-infusion is programmed into the manual, single espresso and double espresso operations. It is a
gradual increase of water pressure pre-soaking the coffee cake before full water pressure is applied. This
in turn delivers greater body and sweetness to the espresso.
IMPORTANT:
In order to extract the maximum flavor from the beans, this machine pre-infuses
each cup. The pump works for 3 seconds, pauses for 3 seconds, and then continues
until the cup is finished
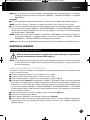
BEFORE FIRST USE
n Place the espresso machine onto a dry, stable benchtop.
n Ensure the drip tray and grid are in place.
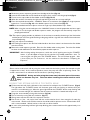
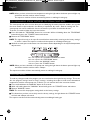
n Fill the tank with water. There are a couple of ways in which the water tank can be filled;
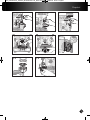
- Simply lift the lid of the water tank at the top of the espresso machine and using a jug, fill with fresh
cold water or filtered water (fig. 3).
- Alternatively the water tank can be removed and filled with fresh cold water. To do so, open the door
on the back of the espresso machine (fig. 4) and simply slide out the water tank (fig. 5). Then fill
with fresh cold water or filtered water. Replace the water tank firmly and shut the door.
n Plug in the appliance. To switch the power on, press the “POWER” button once to turn the espresso
machine on (fig.6). The light above the “POWER” button will illuminate green and start flashing to
indicate that your machine is on and heating up. When the green light above the “POWER” button
stops flashing and turns to a constant red light, this indicates that the espresso machine is heated and
ready to use.
Extraction
Extraction
Extraction
10
KR_ESPRESSO_XP6180_NC00023127-03_Mise en page 1 09/03/12 09:50 Page10

NOTE: Before turning on the espresso machine ensure that the steam and hot water control dials are in
the OFF position (fig. 1 and 2). When the ‘POWER’ light flashes green, the machine is heating
up.
n Place glasses and cups on the warming plate.
IMPORTANT: For first time use or if the machine has not been used for some time, it is important that the
machine is rinsed as follows:
n Fill the tank with fresh water up to the maximum water level.
n Fit either the single or double filter basket into the filter holder (fig. 7). Secure the filter holder to the group
head (fig. 8).
n Place a sufficiently large container under both pouring spouts.
n Start rinsing by circulating the full tank of fresh water as follows:
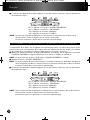
- 1/4 of the water tank through the SPOUT circuit: turn the hot water control dial anti-clockwise as far
as it will go until 1/4 of the water has been poured. Turn the dial clockwise to stop the pour.
- 3/4 of the water tank through the ESPRESSO circuit: press the 'MANUAL' button and let the water
to run through.
NOTE: The espresso machine is programmed to automatically stop the water flow after 240ml, press the
‘MANUAL’ button again to restart the water flow.
USI NG TH E CONTROL PANE L”
Power
n Press the “POWER” button once to turn the espresso machine on (fig.6). The light above the “POWER”
button will illuminate green and start flashing to indicate that your machine is on and heating up. When the
green light above the “POWER” button stops flashing and turns to a constant red light, this indicates that
the espresso machine is heated and ready to use. The lights above the “MANUAL”, “SINGLE
ESPRESSO” and “DOUBLE ESPRESSO” buttons will show a constant green light. The machine is
now in Ready Mode.
NOTE: Remember that if the light above the “POWER” button is flashing it means the espresso machine is
adjusting the temperature of the heating system. To turn the espresso machine off, simply press the
“POWER” button, the red power light and all the other lights on the control panel will turn off.
Manual
n The manual button allows the coffee maker to have complete control over the length of the espresso pour.
n Once the espresso machine is switched on and heated, the light above the “POWER” button will turn red
and the lights above the “MANUAL”, “SINGLE ESPRESSO” and “DOUBLE ESPRESSO” buttons will
show a constant green light, you can now use the machine in manual operation. Simply press the
“MANUAL” button once to start the pour and again to stop.
IMPORTANT: Once the manual mode operation is activated, before the espresso pour starts the pre-infusion
feature will release three short bursts of gradual water pressure onto the coffee cake. After
this the full water pressure is applied and the espresso will pour freely.
NOTE : When you activate the manual operation the lights above the “SINGLE ESPRESSO” and “DOUBLE
ESPRESSO” buttons will go off. The lights above the “POWER” and “MANUAL” buttons will remain
on.
Single espresso
n The “SINGLE ESPRESSO” function removes the guesswork and is programmed to pour 1 ounce of liquid
espresso.
Tip: We recommend using the single cup filter when using the programmed single espresso operation.
English
11
KR_ESPRESSO_XP6180_NC00023127-03_Mise en page 1 09/03/12 09:50 Page11

n Once the espresso machine is switched on and heated , the light above “POWER” button will be red and
the lights above the “MANUAL”, “SINGLE ESPRESSO” and “DOUBLE ESPRESSO” buttons will show
a constant green light, the coffee maker is able to use the single espresso operation. Simply press the
single espresso button once to start and the pour of liquid espresso will stop automatically.
IMPORTANT: Once the single espresso operation is activated, before the espresso pour starts, the pre-
infusion will release three short bursts of gradually increasing water pressure onto the coffee
cake. After this full water pressure is applied and the espresso will pour freely.
NOTE: Once the single espresso operation is activated the lights above the “MANUAL” and “DOUBLE
ESPRESSO” buttons will go off. The lights above the “POWER” and “SINGLE ESPRESSO”
buttons will remain on.
NOTE: You do not need to press the “SINGLE ESPRESSO” button again to end the pour as the espresso
machine will stop automatically. Once the pour of liquid espresso stops, the espresso machine is
ready to make another espresso.
NOTE: When using the single espresso operation you can stop the pour of espresso at any time by pressing
the “MANUAL”, “SINGLE ESPRESSO” or “DOUBLE ESPRESSO” operation buttons.
Double espresso
n The “DOUBLE ESPRESSO” function removes the guesswork and is programmed to pour 2 ounces of
liquid espresso.
Tip: We recommend using the double cup filter when using the programmed double espresso operation.
n Once the espresso machine is switched on and heated , the light above the “POWER” button will be red
and the lights above the “MANUAL”, “SINGLE ESPRESSO” and “DOUBLE ESPRESSO” buttons will
show a constant green light, you are now able to use the double espresso operation. Simply press the
double espresso button once to start and the pour of liquid espresso will stop automatically.
IMPORTANT: Once the double espresso operation is activated, before the espresso pour starts, the pre-
infusion will release three short bursts of gradually increasing water pressure onto the coffee
cake. After this full water pressure is applied and the espresso will pour freely.
NOTE: When the double espresso operation has been activated the lights above the “MANUAL” and
“SINGLE ESPRESSO” buttons will go off. The lights above the “POWER” and “DOUBLE
ESPRESSO” buttons will remain on.
NOTE: You do not need to press the “DOUBLE ESPRESSO” button again to end the pour as the espresso
machine will stop automatically. Once the pour of liquid espresso stops, the espresso machine is
ready to make another espresso.
NOTE: When using the double espresso operation you can stop the pour of espresso at any time by pressing
the “MANUAL”, “SINGLE ESPRESSO” or “DOUBLE ESPRESSO” operation buttons.
Program
n The program function allows you to personalize and save your own espresso pour settings.
NOTE: Refer to the section “Programming your espresso machine” to follow instructions
n Once the espresso machine is switched on and heated , so the light above the “POWER” button is red
and the lights above the “MANUAL”, “SINGLE ESPRESSO” and “DOUBLE ESPRESSO” buttons show
a constant green light, you are able to use the program function. To activate the program function, simply
press the “PROGRAM” button.
NOTE: When the program function has been activated the light above the “PROGRAM” button will show
a constant red light and the light above the “MANUAL” button will go off. Additionally the ligths above
the “POWER”, “SINGLE” and “DOUBLE ESPRESSO” buttons will remain on.
NOTE: For more detailed information on programming refer to page 15 “Programming your espresso volume".
English
12
KR_ESPRESSO_XP6180_NC00023127-03_Mise en page 1 09/03/12 09:50 Page12

OPERATING THE APPLIANCE
PREPARING AN ESPRESSO
Before making an espresso, make sure the steam knob on the left of the appliance is
in the OFF position (fig. 1).
NOTE : In order to extract the maximum flavor from the beans, this machine pre-infuses each cup. The
pump works for a few seconds, pauses for a few seconds and then continues until the cup is finished.
PREHEATING THE ACCESSORIES
For the best results, we recommend that you preheat the filter holder before espresso grounds are added,
and warm the cups.
n Place the espresso machine onto a dry, stable surface.
n Ensure the drip tray and grill are in place.
n Fill the water tank with fresh cold water (see above and fig 3, 4 and 5)
n Turn the machine on (fig. 6). The light above the “POWER” button will illuminate green and start flashing.
This is to indicate that the machine is on and heating up. When the green light above the “POWER” button
stops flashing and turns to a constant red light, this indicates that the espresso machine is heated and
ready to use. The lights above the “MANUAL”, “SINGLE ESPRESSO”, “DOUBLE ESPRESSO” and
“PROGRAM” buttons will also show a constant green light. When the control panel is lit in this way, this
indicates that the machine is in ready mode.
n Insert the filter holder (without espresso grounds) in the machine and turn to the right (fig. 8)
n Place cups under the filter holder.
n Press the “MANUAL” button to start the water flow (fig. 9).
n Once the cups are filled with hot water, press the “MANUAL” button again to stop the water flow. It will
not stop automatically. Remove the cups, taking care to not spill the water.
WITH GROUND COFFEE
The type of coffee you choose strongly influences the strength and flavor of your espresso.
Always use coffee beans ground to the proper size for espresso. Too fine a grind will result in
espresso that is over-extracted and bitter. Too coarse a grind will result in espresso that is under-
extracted and weak in flavor. The perfect espresso grind will feel like fine grains that do not
clump when pressed together.
Store your espresso grounds in an airtight container, and in a cool, dry place to retain the flavor.
Grounds should not be kept for long periods of time as the flavor will be reduced over time.
Do not use instant coffee, or coffee for drip coffee machines.
n Fill the water tank with fresh cold water (fig. 3-4-5) and press the “POWER” (fig. 6) button. The light
above the “POWER” button will illuminate green and start flashing. This is to indicate that the machine is
on and heating up. When the green light above the “POWER” button stops flashing and turns to a constant
red light, this indicates that the espresso machine is heated and ready to use.
n Choose the one or two cup filter (depending on your needs) and insert it inside the filter holder (fig. 8).
n With the measuring spoon, add one level spoon of ground coffee per cup of espresso. (fig. 10).
n Using the tamper included with the espresso machine tamp the coffee grounds into the filter holder
(fig. 11). For a proper tamp place the filter holder on a flat surface then press the bottom of the tamper
onto the coffee grounds with firm pressure to pack it into the filter holder. Twist the tamper 90 degrees to
polish the grounds. This seals the surface of the coffee cake.
English
13
KR_ESPRESSO_XP6180_NC00023127-03_Mise en page 1 09/03/12 09:50 Page13

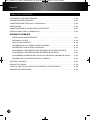
n Remove any excess espresso grounds from the edge of the filter (fig. 13).
n Insert the filter holder and turn the handle to the right to firmly secure it into the group head (fig. 8).
n Put one or two cups under the filter holder as desired (fig. 14-15).
n When the machine is heated up, the light will stop flashing and turn to a constant red light.
n Press the required volume button : “MANUAL” button for a continuous flow (fig.9), the single espresso
button for a 1 ounce flow (fig. 14) or the double espresso for a 2 ounce flow (fig. 15).
NOTE: recommended maximum espresso volume of single cup is 50ml, double cup is 100ml.
NOTE: When using the manual mode, press the “MANUAL” button to start the preparation and once again
to stop it. For the single and double espresso modes, the program will automatically stop at the
pre-programmed level.
Tip: The espresso gauge provides an indication of the resistance created by the dosing of the filter basket
and the particle size of the grind. Referring to the gauge will be a sign that one or both of these elements
may need adjusting.
n Enjoy your espresso immediately.
n After making an espresso turn the filter holder handle to the left to release it and remove the filter holder
from the machine.
n Remove the used espresso grounds. Rinse the filter holder under running water. Once the filter holder
has been rinsed and dried it can be refilled to prepare another espresso.
IMPORTANT : After finishing making the espresso, switch the unit off again by pressing the “POWER”
button. If you do happen to forget, the unit switches into standby mode after 1 hour. To
start using the unit again, press the “POWER” button. The unit will heat up again. After
a short while you can continue to use the machine as described in “Preparing An
Espresso”.
FROTHING MILK
Steam can be used to froth milk by using the steam wand with the frothing nozzle (for example to make
a cappuccino or latte.) As the machine produces steam, the pump will make an operating sound. This
sound is normal and is an indication that the machine is operating properly.
IMPORTANT! During and after using the steam wand, the metal parts of the steam
wand can become very hot. Take care when handling the steam wand to avoid
injury.
USI NG TH E STEAM NOZZLE TO FROTH MILK
n Fill the water tank with fresh cold water to the maximum line and press the “POWER” button. (fig. 6).
The light above the “POWER” button will illuminate green and start flashing to indicate that your
machine is on and heating up. When the green light behind the “POWER” button stops flashing and
turns to a constant red light, this indicates that the espresso machine is heated and ready to use.
n Purge the steam wand by turning dial clockwise. (fig. 16)
n Turn off steam by turning dial anti-clockwise. (fig. 17)
n Swing steam wand to the side of the espresso machine
n Pour 2 to 3 oz. (1/4 – 1/3 cup) of fresh milk into a milk container that is short enough to fit under the
steam nozzle. Both the milk and the container should be cold for optimum results. Pasteurized or UHT
milk is recommended. Whole, lowfat or skim milk can all be frothed.
n As soon as the preheating indicator light stops blinking, place steam wand into milk, approximately 1cm
below surface.
English
14
KR_ESPRESSO_XP6180_NC00023127-03_Mise en page 1 09/03/12 09:50 Page14

n Turn the knob to the OPEN position (fig. 18).
n For optimal results, froth from the bottom of the container and slowly move upwards. Hold the nozzle
towards the bottom of the container without touching the bottom for about 15 seconds (fig. 19). Then
gradually lower the container so that the steam nozzle moves up towards the surface of the milk. Do
not allow the nozzle to come completely out of the milk.
n Once the frothing is complete, turn the dial to the OFF position (fig. 20).
n It is important to clean the steam nozzle after each use to prevent milk from hardening and drying inside
the nozzle which can result in the tube blowing off due to pressure build-up. To clean the nozzle :
n Place the steam nozzle in a small container filled with water.
n Turn the dial to the ON position to remove any remaining milk. Run in the steam position for at least 30
seconds.
n Then turn the dial to the OFF position (fig. 22) and wipe the outside of the steam nozzle with a clean
cloth (fig. 23).
For thorough cleaning of the steam nozzle, see Section, “Cleaning of the Steam Nozzle”.
MAKING HOT WATER
The hot water dispenser is ideal for preparing tea or infusions.
n Fill the water tank with fresh cold water to the maximum line and press the “POWER” button. The
light behind the “POWER” button will illuminate green and start flashing to indicate that your machine
is on and heating up. When the green light behind the “POWER” button stops flashing and turns to a
constant red light, this indicates that the espresso machine is heated and ready to use.
n Turn the steam nozzle to the outside of the appliance.
n Set a container under the nozzle and turn the control knob to the OPEN position.
n Turn the hot water control dial anti-clockwise as far as it will go (fig. 24).
n Hot water will now flow into the container.
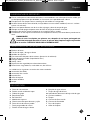
n To stop the water flow, turn the control dial clockwise (fig. 25).
NOTE: recommended maximum volume of hot water is 100ml.
n Remove the cup or container and swing the hot water nozzle over the drip tray to catch any drips of
water (fig. 26).
PROGRAMMING ESPRESSO VOLUME
PROG RAMMI NG SINGLE ESPRE SSO VOLUME
n Fill the water tank with fresh cold water to the maximum line and press the “POWER” button. The
light behind the “POWER” button will illuminate green and start flashing to indicate that your machine
is on and heating up. When the green light behind the “POWER” button stops flashing and turns to a
constant red light, this indicates that the espresso machine is heated and ready to use.
Tip: We recommend using the single cup filter when using the programmed single espresso operation.
n With the measuring spoon, add one level spoon of ground coffee per cup of espresso. (fig. 10).
n Using the tamper included with the espresso machine, tamp the coffee grounds into the filter holder
(fig. 11). For a proper tamp place the filter holder on a flat surface then press the bottom of the tamper
onto the coffee grounds with firm pressure to pack it into the filter holder. Twist the tamper 90 degrees
to polish the grounds. This seals the surface of the coffee cake.
n Remove any excess espresso grounds from the edge of the filter (fig. 13).
n Insert the filter holder and turn the handle to the right to firmly secure it into the group head (fig. 8).
n Put one or two cups under the filter holder as desired (fig. 14-15).
English
15
KR_ESPRESSO_XP6180_NC00023127-03_Mise en page 1 09/03/12 09:50 Page15

n To start programming, press the “PROGRAM” button (fig. 27). It will illuminate red and the “MANUAL”
button will turn off. The lights above the “POWER”, "SINGLE" and "DOUBLE ESPRESSO" buttons
will remain on.
n Press the “SINGLE ESPRESSO” button to start (fig. 27). The light above the “DOUBLE ESPRESSO”
button will turn off, and only the “POWER” light, “SINGLE ESPRESSO” light and “PROGRAM” light
will remain on.
n Stop the flow at the desired level by pressing the “SINGLE ESPRESSO” button.
n 2 beeps indicate that the programmed volume is memorized.
NOTE: recommended maximum espresso volume of single cup is 50ml.
n The espresso machine is ready to make another espresso
PROG RAMMI NG DOU BLE ESPRESSO VOLUME
n Fill the water tank with fresh cold water to the maximum line and press the “POWER” button. The
light behind the “POWER” button will illuminate green and start flashing to indicate that your machine
is on and heating up. When the green light behind the “POWER” button will stop flashing and turns
to a constant red light, this indicates that the espresso machine is heated and ready to use.
Tip: We recommend using the double cup filter when using the programmed double espresso operation.
n With the measuring spoon, add one level spoon of ground coffee per cup of espresso. (fig. 10).
n Using the tamper included with the espresso machine, tamp the coffee grounds into the filter holder
(fig. 11). For a proper tamp place the filter holder on a flat surface then press the bottom of the tamper
onto the coffee grounds with firm pressure to pack it into the filter holder. Twist the tamper 90 degrees
to polish the grounds. This seals the surface of the coffee cake.
n Remove any excess espresso grounds from the edge of the filter (fig. 13).
n Insert the filter holder and turn the handle to the right to firmly secure it into the group head (fig. 8).
n Put one or two cups under the filter holder as desired (fig. 14-15).
n To start programming, press the “PROGRAM” button (fig. 27). It will illuminate red and the “MANUAL”
button will turn off. The lights above the “POWER”, "SINGLE" and "DOUBLE ESPRESSO" buttons
will remain on.
n Press the “DOUBLE ESPRESSO” button to start (fig. 27). The light above the “SINGLE ESPRESSO”
button will turn off, and only the “POWER” light, “DOUBLE ESPRESSO” light and “PROGRAM” light
will remain on.
n Stop the flow at the desired level by pressing the “DOUBLE ESPRESSO” button.
n 2 beeps indicate that the programmed volume is memorized.
NOTE: recommended maximum espresso volume of double cup is 100ml.
n The espresso machine is ready to make another espresso.
RESETING THE FACTORY SETTINGS
To revert back to the original factory settings:
IMPORTANT: Although the espresso machine is plugged in ensure that the actual espresso machine power
is “OFF”. Therefore, no lights will be illuminated on the espresso machine control panel.
n Press and hold down the “MANUAL” button. While still holding down the manual button briefly press
the “POWER” button and then release the “MANUAL” button.
n When you hear the 4 beeps and the power light will flash and the espresso machine will have returned
to the original factory settings and the next time the single or double espresso functions are used the
espresso pours will be 1 ounce and 2 ounces.
English
16
KR_ESPRESSO_XP6180_NC00023127-03_Mise en page 1 09/03/12 09:50 Page16

PROGRAMMING ESPRESSO THERMOBLOCK TEMPERATURE
The water temperature of this unit has been calibrated to precise temperature of 197.6°F at the group
head. The temperature of the water at the group head can be modified in increments of 2°F up and
down should it be desired.
n Press and hold on the “SINGLE ESPRESSO” button for 3 seconds. While still holding down the
"SINGLE ESPRESSO" button briefly press the "POWER" button and release.
NOTE: The light above the “SINGLE ESPRESSO” button will light up.
n Release "SINGLE COFFEE" button.
NOTE: This light will remain on for up to 5 seconds before automatically returning to the factory setting if
no action is taken. The espresso machine will then power on and begin heating up.
n Within 5 seconds, press and release one of the buttons below depending on the required temperature
adjustements:
+2°F = press the “DOUBLE ESPRESSO” button
+4°F = press the “PROGRAM” button
-2°F = press the “MANUAL” button
-4°F = press the “POWER” button
NOTE: When you have selected a new temperature setting the light above the button pressed lights
up and flashes and the machine makes 2 beeps.
The espresso machine will then automatically power on and begin heating up.
PROGRAMMING STEAM THERMOBLOCK TEMPERATURE
The steam temperature of this unit has been calibrated to deliver a powerful and dry steam for frothing
milk. The temperature of the steam can be modified in increments of 3°F up and down should it be desired.
To do this you need to follow the instructions below:
n Press and hold the “DOUBLE ESPRESSO” button for 3 seconds. While still holding down the
"DOUBLE ESPRESSO" button briefly press the "POWER" button and release.
NOTE: The light above the “DOUBLE ESPRESSO” button will light up.
n Release "DOUBLE ESPRESSO" button.
NOTE: This light will remain on for up to 5 seconds before automatically returning to the factory setting if
no action is taken. The espresso machine will then power on and begin heating up.
n Within 5 seconds, press and release one of the buttons below depending on the required temperature
adjustements:
+3°F = press the “DOUBLE ESPRESSO” button
+3°F = press the “PROGRAM” button
-3°F = press the “MANUAL” button
-3°F = press the “POWER” button
English
17
KR_ESPRESSO_XP6180_NC00023127-03_Mise en page 1 09/03/12 09:50 Page17

NOTE: When you have selected a new temperature setting the light above the button pressed lights up
and flashes and the machine makes 2 beeps.
The espresso machine will then automatically power on and begin heating up.
PROGRAMMING STEAM WETNESS OR STEAM PUMP RATE
The steam pump rate of this unit has been pre-set. Modifying the steam pump rate enables you to make
the steam wetter or dryer and aids in the delivery of a powerful, dry steam - ideal for frothing milk. The
steam pump rate can be modified in flow rate increments up or down should it be desired.
To do this you need to follow the instructions below:
n Press and hold the "PROGRAM" button for 3 seconds. While still holding down the "PROGRAM"
button briefly press the "POWER" button and release.
n Release the "PROGRAM" button.
NOTE: This light will remain on for up to 5 seconds before automatically returning to the factory setting if
no action is taken. The espresso machine will then power on and begin heating up.
n Within 5 seconds, press and release one of the buttons below depending on the required temperature
adjustements:
+0.1 sec = press the “DOUBLE ESPRESSO” button
+0.2 sec = press the “PROGRAM” button
-0.1 sec = press the “MANUAL” button
-0.2 sec = press the “POWER” button
NOTE: When you have selected a new pump rate setting the light above the button pressed lights up
and flashes and the machine makes 2 beeps.
The espresso machine will then automatically power on and begin heating up.
FACTORY RESET
To undo any changes made to the program you can revert back to the original factory settings. This resets
ALL the program settings back to factory settings, including the espresso and steam thermoblock
temperatures and the steam pump rate. To do this you will need to follow the instructions below.
n Press and hold down the “MANUAL” button for 3 seconds
n While still holding down the "MANUAL" button briefly press the "POWER" button and release.
n Release "MANUAL" button.
NOTE: This resets ALL the program settings back to the factory settings
n To indicate that you have successfully reset the factory settings, the light above the “POWER” button
will flash and 4 beeps will sound.
The espresso machine will then automatically power on and begin heating up.
English
18
KR_ESPRESSO_XP6180_NC00023127-03_Mise en page 1 09/03/12 09:50 Page18

CLEANING AND CARE
Do not wash your espresso machine accessories in the dishwasher.
CLEANING OF THE MACHI NE
n Always unplug the machine before cleaning and allow to cool down to avoid injury.
n Wipe the outside of the machine with a clean damp cloth. Do not use harsh or abrasive cleaners, or
alcohol/solvent-based cleaners to clean the machine. Use only gentle dishwashing liquid and warm
water. After each use, rinse out the water tank and empty before replacing in the machine.
n When a thin white layer of powder starts to form in the tank, this is a sign that descaling is necessary.
See Section on descaling. Please note that descaling should be performed periodically to maintain
optimum performance of your machine.
CAUTION: any other servicing should be performed by an authorized service representative
CLEANING OF THE DRIP TRAY
n The drip tray must be emptied each time the machine is used. The presence of water in the drip tray is
normal and is not the sign of a leak. Remove the grid of the drip tray (fig. 27). Lift up the tray slightly
and pull out to remove from the machine. (fig. 28)
n If multiple espressos are prepared one after the other, the drip tray should be emptied every few
espressos to prevent overflowing.
n The red overflow indicators in the tray will float up and become visible to remind you to empty the drip
tray before it overflows. When emptying the drip tray, remove the metal tray and rinse out the
compartment below. If necessary, both the metal tray and the compartment can be cleaned with warm
water and a gentle dishwashing liquid. Rinse well and dry completely before replacing the drip tray in
the machine. Make sure when replacing the drip tray to push it all the way into the machine to avoid
leaking.
CLEANING THE G ROUP HEAD
Deposits of coffee oils build up over time and affect the taste of the coffee and operation of the espresso
machine. Therefore the group head will require regular cleaning. It is recommended that the group head
is cleaned at a minimum every 3 months, depending on the frequency of use.
Preparing for the cleaning cycle
n Remove the water tank and rinse clean. Open the door on the back of the espresso machine and simply
slide out the water tank.
n Fill it with fresh water and replace the tank.
n Remove the cleaning disc located on the inside of the back door (fig. 30).
n Should the filter holder be attached to the group head remove it. Remove the filter basket and rinse
both thoroughly under running water and set aside.
n Empty and rinse clean the drip tray, then place back into position on to the machine.
n Fit the filter holder into the filter basket.
n Take care of removing the cleaning pin from the cleaning disc and position the smooth face of the
cleaning disc into the filter basket (fig. 31).
n Secure the filter holder to the group head .
n Place a sufficiently large container under the pouring spout.
English
19
KR_ESPRESSO_XP6180_NC00023127-03_Mise en page 1 09/03/12 09:50 Page19

Starting the cleaning cycle
NOTE: Although the espresso machine is on at the power outlet make sure that the espresso machine
power is ‘OFF’.
n Simultaneously press and hold down the single and double espresso buttons. While still holding down
the single and double espresso buttons briefly press the ‘POWER’ button. As the lights on the control
panel start to chase from left to right release the single and double espresso buttons.
NOTE: The lights on the control panel will continue to chase until the cleaning cycle is completed, this
will take approximately 10 minutes.
NOTE: During the cleaning cycle all other espresso machine operations will be locked until the cleaning
cycle is completed. Should the cleaning cycle be accidentally started it can be cancelled by
switching the power ‘OFF’ at the power outlet.
n When the cleaning cycle is completed the lights on the control panel will stop chasing and the espresso
machine will beep 4 times. Following this, the lights above the 'POWER', 'MANUAL', single and double
espresso buttons will come on, indicating that the machine is ready to use.
n Remove the container from under the pouring spouts and empty.
n Remove the filter holder from the group head.
n Remove the cleaning disc from the filter holder and return to storage position on the inside of the back
door.
n Remove the double filter basket from the filter holder and wash in warm soapy water. Rinse well and
dry. Should the holes in the filter baskets become clogged with coffee grinds use a fine bristled brush
to remove them. Also you can use the thin end of the cleaning pin which is supplied with the espresso
machine.
n The espresso machine is now ready for use.
CLEANING THE STEAM NOZZ LE
n To clean the steam nozzle, use the cleaning pin.
n Use the thick end of the cleaning pin to clean the milk frother nozzle pipe (fig. 32). Clean the filter holes
with the thin end of the pin.
n Clean the pipe with a damp cloth, or under warm running water, using a small amount of gentle
dishwashing liquid if necessary.
DESCALING
It is recommended that the espresso machine is descaled every 4-6 months, this will vary depending on
the frequency of use and water hardness.
DESCALING THE E SPRESSO MACHIN E
NOTE: Make sure the espresso machine is turned off and the power cord is unplugged.
n Remove the water tank and empty it.
n Fill the water tank with water again and mix the water as stated in the descaler manufacturer's
instructions or fill it with 250ml white vinegar mixed with 250ml water.
n Put the water tank back into the unit.
NOTE : The process does not involve the filter holder.
n Use a small brush to clean the brewing head; remove all coffee residue. Place a large container under
the brewing head.
n Switch the power ‘ON’. Press the ‘POWER’ button once to turn the espresso machine on.
n Press the ‘MANUAL’ button and as soon as the container is full, empty it and repeat the process several
times.
English
20
KR_ESPRESSO_XP6180_NC00023127-03_Mise en page 1 09/03/12 09:50 Page20
La page charge ...
La page charge ...
La page charge ...
La page charge ...
La page charge ...
La page charge ...
La page charge ...
La page charge ...
La page charge ...
La page charge ...
La page charge ...
La page charge ...
La page charge ...
La page charge ...
La page charge ...
La page charge ...
La page charge ...
La page charge ...
La page charge ...
La page charge ...
La page charge ...
La page charge ...
La page charge ...
La page charge ...
La page charge ...
La page charge ...
La page charge ...
La page charge ...
La page charge ...
La page charge ...
La page charge ...
La page charge ...
La page charge ...
La page charge ...
La page charge ...
La page charge ...
La page charge ...
La page charge ...
La page charge ...
La page charge ...
La page charge ...
La page charge ...
La page charge ...
La page charge ...
La page charge ...
La page charge ...
La page charge ...
La page charge ...
-
 1
1
-
 2
2
-
 3
3
-
 4
4
-
 5
5
-
 6
6
-
 7
7
-
 8
8
-
 9
9
-
 10
10
-
 11
11
-
 12
12
-
 13
13
-
 14
14
-
 15
15
-
 16
16
-
 17
17
-
 18
18
-
 19
19
-
 20
20
-
 21
21
-
 22
22
-
 23
23
-
 24
24
-
 25
25
-
 26
26
-
 27
27
-
 28
28
-
 29
29
-
 30
30
-
 31
31
-
 32
32
-
 33
33
-
 34
34
-
 35
35
-
 36
36
-
 37
37
-
 38
38
-
 39
39
-
 40
40
-
 41
41
-
 42
42
-
 43
43
-
 44
44
-
 45
45
-
 46
46
-
 47
47
-
 48
48
-
 49
49
-
 50
50
-
 51
51
-
 52
52
-
 53
53
-
 54
54
-
 55
55
-
 56
56
-
 57
57
-
 58
58
-
 59
59
-
 60
60
-
 61
61
-
 62
62
-
 63
63
-
 64
64
-
 65
65
-
 66
66
-
 67
67
-
 68
68


Krups XP618050 Manuel utilisateur
- Catégorie
- Accessoires de préparation de café
- Taper
- Manuel utilisateur
dans d''autres langues
- English: Krups XP618050 User manual
- español: Krups XP618050 Manual de usuario
Documents connexes
-
Krups XP602550 Manuel utilisateur
-
-
-
-
-
-
-
-
-