
mr
.steam® l Feel Good Inc.
®
AromaSteam
Installation, Operation & Maintenance Manual
Fragrance Metering Pump System for
Residential and Day Spa Steam Rooms
Part Number MS AROMA (120V)
__________________________________
IMPORTANT: Leave this material with the home owner.
__________________________________
This installation, operation and maintenance manual is for general reference.
The installation, operation and maintenance manual supplied with the product must be used for
installation, operation and maintenance purposes. Failure to use the installation, operation and
maintenance manual supplied may result in a property damage or personal injury.
WARNING
!

TABLE OF CONTENTS
Installer’s Section:
Box Contents ........................................3
Important Safety Information ...............4
System Overview ..................................5
General System Dimensions ................6
General Installation .........................7-11
Operation ...........................................12
Troubleshooting ................................. 13
Replacement Parts .............................14
Installing the Caddy ......................15-16
Homeowner’s Section
Fragrances .........................................17
Important Safety Information .............18
Locating the Caddy ............................19
Pump Operation............................19-20
Warranty .............................................20
BEFORE INSTALLING
Carefully inspect the AromaSteam pump and packaging for
shipping damage. In the event of shipping damage, please
contact the carrier for claim information. Our customer service
department can assist you with product replacement.
Read these instructions before installation or service. Although
the AromaSteam pump has been fully qualified for shipment
by MrSteam, the following must be reviewed for proper, safe
and enjoyable steam bathing:
1. Verify that the model and accessories specifications are cor-
rect for the application.
2. The physical size of the unit, clearance for plumbing servic-
ing, its distance from the steam room and fragrance location
must all be considered before final installation.
3. Consider any controls and accessories before initiating
installation. Read the Installation and Operation Manual of
all controls and accessories available at www.mrsteam.com
technical downloads.
IMPORTANT NOTES:
This document contains important safety, operation and main-
tenance information. After installation leave this document
with the homeowner. Do not discard this document.
The following general information should be used in conjunc-
tion with consultations with an architect, designer and con-
tractor in determining factors necessary in providing a suitable
and safe steam room. MrSteam AromaSteam pumps are
intended to be operated with MrSteam iSteam® , AirTempo®,
iTempoPlus® and iTempo® controls only, and are to be installed
strictly in accordance with the specific instructions contained in
this manual and as supplied in the manuals provided with the
controls or accessories.
2
INSTALLER SECTION
AromaSteam Operation and Installation Instructions
®
IMPORTANT NOTE:
This “peel and stick” warning label shall be
posted in a conspicuous location next to the
steam room door.
PUR 100402 Rev 05.22

IMPORTANT NOTE:
As you follow these instructions, you will notice warning and caution
symbols. This blocked information is important for the safe and efficient installation and use of
the pump, fragrance and caddy. These are types of potential hazards that may occur during
installation and operation:
states a hazard may cause serious injury or death if precautions are not followed.
signals a situation where minor injury or product damage may occur if you do not
follow instructions.
IMPORTANT NOTE: This highlights information that is especially relevant to a problem-free
installation.
All information in these instructions is based on the latest product information available at the
time of publication.
MrSteam reserves the right to make changes at any time without notice.
WARNING
!
CAUTION
!
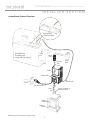
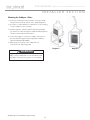
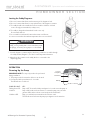
Pump Caddy
Additional Items included but not shown:
U ÓÝÊÕÌ}Ê-VÀiÜÃÊ>`ÊVÀÃÊvÀÊ>``ÞÊ>`Ê*Õ«
U ÕÃi
Box Contents
Check Valve Injector with
Injector Tubing
Installation & Operation
Manual
with peel and stick
Warning label
Pressure Tube
Assembly Suction Tube
Assembly
All Drawings for Illustrative Purposes Only
INSTALLER SECTION
AromaSteam Operation and Installation Instructions
®
All Drawings for Illustrative Purposes Only
3

4
UÊ
Avoid fragrance contact with eyes. May cause mild eye
irritation. Ingestion may cause irritation, nausea, vomiting.
UÊÀ>}À>ViÊÛ>«ÀÃÊ>ÞÊV>ÕÃiÊ`ÀÜÃiÃÃ]Ê>iÀ}VÊÀi>V-
tions, difficulty breathing or skin irritation. If condition
persists get medical attention.
UÊ/iÊÀ>}À>ViÊ->viÌÞÊ>Ì>Ê-iiÌÊ«ÀÛ`iÃÊV«Àii-
sive information about MrSteam Aroma fragrances.
Contact 1-800-767-8326 or go online at www.mrsteam.
com for a copy of the Safety Data Sheet.
UÊÀ-Ìi>ÊvÀ>}À>ViÃÊ-Ê"Ê£Êx®Ê>ÀiÊÞÊvÀÊÕÃiÊÜÌÊ
the MrSteam AromaSteam dispensing pump (part
number MS AROMA and MS AROMAC). Never use
MrSteam fragrances in any other pump, spray or dis-
pensing device. The use of MrSteam fragrances in any
other device may cause personal injury.
UÊ/iÊÕÃiÊvÊ>ÞÊvÀ>}À>ViÃÊÌiÀÊÌ>ÊÀ-Ìi>ÊvÀ>}À>V-
es with a MrSteam AromaSteam dispensing pump may
introduce excessive concentration of fragrances into the
steam room, resulting in personal injury.
UÊii«ÊÕÌÊvÊÌiÊÀi>VÊvÊV`Ài°
UÊÜ>ÞÃÊÃÌ>ÊÌiÊiVÊ6>Ûi° Failure to install the
Check Valve may result in excessive fragrance delivery
WARNING
!
IMPORTANT NOTES:
UÊÀ-Ìi>ÊÀ>ÊvÀ>}À>ViÃÊ>ÀiÊÞÊvÀÊÕÃiÊÊÀiÃ`i-
tial and day spa installations. Do Not use MrSteam
Aroma fragrances in commercial installations.
UÊ ÌÊvÀÊÕÃiÊÊ>VÀÞVÊÀÊvLiÀ}>ÃÃÊÀðÊiVÊÜÌÊ
the room manufacturer to determine compatibility of
these fragrances with room construction materials.
UÊÊ ÌÊ>ÌiÀÊÀÊ`vÞÊ>ÞÊÀ-Ìi>Ê«À`ÕVÌ°Ê}Ê
so will void the warranty.
UÊÀ-Ìi>ÊÀ>ÊvÀ>}À>ViÃÊÕÃÌÊLiÊ`ëÃi`ÊvÊ>ÃÊ
hazardous waste.
FIRST AID
IN CASE OF EYE CONTACT:
Rinse the eyes immediate-
ly with plenty of water, also under the eyelids, for at least
15 minutes. If eye irritation persists: Get medical attention.
IN CASE OF SKIN CONTACT: Remove/Take off imme-
diately all contaminated clothing. Rinse skin with soap
and water or shower. If skin irritation persists, get medi-
cal attention.
IF SWALLOWED: Do not induce vomiting. Rinse mouth
thoroughly with water. If conscious, give large amounts
of water. If symptoms persist, call a physician.
WARNING
!
FLAMMABLE LIQUID AND VAPOR
UÊii«ÊÌiÊ«Õ«Ê>`ÊvÀ>}À>ViÊ>Ü>ÞÊvÀÊi>Ì]Ê
sparks, electrical outlets, open flames such as
candles and hot surfaces.
UÊ ÊÃ}°Ê
UÊii«Ê"ÕÌÊvÊÌiÊ,i>VÊvÊ`Ài°Ê
UÊ1ÃiÊÞÊë>À}ÊÌðÊ/>iÊ«ÀiV>ÕÌ>ÀÞÊ
measures against static discharge.
UÊÌ>ÃÊ`i>ÌÕÀi`ÊiÌÞÊ>V
UÊÊV>ÃiÊvÊvÀi\Ê1ÃiÊ"Ó]Ê`ÀÞÊViV>]Ê>VÊv>]Ê>`Ê
water spray for extinction.
UÊÜ>ÞÃÊÃÌÀiÊÌiÊÀ-Ìi>ÊÀ>ÊvÀ>}À>ViÃÊÊ>ÊÃiVÕÀiÊ
V>Ì°Êii«ÊVÌ>iÀÊÌ}ÌÞÊVÃi`Ê>`ÊÃÌÀiÊÊ>Ê
cool, dry and well-ventilated place.
UÊÜ>ÞÃÊÕÃiÊÌÃÊ>``Þ°
into the steam room and cause dizziness and/or personal
injury.
UÊ
The AromaSteam pump has been factory set to deliver a
suitable amount of fragrance into a typical sized residential
or Day Spa steam room. Start with the pump volume at a
very low setting. Gradually increase the volume setting until
a comfortable fragrance level is reached. Do not exceed the
“
Recommended Setting
” indicated on the pump volume.
UÊÊ ÌÊ>ÌiÀÊÀÊ`vÞÊ>ÞÊÀ-Ìi>Ê«À`ÕVÌ°Ê}ÊÃÊ
may result in a personal injury.
UÊ Discontinue use of the steam generator and control if the
steam generator or control are damaged or otherwise not
functioning properly. Doing so may result in an inoperative or
hazardous installation
UÊELECTRICAL SHOCK HAZARD. MrSteam AromaSteam
pumps are connected to 120V line voltage and contain live
electrical components. All installation and service to be per-
formed by qualified and licensed electricians and plumbers
only. Installation or service by unqualified persons or failure
to use MrSteam parts may result in property damage or in a
hazardous condition.
UÊÃÌ>Ê>VVÀ`}ÊÌÊV>Ê>`Ê >Ì>Ê«ÕL}Ê>`
electrical codes.
INSTALLER SECTION
AromaSteam Operation and Installation Instructions
®
4

90˚ T
Grounded
receptacle
required
90
˚ T
G
r
ou
n
ded
r
eceptacl
e
re
q
u
i
re
d
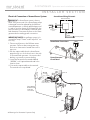
Steam Generator
Printed Circuit Board
Steam
Line Check
Valve
Suction
Tube
Fragrance
Container
Pump Line Cord 120V
Fragrance container cap
with hole for tubing
Typical MrSteam
Steam Generator
(shown with cover removed)
Fragrance
Caddy
Request Cable
Steam
Head
Pressure
Tube
Pump
Priming Valve
AromaSteam System Overview
INSTALLER SECTION
AromaSteam Operation and Installation Instructions
®
All Drawings for Illustrative Purposes Only
5

INSTALLER SECTION
AromaSteam Operation and Installation Instructions
®
All Drawings for Illustrative Purposes Only
6
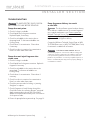
5 -10 ft. optimal
(
6 ft. )
2 ft. max
Steam
Pipe Steam
Generator
Steam
Pipe T
Check Valve
Suction
Hose
Pump Line Cord 120V
(to grounded outlet)
Fragrance
Caddy
Request Cable
(to Steam Generator)
Steam Head
(inside steam room)
Pressure Hose
Pump
General System Dimensions
PUMP SPECS
Dimensions: 7.5”W x 4.5”H x 4.5”D
Weight: 5 pounds
Motor voltage 120VAC, 50/60 Hz
Current Draw 0.5 Amps
(
6 ft. )
(11.5 ft. )

WARNING STICKER
The warning label (
supplied on page 2)
shall be posted in
a conspicuous location next to the steam room door.
PUMP LOCATION AND INSTALLATION
1. ii«ÊÌiÊÀ>-Ìi>Ê-ÞÃÌiÊ>Ü>ÞÊvÀÊi>Ì]Êë>ÀÃ]ÊiiV-
trical outlets, open flames such as candles and hot surfaces.
2. Locate the Fragrance and Caddy to monitor the
consumption of fragrance and for easy replacement.
3. The AromaSteam System should not be installed in areas
accessible to children. A locked room is strongly recommend-
ed (i.e. utility room)
4. The AromaSteam System is designed and intended for indoor
use only and is to be located indoors in a dry clean location
and not subject to moisture, condensation or similar high
humidity environments.
5. Do not install the AromaSteam System outdoors.
6. Do not install the AromaSteam System in a location where
water could freeze.
7. Do not install the AromaSteam System near corrosive materi-
als and chemicals. Installation in areas having high concentra-
tions of chlorine (such as pool equipment room) should be
avoided.
8. Attach the AromaSteam Pump onto a secure vertical surface.
° 1ÃiÊÞÊë>À}ÊÌðÊ/>iÊ«ÀiV>ÕÌ>ÀÞ
measures against static discharge.
INSTALLER SECTION
AromaSteam Operation and Installation Instructions
®
7

Installing the 90 degree T and Check Valve
1. For optimal results locate a brass 90 degree T (not provid-
ed) in the steam supply line within 5-10 feet of the steam
head. If using copper tubing for steam lines, install a female
1/2 NPT or 1/4 NPT reducing Tee in the steam line facing
downward.
2. T must face downward as shown.
IMPORTANT NOTE:
Follow the installation instructions for
the steam pipeline in the MrSteam Steam Bath Installation and
Operation Manual. Visit www.mrsteam.com to download this
document.
3. Install Check Valve into 90˚
T
/adaptor.
The Check Valve prevents excessive amounts of
fragrance from entering the steam line and steam room. Never
install the AromaSteam System without the Check Valve.
Failure to install the Check Valve may result in excessive fra-
grance delivery into the steam room and cause dizziness and/
or personal injury.
PRESSURE TUBE ASSEMBLY
For your convenience the pressure tube assembly is provided pre-
assembled. If additional tubing is needed please contact MrSteam
Technical service at 1-800-767-8326 or 1-800-727-8326.
Installation of Pressure Tube to the Pump
1. Insert the pressure tube through the hole of the pump tight-
ening nut and collar and firmly push the tube onto the tube
holder.
2. Screw the pump tightening nut onto the pump and tighten the
nut by HAND only.
Installation of Pressure Tube to the 90˚ T
1.
Insert the pressure tube through the Check Valve tightening
nut and collar and firmly push the pressure tube onto the tube
holder.
2. Screw the Check Valve tightening nut onto the Check Valve.
IMPORTANT NOTE: To prevent connection from leaking, insert
tubing holder completely into tubing until it reaches the bottom.
Lubricate the ID of the tubing as required with soap to facilitate
insertion.
IMPORTANT NOTE:
To prevent damage do not use tools to
tighten the nut.
WARNING
!
Steam Pipe (not supplied)
Adapter
(not supplied)
Check Valve
Tube Holder
Collar
Check Valve
Tightening Nut
Pressure Tube
Pump
Tightening
Nut
Collar
Tube Holder
Pump
90˚ Tee
(not supplied)
INSTALLER SECTION
AromaSteam Operation and Installation Instructions
®
All Drawings for Illustrative Purposes Only
8

SUCTION TUBE ASSEMBLY
For your convenience the suction tube assembly is provided
preassembled. If additional tubing is needed please
contact MrSteam Technical service at 1-800-767-8326 or
1-800-727-8326.
Installation of Suction Tube to the Pump
1. Insert the suction tube through the pump tightening nut
and collar and firmly push the tube onto the tube holder.
2. Screw the suction tube tightening nut to the
suction side of the pump.
IMPORTANT NOTE: HAND-TIGHTEN ONLY.
Installation of Suction Tube into the
Fragrance Container
1. Locate the “container cap” with the hole included with
the bottle of fragrance.
2. Insert the suction tube through the hole in the
container cap.
3. Remove the foot valve cap and insert the suction tube
through the cap. Push the suction tube onto the foot
valve. Tighten the cap onto the foot valve.
{°Ê1ÃVÀiÜÊÌiÊV>«ÊvÀÊÌiÊvÀ>}À>ViÊVÌ>iÀÊ>`Ê`ÃV>À`°
5. Screw the cap onto the fragrance container.
6. Make sure the Foot Valve rests on the bottom of the
fragrance container.
IMPORTANT NOTE: To prevent connection from leaking,
insert tubing holder completely into tubing until it reaches
the bottom. Lubricate the ID of the tubing as required with
soap to facilitate insertion.
IMPORTANT NOTE: To prevent damage do not use tools to
tighten the nut.
Suction
Tube
Assembly
Tube Holder
Collar
Pump Tightening Nut
Suction Tube
Fragrance
Container
Cap with Hole
Collar
Tube Holder
Foot Valve
Fragrance
Container
Caddy
Pump
INSTALLER SECTION
AromaSteam Operation and Installation Instructions
®
All Drawings for Illustrative Purposes Only
9

Priming the Pump
1. Insure MrSteam fragrance container is full.
2. Insert a short piece of soft injector tube onto the tip of the injector
(see Fig. 1).
3. Insert the open end of the injector tube onto the pressure valve
(see Fig. 1).
4. Open the priming valve by turning the knob counter clockwise
one full revolution.
5. Draw liquid from the injector slowly and evenly.
Continue until the injector is full of liquid.
6. If you have drawn up the injector completely and no liquid
is in the injector, remove the injector tube from the pressure valve.
7. Drain injector. Repeat steps until the injector is filled.
8. Save the fragrance injector as it may be needed when new fragrances are used.
9. Close the priming valve completely by turning the knob clockwise.
Failing to close the valve will result in fragrance
leaking from the priming port.
IMPORTANT NOTE: If an extended pressure tube is special ordered
then contact MrSteam Technical Service (see page 20) for instructions
for filling the pressure tube with fragrance.
Priming Valve Knob
Soft Injector Tubing
Injector
CAUTION
!
Figure 1
INSTALLER SECTION
AromaSteam Operation and Installation Instructions
®
All Drawings for Illustrative Purposes Only
10

Electrical Connection of AromaSteam System
This AromaSteam system is factory
wired. If the power cord of the AromaSteam pump
is damaged it must be replaced by the MrSteam
service department or similarly qualified personnel
in order to avoid an electric shock hazard. All elec-
trical connections to be made by a licensed, quali-
fied electrician. Disconnect all power to the steam
generator before making power connections.
IMPORTANT NOTE:
AromaSteam system is for
use with AirTempo® iSteam® and iTempoPlus® con-
trols only.
1. Disconnect all power to the MrSteam steam
generator. Failure to disconnect power may
result in an electrocution hazard. Remove the
top cover.
2. Run the request cable from the AromaSteam
pump through one of the knock outs in the side
vÊÌiÊÃÌi>ÊL>ÌÊ}iiÀ>ÌÀ°Ê1ÃiÊ>ÊÃÌÀ>ÊÀiiv
bushing or grommet to prevent chafing.
3. Locate the two quick connect tabs labeled
“AROMA” on the printed circuit board in the
location shown.
4. Connect the request cable to the terminals.
The terminals are not polarized.
AromaSteam Wiring Schematic
AromaSteam Connections
Steam Generator
Circuit Board
CAUTION
!
Plug
120 VAC
Outlet
(grounded receptacle
required)
Request Cable
24 VAC
to steam generator
AromaSteam Pump
Steam
Line
Knock Out
Steam Generator
Printed Circuit Board
Typical MrSteam
Steam Generator
(shown with
cover removed)
Request Cable
Pump
INSTALLER SECTION
AromaSteam Operation and Installation Instructions
®
All Drawings for Illustrative Purposes Only
11

chroma
timetemp
aroma
AromaSteam
Button
AromaSteam
Button
Powering Up the Pump
IMPORTANT NOTE: This step only needs to be performed
during installation.
1. The pump needs to be turned on before it can be used
2. Press and hold the power button for 3 seconds.
The LED will turn on solid red.
Activating the Pump from a Control
Air Tempo® Control
1. Press the ON/OFF button to turn the steam generator ON.
2. Press the AROMA button, AROMA will be displayed on the screen
when AromaSteam is on.
3. Aroma fragrance will automatically be pumped into the steam line at
preset intervals.
iSteam® Control
1. Press the START button to turn the steam generator on.
2. In the dashboard press the AROMA button, the button
will be highlighted when AromaSteam Pump is on.
3. Aroma fragrance will automatically be pumped into the steam line
at preset intervals.
iTempoPlus® Control
1. Press the ON/OFF button to turn the steam generator ON.
2. Press the AROMA button, AROMA will be displayed on the screen
when AromaSteam is on.
3. Aroma fragrance will automatically be pumped into the steam line at
preset intervals.
PUMP LED LIGHT: KEY:
Flashing Green LED Pump is OFF. Press and hold the power button for 3 seconds to turn the pump on.
Solid Red Pump is ON, but has not been activated. To activate the pump, turn your steam
generator ON from the in-shower control and press the aroma button.
Solid Green LED
Pump is on and has been activated from the in-shower control.
The LED will turn off each time the pump injects fragrance into the steam line.
Adjusting the Amount of Fragrance Delivery
The AromaSteam system has been factory set to deliver a suitable amount of aromatic fra-
grance into a typical sized steam room. Do not exceed the maximum setting. Please con-
tact the MrSteam Technical Service Department before changing this setting.
Contact the MrSteam Technical Service Dept. at (800) 76-STEAM (East coast)
or (800) 72-STEAM (West Coast) for assistance or additional information.
Increasing the settings may introduce excessive concentration of
fragrance into the steam room, resulting in a health hazard.
Fragrance
Setting Knob
Power Button
LED Light
Rev C
WARNING
!
101 F12:16 PM
AROMA
AromaSteam
Button
INSTALLER SECTION
AromaSteam Operation and Installation Instructions
®
All Drawings for Illustrative Purposes Only
12

Pump fragrance delivery too much
or too little
The AromaSteam system has been factory
set to deliver a suitable amount of aromatic fragrance
into a typical sized steam room. Please contact the
MrSteam Technical Service Department before chang-
ing this setting. See page 12 for instructions on adjust-
ing the amount of fragrance delivery.
Contact the MrSteam Technical Service Dept. at (800)
76-STEAM (East coast) or (800) 72-STEAM (West Coast)
for assistance or additional information.
ELECTRICAL SHOCK HAZARD. MrSteam
AromaSteam pumps are connected to 120V line voltage and
contain live electrical components. All installation and service
to be performed by qualified and licensed electricians and
plumbers only. Installation or service by unqualified persons or
failure to use MrSteam parts may result in property damage or
in a hazardous condition.
TROUBLESHOOTING
Ê /"Ê6"Ê/,Ê-"]Ê-" -
/Ê*"7,Ê/"Ê*1*Ê",Ê-,6
Pump does not prime
1. Check if voltage is available.
2. Check liquid level in fragrance container.
Replenish liquid, if necessary.
3. Check for air bubbles in the suction tube or
the pump head. To eliminate air bubbles see:
Priming Pump.
4. Check valves for contamination. Clean valves
if necessary.
5. Check foot valve in container for contamination.
Rinse foot valve under clean water.
Pump does not inject fragrance into
steam room
1. Check if voltage is available.
2. Check liquid level in fragrance container. Replenish
fragrance if necessary.
3. Check for air bubbles in the suction tube or the
pump head. To eliminate air bubbles see:
Priming Pump.
4. Check valves for contamination. Clean valves if
necessary.
5. Check foot valve in container for contamination.
Rinse foot valve under clean water.
6. Check the pressure tube for kinking or jamming.
Straighten or replace.
7. Check if fragrance is freely flowing through the
Check Valve when the metering pump is energized.
Apply compressed air through the Check Valve.
Attach the compressed air at the point of connection
of the pressure tube.
8.
Ensure the pump has been powered up. See page 12.
WARNING
!
WARNING
!
WARNING
!
INSTALLER SECTION
AromaSteam Operation and Installation Instructions
®
All Drawings for Illustrative Purposes Only
13

Check Valve (5 pcs.)
104240
Tube (per foot)
104255
Tube Connector
(3 pcs)
104250
Pump Head
104239
Request Cable
104307
Foot Valve (2 pcs.)
104241
O-Ring Kit
(3 pcs.) 104275
Tube Connector
(3 pcs) 104250
Syringe (103983)
Priming Tube (6”) 104322
Caddy (104318)
REPLACEMENT PARTS
Tube (per foot)
104255
INSTALLER SECTION
AromaSteam Operation and Installation Instructions
®
All Drawings for Illustrative Purposes Only
14

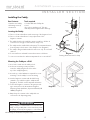
Installing the Caddy
:
Box Contents: Tools required:
U -Ì>iÃÃÊÃÌiiÊV>``Þ U À`iÃÃÊ`ÀÊÜÌÊa Phillips bit
U ÕÌ}ÊÃVÀiÜÃÊÓ® U iÛi
U ÃÌÀÕVÌÃÊÊ I
1ÃiÊÞÊë>À}ÊÌðÊ/>iÊ«Ài
cautionary measures against static discharge
Locating the Caddy:
1. Place in a location that allows visual monitoring of the fragrances level.
2. Place in a location that allows for easy replacement of the
fragrance container.
3. The caddy should not be installed in areas accessible to children. A
locked room is strongly recommended (ie: utility room).
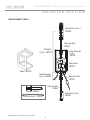
4. The caddy must be installed below the pump. The maximum distance
from the pump to the bottom of the caddy is 6 feet. (Diagram 1)
5. The caddy is designed and intended for indoor use only. Do not install
outdoors.
6. Do not install in an unheated location where water could freeze.
7.
Locate in a area where the ambient temperature does not exceed 88˚ F.
Max
Height
6 ft.
Pump
Suction
Hose
Caddy
Fragrance
Container
Diagram 1
Drawing details removed for clarity
WARNING
!
1Ã}Ê>ÊvÀ>}À>ViÊVÌ>iÀÊÌ>ÌÊÃÊÌÊÃiVÕÀi`ÊÊÌiÊ
caddy, or using a caddy that is not mounted may result
in spillage, excessively strong vapors or a fire hazard.
Mounting the Caddy on a Wall:
£° 1ÃiÊ>ÊiÛiÊÌÊ>iÊÃÕÀiÊÌiÊV>``ÞÊÃÊiÛi°
Ó° 1ÃiÊÌiÊÌÜÊÕÌ}ÊÃVÀiÜÃÊ«ÀÛ`i`ÊÌ
secure the caddy using the two holes at the
top of the caddy (Diagram 2).
ΰ 1ÃiÊ>VÀÃÊÀÊÌiÀÊ>À`Ü>ÀiÊ>ÃÊÀiµÕÀi`ÊvÀÊÃiVÕÀi
mounting. Test the caddy for secure mounting.
4.
Insert the fragrance container with the label facing
outward so it is visible through the caddy window
(Diagram 4). The label contains important information.
5. Connect the fragrance container to the pump accord-
ing to instructions in the AromaSteam Fragrance
ëiÃ}Ê*Õ«ÊÃÌ>>Ì]Ê"«iÀ>ÌÊ>Õ>Ê*1,
100402) (Diagram 5).
6. Always keep the container in the caddy while it is
connected to the dispensing pump.
Diagram 2 Diagram 3
INSTALLER SECTION
AromaSteam Operation and Installation Instructions
®
All Drawings for Illustrative Purposes Only
15

Mounting the Caddy on a Floor:
£°Ê1ÃiÊÌiÊÌÜÊÕÌ}ÊÃVÀiÜÃÊ«ÀÛ`i`ÊÌÊÃiVÕÀiÊÌiÊV>``ÞÊ
using the two holes at the bottom of the caddy (Diagram 3).
Ó°Ê1ÃiÊ>VÀÃÊÀÊÌiÀÊ>À`Ü>ÀiÊ>ÃÊÀiµÕÀi`ÊvÀÊÃiVÕÀiÊÕÌ}°Ê
Test the caddy for secure mounting.
3. Insert the fragrance container with the label facing outward
in a manner it is visible through the caddy window (Diagram 4).
The label contains important information.
4. Connect the fragrance container according to instructions in
the AromaSteam Fragrance Dispensing Pump Installation,
"«iÀ>ÌÊ>Õ>Ê*1,Ê£ää{äÓ®°
5. Always keep the container in the caddy while it is
connected to the dispensing pump.
Diagram 5Diagram 4
WARNING
!
1Ã}Ê>ÊvÀ>}À>ViÊVÌ>iÀÊÌ>ÌÊÃÊÌÊÃiVÕÀi`ÊÊÌiÊ
caddy, or using a caddy that is not mounted may result
in spillage, excessively strong vapors or a fire hazard.
INSTALLER SECTION
AromaSteam Operation and Installation Instructions
®
All Drawings for Illustrative Purposes Only
16

READ ME FIRST!
As you follow these instructions, you will notice warning and caution symbols. This
blocked information is important for the safe and efficient installation and operation of this generator.
These are types of potential hazards that may occur during installation and operation:
Indicates a potentially hazardous situation, which, if not avoided, could result in death or
serious injury.
WARNING
!
WARNING
!
! CAUTION
HOMEOWNER SECTION
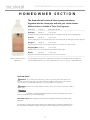
MrSteam Aroma is Available in These Five Fragrances:
,, Ê *,/Ê "°Ê " / ,Ê6"1°
––––––––––––––––––––––––––––––––––––––––––––––––––––––––––––––––––––––––––––––––––––––––––––––––––––––––––––
Eucalyptus (MS OIL 1) 1 liter /33 fl.oz..
A deeply refreshing aroma with cleansing effects, eucalyptus may help open air passageways.
Lavender (MS OIL 2) 1 liter /33 fl.oz.
A sweet, lightly floral scent, lavender may help soothe anxiety with its calming & restorative propertie
Evergreen (MS OIL 3) 1 liter /33 fl.oz.
A refreshing blend of spruce, fir and pine reminiscent of a forest on a crisp morning.
Energizing Mint (MS OIL 4) 1 liter /33 fl.oz.
A blend of mint, citrus and herbs that may stimulate and energize.
Breathe (MS OIL 5) 1 liter /33 fl.oz.
A tropical combination that may help clear chest, nose and sinuses.
–––––––––––––––––––––––––––––––––––––––––––––––––––––––––––––––––––––––––––––––––––––––––––––––––––––––––––
The Safety Data Sheet provides comprehensive information about MrSteam Aroma fragrances.
Contact 1-800-767-8326 or go online at www.mrsteam.com for a copy of the Safety Data Sheet.
The AromaSteam’s state-of-the-art pump introduces
fragrance into the steam pipe and into your steam shower.
MrSteam Aroma Fragrances
(MS OIL 1-5)
17
AromaSteam Operation and Installation Instructions
®
Indicates a potentially hazardous situation, which, if not avoided may result in
minor or moderate injury or product damage.
IMPORTANT NOTE: This highlights information that is especially relevant to a problem-free
installation.
All information in these instructions is based on the latest product information available at the
time of publication. MrSteam reserves the right to make changes at any time without notice.

WARNING
!
FLAMMABLE LIQUID AND VAPOR
U ii«ÊÌiÊ«Õ«Ê>`ÊvÀ>}À>ViÊ>Ü>ÞÊvÀÊi>Ì]
sparks, electrical outlets, open flames such as candles
and hot surfaces.
U ÊÃ}°
U ii«Ê"ÕÌÊvÊÌiÊ,i>VÊvÊ`Ài°
U Ì>ÃÊ`i>ÌÕÀi`ÊiÌÞÊ>V°
U ÊV>ÃiÊvÊvÀi\Ê1ÃiÊ"Ó]Ê`ÀÞÊViV>]Ê>VÊv>]
and water spray for extinction.
U Ü>ÞÃÊÃÌÀiÊÌiÊÀ-Ìi>ÊÀ>ÊvÀ>}À>ViÃÊÊ>ÊÃiVÕÀi
V>Ì°Êii«ÊVÌ>iÀÊÌ}ÌÞÊVÃi`Ê>`ÊÃÌÀiÊÊ>
cool, dry and well-ventilated place.
U Û`ÊvÀ>}À>ViÊVÌ>VÌÊÜÌÊiÞiðÊ>ÞÊV>ÕÃiÊ`ÊiÞi
irritation. Ingestion may cause irritation, nausea, vomiting.
U À>}À>ViÊÛ>«ÀÃÊ>ÞÊV>ÕÃiÊ`ÀÜÃiÃÃ]Ê>iÀ}VÊÀi>V-
tions, difficulty breathing or skin irritation.
If condition persists get medical attention.
U /iÊÀ>}À>ViÊ->viÌÞÊ>Ì>Ê-iiÌÊ«ÀÛ`iÃÊV«ÀiiÃÛi
information about MrSteam Aroma fragrances.
Contact 1-800-767-8326 or go online at www.mrsteam.
com for a copy of the Safety Data Sheet.
U À-Ìi>ÊvÀ>}À>ViÃÊ-Ê"Ê£Êx®Ê>ÀiÊÞÊvÀÊÕÃiÊÜÌ
the MrSteam AromaSteam dispensing pump
(part number MS AROMA and MS AROMAC). Never use
MrSteam fragrances in any other pump, spray or dispens-
ing device. The use of MrSteam fragrances in any other
device may cause personal injury.
WARNING
!
U /iÊÕÃiÊvÊ>ÞÊvÀ>}À>ViÃÊÌiÀÊÌ>ÊÀ-Ìi>ÊvÀ>-
grances with a MrSteam AromaSteam dispensing
pump may introduce excessive concentration of
fragrances into the steam room, resulting in personal
injury.
U ii«ÊÕÌÊvÊÌiÊÀi>VÊvÊV`Ài°
U
The AromaSteam pump has been factory set to deliver
a suitable amount of fragrance into a typical sized res-
idential or Day Spa steam room. Start with the pump
volume at a very low setting. Gradually increase the
volume setting until a comfortable fragrance level is
reached. Do not exceed the “
Recommended Setting
”
indicated on the pump volume.
U Ê ÌÊ>ÌiÀÊÀÊ`vÞÊ>ÞÊÀ-Ìi>Ê«À`ÕVÌ°Ê}
so may result in a personal injury.
IMPORTANT SAFETY INSTRUCTIONS
READ AND FOLLOW ALL INSTRUCTIONS
IMPORTANT NOTES:
U ÌÊvÀÊÕÃiÊÊ>VÀÞVÊÀÊvLiÀ}>ÃÃÊÀðÊiVÊÜÌÊÌiÊÀÊ>Õv>VÌÕÀiÀÊÌÊ`iÌiÀi
compatibility of these fragrances with room construction materials.
U Ê ÌÊ>ÌiÀÊÀÊ`vÞÊ>ÞÊÀ-Ìi>Ê«À`ÕVÌ°Ê}ÊÃÊÜÊÛ`ÊÌiÊÜ>ÀÀ>ÌÞ°
U À-Ìi>ÊÀ>ÊvÀ>}À>ViÃÊÕÃÌÊLiÊ`ëÃi`ÊvÊ>ÃÊ>â>À`ÕÃÊÜ>ÃÌi°
FIRST AID
IN CASE OF EYE CONTACT:
Rinse the eyes immediately with plenty of water, also under the eyelids, for at least 15
minutes. If eye irritation persists: Get medical attention.
IN CASE OF SKIN CONTACT: Remove/Take off immediately all contaminated clothing. Rinse skin with soap and
water or shower. If skin irritation persists, get medical attention.
IF SWALLOWED: Do not induce vomiting. Rinse mouth thoroughly with water. If conscious, give large amounts of
water. If symptoms persist, call a physician.
18
HOMEOWNER SECTION
AromaSteam Operation and Installation Instructions
®

19
Locating the Caddy/Fragrance:
1. Place in a location that allows visual monitoring of the fragrances level.
2. Place in a location that allows for easy replacement of the fragrance container.
3. The caddy should not be installed in areas accessible to children. A locked
room is strongly recommended (ie: utility room).
4. The caddy is designed and intended for indoor use only.
Do not install outdoors.
5. Do not install in an unheated location where water could freeze.
6.
Locate in a area where the ambient temperature does not exceed 88˚ F.
WARNING
!
1Ã}Ê>ÊvÀ>}À>ViÊVÌ>iÀÊÌ>ÌÊÃÊÌÊÃiVÕÀi`ÊÊÌiÊ
caddy, or using a caddy that is not mounted may result
in spillage, excessively strong vapors or a fire hazard.
7.
Insert the fragrance container with the label facing outward so it is visible through
the caddy window (Diagram 1). The label contains important information.
8. Always keep the container in the caddy while it is connected to the
dispensing pump.
Diagram 1
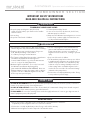
OPERATION
Powering Up the Pump
IMPORTANT NOTE: This step only needs to be performed
during installation.
1. The pump needs to be turned on before it can be used
2. Press and hold the power button for 3 seconds.
The LED will turn on solid red.
PUMP LED LIGHT: KEY:
Flashing Green LED Pump is OFF. Press and hold the power button for 3 seconds to turn the pump on.
Solid Red Pump is ON, but has not been activated. To activate the pump, turn your steam
generator ON from the in-shower control and press the aroma button.
Solid Green LED
Pump is on and has been activated from the in-shower control.
The LED will turn off each time the pump injects fragrance into the steam line.
Fragrance
Setting Knob
Power Button
LED Light
Rev C
HOMEOWNER SECTION
AromaSteam Operation and Installation Instructions
®
All Drawings for Illustrative Purposes Only
19

20
Products, information and specifications are subject to change without notice.
For more information please call Sales & Support at
1.800.76.STEAM (East Coast) 1.800.72.STEAM (West Coast) www.mrsteam.com
mr.steam®
[email protected] I www.mrsteam.com
43-20 34th Street, Long Island City, NY 11101 I 9410 S. La Cienega Blvd. Inglewood CA 90301
1 800 76 STEAM
FAX
: 718 472 3256 I 1 800 72 STEAM
FAX
: 310 216 2944
PUR 100402 Rev 5.19
WARRANTY:
To view or download the MrSteam AromaSteam System Warranty
and register your product go to: blog.mrsteam.com/wr
chroma
timetemp
aroma
AromaSteam
Button
AromaSteam
Button
Activating the Pump from a Control
Air Tempo® Control
1. Press the ON/OFF button to turn the steam generator ON.
2. Press the AROMA button, AROMA will be displayed on the screen
when AromaSteam is on.
3. Aroma fragrance will automatically be pumped into the steam line
at preset intervals.
iSteam® Control
1. Press the START button to turn the steam generator on.
2. In the dashboard press the AROMA button, the button
will be highlighted when AromaSteam Pump is on.
3. Aroma fragrance will automatically be pumped into the steam line
at preset intervals.
iTempoPlus® Control
1. Press the ON/OFF button to turn the steam generator ON.
2. Press the AROMA button, AROMA will be displayed on the screen
when AromaSteam is on.
3. Aroma fragrance will automatically be pumped into the steam line at
preset intervals.
WARNING
!
OPERATION (cont.)
Adjusting the Amount of Fragrance Delivery
The AromaSteam system has been factory set to deliver a suitable amount of fragrance
into a typical sized steam room. Do not exceed the maximum setting. Please contact
the MrSteam Technical Service Department before changing this setting.
Contact the MrSteam Technical Service Dept. at (800) 76-STEAM (East coast)
or (800) 72-STEAM (West Coast) for assistance or additional information.
Increasing the settings may introduce excessive concentration of
fragrance into the steam room, resulting in a health hazard.
101 F12:16 PM
AROMA
AromaSteam
Button
INSTALLER SECTION
AromaSteam Operation and Installation Instructions
®
PUR 100402 Rev 05.22
-
 1
1
-
 2
2
-
 3
3
-
 4
4
-
 5
5
-
 6
6
-
 7
7
-
 8
8
-
 9
9
-
 10
10
-
 11
11
-
 12
12
-
 13
13
-
 14
14
-
 15
15
-
 16
16
-
 17
17
-
 18
18
-
 19
19
-
 20
20


Mr.Steam AromaSteam Fragrance Metering Pump System Manuel utilisateur
- Taper
- Manuel utilisateur
- Ce manuel convient également à
dans d''autres langues
Documents connexes
Autres documents
-
MrSteam AromaFlo System Installation & Operation Manual
-
Mr. Steam AromaSteam (2014) Guide d'installation
-
Mr. Steam iSteam3 Guide d'installation
-
-
-
-
-
Maytag MCE8000AYW Manuel utilisateur
-
Philips ClearTouch Essence GC537 Manuel utilisateur
-