
ENGLISH
Installation and User Manual
Instructions d’installation et
Guide de l’utilisateur
Instrucciones de instalación y
Manual del usuario
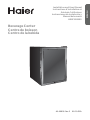
HEBF100BXS
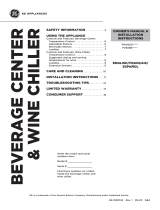
Beverage Center
Centre de boisson
Centro de la bebida
49-60809 Rev. 2 08-19 GEA

49-60809 Rev. 2
2
ENGLISH

3
49-60809 Rev. 2
ENGLISH
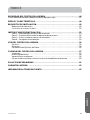
TABLE OF CONTENTS
BEVERAGE CENTER SAFETY ................................................4
Proper Disposal of Your Old Appliance .......................................5
PARTS AND FEATURES ......................................................6
INSTALLATION REQUIREMENTS .............................................7
Location Requirements .....................................................7
Connecting Electricity ...................................................... 8
INSTALLATION INSTRUCTIONS .............................................9
Step 1 - Unpack Beverage center ............................................9
Step 2 - Door Reversing ....................................................10
Step 3 - Level the Beverage Center .........................................13
Step 4 - Complete Installation ..............................................13
BEVERAGE CENTER USE ..................................................14
Control ....................................................................14
Shelves ....................................................................14
Key Eject Lock .............................................................14
BEVERAGE CENTER CARE .................................................15
Cleaning ...................................................................15
Defrosting ............................................................... 16
Vacation and Moving .......................................................17
Reinstalling/Using Beverage center Again ...................................18
TROUBLESHOOTING ...................................................... 19
LIMITED WARRANTY ......................................................22
RECORD KEEPING ........................................................24

49-60809 Rev. 2
4
ENGLISH
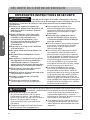
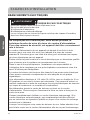
Ŷ Use this appliance only for its
intended purpose as described in
this user manual.
Ŷ This appliance must be properly
installed in accordance with
the installation instructions
before it is used. See grounding
instructions in the installation
section.
Ŷ Plug into a grounded 3 prong
outlet.
Ŷ Do not remove ground prong.
Ŷ Do not use an adapter or
extension cord.
Ŷ Do not repair or replace any
part of the appliance unless
specifically recommended in
the manual. All other servicing
should be referred to a qualified
technician.
Ŷ Disconnect power before
servicing.
Ŷ Replace all parts and panels
before operating.
Ŷ Use nonflammable cleaner.
Ŷ Keep flammable materials
and vapors away from the
refrigerator.
Ŷ Do not store explosive
substances such as aerosol cans
with a flammable propellant in
this appliance.
Ŷ Before discarding or removing
from service, remove the door.
This will reduce the possibility of
danger to children.
Ŷ To avoid serious injury or death,
children should not stand on, or
play in or with the appliance.
Ŷ Children and persons with
reduced physical, sensory or
mental capabilities or lack of
experience and knowledge can
use this appliance only if they are
supervised or have been given
instructions on safe use and
understand the hazards involved.
Ŷ This appliance is intended to be
used in household and similar
applications such as: staff kitchen
areas in shops, offices and other
working environments; farm
houses; by clients in hotels,
motels, bed & breakfast and
other residential environments;
catering and similar non-retail
applications.
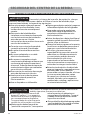
BEVERAGE CENTER SAFETY
CAUTION
To reduce the risk of injury when using your beverage
center, follow these basic safety precautions.
Ŷ Do not clean glass shelves or
covers with warm water when they
are cold. Glass shelves and covers
may break if exposed to sudden
temperature changes or impact,
such as bumping or dropping.
Tempered glass is designed to
shatter into many small pieces if it
breaks.
Ŷ Keep fingers out of the “pinch
point” areas; clearances
between the door and cabinet
are necessarily small. Be careful
closing door when children are in
the area.
ŶThis unit is designed for storing
and cooling beverages. Do not
store perishable foods in this unit.
IMPORTANT SAFETY INSTRUCTIONS
WARNING
To reduce the risk of fire, explosion, electrical shock,
injury to persons, or damage when using the beverage
center, follow basic precautions, including the following:

5
49-60809 Rev. 2
ENGLISH
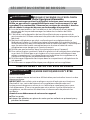
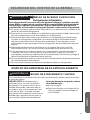
BEVERAGE CENTER SAFETY
WARNING
FIRE OR EXPLOSION HAZARD
Flammable Refrigerant
This appliance contains isobutane refrigerant, also known as R600a,
a natural gas with high environmental compatibility. However, it is
also combustible. Adhere to the warnings below to reduce the risk of
injury or property damage.
1. When handling, installing and operating the appliance, care should be
taken to avoid damage to the refrigerant tubing.
2. Service shall only be performed by authorized service personnel. Use
only manufacturer-authorized service parts.
3. Dispose of refrigerator in accordance with Federal and Local
Regulations. Flammable refrigerant and insulation material used
require special disposal procedures. Contact your local authorities for
the environmentally safe disposal of your refrigerator.
4. Keep ventilation openings in the appliance enclosures or in the built-in
structure clear of obstruction.
5. To remove frost, scrape with a plastic or wood spatula or scraper.
Do not use an ice pick, metal, or sharp-edged instrument as it may
puncture the freezer liner and then the flammable refrigerant tubing
behind it.
6. Do not use electrical appliances inside the food storage compartment
of the appliance.
7. Do not use any electrical device in defrosting your freezer.
PROPER DISPOSAL OF YOUR OLD APPLIANCE
WARNING
SUFFOCATION AND ENTRAPMENT HAZARD
Failure to follow these disposal instructions can result in death or
serious injury.
IMPORTANT: Child entrapment and suffocation are not problems of the
past. Junked or abandoned appliances are still dangerous even if they
will sit for “just a few days.” If you are getting rid of your old appliance,
please follow the instructions below to help prevent accidents.
Before You Throw Away Your Old Appliance:
Ŷ Take off the door.
Ŷ Leave the shelves in place so that children may not easily climb inside.

49-60809 Rev. 2
6
ENGLISH
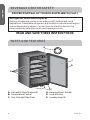
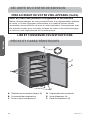
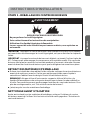
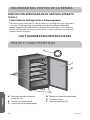
PARTS AND FEATURES
A. Full-width Glass Shelves (4)
B. Temperature Control
C. See-through Glass Door
D. Recessed Door Handle
E. Lock with Key
F. Leveling Legs (2)
Refrigerant and Foam Disposal:
Dispose of beverage center in accordance with Federal and Local
Regulations. Flammable refrigerant and insulation material used require
special disposal procedures. Contact your local authorities for the
environmentally safe disposal of your beverage center.
READ AND SAVE THESE INSTRUCTIONS
BEVERAGE CENTER SAFETY
PROPER DISPOSAL OF YOUR OLD APPLIANCE (Cont.)
B
A
F
E
C
D

7
49-60809 Rev. 2
ENGLISH
INSTALLATION REQUIREMENTS
WARNING
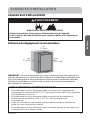
LOCATION REQUIREMENTS
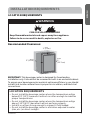
IMPORTANT: This beverage center is designed for freestanding
installation only. It should not be recessed or built-in an enclosed cabinet.
To ensure your beverage center works at optimum efficiency, you should
install it in a location where there is proper air circulation, and electrical
connections.
FIRE OR EXPLOSION HAZARD
Keep flammable materials and vapors away from appliance.
Failure to do so can result in death, explosion or fire.
Recommended Clearances:
LOCATION REQUIREMENTS
• Do not install the beverage center where the temperature will go
below 55°F (13°C) because it will not run often enough to maintain
proper temperatures.
• Do not install the beverage center where the temperature will go
above 110°F (43°C) because it will not perform properly.
• Install it on a floor strong enough to support it fully loaded.
• Do not install the beverage center in a location exposed to water
(rain, etc.) or direct sunlight.
Back
2" (5 cm)
Sides
5"
(12.7 cm)
Top
2" (5 cm)

49-60809 Rev. 2
8
ENGLISH
INSTALLATION REQUIREMENTS
Do not, under any circumstances, cut or remove the third (ground)
prong from the power cord. For personal safety, this appliance must
be properly grounded.
The power cord of this appliance is equipped with a 3-prong (grounding)
plug which mates with a standard 3-prong (grounding) wall outlet to
minimize the possibility of electric shock hazard from this appliance.
Have the wall outlet and circuit checked by a qualified electrician to make
sure the outlet is properly grounded.
Where a standard 2-prong wall outlet is encountered, it is your personal
responsibility and obligation to have it replaced with a properly grounded
3-prong wall outlet.
The beverage center should always be plugged into its own individual
electrical outlet which has a voltage rating that matches the rating plate.
A 115 Volt AC, 60 Hz, 15- or 20-amp fused, grounded electrical supply
is required. This provides the best performance and also prevents
overloading house wiring circuits which could cause a fire hazard from
overheated wires.
Never unplug your beverage center by pulling on the power cord. Always
grip plug firmly and pull straight out from the outlet.
Immediately discontinue use of a damaged supply cord. If the supply
cord is damaged, it must be replaced by a qualified service professional
with an authorized service part from the manufacturer.
When moving the beverage center away from the wall, be careful not to
roll over or damage the power cord.
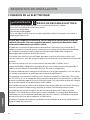
CONNECTING ELECTRICITY
WARNING
ELECTRICAL SHOCK HAZARD
Plug into a grounded 3-prong outlet.
Do not remove the ground prong.
Do not use an adapter.
Do not use an extension cord.
Failure to follow these instructions can result in death, fire, or
electrical shock.

9
49-60809 Rev. 2
ENGLISH
IMPORTANT: Handle with care when moving beverage center to avoid
either damaging the refrigerant tubing or increasing the risk of a leak.
IMPORTANT: When moving the beverage center, never tilt it more than
a 45° angle. This could damage the compressor and the sealed system. If
the beverage center has been placed in a horizontal position for any period
of time, wait 4 hours before plugging in the beverage center to allow the
refrigerant to settle.
REMOVE PACKAGING
Ŷ Remove tape and glue residue from surfaces before turning on the
beverage center. Rub a small amount of liquid dish soap over the adhesive
with your fingers. Wipe with warm water and dry.
NOTE: Do not use sharp instruments, rubbing alcohol, flammable fluids,
or abrasive cleaners to remove tape or glue. These products can damage
the surface of your beverage center. For more information, see “Beverage
Center Safety.”
Ŷ Dispose of/recycle all packaging materials.
CLEAN BEFORE USING
After you remove all of the packaging materials, clean the inside of the
beverage center before using it. See the cleaning instructions in “Beverage
Center Care.”
INSTALLATION INSTRUCTIONS
WARNING
STEP 1 - UNPACK BEVERAGE CENTER
FIRE OR EXPLOSION HAZARD
Do not puncture refrigerant tubing.
Follow handling instructions carefully.
Flammable refrigerant used.
Failure to do so can result in death, explosion or fire.

49-60809 Rev. 2
10
ENGLISH
INSTALLATION REQUIREMENTS
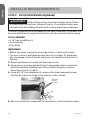
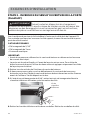
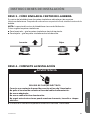
STEP 2 - DOOR REVERSING (Optional)
The door hinges are factory installed on the right-hand side. If you want the
doors to open from the opposite direction, you can reverse the door swing.
TOOLS NEEDED
• 5/16” Hex-head Wrench
• 3 mm Hex Key
• Putty Knife
IMPORTANT:
• Before you begin, unplug the beverage center, or disconnect power.
• The door is heavy and fragile and the door front is glass. To avoid door
glass breakage, use both hands and grasp only the sides of the door to
remove.
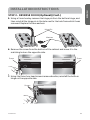
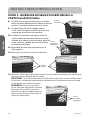
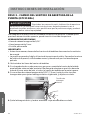
1. Remove all items from inside the beverage center.
2. Using two or more people, gently lay the beverage center on its back.
Keep the machine standing over 4 hours before using if you lay the
beverage center on its back.
3. Using a 5/16” hex-head wrench, remove the three hexagonal screws
fastening the bottom hinge to the cabinet, and set aside.
4. Remove the bottom hinge and the two washers. Set the washers aside.
WARNING
Follow all steps when reversing the door swing. Failure
to follow these instructions, leaving off parts, or overtightening screws,
can lead to the door falling off and result in injury and property damage.
Bottom
Hinge
Screws

11
49-60809 Rev. 2
ENGLISH
INSTALLATION INSTRUCTIONS
STEP 2 - REVERSE DOOR (Optional) (Cont.)
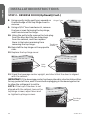
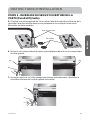
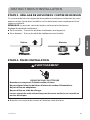
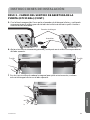
5. Using a 3 mm hex key remove the hinge pin from the bottom hinge, and
then reinstall the hinge pin in the hole next to the hole from which it was
removed. Replace the two washers.
6. Remove the screw from the bottom of the cabinet and move it to the
matching hole on the opposite side.
7. Using the three hex-head screws removed earlier, reinstall the bottom
hinge on the opposite side.
Hinge Pin
Washers
Screw
Screw
Screws

49-60809 Rev. 2
12
ENGLISH
INSTALLATION INSTRUCTIONS
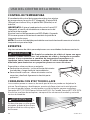
STEP 2 - REVERSE DOOR (Optional) (Cont.)
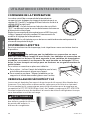
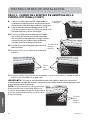
8. Using a putty knife, gently pry upward on
the back edge of the top hinge cover to
remove.
9. Using a 5/16” hex-head wrench, remove
the two screws fastening the top hinge,
and then remove the hinge.
10. Using the putty knife remove the hole plug
from the door and the two hole plugs
from the cabinet, and then replace
them in the holes remaining from
removing the top hinge.
11. Reinstall the top hinge on the opposite
side.
12. Replace the top hinge cover.
13. Stand the beverage center upright, and check that the door is aligned
with the cabinet.
IMPORTANT: If the beverage center has been placed in a horizontal position
for any period of time, wait 4 hours before plugging in the beverage center
to allow the refrigerant to settle.
NOTE: If the top of the door is not
aligned with the cabinet, loosen the
top hinge screws, adjust door and
re-tighten top hinge screws.
Hinge Cover
Top Hinge
Screws
Hole
Plugs
Top Hinge
Screws

13
49-60809 Rev. 2
ENGLISH
INSTALLATION INSTRUCTIONS
STEP 3 - LEVEL BEVERAGE CENTER
Your beverage center has two leveling legs located in the front, bottom
corners. After placing the beverage center in its final position, level the
beverage center.
NOTE: The beverage center door will close easier when leveling legs are
extended.
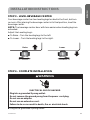
Adjust the Leveling Legs:
Ŷ To Raise – Turn the leveling legs to the left.
Ŷ To Lower – Turn the leveling legs to the right.
Raise Lower
Ŷ Plug into a grounded 3 prong outlet.
STEP 4 - COMPLETE INSTALLATION
WARNING
ELECTRICAL SHOCK HAZARD
Plug into a grounded 3 prong outlet.
Do not remove the ground prong from the power cord plug.
Do not use an adapter.
Do not use an extension cord.
Failure to do so can result in death, fire or electrical shock.

49-60809 Rev. 2
14
ENGLISH
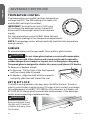
TEMPERATURE CONTROL
The temperature control dial has three temperature
settings and OFF. The MIN setting is the least cold
and the MAX setting is the coldest.
IMPORTANT: Turning the control to OFF turns
off cooling in the beverage center; it does NOT
disconnect the beverage center from the power
supply.
Set the temperature control to MED. Allow 24 hours
to cool before making further temperature adjustments.
NOTE: The beverage center will automatically maintain the temperature
level you select.
BEVERAGE CENTER USE
SHELVES
To accommodate your storage needs, there are four glass shelves.
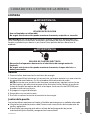
CAUTION
Do not clean glass shelves or covers with warm water
when they are cold. Glass shelves and covers may break if exposed to
sudden temperature changes or impact, such as bumping or dropping.
Tempered glass is designed to shatter into many small pieces if it breaks.
To Remove or Replace a Shelf:
Ŷ To Remove - Tilt the front of the shelf upward,
and then slowly slide it forward.
Ŷ To Replace - Align the shelf with the supports
and gently slide the shelf toward the rear.
KEY EJECT LOCK
The lock is spring loaded so the key cannot be left in the lock. To lock or
unlock, press the key in while turning. If the key is lost, contact your dealer
for a replacement or call 877.337.3639 for US customers. In Canada, call
877.470.9174. Always give the model and serial number of the beverage
center when requesting a replacement key.
WARNING
To
prevent a child from
being entrapped, keep
the key out of reach of
children and away from
the freezer.
Key

15
49-60809 Rev. 2
ENGLISH
BEVERAGE CENTER CARE
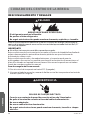
CLEANING
WARNING
EXPLOSION HAZARD
Use nonflammable cleaner.
Failure to do so can result in death, explosion or fire.
IMPORTANT: Do not use harsh chemicals, ammonia, chlorine bleach,
concentrated detergent, solvents, abrasives or metal scouring pads to clean
your product inside or out. They can damage and/or discolor the finish.
General
1. Unplug or disconnect power.
2. Wash interior surfaces, accessories, and outer frame with a solution of
warm water mixed with 3 - 4 tablespoons of baking soda.
NOTE: Before using cleaning products, always read and follow
manufacturer’s instructions and warnings to avoid personal injury or
product damage. Before cleaning glass shelves or covers, read SHELVES
section for instructions.
3. Rinse with clean, warm water.
4. Dry thoroughly with a soft cloth.
5. Plug in or reconnect power.
Door Gaskets
Gaskets must be kept clean and pliable to ensure a proper seal.
Ŷ Clean door gaskets every 3 months with solution of baking soda and
warm water.
Ŷ Petroleum jelly applied lightly to the hinge-side gasket will keep the
gasket pliable and ensure a good seal.
ELECTRICAL SHOCK HAZARD
Unplug your appliance or disconnect power before cleaning.
Failure to do so can result in death, electric shock or personal injury.
WARNING

49-60809 Rev. 2
16
ENGLISH
BEVERAGE CENTER CARE
DEFROSTING
For most efficient operation and minimum energy consumption, defrost
whenever the frost becomes 1/8” (3.2 mm) thick.
IMPORTANT:
Ŷ Do not use mechanical devices to defrost.
Under normal operating conditions, the beverage center is designed to self
defrost during periods when the cooling system cycles off.
Under conditions of extreme heat and humidity, and/or prolonged or
frequent door openings, you may notice frost build up on the cold plate on
the interior rear wall. This frost can be removed through a manual defrost.
To manually defrost:
1. Turn the temperature control dial to OFF.
2. After the frost has been cleared, move the temperature control dial back
to its original position.
FIRE OR EXPLOSION HAZARD
Flammable refrigerant used.
Do not puncture refrigerant tubing.
Failure to do so can result in death, explosion or fire.
DANGER
ELECTRICAL SHOCK HAZARD
Plug into a grounded 3 prong outlet.
Do not remove the ground prong from the power cord plug.
Do not use an adapter.
Do not use an extension cord.
Failure to do so can result in death, fire or electrical shock.
WARNING

17
49-60809 Rev. 2
ENGLISH
VACATION AND MOVING
Vacation
If you will be away for an extended period of time and do not want to leave
the appliance on while you are gone, prepare it for your absence.
1. Remove all items.
2. Turn the temperature control to the OFF position.
3. Unplug or disconnect power.
4. Clean the interior. See “Cleaning.”
5. Clean lid/door gaskets. See “Cleaning.”
6. Prop doors open, so air can circulate inside.
Moving
If you are moving your beverage center to a new home, prepare the
appliance for the move.
IMPORTANT:
Ŷ Handle with care when moving to avoid either damaging the refrigerant
tubing or increasing the risk of a leak.
Ŷ When moving the beverage center, never tilt it more than a 45° angle. If
you do need to tilt it more than 45°or lay the beverage center on its back,
keep it standing over 4 hours before using.
1. Complete vacation preparation steps 1 through 5. See “Vacation.”
2. Take out all removable parts, wrap them well, and tape them together so
they don’t shift and rattle during the move.
3. Tape the lid/door closed and tape the power cord to the back of the
beverage center.
BEVERAGE CENTER CARE
WARNING
FIRE OR EXPLOSION HAZARD
Do not puncture refrigerant tubing.
Follow handling instructions carefully.
Flammable refrigerant used.
Failure to do so can result in death, explosion or fire.

49-60809 Rev. 2
18
ENGLISH
BEVERAGE CENTER CARE
REINSTALLING/USING BEVERAGE CENTER AGAIN
IMPORTANT: If the beverage center has been placed in a horizontal or tilted
position for any period of time, wait 4 hours before plugging in the beverage
center to allow the refrigerant to settle.
1. Clean beverage center. See Cleaning.
2. Place beverage center in desired location and level. See Installation
Instructions.
3. Plug into a grounded 3 prong outlet.
WARNING
ELECTRICAL SHOCK HAZARD
Plug into a grounded 3 prong outlet.
Do not remove the ground prong from the power cord plug.
Do not use an adapter.
Do not use an extension cord.
Failure to do so can result in death, fire or electrical shock.

19
49-60809 Rev. 2
ENGLISH
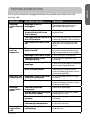
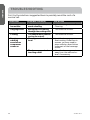
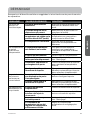
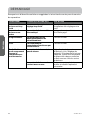
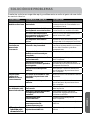
TROUBLESHOOTING
First try the solutions suggested here to possibly avoid the cost of a
service call.
PROBLEM POSSIBLE CAUSE(S) SOLUTION
Beverage
center does not
run.
Beverage center is
unplugged.
Plug beverage center into a
grounded 3 prong outlet.
The circuit breaker is
÷õìóóèç¦÷øõñèçòģòõ÷ëè
fuse is blown.
Reset/Turn on circuit breaker or
replace fuse.
The temperature control is in
the OFF position.
Turn the temperature control to
a setting between Min and Max.
The compressor has cycled
òģ
Wait 30 to 40 minutes to see
whether the compressor will
start.
Compressor
runs too
frequently
The room temperature is hot
and/or humid.
This is normal to maintain
constant temperature during
high temperature, humid days.
Beverage center door is ajar. Close the door completely
The door gasket is not
sealing properly.
Clean the door gasket. See
Cleaning.
Frequent or prolonged door
openings.
Limit door openings to maintain
the internal temperature.
Door is blocked open. Rearrange or remove items
that are keeping the door from
closing completely.
Door does not
close properly
Beverage center is not level
or door is not aligned.
Level beverage center or align
the door.
Door is blocked open. Rearrange or remove items
that are keeping the door from
closing completely.
Beverage
center is too
warm
The door is opened
frequently.
Limit door openings.
A large amount of beverages
was recently added.
Allow time for recently added
beverages to cool.
The door is not sealing
properly.
Clean the door gasket. See
Cleaning.
The control is not set to a
cold enough temperature.
Adjust the temperature control
to a colder setting.
Beverage
center is too
cold
The control is set to a too
cold setting.
Adjust the temperature to a less
cold setting.

49-60809 Rev. 2
20
ENGLISH
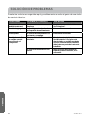
TROUBLESHOOTING
First try the solutions suggested here to possibly avoid the cost of a
service call.
PROBLEM POSSIBLE CAUSE(S) SOLUTION
Beverage center
has an odor.
The beverage center
needs cleaning.
Clean beverage center. See
Cleaning.
Gurgling sound Refrigerant circulating
through the cooling coils.
This sound is normal.
Clicking The temperature control
æüæïìñêòñäñçòģ
This sound is normal.
Popping or
cracking
sound when
compressor
comes on
Beverage center is not
level.
Level the beverage center.
ÜèèÕèùèïìñêÒé÷ëèĥòòõìö
uneven, you may need to
place metal or wood shims
underpart of the beverage
center.
The beverage center is
touching a wall.
Move the beverage center
away from the wall and re-
level, if necessary.
La page est en cours de chargement...
La page est en cours de chargement...
La page est en cours de chargement...
La page est en cours de chargement...
La page est en cours de chargement...
La page est en cours de chargement...
La page est en cours de chargement...
La page est en cours de chargement...
La page est en cours de chargement...
La page est en cours de chargement...
La page est en cours de chargement...
La page est en cours de chargement...
La page est en cours de chargement...
La page est en cours de chargement...
La page est en cours de chargement...
La page est en cours de chargement...
La page est en cours de chargement...
La page est en cours de chargement...
La page est en cours de chargement...
La page est en cours de chargement...
La page est en cours de chargement...
La page est en cours de chargement...
La page est en cours de chargement...
La page est en cours de chargement...
La page est en cours de chargement...
La page est en cours de chargement...
La page est en cours de chargement...
La page est en cours de chargement...
La page est en cours de chargement...
La page est en cours de chargement...
La page est en cours de chargement...
La page est en cours de chargement...
La page est en cours de chargement...
La page est en cours de chargement...
La page est en cours de chargement...
La page est en cours de chargement...
La page est en cours de chargement...
La page est en cours de chargement...
La page est en cours de chargement...
La page est en cours de chargement...
La page est en cours de chargement...
La page est en cours de chargement...
La page est en cours de chargement...
La page est en cours de chargement...
La page est en cours de chargement...
La page est en cours de chargement...
La page est en cours de chargement...
La page est en cours de chargement...
-
 1
1
-
 2
2
-
 3
3
-
 4
4
-
 5
5
-
 6
6
-
 7
7
-
 8
8
-
 9
9
-
 10
10
-
 11
11
-
 12
12
-
 13
13
-
 14
14
-
 15
15
-
 16
16
-
 17
17
-
 18
18
-
 19
19
-
 20
20
-
 21
21
-
 22
22
-
 23
23
-
 24
24
-
 25
25
-
 26
26
-
 27
27
-
 28
28
-
 29
29
-
 30
30
-
 31
31
-
 32
32
-
 33
33
-
 34
34
-
 35
35
-
 36
36
-
 37
37
-
 38
38
-
 39
39
-
 40
40
-
 41
41
-
 42
42
-
 43
43
-
 44
44
-
 45
45
-
 46
46
-
 47
47
-
 48
48
-
 49
49
-
 50
50
-
 51
51
-
 52
52
-
 53
53
-
 54
54
-
 55
55
-
 56
56
-
 57
57
-
 58
58
-
 59
59
-
 60
60
-
 61
61
-
 62
62
-
 63
63
-
 64
64
-
 65
65
-
 66
66
-
 67
67
-
 68
68


dans d''autres langues
- English: Haier HEBF100BXS User manual
- español: Haier HEBF100BXS Manual de usuario
Documents connexes
Autres documents
-
GE CCP06BP3PD1 Le manuel du propriétaire
-
KitchenAid W11409844D Le manuel du propriétaire
-
 GE Profile Series PWS06DSPSS Le manuel du propriétaire
-
Jenn-Air JUBFL242HX Le manuel du propriétaire
-
-
-
KitchenAid KUBR314KBS Manuel utilisateur
