GE Profile Series PWS06DSPSS Le manuel du propriétaire
- Catégorie
- Cave à vin
- Taper
- Le manuel du propriétaire

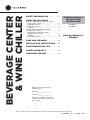
BEVERAGE CENTER
& WINE CHILLER
ENGLISH/FRANÇAIS/
ESPAÑOL
Write the model and serial
numbers here:
Model # _________________
Serial # _________________
Find these numbers on a label
inside the beverage center and
wine chiller.
49-1000514 Rev. 1 09-20 GEA
PWS06D*****
PVS06B*****
OWNER’S MANUAL &
INSTALLATION
INSTRUCTIONS
GE is a trademark of the General Electric Company. Manufactured under trademark license.
SAFETY INFORMATION ............. 3
USING THE APPLIANCE
Controls and Features: Beverage Center
Temperature Control .....................6
Adjustable Shelves .......................6
Reversible Shelves ....................... 7
Loading ................................ 7
Controls and Features: Wine Chiller
Temperature Control ..................... 8
Suggested storing and serving
temperatures for wine .................... 8
Loading .................................9
Extension Drawers ....................... 9
CARE AND CLEANING .............. 10
INSTALLATION INSTRUCTIONS ....11
TROUBLESHOOTING TIPS ...........14
LIMITED WARRANTY ................17
CONSUMER SUPPORT ...............18

2 49-1000514 Rev. 1
THANK YOU FOR MAKING GE APPLIANCES A PART OF YOUR HOME.
Whether you grew up with GE Appliances, or this is your first, we’re happy to have you
in the family.
We take pride in the craftsmanship, innovation and design that goes into every GE Appliances
product, and we think you will too. Among other things, registration of your appliance ensures that
we can deliver important product information and warranty details when you need them.
Register your GE appliance now online. Helpful websites and phone numbers are available in
the Consumer Support section of this Owner’s Manual. You may also mail in the pre-printed
registration card included in the packing material.

49-1000514 Rev. 1 3
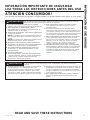
READ AND SAVE THESE INSTRUCTIONS
IMPORTANT SAFETY INFORMATION
READ ALL INSTRUCTIONS BEFORE USING
SAFETY INFORMATION
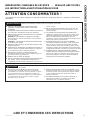
CAUTION
To reduce the risk of injury when using your appliance, follow these basic safety
precautions.
Ŷ 'RQRWFOHDQJODVVVKHOYHVRUFRYHUVZLWK
warm water when they are cold. Glass shelves
and covers may break if exposed to sudden
temperature changes or impact, such as bumping
or dropping. Tempered glass is designed to
shatter into many small pieces if it breaks.
Ŷ .HHSILQJHUVRXWRIWKH³SLQFKSRLQW´DUHDV
clearances between the doors and between the
doors and cabinet are necessarily small. Be careful
closing doors when children are in the area.
Ŷ 7KLVXQLWLVGHVLJQHGIRUVWRULQJDQGFRROLQJ
EHYHUDJHV'RQRWVWRUHSHULVKDEOHIRRGVLQWKLVXQLW
WARNING
To reduce the risk of fire, explosion, electric shock, or injury when using your
appliance, follow these basic safety precautions:
Ŷ 8VHWKLVDSSOLDQFHRQO\IRULWVLQWHQGHGSXUSRVHDV
described in this Owner’s Manual.
Ŷ 7KLVDSSOLDQFHPXVWEHSURSHUO\LQVWDOOHGDQG
located in accordance with the Installation
Instructions before it is used.
Ŷ 8QSOXJWKHDSSOLDQFHEHIRUHPDNLQJUHSDLUVRU
cleaning.
NOTE: Power to the appliance cannot be
disconnected by any setting on the control panel.
NOTE: Repairs must be performed by a qualified
Service Professional.
Ŷ 5HSODFHDOOSDUWVDQGSDQHOVEHIRUHRSHUDWLQJ
Ŷ 'RQRWVWRUHRUXVHJDVROLQHRURWKHUIODPPDEOH
vapors and liquids in the vicinity of this or any
other appliance.
Ŷ 'RQRWVWRUHH[SORVLYHVXEVWDQFHVVXFKDVDHURVRO
cans with a flammable propellant in this appliance.
Ŷ 'RQRWXVHDQH[WHQVLRQFRUG
Ŷ 7RSUHYHQWVXIIRFDWLRQDQGHQWUDSPHQWKD]DUGVWR
children, remove door from this appliance before
disposing of it or discontinuing its use.
Ŷ 7RDYRLGVHULRXVLQMXU\RUGHDWKFKLOGUHQVKRXOG
not stand on, or play in or with the appliance.
Ŷ &KLOGUHQDQGSHUVRQVZLWKUHGXFHGSK\VLFDO
sensory or mental capabilities or lack of experience
and knowledge can use this appliance only if they
are supervised or have been given instructions on
VDIHXVHDQGXQGHUVWDQGWKHKD]DUGVLQYROYHG
Ŷ 7KLVDSSOLDQFHLVLQWHQGHGWREHXVHGLQKRXVHKROG
and similar applications such as: staff kitchen
areas in shops, offices and other working
HQYLURQPHQWVIDUPKRXVHVE\FOLHQWVLQKRWHOV
motels, bed & breakfast and other residential
HQYLURQPHQWVFDWHULQJDQGVLPLODUQRQUHWDLO
applications.
Ŷ 'RQRWDSSO\KDUVKFOHDQHUVWRWKHDSSOLDQFH
Certain cleaners will damage plastic which may
cause parts such as the door or door handles to
detach unexpectedly. See the Care and Cleaning
section for detailed instructions.
ATTENTION CONSUMER!
7KLVDSSOLDQFHLVGHVLJQHGIRUVWRULQJDQGFRROLQJEHYHUDJHV'RQRWVWRUHSHULVKDEOHIRRGVLQWKLVXQLW

4 49-1000514 Rev. 1
Do not, under any circumstances, cut or remove the third (ground) prong from the power cord.
For personal safety, this appliance must be properly grounded.
The power cord of this appliance is equipped with
a 3-prong (grounding) plug which mates with a
VWDQGDUGSURQJJURXQGLQJZDOORXWOHWWRPLQLPL]H
WKHSRVVLELOLW\RIHOHFWULFVKRFNKD]DUGIURPWKLV
appliance.
Have the wall outlet and circuit checked by a qualified
electrician to make sure the outlet is properly
grounded.
If you have only a standard 2-prong wall outlet, it is
your personal responsibility and obligation to have it
replaced with a properly grounded 3-prong wall outlet.
NOTE: GFI (ground fault interrupter) is not
recommended.
The appliance should always be plugged into its own
individual electrical outlet which has a voltage rating
that matches the rating plate.
This provides the best performance and also prevents
overloading house wiring circuits which could cause a
ILUHKD]DUGIURPRYHUKHDWHGZLUHV
Never unplug your appliance by pulling on the power
cord. Always grip plug firmly and pull straight out from
the outlet.
Immediately discontinue use of a damaged supply
cord. If the supply cord is damaged, it must be
replaced by a qualified service professional with an
DXWKRUL]HGVHUYLFHSDUWIURPWKHPDQXIDFWXUHU
When moving the appliance away from the wall, be
careful not to roll over or damage the power cord.
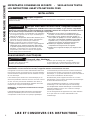
CONNECTING ELECTRICITY
WARNING
Electrical Shock Hazard.
Plug into a grounded 3-prong outlet.
'RQRWUHPRYHWKHJURXQGSURQJ
'RQRWXVHDQDGDSWHU
'RQRWXVHDQH[WHQVLRQFRUGZLWKWKLVDSSOLDQFH
Failure to follow these instructions can result in
death, fire, or electrical shock.
READ AND SAVE THESE INSTRUCTIONS
SAFETY INFORMATION
IMPORTANT SAFETY INFORMATION
READ ALL INSTRUCTIONS BEFORE USING
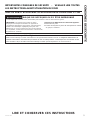
INSTALLATION
WARNING
EXPLOSION HAZARD
.HHSIODPPDEOHPDWHULDOVDQGYDSRUVDZD\IURPDSSOLDQFH)DLOXUHWRGRVRFDQUHVXOWLQILUHH[SORVLRQRUGHDWK
WARNING
FIRE OR EXPLOSION HAZARD Flammable Refrigerant
This appliance contains isobutane refrigerant, also known as R600a, a natural gas with high
environmental compatibility. However, it is also combustible. Adhere to the warnings below to reduce
the risk of injury or property damage.
1. When handling, installing and operating the
appliance, care should be taken to avoid damage
to the refrigerant tubing.
2. 6HUYLFHVKDOORQO\EHSHUIRUPHGE\DXWKRUL]HG
VHUYLFHSHUVRQQHO8VHRQO\PDQXIDFWXUHU
DXWKRUL]HGVHUYLFHSDUWV
3. 'LVSRVHRIDSSOLDQFHLQDFFRUGDQFHZLWK
the Federal and Local Regulations. The
flammable refrigerant and insulation material
used in this product require special disposal
procedures. Contact your local authorities for the
environmentally safe disposal of your appliance.
4. .HHSYHQWLODWLRQRSHQLQJVLQWKHDSSOLDQFH
enclosures or in the built-in structure clear of
obstruction.
5. To remove frost, scrape with a plastic or wood
VSDWXODRUVFUDSHU'RQRWXVHDQLFHSLFNRUD
metal or sharp-edged instrument as it may puncture
the appliance liner and then the flammable
refrigerant tubing behind it.
6.'RQRWXVHHOHFWULFDODSSOLDQFHVLQVLGHWKHVWRUDJH
compartment of the appliance.
7.'RQRWXVHDQ\HOHFWULFDOGHYLFHWRGHIURVW\RXU
appliance.

49-1000514 Rev. 1 5
READ AND SAVE THESE INSTRUCTIONS
SAFETY INFORMATION
IMPORTANT SAFETY INFORMATION
READ ALL INSTRUCTIONS BEFORE USING
WARNING
SUFFOCATION AND ENTRAPMENT HAZARD
Failure to follow these disposal instructions can result in death or serious injury
IMPORTANT: Child entrapment and suffocation
are not problems of the past. Junked or abandoned
DSSOLDQFHVRUIUHH]HUVDUHVWLOOGDQJHURXVHYHQLI
WKH\ZLOOVLWIRU³MXVWDIHZGD\V´,I\RXDUHJHWWLQJULG
of your old appliance, please follow the instructions
below to help prevent accidents.
Before You Throw Away Your Old Appliance
Ŷ Take off the door.
Ŷ Leave the shelves in place so that children may not
easily climb inside.
Refrigerant and Foam Disposal:
'LVSRVHRIDSSOLDQFHLQDFFRUGDQFHZLWK)HGHUDODQG/RFDO5HJXODWLRQV)ODPPDEOHUHIULJHUDQWDQGLQVXODWLRQ
material used require special disposal procedures. Contact your local authorities for the environmentally safe
disposal of your appliance.
PROPER DISPOSAL OF THE BEVERAGE CENTER OR WINE CHILLER

6 49-1000514 Rev. 1
Controls and Features - Beverage Center
USING THE APPLIANCE: Features - Beverage Center
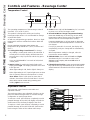
Adjustable Shelves
The beverage center features removable and
adjustable shelves.
The top three shelves are adjustable. Shelves can be
placed on different height levels for versatile storage
configuration or storing larger items.
To remove a shelf, open the door completely to avoid
potential damage to the shelf. Lift slightly and pull the
shelf forward. The shelf may fit tightly in the track.
To replace a shelf, open the door completely to avoid
potential damage to the shelf. Slide the shelf into the
tracks along the sides of the cabinet until it stops.
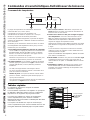
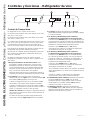
Temperature Control
The operating temperature of the beverage center is
from 38°F (3°C) to 61°F (16°C).
This product is designed for storing and cooling
beverages and/or wines. It is not intended for storage
of perishable foods.
As with any refrigeration-type product, there is a slight
temperature variance at different locations within the
cabinet.
'RQRWLQVWDOOWKHEHYHUDJHFHQWHUZKHUHWKH
temperature will go below 55°F (13°C) or above 90°F
(32°C).
1. Locking/Unlocking Control Panel: To change
any settings, control panel needs to be unlocked. If
control panel is locked, display will flash Loc for 4
seconds when a key is pressed, and the key press
is ignored.
Press and hold Lock for 3 seconds to lock/unlock
control panel.
2. Interior Light: To switch the interior light on/off,
simply press Light. The display will flash ON or OFF
in this process.
When light setting is ON, interior light is always on.
When light setting is OFF, interior light turns on when
door is opened, and turns off when door is closed.
Door Alarm: If door is left open for more than 2
minutes, door alarm will sound until door is closed.
'RRUDODUPFDQEHWXUQHGRIIE\SUHVVLQJDQG
holding Light for 10 seconds.
3. Power: Press and hold the Power key for 3 seconds
to power on or off the beverage center.
4. UP and DOWN to Change Temperature Setting:
3UHVVWKH'2:1NH\RUWKH83NH\RQFHWRHQWHU
temperature setting change mode. The display will
start to flash the current temperature setting.
3UHVVWKH'2:1NH\RU83NH\DJDLQWRGHFUHDVH
or increase the desired temperature in increments of
one degree.
If no key is pressed in 3 seconds, the display will
stop flashing, and your change will be automatically
accepted.
When temperature setting is changed, allow 24
KRXUVIRUWKHXQLWWRVWDELOL]H
5. Sabbath Mode: Press and hold Lock and Light
simultaneously for 5 seconds to enter or exit
6DEEDWKPRGH'LVSOD\ZLOOVKRZSAb when in
Sabbath mode.
6. Fahrenheit and Celsius: 3UHVVDQGKROGWKH'2:1
NH\DQGWKH83NH\VLPXOWDQHRXVO\IRUVHFRQGVWR
switch between Fahrenheit and Celsius temperature
display.
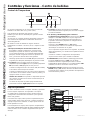
Lock Light Power
Hold 3 Sec Hold 3 Sec
14
5
6
23
Shelves can
be placed on
GLႇHUHQWKHLJKW
levels

49-1000514 Rev. 1 7
Controls and Features - Beverage Center
USING THE APPLIANCE: Controls and Features - Beverage Center
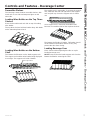
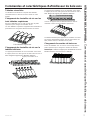
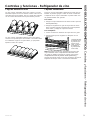
Reversible Shelves
The beverage center features reversible shelves, with
wood rack on one side and tempered glass on the
other side.
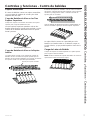
Loading Wine Bottles on the Top Three
Shelves
Place shelves with wood rack side on top for loading
wine bottles.
The top three shelves hold two bottles deep, with bottle
necks alternating front to back.
Loading Wine Bottles on the Bottom
Shelf
The bottom shelf features a wine bottle support rack.
The support rack enables wine bottles being displayed
at an angle. The support rack holds 6 bottles.
The support rack is removable. To remove the support
rack, hold both left side and right side of the support
rack and pull it up. Store the support rack for future
use.
Once support rack is removed, the bottom shelf
becomes a reversible shelf as the top three shelves.
The bottom shelf holds six bottles. Tall bottles should
not be loaded in the bottom drawer as they may
prevent the door from closing.
Loading Beverage Cans
Place shelves with tempered glass side on top for
loading beverage cans.
NOTE: Remove the wine bottle support rack from the
bottom shelf before reversing the shelf.
Top Three Shelves
Bottle Support Rack

8 49-1000514 Rev. 1
USING THE APPLIANCE: Controls and Features - Wine Chiller
Controls and Features - Wine Chiller
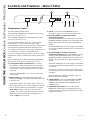
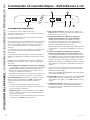
Temperature Control
7KHZLQHFKLOOHUKDVWZR]RQHV
7KHRSHUDWLQJWHPSHUDWXUHRIWKHXSSHU]RQHLVIURP
43°F (6°C) to 55°F (13°C).
7KHRSHUDWLQJWHPSHUDWXUHRIWKHORZHU]RQHLVIURP
55°F (13°C) to 62°F (17°C).
Recommended setting is 45°F (7°C) for the upper
]RQHDQG)&IRUWKHORZHU]RQH7KLV
recommendation allows for easy storage of white wines
LQWKHXSSHU]RQHDQGUHGZLQHVLQWKHORZHU]RQH
This product is designed for storing and cooling wine. It
is not intended for storage of perishable foods.
As with any refrigeration-type product, there is a slight
temperature variance at different locations within each
]RQH
'RQRWLQVWDOOWKHZLQHFKLOOHUZKHUHWKHWHPSHUDWXUH
will go below 55°F (13°C) or above 90°F (32°C).
1. Locking/Unlocking Control Panel: To change
any settings, control panel needs to be unlocked. If
control panel is locked, display will flash Loc for 4
seconds when a key is pressed, and the key press
is ignored.
Press and hold Lock for 3 seconds to lock/unlock
control panel.
2. Interior Light: To switch the interior light on/off,
simply press Light. The display will flash ON or OFF
in this process.
When light setting is ON, interior light is always on.
When light setting is OFF, interior light turns on when
door is opened, and turns off when door is closed.
Door Alarm: If door is left open for more than 2
minutes, door alarm will sound until door is closed.
'RRUDODUPFDQEHWXUQHGRIIE\SUHVVLQJDQG
holding Light for 10 seconds.
3. Power: Press and hold the Power key for 3
seconds to power on or off the beverage center.
4. UP and DOWN to Change Upper Zone
Temperature Setting:
3UHVVWKH'2:1NH\RUWKH83NH\RQFHWRHQWHU
WHPSHUDWXUHVHWWLQJFKDQJHPRGH7KHXSSHU]RQH
display will start to flash the current temperature
setting.
3UHVVWKH'2:1NH\RU83NH\DJDLQWRGHFUHDVH
or increase the desired temperature in increments of
one degree.
5. UP and DOWN to Change Lower Zone
Temperature Setting: 3UHVVWKH'2:1NH\RUWKH
83NH\LQWKHORZHUGLVSOD\DUHDRQFHWRHQWHU
WHPSHUDWXUHVHWWLQJFKDQJHPRGH7KHORZHU]RQH
display will start to flash the current temperature
setting.
3UHVVWKH'2:1NH\RU83NH\DJDLQWRGHFUHDVH
or increase the desired temperature in increments of
one degree.
If no key is pressed in 3 seconds, the display will
stop flashing, and your change will be automatically
accepted.
When temperature setting is changed, allow 24
KRXUVIRUWKHXQLWWRVWDELOL]H
6. Sabbath Mode: Press and hold Lock and Light
simultaneously for 5 seconds to enter or exit
6DEEDWKPRGH'LVSOD\ZLOOVKRZSAb when in
Sabbath mode.
7. Fahrenheit and Celsius: Press and hold the
'2:1NH\DQGWKH83NH\VLPXOWDQHRXVO\IRU
seconds to switch between Fahrenheit and Celsius
temperature display.
Lock Light Power
Hold 3 Sec Hold 3 Sec
Upper
Recommended: 45°F
Lower
Recommended: 55°F
1
4
6
23
5
7

49-1000514 Rev. 1 9
Controls and Features - Wine Chiller
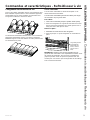
Loading Wine Bottles
$OOWKUHHH[WHQVLRQGUDZHUVLQWKHXSSHU]RQHDQGWKH
WRSH[WHQVLRQGUDZHULQWKHORZHU]RQHHDFKKROGHLJKW
bottles, two deep with the necks alternating front to
back.
7KHERWWRPWZRH[WHQVLRQGUDZHUVLQWKHORZHU]RQH
hold six bottles each. Tall bottles should not be loaded
in the bottom drawer as they may prevent the door
from closing.
Extension Drawers
All of the extension drawers pull out so bottles can be
conveniently loaded or removed.
Any of the extension drawers can be removed to store
larger bottles.
To remove:
1. Pull the extension drawer out to the STOP position.
2. Push the tab on right drawer guide down while
pushing the tab on left guide up, and pull the drawer
out.
To replace:
1. Insert the sides of the drawer back into the guides.
2. Push until the tabs lock into place.
NOTE: Make sure the tabs on the extension drawer
guides are fully engaged before loading any bottles.
Pull the drawers out all the way to the STOP position
and push back in several times to make sure locking
tabs are properly engaged.
USING THE APPLIANCE: Controls and Features - Wine Chiller
Tab (Push the tab
on right drawer
guide down, push
the tab on left
guide up)

10 49-1000514 Rev. 1
CARE AND CLEANING
Automatic Defrosting
WARNING
Risk of Fire or Explosion.
Flammable Refrigerant Used.
This product defrosts automatically.
'RQRWXVHDQLFHSLFNRUDPHWDORUVKDUSHGJHG
instrument to accelerate the defrosting process as
it may puncture the appliance liner and then the
flammable refrigerant tubing behind it.
'RQRWXVHDQ\HOHFWULFDOGHYLFHWRGHIURVW\RXU
appliance.
NOTE: The drain pan above the compressor may be
full following defrost. Check to make sure no water
spills when moving the unit.
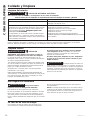
Cleaning the Outside
WARNING
Electrical Shock Hazard.
Unplug the beverage center or wine chiller before cleaning.
Cleaning the Inside
WARNING
Electrical Shock Hazard.
Unplug the beverage center or wine chiller before
cleaning.
The vinyl door gasket may be cleaned with mild soap
and water or a baking soda solution. Rinse well.
After cleaning the door gasket, apply a thin layer of
paraffin wax or petroleum jelly to the door gasket at the
hinge side. This helps keep the gasket from sticking
and bending out of shape.
8VHDVOLJKWO\GDPSFORWKRUVSRQJHZKHQFOHDQLQJ
around lights or controls.
8VHZDUPZDWHUDQGEDNLQJVRGDVROXWLRQ²DERXWD
tablespoon (15 ml) of baking soda to a quart (1 liter)
RIZDWHU7KLVERWKFOHDQVDQGQHXWUDOL]HVRGRUV
Thoroughly rinse and wipe dry.
Other parts of the beverage center or wine chiller
unit—including the extension drawers and glass
VKHOYHV²FDQEHFOHDQHGWKHVDPHZD\
Do not use detergents, scouring powders, spray
cleaners or other harsh chemicals to clean the
interior.
CAUTION
'RQRWFOHDQJODVVVKHOYHVZLWK
warm water when they are cold. Glass shelves may
break if exposed to sudden temperature changes
or impact, such as bumping or dropping. Tempered
glass is designed to shatter into many small pieces if it
breaks.
Care and Cleaning
In the Event of a Power Failure
If the power fails, open the door as infrequently as
possible to maintain the temperature.
Directions for Cleaning Outside Surfaces, Door Handles, and Trim
DO USE DO NOT USE
Soft, clean cloth or sponge Abrasive cloths, scrubbing sponges, scouring or steel
wool pads
Mild detergent mixed with warm water
$SSURYHGVWDLQOHVVVWHHOFOHDQHUV9LVLWWKH*(
Appliances parts store for approved stainless
steel cleaners: GEAppliancesparts.com or call
877.959.8688
&OHDQHUVZLWKR[DOLFDFLGVXFKDV%DU.HHSHUV)ULHQG
Soft Cleanser™ can be used to remove surface
rust, tarnish and small blemishes on stainless steel
surfaces only.
Abrasive powders or sprays
Window Sprays or Ammonia
Citrus or plant oil-based cleaners
Acidic or vinegar-based cleaners
Oven cleaners
Cleaners containing acetone (propanone)
Any cleaner with WARNING about plastic contact
NOTE: DO NOT allow stainless steel cleaner to come in contact with any plastic parts such as trim pieces,
handle hardware and liners. If unintentional contact of cleaners with plastic parts does occur, clean plastic part
with a sponge and mild detergent mixed with warm water.

49-1000514 Rev. 1 11
BEFORE YOU BEGIN
Read these instructions completely and
carefully.
•
IMPORTANT – Save these
instructions for local inspector’s use.
• IMPORTANT – Observe all
governing codes and ordinances.
• Note to Installer – Be sure to leave these
instructions with the Consumer.
• Note to Consumer – .HHSWKHVH
instructions for future reference.
•
WARNING
This appliance must be properly
JURXQGHG6HH³*URXQGLQJWKH%HYHUDJH&HQWHU
DQG:LQH&KLOOHU´
•
If you received a damaged beverage center or
wine chiller, you should immediately contact your
dealer or builder.
•
Skill Level – Installation requires basic
mechanical skills. Proper installation is the
responsibility of the installer. Product failure due
to improper installation is not covered under the
GE Appliance Warranty.
Questions? Call 800.GE.CARES (800.432.2737) or 9LVLWRXU:HEVLWHDW
GEAppliances.com
Installation Beverage Center
Instructions and Wine Chiller
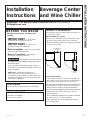
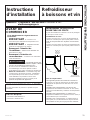
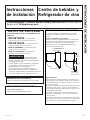
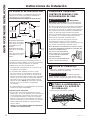
PRODUCT CLEARANCES
The beverage center and wine chiller is factory set
for a 125° door swing.
When installed in a corner:
$OORZ´PLQFOHDUDQFHRQWKHKLQJHVLGHIRUWKH
90° door swing and to allow racks to slide out.
$OORZ´PLQLPXPFOHDUDQFHRQWKHKLQJHVLGHIRU
a full 125° door swing.
Choose the location:
• These products may be closed in on the top and
three sides as long as the front is unobstructed for
air circulation and proper access to the door.
• 'RQRWLQVWDOOWKHDSSOLDQFHZKHUHWKHWHPSHUDWXUH
will go below 55°F (19°C) because it will not run
often enough to maintain proper temperatures.
• 'RQRWLQVWDOOWKHDSSOLDQFHZKHUHWKHWHPSHUDWXUH
will go above 90°F (35°C) because it will not
perform properly.
• 'RQRWLQVWDOOWKHDSSOLDQFHLQDORFDWLRQH[SRVHG
to water (rain, etc.) or direct sunlight.
• These products are not designed to be stacked
one over the other.
DOOR SWING
The door swing on this product is not reversible.
TOOLS REQUIRED
• #2 Phillips screwdriver
• 10mm Hex nut driver
INSTALLATION INSTRUCTIONS
16" Minimum
to Wall
125°
21-1/4"
24"
4" Minimum
to Wall
90°

12 49-1000514 Rev. 1
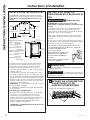
INSTALLATION INSTRUCTIONS
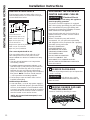
INSTALLATION SPACE
The beverage center and wine chiller can be a
free-standing model or it can be built in using the
cut-out dimensions below.
The cutout depth should be 24”
The cutout dimensions shown allow for a full
door swing and access to the pull-out racks
ZKHQLQVWDOOHGDVDEXLOWLQLQVWDQGDUG´GHHS
cabinets.
7KHGRRUVKRXOGSURWUXGH´EH\RQGWKH
surrounding cabinets.
,ILQVWDOOLQJEHWZHHQIUDPHOHVVFDELQHWVD´
wide filler strip or side panel may be needed on
hinge side. The filler strip will act as a spacer
between the case and adjacent cabinet door
swing. The width of the opening must include the
filler panels. NOTE: The door should protrude
´EH\RQGWKHVXUURXQGLQJFDELQHWV
• The beverage center and wine chiller can be
installed freestanding.
Additional Specifications
$YROW+]RUDPSSRZHUVXSSO\LV
required. An individual properly grounded branch
circuit or circuit breaker is recommended. Install
a properly grounded 3-prong electrical receptacle
recessed into the back wall as shown. Electrical
must be located on rear wall as shown.
NOTE: GFI (ground fault interrupter) is not
recommended.
Locate
Outlet
34-1/2"-35"
24"
24" Min.
12" Min.
Product dimensions:
Height: 33-3/4" (85.72 cm)
Width: 23-2/5" (59.44 cm)
'HSWKFP
Cut-out dimensions:
+HLJKW´FPPLQLPXP
Width: 24" (61 cm) minimum
'HSWKFPPLQLPXP
Installation Instructions
23-1/4”
33-3/4”
23-2/5”
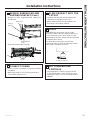
1
REMOVE PACKAGING
• Remove all packing material, tape and protective
plastic coverings.
WARNING
Small objects are a choke
KD]DUGIRUFKLOGUHQ5HPRYHDQGGLVFDUGDQ\
parts not used.
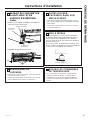
2
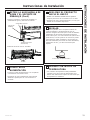
REMOVE RUBBER PAD AND
SHIPPING BRACKET
• Remove Toekick by removing 3 screws.
GROUNDING THE BEVERAGE
CENTER AND WINE CHILLER
WARNING
Electrical Shock
Hazard.
For personal safety, this appliance
must be properly grounded.
The power cord of this appliance is equipped
with a three-prong (grounding) plug which mates
with a standard three-prong (grounding) wall
UHFHSWDFOHWRPLQLPL]HWKHSRVVLELOLW\RIHOHFWULF
VKRFNKD]DUGIURPWKLVDSSOLDQFH
Have the wall outlet and circuit checked by a
qualified electrician to make sure the outlet is
properly grounded.
Where a standard 2-prong wall outlet is
encountered, it is your personal responsibility
and obligation to have it replaced with a properly
grounded 3-prong wall outlet.
'212781'(5$1<
&,5&8067$1&(6&87
255(029(7+(7+,5'
*5281'3521*)520
7+(32:(5&25'
'212786($1$'$37(5
3/8*72&211(&77+(
$33/,$1&(72$3521*287/(7
'212786($1(;7(16,21&25':,7+
THIS APPLIANCE.
Screws

49-1000514 Rev. 1 13
Installation Instructions
5
LEVEL
Adjustable legs at the front corners of the
beverage center and wine chiller should be set
so the beverage center / wine chiller is firmly
SRVLWLRQHGRQWKHIORRUZLWKD´WLOWWRWKHEDFN
to help the door closure.
To adjust the leveling legs, turn the legs
counterclockwise to raise the beverage center /
wine chiller, clockwise to lower it.
6
SET TEMPERATURE
CONTROLS
• The temperature controls are preset. Refer
to the Temperature Control section for more
information. Allow 24 hours for temperature to
VWDELOL]H
4
SLIDE PRODUCT INTO THE
CUTOUT
• Carefully slide the unit into the opening. Be
careful not to entangle power cord.
0DNHFHUWDLQWKDWWKHGRRUSURWUXGHV´
beyond the surrounding cabinets.
To raise the appliance
INSTALLATION INSTRUCTIONS
3
CONNECT POWER
• Connect power cord plug to a properly grounded
receptacle.
• Make sure power is on by opening the door to
see if interior light turns on.
2
REMOVE RUBBER PAD AND
SHIPPING BRACKET (Cont.)
• Remove 2 screws, shipping bracket, rubber pad
and discard.
• Re-install Toekick with 3 screws.
Rubber Pad
Shipping Bracket
Screws
Shipping
Bracket
Screws

14 49-1000514 Rev. 1
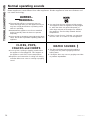
HUMMM...
WHOOSH...
Ŷ The new high efficiency compressor may run
faster and longer than your old appliance and you
may hear a high-pitched hum or pulsating sound
while it is operating.
Ŷ 6RPHWLPHVWKHappliance runs for an extended
period, especially when the doors are opened
frequently.
Ŷ <RXPD\KHDUDZKRRVKLQJVRXQGZKHQWKHGRRUV
FORVH7KLVLVGXHWRSUHVVXUHHTXDOL]LQJZLWKLQWKH
appliance.
Ŷ You may hear the fans spinning at high speeds.
This happens when the appliance is first plugged
in, when the doors are opened frequently or
when large amounts of beverages are added to
the appliance. The fans help maintain desired
temperatures.
Ŷ If door is open for over 3 minutes, you may hear
the fans come on in order to cool the appliance.
CLICKS, POPS,
CRACKS and CHIRPS
Ŷ You may hear cracking or popping sounds when
the appliance is first plugged in. This happens as
the appliance cools to the correct temperature.
Ŷ Expansion and contraction of cooling coils during
and after defrost can cause a cracking or popping
sound.
WATER SOUNDS
Ŷ The flow of refrigerant through the appliance
cooling coils may make a gurgling noise like
boiling water.
Ŷ Closing the door may cause a gurgling sound due
WRSUHVVXUHHTXDOL]DWLRQ
Normal operating sounds
Newer appliances sound different from older appliances. Modern appliances have more features and
use newer technology.
TROUBLESHOOTING TIPS

49-1000514 Rev. 1 15
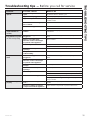
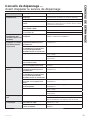
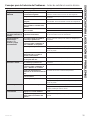
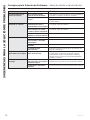
Problem Possible Causes What To Do
Appliance does not
operate
Appliance may be in defrost
cycle.
This is normal. Compressor does not operate for about
30 minutes when in defrost cycle.
Appliance is unplugged. Push the plug completely into the outlet.
Appliance is powered off. 3RZHUDSSOLDQFHEDFNRQ6HH³3RZHU´LQ7HPSHUDWXUH
Control section.
The circuit breaker is tripped/ he
fuse is blown.
Replace fuse or reset the breaker.
GFI outlet is tripped. Reset outlet.
GFI outlet is not recommended.
Vibration or rattling
(slight vibration is
normal)
Appliance is on an uneven
surface.
Adjust the leveling legs as shown in the Installation
Instructions.
Motor operates for
long periods or cycles
on and off frequently
Normal when appliance is first
plugged in.
Wait 24 hours for the appliance to completely cool
down.
Often occurs when large
amounts of wine or beverages
are placed in the appliance.
This is normal.
Door left open. Always make sure that the door is closed after opening.
Check to see if a bottle is holding door open.
Hot weather or frequent door
openings.
This is normal.
Temperature control set at the
coldest setting.
Allow 24 hours for temperature to change.
Compartment too
warm
Normal when appliance is first
plugged in.
Wait 24 hours for the appliance to completely cool
down.
Often occurs when large
amounts of wine or beverages
are placed in the appliance.
This is normal.
Temperature control not set cold
enough.
See Temperature Control section.
Warm weather or frequent door
openings.
See Temperature Control section.
Door left open. Always make sure that the door is closed after opening.
Check to see if a bottle is holding door open.
Appliance has odor Interior needs cleaning. See Care and cleaning.
.HHSRSHQER[RIEDNLQJVRGDLQDSSOLDQFHUHSODFH
every 3 months.
Door not closing
properly
Door gasket is sticking or folding
over.
Apply petroleum jelly or paraffin wax to the face of the
gasket.
The door is hitting an internal
component inside the appliance.
Adjust internal components to prevent interference.
Troubleshooting tips ... Before you call for service
TROUBLESHOOTING TIPS

16 49-1000514 Rev. 1
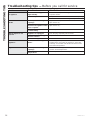
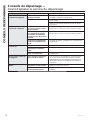
Problem Possible Causes What To Do
Moisture forms on outside
of appliance
Not unusual during periods of
high humidity.
,IERWKHUVRPHZLSHVXUIDFHGU\RWKHUZLVHPRLVWXUHZLOO
evaporate in time.
Door left open. Always make sure that the door is closed after opening.
Check to see if a bottle is holding door open.
Frost or moisture collects
inside
Too frequent or too long door
openings.
Appliance will dissipate moisture in time. If bothersome,
wipe surface dry.
In humid weather, air carries
moisture into appliance when
door is opened.
Appliance will dissipate moisture in time. If bothersome,
wipe surface dry.
Temperature control set at
coldest setting.
See Temperature Control section.
Interior light does not
operate
Appliance is unplugged. Push the plug completely into the outlet.
The circuit breaker is tripped /
the fuse is blown.
Replace fuse or reset the breaker.
GFI outlet is tripped. Reset outlet.GFI outlet is not recommended.
Hot air from bottom of
appliance
Normal air flow cooling
motor.
In the refrigeration process, it is normal for heat to be
expelled in the area under the appliance. Some floor
coverings are sensitive and will discolor at these safe
and normal temperatures.
Appliance never shuts off Too frequent or too long door
openings.
This is normal. The appliance will cycle off after it
reaches desired temperature.
Extreme environment
temperatures
Normal operation in extreme temperatures.
Troubleshooting tips ... Before you call for service
TROUBLESHOOTING TIPS

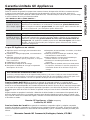
49-1000514 Rev. 1 17
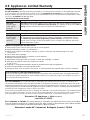
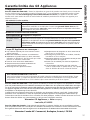
Staple your receipt here. Proof of the original purchase
date is needed to obtain service under the warranty.
GEAppliances.com
For US Customers, DOOZDUUDQW\VHUYLFHLVSURYLGHGE\RXU)DFWRU\6HUYLFH&HQWHUVRUDQDXWKRUL]HG&XVWRPHU
Care
®
technician. To schedule service online, visit us at geappliances.com/service, or call GE Appliances at
800.GE.CARES (800.432.2737). Please have your serial number and your model number available when calling
for service.
In Canada, call 800.561.3344.
What GE Appliances will not cover:
Ŷ6HUYLFHWULSVWR\RXUKRPHWRWHDFK\RXKRZWRXVHWKHSURGXFW
Ŷ,PSURSHULQVWDOODWLRQGHOLYHU\RUPDLQWHQDQFH
Ŷ)DLOXUHRIWKHSURGXFWLILWLVDEXVHGPLVXVHGRUXVHGIRURWKHUWKDQWKHLQWHQGHGSXUSRVHRUXVHG
commercially.
Ŷ/RVVRIZLQHGXHWRVSRLODJH
Ŷ5HSODFHPHQWRIKRXVHIXVHVRUUHVHWWLQJRIFLUFXLWEUHDNHUV
Ŷ'DPDJHFDXVHGDIWHUGHOLYHU\
Ŷ5HSODFHPHQWRIWKHOLJKWEXOEVLILQFOXGHGRUZDWHUILOWHUFDUWULGJHLILQFOXGHG
Ŷ'DPDJHWRWKHSURGXFWFDXVHGE\DFFLGHQWILUHIORRGV
or acts of God.
Ŷ,QFLGHQWDORUFRQVHTXHQWLDOGDPDJHFDXVHGE\SRVVLEOHGHIHFWVZLWKWKLVDSSOLDQFH
Ŷ3URGXFWQRWDFFHVVLEOHWRSURYLGHUHTXLUHGVHUYLFH
Ŷ'DPDJHWRILQLVKVXFKDVVXUIDFHUXVWWDUQLVKRUVPDOOEOHPLVKHVQRWUHSRUWHGZLWKLQKRXUVRIGHOLYHU\
LIMITED WARRANTY
GE Appliances Limited Warranty
EXCLUSION OF IMPLIED WARRANTIES
Your sole and exclusive remedy is product repair as provided in this Limited Warranty. Any implied warranties,
including the implied warranties of merchantability or fitness for a particular purpose, are limited to one year or
the shortest period allowed by law.
For US Customers: This limited warranty is extended to the original purchaser and any succeeding owner
IRUSURGXFWVSXUFKDVHGIRUKRPHXVHZLWKLQWKH86$,IWKHSURGXFWLVORFDWHGLQDQDUHDZKHUHVHUYLFHE\D*(
$SSOLDQFHV$XWKRUL]HG6HUYLFHULVQRWDYDLODEOH\RXPD\EHUHVSRQVLEOHIRUDWULSFKDUJHRU\RXPD\EHUHTXLUHG
WREULQJWKHSURGXFWWRDQ$XWKRUL]HG*($SSOLDQFHV6HUYLFHORFDWLRQIRUVHUYLFH,Q$ODVNDWKHOLPLWHGZDUUDQW\
excludes the cost of shipping or service calls to your home.
Some states do not allow the exclusion or limitation of incidental or consequential damages. This limited warranty
gives you specific legal rights, and you may also have other rights which vary from state to state. To know what
your legal rights are, consult your local or state consumer affairs office or your state’s Attorney General.
Warrantor: GE Appliances, a Haier company
Louisville, KY 40225
For Customers in Canada: This limited warranty is extended to the original purchaser and any succeeding
owner for products purchased in Canada for home use within Canada. In-home warrant service will be provided
in areas where it is available and deemed reasonable by Mabe to provide.
Warrantor Canada: MC Commercial, Burlington, Ontario, L7R 5B6
GE and PROFILE Series Models:
For the period of GE Appliances will replace
One year
From the date
of the original
purchase
Any part of the beverage center or wine chiller which fails due to a defect in materials or
ZRUNPDQVKLS'XULQJWKLVlimited one-year warranty, GE Appliances will provide, free of
charge, all labor and in-home service to replace the defective part.
PROFILE Series Models Only:
For the period of GE Appliances will replace
Five years
From the date
of the original
purchase
Any part of the sealed refrigerating system (the compressor, condenser, evaporator and
DOOFRQQHFWLQJWXELQJZKLFKIDLOVGXHWRDGHIHFWLQPDWHULDOVRUZRUNPDQVKLS'XULQJ
this limited five-year sealed refrigerating system warranty, GE Appliances will also
provide, free of charge, all labor and related service to replace the defective part in the
sealed refrigerating system.

18 49-1000514 Rev. 1
Printed in China
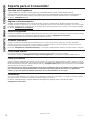
Consumer Support
CONSUMER SUPPORT
GE Appliances Website
Have a question or need assistance with your appliance? Try the GE Appliances Website 24 hours a day, any
day of the year! You can also shop for more great GE Appliances products and take advantage of all our on-line
VXSSRUWVHUYLFHVGHVLJQHGIRU\RXUFRQYHQLHQFH,QWKH86GEAppliances.com In Canada: GEAppliances.ca
Register Your Appliance
Register your new appliance on-line at your convenience! Timely product registration will allow for enhanced
communication and prompt service under the terms of your warranty, should the need arise. You may also mail in
the pre-printed registration card included in the packing material.
,QWKH86GEAppliances.com/register
In the Canada: Prodsupport.mabe.ca/crm/Products/ProductRegistration.aspx
Schedule Service
Expert GE Appliances repair service is only one step away from your door. Get on-line and schedule your service
DW\RXUFRQYHQLHQFHDQ\GD\RIWKH\HDU,QWKH86GEAppliances.com/service or call 800.432.2737 during
normal business hours.
In Canada: GEAppliances.ca/en/support/service-request or call 800.561.3344
Extended Warranties
Purchase a GE Appliances extended warranty and learn about special discounts that are available while your
warranty is still in effect. You can purchase it on-line anytime. GE Appliances Services will still be there after
\RXUZDUUDQW\H[SLUHV,QWKH86GEAppliances.com/extended-warranty or call 800.626.2224 during normal
business hours.
In Canada: GEAppliances.ca/en/support/purchase-extended-warranty or call 866.277.9842
Remote Connectivity
For assistance with wireless network connectivity (for models with remote enable),
visit our website at GEAppliances.com/ge/connected-appliancesRUFDOOLQWKH86RQO\
Parts and Accessories
Individuals qualified to service their own appliances can have parts or accessories sent directly to their homes
9,6$0DVWHU&DUGDQG'LVFRYHUFDUGVDUHDFFHSWHG2UGHURQOLQHWRGD\KRXUVHYHU\GD\
,QWKH86GEApplianceparts.com or by phone at 877.959.8688 during normal business hours.
Instructions contained in this manual cover procedures to be performed by any user. Other servicing
generally should be referred to qualified service personnel. Caution must be exercised, since improper
servicing may cause unsafe operation.
Customers in Canada should consult the yellow pages for the nearest Mabe service center, visit our website at
GEAppliances.ca/en/products/parts-filters-accessories or call 800.661.1616.
Contact Us
If you are not satisfied with the service you receive from GE Appliances, contact us on our Website with all the
details including your phone number, or write to:
,QWKH86*HQHUDO0DQDJHU&XVWRPHU5HODWLRQV_*($SSOLDQFHV$SSOLDQFH3DUN_/RXLVYLOOH.<
GEAppliances.com/contact
,Q&DQDGD'LUHFWRU&RQVXPHU5HODWLRQV0DEH&DQDGD,QF_6XLWH)DFWRU\/DQH_0RQFWRQ1%(&0
GEAppliances.ca/en/contact-us

49-1000514 Rev. 1 09-20 GEA
REFROIDISSEUR À
BOISSONS ET VIN
CONSIGNES DE SÉCURITÉ ......... 3
MODE D’EMPLOI
Commandes et caractéristiques :
Refroidisseur de boissons
Commande de température ............... 6
Tablettes réglables .......................6
Tablettes réversibles ..................... 7
Chargement ............................ 7
Commandes et caractéristiques :
Refroidisseur de vin
Commande de température ............... 8
Suggestions de températures pour le
rangement et le service du vin. ............ 8
Chargement .............................9
Tiroirs extensibles ........................9
ENTRETIEN ET NETTOYAGE ....... 10
INSTRUCTIONS D’INSTALLATION ...11
CONSEILS DE DÉPANNAGE .........14
GARANTIE LIMITÉE ..................17
SOUTIEN AU CONSOMMATEUR ....18
PWS06D*****
PVS06B*****
MANUEL D’UTILISATION
ET INSTRUCTIONS
D’INSTALLATION
Inscrivez les numéros de modèle
et de série ci-après :
N° de modèle : ____________
N° de série : ______________
Vous trouverez ces numéros
sur l’étiquette à l’intérieur du
refroidisseur à boissons et vin.
GE est une marque déposée de General Electric Company. Fabriqué sous licence de marque.
FRANÇAIS

2 49-1000514 Rev. 1
NOUS VOUS REMERCIONS D’ACCUEILLIR CET
ÉLECTROMÉNAGER GE CHEZ VOUS.
Que vous ayez grandi avec des électroménagers GE ou qu’il s’agisse de votre première
acquisition, nous sommes heureux de vous accueillir dans notre famille.
Nous sommes fiers du savoir-faire, de l’innovation et de l’esthétique qui composent chaque
électroménager GE, et nous pensons que vous le serez aussi. Dans cette optique, nous vous
rappelons que l’enregistrement de votre électroménager vous assure la communication de
renseignements importants sur le produit et la garantie lorsque vous en avez besoin.
Enregistrez votre électroménager GE en ligne dès maintenant. Des sites Web et des numéros
de téléphone utiles figurent dans la section Soutien au consommateur de ce manuel d’utilisation.
Vous pouvez aussi poster la fiche de garantie préimprimée incluse dans l’emballage.
La page est en cours de chargement...
La page est en cours de chargement...
La page est en cours de chargement...
La page est en cours de chargement...
La page est en cours de chargement...
La page est en cours de chargement...
La page est en cours de chargement...
La page est en cours de chargement...
La page est en cours de chargement...
La page est en cours de chargement...
La page est en cours de chargement...
La page est en cours de chargement...
La page est en cours de chargement...
La page est en cours de chargement...
La page est en cours de chargement...
La page est en cours de chargement...
La page est en cours de chargement...
La page est en cours de chargement...
La page est en cours de chargement...
La page est en cours de chargement...
La page est en cours de chargement...
La page est en cours de chargement...
La page est en cours de chargement...
La page est en cours de chargement...
La page est en cours de chargement...
La page est en cours de chargement...
La page est en cours de chargement...
La page est en cours de chargement...
La page est en cours de chargement...
La page est en cours de chargement...
La page est en cours de chargement...
La page est en cours de chargement...
La page est en cours de chargement...
La page est en cours de chargement...
La page est en cours de chargement...
La page est en cours de chargement...
-
 1
1
-
 2
2
-
 3
3
-
 4
4
-
 5
5
-
 6
6
-
 7
7
-
 8
8
-
 9
9
-
 10
10
-
 11
11
-
 12
12
-
 13
13
-
 14
14
-
 15
15
-
 16
16
-
 17
17
-
 18
18
-
 19
19
-
 20
20
-
 21
21
-
 22
22
-
 23
23
-
 24
24
-
 25
25
-
 26
26
-
 27
27
-
 28
28
-
 29
29
-
 30
30
-
 31
31
-
 32
32
-
 33
33
-
 34
34
-
 35
35
-
 36
36
-
 37
37
-
 38
38
-
 39
39
-
 40
40
-
 41
41
-
 42
42
-
 43
43
-
 44
44
-
 45
45
-
 46
46
-
 47
47
-
 48
48
-
 49
49
-
 50
50
-
 51
51
-
 52
52
-
 53
53
-
 54
54
-
 55
55
-
 56
56


GE Profile Series PWS06DSPSS Le manuel du propriétaire
- Catégorie
- Cave à vin
- Taper
- Le manuel du propriétaire
dans d''autres langues
Documents connexes
Autres documents
-
Haier HEBF100BXS Manuel utilisateur
-
GE GVS04BDWSS Le manuel du propriétaire
-
Yes CCP06DP3PD1 Le manuel du propriétaire
-
-
-
-
-
-
-