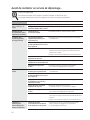
GE GVS04BDWSS Le manuel du propriétaire
- Catégorie
- Cave à vin
- Taper
- Le manuel du propriétaire

GEAppliances.com
Beverage Center
and Wine Chiller
197D4613P006 49-60651 03-11 GE
Safety Instructions . . . . . . . . . . .2, 3
Installation Instructions . . . . . . .4
Operating Instructions
Control Settings . . . . . . . . . . . . . . . . . . . . .5
Interior Space . . . . . . . . . . . . . . . . . . . . . . .6
Care and Cleaning . . . . . . . . . . . .7–9
Replacing the Light Bulb . . . . . . . . . . . . .8
Reversing the Door . . . . . . . . . . . . . . . . . .9
Troubleshooting Tips . . . . . .10, 11
Consumer Support
Consumer Support . . . . . . . .back cover
Product Registration (Canada) . .15, 16
Product Registration (U.S.) . . . . . .13, 14
Warranty (Canada) . . . . . . . . . . . . . . . .18
Warranty (U.S.) . . . . . . . . . . . . . . . . . . . .17
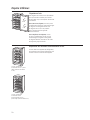
Write the model and serial
numbers here:
Model # __________________
Serial # __________________
Find these numbers inside the
beverage center/wine chiller
on the left side.
Owner’s Manual
and Installation
Refroidisseur
à boissons et
à vin
Manuel d’utilisation
et d’installation
Manual del
propietario y
instalación
La section française commence à la page 19
La sección en español empieza en la página 33
Centro
de bebidas
y enfriador
de vinos

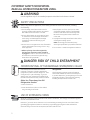
PROPER DISPOSAL OF THE BEVERAGE CENTER/WINE CHILLER
Child entrapment and suffocation are not
problems of the past. Junked or abandoned
refrigeration products are still dangerous… even
if they will sit for “just a few days.” If you are
getting rid of your old appliance, please follow
the instructions below to help prevent accidents.
Before You Throw Away Your Old
Refrigeration Product:
Take off the doors.
Leave the shelves in place so that children
may not easily climb inside.
Refrigerants
All refrigeration products contain refrigerants,
which under federal law must be removed prior
to product disposal. If you are getting rid of an old
refrigeration product, check with the company
handling the disposal about what to do.
USE OF EXTENSION CORDS
Because of potential safety hazards under certain conditions, we strongly recommend against
the use of an extension cord.
However, if you must use an extension cord, it is absolutely necessary that it be a UL-listed, 3-wire
grounding type appliance extension cord having a grounding type plug and outlet and that the
electrical rating of the cord be 15 amperes (minimum) and 120 volts.
DANGER! RISK OF CHILD ENTRAPMENT
2
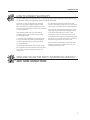
IMPORTANT SAFETY INFORMATION.
READ ALL INSTRUCTIONS BEFORE USING.
WARNING!
Use this appliance only for its intended purpose as described in this Owner’s Manual.
SAFETY PRECAUTIONS
When using electrical appliances, basic safety precautions should be followed, including
the following:
This beverage center/wine chiller must be
properly installed and located in accordance
with these instructions before it is used.
Do not allow children to climb, stand or hang
on the shelves in the beverage center/wine
chiller. They could damage the beverage
center/wine chiller and seriously injure
themselves.
Do not store or use gasoline or other flammable
vapors and liquids in the vicinity of this or any
other appliance.
Before replacing a burned-out light bulb,
the beverage center/wine chiller should be
unplugged in order to avoid contact with a live
wire filament. (A burned out light bulb may
break when being replaced.)
Keep fingers out of the “pinch point” areas;
clearances between the doors and between
the doors and cabinet are necessarily small.
Be careful closing doors when children are
in the area.
Unplug the beverage center/wine chiller before
cleaning and making repairs.
NOTE: We strongly recommend that any
servicing be performed by a qualified individual.
Do not store or install this appliance outdoors.

GEAppliances.com
3
HOW TO CONNECT ELECTRICITY
Do not, under any circumstances, cut or remove the third (ground) prong from the power cord.
For personal safety, this appliance must be properly grounded.
The power cord of this appliance is equipped
with a 3-prong (grounding) plug which mates
with a standard 3-prong (grounding) wall outlet
to minimize the possibility of electric shock hazard
from this appliance.
Have the wall outlet and circuit checked by
a qualified electrician to make sure the outlet
is properly grounded.
If you have only a standard 2-prong wall outlet,
it is your personal responsibility and obligation
to have it replaced with a properly grounded
3-prong wall outlet.
The beverage center/wine chiller should always
be plugged into its own individual electrical outlet
which has a voltage rating that matches the
rating plate.
This provides the best performance and also
prevents overloading house wiring circuits which
could cause a fire hazard from overheated wires.
Never unplug your beverage center/wine chiller
by pulling on the power cord. Always grip plug
firmly and pull straight out from the outlet.
Immediately repair or replace all power cords
that have become frayed or otherwise damaged.
Do not use a cord that shows cracks or abrasion
damage along its length or at either end.
When moving the beverage center/wine chiller
away from the wall, be careful not to roll over
or damage the power cord.
READ AND FOLLOW THIS SAFETY INFORMATION CAREFULLY.
SAVE THESE INSTRUCTIONS

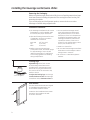
Installing the beverage center/wine chiller.
4
Removing the Packaging
Before using the beverage center/wine chiller, be sure all packing materials and tape
have been removed, including the protective film covering the control and any film
protecting the cabinet.
If you are discarding an old refrigeration product, remove the doors to reduce
the danger of children being trapped inside.
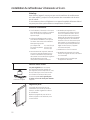
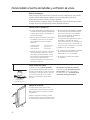
To raise the appliance
The beverage center/wine chiller can be
freestanding or can be installed under
the counter, with proper clearances.
Allow the following clearances for ease
of installation, proper air circulation
and electrical connections:
Each side 1/2” (12,7 mm)
Top 2” (51 mm)
Back 2” (51 mm)
Before connecting the appliance
to the power source, let it stand upright
for approximately 2 hours. This will
reduce the possibility of a malfunction
in the cooling system from handling
during transportation.
Do not install the beverage center/
wine chiller where the temperature
will go below 55°F (12,7°C) or above
90°F (32,2°C). If the room temperature
is below the temperature setting, the
beverage center/wine chiller will not
operate (for instance, if the room is
at 55°F (12,7°C) and the setting is 60°F
(15,6°C), the unit will not run).
Install it on a level floor.
Do not install the beverage center/wine
chiller where it will be subject to direct
sunlight, heat or moisture.
Do not store or install this appliance
outdoors.
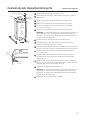
Installation Guidelines
Adjustable legs at the front corners
of the beverage center/wine chiller
should be set so the beverage center/
wine chiller is firmly positioned on the
floor, with a 1/8” tilt to the back to help
the door closure.
To adjust the leveling legs, turn the legs
counterclockwise to raise the beverage
center/wine chiller, clockwise to lower it.
Leveling Legs
The door handle and screws are shipped
in a hardware bag attached to one
of the shelves inside the cabinet.
Locate the door handle and two screws.
Secure the door handle to the side
of the door as shown.
Door Handle
Screw
Door
Handle

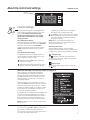
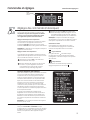
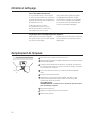
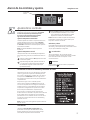
You can turn the light ON or OFF by pushing the
light switch located on the right side of the
control panel housing. If the interior light is left on,
it will raise the inside temperature.
About the control and settings. GEAppliances.com
Control Settings
The temperature range of the beverage center/
wine chiller is intended for 40°F (4,4°C) to 60°F
(15,6°C). The display shows the average
temperature of the appliance. It is normal
for the actual temperature to vary slightly
during operation.
Auto Temperature Setting
When the appliance is plugged in or the “+” pad
is pressed, the appliance runs on the “Auto Bev”
setting of 44°F (6,7°C) and the “Auto Bev”
indicator light in the upper left corner stays lit.
NOTE: Display will flash when the “+” pad is
pressed.
Normal Temperature Setting
The temperature of the beverage center can
be set anywhere between 39°F (3,9°C) to 61°F
(16,1°C) by the “+” and “–” pads.
Press and hold the SET pad. You will hear
a series of 2 beeps.
After the second beep, press the “+” and “–”
pads to increase or decrease the desired
temperature in increments of one degree.
During this time the display will flash.
Press SET to confirm your choice. The display
will stop flashing. If no confirmation is made
in ten seconds, the unit will automatically
accept your change.
NOTE: When you change the temperature
setting, there may be a 5-minute delay until
the compressor starts to run.
Fahrenheit and Celsius
The temperature display can be changed
between Fahrenheit and Celsius by pressing and
holding the “+” pad for approximately 5 seconds.
Indicator Light
The indicator is lit when the compressor is
running to cool your unit. It will not be lit when
the compressor is idle.
Interior Light
To switch the interior light on/off, simply press
the pad.
5
Interior Light
Auto Bev
Indicator Light
After plugging in the beverage center/wine
chiller and setting the desired temperature,
allow the beverage center/wine chiller to reach
the set temperature before loading your wine.
The temperature may take up to 12 hours to
completely stabilize.
After loading the wine or beverages, you may
notice the actual temperature rise. This is normal.
The actual temperature will continue to change
as the wine and beverages are cooled to the set
temperature. The temperature may take up to
12 hours to completely stabilize.
A guide with wine serving temperature suggestions
is located on the inside right portion of the unit.
It gives recommended temperatures for different
wines, as well as instructions on adjusting the
temperature of the beverage center/wine chiller.
NOTE: The exterior of the cabinet may get warm.
This is normal.
When the Beverage Center/Wine Chiller is Plugged In

6
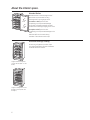
About the interior space.
As with any refrigeration product, there
is a slight temperature variance at different
locations within the cabinet.
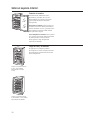
Wine and Beverage Loading
Suggested bottle arrangement
for wine–full load (holds 31 wine
bottles)
Suggested arrangement for other
beverages–full load (holds 109
beverages)
Wooden shelves in the beverage center/
wine chiller are removable for easy
cleaning and for storing larger items.
To remove a shelf, open the door
completely to avoid potential damage
to the shelf. Lift slightly and pull the shelf
forward. The shelf may fit tightly in the track.
To replace a shelf, open the door
completely to avoid potential damage to the
shelf.
Slide the shelf into the tracks along
the sides of the cabinet until it stops.
Wooden Shelves

7
Care and cleaning. GEAppliances.com
IMPORTANT: Unplug the beverage
center/wine chiller before cleaning.
Keep the outside clean. The cabinet
can be washed with mild soap and water.
Clean with a damp cloth. Never use
abrasive scouring powders.
Use a glass cleaner or mild soap and water
and a soft cloth to clean the glass door.
Do not use any abrasive powders.
Do not wipe the beverage center/wine
chiller with a soiled dishcloth or towel.
These may leave a residue that can
erode the paint. Do not use scouring pads,
powdered cleaners, bleach or cleaners
containing bleach because these products
can scratch and weaken the paint finish.
Protect the paint finish. The finish
on the outside of the beverage center/
wine chiller is a high-quality, baked-on
paint finish. With proper care, it will stay
new-looking and rust-free for years. Apply
a coat of kitchen/appliance wax when the
wine chiller is new, and then at least twice
a year.
Cleaning the Outside
IMPORTANT: Unplug the beverage
center/wine chiller before cleaning.
To clean the inner liner and racks, use
a warm water and baking soda solution—
about one tablespoon (15 ml) of baking
soda to a quart (1 liter) of water. This both
cleans and neutralizes odors. Clean with
a damp cloth.
The vinyl door gasket may be cleaned
with mild soap and water or a baking soda
solution.
Do not use detergents, scouring powders,
spray cleaners or other harsh chemicals
to clean the interior.
To avoid water stains on the wood
shelves, clean up and dry any liquid spills
immediately.
Wipe the control panel with a damp
cloth. Dry thoroughly. Do not use cleaning
sprays, large amounts of soap and water,
abrasives or sharp objects on the panel—
they can damage it. Some paper towels
can also scratch the control panel.
Cleaning the Inside
Automatic Defrosting
The model uses the compressor on/off
cycling to defrost automatically
(compressor stop, temperature rises).
Never use a heater
of any kind, scraper or sharp instrument
to remove frost as it may damage
the beverage center/wine chiller.
NOTE: The drain pan above the compressor
may be full following defrost. Check to
make sure no water spills when moving
the unit.
Defrosting

8
Care and cleaning.
If the power fails, open the door as
infrequently as possible to maintain
the temperature. A gradual rise in
temperature should not have any
adverse effect on the wine.
If it is extremely hot, you may want to
unload the wine from the beverage
center/wine chiller and move the wine
to a cooler location until power is restored.
The controls may maintain your
temperature settings when the power
has been restored. If your settings are not
correct, reset according to the Control
Settings section.
In the Event of a Power Failure
Unload the wine, then secure the racks by
taping them in place to prevent damage.
Be sure the beverage center/wine chiller
stays in an upright position during the move.
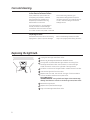
Preparing to Move
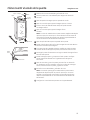
Replacing the light bulb.
Unplug the beverage center/wine chiller.
Remove any beverages and shelves as needed for access.
The light bulb is located behind a light shield in the ceiling of the
beverage center/wine chiller near the back. To remove the light
shield, remove the screw on the right side of the light shield.
Pull down on the back of the light shield to release the two front tabs.
Unscrew the light bulb from the socket.
Replace with a 15 watt, 120 volt bulb. This type of bulb is available
at most hardware and automotive parts stores.
WARNING: Using a bulb rated higher than 15 watts may
damage the electronic controls on the beverage center/wine chiller.
Reinstall the light shield.
Replace the top shelf and beverages.
Plug in the beverage center/wine chiller.
Light Shield
Screw

9
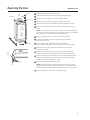
Reversing the Door. GEAppliances.com
Unplug the beverage center/wine chiller.
Tape the door shut with masking tape to secure alignment.
Remove the top hinge cover by removing the screw.
Remove the 2 screws securing the top hinge to the frame.
Lean the beverage center backward to access the bottom hinge.
Remove the 2 screws securing the bottom hinge assembly to the
frame.
NOTE: If you lay the unit on its back, be sure to let it stand upright for
at least 2 hours before connecting to the power source; this will reduce
the possibility of a malfunction in the cooling system.
Remove the Plug Button from the top left side of the door.
Install the Plug Button into the hinge hole on the right side.
Press firmly to secure.
If the handle has been installed, remove it and install it
on the opposite side. Refer to Door Handle section for instructions.
Hold the door securely in place and install the bottom hinge
on the opposite side.
Install the top hinge and cover on the opposite side. Make sure
the door is aligned with the cabinet before tightening the screws.
Remove the tape. Open and close the door to check alignment with
the cabinet. If necessary, loosen the screws on the bottom hinge,
realign the door, and retighten the screws.
Plug in the beverage center/wine chiller.
NOTE: If you had to lay the unit on its back, be sure to let it stand
upright for at least 2 hours before connecting it to the power source;
this will reduce the possibility of a malfunction in the cooling system.
Set the temperature controls to the desired setting.
Hinge
cover
Top Hinge
Bottom Hinge
Plug Button
Bottom
Hinge
Leveling Leg
Screw

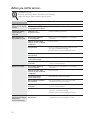
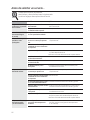
Problem Possible Causes What To Do
Appliance does not Appliance is unplugged. •Push the plug completely into the outlet.
operate and the display
The home circuit breaker • Replace fuse or reset the breaker.
is blank
is tripped/the fuse is blown.
Vibration or rattling Appliance is on •See the Leveling Legs section.
(slight vibration an uneven surface.
is normal)
Motor operates for Normal when appliance • Wait 12 hours for the appliance to completely
long periods or cycles is first plugged in. cool down.
Often occurs when large • This is normal.
amounts of wine are placed
in appliance.
Door left open. • Door is not self-closing. Always make sure that
the door is closed after opening.
• Check to see if a bottle is holding door open.
Hot weather or frequent • This is normal.
door openings.
Temperature control set • See About the control and settings.
at the coldest setting.
Appliance is too close • See the Installation Guidelines section
to the wall. for the correct clearances.
Appliance too warm Normal when appliance •Wait 12 hours for the appliance to completely
is first plugged in. cool down.
Often occurs when large • This is normal.
amounts of wine are placed
in appliance.
Temperature control • See About the control and settings.
not set cold enough.
Warm weather or frequent • Set the temperature control one step colder.
door openings. See About the control and settings.
Appliance is too close • See the Installation Guidelines section
to the wall. for the correct clearances.
Door left open. •Door is not self-closing. Always make sure that
the door is closed after opening.
•Check to see if a bottle is holding door open.
Appliance does not Setting is above room • This is normal. If wine or beverages are too warm,
operate, but the display temperature. change the temperature setting to a lower
temperature.
is lit and functioning
Troubleshooting Tips
Save time and money! Review the charts on the following
pages first and you may not need to call for service.
10
Before you call for service…

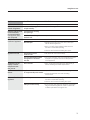
11
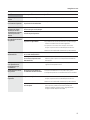
Problem Possible Causes What To Do
Appliance has odor Interior needs cleaning. • See Care and cleaning.
Moisture forms on Not unusual during periods •Wipe surface dry.
outside of appliance of high humidity.
Moisture collects inside Too frequent or too long
(in humid weather, door openings.
Wine bottles touching • Reposition bottles.
the back wall.
Frost forms on interior This is normal. • See the Defrosting section.
surfaces of appliance
Door left open. • Excessive frost may form if the door is left open.
See the Defrosting section.
•Door is not self-closing. Always make sure that
the door is closed after opening.
•Check to see if a bottle is holding door open.
Appliance too cold Temperature control •See About the control and settings.
is set too cold.
The room temperature where •For proper operation, the room temperature should
the appliance is located is be equal to or greater than the set temperature
too cold. of the appliance.
Temperature in the This is normal. • After you set the temperature, the display will go
display is not the back to showing the actual temperature.
temperature that
was just set.
Condensation on front Appliance is located • Wipe off the condensation with a clean, dry cloth.
of door in a high humidity environment.
• Locate the appliance in a lower humidity
environment.
Water on floor behind Door left open. • Door is not self-closing. Always make sure that
appliance the door is closed after opening.
• Check to see if a bottle is holding door open.
Tilting unit when moving. • This is normal. The drain pan above the compressor
may be full following defrost. Check to make sure
no water spills when moving the unit.
air carries moisture
into appliance when
door is opened)
GEAppliances.com

12
Notes.

13
General Electric Company
Warranty Registration Department
P.O. Box 32150
Louisville, KY 40232-2150
GE Service Protection Plus
™
GE, a name recognized worldwide for quality and dependability together with Assurant Solutions, offers you
Service Protection Plus
™
—comprehensive protection on your appliances.*
Benefits Include:
• Prompt, reliable service from GE Authorized Servicers
• Convenient hours designed to suit your busy schedule
• Quality replacement parts
• The dependability of GE, a name recognized and trusted worldwide
• Ask about our interest-free payment plans
With Service Protection Plus you can expect:
• An extended service plan that limits unexpected repair bills
• Service coverage for most major brands
• Unlimited service calls for the length of your contract, or credit toward a replacement product
• Service coverage for covered operating parts and labor on appliances and home electronics that fail during normal single family
household use
• Your satisfaction is our goal. We strive to provide you with excellent service in a professional and timely manner.
Place your confidence in GE and call us in the U.S. toll-free at 1.800.626.2224 for more information.
*Most brands covered up to 15 years old in the continental U.S.
SPP is a trademark of General Electric Company.
Please place in envelope and mail to:
Cut here

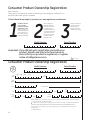
Consumer Product Ownership Registration
Important
Mail
Today!
First
Name
Mr.
Ms.
Mrs.
Miss
Street
Address
City
State
Date Placed
In Use
Month
Day
Year
Zip
Code
Apt. #
Last
Name
Phone
Number
_
_
Consumer Product Ownership Registration
Dear Customer:
Thank you for purchasing our product and thank you for placing your confidence in us.
We are proud to have you as a customer!
Follow these three steps to protect your new appliance investment:
Important: If you did not get a registration card with your
product, detach and return the form below to
ensure that your product is registered, or register
online at GEAppliances.com.
1
23
Model Number Serial Number
Cut here
Complete and mail
your Consumer
Product Ownership
Registration today.
Have the peace of
mind of knowing we
can contact you in
the unlikely event of
a safety modification.
After mailing the
registration below,
store this document
in a safe place. It
contains information
you will need should
you require service.
Our service number
is 800 GE CARES
(800.432.2737).
Read your Owner’s
Manual carefully.
It will help you
operate your new
appliance properly.
Model Number Serial Number
E-mail Address*
14
* Please provide your e-mail address to receive, via e-mail, discounts, special offers and other important
communications from GE Appliances (GEA).
Check here if you do not want to receive communications from GEA’s carefully selected partners.
FAILURE TO COMPLETE AND RETURN THIS CARD DOES NOT DIMINISH YOUR WARRANTY RIGHTS.
For information about GEA’s privacy and data usage policy, go to GEAppliances.com and click on
“Privacy Policy”
or call 800.626.2224.

15
OWNERSHIP REGISTRATION
P.O. BOX 1780
MISSISSAUGA, ONTARIO
L4Y 4G1
(FOR CANADIAN CONSUMERS ONLY)
Please place in envelope and mail to:
Veuillez mettre dans une enveloppe et envoyez à :

16

17
Wine Chiller Warranty. (For customers in the United States)
All warranty service provided by our Factory Service Centers,
or an authorized Customer Care
®
technician. To schedule
service, on-line, visit us at GEAppliances.com, or call
800.GE.CARES (800.432.2737). Please have serial number and
model number available when calling for service.
Service trips to your home to teach you how to use
the product.
Improper installation, delivery or maintenance.
Failure of the product if it is abused, misused, or used for
other than the intended purpose or used commercially.
Loss of beverages due to spoilage.
Replacement of house fuses or resetting of circuit
breakers.
Damage caused after delivery.
Replacement of the light bulbs, if included, or water filter
cartridge, if included, other than as noted above.
Damage to the product caused by accident, fire, floods
or acts of God.
Incidental or consequential damage caused by possible
defects with this appliance.
Product not accessible to provide required service.
What GE Will Not Cover:
This warranty is extended to the original purchaser and any succeeding owner for products purchased
for home use within the USA. If the product is located in an area where service by a GE Authorized Servicer
is not available, you may be responsible for a trip charge or you may be required to bring the product
to an Authorized GE Service location for service. In Alaska, the warranty excludes the cost of shipping
or service calls to your home.
Some states do not allow the exclusion or limitation of incidental or consequential damages. This warranty
gives you specific legal rights, and you may also have other rights which vary from state to state. To know
what your legal rights are, consult your local or state consumer affairs office or your state’s Attorney General.
Warrantor: General Electric Company. Louisville, KY 40225
Staple your receipt here.
Proof of the original purchase
date is needed to obtain service
under the warranty.
EXCLUSION OF IMPLIED WARRANTIES—Your sole and exclusive remedy is product repair as provided
in this Limited Warranty. Any implied warranties, including the implied warranties of merchantability
or fitness for a particular purpose, are limited to one year or the shortest period allowed by law.
For The Period Of: GE Will Replace:
One Year Any part of the wine chiller which fails due to a defect in materials or workmanship.
From the date of the During this limited one-year warranty, GE will also provide, free of charge, all labor
original purchase and related service to replace the defective part.

18
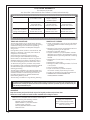
TERMS AND CONDITIONS:
This warranty applies only for single family domestic
use in Canada when the Wine Chiller has been properly
installed according to the instructions supplied by
Mabe and is connected to an adequate and proper
utility service.
Damage due to abuse, accident, commercial use, and
alteration or defacing of the serial plate cancels all
obligations of this warranty.
Service during this warranty period must be
performed by an Authorized Mabe Service Agent.
Neither Mabe nor the Dealer is liable for any claims or
damages resulting from failure of the Wine Chiller or
from service delays beyond their reasonable control.
To obtain warranty service, purchaser must present
the original Bill of Sale. Components repaired or replaced
are warranted through the remainder of the original
warranty period only.
This warranty is extended to the original purchaser and
any succeeding owner for products purchased for home
use within Canada. In home warranty service will be
provided in areas where it is available and deemed
reasonable by Mabe to provide.
This warranty is in addition to any statutory warranty.
WHAT IS NOT COVERED:
• Owner is responsible to pay for service calls related
to product installation and/or teaching how to use
the product.
• Damage to finish must be reported within 48 hours
following the delivery of the appliance.
• Damage to finish after delivery.
• Improper installation—proper installation includes
adequate air circulation to the refrigeration system,
adequate electrical, plumbing and other connecting
facilities.
• Replacement of house fuses or resetting of circuit
breakers.
• Replacement of light bulbs.
• Damage to product caused by accident, fire, floods
or acts of God.
• Loss of food due to spoilage.
• Proper use and care of product as listed in
the owner’s manual, proper setting of controls.
• Product not accessible to provide required service.
• WARRANTOR IS NOT RESPONSIBLE FOR
CONSEQUENTIAL DAMAGES.
IMPORTANT
Keep this warranty and your bill of sale as proof of original purchase and purchase date.
Please have serial number and model number available when calling for service.
Mabe Service is available coast to coast. If further help is
needed concerning this warranty, contact:
Manager, Consumer Relations
Mabe Canada Inc., Consumer Service
1 Factory Lane, Suite 310
Moncton, New Brunswick E1C 9M3
1.800.561.3344
Staple your receipt here.
Proof of the original purchase
date is needed to obtain service
under the warranty.
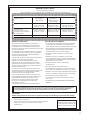
What is covered How Long Warranted Parts Labour
(From Date of Sale) Repair or Replace
at Mabe’s Option
Compressor GE Profile: Ten (10) Years GE Profile: Ten (10) Years GE Profile: Five (5) Years
GE and All Other GE and All Other GE and All Other
Brands: One (1) Year Brands: One (1) Year Brands: One (1) Year
Sealed System (including GE Profile: Five (5) Years GE Profile: Five (5) Years GE Profile: Five (5) Years
evaporator, condenser GE and All Other GE and All Other GE and All Other
tubing and refrigerant) Brands: One (1) Year Brands: One (1) Year Brands: One (1) Year
All Other Parts One (1) Year One (1) Year One (1) Year
CUSTOMER WARRANTY
(for customers in Canada)
Your wine chiller is warranted to be free of defects in material and workmanship.
EXCLUSION OF IMPLIED WARRANTIES—Your sole and exclusive remedy is product repair as provided in this Limited Warranty. Any
implied warranties, including the implied warranties of merchantability or fitness for a particular purpose, are limited to one year
or the shortest period allowed by law.

Instructions de sécurité . . . . . . .20, 21
Instructions d’installation . . . . . . . .22
Mode d’emploi
Espace intérieur . . . . . . . . . . . . . . . . . . . . . . .24
Réglages des commandes . . . . . . . . . . . . .23
Entretien et nettoyage . . . . . . . . .25–27
Inversion de la porte . . . . . . . . . . . . . . . . . . .27
Remplacement de l’ampoule . . . . . . . . . . .26
Conseils de dépannage . . . . . . . .28, 29
Soutien au consommateur
Garantie . . . . . . . . . . . . . . . . . . . . . . . . . . . . . . .31
Soutien au consommateur . . . . . . . . . . . . .32
Transcrivez ici les numéros
de modèle et de série :
N° de modèle ______________
N° de série ______________
Ces numéros se trouvent à l’intérieur
du refroidisseur à vin à gauche.
19

MISE AU REBUT APPROPRIÉE DE L’APPAREIL
Les enfants pris au piège ou morts d’asphyxie sont
toujours d’actualité. Les appareils de réfrigération
abandonnés ou mis au rebut sont toujours aussi
dangereux... même si ce n’est que pour quelques
jours. Si vous vous débarrassez de votre ancien
appareil, veuillez suivre les directives ci-dessous
afin de prévenir les accidents.
Avant de mettre au rebut votre appareil
de réfrigération :
Démontez les portes.
Laissez les clayettes en place afin d’empêcher
les enfants de grimper facilement à l’intérieur.
Élimination des CFC
Votre ancien réfrigérateur comporte
un système de réfrigération qui utilise des CFC
(chlorofluorocarbures). Les CFC sont considérés
comme nocifs pour l’ozone stratosphérique.
Si vous vous débarrassez de votre ancien
réfrigérateur, assurez-vous que le frigorigène avec
CFC est enlevé correctement par un technicien
qualifié. Si vous libérez intentionnellement
ce frigorigène avec CFC, vous pouvez être soumis
à des amendes et à l’emprisonement en vertu
de la loi sur l’environnement.
UTILISATION DE CORDONS PROLONGATEURS
En raison des risques éventuels sur la sécurité dans certaines conditions, nous déconseillons
fortement l’utilisation d’un cordon prolongateur.
Cependant, si vous devez utiliser un cordon prolongateur, celui-ci doit être absolument homologué
par CSA, de type trifilaire avec mise à la terre, avec fiche et prise mises à la terre, pour une alimentation
nominale de 15 ampères (minimum) et de 120 volts.
DANGER! RISQUE D’ENFERMEMENT
D’UN ENFANT
20
CONSEILS DE SÉCURITÉ IMPORTANTS.
LISEZ TOUTES LES INSTRUCTIONS AVANT D’UTILISER VOTRE APPAREIL.
AVERTISSEMENT!
Cet appareil doit être utilisé uniquement aux fins prévues et décrites dans ce manuel.
MESURES DE SÉCURITÉ
Lors de l’utilisation de l’appareil, observez les précautions élémentaires, dont les suivantes :
Ce refroidisseur à boissons et à vin doit être
correctement installé, conformément à ces
instructions, avant que vous ne l’utilisiez.
Ne laissez pas les enfants grimper, s’asseoir, se
tenir debout ni se pendre aux clayettes de cet
appareil. Ils pourraient l’endommager et
gravement se blesser.
N’entroposez pas et n’utilisez pas d’essence ou
autres vapeurs et liquides inflammables à
proximité de cet appareil ou de tout autre
appareil électroménager.
Avant de remplacer une ampoule grillée,
le refroidisseur à boissons et à vin doit être
débranché pour éviter tout contact avec un
filament sous-tension.(Une ampoule grillée
peut se casser durant le remplacement).
Éloignez les doigts des parties où vous pouvez
facilement vous pincer; les espaces entre les
portes et entre les portes et les armoires sont
toujours étroits. Soyez prudent lorsque vous
fermez les portes de l’appareil en présence
des enfants.
Débranchez l’appareil avant de le nettoyer
et de le réparer.
REMARQUE : Nous vous recommandons
vivement de confier toute réparation
à un technicien qualifié.
Ne remisez pas et n’installez pas cet appareil
à l’extérieur.
La page charge ...
La page charge ...
La page charge ...
La page charge ...
La page charge ...
La page charge ...
La page charge ...
La page charge ...
La page charge ...
La page charge ...
La page charge ...
La page charge ...
La page charge ...
La page charge ...
La page charge ...
La page charge ...
La page charge ...
La page charge ...
La page charge ...
La page charge ...
La page charge ...
La page charge ...
La page charge ...
La page charge ...
La page charge ...
La page charge ...
La page charge ...
La page charge ...
-
 1
1
-
 2
2
-
 3
3
-
 4
4
-
 5
5
-
 6
6
-
 7
7
-
 8
8
-
 9
9
-
 10
10
-
 11
11
-
 12
12
-
 13
13
-
 14
14
-
 15
15
-
 16
16
-
 17
17
-
 18
18
-
 19
19
-
 20
20
-
 21
21
-
 22
22
-
 23
23
-
 24
24
-
 25
25
-
 26
26
-
 27
27
-
 28
28
-
 29
29
-
 30
30
-
 31
31
-
 32
32
-
 33
33
-
 34
34
-
 35
35
-
 36
36
-
 37
37
-
 38
38
-
 39
39
-
 40
40
-
 41
41
-
 42
42
-
 43
43
-
 44
44
-
 45
45
-
 46
46
-
 47
47
-
 48
48


GE GVS04BDWSS Le manuel du propriétaire
- Catégorie
- Cave à vin
- Taper
- Le manuel du propriétaire
dans d''autres langues
- English: GE GVS04BDWSS Owner's manual
- español: GE GVS04BDWSS El manual del propietario
Documents connexes
-
GE GVS04BDWSS Mode d'emploi
-
GE PCR06BATSS Le manuel du propriétaire
-
-
-
 GE Profile Series PWS06DSPSS Le manuel du propriétaire
-
-
-
-
