
Beverage Center
Réfrigérateur / Congélateur
Refrigerado / Congelador
User Manual
Model # BC100GS
Guide de l’Utilisateur
Modéle # BC100GS
Manual del Usuario
Para Modelo de # BC100GS
Quality
n
Innovation
n
Style

IMPORTANT SAFEGUARDS
When using this applaince, always exercise basic safety
precautions, including the following:
1) Read all of the instructions before using this appliance.
2) Use this appliance only for its intended purposes as described in this
use and care guide.
3) This appliance must be properly installed in accordance with the instal-
lation instruction before it is used. See grounding instructions in the
installation section.
4) Never unplug your beverage center by pulling on the power cord.
Always grasp the plug firmly and pull straight out from the outlet.
5) Unplug your beverage center before cleaning or before making any
repairs. Note: If for any reason this product requires service, we strong-
ly recommend that a certified technician performs the service.
6) Repair or replace immediately, all electric power cords that have
becomefrasyed or otherwise damaged. Do not use a cord that shows
cracks or abrasion damage along its length, the plug or the connector
end.
7) This appliance is designed built-in use only in an enclosed cabinet.
8) If your old beverage center is not being used, we recommend that you
remove the door and leave the shelves in place. This will reduce possi-
bility of danger to children.
9) Do not operate your beverage center in the presence of explosive
fumes.
10) Do not store foods in beverage center as interior temperature may not
be cool enough to prevent spoilage or may cause bacteria growth.
11) Cabinet edges along stamp/cut-out areas may be sharp. Please avoid
placing hands, fingers, or other appendages near these areas.
12) This appliance is not intended for use by young children or infirm
persons without supervision. Young children should be supervised to
ensure they do not play with the appliance.
NOTE: Ambient operating temperature is between 55˚-90˚F.
SAVE THESE INSTRUCTIONS
DANGER
Risk of child entrapment. Before you throw away your old
beverage center, take off the doors. Leave the shelves in
place so that children may not easily climb inside.
1
English

2
English
Staple your receipt to your manual.
You will need it to obtain warranty service.
Thank you for using our product.
This easy-to-use manual will guide
you in getting the best use of your
beverage center.
Remember to record the model and
serial number. They are on a label
in back of the beverage center.
Model Number
Serial Number
Date of Purchase
TABLE OF CONTENTS
PAGE
IMPORTANT SAFEGUARDS ....................................................................1
PARTS AND FEATURES ...........................................................................3
INSTALLING YOUR BEVERAGE CENTER .............................................4-7
Unpacking your Beverage Center ................................................................4
Leveling your Beverage Center ....................................................................4
Installation Limitations .................................................................................4
Unit Dimensions .........................................................................................5
Electrical Requirements ...............................................................................5
Use of Extension Cords ...............................................................................5
Anti-tip Bracket Installation ..........................................................................6
Door Reversal .........................................................................................7-8
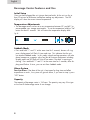
BEVERAGE CENTER FEATURES AND USE .........................................9-10
Initial Set up ..............................................................................................9
Temperature Adjustment ..............................................................................9
Sabbath Mode ..........................................................................................9
Alarm System ............................................................................................9
Capacity ...................................................................................................9
Shelving ..................................................................................................10
˚F/˚C Conversion .....................................................................................10
Interior Light ............................................................................................10
Power Button ...........................................................................................10
Normal Operating Sounds ........................................................................10
PROPER BEVERAGE CENTER CARE AND CLEANING ..........................11
Cleaning and Maintenance .......................................................................11
Power interruptions...................................................................................11
Vacation & Moving care ...........................................................................12
TROUBLESHOOTING ............................................................................12
WARRANTY ..........................................................................................13

3
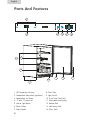
1. LED Temperature Dispay
2. Temperature Adjustment (up/down)
3. Temperature Set Button
4. °C and °F Conversion
5. Interior Light Button
6. Power Button
7. Door Handle
8. Glass Door
9. Light Switch
10. Front Cover (Toe Kick)
11. Adjustable Leveling Leg
12. Bottom Rack
13. Fold Away Shelf
14. Glass Shelf
English
Parts And Features
1
14
11
12
10
9 8 7
13
2
3 4 5 6

4
English
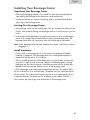
Installing Your Beverage Center
Unpacking Your Beverage Center
1. Remove all packaging material. This includes the foam base and all adhesive
tape holding the beverage center accessories inside and outside.
2. Inspect and remove any remains of packing, tape or printed materials before
powering on the beverage center.
Leveling Your Beverage Center
• Your beverage center has four leveling legs whch are located in the front and rear
corners. After properly placing your beverage center in its finals position, you can
level it.
• Leveling legs can be adjusted by turning them clockwise to raise your beverage
center or by turning them counterclockwise to lower your beverage center. The
beverage center door will close easier when the leveling legs are extended.
Note: If your beverage center has been titlted for any reason, wait 24 hours before
plugging it in.
Install Limitations
• Do not install your beverage center in any location not properly insulated or
heated e.g. garage etc. Your beverage center was not designed to operate in
temperature settings below 55˚ Fahrenheit.
• Select a suitable location for the beverage center on a hard, even surface away
from direct sunlight or heat source e.g. radiotors, baseboard heaters, cooking
appliances etc. Any floor unevenness should be corrected with the leveling legs
located on the front and rear botto m corners of the beverage center.
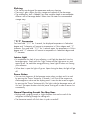
• Built-in beverage center need to be ventilated from the front. This feature allows
the unit to be built-in in an enclosed area. The bottom front grill should be clear of
all obstructions. This is absolutely necessary for the air to circulate and for the unit
to operate efficiently. The dimensions for installation are as follows (WxDxH).
Note: Remove the upper hinge cover before built-in the beverage center.

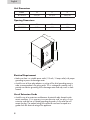
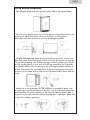
Unit Dimensions
Model W D H
BC100GS 23-7/8" 23-3/4" 34-9/16"
Opening Dimensions
Model W D H
BC100GS 24" 24" 35"
Electrical Requirement
• Make sure there is a suitable power outlet (115 volts, 15 amps outlet) with proper
grounding to power the beverage center.
• Avoid the use of three plug adapters or cutting off the third grounding prong in
order to accommodate a two prong outlet. This is a dangerous practice since it
provides no effective grounding for the beverage center and may result in shock
hazard.
Use of Extension Cords
• Avoid the use of an extension cord because of potential safety hazards under
certain conditions. If it is necessary to use an extension cord, use only a 3-wire
extension cord that has a 3-blade grounding plug and a 3-slot outlet that will
accept the plug. The marked rating of the extension cord must be equal to or
greater than the electrical rating of the appliance.
5
English
AWCDZ24S
AWCDZ24S
23-7/8”
25-1/2”
34-9/16”
23-3/4”
D
H
34-9/16”
25-1/2”

Anti-tip bracket Installation
1. Take off upper hinge cover with upwards motion. Refer to illustrations below:
2. Take the anti-tip bracket and screws from the accessory bag. Tighten the anti-tip
bracket on the top of the product with screws as follows in the illustration.
Note: Follow instructions properly or you may do damage to product.
3. Pull glass door open and attach the anti-tip bracket to counter by screw as seen
below. Adjustment of the leveling legs under the unit may be necessary for a proper
fit in the cabinet opening. Start with the rear legs (if necessary) before you slide the
unit fully into the opening –rise or lower the rear legs to make the unit fit properly.
Then carefully slide the unit into opening as not to damage accidently cabinetry or
the floor. Then perform the same adjustments to the front leveling legs to bring the
front of unit to the proper level to install the anti-tip bracket and fit evenly under the
counter.
4. Another set of anti-tip brackets for side installation is provided as option when
the counter top is granite and hard to fix by screw. This set of brackets include one
bracket and four screws for installation on left side if the cabinet when the door is
left-open or on the right side of the cabinet when the door is right-open. Below draft
illustrates the installation procedure.
6
English

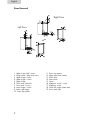
7
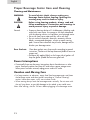
1. Upper hinge hole's cover
2. Hinge cover's plug and screw
3. Upper hinge's cover
4. Upper hinge's screw
5. Upper hinge
6. Front cover (toe kick)
7. Front cover's screw
8. Lower hinge's screw
9. Lower right hinge
10. Door stop spacer
11. Door stop spacer
12. Upper door hole spacer
13. Glass door
14. Door closer
15. Screw
16. Magnetic switch's screw
17. Magnetic switch
18. Lower left hinge (spare part)
19. Screw hole cap
Right Door
Left Door
Door Reversal
English

8
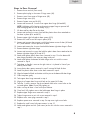
1. Remove lower toe kick (Front cover)
2. Remove plastic plug in the center if hinge cover (#3)
3. Remove screw from center of hinge cover (#2)
4. Remove hinge cover (#3)
5. Remove Square cover on left (#1)
6. Loosen and remove all 3 screws from upper door hinge (#4 and #5)
NOTE: Hold door while loosing and removing upper hinge to prevent fall
and Damaging door as well as bodily injury
7. Lift door and lay door flat on the door
8. Loosen and remove the screws that hold the plastic door closer attached on
the door in place (#14 and #15)
9. Remove upper right hole plastic door spacer (#12)
10. Remove the small screw hole cap in place (#19)
11. Loosen and remove door magnet switch from bottom center of door (#16 and
#17) and reattach it to the top center of door.
12. Loosen and remove the 4 screws that hold the bottom right door hinge in Place
13. Remove bottom right door hinge
14. Loosen and remove the screw that hold the plastic door closer attached to the
bottom right door hinge (#10 and #11)
15. Attach and tighten plastic door closer removed in step 13 to the bottom left
door hinge provided in the accessory bag inside unit
16. Attach and tighten the bottom left door hinge to the unit with the screws
removed in step 8
17. Take door so handle is now on the right side as it is placed in front of you
and lay flat on floor
18. Insert plastic door spacer removed in step 9 into top left hole of door
19. Attach the plastic door closer to the door removed in step 8
20. Align the bottom left hole on the door with the pin on the bottom left door hinge
21. Slide into place gently
22. Take upper door hinge removed in step 6
23. Align pin of upper door hinge with hole on the upper left if door
24. Take the 3 screws removes step 6 and attach them to the screw holes on the
unit and tighten Note: Do not fully tighten yet
25. Make sure top of door is level with top of cabinet
26. Once level, fully tighten screws that hold upper door hinge in place
27. Replace upper hinge cover removed in step 4
28. Tighten hinge cover to unit with screw removed in step 3
29. Replace screw cover plug removed in step 2
30. Replace square cover removed in step 5 to top cover right screw holes
31. Replace the small screw hole cap removes in step 10
32. Attach and tighten toe kick (Front cover) to the unit with the screws removed in
step 1
Steps to Door Reversal
English

9
English
Beverage Center Features and Use
Initial Setup
Once you have plugged the unit into an electrical outlet, let the unit run for at
least 30 minutes to acclimate itself before making any adjustments. The LED
display will show the current internal temperature.
Temperature Adjustments:
• The beverage center can be set to any temperature between 39˚ and 62˚F to
accommodate your storage requirements. To set the temperature hold the "Set"
button for about 3 seconds. You will notice the temperature display blink.
Fig.#1
Sabbath Mode
• Press and hold "^" and "v" at the same time for 3 seconds, buzzer will ring
once, display panel will flash 5 times and stop. This indicates that the unit
has entered Sabbath mode. In this mode, normal cooling operations still take
place (compressor, magnetic valve, fan) but all luminous equipment including
display panel and LED bulb will shut off no matter if the door is opening or
closing. Press and hold "^" and "v" at the same time for 3 seconds, after dis-
play panel flahses 5 times, you cna exit from Sabbath mode.
Alarm System
Door Ajar Alarm- If the door of the unit is kept open for long time and affect
temperature so much , the system will give an alarm, if you want to stop it, press
"SET" button.
Capacity
The capacity of beverage center is 150 cans. The quantity may vary if the type
or the size of the beverage center & can change.

English
10
Shelving
• The shelves are designed for appearance and easy cleaning.
• There are 3 glass shelves for easy storage and removal of your beverage.
• The middle glass shelf is foldable, has three variable shapes to accommodate
different sizes of beverage bottles. Below chart illustrates the recommended
storage ways.
“°F/°C” Conversion
Press and hold “°F/°C” for 3 seconds, the displayed temperature in Fahrenheit
degree and °F character will convent to temperature in Celsius degree and “°C”
character. Press and hold “°F/°C” for 3 seconds again, the temperature in Celsius
degree and “°C” character will convert to temperature in Fahrenheit degree and
“°F” character.
Interior Light
• To complement the look of your collection, a soft light has been built into the
beverage center. Simply push the "Light" button and the light comes on, push
again for off. For maximum energy efficiency, leave light off when not viewing
your collection.
• When door is open the light will go on. Upon closing the door, the light will go
off.
Power Button
• You can shut the power of the beverage center when you dont ned it to work
by pressing the "Power" button for 3 seconds. It will shut off the compressor,
electromagnetism valve and the display panel. It can also be turned on again
by pressing the "Power" button quickly. The light inside the beverage center will
turn on if you open the door when the power shutting off in order to access the
conveniently.
Normal Operating Sounds You May Hear
• Boiling water, gurgling sounds or slight vibrations that are the result of the
refrigerant circulating through the colling coils.
• The thermostat control will click when it cycles on and off.

11
English
Proper Beverage Center Care and Cleaning
Cleaning and Maintenance
WARNING: To avoid electric shock, always unplug your
Beverage Center before cleaning. Ignoring this
warning may result in death or injury.
CAUTION: Before using cleaning products, always read and
follow manufacturer’s instructions and warnings to
avoid personal injury or product damage.
General: • Prepare a cleaning solution of 3-4 tablespoons of baking soda
mixed with warm water. Use sponge or soft cloth, dampened
with the cleaning solution, to wipe down your beverage center.
• Rinse with clean warm water and dry with a soft cloth.
• Do not use harsh chemicals, abrasives, ammonia, chlorine
bleach, concentrated detergents, solvents or metal scouring
pads. Some of these chemicals may dissolve, damage and/or
discolor your beverage center.
Door Gaskets: Clean door gaskets every three months according to general
instructions. Gaskets must be kept clean and pliable to assure a
proper seal
• Petroleum jelly applied lightly on the hinge side of gaskets will
keep the gasket pliable and ensure a good seal.
Power Interruptions
• Occasionally there may be power interruptions due to thunderstorms or other
causes. Remove the power cord from AC outlet when a power outage occurs.
When power has been restored, replug power cord to AC outlet.
Vacation and Moving Care
• For long vacations or absences, empty food from beverage center and clean
the beverage center and door gaskets according to "General Cleaning"
section. Leave doors open, so air can circulate inside.
• When moving always move the beverage center vertically. Do not move with
the unit lying down, as possible damage to the sealed system could occur.
Note: After moving, wait for 24 hours before plugging in the beverage center.

12
English
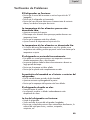
Beverage Center does not operate:
• Check if beverage center is plugged in.
• Check if there is power at the AC outlet, by checking the circuit breaker.
Food temperature appears too warm:
• Frequent door openings.
• Allow time for recently added product to reach desired temperature.
• Check gaskets for proper seal.
• Clean front cover.
• Adjust temperature control to colder setting.
Beverage Center is too cold:
• If temperature control setting is too cold, adjust to a warmer setting.
Beverage Center cellar runs too frequently:
• This may be normal to maintain constant temperature during high temperature
and humid days.
• Doors may have been opened frequently or for an extended period of time.
• Clean front cover.
• Check gasket for proper seal.
• Check to see if doors are completely closed.
Moisture build up on interior or exterior of the beverage
center:
• This is normal during high humidity periods.
• Prolonged or frequent door openings.
• Check door gaskets for proper seal.
Beverage Center door does not shut properly:
• Level the beverage center .
• Check for blockages, e.g. beverages.
Troubleshooting

English
Limited Warranty
13
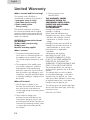
What is covered and for how long?
This warranty covers all defects in
workmanship or materials for a period of:
1 year parts (carry in only)
1 year labor (carry in only)
5 years sealed system
(carry in only)
The warranty commences on the date
the item was purchased and the original
purchase receipt must be presented to the
authorized service center before warranty
repairs are rendered.
EXCEPTION: Commercial or Rental
Use Warranty
90 days labor (carry-in only)
90 days parts
No other warranty applies
What is covered.
1. The mechanical and electrical parts,
which serve as a functional, purpose of
this appliance for a period of 1 year.
This includes all parts except finish, and
trim.
2. The components of the sealed system
e.g. hermetic compressor, condenser
and evaporator from manufacturing
defects for a period of 5 years from the
date of purchase. Any damages to such
components caused by mechanical abuse
or improper handling or shipping will not
be covered.
What will be done?
1. We will repair or replace, at our
discretion any mechanical or electrical
part which proves to be defective in
normal usage during the warranty period
so specified.
2. There will be no charge to the
purchaser for parts and labor on any
covered items during the initial 1 year
period. Beyond this period only parts are
covered in the remaining warranty. Labor
is not provided and must be paid by
the customer.
3. Contact customer service:
1-866-927-4833.
THIS WARRANTY COVERS
APPLIANCES WITHIN THE
CONTINENTAL UNITED STATES,
PUERTO RICO AND CANADA.
IT DOES NOT COVER
THE FOLLOWING:
Damages from improper installation.
Damages in shipping.
Defects other than manufacturing.
D amage from misuse, abuse, accident,
alteration, lack of proper care and
maintenance or incorrect current or
voltage.
Damage from other than household use.
D amage from service by other than an
authorized dealer or service center.
D ecorative trims or replaceable
light bulbs.
Transportation and shipping.
Labor (after the initial 1 year).
THIS LIMITED WARRANTY IS GIVEN
IN LIEU OF ALL OTHER WARRANTIES,
EXPRESSED OR, INCLUDING THE
WARRANTIES OF MERCHANTABILITY AND
FITNESS FOR A PARTICULAR PURPOSE
The remedy provided in this warranty is
exclusive and is granted in lieu of all other
remedies.
This warranty does not cover incidental
or consequential damages, so the above
limitations may not apply to you. Some
States do not allow limitations on how long
an implied warranty lasts, so the above
limitations may not apply to you.
This warranty gives you specific legal rights,
and you may have other rights, which vary,
from state to state.
New York, NY 10018

14
Français
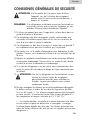
CONSIGNES GÉNÉRALES DE SECURITÉ
ATTENTION: Lire l’ensemble des instructions avant d’utiliser
l’appareil. Lors de l’utilisation de cet appareil,
prendre toutes les mesures de sécurité de base, y
compris les suivantes:
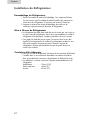
REMARQUE: Si le réfrigérateur a été placé en position horizontale ou
en position inclinée, que ce soit pour longtemps ou non,
attendez 24 heures avant de brancher l’appareil.
1) N’utiliser cet appareil que pour l’usage prévu, tel que décrit dans ce
guide d’utilisation et d’entretien.
2) Ce réfrigérateur doit être correctement installé, conformément aux
instructions d’installation avant d’être utilisé. Voir les instructions de
mise à la terre dans la section Installation.
3) Ce réfrigérateur ne doit être ni encastré, ni enclos dans un placard. Il
est uniquement conçu pour être installé tel qu’il se présente.
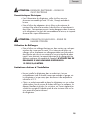
4) Ne jamais tirer sur le cordon d’alimentation pour débrancher le réfri-
gérateur. Toujours saisir fermement la fiche et la tirer tout droit hors de
la prise.
5) Réparer ou remplacer immédiatement tout cordon électrique effiloché
ou autrement endommagé. Ne pas utiliser un cordon fissuré, abrasé
ou dont la prise ou le connecteur est endommagé.
6) Si un ancien réfrigérateur n’est pas utilisé, nous recommandons d’en
retirer les portes afin de réduire le danger qu’il peut représenter pour
les enfants.
7) ATTENTION: Une fois le réfrigérateur en fonctionnement, ne pas
toucher les surfaces froides du congélateur,
particulièrement avec des mains mouillées ou
humides. La peau peut adhérer à ces surfaces
extrêmement froides.
8) Ne pas recongeler les aliments qui ont été complètement décongelés.
Le bulletin maisons et jardins du ministère de l’agriculture des États-
Unis no. 69 stipule : « ..Les aliments congelés peuvent être recongelés
en toute sécurité s’ils contiennent toujours des cristaux de glace ou si
leur température est toujours inférieure à 4,5 °C (40 °F) ».
« …Les viandes hachées, la volaille et le poison présentant une odeur
ou une couleur suspecte ne doivent être ni recongelés, ni mangés.
La crème glacée dégelée doit être jetée. Tout aliment présentant une
odeur ou couleur douteuse doit être jeté cas son ingestion pourrait être
dangereuse.»

« …La décongélation ou la recongélation, même partielle réduit la quali
é gustative des aliments, en particulier des fruits, légumes et plats pré-
parés. La qualité gustative des viandes rouge est beaucoup moins affec-
tée que celle de nombreux autres aliments. Utiliser les aliments recongelés
dès que possible, afin de conserver un maximum de leur qualité gustat-
ive. »
9) Ne pas utiliser d’appareils électriques ou d’objets acérés pour dégivrer le
réfrigérateur.
10) Débrancher le réfrigérateur avant de le nettoyer ou d’effectuer toute
réparation. Remarque: si, pour une raison quelconque, ce produit devait
être dépanné, nous recommandons vivement de confier le travail à un
technicien certifié.
11) Ne pas utiliser le réfrigérateur en présence d’émanations explosives.
REMARQUE: La température ambiante de fonctionnement est comprise entre
55˚-90˚F.
VEUILLEZ CONSERVER CES
INSTRUCTIONS
DANGER
Les enfants pourraient se retrouver coincés dans votre
réfrigérateur ou congélateur usagé avant que vous ne
puissiez vous en débarrasser. Retirer les portes. Laisser les
étagères en place de manière à ce que les enfants ne
puissent pas grimper facilement à l’intérieur.
Français
Agrafer le ticket de caisse au guide. Il devra être présenté pour tout
service après-vente sous garantie.
15

Français
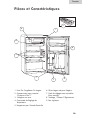
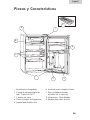
1. Demi De Congélateur De Largeur
2. Compartiment pour cannettes
"Dispense-A-Can™"
3. 3 étagères en verre
4. Commande de Réglage de
Température
5. Rangement pour Grandes Bouteilles
6. Pleine largeur de porte Etagère
7. Pieds de réglage avant ajustables
(Non montrés)
8. Stockage / Plateau D'Égouttement
9. Bac à glaçons
Piéces et Caractéristiques
16
0
3
4
5
6
7
3
2
5
6
1
7
4
8
9

17
Français
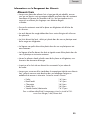
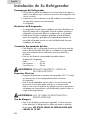
1. Retirer l’ensemble du matériel d’emballage. Ceci comprend la base
en mousse ainsi que l’ensemble du matériel adhésif qui maintient les
accessoires du réfrigérateur à l’intérieur tout comme à l’extérieur.
2. Inspecter et enlever tout restant d’emballage, de scotch ou de
matériaux imprimés avant de brancher le réfrigérateur.
• Le réfrigérateur possède deux pieds de mise à niveau qui sont situés sur
les coins avant du réfrigérateur. Après avoir convenablement installé le
réfrigérateur à la place qu’il occupera, procéder à la mise à niveau.
• Pour régler les pieds de mise à niveau, les tourner dans le sens des
aiguilles d’une montre afin de surélever le réfrigérateur et dans le sens
inverse des aiguilles d’une montre pour l’abaisser. La porte du
réfrigérateur se ferme plus facilement lorsque les pieds de mise à
niveau sont surélevés.
• Pour être sûr que le réfrigérateur fonctionne à son maximum d’efficacité,
l’installer dans un environnement favorable à une bonne circulation
d’air et possédant des connexions de plomberie et d’électricité saines.
• Les indications suivantes concernent l’espace recommandé autour du
réfrigérateur:
Latéralement...................19mm (3/4")
Partie supérieure.............50mm (2")
Arrière...........................50 mm (2")
Installation du Réfrigérateur
Désemballage du Réfrigérateur
Mise á Niveau du Réfrigérateur
Circulation d’Air Adéquate

18
Français
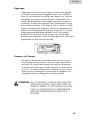
• Pour l’alimentation du réfrigérateur, veiller à utiliser une prise
de courant convenable (prise de 120 volts,15 amp) raccordée à
la terre.
• Eviter d’utiliser des adaptateurs à trois fiches ou de sectionner la
troisième fiche reliée à la terre dans le but d’utiliser un branchement à
deux fiches. Cette pratique pourrait s’avérer dangereuse dans la mesure
où le réfrigérateur n’est pas relié convenablement à la terre, et risquerait
de causer des risques d’électrocution.
• Éviter d’utiliser une rallonge électrique car, dans certains cas, cela peut
entraîner des risques pour la santé. S’il est nécessaire d’utiliser une
rallonge, utiliser uniquement une rallonge possédant une fiche male à
deux broches plus terre à une extrémité et une prise femelle de même
type à l’autre extrémité. La capacité électrique de la rallonge doit être
égale ou supérieure à la capacité de l’appareil. N’UTILISEZ PAS DE
RALLONGES D’UNE LONGUEUR SUPÉRIEURE À
12 PIEDS/3,65 MÈTRES.
• Ne pas installer le réfrigérateur dans un endroit qui n’est pas
convenablement isolé ou chauffé; comme par exemple un garage, etc.
Le réfrigérateur n’est pas conçu pour fonctionner à des températures
inférieures à 12°C.
• Choisir un endroit convenable et placer le réfrigérateur sur une surface
solide et plane, loin de sources de chaleur telles que: les radiateurs, les
éléments chauffants à plinthes, les cuisinières, etc. Toute irrégularité au
sol doit être corrigée à l’aide des pieds de mise à niveau situés sur les
coins avant de la partie inférieure
du réfrigérateur.
Limitations relatives à l’Installation
ATTENTION: EXIGENCES ÉLECTRIQUES – RISQUE DE
CHOC ÉLECTRIQUE
ATTENTION: UTILISATION DE RALLONGES – RISQUE DE
DANGER POTENTIEL
Caractéristiques Electriques
Utilisation de Rallonges

19
Français
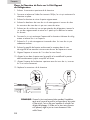
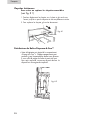
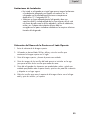
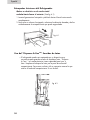
Placer la Charnière de Porte sur le Côté Opposé
du Réfrigérateur
1. Enlevez la couverture superieure de la charniere
2. Desserrez et enlevez a l'aide d'un tournevis Phillips, les vis qui soutiennent la
charniere en place.
3. Enlevez la charniere et retirez la porte soigneusement
4. Enlevez les bouchons des trous des vis du cote oppose et inserrez les dans
les ouvertures des trous des vis que vous venez de retirer
5. Enlevez tous les articles qui ne sont pas attaches du refrigerateur, tournez le
sur son dos soigneusement et retirez les 2 pieds qui le stabilisent et mettez
les de cote .
6. Desserez les vis qui soutiennent l'equerre de la charniere inferieure du refrig
erateur et enlevez les vis et l'equerre
7. Enlevez les 2 vis du cote oppose et inserrezles dans les trous des vis pre
cedemment enleves .
8. Enlevez la goupille de la porte and tournant le compteur dans le sens
des aiguilles d'une montre et reinserrez au dessous de l'equerre et serrez.
9. Alignez l'equerre et inserrez les 2 vis dans les trous fournis
10. Alignez le trou dans la porte avec la goupille et la rondelle de la porteet
abaissez doucement jusqu'a ce qu'elle soit ferme.
11. Alignez l'equerre de la charniere superieure avec les trous des vis, inserrez
les vis et serrez fermement.
12. Replacez la couverture de la charniere
1
0
2
3
4
5
6
7
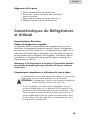
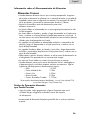
REMARQUE: Comme le joint recoit aoouyé-dans pendant l’expédition,
aprés avoir renversé la porte le joint peut devoir étre remet
á l’état initial. Ceci est fait pour empécher le refroidit l’air
réfrigéré d’échapper. Si lá-bas est un écart entre la porte
et le placard, régle le joint en tirant doucement il hors
sceller l’écart.
La page est en cours de chargement...
La page est en cours de chargement...
La page est en cours de chargement...
La page est en cours de chargement...
La page est en cours de chargement...
La page est en cours de chargement...
La page est en cours de chargement...
La page est en cours de chargement...
La page est en cours de chargement...
La page est en cours de chargement...
La page est en cours de chargement...
La page est en cours de chargement...
La page est en cours de chargement...
La page est en cours de chargement...
La page est en cours de chargement...
La page est en cours de chargement...
La page est en cours de chargement...
La page est en cours de chargement...
La page est en cours de chargement...
La page est en cours de chargement...
La page est en cours de chargement...
La page est en cours de chargement...
La page est en cours de chargement...
La page est en cours de chargement...
-
 1
1
-
 2
2
-
 3
3
-
 4
4
-
 5
5
-
 6
6
-
 7
7
-
 8
8
-
 9
9
-
 10
10
-
 11
11
-
 12
12
-
 13
13
-
 14
14
-
 15
15
-
 16
16
-
 17
17
-
 18
18
-
 19
19
-
 20
20
-
 21
21
-
 22
22
-
 23
23
-
 24
24
-
 25
25
-
 26
26
-
 27
27
-
 28
28
-
 29
29
-
 30
30
-
 31
31
-
 32
32
-
 33
33
-
 34
34
-
 35
35
-
 36
36
-
 37
37
-
 38
38
-
 39
39
-
 40
40
-
 41
41
-
 42
42
-
 43
43
-
 44
44


dans d''autres langues
- English: Haier BC100GS User manual
- español: Haier BC100GS Manual de usuario
Documents connexes
Autres documents
-
GE CCP06BP3PD1 Le manuel du propriétaire
-
Jenn-Air JUBFL242HM Le manuel du propriétaire
-
KitchenAid 24" Panel Ready Beverage Center with Glass Door Manuel utilisateur
-
KitchenAid KUBR204EPA00 Le manuel du propriétaire
-
KitchenAid KUBR314KBS Manuel utilisateur
-
-
Frigidaire EFMIS155 Manuel utilisateur